Corby qq 2032 v User manual

COI0011_V1_190913
USE & CARE MANUAL
SAFE
www.corbyofwindsor.com

02
SECTION 01
These notes must be read before use
These instructions are for your safety. Please read through them thoroughly before use
and retain for future reference. Failure to follow them could cause injury and/or
property damage.
CONTENTS
SECTION 01
Important safety 03
Special inistructions 03
SECTION 02
Introduction 04
Identification 04
SECTION 03
Installation 05
Use 06 - 07
Guarantee 08
Contacts 08

03
SECTION 01
IMPORTANT SAFETY
DO’S
• Read ALL the instructions before installing or using this Safe.
• Only use this Safe for its intended use as described in this manual.
• Ensure the Safe is installed where there is sufficient load bearing capacity.
• Always install the Safe in accordance with this guide. If in doubt obtain
expert advice.
DON’TS
• Do not use or store the Safe outdoors.
• Do not attempt to modify or make repairs to the Safe.
• Do not attempt to power this product by the introduction of a separate
power supply other that supplied.
BATTERY CAUTION
• Use of rechargeable batteries is not recommended for this product.
• Do not attempt to recharge non-rechargeable batteries.
• Only use batteries of the same or equivalent type to those recommended.
• Take special care to ensure the batteries are inserted correctly, observing
polarity.
• Avoid short circuiting the contacts of the battery housing or the battery
terminals.
• Remove exhausted batteries from product.
• Remove the battery from the product if storing for long periods.
• Remove the battery if the product is to be scrapped.
• Dispose of exhausted batteries safely and never dispose of batteries in a fire.
SAVE THESE INSTRUCTIONS

04
SECTION 02
INTRODUCTION
Thank you for choosing this Corby Safe. The product has been designed to meet the
most stringent quality, performance, and safety requirements.
This Safe is perfectly suited to the requirements of a hotel guestroom.
HANDLING
Before continuing any further with the installation of this Safe please read the following:
• When lifting always keep your back straight. Bend your legs and not your
back.
• Avoid twisting at the waist. It is better to reposition your feet.
• Avoid upper body / top heavy bending. Always bend from the knees rather
than the waist.
• Do not lean forward or sideways whilst handling the Safe.
• Always grip with the palm of the hand. Do not use the tips of fingers for
support.
• Always keep the product as close to the body as possible to prevent
unnecessary and undue strain on the body.
• Use gloves to provide additional grip.
• Always use assistance if required.
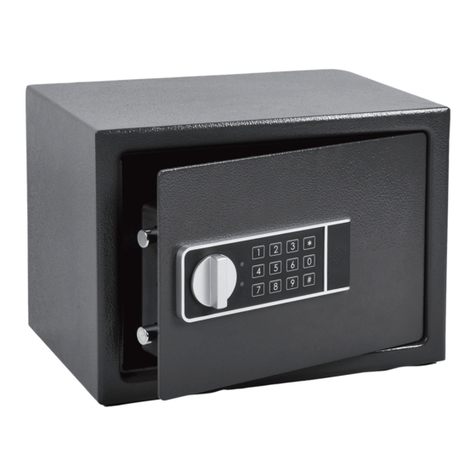
IDENTIFICATION
(Image fior illustrative purposes only)
PARTS SUPPLIED
1x Safe
1x Accessories pack
• Backup power supply
• Override key (x2)
• Fixing bolt (x2)
• AA battery (x4)
• ‘Instructions for Use’ sticker

05
INSTALLATION
Always bolt your Safe down.
1. Choose a location for the Safe that is preferably concealed from view
2. Take care that there is sufficient floor load bearing capacity.
3. If installing the Safe in a cupboard or closet, make sure that its load bearing
capacity is sufficient and that a secure anchorage point can be made through to
the wall or floor.
4. Make sure that there is no plumbing or wiring below or behind the chosen location.
5. Always mount using fixing bolts no smaller than those supplied and use more than
one bolt.
6. When the Safe is to be anchored to a wood floor, try to anchor at least one of the
bolts into a joist/support beam rather than just the floorboards.
05
SECTION 03
SECURING THE SAFE
‘Instructions for Use’ label
The ‘Instructions for use’ label, provided in the Safe accessory box, outlines basic
operational details of the Safe specifically for the user.
It is recommended that this label is applied onto the Safe or a wall/surface near to the
Safes location.
The label shows how to set the primary code and will guide the user to the reset
button.
Using the provided
fixings, fix the safe to
a wall (A) or the floor (B)
Safe door
Bolt
A
B

06
SECTION 03
USE
INITIAL SETUP
1. Remove the keyhole cover as shown below.
2. Use the override key and turn it 90° clockwise
3. Turn the handle 90° clockwise
4. Open the safe door.
5. Open the battery pack and insert the supplied batteries; observing polarity.
Note: Only use dry cell AA batteries in this product.
Battery
pack
Reset
button
Keyhole
Cover
Handle

IMPORTANT SAFETY
DO’S
• Read ALL the instructions before installing or using this Safe.
• Only use this Safe for its intended use as described in this manual.
• Ensure the Safe is installed where there is sufficient load bearing capacity.
• Always install the Safe in accordance with this guide. If in doubt obtain
expert advice.
DON’TS
• Do not use or store the Safe outdoors.
• Do not attempt to modify or make repairs to the Safe.
• Do not attempt to power this product by the introduction of a separate
power supply other that supplied.
BATTERY CAUTION
• Use of rechargeable batteries is not recommended for this product.
• Do not attempt to recharge non-rechargeable batteries.
• Only use batteries of the same or equivalent type to those recommended.
• Take special care to ensure the batteries are inserted correctly, observing
polarity.
• Avoid short circuiting the contacts of the battery housing or the battery
terminals.
• Remove exhausted batteries from product.
• Remove the battery from the product if storing for long periods.
• Remove the battery if the product is to be scrapped.
• Dispose of exhausted batteries safely and never dispose of batteries in a fire.
SAVE THESE INSTRUCTIONS
07
SECTION 03
OPERATING THE SAFE
It is recommended that both the primary code and master code are changed for
security reasons.
The reset button is located on the inside of the Safe door (see INITIAL SETUP). Pressing
this button will allow the codes to be changed and reset.
CHANGING THE CODES
Follow the processes below to change the primary code and master code values.
BACKUP POWER SUPPLY
If the batteries in the Safe run out, use the backup
power supply (supplied).
Simply plug it into the front of your Safe; this will allow
you to enter your code as normal.
Alternatively the override keys can be used to gain
entry into the Safe if the power for the batteries has
run out.
LED definitions
INPUT: Will flash each time a button is pressed
LOBATT: Indicates batteries are running out
OPEN: Indicates code has been accepted
Code definitions
Primary Code (Default - 1, 2, 3, 4, #
Master Code (Default - 1, 2, 3, 4, 5, 6, 7, 8, #
Changing the
primary code
Open safe with
override key
“Reset”
Button
4 digits of your
choice e.g. 1, 2, 3, 4
“#”
Button
Changing the
master code
Open safe with
override key or
primary code
Wait for “Open”
Light to go off
Press “0” button,
“0” button,
“Reset” button
8 digits of your
choice e.g.
1, 2, 3, 4, 5, 6, 7, 8
“#”
Button

08
SECTION 03
GUARANTEE
For your convenience, you are not required to complete a form and return it to us in
order to validate your guarantee. However, please ensure that you retain your
receipt which will act as both proof of purchase and a guarantee validation
document. We recommend that you attach your receipt to this documentation.
Your product carries a 12 month guarantee from the date of original purchase
(or as otherwise stated at point of purchase) If your product fails to operate to its
specification due to faulty workmanship or materials during the guarantee period,
we will either repair or replace the product. We will use our discretion to determine
whether to offer a repair or provide a replacement. The product will not be covered
by the guarantee if it has been misused, transformed, modified or altered in any way.
If your product fails within the guarantee period please ensure that you have all
necessary documentation available including proof or purchase (receipt or invoice
with serial number, location and date of purchase) in addition to all original
undamaged packaging and leaflets etc. It is strongly recommended that you
inspect your product carefully before it is used or installed. For full details of your
product you should refer to the instruction manual which accompanies the product.
You are strongly advised to read this manual carefully in its entirety and to retain it for
future reference.
This product guarantee does not affect your statutory rights.
AFFIX RECIEPT OR PROOF
OF PURCHASE HERE
www.firedupgroup.co.uk
Fired Up Corporation Ltd.
Fired Up Buildings
St Thomas Road
Huddersfield
HD1 3LF
United Kingdom
IDENTIFICATION
(Image fior illustrative purposes only)
PARTS SUPPLIED
1x Safe
1x Accessories pack
• Backup power supply
• Override key (x2)
• Fixing bolt (x2)
• AA battery (x4)
• ‘Instructions for Use’ sticker
Table of contents
Other Corby Safe manuals