Cormach 50000 WB 50000 WB80 User guide

UT
Handbook for Use and Maitenance
–
50000 WB
-
80
-
87
-
95
Edition
01
/11
Revisione
00
1
50000WB_e111_E.doc
ENGLISH
50000 WB
HANDBOOK FOR USE AND MAINTENANCE
EDITION: 1/2011
Models
50000 WB80
50000 WB87
50000 WB95
25018 MONTICHIARI (BRESCIA) ITALIA
Via Madonnina n° 27 – C. . 199
Tel. ++39(030)9656811 - Fax ++39(030)9656846
Web: http://www.cormach.com
e-mail: [email protected]

UT
Handbook for Use and Maitenance
–
50000 WB
-
80
-
87
-
95
Edition
01
/11
Revisione
00
2
50000WB_e111_E.doc
IDENTIFICATION DATA
CRANE MODEL:
50000 WB__
SERIAL N°:_____________________ (The serial number is engraved in the frame,
near the outriggers exit and on the crane
identification plate, placed on the column).
FITTED ON VEHICLE (brand):___________________(model)____________________
CHASSIS NUMBER:_____________________
LIMITS IN USE
The crane/vehicle assembly is subject to the following limitations:
When stability, on front, is not granted (in front of driver’s cab), the crane
working area shall be limited to the rear180°. The rotation towards the front is
prevented with mechanical means. The load charts for the crane/vehicle
assembly, apply only to the authorised working area.
When stability is not granted on the rear (Body side), the crane working area
shall be limited to the front 180°. The rotation towards the rear is prevented with
mechanical means. The load charts for the crane/vehicle assembly, apply only to
the authorised working area.
When full stability is not granted, the lifting capacities in that working area are
consequently limited. In the front working area ONLY the here joint loading
chart is valid.(*)
When stability is not granted on the front (in direction of the driver’s cab), the
lifting capacities, in that working area, shall be consequently limited. In the back
working area ONLY the here-joint loading chart is valid.(*)
When stability is not granted on the side (in forward motion sense of the
vehicle), the lifting capacities shall be consequently reduced. For this
crane/vehicle assembly ONLY the here-joint loading chart is valid.
Others (to be specified):
________________________________________________________________
________________________________________________________________
________________________________________________________________
(*) Valid only for cranes equipped with double load limiting device.

UT
Handbook for Use and Maitenance
–
50000 WB
-
80
-
87
-
95
Edition
01
/11
Revisione
00
3
50000WB_e111_E.doc
TABLE OF CONTENTS
IDENTIFICATION DATA .............................................................................................. 2
LIMITS IN USE............................................................................................................ 2
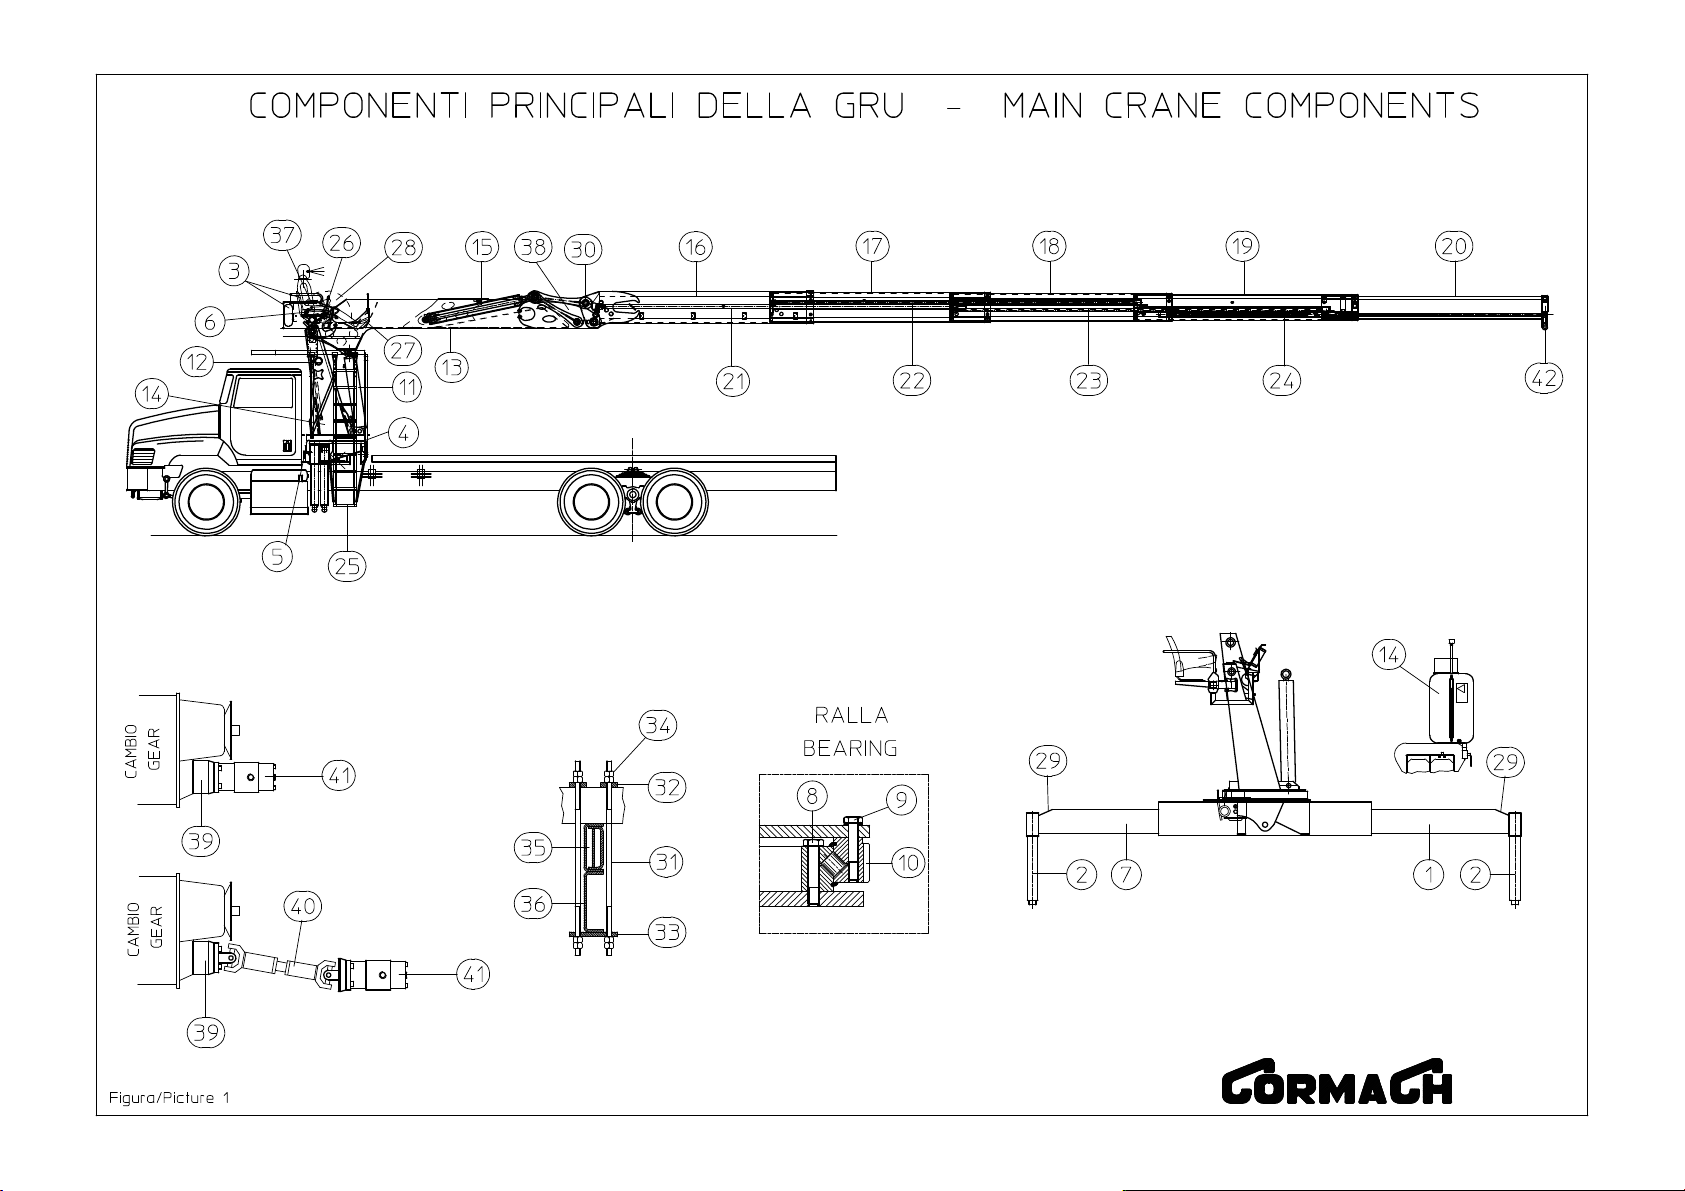
(CHAPTER 1) - TECHNICAL FEATURES ........................................................................ 4
1.1 - GENERAL ...................................................................................................... 4
1.2.1 Table 1 : TECHNICAL INFORMATION ................................................................ 5
1.2.2 Table 2 : THEORETICAL TIME AND PEED FOR VARIOU MOVEMENT ............... 5
1.3 - NOTION FOR THE FIR T IN TALLATION ......................................................... 9
1.3.1 - ELECTRIC UPPLY OF THE MACHINE ................................................................ 9
1.3.2 - HYDRAULIC UPPLY OF THE MACHINE ........................................................... 10
1.3.3 - PRE URE-READING OUTLET ON 50000 WB ................................................. 11
1.3.4 - ETTING OF THE VARIABLE DI PLACEMENT PUMP .......................................... 11
1.3.5 - READING OF THE WORKING PRE URE ....................................................... 11
(CHAPTER 2) - INSTRUCTIONS FOR USE .................................................................. 14
2.1 - AFETY RULE .............................................................................................14
2.2 - TART-UP ....................................................................................................17
2.3 - TABILIZATION ............................................................................................18
2.4 - RETRACTING AND HOMING THE TABILIZER .................................................21
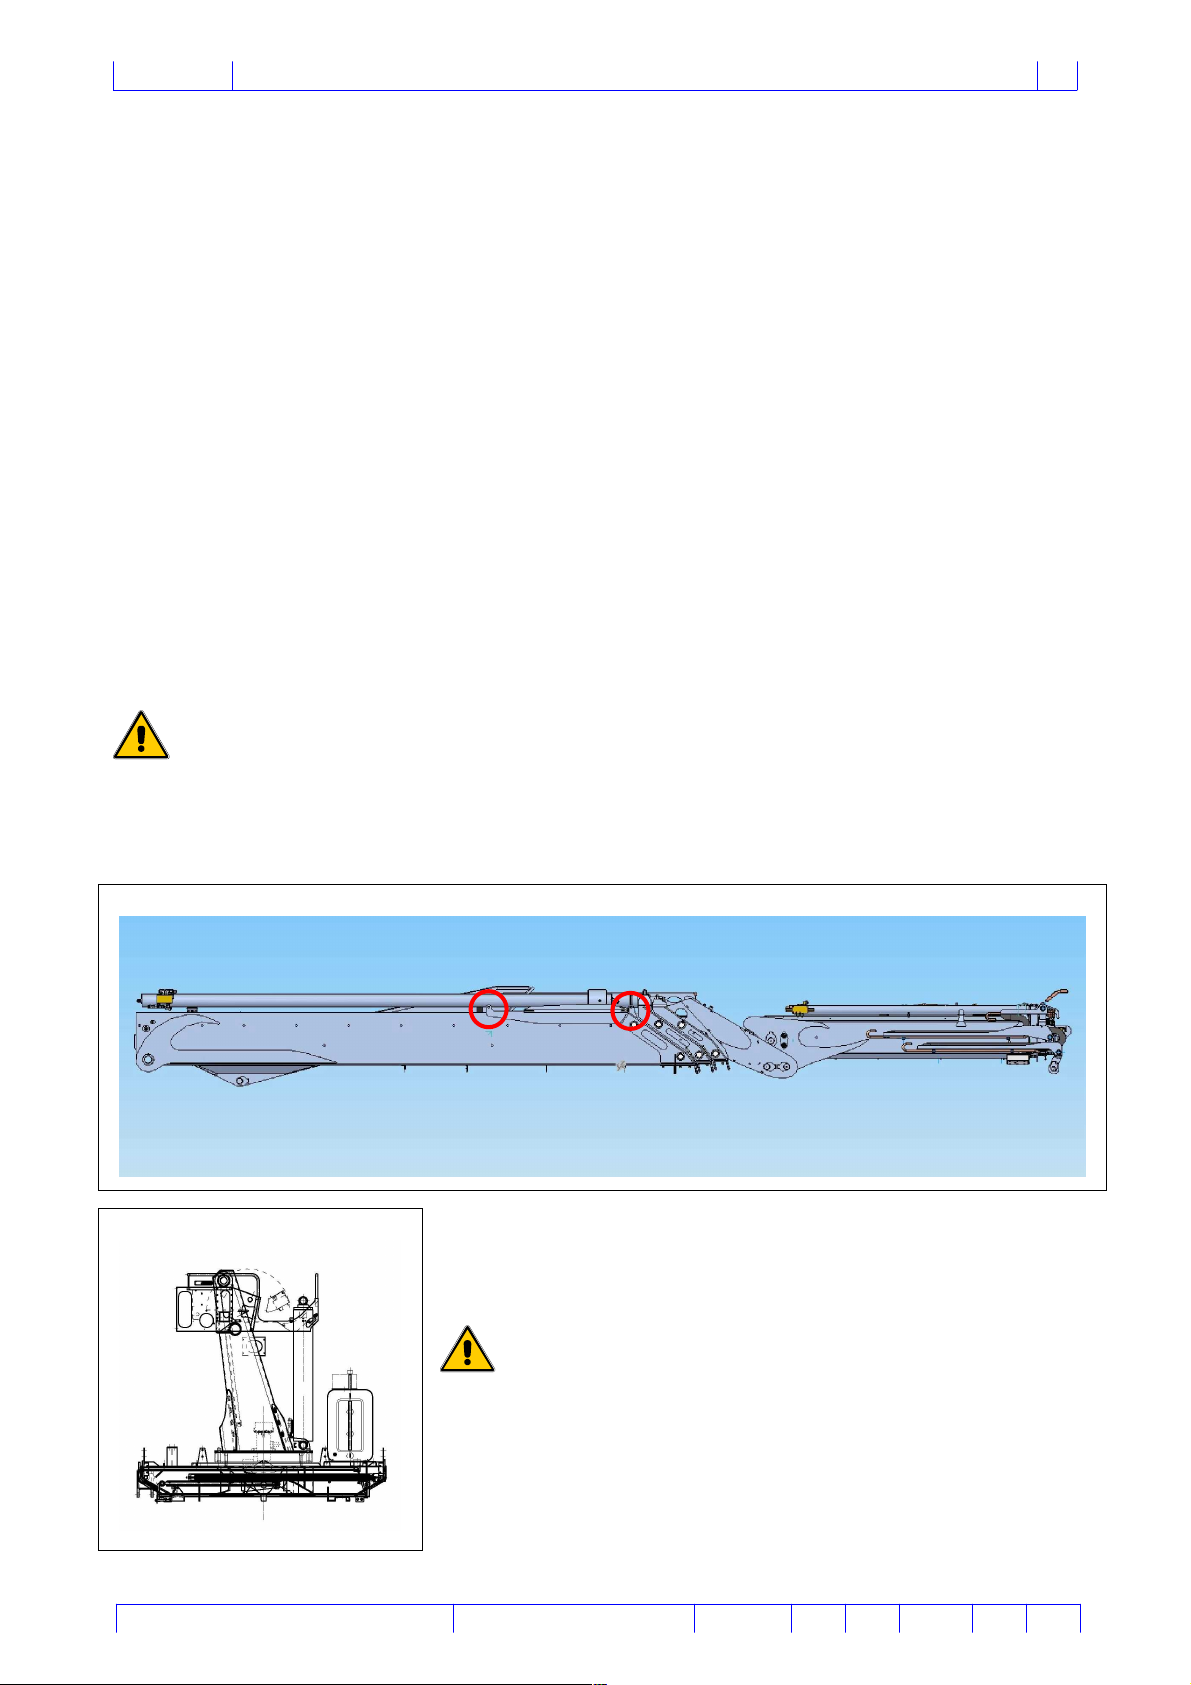
2.5 - EXTENDING THE BOOM .................................................................................22
2.6 - FOLDING OF THE BOOM ................................................................................25
2.7 - MANOEUVRING.............................................................................................25
2.8 - LOAD CAPACITIE ........................................................................................29
2.8.1 – TIME RE ET FUNCTION ............................................................................... 31
(CHAPTER 3) - ROUTINE MAINTENANCE.................................................................. 37
3.1 - AFTER THE FIR T 20 HOUR OF OPERATION....................................................37
3.2 - AFTER THE FIR T 300 HOUR OF OPERATION..................................................37
3.3 - PERIODIC MAINTENANCE ..............................................................................37
3.3.1 - EVERY 20 HOUR OF OPERATION.................................................................. 37
3.3.2 - EVERY 100 HOUR OF OPERATION ................................................................ 39
3.3.3 - EVERY 200 HOUR OF OPERATION ................................................................ 39
3.3.4 - EVERY 600 HOUR OF OPERATION OR AT LEA T ONCE A YEAR ........................ 39
3.3.5 - EVERY 1000 HOUR OF OPERATION .............................................................. 40
3.3.6 - EVERY 2000 HOUR OF OPERATION .............................................................. 40
3.4 - WHENEVER NECE ARY ................................................................................40
3.5 - MAINTENANCE TO BE CARRIED OUT AFTER A LONG PERIOD OF INACTIVIT .........41
3.6 - CHEDULE OF IN PECTION AND PROGRAMMED MAINTENANCE TO BE CARRIED
OUT IN AUTHORIZED WORK HOP . .......................................................................42
3.7 - CHEDULE FOR WIRE ROPE AND CHAIN IN PECTION ..................................44
3.8 - NOTE FOR EXCEPTIONAL PART EXCHANGE ................................................45
(CHAPTER 4) - EXTRAORDINARY MAINTENANCE...................................................... 46
4.1 - THE CRANE DOE NOT WORK ........................................................................46
4.2 - THE CRANE MOVE BUT IT I NOT POWERED ..................................................46
4.3 - THE CRANE MOVE BY JERK AND VIBRATE ..................................................47
4.4 - THE MOVEMENT ARE PONGY ......................................................................47
4.5 - THE EXTEN ION CYLINDER VIBRATE WHEN MOVING OUTWARD OR INWARD
AND ARE OUT OF EQUENCE .................................................................................47
4.6 - THE EXTEN ION CYLINDER EXTEND UNCONTROLLEDLY ..................................47
APPENDIX A” ADDITIONAL RISKS .......................................................................... 48
SPECIAL NOTES - SPECIAL VERSION ........................................................................ 49

UT
Handbook for Use and Maitenance
–
50000 WB
-
80
-
87
-
95
Edition
01
/11
Revisione
00
4
50000WB_e111_E.doc
(Chapter 1) - TECHNICAL FEATURES
1.1 - GENERAL
In order to work, the lorry crane must be installed on a vehicle and, from this vehicle,
take the mechanical power it needs. It follows that the correct performance and
safety of the system depend on the installation.
It is important to note that the capacities given on the plate that is located on the
crane are intended for lifting operations carried out with hook, pallets fork and
buckets for loose material or any other device that doesn’t build up other tensions on
the structure the those of the hook itself.
Lifting capacities are calculated for a crane servicing the vehicle on which it is
installed.
The use of the crane with the given lifting capacities is not permitted when the crane
is equipped with: buckets, hearth moving, magnets or any other equipment that can
cause to the crane stresses similar to those caused by the, here mentioned, devices.
Crane can not be sed in explosive environment.
The crane is equipped with lifting eyes that make it possible to lift the crane by
respecting the gravity centre (picture 1). The crane shall be lifted with a proper lifting
beam equipped with chains and shakels in proportion with the crane weight.
The lifting points can bear the crane weight
only.
Picture 1
Picture 2

UT
Handbook for Use and Maitenance
–
50000 WB
-
80
-
87
-
95
Edition
01
/11
Revisione
00
5
50000WB_e111_E.doc
1.2.1 Table 1 : TECHNICAL INFORMATIONS
Model:
50000 WB
80 87 95
Identification Code :
901001001 901001003 901001002
Max.Din.Mom.Rotat.Axle: daN*m 63000 63000 63000
Max. slew torque: daN*m 4000 4000 4000
Max. capacity: k 3100 2940 2780
Dry mass: k 6100 6260 6410
Max.react stab.plus loaded daN 16000 16000 16000
Max. pump pressure: bar 320 320 320
Delivery pump: litri/min 100 100 100
Pump type: PISTONI PISTONI PISTONI
Oil tank capacity (*): litri 250 250 250
Total system capacity: litri 350 355 360
Classificat. GRU: DIN 15018 e EN 12999 Other type of utilisation that are substantially different must be authorised by
(*)The oil supplied by S.r.l., contained in the hydraulic system and in the tank, when the crane is mounted directly by the same, is type:
(For cold climates we recommend the use of lower viscosity oils.): mineral type L-HV gradiation ISO VG46 temperatura di utilizzo: min. -
25°C max. +70°C
1.2.2 Table 2 : THEORETICAL TIMES AND SPEEDS FOR ARIOUS MO EMENTS
(100 l/min delivery) can be make more manoeuvres at the same time.
Mouvements WB80 WB87 WB95
Note
Rotation 360° (35 litri/min.)
58 58 58
Main boom rise (40 litri/min.):
32 32 32
Secondari boom rise (40 litri/min.):
28 28 28
1
st
Boom extension (100 litri/min.):
20 20 20
2
nd
Boom extension (100 litri/min.):
10 10 10
3
rd
Boom extension (100 litri/min.):
10 10 10
1
st
Boom extension JIB (40 litri/min.):
9 9 9
2
nd
Boom extension JIB (40 litri/min.):
10 10 10
3
rd
Boom extension JIB (40 litri/min.):
10 10
4
th
Boom extension JIB (40 litri/min.):
11
Outri ers extensions
12+12 12+12 12+12
Outri ers
10+10 10+10 10+10

UT
Handbook for Use and Maitenance
–
50000 WB
-
80
-
87
-
95
Edition
01
/11
Revisione
00
6
50000WB_e111_E.doc
IDENTI ICATION O THE MAIN CRANE COMPONENTS
The major crane components are listed below in order to make, the reading and
understanding of the operator’s manual easier.
LIST O MAIN COMPONENTS:
1 Right outrigger beam 26
2 tabilising cylinder 27
3 Crane control valve 28
4 3 point linkage 29 Fitting bolts
5 Basement (chassis) 30 Top fitting plate
6 Control station 31 Bottom fitting plate
7 Left outrigger beam 32 Fitting nut
8 crews of bearing inner ring 33 Power take off
9 crews of bearing outer ring 34 haft
10 Bearing 35 Pump
11 Main lifting cylinder 36
12 Column 37 Hydraulic load limiting device
13 Main boom 38 Hydraulic load limiting device
14 Hydraulic oil tank 39
15 econd (knukle) boom cylinder 40
16 econd boom 41 ub frame
17 JIB boom extension cylinder 42 Vehicle chassis
18 Acces stairs 43 Grab suspension
19 Joystick
20 Foot pedals
21 Hydraulic extensions
22 Lifting capacities sticker
23 Outriggers looks
24 Links
25 Main boom extension cylinder


UT
Handbook for Use and Maitenance
–
50000 WB
-
80
-
87
-
95
Edition
01
/11
Revisione
00
9
50000WB_e111_E.doc
1.3 - NOTIONS FOR THE FIRST INSTALLATION
1.3.1 - ELECTRIC SUPPLY OF THE MACHINE
The 2 plugs that must be used for the connection to the power supply are located in
the lower part of the crane (picture 3). Electric power (plug PW), for engine start –
stop use plug see drawing in next page.
Picture 3
SS
PW

UT
Handbook for Use and Maitenance
–
50000 WB
-
80
-
87
-
95
Edition
01
/11
Revisione
00
10
50000WB_e111_E.doc
Under the control bank, at top seat level, (picture 4) there 2 electric plugs (TEL and
), they are the interfaces for the connection of a radio remote control (optional).
1.3.2 - HYDRAULIC SUPPLY OF THE MACHINE
The picture (5) shows the
connection “P” for the connection
to the pump outlet. REMAINDER:
the crane has been prepared for
the use of a variable displacement
pump. In case the used pump is a
fix displacement one contact
Cormach technical service.
Picture 4
SS
TEL
Picture 5
P

UT
Handbook for Use and Maitenance
–
50000 WB
-
80
-
87
-
95
Edition
01
/11
Revisione
00
11
50000WB_e111_E.doc
1.3.3 - PRESSURE-READING OUTLETS ON 50000 WB
The machine has been equipped with 3 pressure reading outlets.
1. On the left side. On the 2 way valve, picture 6 (red colour); Pressure outlet “P”
(pressure gauge 1)
2. On the right side. On the outriggers control bank, picture 7 (Yellow colour);
pressure outlet “ ” (pressure gauge 2).
3. On the control board, picture 8 (yellow colour); pressure outlet at the function
that is operated at the time (pressure gauge 3).
1.3.4 - SETTING OF THE VARIABLE DISPLACEMENT PUMP
1. et the flow controller differential pressure of the pump at 17 bar (247 psi) The
setting procedure needs 2 pressure gauges with maximal pressure scale at 40
bar ( 580 psi). One pressure gauge shall be installed at the position “1” , the
other one at position “2”. Lower the lever (4) of the two (2) way valve (2 way
valve for crane/outriggers , position 4 picture 6) so that the oil is sent to the
outriggers control bank. et the flow controller of the pump in such a way that
the difference between the two pressure read at the two pressure gauges, is
equal to 17 bar (247 psi). No one lever of any function shall be moved during
the mentioned operation. The use of some function could cause the explosion of
the pressure gauges.
2. Rise the lever of the two (2) way valve (crane / outriggers) with the oil flow in
direction of the crane. , install the pressure gauge, with maximal scale at 40 bar
(580 psi) at position “3” (yellow pressure outlet on the control station). The
read pressure, with all levers in neutral position, shall be less than 30 bar (435
psi) setting the pressure at an higher level is causing a malfunctioning of the
load limiting device.
3. et the pump cut-off valve at 280 bar ( 3982 psi), this setting is achieved by
using the valve on the pump and than slowly screw the regulator until the
pressure value read on the pressure gauge “3” on the control board To the Top
seat (yellow colour) when the jib is risen up to end stroke it reaches 280 bar
(about).
1.3.5 - READING OF THE WORKING PRESSURES
The working pressures of the crane must be taken form the pressure outlet “3”
(yellow colour) located on the control station.

UT
Handbook for Use and Maitenance
–
50000 WB
-
80
-
87
-
95
Edition
01
/11
Revisione
00
12
50000WB_e111_E.doc
Picture 6
1
4
Pictur
e 7
2

UT
Handbook for Use and Maitenance
–
50000 WB
-
80
-
87
-
95
Edition
01
/11
Revisione
00
13
50000WB_e111_E.doc
Picture 8
3

UT
Handbook for Use and Maitenance
–
50000 WB
-
80
-
87
-
95
Edition
01
/11
Revisione
00
14
50000WB_e111_E.doc
(Chapter 2) - INSTRUCTIONS FOR USE
IMPORTANT NOTE: BE ORE ATTEMPTING TO OPERATE THE MACHINE;
• READ ALL THE RECOMMENDATIONS AND INSTRUCTIONS OR USE AND THE
SA ETY RULES CONTAINED HEREIN AND MAKE SURE YOU UNDERSTAND
THEM,
• AMILIARIZE YOURSEL WITH THE OPERATING AND SA ETY DEVICES,
• RE ER TO THE NATIONAL STANDARDS REGULATING THIS TYPE O WORK.
2.1 - SAFETY RULES
• Before beginning the work, make sure that all protections, handles,
guards around the control station and safety devices - including those for
the hook and framework - are in proper working order.
• The crane operator must make sure that all accessories, attached to the
crane, fit the crane and have been verified for the use they are intended to
be used.
DANGER O INTOXICATION
• It is necessary to deviate the exhaust gases in case the operator’s station
is located in proximity of the exhaust pipe.
DANGER O CRANE ALLING PARTS
• When using the crane, the operator must wear a hard hat.
• Clothing suitable for the local climate must be worn, bearing in mind that
the crane does not have a cab.
• As the crane is not equipped with its own lighting system, it cannot be
used in the dark.
DANGER O SQUEEZING
• The load shall not pass over the operator’s head or any other persons.
DANGER O ELECTROCUTION
• During manoeuvres, the boom and load must always be at least 5 metres
away from any electric power lines in the vicinity. Any more restrictive
national standards must be complied with. In the case of prolonged
exposure to risk, it is good practice to earth the crane properly.

UT
Handbook for Use and Maitenance
–
50000 WB
-
80
-
87
-
95
Edition
01
/11
Revisione
00
15
50000WB_e111_E.doc
• In stormy weather when there is the risk of high winds and lightning, the
boom of the crane must be lowered if it is one of the highest structures in
the surrounding area.
DANGER OF OVERTURNING
• The crane must always be operated with extreme care and attention and
must never be left unattended with the load suspended.
• Never operate the crane beyond the permitted angle or drag the load.
• Do not use the crane to push or pull loads.
• Guide the load with suitable cables, and do not allow it to swing or knock
against any part of the crane.
• EMERGENCY STOP BUTTON:
The operator’s seat is equipped with an emergency button (red) that
stops all crane functions, when pushed, preventing the hydraulic circuit
to be pressurised.
This button must be used whenever it is necessary to halt all of the
movements of the crane instantly.
or example:
A control lever remains stuck and does not allow for the movement
to stop.
The emergency button does not stop the pump, therefore if the
hydraulic system fails between the pump and control bank, it is
necessary to stop the vehicle engine or disconnect the power take
off, whichever is the quickest.
Always perform the following procedure after pressing the stop
button:
1) Turn off the vehicle engine
2) Remove the cause of danger or the reason why the emergency
button was pressed.
3) It Is possible to re-start the engine and to release the
emergency button, by rotating slightly in the direction shown by the
arrows, marked on it. Only after all the causes of danger have been
removed and the controls are finally in neutral position.
The emergency button cannot be used as an operating switch for the
crane.
In some cases, when the power take off control, is electropneumatic,
the emergency button also stops the pump. In this case, after a stop it is

UT
Handbook for Use and Maitenance
–
50000 WB
-
80
-
87
-
95
Edition
01
/11
Revisione
00
16
50000WB_e111_E.doc
necessary to reconnect the power take off using the special spanner
provided. The fitter must clearly specify the system adopted.
• Like all machinery, the crane requires maintenance, checks and repairs. If
this is overlooked or not done properly, it will shorten the life of the crane
and affect general safety.
DANGER OF SQUEEZING
• All of the crane’s cylinders are equipped with piloted check valves to
prevent the load from descending in case of hose failure or power failure.
In case of breakdown, do not disassemble the valves to lower the load.
• At least once a week, the crane must be overloaded in order to check if the
load limiting device works properly, verify that the distance correspond to
the right one indicated on lifting diagram, make sure that the red lights are
on and that the acoustic signal works properly. Check weekly that the
emergency stop button works properly. The acoustic signal indicates that
the outer boom is in overload condition, the red light, on the control board,
indicates the general overload condition.
• When the truck is moving on the road the crane must be stored in folded
position. The crane boom must be extended over the truck body and the
boom must be laid upon a correct support that can hold the boom lifted
from the body bed and prevents the crane from rotate. The crane support
must be on a fix point that shall not be installed on trailers. The
movement, when approaching bends on the road, overloads pins and
rotation system.

UT
Handbook for Use and Maitenance
–
50000 WB
-
80
-
87
-
95
Edition
01
/11
Revisione
00
17
50000WB_e111_E.doc
2.2 - START-UP
Apply the parking brake of the
vehicle and block it with the
chocks provided (Picture 9).
Before starting up, make sure the oil level is above
the minimum line and/or at the operation level with
folded crane. (Picture 10).
When you are certain that the compressed air system
of the vehicle is pressurised, depress the clutch fully
to engage the power take off and set the engine
speed to around 800 R.P.M.
Caution: The crane will not work unless all the
controls have been powered on. A green light
installed on the electric box (picture 11) gives the
indication to the operator that the crane has the
correct electric supply. This can be seen be verified
from the ground before reaching for the top seat.
Some minutes of use, on pressure line,
the obstruction indicator of filter must be
green; with red light chenge the filter
cartridge as soon as possible.
On electric box (Picture 11) there’s a
buzzer that hutters an acoustic signal if
the filter is completely obstructed: in that
case change the filter immediately. A fuse
is located on the box, it protects the crane
circuits. In case the electricity supply is
missing verify the correct functioning of
the safety fuse.
Picture 10
Picture 11
Picture 9

UT
Handbook for Use and Maitenance
–
50000 WB
-
80
-
87
-
95
Edition
01
/11
Revisione
00
18
50000WB_e111_E.doc
2.3 - STABILI ATION
DANGER O OVERTURNING
NOTE: Outriggers must be fully extended
before using the crane.
VEHICLES EQUIPPED WITH PNEUMATIC
SUSPENSIONS; unload them completely
before the stabilisation of the crane to avoid
their utilisation during the using of the
crane.
In the rest position, extension of the stabiliser
cross member (supplied as standard) is prevented
by means of a pin, which is removed by rotating
the handle 180° (Picture 12).
After release, activate the
extension by means of the
stabiliser lever and select
the manoeuvre with the
special diverter valve (lever
1) (Picture 13 and 14).
When operator wants to
move the outriggers, lever
3 (located on 1st control
board, picture 13) must be
on position “outriggers”
(lever pushed down in
position B).
Picture 13 Outriggers control X
1
2
3
A
B
Picture 14 Outriggers control DX
1
2
Picture 12

UT
Handbook for Use and Maitenance
–
50000 WB
-
80
-
87
-
95
Edition
01
/11
Revisione
00
19
50000WB_e111_E.doc
Each diverter valve has four positions corresponding to the following manoeuvres:
LEFT DIVERTER RIGHT DIVERTER
1) front left stabiliser extension 1) front right stabiliser extension
2) front left stabiliser descent 2) front right stabiliser descent
0) controls off 0) controls off
3) left auxiliary stabiliser extension 3) right auxiliary stabiliser extension
4) left auxiliary stabiliser descent 4) left auxiliary stabiliser descent
Right and left stabilisers must be moved alternatively in order to maintain the truck
chassis as straight as possible. Make sure the vehicle is levelled by using the level
gauges located near by the stabiliser control levers.
DANGER O OVERTURNING
Control extension of the stabilisers keeping the body far enough away from them
to be hit or dragged along the ground. In particular, never stand between the
stabilisers and any other obstacle.
The stabilisers are fully extended
when the strip, painted on the
beam is fully visible, (Picture 16).
Control the lowering of the stabilisers; by acting alternatively on the right or left
control, until the crane basement reaches the closes position to the horizontal.
Picture 16
Picture 15

UT
Handbook for Use and Maitenance
–
50000 WB
-
80
-
87
-
95
Edition
01
/11
Revisione
00
20
50000WB_e111_E.doc
For each stabilising beam the last manoeuvre shall be the lowering of the
stabiliser.
Remember that the crane may only exceptionally operate at full power up to a
maximum inclination of the base of 5.7° equal to an angle of approximately 10% and
only to a boom extension equal to 11 m.
NOTE: DO NOT OPERATE THE EXTEN ION OR RETRACTION CONTROL WHEN THE
TABILIZER ARE RE TING ON THE GROUND.
DANGER O OVERTURNING
It is also necessary to keep to the following rules for stabilisation:
A) Before using the crane, make sure all of the stabilisers are completely
extended and resting on the ground, independently whatever the sector you
are operating in.
B) The wheels of the vehicle must not be completely off the ground.
Whenever working off the road, on soft ground or asphalt, arrange
distribution plates under the stabilisers (supplied on request) or planks of
wood of a suitable thickness to reduce the pressure.
Check that the stabiliser supporting surface is suitable because should one of
the stabilisers sink in, the vehicle will overturn. In particular, make sure the
stabilisers do not rest on drain covers, over cavities or on any surface that is
not sufficiently resistant.
In difficult working conditions, the crane transmits a force to the stabiliser
which may be as high as 16000 daN.
DANGER O SHEARING
GENERAL NOTE ON SA ETY:
WHEN OPERATING THE STABILIZERS, MAKE SURE ALL LIMBS ARE KEPT WELL
AWAY ROM THE DANGER AREA TO PREVENT CRUSHING. IN PARTICULAR
KEEP YOUR HANDS ON THE CONTROLS, WELL AWAY ROM ANY MOVING
PARTS AND KEEP YOUR EET OUTSIDE THE AREA WHERE THE CRANE IS
STANDING.
This manual suits for next models
2
Table of contents
Popular Construction Equipment manuals by other brands

National Crane
National Crane NBT40-2 Series Operator's manual

Vestil
Vestil JIB-P Series instruction manual

Sky Climber
Sky Climber IC1000 Operator's manual

Highway Care
Highway Care BG800 Product and installation manual

Broderson
Broderson IC-20-1J Operation and maintenance manual

BURR KING
BURR KING VIBRAKING M45 instruction manual

Bramley
Bramley 42 AB2 Operating instructions & parts list

Wacker Neuson
Wacker Neuson RD24 instruction manual

Kato
Kato SR-300L instruction manual

Meva
Meva STB Series Technical instruction manual

Festool
Festool FS-KS instructions

Fayat Group
Fayat Group Bomag BW 138 AD-5 Operating Instruction, Maintenance Instruction