Cosori CP267-FD User manual

Model: CP267-FD
Premium Stainless Steel Food Dehydrator
User Manual
Questions or Concerns?
EN FR

2
Table of Contents Package Contents
Specifications
2
2
5
5
6
7
8
8
8
8
9
9
10
10
10
10
10
11
12
13
Power Supply AC 120V, 60Hz
Rated Power 600W
Temperature
Range 35°–73°C (95°–165°F)
Dimensions 340 × 450 × 311 mm /
13.4 × 17.8 × 12.4 in
1 × Stainless Steel Food Dehydrator
6×Trays
1 ×Fruit Roll Sheet
1 ×Mesh Screen
1 ×Recipe Book
1×User Manual
Package Contents
Specifications
Important Safeguards
• General Safety
• Plug & Cord
Getting to Know Your Dehydrator
Display
• Controls
Before First Use
• Setting Up
Using Your Dehydrator
• Operation
• Tray Liners
• Sounds
• Overheat Protection
• Tips
Care & Maintenance
Troubleshooting
Warranty Information
Customer Support
ENGLISH
EN

3
Table des matières Contenu de l’emballage
Caractéristiques techniques
3
3
17
17
18
19
20
20
20
20
21
21
22
22
22
22
22
23
24
25
Alimentation
électrique 120V c.a., 60Hz
Puissance
nominale 600W
Plage de
températures 35° à 73°C (95° à 165°F)
Dimensions 340 × 450 × 311mm/
13,4 × 17,8 × 12,4po
1 × déshydrateur alimentaire en inox
6×plateaux
1 ×feuille pour roulade aux fruits
1 ×grille
1 ×livre de recettes
1×guide d’utilisation
Contenu de l’emballage
Caractéristiques techniques
Mises en garde importantes
• Consignes générales de sécurité
• Fiche et cordon d’alimentation
Prise en main de votre déshydrateur
Écran
• Commandes
Avant la première utilisation
• Configuration
Mode d’emploi de votre déshydrateur
• Utilisation
• Protections de plateau
• Bip
• Protection en cas de surchaue
• Conseils
Entretien
Dépannage
Informations relatives à la garantie
Service client
FRANÇAIS
FR

Our helpful, in-house chefs are ready to assist
you with any questions you might have!
CONTACT OUR CHEFS
Email: [email protected]
On behalf of all of us at Cosori,
Happy cking!
Happy cking!
the Cosori Cooks Community on Facebook
facebook.com/groups/cosoricooks
our recipe gallery
www.cosori.com/recipes
weekly, featured recipes
made exclusively by our in-house chefs
join
join
explore
explore
enjoy
enjoy
Thank you for
your purchase!
Thank you for
your purchase!
(We hope you love your new food dehydrator as much as we do.)
EN

Follow basic safety precautions when using the dehydrator.
Read all instructions.
General Safety
• Do not touch hot surfaces. Use handles.
• Be cautious when handling the back of the
dehydrator. This area will be hotter than
the rest of the dehydrator.
• Do not immerse cord, plug, or housing in
water or other liquids.
• Closely supervise children near the
dehydrator.
• Unplug when not in use, and before
cleaning. Allow to cool completely before
putting on or taking o parts.
• Do not use the dehydrator if it is damaged,
not working, or if the cord or plug is
damaged. Contact Customer Support (see
page 13).
• Using third-party parts or accessories may
cause injuries.
• Do not use outdoors.
• Do not place on a stove, near gas or
electric burners, or in a heated oven.
• Be extremely cautious when moving
the dehydrator or removing trays if they
contain hot liquid.
• To disconnect, turn o the dehydrator,
then remove the plug from the wall outlet.
• Keep the dehydrator away from flammable
materials (curtains, tablecloths, etc). Use on
a flat, stable, heat-resistant surface away
from heat sources and liquids.
• Do not store anything on top of the
dehydrator while in use.
• Do not clean housing with metal
scouring pads. Metal fragments can
break o the pad and touch electrical
parts, creating a risk of electric shock.
• Do not use where aerosol (spray)
products are being used.
• Do not run the dehydrator for more
than 48 hours at a time. After 48 hours,
unplug and allow to cool for 2 hours
before using again.
• Avoid contact with moving parts. Never
place any object into the openings in the
screen protecting the dehydrator fan.
• Only use the dehydrator as directed in
this manual.
• Not for commercial use. Household
use only.
IMPORTANT SAFEGUARDS
READ AND SAVE THESE INSTRUCTIONS
5
EN

IMPORTANT SAFEGUARDS (CONT.)
Plug & Cord
• Do not let cord (or any extension cord)
hang over the edge of a table or counter,
or touch hot surfaces.
• This dehydrator has a 3-prong grounding
plug, and should only be used with 120V,
60Hz electrical systems in North America.
Always plug in to a grounded electrical
outlet. Do not modify the plug in any way.
• Do not use with a 220–240V outlet.
• Any extension cord must also be a
grounding-type 3-wire cord.
• This dehydrator uses a short power-supply
cord to reduce the risk of entangling or
tripping. Use extension cords with care.
• The marked electrical rating of an
extension cord should be at least as high
as the rating of the dehydrator (see page 2).
CAUTION!
220–240 V
120V, 60Hz
6
EN

Your Cosori Dehydrator features an automatic fan, which circulates warm air horizontally to
evenly and quickly dry food. Dried foods are a great treat to snack on, because they keep most
of their nutritional value and flavor. Dehydrating is the perfect way to preserve snacks, fruit,
vegetables, bread, and even flowers.
GETTING TO KNOW YOUR DEHYDRATOR
Food Dehydrator Diagram
INSIDE
I
G
H
A. Housing
B. Handles
C. Control Panel
D. Trays
E. Fruit Roll Sheet
F. Mesh Screen
G. Door
H. Power Cord
I. Fan
B
AC
D
E
F
7
EN

DISPLAY
BEFORE FIRST USE
Setting Up
Controls
1. Remove all packaging from the dehydrator and its accessories. Make sure all package
contents are included (see page 2).
2. Clean the housing, trays, and tray liners with a moistened cloth.
• Press START/STOP to start or stop the dehydrator.
• Press TEMP/TIME once and use the +and –buttons to change the temperature.
• Press TEMP/TIME a second time and use the +and –buttons to change the time.
Note: The trays are dishwasher safe. Do not wash the mesh screen or fruit roll sheet in a dishwasher.
Note: You only need to do this the first time you use the dehydrator.
3. Place the dehydrator on a solid, level surface. Plug in. Place the trays inside the dehydrator.
4. Run the dehydrator for 30 minutes at any temperature, without adding any food. Make
sure that the room has sucient ventilation in case the dehydrator produces any smoke
or smells. This is normal.
5. Rinse the trays with water. Dry all parts.
8
EN

Operation
USING YOUR DEHYDRATOR
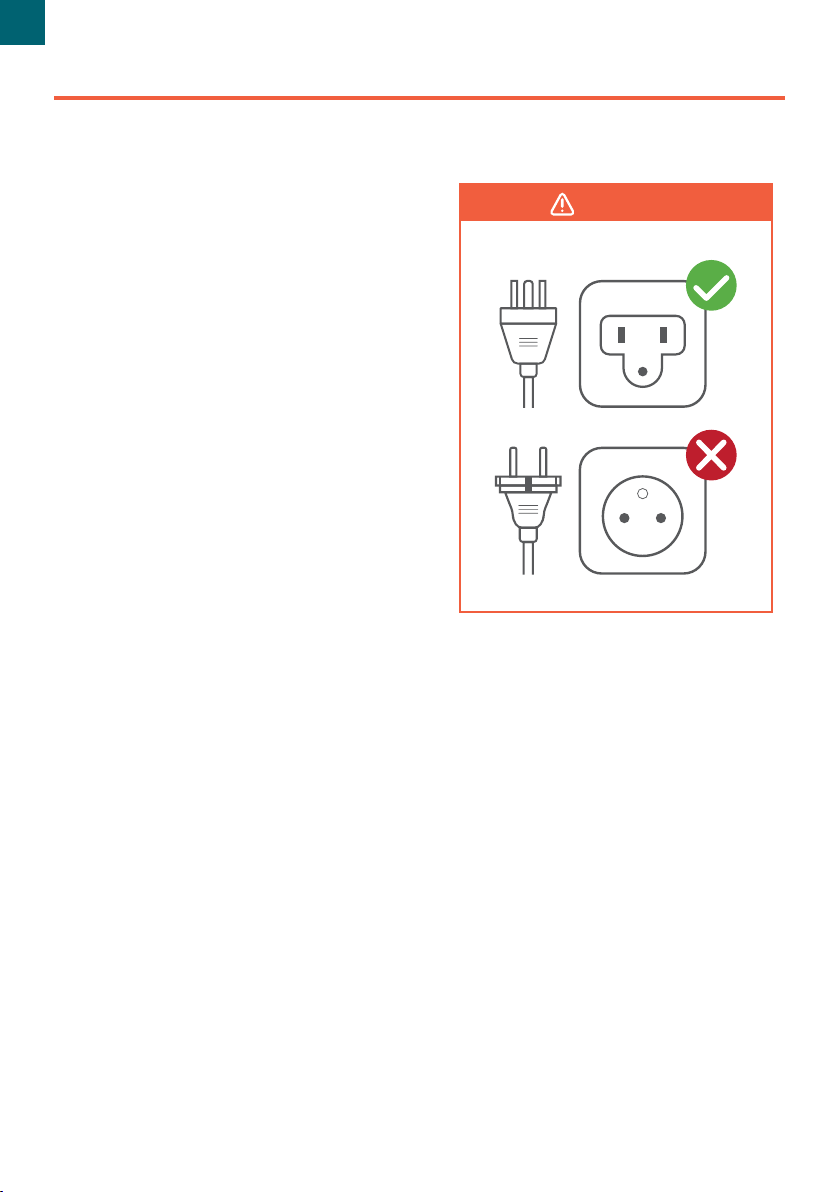
Note:
• Use the dehydrator in a warm, dry room, and
place on a stable, level, heat-resistant surface.
• Depending on humidity in the air and moisture
in the food, dehydration times may vary.
1. Place food on trays. Rearrange the trays
to fit thicker food items. The trays can
safely hold 3.5 kg / 7.7 lb of food. Avoid
overloading the trays or overlapping
food. Close the dehydrator door.
Note: Temperature changes in 1°C increments. Press
and hold +or –to change the temperature rapidly.
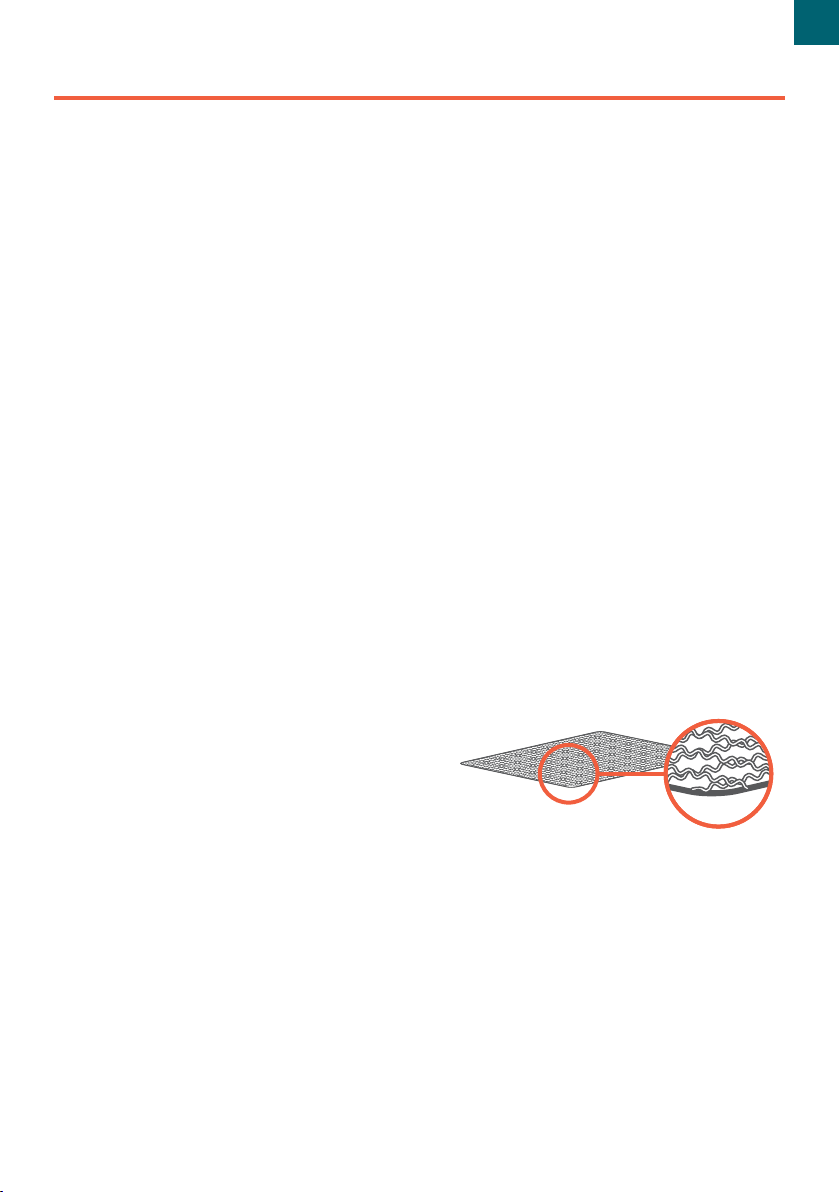
Note: To avoid scratching the inside of your
dehydrator, insert the mesh screen with the smooth
side of the frame facing down [Figure 1.1].
Note: Time changes in 30-minute increments.
Press and hold +or –to change the time rapidly.
Note: If you press START/STOP again to stop
dehydration, the timer countdown will reset and
the dehydrator will go into standby mode.
2. Plug in. The dehydrator will beep,
and the display will show “88:88”.
The dehydrator will switch to standby
mode after 3 seconds, and the display
will show “00:00”.
3. Press TEMP/TIME to choose
temperature. The temperature will blink
on the display, and the +or –buttons
will light up. Use +or –to change the
temperature (35°–73°C / 95°–165°F).
4. Press TEMP/TIME again to choose time.
The time will blink on the display, and
the +and –buttons will light up. Use +or
–to change the time (0:30–48:00).
5. Press START/STOP to start dehydrating.
The dehydrator will start heating. START/
STOP will stay lit, and the other buttons
will turn o. Temperature and time will
cycle on the display every 3 seconds.
6. Optionally, you can change the time
and temperature at any time by
pressing TEMP/TIME.
7. When the timer finishes, the display
will show “End” and heat will turn o.
The dehydrator will beep 5 times, and
the fan will stop.
8. Use a kitchen towel, heat-resistant glove,
or oven mitt to handle the trays.
Note: The dehydrator will always remember your
previous temperature and time settings.
Figure 1.1
9
EN

Tray Liners
Overheat Protection
Sounds
Tips
The dehydrator comes with 2 tray liners: a
fruit roll sheet and a mesh screen.
1. Place a tray liner on a dehydrator tray.
Place food on the liner.
2. Once the food is dehydrated, remove the
tray and lift the tray liner out of the tray.
3. Remove food. Bending the screen is
helpful for removing sticky foods.
• Use for making fruit rolls and strips from
fresh, frozen, or canned fruit. You can also
use this liner for pouring purée onto a tray.
• Use for foods that shrink when dried.
This liner will prevent them from falling
through tray grates.
• Overheating is rare. If the dehydrator
overheats, it will automatically shut down
as a safety feature, and the dehydrator can
no longer be used. Contact Customer
Support (see page 13).
• To turn sounds on/o, wait for the display
to show “00:00” and press and hold +for 5
seconds until it beeps 1 time.
• Fruit and vegetables dried in the food
dehydrator will look dierent from those
sold in stores. This is because homemade
dried foods do not use preservatives,
artificial colouring, or artificial additives.
• Check out the Recipe Book for more tips
on dehydrating foods.
Fruit Roll Sheet
Mesh Screen
CARE & MAINTENANCE
1. Unplug the dehydrator and allow it to
cool before cleaning.
2. Soak trays in hot, soapy water for easy
removal of food residue.
3. If needed, use a soft brush to clean.
4. Clean the dehydrator housing with a
damp cloth.
5. Dry all parts before storing or using the
dehydrator.
Note: This liner can also be placed on the bottom
of the dehydrator to catch any dripping liquids, to
make cleaning easier.
Note: The trays are dishwasher safe. Do not wash
the mesh screen or fruit roll sheet in a dishwasher.
Note: Do not clean any part of the dehydrator with abrasive chemicals, as this will damage the surface.
10
EN

TROUBLESHOOTING
Problem Possible Solution
The dehydrator will not turn
on, or the fan is not working.
Unplug the dehydrator and plug it in again.
The dehydrator may be damaged or malfunctioning.
Contact Customer Support (see page 13).
“E1”, “E2”, or “E3” appears on
the display.
The dehydrator may be damaged or malfunctioning.
Contact Customer Support (see page 13).
Foods are dried unevenly.
Cut foods evenly to ensure that they all finish drying at
the same time. Avoid overlapping the food.
Follow the recipes and tips in the Recipe Book.
If your problem is not listed, please contact Customer Support (see page 13).
11
EN

Product
Premium
Stainless Steel
Food Dehydrator
Model CP267-FD
For your own reference, we strongly
recommend that you record your order ID
and date of purchase.
Order ID
Date of Purchase
WARRANTY INFORMATION
TERMS & POLICY
Arovast Corporation (“Arovast”) warrants this
product to the original purchaser to be free from
defects in material and workmanship, under
normal use and conditions, for a period of 2
years from the date of original purchase.
Arovast agrees, at our option during the
warranty period, to repair any defect in material
or workmanship or furnish an equal product in
exchange without charge, subject to verification
of the defect or malfunction and proof of the
date of purchase.
There is no other express warranty. This
warranty does not apply:
• If the product has been modified from its
original condition;
• If the product has not been used
in accordance with directions and
instructions in the user manual;
• To damages or defects caused by
accident, abuse, misuse or improper or
inadequate maintenance;
• To damages or defects caused by service
or repair of the product performed by
an unauthorized service provider or by
anyone other than Arovast;
• To damages or defects occurring during
commercial use, rental use, or any use for
which the product is not intended;
• To damages or defects exceeding the cost
of the product.
Arovast will not be liable for indirect, incidental,
or consequential damages in connection with
the use of the product covered by this warranty.
This warranty extends only to the original
consumer purchaser of the product and is
not transferable to any subsequent owner
of the product regardless of whether the
product is transferred during the specified
term of the warranty.
This warranty does not extend to products
purchased from unauthorized sellers. Arovast’s
warranty extends only to products purchased
from authorized sellers that are subject to
Arovast’s quality controls and have agreed to
follow its quality controls.
All implied warranties are limited to the period
of this limited warranty.
This warranty gives you specific legal rights
and you may also have other rights which vary
from state to state. Some states do not allow
the exclusion or limitation of incidental or
consequential damages, so the above limitation
or exclusion may not apply to you.
If you discover that your product is defective
within the specified warranty period, please contact
NOT dispose of your product before contacting us.
Once our Customer Support Team has approved
your request, please return the product with a copy
of the invoice and order ID.
This warranty is made by:
Arovast Corporation
1202 N. Miller St., Suite A
Anaheim, CA 92806
USA
12
EN

If you have any questions or concerns about your new product, please contact our helpful
Customer Support Team.
*Please have your order invoice and order ID ready before contacting Customer Support.
Arovast Corporation
1202 N. Miller St., Suite A
Anaheim, CA 92806
USA
Support Hours
Mon–Fri, 9:00 am–5:00 pm PST/PDT
Email: [email protected]
Toll-Free: (888) 402-1684
CUSTOMER SUPPORT
13
EN

We hope this has been helpful to you. We can’t wait to see your beautiful
results, and we think you’ll want to share glam shots! Our community awaits
your uploads—just pick your platform of choice below.
Snap, tag, and hashtag away, Cosori chef!
If you’re happy with this air fryer, the line doesn’t stop here.
Check out www.cosori.com for a line of all our beautiful and thoughtfully
designed cookware. They might be right at home in your kitchen, too!
@cosoricooks
Cosori Appliances
#iCookCosori
Considering what to cook? Many recipe ideas are available,
both from us and the Cosori community.
SHOW US WHAT YOU’RE MAKING
MORE COSORI PRODUCTS
14
EN

15
EN
NOTES

Nos chefs maison se tiennent
prêts à répondre à vos questions.
CONTACTER NOS CHEFS
Courriel: [email protected]
Au nom de nous tous chez Cosori,
Boe cuisine!
Boe cuisine!
la communauté Cosori Cooks sur Facebook
facebook.com/groups/cosoricooks
notre galerie de recettes
www.cosori.com/recipes
chaque semaine des recettes en vedette
préparées exclusivement par nos
chefs maison
rejoignez
rejoignez
explorez
explorez
protez
protez
Merci de
votre achat!
Merci de
votre achat!
(nous espérons que vous apprécierez votre nouveau
déshydrateur alimentaire autant que nous).
16
FR

Appliquez les précautions de sécurité de base lors de l’utilisation du déshydrateur.
Lisez attentivement les instructions.
Consignes générales de sécurité
• Ne touchez pas les surfaces chaudes.
Utilisez les poignées.
• Soyez prudent quand vous manipulez
l’arrière du déshydrateur. Cette partie
de l’appareil chaue plus que le reste
du déshydrateur.
• Ne plongez pas le cordon, la prise
ou le châssis dans l’eau ou dans tout
autre liquide.
• Surveillez de près les enfants à proximité
du déshydrateur.
• Débranchez-la lorsqu’elle n’est pas
utilisée et avant tout nettoyage. Laissez-
le entièrement refroidir avant d’installer
ou d’enlever des pièces.
• N’utilisez pas votre déshydrateur s’il est
endommagé, s’il ne fonctionne pas ou si
le cordon ou la prise sont endommagés.
Contactez le service client (voir page 25).
• L’utilisation de pièces ou d’accessoires
tiers comporte un risque de blessure.
• N’utilisez pas le four à l’extérieur.
• Ne placez pas l’appareil sur un fourneau,
près de brûleurs à gaz ou électriques ou
dans un four en marche.
• Soyez extrêmement prudent lors du
déplacement du déshydrateur ou
lorsque vous en retirez les plateaux,
surtout si ces derniers contiennent un
liquide chaud.
• Pour débrancher l’appareil, éteignez le
déshydrateur avant de retirer la fiche de
la prise murale.
• N’approchez pas le déshydrateur de
matériaux inflammables (rideaux,
nappes, etc.). Utilisez-le sur une
surface plane, stable et résistante à
la chaleur, à l’écart des sources de
chaleur ou de liquides.
• Ne rangez rien sur le dessus du
déshydrateur lorsqu’il fonctionne.
• Ne nettoyez pas son châssis avec des
tampons à récurer métalliques. Les
fragments métalliques peuvent briser
le pavé et toucher les composants
électriques, entraînant un risque de
décharge électrique.
• Ne l’utilisez pas au même endroit que
des produits en aérosol sont utilisés.
• N’utilisez pas le déshydrateur pendant
plus de 48 heures d’alée. Au bout
de 48 heures, débranchez l’appareil et
laissez-le refroidir pendant deux heures
avant de le réutiliser.
• Évitez de toucher aux pièces mobiles.
Ne placez aucun objet dans les
ouvertures de la grille de protection
du ventilateur du déshydrateur.
• N’utilisez ce déshydrateur qu’en
respectant les consignes indiquées
dans ce guide.
• Non adaptée à un usage commercial.
Pour un usage domestique seulement.
MISES EN GARDE IMPORTANTES
INSTRUCTIONS À LIRE ET À CONSERVER
17
FR

MISES EN GARDE IMPORTANTES (SUITE)
Fiche et cordon d’alimentation
• Ne laissez pas le cordon d’alimentation
(ou toute rallonge) pendre du bord
d’une table, d’un plan de travail ou
toucher des surfaces chaudes.
• Ce déshydrateur est équipé d’une prise
de courant mise à la terre à 3 broches. Il
ne convient qu’aux circuits électriques
de 120 V, 60 Hz utilisés en Amérique
du Nord. Branchez-le toujours dans
une prise de courant électrique mise
à la terre. Ne modifiez pas la prise de
quelque façon que ce soit.
• Ne l’utilisez pas sur une prise de 220
à 240 V.
• Toute rallonge utilisée doit également
être du type à trois fils et dotée d’une
broche de mise à la terre.
• Ce déshydrateur utilise un cordon
d’alimentation court,pour réduire
les risques d’enchevêtrement ou de
trébuchement. Utilisez des rallonges
avec précaution.
• La valeur du courant nominal d’une
rallonge doit être au moins aussi élevée
que celle du déshydrateur (voir page 3).
MISE EN GARDE!
220 à 240 V
120V, 60Hz
18
FR

Votre déshydrateur Cosori est équipé d’un ventilateur automatique qui diuse
l’air horizontalement pour assurer le séchage uniforme des aliments. Les aliments
déshydratés, qui conservent la majeure partie de leur valeur nutritionnelle et de leur
goût, font d’excellentes collations. La déshydratation est la solution parfaite pour
conserver les collations, les fruits, les légumes, le pain et même les fleurs.
PRISE EN MAIN DE VOTRE DÉSHYDRATEUR
Schéma du déshydrateur alimentaire
INTÉRIEUR
I
G
H
A. Châssis
B. Poignées
C. Panneau de commande
D. Plateaux
E. Feuille pour roulade aux fruits
F. Grille
G. Porte
H. Cordon d’alimentation
I. Ventilateur
B
AC
D
E
F
19
FR

ÉCRAN
AVANT LA PREMIÈRE UTILISATION
Configuration
Commandes
1. Enlevez tous les emballages du déshydrateur et de ses accessoires. Assurez-vous que tout le
contenu de l'emballage est inclus (voir page3).
2. Essuyez le châssis, les plateaux et les protections de plateau à l’aide d’un chion humide.
• Appuyez sur START/STOP (Marche/arrêt) pour démarrer ou arrêter le déshydrateur.
• Appuyez une seule fois sur TEMP/TIME (Température/durée) et utilisez les boutons
+et –pour changer la température.
• Appuyez une deuxième fois sur TEMP/TIME (Température/durée) et changez la
durée à l’aide des boutons +et –.
Remarque: Les plateaux sont peuvent aller au lave-vaisselle. Ne lavez pas la grille ou la feuille pour roulade
aux fruits au lave-vaisselle.
Remarque: cette procédure n’est à suivre que lors de la première utilisation du déshydrateur.
3. Posez le déshydrateur sur une surface solide et plane. Branchez l’appareil. Placez les plateaux
dans le déshydrateur.
4. Faites fonctionner le déshydrateur vide pendant 30minutes, à n’importe quelle température,
sans aucun aliment. Veillez à ce que la pièce soit susamment ventilée, au cas où le
déshydrateur produirait de la fumée ou des odeurs. Ce phénomène est normal.
5. Rincez les plateaux à l’eau. Séchez toutes les pièces.
20
FR
Other manuals for CP267-FD
3
Table of contents
Languages:
Other Cosori Kitchen Appliance manuals

Cosori
Cosori CP267-FD User manual

Cosori
Cosori CP267-FD User manual

Cosori
Cosori CP267-FD User manual

Cosori
Cosori CO165-FD User manual

Cosori
Cosori C361-VS User manual

Cosori
Cosori CO162-CWM User manual

Cosori
Cosori CFD-N051-W User manual

Cosori
Cosori CFD-N051-W User manual

Cosori
Cosori CP001-SC User manual

Cosori
Cosori CP267-FD-RXS User manual