Cosori C361-VS User manual

Questions or Concerns?
Please contact us Mon - Fri 9:00 AM - 5:00 PM PST


THANK YOU.
Thank you for purchasing the C361-VS Slim Vacuum Sealer by Cosori. We are dedicated to
providing our customers with high quality products to live life tastefully. Should you have any
questions or concerns about using your new product, feel free to reach out to our helpful
enjoy your new product!

TABLE OF CONTENTS
Safety Information
Product Diagram
Operation
Helpful Tips
Care & Maintenance
Troubleshooting
Specifications
Warranty
Customer Support
3
4
5
7
8
9
10
11
12

3
SAFETY INFORMATION
IMPORTANT SAFEGUARDS: Please read, understand, and comply with all the instructions
provided in this manual before using the device. Failure to comply with the instructions given in
this manual and/or using the device in ways other than the ones mentioned in this manual may
result in serious injury and/or damage to the product.
Safety Use & Care
• Check if the local power supply voltage matches the voltage indicated on this appliance (AC
220V) before use.
• DO NOT operate this appliance if it has a damaged power cord or plug.
• DO NOT operate this appliance if it malfunctions or is damaged in anyway. Contact
customer service immediately if any part of this appliance is damaged.
• DO NOT disconnect the appliance by pulling on the power cord. To disconnect the power,
unplug the power cord from the electrical outlet.
• Always unplug the vacuum sealer when it is not in use, is unattended, or when being
cleaned.
• DO NOT use an extension cord with this appliance.
• DO NOT use the vacuum sealer on wet or hot surfaces, or near a power source.
• DO NOT immerse any part of the appliance, power cord, or plug in water or other liquids.
• Only use this appliance for its intended use as described in this manual.
• DO NOT use this vacuum sealer as a toy. Close supervision is required when being used
near or by children.
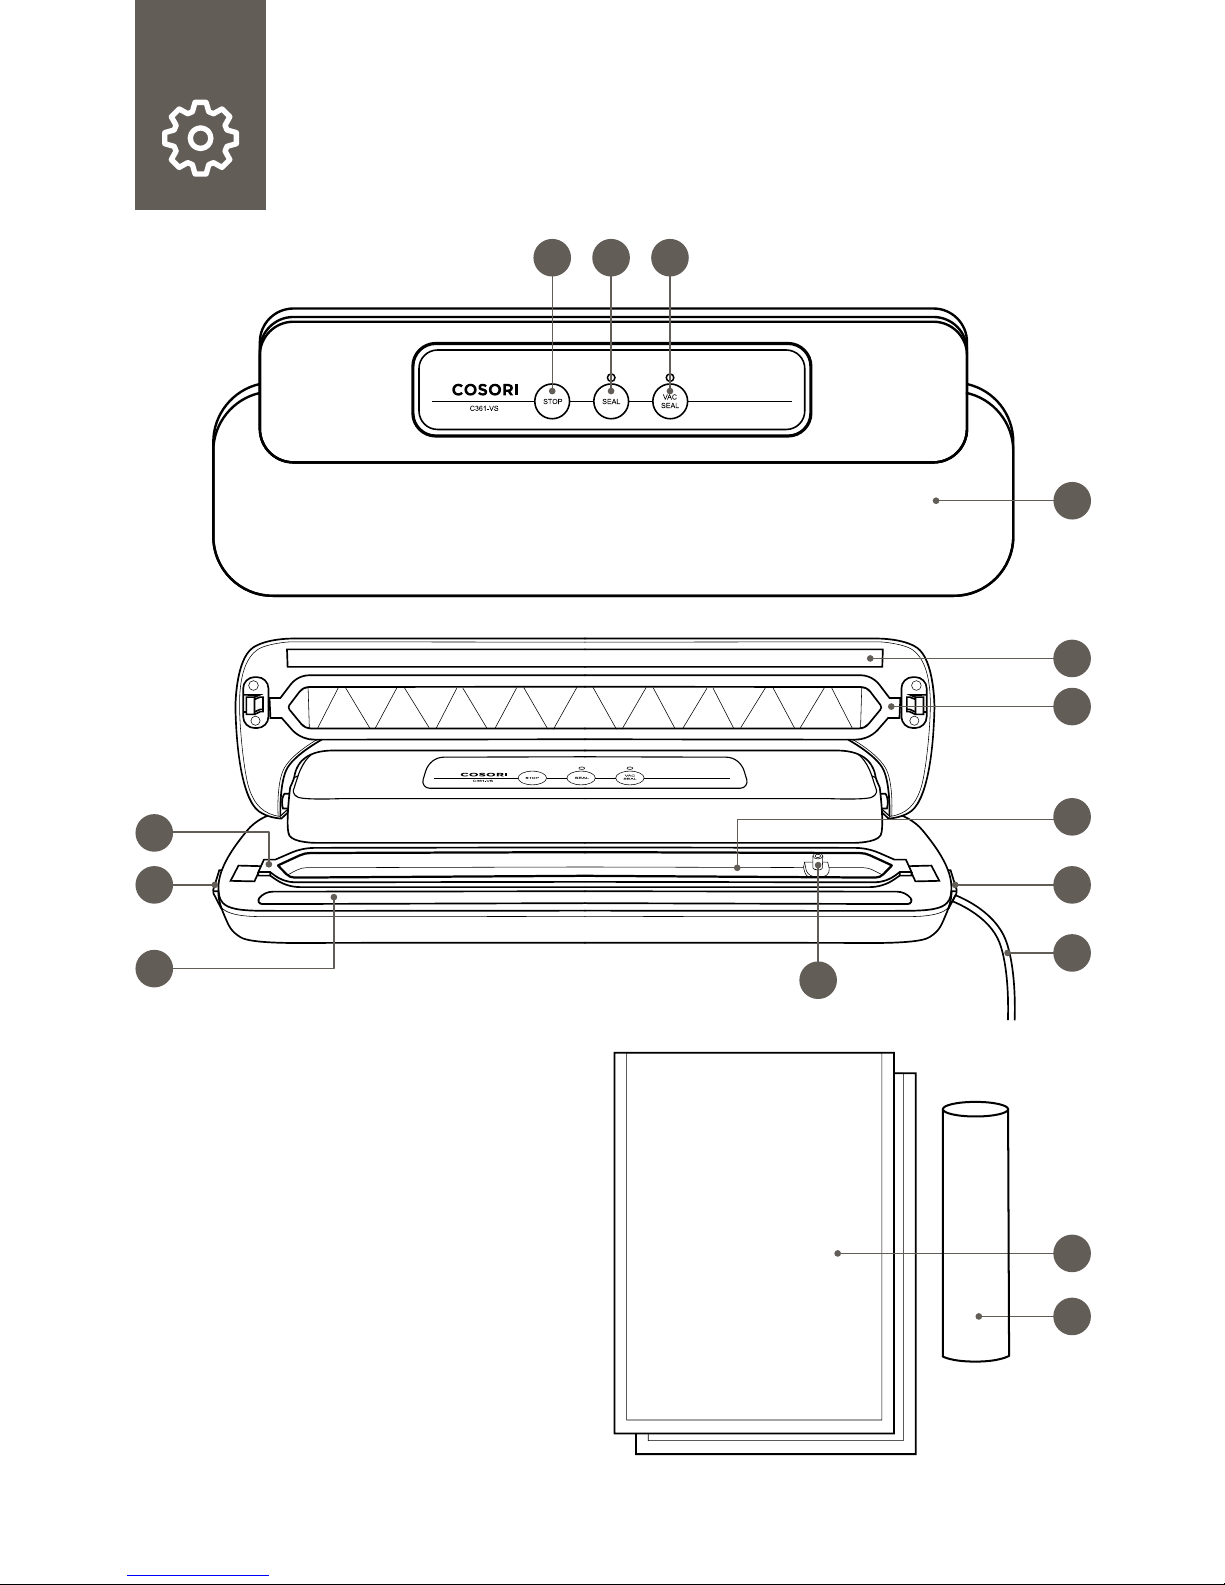
• This vacuum sealer is compatible with most 8” and 11” vacuum sealer bags and vacuum
sealer bag rolls.
• When sealing multiple bags, allow the vacuum sealer to rest for at least 40 seconds in
between each bag to prevent the device from overheating.
• DO NOT reuse bags after storing raw meats, raw fish, or greasy foods, doing so may result
in contamination and could lead to possible illness.
• DO NOT reuse bags that have been microwaved or simmered. Bags used for cooking
should not be used more than once to help prevent contamination.
• DO NOT vacuum package carbonated or sparkling beverages as gas removal will cause
such liquids to go flat.
SAVE THESE INSTRUCTIONS

4
PRODUCT DIAGRAM
1. Lid
2. Release buttons
3. Vacuum chamber
4. Gasket
5. Rubber sealing lip
6. Sealing bar
7. Vacuum nozzle
8. Stop button
9. Seal button
10. Vacuum/Seal button
11. Power cord
12. Vacuum bags
13. Vacuum bag roll
1
2
7
8 9 10
11
5
4
3
2
4
6
12
13

5
OPERATION
1. Plug in the vacuum sealer and open the lid.
2. Place the opening of the bag on the sealing bar. Do not place the opening into the vacuum
chamber.
3. Close the lid; you should hear 2 clicks that indicate the lid is locked in place.
4. Press the ‘Seal’ button. The ‘Seal’ light will come on while the bag is being sealed, and will
turn off when the process is complete.
5. Press the release buttons on both sides of the vacuum sealer to unlock the lid. Open the lid
and remove the sealed bag.
NOTE:
• The Cosori vacuum sealer is compatible with most 8” and 11” vacuum sealer bags and vacuum sealer bag rolls.
• When sealing multiple bags, allow the vacuum sealer to rest for at least 40 seconds in between each bag to
prevent the device from overheating.
• DO NOT touch the sealing bar immediately after sealing a bag, the bar may still be hot.
Sealing Bags
CLICK!CLICK!

6
1. Plug in the vacuum sealer.
2. Carefully place items into the vacuum bags, ensuring there is at least 2 inches of space
between the bag contents and the opening.
3. Insert the opening of the bag into the vacuum chamber. Ensure that the opening is inside
the chamber or else all of the air will not be vacuumed out of the bag.
4. Close the lid; you should hear 2 clicks that indicate the lid is locked in place.
5. Press the ‘Vac/Seal’ button. The ‘Vac/Seal’ light will come on while the bag is being
vacuum packaged, and will turn off when the process is complete. Please note that the
‘Seal’ light will also come on when the bag is being sealed, and will turn off when the
process is complete.
6. Press the release buttons on both sides of the vacuum sealer to unlock the lid. Open the lid
and remove the sealed bag.
Vacuum Packaging & Sealing
2 in.
CLICK!CLICK!

7
1. DO NOT overfill bags. Always ensure there is at least 2 inches (5 cm) of space left at the
top of the bag.
2. DO NOT reuse bags after storing raw meats, raw fish, or greasy foods, doing so may result
in contamination and could lead to possible illness.
3. DO NOT reuse bags that have been microwaved or simmered. Bags used for cooking
should not be used more than once to help prevent contamination.
4. DO NOT vacuum package carbonated or sparkling beverages as gas removal will cause
such liquids to go flat.
5. Ensure that the opening of the bag is not wet. Wet bags may be difficult to properly seal.
6. Vacuum sealing foods can not completely replace refrigeration or freezing. Perishable
foods need to be refrigerated or frozen.
7. Flatten the opening of the plastic bag before sealing or vacuum packaging. Ensure that no
foreign objects or folds are on the bag, otherwise it will cause the bag to tear or leak during
sealing.
8. When vacuum sealing bulky items, gently stretch the bag flat while inserting it into vacuum
chamber and hold the bag until the pump begins to work.
9. Pre-freeze fruits and blanch vegetables before vacuum sealing for best results.
10. Bags used to store dried or fresh fruits, nuts, grains, and vegetables can be washed and
reused.
11. When vacuum sealing multiple bags, allow the vacuum sealer to rest for 40 seconds
between each bag.
12. If you are unsure whether your bag was sealed properly, reseal the bag about ¼ inch above
the first seal.
HELPFUL TIPS

8
CARE & MAINTENANCE
• Unplug the vacuum sealer before cleaning.
• DO NOT immerse the appliance in water or other liquids.
• DO NOT use abrasive cleaners on the vacuum sealer.
• With the vacuum sealer unplugged, wipe the outside of of the vacuum sealer with a damp
cloth; if necessary, use a sponge with mild soap. Dry the appliance with a clean cloth
immediately after.
• Clean the vacuum chamber by wiping away any food or liquid with a clean, damp cloth.
• Thoroughly dry all parts before using again or storing.

9
TROUBLESHOOTING
Nothing happens when I try to vacuum a package:
Air is still in the bag after sealing:
Air has re-entered a vacuumed sealed bag:
The bag melts before vacuuming or sealing:
1. Check if the power cord is properly plugged into an electrical outlet.
2. Check if the power cord is damaged. Discontinue use immediately if cord is damaged.
3. Check if the electrical outlet is working by plugging in another appliance.
4. Make sure the light is securely closed.
5. Make sure the bag is correctly placed inside the vacuum chamber.
6. When sealing multiple bags, allow the vacuum sealer to rest for at least 40 seconds in
between each bag to prevent the device from overheating.
1. Make sure the opening of the bag is placed entirely inside the vacuum chamber.
2. If air still remains in the bag after being vacuumed, examine if the bag for leaks.
Alternatively, you can immerse the bag in a bowl of water and look for any air bubbles
coming out of the bag.
3. If you are using a vacuum sealer bag with a customized size, check the seal on the bag. A
wrinkle along the seal may cause the bag to leak. Cut off the wrinkled seal and reseal the
bag.
4. DO NOT attempt to make your own side seams for a vacuum sealer bag, these bags are
manufactured with special side seams. Creating your own side seams may cause the bag
to leak.
1. Sometimes moisture or food (such as juices, grease, crumbs, powders, etc.) along the seal
prevents the bag from being sealed properly. Cut the old seal off the bag, wipe the top part
of the bag dry, then reseal.
2. Vacuuming sharp foods (i.e. dry pasta, bones) may cause the bags to tear. Cover sharp food
items with cushioning such as tissues or paper towels when vacuum sealing.
3. Fermentation or the release of other natural gases from the foods may have occurred. The
food may have begun to spoil and should be discarded.
The rubber sealing lip may have become hot from excessive use. If this happens, wait at least 5
minutes for the vacuum sealer to completely cool down before vacuum packaging another item.

10
SPECIFICATIONS
Power supply: AC 220V/50-60Hz
Rated power: 110W
Sealing Time: 6~10 seconds
Vac/Sealing Time: 10~20 seconds
Vacuum power: -0.8 bar
Size: 14.5 x 5.1 x 2.5 in. ( 370 x 132 x 65 mm)
Weight: 2 lb (0.95 kg)
1 x Cosori Slim Vacuum Sealer
5 x Vacuum Sealer Bags (size is 20*30cm W*L)
1 x Vacuum Sealer Roll (size is 20*200cm W*L)
1 x User manual
Package Contents

11
WARRANTY
Cosori warrants all products to be of the highest quality in material, craftsmanship and
service for a minimum of 1 year, effective from the date of purchase. Warranty lengths may
vary between product categories. Cosori will replace any product found to be defective due
to manufacturer flaws based on eligibility; refunds are available within the first 30 days of
purchase. This warranty extends only to personal use and does not extend to any product that
has been used for commercial, rental, or any other use in which the product is not intended for.
There are no warranties other than the warranties expressly set forth with each product.
This warranty is non-transferrable. Cosori is not responsible in any way for any damages,
losses or inconveniences caused by equipment failure or by user negligence, abuse, or use
noncompliant with the user manual or any additional safety, use, or warnings included in the
product packaging and manual.
This warranty does not apply to the following:
Damage due to abuse, accident, alteration, misuse, tampering or vandalism.
Improper or inadequate maintenance.
Damage in return transit.
Unsupervised use by children under 18 years of age.
Cosori and its subsidiaries assume no liability for damage caused by the use of the product
other than for its intended use or as instructed in the user manual. Some states do not allow
this exclusion or limitation of incidental or consequential losses so the foregoing disclaimer
may not apply to you. This warranty gives you specific legal rights and you may also have other
rights which may vary from state to state.
ALL EXPRESSED AND IMPLIED WARRANTIES, INCLUDING THE WARRANTY OF
MERCHANTABILITY, ARE LIMITED TO THE PERIOD OF THE LIMITED WARRANTY.
Should your product prove defective within the specified warranty period, please return the
defective unit in its original packaging with (1) an original copy of the invoice, (2) your order
confirmation number, (3) and your warranty ID number.
To find out more about extending your warranty, visit www.cosori.com/warranty or contact
customer support.
Date of Purchase: ____________________
Purchased From: ____________________
Order Number: ____________________
Terms & Policy

12
CUSTOMER SUPPORT
Should you encounter any issues or have any questions regarding your new product, feel free
to contact our helpful Customer Support Team. Your satisfaction is ours.
Cosori Corporation
1202 N Miller St. Suite A
Anaheim, CA 92806
Phone: (888) 402-1684
Email: [email protected]
Monday - Friday: 9:00 am - 5:00 pm PST
CUSTOMER SUPPORT
SUPPORT HOURS
*Please have your order number ready before contacting customer support.


14
Questions or Concerns?
Please contact us Mon - Fri 9:00 AM - 5:00 PM PST
Table of contents
Other Cosori Kitchen Appliance manuals

Cosori
Cosori CFD-N051-W User manual

Cosori
Cosori CP267-FD User manual

Cosori
Cosori CP267-FD User manual

Cosori
Cosori CO165-FD User manual

Cosori
Cosori Premium Pro CFD-P101-SUS User manual

Cosori
Cosori CP267-FD User manual

Cosori
Cosori CP267-FD User manual

Cosori
Cosori CO165-FD User manual

Cosori
Cosori CP267-FD-RXS User manual

Cosori
Cosori CFD-N051-W User manual