Cosori CFD-N051-W User manual

Model: CFD-N051-W
Pioneer 5-Tray Food Dehydrator
User Manual
Questions or Concerns?
Mon–Fri, 9:00 am–5:00 pm PST/PDT

2
join
join
enjoy
enjoy
explore
explore
the Cosori Cooks Community on Facebook
facebook.com/groups/cosoricooks
weekly, featured recipes
made exclusively by our in-house chefs
our recipe gallery
www.cosori.com/recipes
(We hope you love our new food dehydrator as much as we do.)
Our helpful, in-house chefs are ready to assist
you with any questions you might have!
On behalf of all of us at Cosori,
CONTACT OUR CHEFS
Email: [email protected]
Toll-Free: (888) 402-1684
M-F, 9:00 am–5:00 pm PST/PDT

3
Table of Contents Package Contents
Specifications
Package Contents
Specifications
Important Safeguards
Getting to Know Your Dehydrator
·Food Dehydrator Diagram
Control Panel
Before First Use
Using Your Dehydrator
·Operation
·Overheat Protection
·Tips
Care & Maintenance
Troubleshooting
Warranty Information
Customer Support
3
3
4
6
6
7
7
8
8
9
9
10
11
13
14
Power Supply AC 120V, 60Hz
Rated Power 350W
Temperature
Range 95°–165°F / 35°–73°C
Product Size 12 × 12 × 9 in /
30.8 × 30.8 × 23 cm
1 ×Pioneer 5-Tray Food Dehydrator
5 ×Trays
1 ×Recipe Book
1 ×User Manual

44
Always follow basic safety precautions when using your dehydrator.
Read all instructions.
General Safety
• Do not touch hot surfaces.
• Do not immerse cord, plug, or base in water or other liquid.
• Closely supervise children near the dehydrator.
• Unplug when not in use, and before cleaning. Allow to cool before putting on or
taking o parts.
• Do not use dehydrator if it is damaged, not working, or if the cord or plug is
damaged. Contact Customer Support (page 14).
• Using third-party parts or accessories may cause injuries.
• Do not use outdoors.
• Do not place on a stove, near gas or electric burners, or in a heated oven.
• Be extremely cautious when moving the dehydrator if it contains hot liquids, and
when removing trays if they contain hot liquids.
• Do not clean base with metal scouring pads. Metal fragments can break o the pad
and touch electrical parts, creating a risk of electric shock.
• Do not run the dehydrator for more than 48 hours at a time. After 48 hours, unplug
and allow to cool for 2 hours before using again.
• Do not allow liquids to drip into the vents in the base of the dehydrator.
• Not for commercial use. Household use only.
• Only use the dehydrator as directed in this manual.
IMPORTANT SAFEGUARDS
READ AND SAVE
THESE INSTRUCTIONS

55
Power & Cord
• Do not let cord (or any extension cord) hang over the edge of a table or counter, or
touch hot surfaces.
• This dehydrator has a polarized plug (one prong is wider than the other), which fits
into a polarized outlet only one way. If the plug does not fit, reverse the plug. If it still
does not fit, do not use the plug in that outlet. Do not alter the plug in any way.
• This dehydrator uses a short power-supply cord to reduce the risk of entangling or
tripping. Use extension cords with care.
• The marked electrical rating of an extension cord should be at least as high as the
rating of the dehydrator (page 3).
• Your dehydrator should only be used with 120V, 60Hz electrical systems. Do not plug
into another type of outlet. If you try to use the dehydrator with a higher voltage, the
display will show an E4 error.
220-240V
120V, 60Hz
IMPORTANT SAFEGUARDS (CONT.)

6
Your Cosori Dehydrator features an automatic fan, which circulates warm air to evenly dry
food. Dried foods are a great treat to snack on because they keep almost all their nutritional
value and flavor. Dehydrating is the perfect way to preserve snacks, fruit, vegetables, bread,
and even flowers.
GETTING TO KNOW YOUR DEHYDRATOR
Food Dehydrator Diagram
E
C
B
F
A
D
A. Base
B. Underpan
C. Control Panel
D. Trays
E. Cover
F. Power Cord

7
CONTROL PANEL
BEFORE FIRST USE
Setting Up
Controls
Sounds
1. Remove all packaging from your dehydrator and its accessories. Make sure
all package contents are included (see page 3).
2. Clean the base and trays with a moistened cloth.
Note:
The trays can be washed in the top rack of a dishwasher only if you
remove them before the drying cycle starts. Do not wash the base in a
dishwasher. Do not immerse the base in water.
3. Place the dehydrator base on a solid, level surface. Plug in. Stack the drying
trays on top of the base.
4. Run the dehydrator for 30 minutes at any temperature, without adding
any food. Make sure that the room has sucient ventilation, in case the
dehydrator produces any smoke or smells. This is normal.
5. Rinse the trays in water. Dry all parts.
Note:
You only need to do this the first time you use the dehydrator.
• To start or stop the dehydrator, press START/STOP.
• To change the temperature, press TEMP/TIME once, then press +or -
• To change the time, press TEMP/TIME a second time, then press +or -
• To turn sounds on/o, wait for the display to show “--:--”, then press and hold +for 5
seconds until the dehydrator beeps 1 time.
Hours Minutes

8
Operation
USING YOUR DEHYDRATOR
1. Place food on trays. The trays can hold up to 1.1 lb (0.5 kg) of food. Place food on the bottom
tray first, and use the top tray last. Be careful not to overload the trays.
Note:
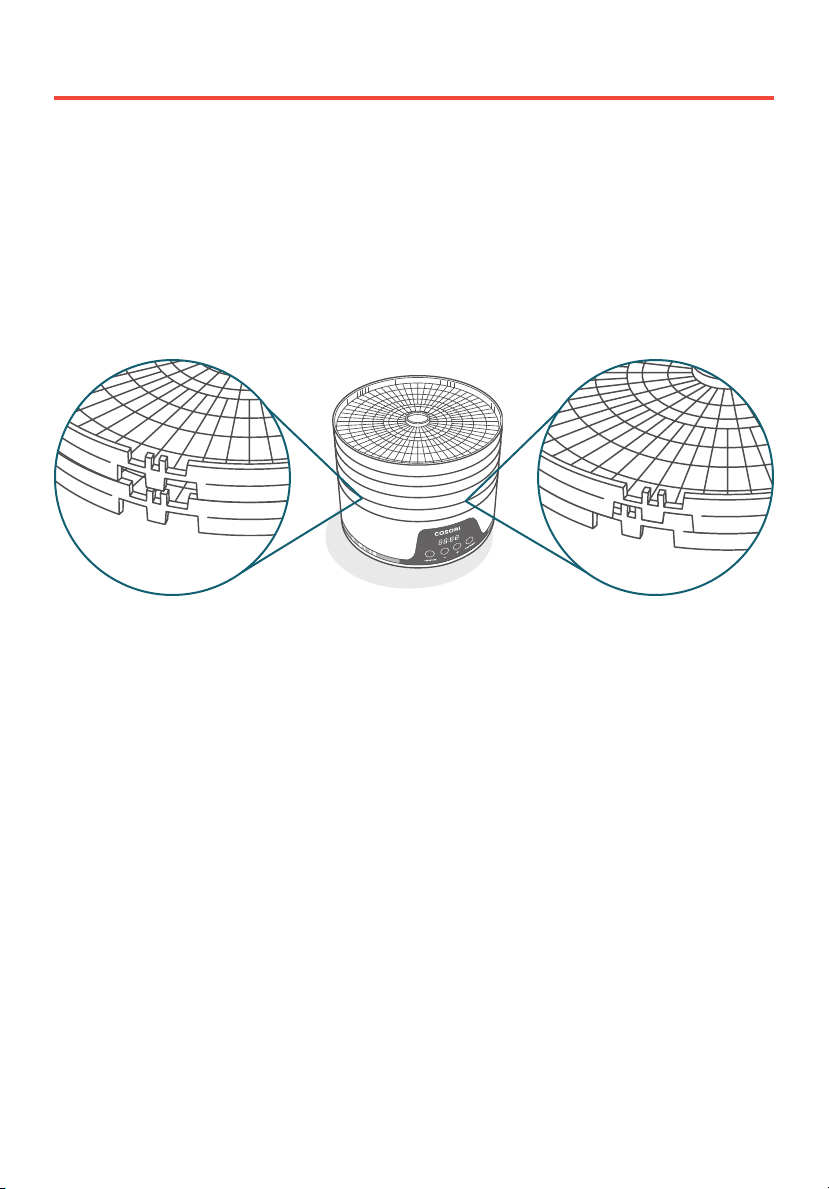
The trays can be rotated to provide more spacing between each tray.
[
Figure1.1
]
Note:
Use the dehydrator in a warm, dry room. Depending on humidity in the air and moisture
in the food, dehydration time may vary.
2. Plug in. The dehydrator will beep, and the display will show “88:88”. The dehydrator will
switch to standby mode after 3 seconds, and the display will show “--:--”.
3. Press TEMP/TIME to choose temperature. The temperature will blink on the display, and
the +and –buttons will light up. Use +or –to change the temperature (95°—165°F).
Note:
Temperature changes in 1°F increments. Press and hold
+or –
to change the
temperature rapidly.
4. Press TEMP/TIME again to choose time. The time will blink on the display, and the +and –
buttons will light up. Use +or –to change the time (0:30–48:00).
Note:
Time changes in 30 minute increments. Press and hold
+or –
to change the time rapidly.
5. Press START/STOP to start dehydrating. The dehydrator will start heating. START/STOP
will stay lit, and the other buttons will turn o. Temperature and time will cycle on the
display every 3 seconds.
Note:
If you press START/STOP again to stop dehydration, the timer countdown will reset
and the dehydrator will go into standby mode.
6. Optionally, you can change the time and temperature at any time by pressing TEMP/TIME.
7. When the timer finishes, the display will show “End” and heat will turn o. The dehydrator
will beep 5 times, and the fan will continue running for 5 seconds before stopping.
Note:
The dehydrator will always remember your previous temperature and time settings.
Figure 1.1

9
Overheat Protection
Tips
USING YOUR DEHYDRATOR (CONT.)
• Overheating is extremely rare. If the dehydrator overheats, it will automatically shut down as
a safety feature, and will no longer turn on. Contact Customer Support (page 14).
• Fruit and vegetables dried in your food dehydrator will look dierent from those sold in
stores. This is because homemade dried foods do not use preservatives, artificial coloring, or
artificial additives.
• Check out the Recipe Book for many more tips on dehydrating foods.

10
CARE & MAINTENANCE
1. Unplug the dehydrator and allow it to
cool before cleaning.
2. If you used a recipe that left traces of
liquid or other residue, use paper towels
to wipe down the trays before cleaning.
3. Soak trays in hot soapy water for easy
removal of food residue.
4. Use a soft brush to clean the trays.
Note: The trays can be washed in
the top rack of a dishwasher only if
you remove them before the drying
cycle starts. Do not wash the base in
a dishwasher. Do not immerse the
base in water.
5. Clean the surface of the dehydrator
base with a damp cloth.
6. Dry all parts before storing or using
the dehydrator.
7. When storing, turn the base upside
down and wrap the cord around the
center of the base. Secure the cord
under the clips. [
Figure 2.1
]
8. Set the base back upright and stack the
trays on top of the dehydrator as normal.
Figure 2.1
Note: Do not clean any part of the dehydrator with abrasive chemicals, as this
will damage the surface.

11
TROUBLESHOOTING
Problem Possible Solution
The dehydrator will not turn
on, or the fan is not working.
Unplug the dehydrator and plug it in again.
The dehydrator may be damaged or malfunctioning.
Contact Customer Support (page 14).
“E1”, “E2”, or “E3” appears on
the display.
The dehydrator may be damaged or malfunctioning.
Contact Customer Support (page 14).
“E4” appears on the display.
The dehydrator is being used at a voltage that is too
high (such as 220–240V). Unplug and use at a voltage
of 120V, 60Hz.
Foods are dried unevenly.
Food placed in the lower trays will cook faster. Rotate
the trays every few hours.
Cut foods evenly to ensure that they all finish drying at
the same time.
Follow the recipes and tips in the Recipe Book.

12
FEDERAL COMMUNICATION
COMMISSION INTERFERENCE
STATEMENT
This device complies with Part 15 of the FCC Rules. Operation is subject to the following two
conditions:
(1) This device may not cause harmful interference, and
(2) This device must accept any interference received, including interference that may cause
undesired operation.
NOTE: This equipment has been tested and found to comply with the limits for a Class B digital
device, pursuant to Part 15 of the FCC Rules. These limits are designed to provide reasonable
protection against harmful interference in a residential installation. This equipment generates,
uses and can radiate radio frequency energy and, if not installed and used in accordance with
the instructions, may cause harmful interference to radio communications. However, there is no
guarantee that interference will not occur in a particular installation. If this equipment does cause
harmful interference to radio or television reception, which can be determined by turning the
equipment o and on, the user is encouraged to try to correct the interference by one or more of
the following measures:
• Reorient or relocate the receiving antenna.
• Increase the separation between the equipment and receiver.
• Connect the equipment into an outlet on a circuit dierent from that to which the
receiver is connected.
• Consult the dealer or an experienced radio/TV technician for help.
FCC Caution: Any changes or modifications not expressly approved by the party responsible for
compliance could void the user’s authority to operate this equipment.

13
WARRANTY INFORMATION
Product Name Pioneer 5-Tray Food
Dehydrator
Model CFD-N051-W
For your own reference, we strongly recommend
that you record your order ID and date of purchase.
Order ID
Date of Purchase
TERMS & POLICY
Arovast Corporation (“Arovast”) warrants this
product to the original purchaser to be free from
defects in material and workmanship, under
normal use and conditions, for a period of 2 years
from the date of original purchase.
Arovast agrees, at our option during the warranty
period, to repair any defect in material or
workmanship or furnish an equal product in
exchange without charge, subject to verification of
the defect or malfunction and proof of the date of
purchase.
There is no other express warranty. This warranty
does not apply:
• If the product has been modified from its
original condition;
• If the product has not been used in
accordance with directions and instructions
in the user manual;
• To damages or defects caused by accident,
abuse, misuse or improper or inadequate
maintenance;
• To damages or defects caused by service
or repair of the product performed by an
unauthorized service provider or by anyone
other than Arovast;
• To damages or defects occurring during
commercial use, rental use, or any use for
which the product is not intended;
• To damages or defects exceeding the cost of
the product.
Arovast will not be liable for indirect, incidental, or
consequential damages in connection with the use
of the product covered by this warranty.
This warranty extends only to the original
consumer purchaser of the product and is not
transferable to any subsequent owner of the
product regardless of whether the product is
transferred during the specified term of the
warranty.
This warranty does not extend to products
purchased from unauthorized sellers. Arovast’s
warranty extends only to products purchased
from authorized sellers that are subject to Arovast’s
quality controls and have agreed to follow its
quality controls.
All implied warranties are limited to the period of
this limited warranty.
This warranty gives you specific legal rights
and you may also have other rights which vary
from state to state. Some states do not allow
the exclusion or limitation of incidental or
consequential damages, so the above limitation or
exclusion may not apply to you.
If you discover that your product is defective within
the specified warranty period, please contact
NOT dispose of your product before contacting us.
Once our Customer Support Team has approved
your request, please return the product with a copy
of the invoice and order ID.
Every Cosori product automatically includes a
2-year warranty. To make the customer support
process quick and easy, register your product
online at www.cosori.com/warranty.
This warranty is made by:
Arovast Corporation
1202 N. Miller St., Suite A
Anaheim, CA 92806

14
CUSTOMER SUPPORT
If you have any questions or concerns about your new product, please contact our
helpful Customer Support Team.
*Please have your order invoice and order ID ready before contacting Customer Support.
Arovast Corporation
1202 N. Miller St., Suite A
Anaheim, CA 92806
Email: [email protected]
Toll-Free: (888) 402-1684
Support Hours
Mon–Fri, 9:00 am–5:00 pm PST/PDT

We hope this manual has been helpful. We can’t wait to see your beautiful
results, and we think you’ll want to share glam shots! Our community
awaits your uploads—just pick your platform of choice below. Snap, tag,
and hashtag away, Cosori chef!
@cosoricooks
Cosori Appliances
#iCookCosori
Considering what to cook? Many recipe ideas are available,
both from us and the Cosori community.
SHOW US WHAT YOU’RE MAKING

Questions or Concerns?
Mon - Fri 9:00 AM - 5:00 PM PT
A1-01.01_S_21H02 US
Other manuals for CFD-N051-W
2
Table of contents
Other Cosori Kitchen Appliance manuals

Cosori
Cosori CO162-CWM User manual

Cosori
Cosori CP267-FD User manual

Cosori
Cosori CP001-SC User manual

Cosori
Cosori Premium Pro CFD-P101-SUS User manual

Cosori
Cosori CP267-FD-RXS User manual

Cosori
Cosori CO165-FD User manual

Cosori
Cosori C361-VS User manual

Cosori
Cosori CP267-FD User manual

Cosori
Cosori CP267-FD User manual

Cosori
Cosori CO165-FD User manual