Welcome to visit our website and purchase our quality products!
Reward Points
Exclusive Customer Service
Permanent Shopping Cart
Order History
this product and giving us valuable feedbacks.
www.costway.com
Your suggestions and comments for COSTWAY are really important to us!
We sincerely solicit you to go back to our shop and leave a good rating in just a
simple click. It would be quite encouraging if you could kindly do so like below:
February 24, 2019
Great products so far. Fast delivery, easy setup, and working without any issues.
Great products so far
With your inspiring rating, COSTWAY will be more consistent to offer you
EASY SHOPPING EXPERIENCE, GOOD PRODUCTS and EFFICIENT SERVICE!
US office: Fontana, California
UK office: Ipswich
7
www.costway.com
6
www.costway.com
Use and Care
Curing Your Smoker
1. Before first use and after cleaning, apply a light coat of vegetable oil or vegetable cooking spray to the interior surface of the dome lid,
cooking grills and water pan. This simple process will help reduce interior rusting. DO NOT apply oil to the charcoal pan.
2. Charcoal lighting fluid must be allowed to burn off prior to closing dome lid (approximately 20 minutes). Failure to do this could
trap fumes from charcoal lighting fluid in smoker and may result in a flash-fire or explosion when lid is opened.
3. With coals burning hot in charcoal pan, close dome lid.
Lighting
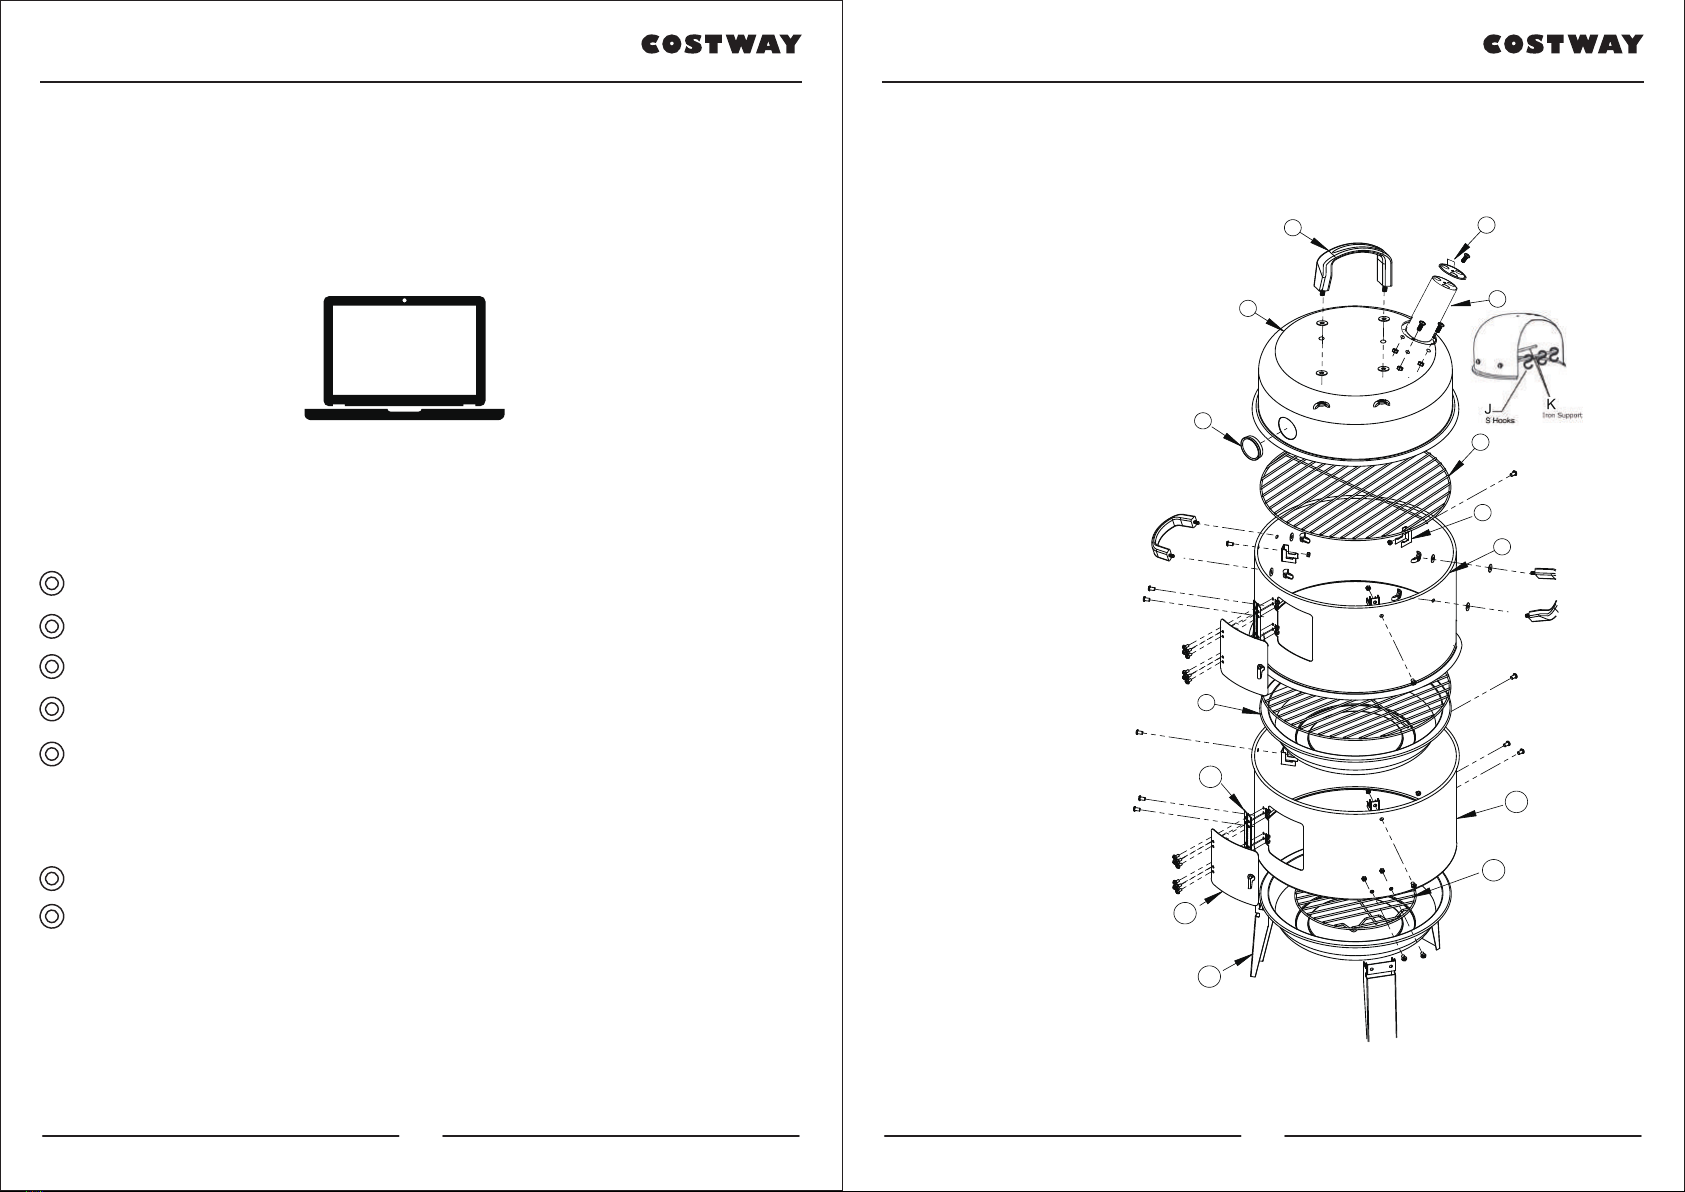
1. Remove dome lid, upper layer body, water pan, cooking grills and set aside.
2. Make sure the charcoal pan is resting securely on the notched out step of all three legs.
WARNING: Never use charcoal that has been pre-treated with lighter fluid. Use only high grade plain charcoal or charcoal/wood mixture.
3. Use charcoal lighting fluid approved for lighting charcoal ONLY. Do not use gasoline, kerosene or alcohol for lighting charcoal.
Place 8-10 pounds of high quality charcoal in charcoal pan.
4. Saturate charcoal with lighting fluid and wait 2 to 3 minutes for fluid to soak in. Store charcoal lighting fluid safely away from smoker.
5. Carefullly light the charcoal and allow to burn until covered with a light ash prior to closing door and placing upper layerbody and dome
lid on smoker. This will allow charcoal lighting fluid to burn off.
6. Dried aromatic wood chips or chunks should be saturated with water, so that when placed directly on hot charcoal briquets,
a smoldering smoke will result.
7. Place the upper layer body on top of the lower layer body. Place water pan on the support brackets of the lower layer body.
Make sure water pan is resting securely on notched out step of all three support brackets.
8. Carefully fill water pan with warm water or marinade to 1”below the rim. A full pan holds 4 quarts/1 gallon of water and will
last 2-3 hours. Do not overfill and allow water to overflow from water pan.
9. Place a cooking grill on the lower support brackets directly on top of the water pan.
10. Place food on the cooking grill in a single layer with space between each piece.
11. Place the other cooking grill on the upper support brackets of the upper layer body, position the grill so the rim is resting
securely on notched out step of all three support brackets. Place food on the cooking grill.
12. Place the dome lid on smoker body and allow food to cook.
13. After 2-3 hours of cooking, check water & charcoal levels by following instructions in the”adding water during cooking and
adding charcoal/wood during cooking” section of this manual.
14. The smoker can be used without using the water pan and upper layer body. Place the charcoal pan in position and light as
per the instructions above. Place the cooking grill on the lower support brackets of the lower layer body.
15. Always use a meat thermometer to ensure food is fully cooked before removing from smoker.
Adding Charcoal/Wood During Cooking
1. Remove dome lid by tilting it toward you to allow heat and steam to escape away from your face.
Use caution as flames can flare up when thery come into contact with fresh air.
2. Stand back a safe distance and carefully open door.
CAUTION : When the smoker is in use, the door will be very hot. Wear oven mitts and use caution when touching the door.
3. Use long cooking tongs to lightly brush ashes off hot coals. Use tongs to add charcoal and/or wood, being careful not to stir-up
WARNING : Never add charcoal lighting fluid to hot or even warm coals as flashback may occur causing severe burns.
4. When charcoal is burning hot again, close the door and replace the dome lid.
Adding Water During Cooking
smoker body,
Cook on the grill dicrectly with or without dome lid.
This will allow smoke and moist heat to circulate evenly around all pieces.
ahses and sparks.
1. Remove dome lid by tilting toward you to allow heat and steam to escape away from your face. Use caution as flames
contact with fresh air. Inspect the water level in pan.
2. If water level is low, add water to water pan. If food is on top cooking grill only, water may be added to the water pan by moving food aside on
cooking grill and pouring water down through the cooking grill. Fill water pan to 1” below the rim. Pour slowly to avoid splashing or over-filling.
If using both cooking grills, wear oven mitts to remove food and the top cooking grill. Move food aside on lower cooking grill and
pour water through the lower cooking grill into water pan. Pour slowly to avoid splashing or over-filling.
can flare up when they come into