logo
Brands
  1. Home
  2. •
  3. Brands
  4. •
  5. Costway
  6. •
  7. Swimming Pool
  8. •
  9. Costway NP10424 User manual

Costway NP10424 User manual

Other Costway Swimming Pool manuals

Costway NP10336 User manual

Costway

Costway NP10336 User manual

Costway NP10374 User manual

Costway

Costway NP10374 User manual

Popular Swimming Pool manuals by other brands

Piscine Solide V35018 installation manual

Piscine Solide

Piscine Solide V35018 installation manual

Bestway STEEL PRO 56545 owner's manual

Bestway

Bestway STEEL PRO 56545 owner's manual

Bestway 52385E owner's manual

Bestway

Bestway 52385E owner's manual

GardiPool Quatroo 300x500 manual

GardiPool

GardiPool Quatroo 300x500 manual

Vogue V31039 instruction manual

Vogue

Vogue V31039 instruction manual

Intex PureSpa SC-10 user manual

Intex

Intex PureSpa SC-10 user manual

Intex 128912GH manual

Intex

Intex 128912GH manual

GRE KPCOR60 instruction manual

GRE

GRE KPCOR60 instruction manual

GRE Marbella instruction manual

GRE

GRE Marbella instruction manual

Intex 126384GS owner's manual

Intex

Intex 126384GS owner's manual

Piscine Solide V35038 installation manual

Piscine Solide

Piscine Solide V35038 installation manual

Coleman Power Steel 90387E owner's manual

Coleman

Coleman Power Steel 90387E owner's manual

Wilbar Mediterranean V35041 installation manual

Wilbar

Wilbar Mediterranean V35041 installation manual

GRE PBT201 Assembly instructions

GRE

GRE PBT201 Assembly instructions

Endless Pools SwimCross owner's manual

Endless Pools

Endless Pools SwimCross owner's manual

GRE Vermela instruction manual

GRE

GRE Vermela instruction manual

Polygroup Funsicle Oasis Pool user guide

Polygroup

Polygroup Funsicle Oasis Pool user guide

GRE Mango instruction manual

GRE

GRE Mango instruction manual

https://manuals.online logo
https://manuals.online logoBrands
  • About & Mission
  • Contact us
  • Privacy Policy
  • Terms and Conditions

Copyright 2025 Manuals.Online. All Rights Reserved.

Please give us a chance to make it right and do better !
Contact our friendly customer service department for help first.
Replacements for missing or damaged parts will be shipped ASAP !
Contact Us!
Do NOT return this item.
Above Ground Swimming Pool
NP10424
USER’S MANUAL
THIS INSTRUCTION BOOKLET CONTAINS IMPORTANT SAFETY INFORMATION. PLEASE READ AND KEEP FOR FUTURE REFERENCE.
US office: Fontana UK office: Ipswich AU office: Truganina
DE office: Hamburg
FR office: Saint Vigor d'Ymonville
PL office: Gdańsk
US:cs.us@costway.com
UK:cs.uk@costway.com
AU:[email protected]
Before You Start
Please read all instructions carefully.
Retain instructions for future reference.
Separate and count all parts and hardware.
Read through each step carefully and follow the proper order.
We recommend that, where possible, all items are assembled
near to the area in which they will be placed in use, to avoid
moving the product unnecessarily once assembled.
Always place the product on a flat, steady and stable surface.
Keep all small parts and packaging materials for this product
away from babies and children as they potentially pose a serious
choking hazard.
02 03
PARTS REFERENCE
FOR ABOVE GROUND SWIMMING POOL
SIZE: 142* 30 INCH
NOTE: Drawings for illustration purpose only. Actual product may vary.
Not to scale.
04 05
REF. NO
1
2
3
4
5
6
7
8
9
10
SIZE: 142* 30 INCH
10
10
10
10
10
1
1
3
3
1
DESCRIPTION
J-SHAPED HORIZONTAL BEAM
VERTICAL LEG
END CAP
PIN
LEG CAP
POOL LINER(DRAIN VALVE CAP INCLUDED)
BELT
STRAINER HOLE PLUG
FILTER MASK
DRAIN CONNECTOR
POOL SETUP
Before assembling your product, please take a few minutes to check the
contents and become familiar with all the parts.
WARNING · DO NOT overfill the pool or allow people to lay over or
sit on pool wall - DOING so CAN CAUSE PERMANENT INJURY!DRAIN pool to
the proper level after a heavy rain.
TIP: It will be much easier to install your pool if you unfold it and let it lay
in direct sunlight for about 2 hours prior to installation. This will help to
ensure a wrinkle-free fit because the pool material will be more pliable
allowing it to form into shape during installation.
WARNING -VERY IMPORTANT! SITE MUST BE LEVEL, STABLE,
COMPACTED SOIL.
- The pool must be assembled on a smooth and level site of firm soil that
is free of stones, gravel, sticks, blacktop, or other oil base compounds.
- Before setting up your pool, it is recommended that you clear the area of
hard grasses. Certain types of vigorous grasses such as St. Augustine and
Bermuda can grow through the liner. A ground cloth or tarp may be helpful
in preventing this from occurring.
- Do not install pool on a wooden deck or any type of wooden surface. You
cannot use sand and/or uncompacted soil to provide a level surface for this
pool; it will only wash out.
-FAILURE TO FOLLOW ALL OF THESE INSTRUCTIONS WILL CAUSE POOL
TO COLLAPSE!
SETUP INSTRUCTIONS
1.Locate a level and flat area to set up the pool. Make sure the ground is
free from stones, branches, or other sharp objects as they may puncture
the pool.
2.Take out the ground cloth and spread it over the cleared area, then take
out the pool liner and spread it over the ground cloth, inspect the seams.
3.lt is recommended to assemble the pool after the pool liner is heated by
the sun.
IMPORTANT: Always set up the pool unit with at least 2 persons. Do not
drag the lineracross the ground as this can cause liner damage and pool
leakage.
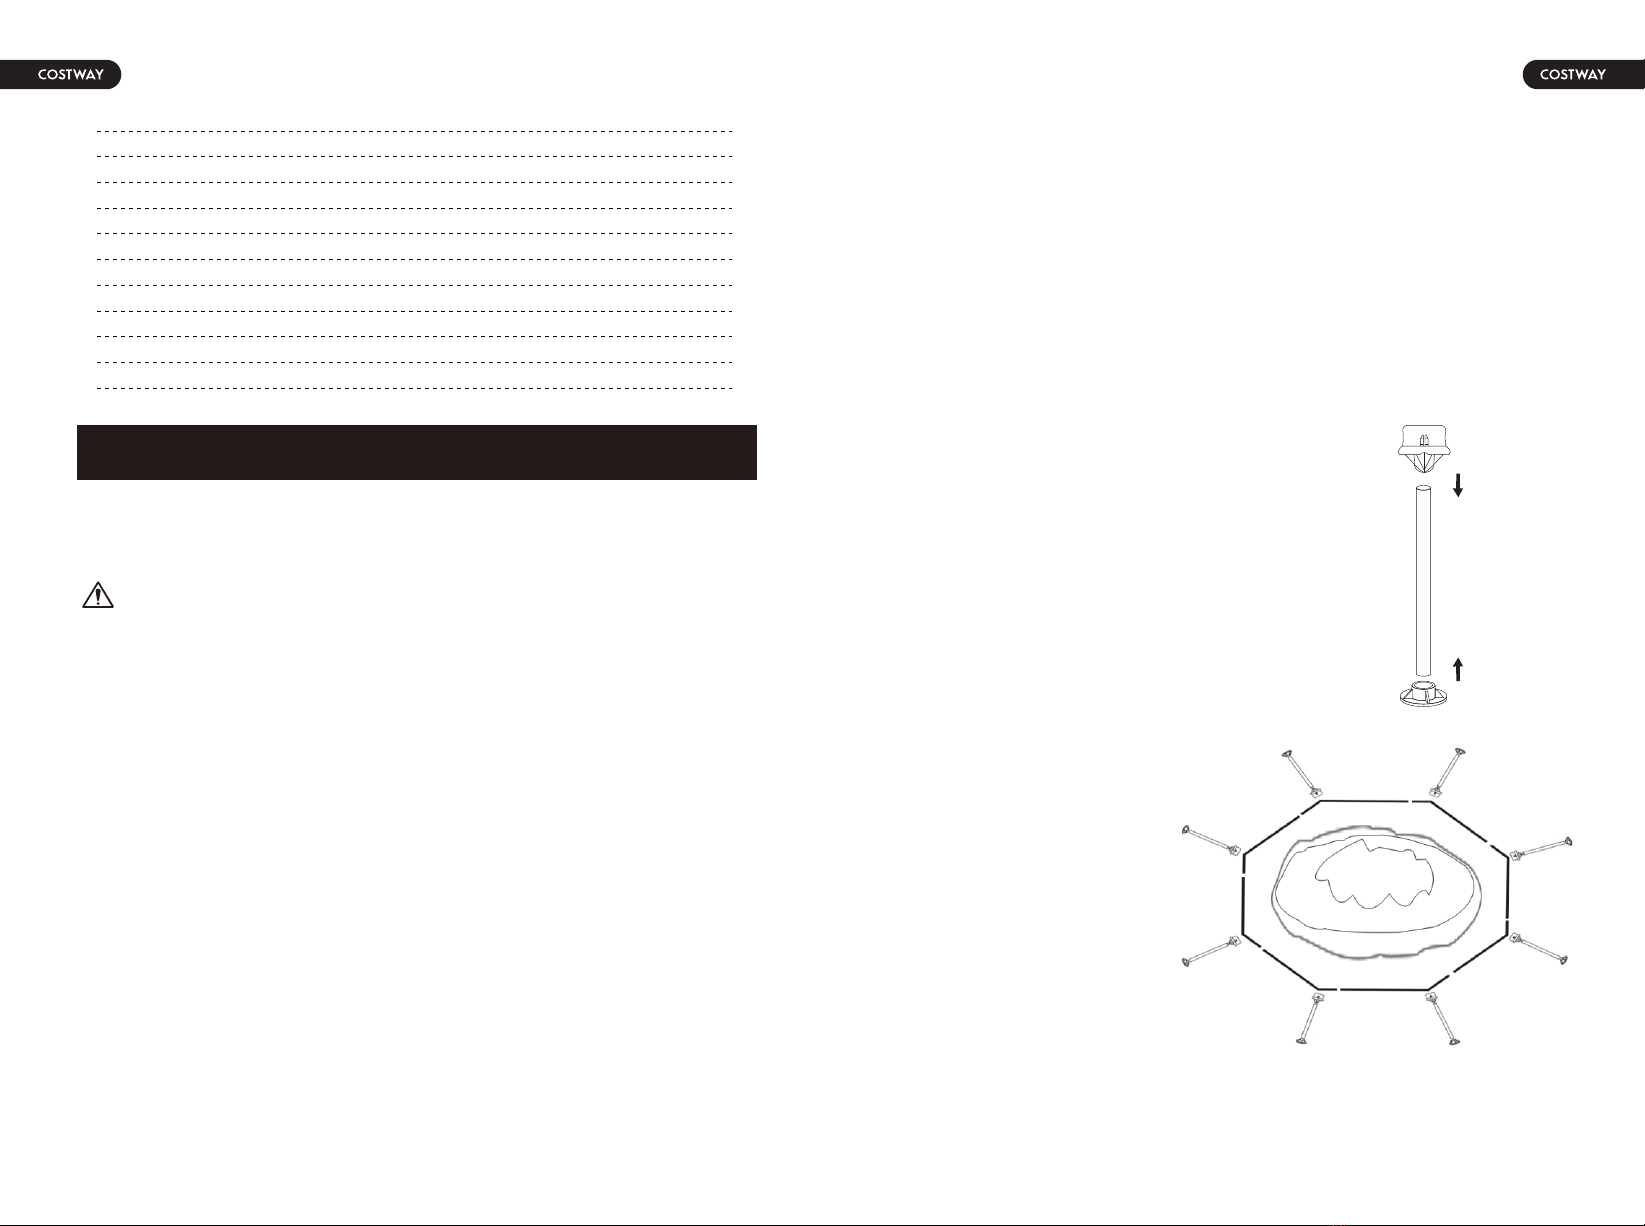
4. Insert the Vertical Legs
into the Leg Caps, then insert
the end cap into the head of
the vertical leg.
5.Lay all parts on the
ground as shown
below. Check the parts
listing and be sure all
the pieces to be
assembled are
accounted for(see
picture).
06 07
6. Carefully slide the J-shaped Horizontal Beams into the sleeves of the
pool.
Connect the j-shaped horizontal beams, rotate the J-shaped horizontal
beams so that the holes are aligned, and insert the plastic pins.
Note: Insert the plastic pins only after all J-shaped horizontal beams have
been connected.
8.Insert the J-shaped vertical
legs with end caps into the
holes at the bend of the
J-shaped horizontal beams.
9.Before filling the pool with water, ensure that the drain plug inside
the pool is closed and that the drain cap on the outside is screwed on
tightly. Fill the pool with no more than 1 inch (2.5 cm) of water. Check
to see whether the water is level.
IMPORTANT: If the water in the pool flows to one side, the pool is not
completely level.
Setting up the pool on unleveled ground will cause the pool to tilt
resulting in the sidewall material to bulge and a potential collapse of
the pool. lf the pool is not completely level, you must drain the pool,
level the area and re-fill the pool, following the above directions.
10.Fill the pool with water up to just below the sleeve line.
IMPORTANT
Before allowing anyone to use the pool, hold a family meeting.
Establish a set of rules that include, at aminimum, the important
safety rules and general aquatic safety information in this
manual. Review these rules on a regular basis and with all users
of the pool, including guests.