manuals.online logo
Brands
  1. Home
  2. •
  3. Brands
  4. •
  5. Cosytoes
  6. •
  7. Thermostat
  8. •
  9. Cosytoes CGW User manual

Cosytoes CGW User manual

12
Gloss Touch-Screen
Stat [CGW/CGB]
Technical Data
Consumption: <2W
Power Supply: 85~265VAC 50/60Hz
Output Switch: Active contact (NO) and pas-
sive contact (NO)
Max. Current: 20Amp MAX (Resistive load)
On/O Dierential Temp: 0.5~5ºC
Transport and Storage
Temp: -20~60ºC
Relative Humidity: 10~90% (No Condensation)
Setting Temp: 5~35ºC/0.5ºC per step
Accuracy: 1ºC
Temp Limitation: 30~60ºC (External Sensor)
Wiring Port: 2.5mm2Max
Working Temp: 0~50ºC
Display Overview
Dimensions
General Settings
Power on/o:
Press POWER to turn on or o.
When the power is o, the display shows “OFF” and the
current time alternatively.
When the power is on, the display shows the set temp and
the current time alternatively.
Adjust the set temperature:
Press UP/DOWN to adjust the temp during manual control
and temporary control modes.
Key-lock function:
In the “ON” state, press and hold SET for 3 seconds until
“LOC” displays. Repeat to unlock the controller.
(Note: If mains power is switched o when in key-lock, when power is switched on
again the power button will not work.)
Time and Week Setting:
Ensure the unit is in the “ON” state.
Press SET and then press UP/DOWN to adjust the
minutes, then press SET to amend the hour, and press
SET to set the day of the week.
Press POWER to save and exit the settings.
Time Program:
Ensure the unit is in the “ON” state.
Press and hold MENU for 3 seconds.
Press UP/DOWN to adjust the time for period 1.
Press MENU again to adjust the related temperature using
UP/DOWN.
Press MENU to adjust the next time period and continue
until all periods are set.
Press POWER to save and exit the settings.
Control Mode:
Press MENU to switch between manual or time program
control modes.
In time control mode, keep pressing UP/DOWN to enter
temporary temperature override mode.
Time Periods Default
Time
Default
Temp
Weekdays
1 06:00
22ºC
2 08:00
3 11:30
4 12:30
5 17:00
6 22:00
Weekend 1 08:00
2 23:00
Period 1 - Wake up
Period 2 - Leave in the morning
Period 3 - Return over lunch
Period 4 - Leave after lunch
Period 5 - Return later afternoon
Period 6 - Sleep
Key-LOC
Manual Control
Day Display
Setting Increase Reduce Menu
Time Control
Power Clock/
Set
OFF
Time Program
Heating
Temperature/
Ambient
Temperature
Temperature
Value
Cosytoes®Gloss Touch-Screen Stat [CGW/CGB]
13
Advanced Settings
Note - These are normally set by technicians during
initial installation.
In the “ON” state, press and hold MENU and then press
POWER for 3 seconds to enter advanced settings.
1 Adj will show on the screen.
1 Adj - Probe temperature compensation
Press UP/DOWN to adjust during range -9~9ºC.
Press MENU to enter the next setting.
2 Sen - Sensor Selection
Press UP/DOWN to choose the sensor.
“IN” = The internal Sensor.
“OU” = The external sensor.
“AL” = Both internal and external sensors. (Note: Use
“OU” for UFH)
Press MENU to enter the next setting.
3 Lit - Limitation temperature of external sensor
Press UP/DOWN to change the limit temperature (35ºC
recommended).
Press MENU to enter the next setting.
4 Dif - Dierential Temp
Press UP/DOWN to adjust the dierential temperature
range 0.5~5ºC.
Press MENU to enter the next setting.
5 Prg - 5+2/6+1/7 or o
Press UP/DOWN to change to 7 day for ease of setting.
Press MENU to enter the next setting.
6 Rle - Leave on 00
Press MENU to enter the next setting.
7 Dly - Leave on 0
Press MENU to enter the next setting.
8 Hit - Max Temp Setting
Press UP/DOWN to adjust the max temp from 35~60ºC
(35ºC recommended)
Press MENU to enter the next setting.
9 LIG - Backlight Setting
Press UP/DOWN to adjust the setting value “ON” or
“OFF”.
Press MENU to enter the next setting.
10 LT - Backlight timer
Press UP/DOWN to set the time for the backlight. It can
be set between 10 and 30 seconds. The default is 15
seconds.
Press MENU to enter the next setting.
11 PE - Button Sound
Press UP/DOWN to adjust the setting value. “ON” means
enable, “OFF” means disable.
Press MENU to enter the next setting.
12 LP - Frost function setting
Press UP/DOWN to adjust the setting value. “ON” means
enable, “OFF” means disable.
Press MENU to enter the next setting.
13 TP - Defrost Temp Setting
Press UP/DOWN to adjust the defrost value at the range of
5ºC to 12ºC.
Press MENU to enter the next setting.
14 SF - ON/OFF state of the thermostat
Press UP/DOWN to change the state of the thermostat.
The default is “ON”.
15 CF - Temperature Unit Setting
Press UP/DOWN to switch the temperature unit.
C = Display temperatures in degrees celsius.
F = Display temperatures in degrees fahrenheit.
16 AFAC - Recover factory settings
Press and hold UP
The symbol “—“ will appear on the screen
Keep holding UP until it changes to “— —“
Press MENU to enter the next setting, or press POWER to
save and exit advanced settings.
Wiring Diagrams
Installation Diagrams
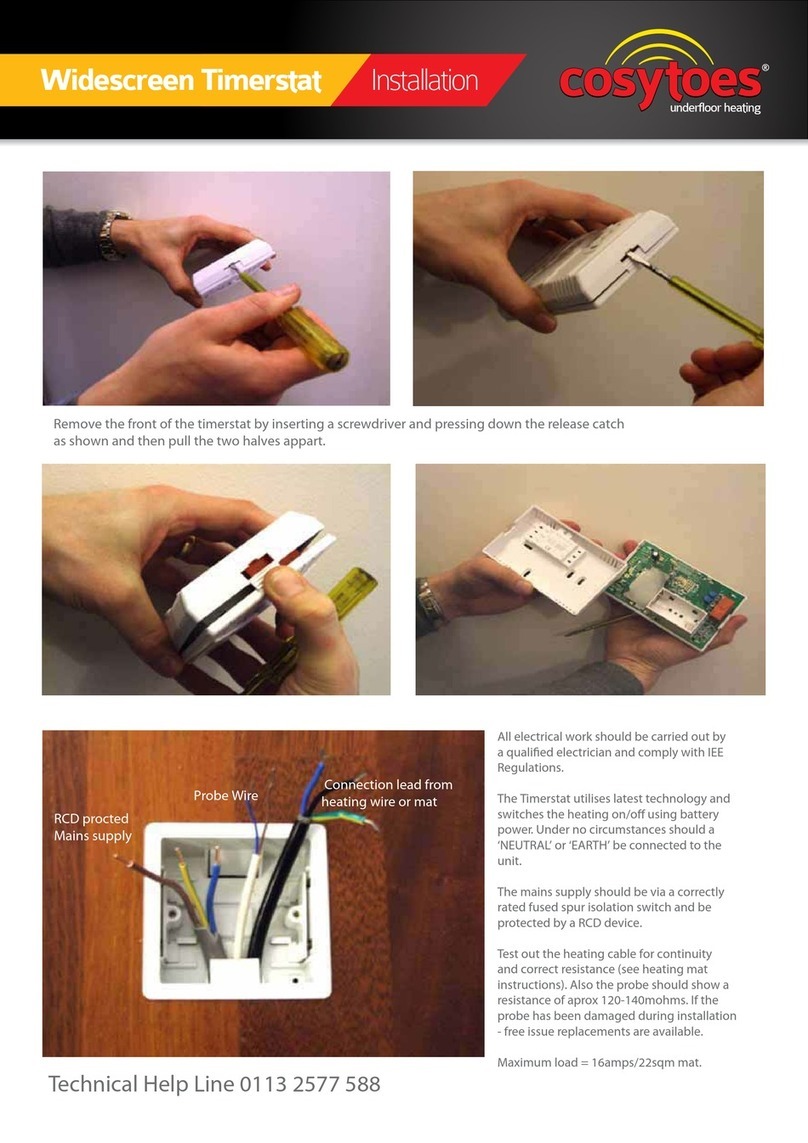
1. To remove the front cover,
gently twist the screwdriver
clockwise as shown.
2. Use a 38mm deep wallbox
and connect wiring as shown
in the wiring diagram. The
Neutral to the mat connects to
the mains Neutral. The heating
cable Earth connects to Mains
Earth in the back of the wall
box.
3. Reconnect the unit as shown. Only reconnect from the
top and ensure the internal pins line up before clicking the
unit together at the bottom.
Troubleshooting
Error Codes
Display Er2: External Sensor Error. Floor probe not
connected or damaged.
Cosytoes®Gloss Touch-Screen Stat [CGW/CGB]

This manual suits for next models

1

Other Cosytoes Thermostat manuals

Cosytoes Vista Timerstat User manual

Cosytoes

Cosytoes Vista Timerstat User manual

Cosytoes TS3 User manual

Cosytoes

Cosytoes TS3 User manual

Cosytoes TS2 User manual

Cosytoes

Cosytoes TS2 User manual

Popular Thermostat manuals by other brands

SlimLine RF manual

SlimLine

SlimLine RF manual

Honeywell T7300E Series installation instructions

Honeywell

Honeywell T7300E Series installation instructions

UPM HTM511A owner's manual

UPM

UPM HTM511A owner's manual

Honeywell Home TH6220WF2 Professional install guide

Honeywell Home

Honeywell Home TH6220WF2 Professional install guide

Knauer Azura CT 2.1 Service instructions

Knauer

Knauer Azura CT 2.1 Service instructions

Charmeg MP-TR user manual

Charmeg

Charmeg MP-TR user manual

LSB ATC32U01A user manual

LSB

LSB ATC32U01A user manual

Robertshaw RS9110 installation manual

Robertshaw

Robertshaw RS9110 installation manual

SPC Modulo Installation and operating instructions

SPC

SPC Modulo Installation and operating instructions

Zehnder Rittling ComfoControl Luxe Installer manual

Zehnder Rittling

Zehnder Rittling ComfoControl Luxe Installer manual

Johnson Controls T7200 installation instructions

Johnson Controls

Johnson Controls T7200 installation instructions

Honeywell Digital Round T8775A owner's guide

Honeywell

Honeywell Digital Round T8775A owner's guide

EUROSTER Q1 Installation and operation manual

EUROSTER

EUROSTER Q1 Installation and operation manual

CALEFFI 738 manual

CALEFFI

CALEFFI 738 manual

Emerson 1F75C-11PR Installation and operating instructions

Emerson

Emerson 1F75C-11PR Installation and operating instructions

Habitat HTE-01 Installation & Pairing Manual

Habitat

Habitat HTE-01 Installation & Pairing Manual

Danfoss Basic Plus2 user guide

Danfoss

Danfoss Basic Plus2 user guide

International Refrigeration Products MEDALLION Series Installation & operating instructions

International Refrigeration Products

International Refrigeration Products MEDALLION Series Installation & operating instructions

manuals.online logo
manuals.online logoBrands
  • About & Mission
  • Contact us
  • Privacy Policy
  • Terms and Conditions

Copyright 2025 Manuals.Online. All Rights Reserved.