manuals.online logo
Brands
  1. Home
  2. •
  3. Brands
  4. •
  5. Cosytoes
  6. •
  7. Thermostat
  8. •
  9. Cosytoes TS2 User manual

Cosytoes TS2 User manual

underfloor heating
Programmable Timerstat Installation
- IMPORTANT -
Please read these instructions
We recommend that a qualified Electrician carry out the installation of your timerstat in accordance with all current regulations. Please
also refer to the installation instructions for your Cosytoes® kit when connecting your power supply.
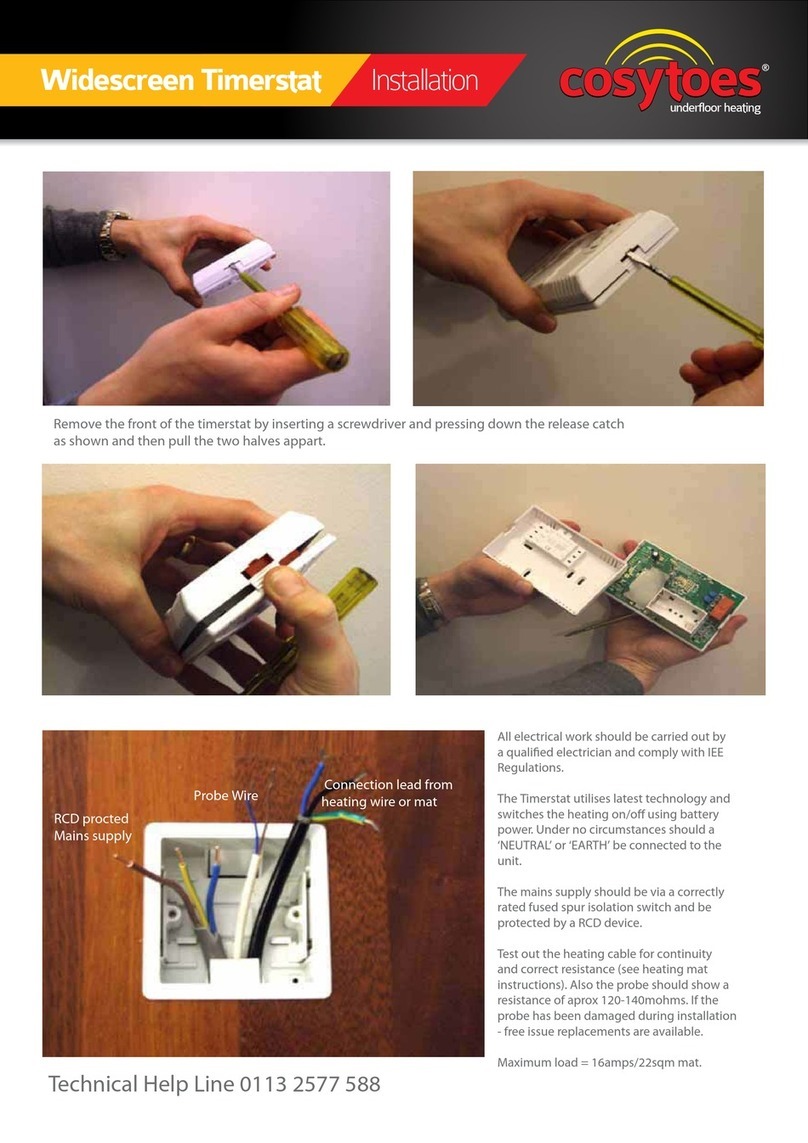
To remove the back plate from the thermostat - press the release button firmly and pull the back plate and thermostat top
gently apart until separated.
(Opens from the left - hinges/hooks on the right).
Wire the timerstat to your Cosytoes® underfloor heating as illustrated on back page.
(Do not cut the back plate as this may cause the pins to misalign).
Quick Start
Install two “AA” 1.5 volt batteries (supplied) into the battery compartment of the timerstat.
Re-attach the timerstat to the back plate by hooking the right hand edge in first and carefully pressing the two components
together.
Press the reset button with a pen nib.
All the characters will be displayed for approximately ten seconds.
Then either 5:2d or 7d will appear on the display for approximately ten seconds. (Use 5:2d for more convenient reprogramming - to alternate
between the two modes press the button within 10 seconds).
(Explanation:- the timerstat is already preprogrammed for popular time periods and temperature. If you wish to vary the
preprogram, selecting the 7d mode will allow you to program each day independently and selecting the 5:2d mode will allow you to program 5 week
days and Saturday and Sunday).
underfloor heating
Programmable Timerstat Installation
There should be a floor temperature reading showing at the bottom of the dial. If only - - - appears then the timerstat is not
reading the floor probe and the timerstat will not work correctly.
(The Electrician should check that the probe has been connected correctly and that there is a circuit and resistance reading
across the probe wires. The end of the probe may have been damaged during installation – next day delivery, free issue
replacement probes are available to installers by contacting our customer service department).
SET THE DAY AND TIME
Press and use to select the correct day
(Monday = 1, Sunday = 7 etc.)
Then press and use to select the hour.
Then press and use to select the minutes.
Then press the PROGRAM BUTTON
Your Cosytoes timerstat is now working and controlling your underfloor heating
The timerstat will then automatically click onto the preprogrammed settings as shown below.
Weekday 1-5 Time Temperature Saturday 6 Time Temperature
P1 06:00 23C P1 07:00 23C
P2 08:30 17C P2 08:30 17C
P3 12:00 17C P3 16:30 23C
P4 14:00 17C P4 22:30 17C
P5 16:30 23C Sunday 7 Time Temperature
P6 22:30 17C P1 07:00 23C
P2 08:30 17C
P3 16:30 23C
P4 22:30 17C
THE BASICS
Your Cosytoes® Timerstat uses battery power to operate a 16amp relay-switch that can handle up to 22sqm of underfloor heating. THE BATTERY
POWERED TIMERSTAT WILL WORK EVEN IF THERE IS NO POWER TO THE HEATING CABLE!
THERE ARE 6 TIME PERIODS (P1-P6) DAYS 1-5 AND 4 TIME PERIODS (P1-P4) DAYS 6-7. THE CURRENT TIME PERIOD SHOWS AS
BLACK AROUND THE DISPLAY FACE PERIMETER. (The time periods anticipate approximate times for the average user’s lifestyle and can be
adjusted if necessary).
THE TIMERSTAT IS ALWAYS ON! and switches the power ON/OFF as required by the temperatures that are programmed in.
(For example, if the Period temperatures were reduced to 5°C (minimum) then the timerstat would likely always be OFF. If the Period temperatures
were increased to 32°C (maximum) then the timerstat would be ON (until 32°C is reached). When the system is attempting to reach the current set
temperature the heater active indicator is on constant. When the set temperature is reached, the heater active indicator will flash to show that
the system has turned off).
If you need to reprogram the timerstat, it is much simpler to ignore the span of each time period and simply
adjust the temperature for the relevant time period.
(For example the two time periods that are most relevant are P1 and P5 (days 1-5) and P1 and P3 (days 6-7).
This is generally getting up and going-to-bed time - so simply alter the temperatures for these periods).
underfloor heating
Programmable Timerstat Installation
Always press the button before starting any reprogramming.
Press and days 1 2 3 4 5 will show above the time (or day 1 if in 7d mode)
When is pressed the first program is P1 temperature.
Press to access P1 time. Press to access P2 temperature - and so on as follows: -
P1 Temperature P1 Time
P2 Temperature P2 Time
P3 Temperature P3 Time
P4 Temperature P4 Time
P5 Temperature P5 Time
P6 Temperature P6 Time
Have a ‘play’ to familiarise yourself by pressing and then keep pressing and you will see how the timerstat scrolls through the periods in
order to access temperature or time settings.
Press the button to return to the normal screen.
TO ALTER TEMPERATURE SETTINGS FOR WEEKDAYS 1-5 (5:2D MODE)
Press the button before starting - and then press once. (Tip - there is a time-window of 10 seconds between pressing buttons after
which the unit will revert to its previous program. Simply start over again if this happens).
Use to set the desired temperature for P1. Then press twice.
Use to set the desired temperature for P2. Then press twice.
Use to set the desired temperature for P3. Then press twice.
Use to set the desired temperature for P4. Then press twice.
Use to set the desired temperature for P5. Then press twice.
Use to set the desired temperature for P6. Then press the button to accept the new settings.
(Tip - when in simply keep pressing the next button to scroll through P1 – P6 if you want to check or access temperatures)
TO ALTER TEMPERATURE SETTINGS FOR WEEKENDS 6-7 (5:2D MODE)
Press the button before starting and then press twice for day 6.
Press the button before starting and then press x 3 for day 7.
Use to set the desired temperature for P1. Then press twice.
Use to set the desired temperature for P2. Then press twice.
Use to set the desired temperature for P3. Then press twice.
Use to set the desired temperature for P4. Then press the button to accept the new settings.
(Tip - when in simply keep pressing the next button to scroll through P1 – P4 if you want to check or access temperatures)
underfloor heating
Programmable Timerstat Installation
WE ARE ALWAYS HAPPY TO HELP CUSTOMERS AND INSTALLERS WITH TECHNICAL QUERIES OR REPROGRAMMING IF REQUIRED.
TELEPHONE 0113 2577 588 DURING NORMAL OFFICE HOURS.
TO ALTER TIME SETTINGS FOR WEEKDAYS 1-5 (5:2D MODE)
Press the button before starting - and then press once and once. (Tip – the start time of each time period can be changed but
don’t try to have less time periods – simply alter the temperature up or down to turn the time-period on or off as required. If you try to take the start
of the time period through the start of the next or previous time period Err will show).
Use to set the desired time for P1. Then press twice.
Use to set the desired time for P2. Then press twice.
Use to set the desired time for P3. Then press twice.
Use to set the desired time for P4. Then press twice.
Use to set the desired time for P5. Then press twice.
Use to set the desired time for P6. Then press the button to accept the new settings.
(Tip - when in simply keep pressing the next button to scroll through P1 – P6 if you want to check or access times/temperatures)
TO ALTER TIME SETTINGS FOR WEEKENDS 6-7 (5:2D MODE)
Press the button before starting and then press twice for day 6 and once.
Press the button before starting and then press x 3 for day 7 and once.
Use to set the desired time for P1. Then press twice.
Use to set the desired time for P2. Then press twice.
Use to set the desired time for P3. Then press twice.
Use to set the desired time for P4. Then press the button to accept the new settings.
(Tip - when in simply keep pressing the next button to scroll through P1 – P4 if you want to check or access times/temperatures)
underfloor heating
Programmable Timerstat Installation
MANUAL OVERRIDES
TO OVERRIDE THE CURRENT PRE-SET TEMPERATURE.
Simply use to set the desired temperature. This temperature will be held until the beginning of the next
period. The temperature hold indicator will be displayed.
To revert to normal program press the button.
TO OVERRIDE THE CURRENT PRE-SET TEMPERATURE FOR A NUMBER OF HOURS.
Press . Use to set the desired temperature.
Press . Use to set the desired number of hours you wish the temperature to be overridden from (1-
23).
The temperature hold indicator will be displayed.
To revert to normal program press the button.
TO OVERRIDE THE CURRENT PRE-SET TEMPERATURE FOR A NUMBER OF DAYS.
Press . Use to set the desired temperature.
Press . Use to set the desired number of days you wish the temperature to be overridden from (1-
99).
The word "hold" will be displayed.
To revert to normal program press the button.
Note: - The little pictures of people in/out of the house and asleep is intended to depict Mr and Mrs Averages occupancy of the house. For the
purpose of reprogramming the timerstat this has no relevance and should be ignored.
Timerstat wiring diagram
We recommend that a qualified Electrician carry out the installation of your timerstat in accordance with all current regulations. Please
also refer to the installation instructions for your Cosytoes® kit when connecting your power supply.
underfloor heating
Programmable Timerstat Instructions
underfloor heating
Programmable Timerstat Instructions
underfloor heating
Programmable Timerstat Instructions
underfloor heating
Programmable Timerstat Instructions

Other Cosytoes Thermostat manuals

Cosytoes Vista Timerstat User manual

Cosytoes

Cosytoes Vista Timerstat User manual

Cosytoes TS3 User manual

Cosytoes

Cosytoes TS3 User manual

Cosytoes CGW User manual

Cosytoes

Cosytoes CGW User manual

Popular Thermostat manuals by other brands

Honeywell PRESTIGE THX9321 operating manual

Honeywell

Honeywell PRESTIGE THX9321 operating manual

PNI CT35 user manual

PNI

PNI CT35 user manual

OERTLI OE-tronic 3 manual

OERTLI

OERTLI OE-tronic 3 manual

HOTOWELL HTW-31-H12 quick start guide

HOTOWELL

HOTOWELL HTW-31-H12 quick start guide

Danfoss TP5001 series installation guide

Danfoss

Danfoss TP5001 series installation guide

Vaillant VRC 410 Operating and installation instructions

Vaillant

Vaillant VRC 410 Operating and installation instructions

Pentair Raychem QuickStat-TC Installation and operation manual

Pentair

Pentair Raychem QuickStat-TC Installation and operation manual

ELEKTROBOCK BPT102 manual

ELEKTROBOCK

ELEKTROBOCK BPT102 manual

Hive Active Heating user guide

Hive

Hive Active Heating user guide

TrickleStar TS2501 installation guide

TrickleStar

TrickleStar TS2501 installation guide

ChiliTec ST-50 instruction manual

ChiliTec

ChiliTec ST-50 instruction manual

Cypress Envirosystems WPT Series quick start guide

Cypress Envirosystems

Cypress Envirosystems WPT Series quick start guide

Robertshaw 200 Series Installation data

Robertshaw

Robertshaw 200 Series Installation data

Braeburn Premier Series Detailed installer guide

Braeburn

Braeburn Premier Series Detailed installer guide

CAME BPT TH/500 Installation and use manual

CAME BPT

CAME BPT TH/500 Installation and use manual

Apator Metra TH 473 Installation and operation manual

Apator Metra

Apator Metra TH 473 Installation and operation manual

Friedrich RT2 installation instructions

Friedrich

Friedrich RT2 installation instructions

Thermokon JOY Fancoil EC 3AO RS485 Modbus datasheet

Thermokon

Thermokon JOY Fancoil EC 3AO RS485 Modbus datasheet

manuals.online logo
manuals.online logoBrands
  • About & Mission
  • Contact us
  • Privacy Policy
  • Terms and Conditions

Copyright 2025 Manuals.Online. All Rights Reserved.