manuals.online logo
Brands
  1. Home
  2. •
  3. Brands
  4. •
  5. Cosytoes
  6. •
  7. Thermostat
  8. •
  9. Cosytoes TS3 User manual

Cosytoes TS3 User manual

underfloor heating
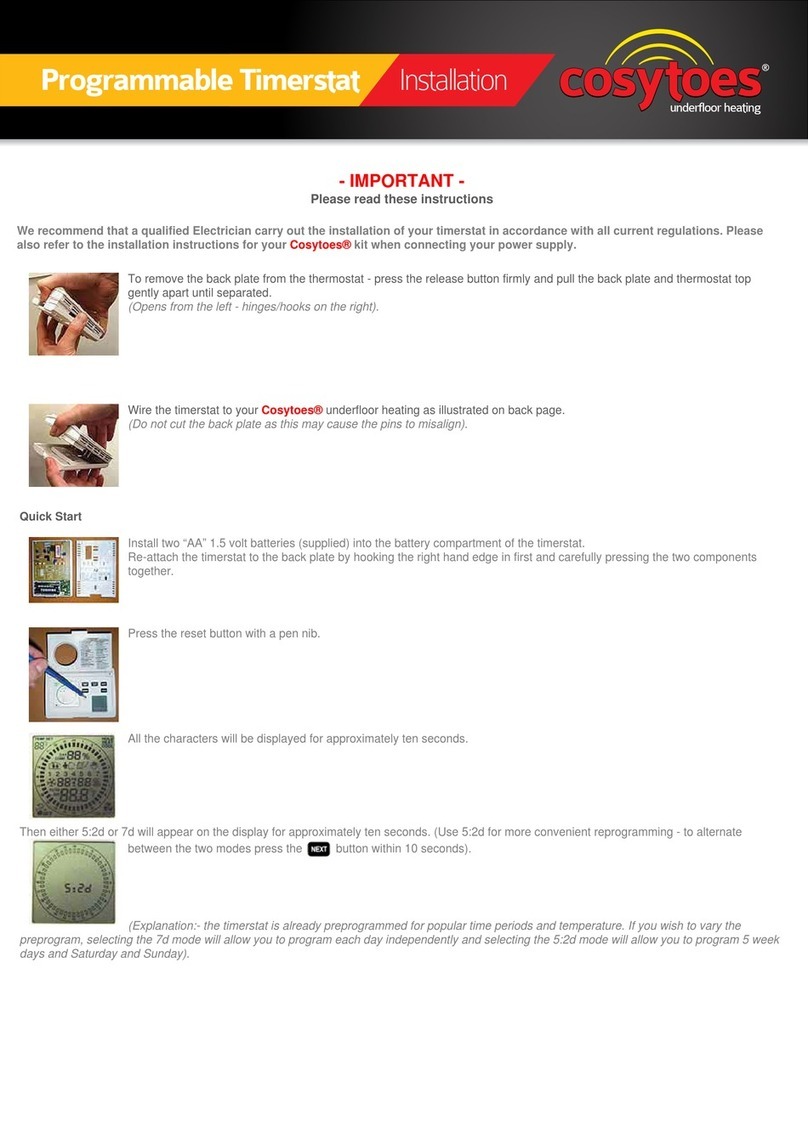
Widescreen Timerstat Installation
Remove the front of the timerstat by inserting a screwdriver and pressing down the release catch
as shown and then pull the two halves appart.
RCD procted
Mains supply
Probe Wire Connection lead from
heating wire or mat
All electrical work should be carried out by
a qualied electrician and comply with IEE
Regulations.
The Timerstat utilises latest technology and
switches the heating on/o using battery
power. Under no circumstances should a
‘NEUTRAL’ or ‘EARTH’ be connected to the
unit.
The mains supply should be via a correctly
rated fused spur isolation switch and be
protected by a RCD device.
Test out the heating cable for continuity
and correct resistance (see heating mat
instructions). Also the probe should show a
resistance of aprox 120-140mohms. If the
probe has been damaged during installation
- free issue replacements are available.
Maximum load = 16amps/22sqm mat.
Technical Help Line 0113 2577 588
underfloor heating
Widescreen Timerstat Installation
<--
Using a connector block, connect the
mains neutral and the neutral from
the heating cable.
Similarly connect the mains and
heating cables earth’s together.
Fix the back plate and connect: -
Mains Live - terminal 2
Heating Live - terminal 3
Probe Wires - terminals 4 & 5
Heating mats are connected in parallel up to a maximum
of 22sqm. The Timerstat terminals will only take
2 cables. Use a suplimentary wall connection box where
more than 2 mats are to be connected.
E & O. E. 2008
1No Connection
(for air-conditioning)
2
Mains Live
3
Switched Live
4Probe Wire
5Probe Wire
Insert the batteries
Replace the inner cover
Live connection
to heating cable
Probe wire
Connect Mains Neutral
directly to Neutral connection
from heating cable
Mains Live
Connect Mains Earth directly to
Earth connection from heating cable
Replace the Timerstat front section
Lightly press the reset button and the
Timerstats default programme will take over
PLEASE ENSURE THAT THE RESET BUTTON IS PRESSED BEFORE USE,
OTHERWISE THE UNIT MAY NOT OPERATE CORRECTLY.
underfloor heating
Widescreen Timerstat Instructions
Beforeyou begin,youmustpresstheresetbuttonortheunitmaynotfunctionproperlyinuse. Simplypressthe
recessedbuttonlighlywithapencilorpenandallowtheunittogothroughitsdiagnosticproceedure.Ifthereare
dashesshowingwherethefloortemperatureshouldbe,thereisainstallationproblemwiththeprobe.
‘LO’indicatesaproblemwiththebatteries.
Set Temperature
Floor Temperature
Time
Day
Instructions
1. Set date and time: hold ‘Set’ for 10 seconds - -- select degrees C or degrees F using + - buttons then press OK
select 24hour clock or 12hour clock using + - buttons then press OK
set the year using + - buttons then press OK
set the month using + - buttons then press OK
set the day/date using + - buttons then press OK
set the hour using + - buttons then press OK
set the minutes using + - buttons then press OK
set the temperature differential to 0.5 using + - buttons then press OK
Ignor the filter hours that is not applicible to heating and press OK
PRESS OK TO RUN
start time for P1 is 06:00 @ 23C
start time for P2 is 08:30 @ 17C
start time for P3 is 12:00 @ 17C
start time for P4 is 14:00 @ 17C
start time for P5 is 16:30 @ 23C
start time for P6 is 22:30 @ 17C
2. Understanding how your timerstat works. There are 6 time periods for each day that are preset with an
accompanying preset temperature as shown in the following table. The start time for each time period
can be altered and the temperature for each period can be changed. If you consider that the timerstat is
always on and it is the temperature that is set in each period that will make the heating come on or switch
off. For example the early morning period is 6 - 8.30 am, so if you put the temperature up to 28 - 30C
then the heating will come on as the set temperature is greater than the normal ambient temperature
for the room. Similarly, if the second period 8.30 - 12pm is set to 10C then it will be colder than the
ambient temperature so will not call for heat. The time periods cannot be deleted so leave them where
they are with minor adjustments to their start times and allot the desired temperature to each time period
so the heating will be on or off when required.
3. Reprogramming the timerstat - before you begin decide what temperatures you require for each period and any
minor adjustments to the start times. There is a long 30 seconds window between
each press of a button. if it ‘times out’ then just begin again and keep pressing
OK until you get to where you was before.
underfloor heating
Widescreen Timerstat Instructions
press ‘Set’ once - (you will start programming from monday morning)
set the temperature for early moring using the + - buttons then press OK
set the time you want this temperature to begin using the + - buttons then press OK
set the temperature for day using the + - buttons then press OK
set the time you want this temperature to begin using the + - buttons then press OK
set the temperature for midday using the + - buttons then press OK
set the time you want this temperature to begin using the + - buttons then press OK
set the temperature for afternoon using the + - buttons then press OK
set the time you want this temperature to begin using the + - buttons then press OK
set the temperature for evening using the + - buttons then press OK
set the time you want this temperature to begin using the + - buttons then press OK
set the temperature for night using the + - buttons then press OK
set the time you want this temperature to begin using the + - buttons then press OK
(you will now start to set tuesday in the same way)
If you want tuesday to be set the same as monday:
press ‘Set’ again to copy the program.
‘From’ will flash on the screen, press the + button to select Mo (monday) then press OK
‘To’will flash on the screen, press the + button to select Tu (tuesday) then press OK
‘To’will flash on the screen again, if you want to copy the program to wednesday press the + button to select
We then press OK
TO will flash on the screen again, if you want to copy the program to thursday press the + button to select Th
then press OK etc...
All the days you have selected to copy the program to will be displayed on the screen
When you have selected all the days you want to copy the program to press OK -
THEN PRESS OK TO RUN.
You can override the automatic program settings:
simply press + or - to change temperature, then press OK. Will revert to normal settings at end of
timeperiod.
press M once for ‘comfort override’, select temperature with + or - , press OK, then select time with + or -, then
press
OK.
press M twice for ‘permanent hold temperature’, select temperature with + or - , then press OK.
press M three times for ‘hold temp until’, select temperature with + or - , then press OK,
select date/year with + or - then press OK.
(note - to remove overrides, press OK in all cases.)
Should you need assistance with the programming then please telephone 0113 2577 588 Cosytoes, Bramley House
,
Bath Lane, Bramley, Leeds. LS13 3BB - email [email protected] information website www.cosytoes.biz
E & OE 2010
the current
Or the easy way is to copy monday to all the other days
If you want saturday and sunday different for example, then press set and scroll through all the
days using the OK button until saturday first appears - then set the values as already described.
The ‘M’button and other overrides.

Other Cosytoes Thermostat manuals

Cosytoes TS2 User manual

Cosytoes

Cosytoes TS2 User manual

Cosytoes CGW User manual

Cosytoes

Cosytoes CGW User manual

Cosytoes Vista Timerstat User manual

Cosytoes

Cosytoes Vista Timerstat User manual

Popular Thermostat manuals by other brands

OJ Microline OCC2 instructions

OJ

OJ Microline OCC2 instructions

Honeywell T841A installation instructions

Honeywell

Honeywell T841A installation instructions

Salus DIGITAL PROGRAMMABLE THERMOSTAT user manual

Salus

Salus DIGITAL PROGRAMMABLE THERMOSTAT user manual

White Rodgers 1C26 installation instructions

White Rodgers

White Rodgers 1C26 installation instructions

Carrier GAS FURNACE 58MVP Installation, start-up, and operating instructions

Carrier

Carrier GAS FURNACE 58MVP Installation, start-up, and operating instructions

Radio Thermostat CT32 install guide

Radio Thermostat

Radio Thermostat CT32 install guide

RV Products 8330*331 Series Installation, operation & application guide

RV Products

RV Products 8330*331 Series Installation, operation & application guide

Danfoss MBC 8000 installation guide

Danfoss

Danfoss MBC 8000 installation guide

Danfoss HC75-3 Setting instructions

Danfoss

Danfoss HC75-3 Setting instructions

Proliphix IMT installation guide

Proliphix

Proliphix IMT installation guide

White Rodgers 2B61 installation instructions

White Rodgers

White Rodgers 2B61 installation instructions

Carrier Infinity SYSTXCCWIC01-B installation instructions

Carrier

Carrier Infinity SYSTXCCWIC01-B installation instructions

SUNSTONE SS-PSTAT Easy Programming Guide

SUNSTONE

SUNSTONE SS-PSTAT Easy Programming Guide

EPH Controls HDT Installation and operation guide

EPH Controls

EPH Controls HDT Installation and operation guide

Johnson Controls T9500 owner's manual

Johnson Controls

Johnson Controls T9500 owner's manual

Bryant SYSTXBBUID01--D installation instructions

Bryant

Bryant SYSTXBBUID01--D installation instructions

Honeywell DT92A user guide

Honeywell

Honeywell DT92A user guide

Honeywell Tradeline Chronotherm IV installation instructions

Honeywell

Honeywell Tradeline Chronotherm IV installation instructions

manuals.online logo
manuals.online logoBrands
  • About & Mission
  • Contact us
  • Privacy Policy
  • Terms and Conditions

Copyright 2025 Manuals.Online. All Rights Reserved.