Cosytoes Vista Timerstat User manual

Vista Timerstat Instructions
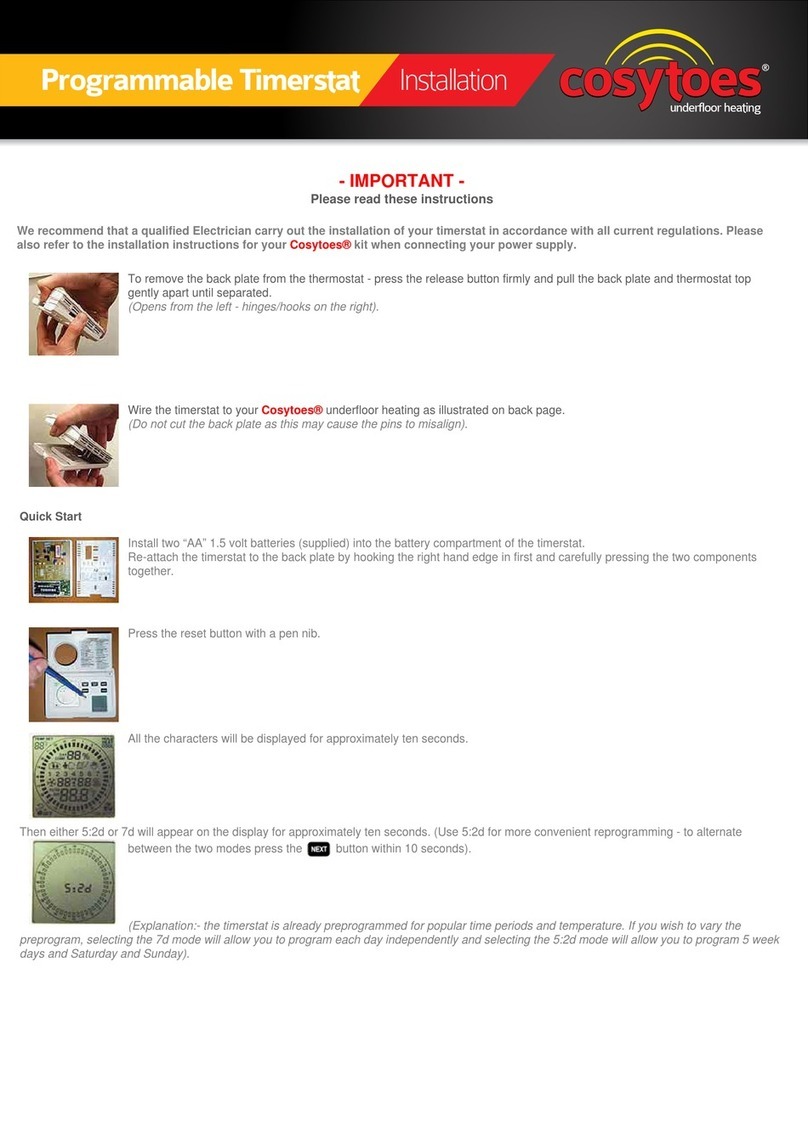
INSTALL
V2.2
See https://www.cosytoes.co/technical.html for instructions and ‘How to Videos’

Cosytoes APP for WiFi thermostat
01
03
04 Display symbols
05
06
08 Dimension
09
07
02
Table of Contents
01
01
01
02
03
05
13
13
14
WiFi Setup
Step 1: Scan the QR code or
search for “cosytoes” on Google
Play or the Apple App Store.
(Only compatible with Android and
Apple operating systems)
Step 2: Press ‘Register’ and enter either your mobile phone
number or email address. If using your mobile number
for your login, a verification number will be texted to the
supplied number. This registration process creates a profile
connecting your device to the cloud, allowing it to be
accessed wherever you are using your mobile data.

MAIN FUNCTIONS
THERMOSTAT DESCRIPTION
Supply voltage: 85-265Vac 50/60Hz
Hold mode
Auto mode
Brightness
Key-lock
Holiday mode
Floor temperature limit
TECHNICAL SPECIFICATION
DISPLAY SYMBOLS
02
Standby power: <2W
Wire diametĞƌчϮϱŵŵϸ
Menu Decrease
Increase
WiFi / Heat / Event / Floor Sensor
Hold Mode
Time
Detected Temp
The ‘VistĂƐĞƌŝĞƐŝƐĂƐŵĂƌƚƟŵĞrstat used to control yŽƵƌĞůĞĐƚƌŝĐŇŽŽƌŚĞĂƟng
systĞŵ/ƚǁŝůůŚĞůƉkeep your home at a comfortable temperature whilst
minimising enerŐLJƵƐĞ/Ŷstall the Cosytoes app on your smart phone to control
your Cosytoes heĂƟng system remotely with the ‘VistĂtŝ&ŝƟŵĞrstaƚ

WIFI CONNECTIONION
03 04
Step 3:
Click ‘Add Device’ or ‘+’ on the top-right to add device.
Step 5:
Operate thermostat. If the WIFI icŽŶŇĂƐŚĞƐƋƵŝĐŬůy,
Click ‘Press to connect’.
Step 1:
Scan the QR code or download the CosytoesAppfrom APP store.
Step 2:
RegistĞƌĂŶĚůŽŐŝŶǁŝƚŚŵŽďŝůĞŶƵŵďĞƌ/email
address in the APP.
Policy and Service agreement’ before
Step 4:
Click ‘WiFi thermostat’.
Step 6:
EntĞƌtŝĮƉĂƐsword, and click ‘ConĮƌŵ’.
Step 8:
YŽƵcan check the
ĂĐƚƵĂů
temperaƚƵre and
set temperaƚƵre etc. at the control interface.
Step 7:
If deǀŝĐĞĂĚĚĞĚƐƵĐĐĞƐsĨƵůůy, change the device name
and set region. Then, click ‘Done’.
/ĨĨĂŝůĞĚĞŶƐƵƌĞƚŚĂƚƚŚĞϱ',njŝ
Ɛ
tem
p
oraril
y
disabled to allow
ĨŽƌĐŽŶŶĞĐƟŽŶƚŽƚŚĞϮϰ',nj
K
ŶĐĞĐŽŵƉ
ů
ĞƚĞĚϱ',njĐĂŶ
ď
Ğ
ƚƵ
ƌŶ
ĞĚ
ďĂĐ
Ŭ
Ž
Ŷ

FUNCTION & USER OPERATION
KŶKī
WƌĞƐƐƚŚĞƉŽǁĞƌďƵƩŽŶŽŶƚŚĞƌŝŐŚƚĞĚŐĞŽĨƚŚĞƚŚĞƌŵŽƐƚĂƚƚŽƚƵƌŶŽŶŽī
ƚĞŵƉĞƌĂƚƵƌĞǁŚĞŶƚŚĞƉŽǁĞƌŝƐŽīͿ
Temporarily override temperature
KŶƚŚĞŚŽŵĞƐĐƌĞĞŶƉƌĞƐƐƵƉŽƌĚŽǁŶƚŽĐŚĂŶŐĞƚŚĞĐƵƌƌĞŶƚƉĞƌŝŽĚ
ƚĞŵƉĞƌĂƚƵƌĞƐĞƫŶŐdŽĐŽŶĮƌŵƚŚĞƚĞŵƉĞƌĂƚƵƌĞLJŽƵŚĂǀĞƐĞƚ
ƉƌĞƐƐƚŚĞƟĐŬŝĐŽŶdŚĞdŝŵĞƌƐƚĂƚǁŝůůƌĞǀĞƌƚƚŽƚŚĞŶŽƌŵĂůƉƌŽŐƌĂŵŵĞĚ
ƐĞƫŶŐƐĂƚƚŚĞƐƚĂƌƚŽĨƚŚĞŶĞdžƚƟŵĞƉĞƌŝŽĚ
05 06
Menu:
Manual mode:
dŚĞdŝŵĞƌƐƚĂƚǁŝůů ƌƵŶĂƚƚŚĞŽǀĞƌƌŝĚĞƐĞƫŶŐŽŶƚŚĞŚŽŵĞƐĐƌĞĞŶ
ƵŶƟůĐŚĂŶŐĞĚŵĂŶƵĂůůLJůǁĂLJƐĞŶƐƵƌĞLJŽƵƉƌĞƐƐƚŚĞƟĐŬŝĐŽŶ to
ĐŽŶĮƌŵƚŚĞƚĞŵƉĞƌĂƚƵƌĞƚŚĂƚLJŽƵŚĂǀĞƐĞůĞĐƚĞĚ
Holiday mode
Auto mode
dŚŝsŝƐƚŚĞĚĞĨĂƵůƚŵŽĚĞƚŚĞdŝŵĞƌƐƚĂƚǁŝůů ƌƵŶĂĐĐŽƌĚŝŶŐƚŽƚŚĞ
ƟŵĞƉĞƌŝŽĚƐƐĞƚŝŶĚŝƚ^ĞƫŶŐƚŽƐĂǀĞĞŶĞƌŐLJ
KŶƚŚĞŚŽŵĞƐĐrĞĞŶƉrĞƐƐƚŚĞŝĐŽŶŝŶƚŚĞtŽƉůĞŌ ĐŽƌŶĞƌ
(circle with 4 clockwise arroǁƐͿ tŽƐĞůĞĐƚŵŽĚĞdŚĞrĞĂrĞϯŵŽĚĞƐ
dŚĞdŝŵĞrstĂƚǁŝůů ƌƵŶĂt the set tĞŵƉĞrĂture ĨŽƌƚŚĞŶƵŵďeƌŽĨĚĂLJs thĂt
LJou hĂǀĞƐĞůĞĐtĞĚ&ŝrsƚůLJĞŶtĞƌƚŚĞŶƵŵďeƌŽĨĚĂLJs LJŽƵǁŝƐŚƚŚĞ,ŽůŝĚĂLJDŽĚĞ
tŽƌƵŶĨorto ĐoŶĮƌŵƉrĞƐƐƚŚĞƟĐŬŝĐŽŶ^ĞĐŽŶĚůLJĞŶter the tĞŵƉĞrĂture thĂt
LJŽƵǁŝƐŚto seƚƚŚĞdŝŵĞrstĂt tŽĂŶĚƉrĞƐƐƚŚĞƟĐŬŝĐŽŶto ĐoŶĮƌŵ(NOTE: In Holiday
Mode to cancĞů,ŽůŝĚĂLJDŽĚĞͿ
KŶƚŚĞŚŽŵĞƐĐrĞĞŶƉrĞƐƐƚŚĞŝĐŽŶŽŶƚŚĞďŽƩŽŵůĞŌͲŚĂŶĚĐŽƌŶĞƌŽĨƚŚĞƐĐrĞĞŶ
to eŶtĞƌƚŚĞŵĞŶƵdŚĞrĞĂre 5 sĞƫŶŐƐ

07 08
1. Time
Day and clock are set here.
Steps:
Press or toset hour.
Press or toset minute.
Press to conĮƌŵĂŶĚďĂĐŬto Menu.
Press tŽďĂĐŬto the page of detected temperature.
to WiFi.
2. Key lock
Lock Steps:
Press or toselect lock.
Press to conĮƌŵĂŶĚďĂĐŬto the page of detected temperature.
Unlock steps:
In the page of detected temperature, press any key then
ht corner)
Press and hold for 3 seconds to unlock.
3. Brightness
Steps:
Press to move up/down or touch any part of the line to seƚƚŚĞďƌŝŐhtness.
Press to conĮƌŵĂŶĚďĂĐŬto Menu.
This option allows you to set and change the Timerstat parameters. To use this function,
the Timerstat will need tŽďĞŝŶƵto Mode. Each day of the week has 4 events (Wake,
Leave, Return & Sleep) you should allot a time & temperature to each event. Set the
temperaturĞĂďove ĐƵƌƌĞŶƚŇŽŽƌ temperature and the heating will come on until the
desired temperature is reached, or, set the temperature low and the heating will not
come on during that event.

09
Steps:
Press or toswitch page.
Press the item to set its parameters.
Day Wake Leave Back Sleep
Mon-Fri 07:00 22.0°C 08:30 19.0°C 17:00 22.0°C22:0019.0°C
Sat/Sun 08:00 22.0°C 08:30 22.0°C 17:00 22.0°C 22:00 19.0°C
Press or toset temperature.
Default parameters:
1
2
3
No. Name
Default
Ranges
0°C
0°C
ON
-5°C -- 5°C
-5°C -- 5°C
ON/OFF
4
5
8
5°C
30°C
5°C -- 15°C
20°C -- 50°C
Floor Temperature Limit 1°C 0.5°C/1°C/2°C/3°C
°C
Floor
5+1+1
°C/°F
Room/Floor/Both
5+1+1/7
6
Temperature Tolerance
7
Temperature Unit
9
Schedule
0 Sec 0S/30S/60S/90S
10
Output Delay
10
Steps:
WƌĞƐƐĚŝƚ^ĞƫŶŐƚŽĞŶƚĞƌĚĂLJƐƐĞůĞĐƟŽŶ
Press the day you want to set.
WƌĞƐƐƚŽĞŶƚĞƌĞǀĞŶƚƐĞůĞĐƟŽŶ
when all 4 events have been set - to set your next day.

1211
when the actual temperature is 1
°C
lower than the set temperature. It will switch
ŽīǁŚĞŶƚŚĞƚĞŵƉĞƌĂƚƵƌĞŝƐϭ
°C above the set temperature.
7.Temp unit: °F and °C can be selected.
Room sensor: Run by room sensor.
Floor sensor: Run bLJŇŽŽƌƐĞŶƐŽr.
Both sensors: Run by rŽŽŵƐĞŶƐŽƌǁŝƚŚŇŽŽƌtemp limit.
9. Schedule: Select a weekly schedule for the event.
7: each day from Mon to Sun can be set individually.
5+1+1: Mon to Fri have the same events, Sat and Sun can be set individually.
10. Output delay: ThisŽƉƟŽŶǁŝůů help avoid ŽƉĞƌĂƟŶŐƚŚĞŚĞĂtiŶŐŝŶĂĚǀĞƌƚĞŶƚůLJ
ensures that the required temp has already been reached when the next evenƚďĞŐŝŶƐ
12. Open window: dŚŝƐĨƵŶĐƟŽŶŽŶůLJǁŽƌŬƐǁŝƚŚƚŚĞƌŽŽŵƐĞŶƐŽƌtĞĂĚǀŝƐĞƚŚŝƐƐŚŽƵůĚ
ŶŽƚďĞƵƐĞĚǁŝƚŚƵŶĚĞƌŇŽŽƌŚĞĂƟŶŐƚŚĂƚƚĂŬĞƐŝƚƐƚĞŵƉĞƌĂƚƵƌĞƌĞĂĚŝŶŐĨƌŽŵƚŚĞŇŽŽƌ
sensor only.
13&14. Energy use
enerŐLJƵƐĞ
15.Sensor Type: The default 10K Ohm sensor is in the box.
: Calibrate the temperature detected by room sensor.
: Calibrate the temperature detected bLJŇŽŽƌƐĞŶƐŽr.
5. Floor temperature limit: dŚŝƐƐŚŽƵůĚďĞƐĞƚƚŽ&ůŽŽƌ^ĞŶƐŽƌ;ĚĞĨĂƵůƚƐĞƫŶŐͿdŚĞ
system will stop heatiŶŐŝĨƚŚĞŇŽŽƌƚĞŵƉĞƌĂƚƵƌĞĞdžĐĞĞĚƐϯϬ
°C
;ĚĞĨĂƵůƚƐĞƫŶŐͿ
6. Temperature TolerancedŚŝƐŝƐƐĞƚĂƚϭΣdŚĞŚĞĂƟŶŐǁŝůůĐŽŵĞŽŶ
No. Name
Default
Ranges
12
ϭϯ
EnerŐLJhƐĞ
NO/YESFactory Reset NO
Ϭt
10K Ohms
16
Sensor Type
KƉĞŶtŝŶĚow
ϬtͲͲϰϱϬϬt
OFF ON/OFF
OFF ON/OFF
11
Power Set
ϭϰ
ϭϱ
ϯΘϰŶƟͲĨƌŽnjĞŶĨƵŶĐƟŽŶ/ĨƚŚĞĂŶƟͲĨƌŽnjĞŶĨƵŶĐƟŽŶŝƐĂĐƟǀĞƚŚĞŚĞĂƟŶŐǁŝůůĐŽŵĞ
ŽŶƚŽŬĞĞƉƚŚĞŇŽŽƌĂďŽǀĞϱ
°C.
ϭϭĚĂƉƟǀĞ&ƵŶĐƟŽŶŌĞƌƐĞǀĞƌĂůĚĂLJƐŽĨŝŶƐƚĂůůĂtion and use, AdapƟve FuncƟon

dZKh>^,KKd/E'
/DE^/KEΈDDΉ
/E^d>>d/KEEt/Z/E'/E^dZhd/KE^
ŽŶŶĞĐƚƚŚĞǁŝƌĞĂƐƐŚŽǁŶŝŶ
ƚŚĞǁŝƌŝŶŐŝŶƐƚƌƵĐƟŽŶ
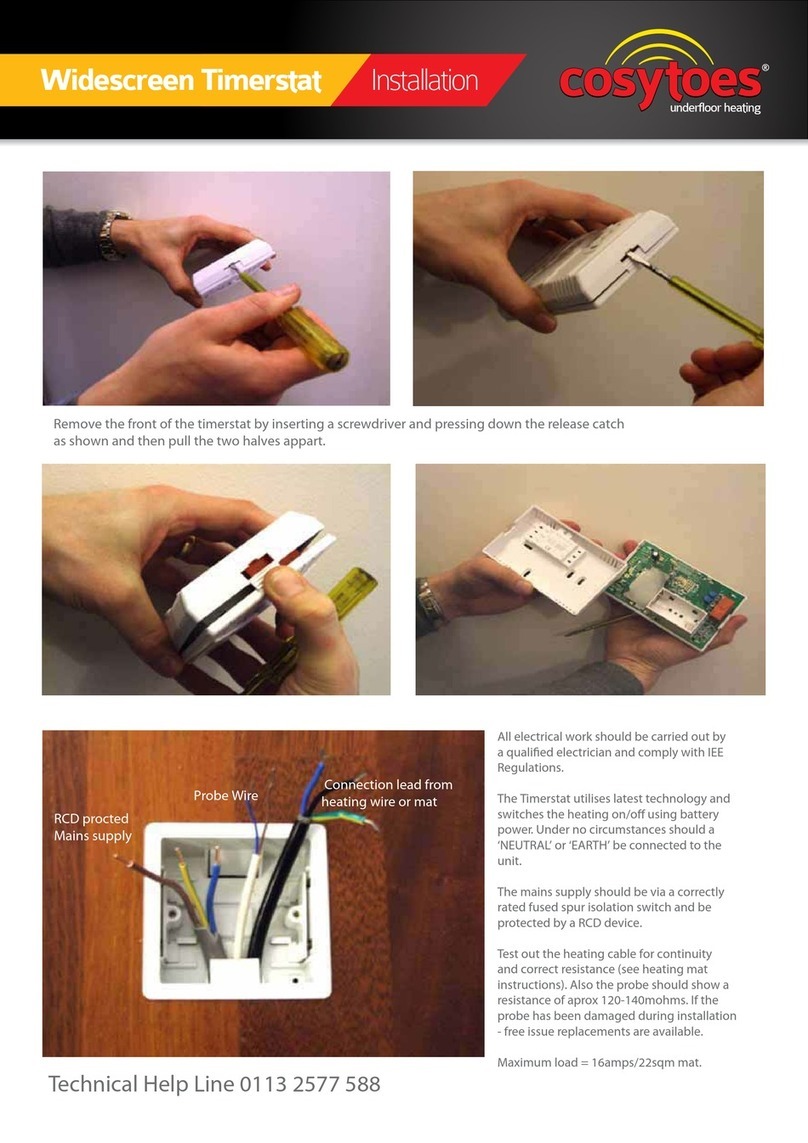
^ĞƉĂƌĂƚĞƚŚĞƉĂŶĞůĨƌŽŵƚŚĞďĂĐŬ
ƐĞĐƟŽŶŝŶƐĞƌƚƚŚĞƐĐƌĞǁĚƌŝǀĞƌŝŶƚŽ
ƚǁŽŚŽůĞƐƵŶĚĞƌƚŚĞƚŚĞƌŵŽƐƚĂƚĂŶĚ
ƉƌLJŝƚůŝŬĞƚŚĞƉŝĐƚƵƌĞ
Step 1 ^ƚĞƉϮ
16. Factory ResetůůƉĂƌĂŵĞƚĞƌƐĂƌĞƌĞƐƚŽƌĞĚƚŽĚĞĨĂƵůƚǀĂůƵĞƐ
ZŽŽŵ^ĞŶƐŽƌƌƌŽƌ ƵŝůƚͲŝŶƐĞŶƐŽƌƐŚŽƌƚͲĐŝƌĐƵŝƚŽƌĚŝƐĐŽŶŶĞĐƚĞĚ
&ůŽŽƌ^ĞŶƐŽƌƌƌŽƌ &ůŽŽƌƐĞŶƐŽƌƐŚŽƌƚͲĐŝƌĐƵŝƚŽƌĚŝƐĐŽŶŶĞĐƚĞĚ
/ŶƐƚĂůůĂƟŽŶ
Temperature dŚĞƌĞƐŝƐƚĂŶĐĞǀĂůƵĞŽĨƚŚĞŇŽŽƌƐĞŶƐŽƌĂƚƚŚĞĐŽƌƌĞƐƉŽŶĚŝŶŐ
ƚĞŵƉĞƌĂƚƵƌĞƉŽŝŶƚ;ɏͿ
0 °C
0-3950
10 °C
1-3380
25 °C
3-3600 4-37402-3700
30 °C
32800
19733
10000
7905
26050
17630
10000
8331
30286
19055
10000
8165
34423
22217
12000
9869
34720
22328
12000
9854

mounted in a standard 86 type deep switch box.
R
e-install front panel whilst
ensuring the pins engage
properly in the circuit board
socket.
box with screws provided.
15
Step 3 Step 4
The ‘Vista’ƐĞƌŝĞƐƟŵĞƌƐƚĂƚƐŚŽƵůĚďĞ
NOTE:
16
3'>25'* '
9+4958
24 4 2
FLOOR
SENSOR
65=+8
85V-265V
50/60Hz
/6
4 422 9 )53 9
POWER FLOOR SENEOR
Table of contents
Other Cosytoes Thermostat manuals