Coyote Mini8 Plus User manual

Coyote Bioscience Co., Ltd.
Tel: 010-64844237
Fax: 010-64844237-8000
Add: Room A211/213, 2/F, Shangdixinxilu#12 Haidian District, Beijing, China. 100085
www.coyotebio.com
Mini8 Plus
Real-Time PCR System
Coyote, highly specialized in research & development, offers
integrate molecular diagnostic solutions by providing devices
from sample pre to gene amplification / detection.
Version:EN / 20160413

Overview
Introduction
Setup
Unpack the Mini8 Plus System
Place Mini8 Plus on the Bench
Connect Mini8 Plus
Install the Mini8 Plus Software
Turn on the Mini8 Plus System
Workow
Mini8 Plus System Workow
Load the reaction tubes
Dene a New Experiment
Set Up the Thermal Prole
Dene the Plate Layout
Monitor Run
Data Analysis
System Information
Lights
Specications and Environmental Requirements
Electromagnetic Compatibility
Cleaning and Maintenance
Concepts
Chapter 1
Chapter 2
Chapter 3
Chapter 4
Chapter 5
Contents
1

Introduction
Coyote Mini8 Plus Real-Time PCR System is designed for molecular
diagnostic market.
It has a small footprint, with high detection sensitivity. The machine has
two channels, one is SYBR/FAM, and the other is Texas Red / ROX. The
sample capacity is 8 × 0.2mL PCR tubes, and it is compatible with any
commercial SYBR®or TaqMan®qPCR kits.
The user interface on the computer is friendly and very simple to operate.
The uorescence dye preference can be customized. This product
requires 12V DC power supply, that is compatible with a car charger or a
battery pack.
Coyote Bio engaged on designing and manufacturing innovative
personal devices for both life science and molecular diagnosis. All our
devices were vested portable features for eld applications with 12V DC
power or batteries while all redundant features were minimized and the
key functions were developed more powerful and user-friendly. Therefore
Coyote’s devices are easy to handle and set, means that the labor cost
could be signicantly reduced.
Service: Coyote Bioscience Co., Ltd.
Registered Address: 509, 510, 5th oor, Chuangyezhonglu#36, Haidian,
Beijing
ZIP: 100085
TEL: 010-64844237
FAX: 010-64844237-8000
SALES: [email protected]
Overview
2
Unpack the Mini8 Plus System
1. Lift the Mini8 Plus instrument out of the package. Place it on a
at surface and remove the packaging materials (Keep the box and
packaging in case of a return).
2. Check the packing list as follows to ensure that all components are
present and intact. Your system comes with:
A. Mini8 Plus instrument
B. Power adapter
C. Power cable
D. USB cable
E. DVD
F. User's manual
Place Mini8 Plus on the Bench
Benet from its mini size, two distances of only 10cm (4 inches) for each
sides of left and right are enough for ventilation, and also a distance of
5cm (2 inches) above is necessary for opening the lid.
Connect Mini8 Plus
1. Connect one connector of the USB cable to the port on the computer.
Connect the other connector to the port on the side panel of the Mini8
Plus.
2. Connect the Mini8 Plus power cable to the DC power inlet on the side
panel, and then to the wall outlet.
3. Plug the computer power cable to the wall outlet.
Setup
A B C D E F
3
Mini-8
Real-Time PCR System
Install DVD
Version 14.0.3
Coyote Biotech Company
www.coyotebiotech.com

Install Mini8 Plus software
·Connect Mini8 Plus to computer and switch on the device;
·Load CD or open the software le, click setup program.
1) Before installation the Prerequisites Wizard must be started running to
set up the environment as follow:
Click Next
PC port
Mini8 Plus port
A B C
Power cable
USB cable Power adapter
ABC
Select ‘DriverInstaller Application’, ‘.NET Framework 4.0’, ‘NI LabVIEW
Runtime 2014 SP1 f3’ and Click next. Click‘next’ per dialog box
continuously to install ‘DriverInstaller Application’, ‘.NET Framework 4.0’,
‘NI LabVIEW Runtime 2014 SP1 f3’.
Click Install
Click OK
Click Next
4 5

Click Install
Click Finish
·The System will automatically detect the operating environment, and
check the installation options, If a project has been installed, you can
manually cancel.
·Click next to start the installation.
Note: During the installation, the system may be requested to restart, you
can choose to restart later.
Click Next
Click Next
6 7

Select installation
path and click
Next to continue
Click Next
2) The software installation will be boot up once the environment
detection completed.
Click Install
to start the
installation
The Mini8 Plus
software is
installing
8 9

After the
installation
click Finish to
close the setup
program
Turn on the Mini8 Plus System
Turn on the Mini8 Plus instrument, then double-click the Mini8 Plus icon
to start the software.
*When the Power indicator lights on the front panel stop ashing and
remain solid, the instrument is ready.
Mini8 Plus System Workow
1. Prepare the sample strip, load it into the Mini8 Plus, and close the lid.
2. Double-click the Mini8 Plus icon on desktop to open the
software.
3. Dene and name the experiment, save the experiment.
Tip: to use a pre-dened thermal prole and plate layout for your
experiment, click and select one of the template experiments
saved in your computer.
4. Review the thermal prole and adapt it if needed.
5. Set up the plate layout by dening assays, samples, and standards and
assigning them to wells.
6. Start the run. The Monitor Run tab opens.(Do not open the lid while a
run is in progress.This will corrupt the data.)
7. When the run is completed, open the Mini8 Plus lid. Remove the strip
from the block. Dispose of any hazardous materials into appropricate
containers for biohazard, caustic materials, according to your local safety
regulations.
Load reaction tubes
1. Thaw all necessary reagents (templates, primers, probes, and master
mix).
2. Turn on the computer, then the Mini8 Plus, and wait until the Mini8 Plus
"Power" light is ashing (Standby mode)
3. Conrm that the block and optical path are clear of visible
contaminants and there is no physical damage to the system.
4. Pipette samples and qPCR reagents into the strip according to your
protocol. (Warning: Wear protective gloves and eyewear when operating
with any material that might be considered caustic or hazardous.)
5. Open the Mini8 Plus lid and place the strip on the dock.
6. Close the Mini8 Plus lid.
7. Proceed to dene a new experiment.
Workow
10 11
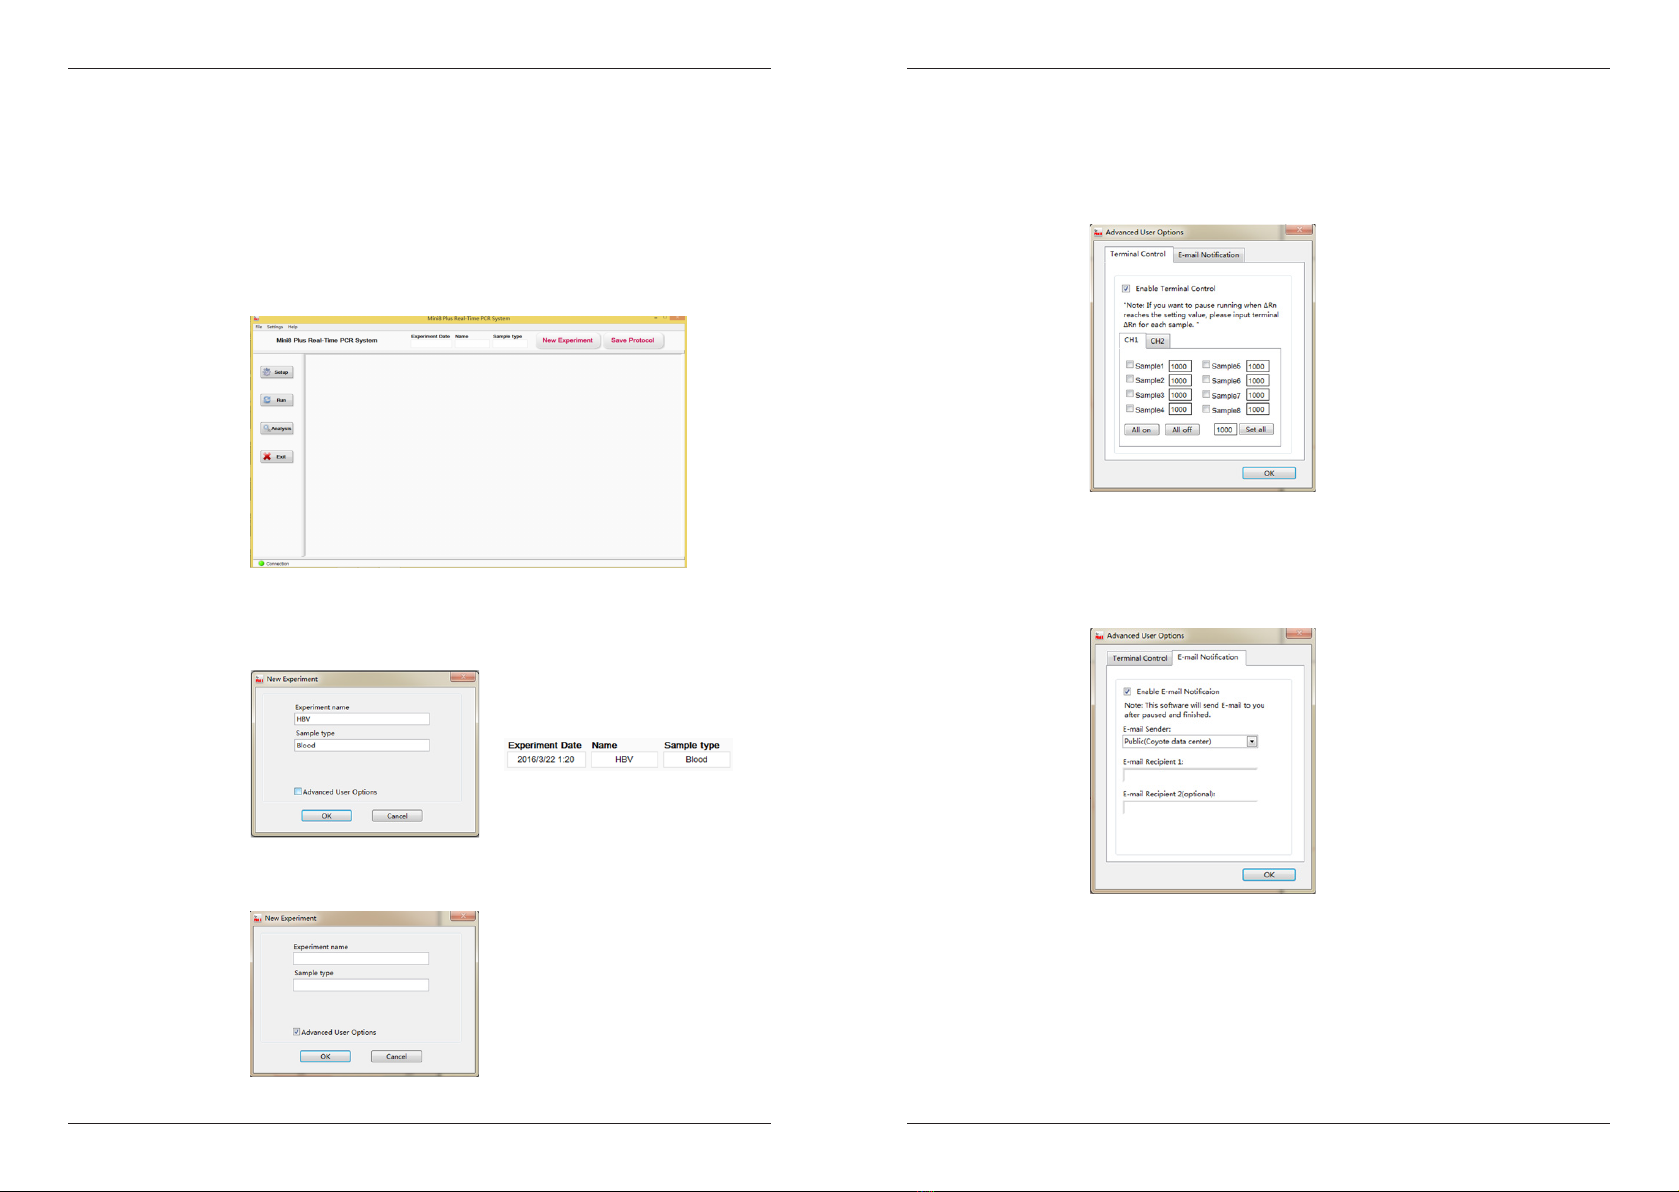
1. Double-click the Mini8 Plus icon on the desktop to open the software.
Advanced user options (optional functions)
2. Click "New Experiment", the New Experiment tab opens, enter an
experiment name and sample type.
Dene a New
Experiment
Select advanced
user options and
click OK
Warning
Do not touch hot lid. The hot lid temperature would be up to 105°C
(221°F) when the device is working .
2) Fill in your Email, when the running is over, the result report (Excel le)
will be sent to your email.
PS. The computer need to be connected to the network.
1) If you want to pause running when ∆Rn reaches the setting value,
please input terminal ∆Rn for each sample. This function can help you to
get the PCR amplication product in the status you want.
12 13

1. Click , the Setup window opens, with the Thermal Protocol
tab visible.
2. Click / to add/delete segment.
3. Click / to add/delete step.
4. The camera icon indicates that the uorescence is being read.
5. Click to add the Melt Curve prole.
6. Click to save Protocol
7. Click to choose and use the saved Protocol (*.pdt)
Set up the Thermal Prole
The "plate setup" involves the following steps:
1. Click , the Plate Setup window opens.
2. Click to choose the sample.
3. Set up sample name.
4. Set up sample type: unknown, positive control, negative control, standard.
When the sample type is dened as “Standard”
the concentration setting interface will be promoted for user to set the
“Standard” concentration in the following interfaces:
Dene the Plate Layout
Dene Sample Name
Dene Sample Type
Dene Fluorophore CH1(None/SYBR/FAM)
Dene Fluorophore CH2(None/Texas Red/ROX)
Dene the concentration unit for samples
Click to choose the sample(1-8)
14 15

5. Set up uorophore CH1(None/SYBR/FAM)
6. Set up uorophore CH2(None/Texas Red/ROX)*
7. Click to save plate layout
8. Click to choose and use the saved plate
Click to enter the running interface, and click to
start the running.
Click to pause the running.
Click to stop the running.
Monitor Run
Cycle Numbers(You can increase and
reduce the cycle numbers during the cycling)
Data Collection Point
Melt Curve
Drag Bar Up or Down to Adjust
Temperature and Duration/
Click Temperature Plateau to Adjust
Temperature and Duration
Remaining Time
Warning
Do not open the lid while a run is in progress. It may allow extraneous
light enter the system so the data will be corrupted.
Note
If you do not set up the uorophore channel when set the thermal prole,
there will be not any curve showing neither during nor after the process
of amplication, for the uorescence will not be read.
When the running is over, click to save data(*.edt).
The Real time PCR curve will be showed during the amplication.
Channel switch
16 17

Data Analysis Click to show the saved data.
CH1 FAM
CH2 ROX
Thermal Prole
PCR amplication curve
PCR amplication curve
Melt Peak
Melt Curve
18 19

Quantication
Quantication interface
Click to export the result report (*.Excel).
Click to show the quantication result.
And then click to exit the software. Turn off the Mini8
Plus instrument.
Lights
System
Information
Lights
The Mini8 Plus System has four indicator lights on the bottom right corner
of the top panel: Power, Error, Status, and Scaning . The following table
shows the meaning of each combination of off ,on,and ashing lights.
Description
Power off
Standby mode
Power on
PCR is running
PCR is running & scanning
Fatal Error (instrument might be overheated)
20 21

System
Information
Specications and Environmental Requirements
Optical
Thermal
Operational
Physical
Computer
Requirement
Environmental
Light Source
Detector
Heating/cooling
module
Ramping Rate (Max.)
Thermal Uniformity
Thermal Accuracy
Temperature Range
Sample Capacity
Reaction Volume
Warm Up Time
Sensitivity of
Detection
Melt Curve Resolution
Multiplexing
Dimensions
Weight
Power
System
Environmental
Temperature Range
Environmental
Humidity Range
High Power LED
Photodiodes
Peltier
3°C/s
±0.2°C
±0.2°C
4-100°C
8 wells
15-150μL
1min
1 copy
Supported Resolution to 0.5°C
Detect up to 2 dyes simultaneously, (FAM/ROX)
205×190×98 mm (L×W×H)
2.1 kg
12V, 10A
WIN 7; WIN 8.1; WIN 10
Operating: 15°C to 30°C
Storage: 10°C to 60°C
Operating: 15-90% relative Humidity
Storage: 5-95% relative Humidity
Electromagnetic Compatibility
·To conrm proper operation: The electromagnetic environment should
be evaluated prior to operation of the system.
·Do not use this system in close proximity to sources of strong
electromagnetic radiation (e.g. unshielded intentional RF sources), as
these may interfere with proper operation.
·If you notice any interference, discontinue using the system until all
issues are resolved. Resolution may include moving cords from other
equipment away from the system, plugging the system into an outlet on
a different circuit from other equipment, or moving the system away from
other equipment. If you still have difculties, contact COYOTE.
Cleaning and Maintenance
Clean the block and housing as needed, following these directions.
Caution: If hazardous or biohazardous materials are spilled onto or into
the equipment, clean it immediately.
1. Turn the system off and allow the block to cool completely.
2. Using a lint-free cloth slightly dampened with clean water, gently wipe
the surfaces of the equipment. If a stronger cleaning agent is needed,
use a lint-free cloth slightly dampened with 95% isopropyl alcohol.
Follow these practices for regular maintenance of your Mini8 Plus system.
1. Every time before using the system, visually check it to conrm there
is no obvious physical damage such as dents, frayed cords, or damaged
levers. If you see any damage, discontinue using and contact COYOTE
Technical Support.
2. Once a year, run a known test sample to conrm accurate analysis.
22 23

Concepts ·The weight of one genome (g) = (size of genome in bp) x (618 g/mol/
bp)/Avogadro’s number
One human genome (g) = (3x10⁹bp) x (618g/mol/bp) / (6.02x10²³) =
3.08x10⁻¹²g
One haploid cell (sperm/egg) = 3.08 pg of DNA
One diploid cell = 6.16 pg of DNA
·RNA concentration (μg/μl) = (A260×40×D)/1000, where D = dilution
factor and A260= absorbance at 260 nm.
·DNA concentration (μg/μl) = (A260×50×D)/1000, where D = dilution
factor and A260= absorbance at 260 nm.
24
Table of contents
Popular Laboratory Equipment manuals by other brands

Gilson
Gilson PIPETMAN F Series manual

Oxford Instruments
Oxford Instruments Austin Scientific 320 quick start guide

DH Lifelabs
DH Lifelabs AquaSolvo AAE-30 06 Series instruction manual

OHAUS
OHAUS HSMNHP4CAL instruction manual

Gilson
Gilson Safe Aspiration quick guide

Buchi
Buchi Pure Chromatography C-900 Operation manual


