Craft'A'Camper DIESEL HEATER User manual
DIESEL HEATER
USER MANUAL V1.0
Page 1: The Basics
Page 2: Dos & Don’ts
Page 3: Using the Heater
Page 4: Heater Modes
4:1: Fan Mode
4:2 Thermostat Mode
Page 5: Timer Functions
5:1 Setting an “ON” timer
6:1 Setting an “OFF” timer.
Page 7:1: Alpine Mode
Page 7:2: Controller Switch
Page 8: Fuel Pump & Priming
8:1: Priming the Pump
8:2 Replacing the Pump
8:3 Fuel Pickup & Usage
Page 9:1: Controller Labels
Page 9:2: Remote Fob
Page 10: Faults
10:1 Fault Codes
10:2 Common Faults
Page 11: Contact Info

THE BASICS!
WHAT YOU NEED TO KNOW:
This page should go through the basics of what the install engineer would have explained
plus some additional numbers and info. We’d recommend reading the dos and don’ts on the
next page (2) too.
Firstly, to turn the heater on, simply hold the power button on your wall mounted
controller for 3 seconds or hold the ON button on the little remote fob you will have
been given. This’ll now begin a start up procedure of the heater, this may take 5 or so
minutes.
There are 2 different settings you can run your heater on. The default fan speed setting
will display 1 through 6 with the higher number being a more powerful setting. The
other setting being a thermostat mode, this setting can be a little tricky to understand
but please see section 4:2 for more details on this. To change between the thermostat
and fan speed setting, all you have to do is hold the settings button in the top left
corner of your wall mounted controller for 3 seconds.
To turn the heater off, hold the power button again until OFF appears on the LCD
screen. The heater will now start running a cool down cycle which will usually last 5
minuets. You will not be able to turn the heater on or change any settings during the
cool down cycle. Once the heater has fully turned off, the fan will stop, and the display
will now show the battery voltage with a little red icon in the bottom left.
Depending on your install, you might have a little black rocker switch. These are used to
turn the display off on your wall mounted controller while you’re not using the heater.
Although these displays do dim down slightly after a few seconds of no input, they can
still be quite bright if you’re driving or sleeping at night, annoying! Think of this switch
like your TV at home with the red standby light, if you want to get rid of that you turn
it off at the wall and this switch is basically the same principle. It is not there to save
on battery life and it’s not something you ever NEED to turn off, its simply there if the
controller backlight is annoying you! Unfortunatly, this switch will HAVE to be on if you’re
using the heater. (See section 7:2)
On your remote fob, you’ll have 4 buttons. These are all labelled and should do as they
say. You may have to hold the ON/OFF buttons for a few seconds for it to register. If
your key fob isn’t linked to the controller, you can link it by holding the “ON BUTTON” and
“DOWN ARROW” simultaneously until the letter “OC1” appears. Then simply hold the “ON”
button for 3 seconds on the remote fob and it should be linked. Please note that this
cannot be done while the (heater running. You can link more than 1 remote fob by
changing the OC channel. See section 9:2)
You may hear a small clicking noise under the van. This is the fuel pump for the heater
and is a normal function and nothing to worry about. Most fuel pumps will be installed
with a quieter mounting (depending on vehicle) but the pumps will be heard most if the
heaters running on a low setting. The diesel heater is very efcient on fuel, you could
leave it running all night and will notice little movement on the fuel tank needle. The
heaters should pick up fuel all the way into the red but will always run out of fuel
before the vans engine. For the reliability of the heater, try keep the tank above 1/4. (If
you run below the level of fuel for the heater, please see section 8:1).
Please make sure you have a functioning carbon monoxide alarm in your vehicle at all
times, even when not using the heater.
1

DOS & DON’TS!
PRECAUTIONS & MAINTENANCE:
2:1 Monitor Start Up Procedure: After every drive of the vehicle, you must monitor
the heater for at least 15 minuets on its rst startup. Due to conditions out of our
control things might become damaged or loose under the vehicle which could cause
various problems on startup. If you hear or smell anything irregular the heater
must be inspected further. In the event of dense white smoke please follow step
8:1 below. It’s common to fail startup on the rst use in a while and the smoking
will be a cause of the heater hitting air pockets in the fuel line - this will clear.
2:3 Use regularly: We advise running the heater on full blast once a month for at
least 30 minuets. This will help clear any condensation, soot issues and help keep
the unit lubricated. This will also help catch any age related issues now rather
than your rst trip away in the next colder season. Prolonged non-usage is the
leading cause to faulty units.
2:4 Safe Usage: Do not use the heater while your vehicle is parked inside a garage
or building. It is not advised to use the heater while having an awning rolled out.
Carbon monoxide alarms are a must for any unventilated area of living. Do not use
the heater while parked on steep inclines of more than 15%, this includes
driveways but is nothing to worry about while driving. Use extra care when using
the heaters in areas with little to no wind, gases may become trapped under the
vehicle and build up to enter through manufactured gaps outside of our control -
this is more of an issue on older vehicles.
2:5 Keep Vents Clear: Do not block any heater vents while in use. It’s important the
intake vent at the back of the heater is kept clear and the heater vent also be
allowed free ow. Do not block vents to dry/warm things like clothing, shoes or
body parts ect.
2:6 Do Not Disconnect Power: The most important rule is to keep power to the
heater unit. Never disconnect the fuse, battery or any part of the heater while
running. When the heater turns off, it’s a must to allow it to run a cooldown cycle,
this can take 5+ minutes. You WILL damage or melt internal parts if this cycle is
not performed. If the heater becomes faulty during use, turn off using the display
and still wait for the unit to cool before disconnecting power.
2:7 Monitor Battery Level: Do not use the heater on low, discharged or damaged
batteries. If the heater displays E2 during startup or usage, you will need to get
more charge in your battery before using the heater. The heater does have a built
in cut off if the battery level gets too low (under 8v) but factors with the battery
can still prevent an adequate cool down of the heater when this cutoff is
triggered.
2:8 Refuelling: The heaters can be used while driving in most scenarios, but law
prohibits the usage while refuelling the vehicle, this won’t damage the unit.
2

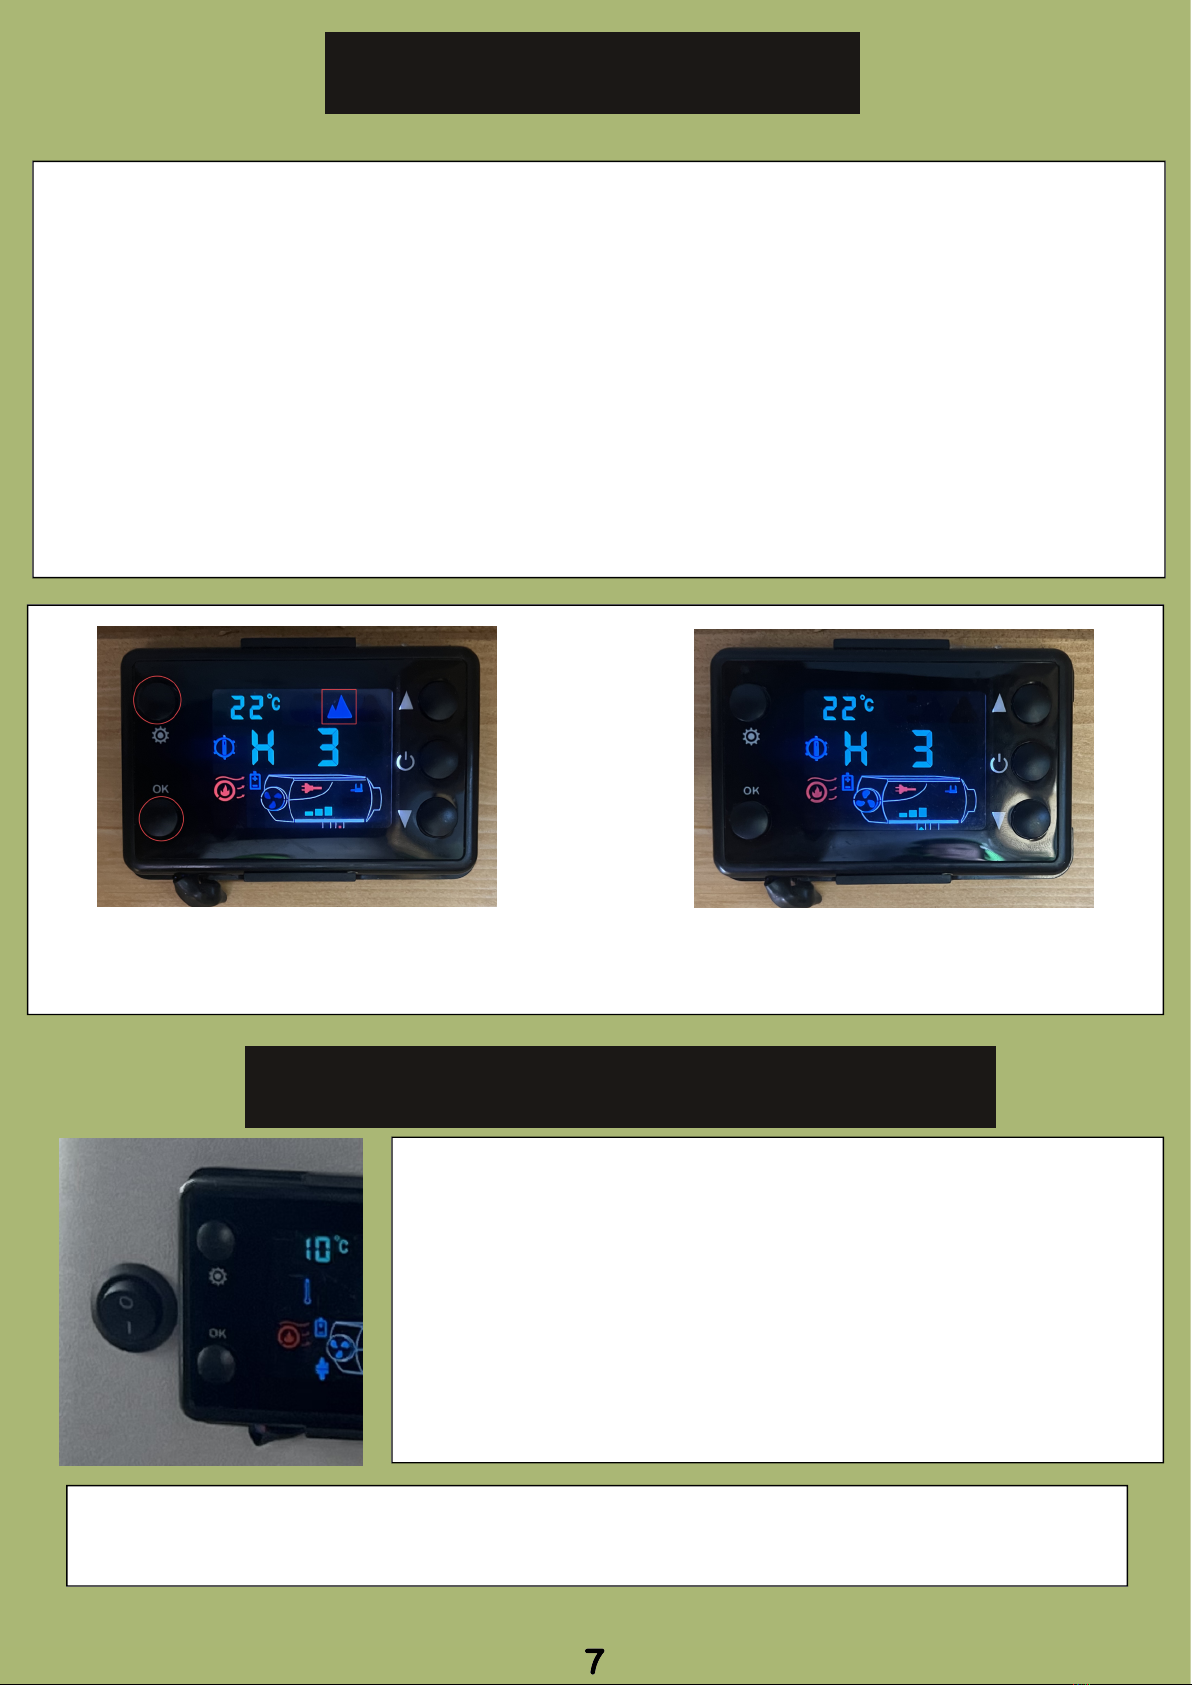
USING THE HEATER:
KEEPING IT SIMPLE!
3
Step 1: Turning the heater on - Hold the
power button circled in red above for 3
seconds. You can also hold the ON button on
your wireless remote fob.
Step 3: Choosing your heating mode - See
section 4 below for more details on this. Use
the Up and Down arrows on the right side to
change the fan speed or temperature. The
blue bars in the middle of the display
represent the speed the units running at. The
number in the top left corner will also show
the current room temperature.
Step 4: Turning the heater off - To turn the
heater off, hold the Power Button again for 3
seconds or until the display shows “OFF”. The
fan will remain on for 5 minuets or until the
unit is cool enough. You will not be able to
change any settings or turn the heater back
on until this cycle has nished.
Step 2: The heater will now begin a start up
procedure. This may take 5 mins to generate
any noticeable heat and you may notice a
fumes smell during this process, this is
normal.
Step 5: Once the heater fully turns off, it’ll
show the above screen, this is your battery
voltage, this will always show with the red
symbol in the bottom left..
Step 6: More details on this switch in section
7:2. This switch will have to remain on if the
unit is running.
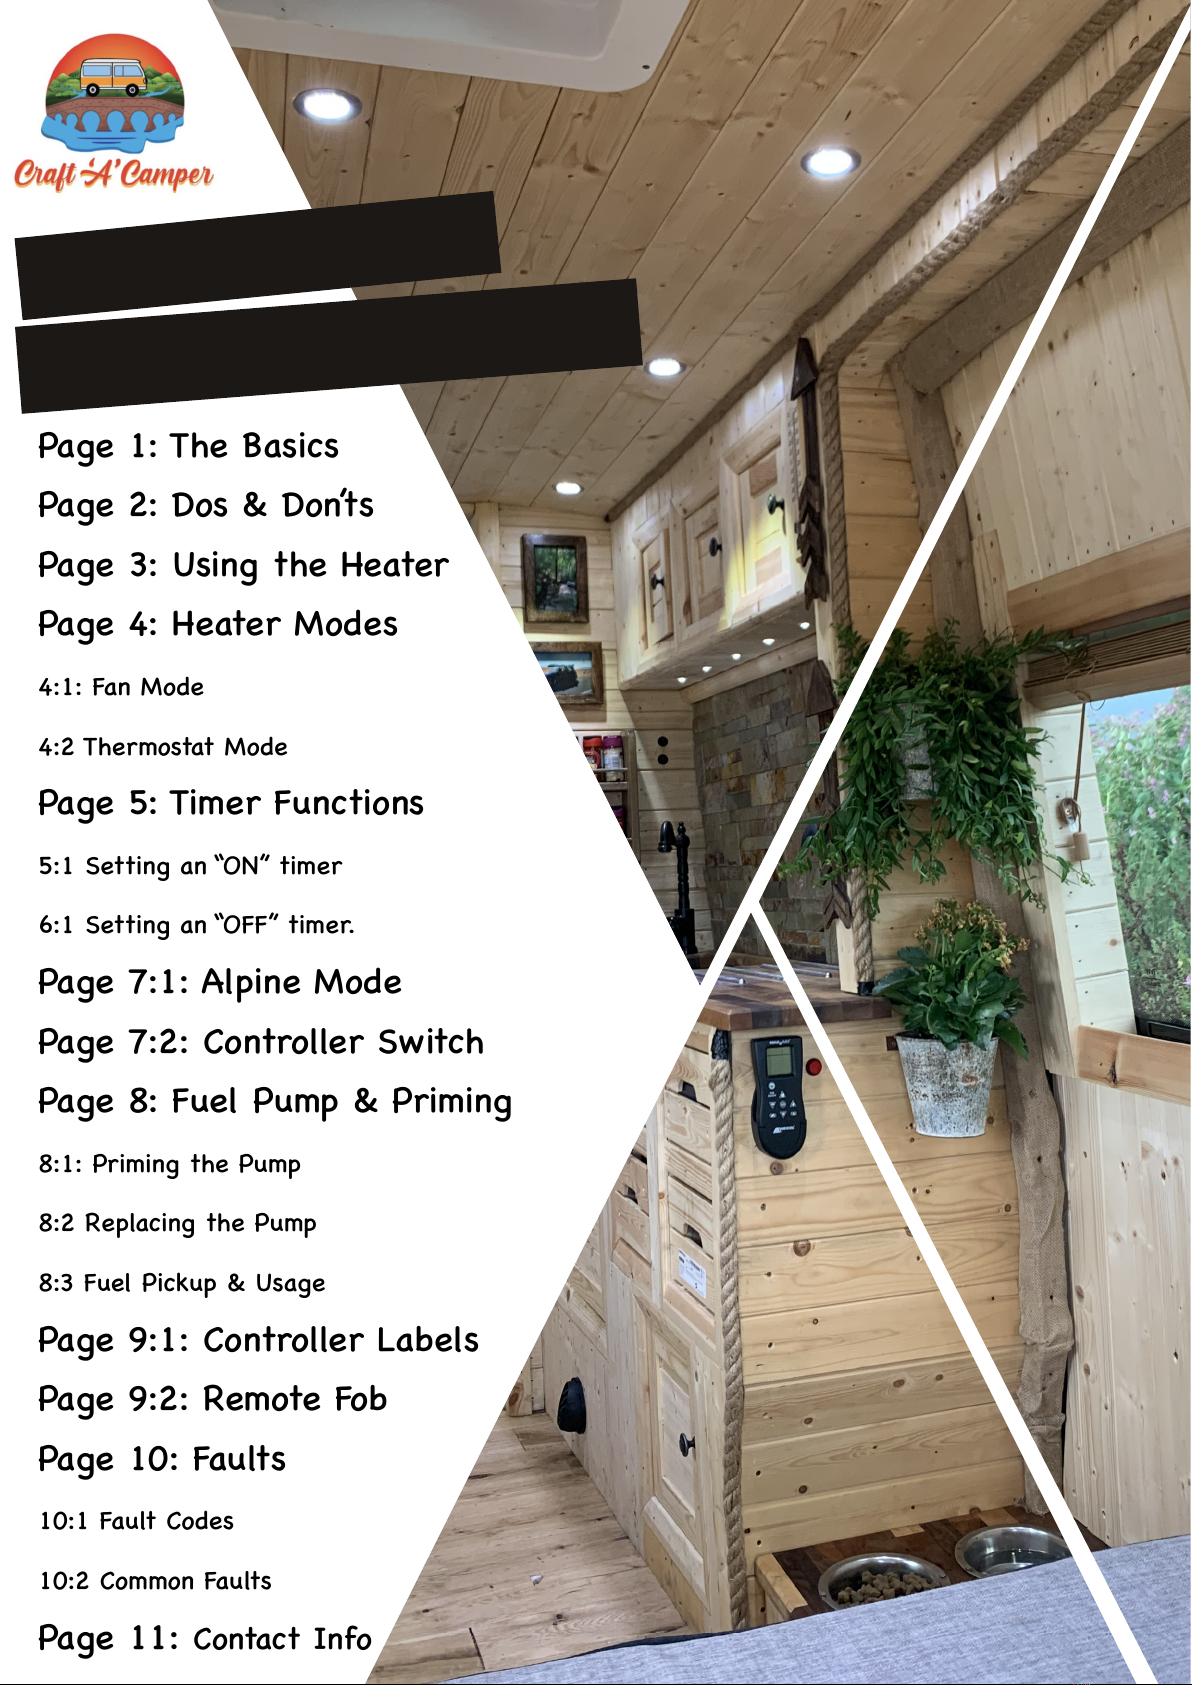
The default setting on your heater will be a fan
speed operation. Once you turn the heater on it’ll
display “H (1-6)” in the middle. Use the arrows
(circled in red) to turn the heater up and down.
The system will run from 1-6, with the higher
number being a faster speed. This is a very basic
setting and is what the majority of people tend
to use. The heater will continue on your set fan
speed until you turn it off or tell it otherwise. It
will take a moment to adjust to any change.
To change between the thermostat mode and fan
speed, simply hold the settings buttons in the top left
of your wall mounted controller for 3 seconds (Circled
in red on the right). Now you should see a temperature
displayed in the middle. Using the same arrows will
change the vans set temperature instead of the fan
speed. There is a temperature range of 5oc to 40oc.
The temperature in the middle is the preset and the
temperature displayed in the top left is the current
temperature.
There is a few misconceptions with the thermostat mode. It’s an always on system, so the heater
WON’T turn itself on/off automatically but it will speed up and slow down as the temperature
uctuates inside the vehicle. Once the heater reaches the temperature you set, it’ll start to slow
down and basically idle at the very lowest setting until the temperature falls below your set
temperature where it will slowly speed up again. In the warmer months or even on the warmer
winter nights, you might nd that even when the heater has reached the set temperature and is
running at the lowest setting it may still be generating more heat than the vans losing. We’d advise
adding some airow by opening a few windows or roof vents but if it’s too hot inside, you may need
more user input and turn the heater off and on yourself. The reason it doesn’t turn itself on and
off automatically is because on startup the heater uses the most battery power, if it had to turn
on 15 times a night, you’d likely end up with a at battery and it’s just not the most efcient way
of working. The thermostat will function better the colder it is outside and will perform best in the
larger vehicles. Smaller vehicles may not lose heat quick enough for the heater to reasonably control.
You as the user will learn what suits your van, you’ll learn how quick it warms up and how the
heater performs with different external temperatures. Some people choose to have the heater preset
on the maximum fan speed (as seen in section 4:1) and turn the heater off when they’re comfortable
and others may choose to run the heater on a thermostat 24 hours a day for the entire winter
season. It is up to you to nd what’s best for your needs.
HEATER MODES:
4:1 FAN OPERATION
4:2 THERMOSTAT OPERATION
4
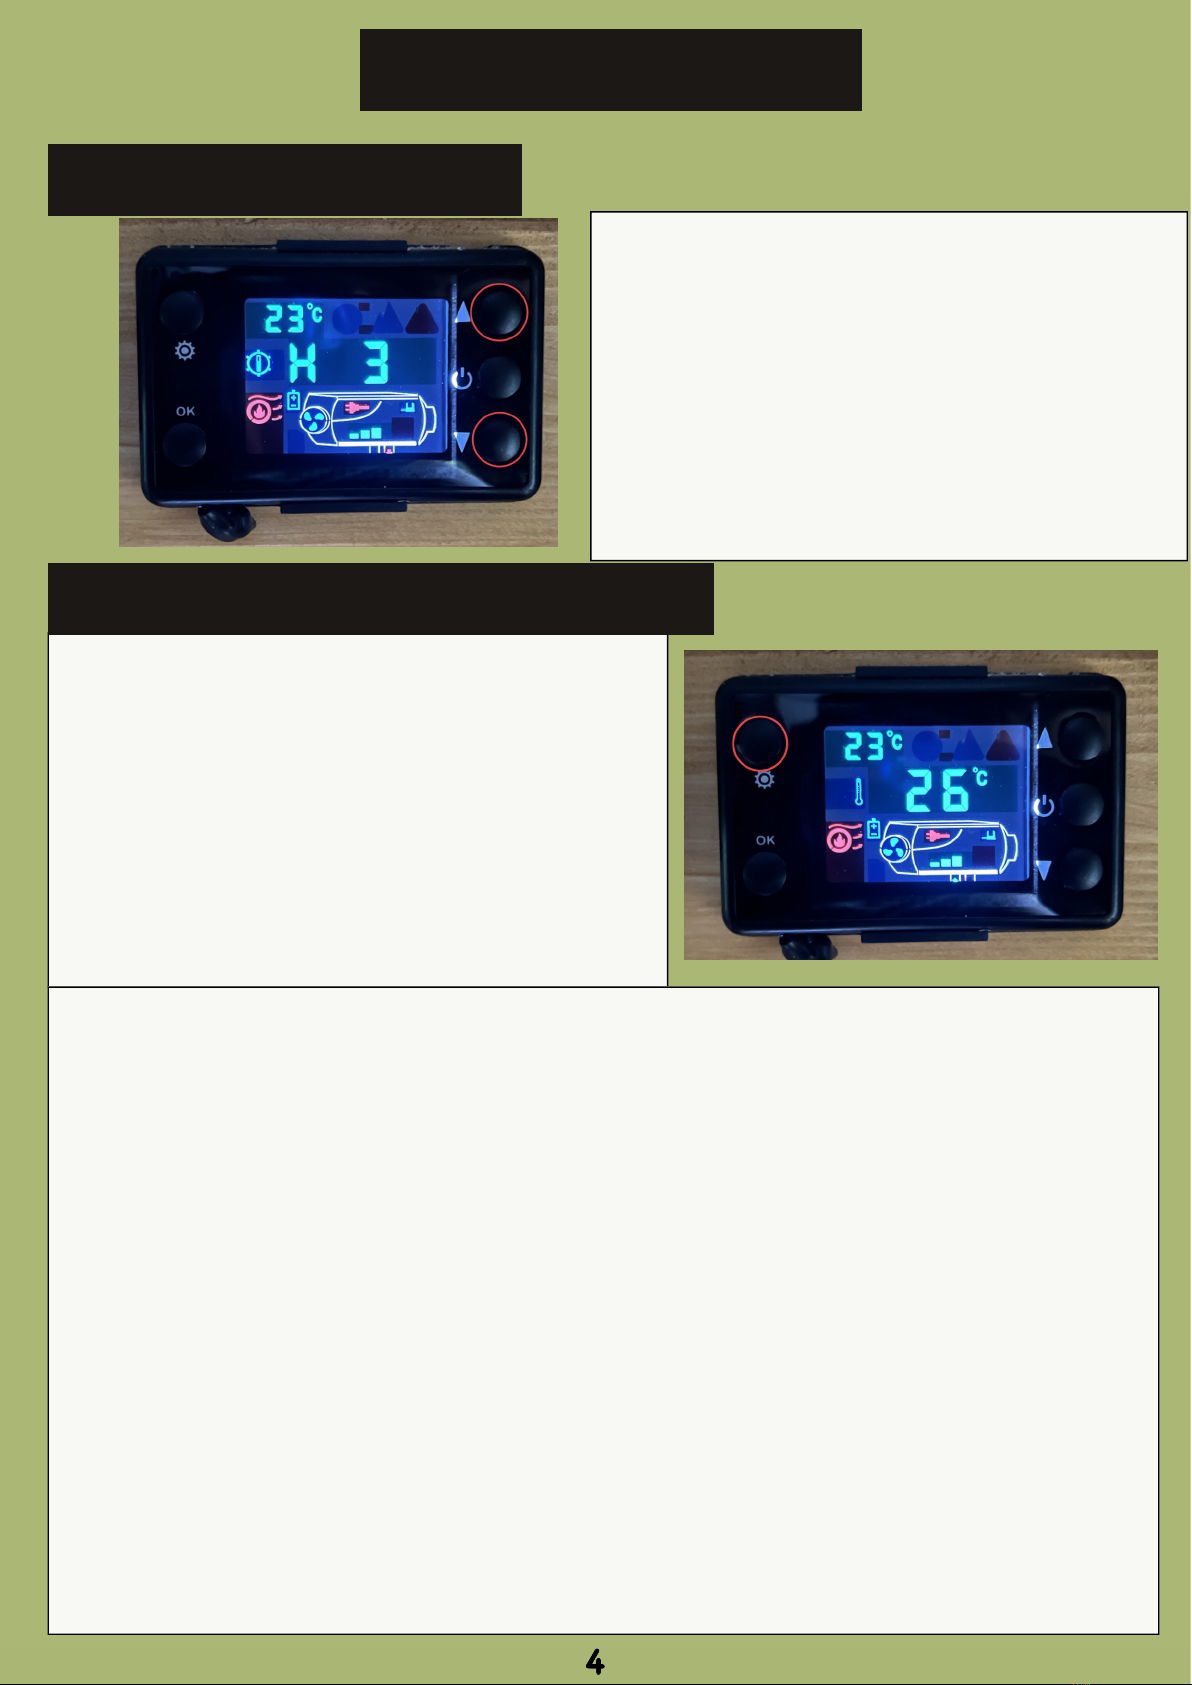
5:1 Setting A Turn On Timer:
The timer function on these heaters can be tricky to understand. It might not be valuable for
everyone but perfect for customers who use their vans regularly and want the vehicle to be warm
before you wake up in the morning without the need to run the heater overnight. Now, the way
the timer works is on a countdown rather than entering a specic time. For example: if its currently
23:00 and you want the heater to turn on at 08:00 you will need to enter how many hours and
minuets it is until 08:00. So, using the instructions below you’d enter 09:0 into the heater because
in 9 hours time it’ll be 08:00. A very useful trick is to ask Siri (or google) “how long until *time
you want the heater to turn on*” and it’ll tell you the exact time to enter into the controller. This
may all make more sense after reading through the step by step guide below.
Step 1: With the heater OFF - Hold the “OK”
and “DOWN ARROW” simultaneously until
##.#H appears. You should see a clock
ashing with “ON” at the top of the screen.
Step 3: Press the OK button to save the time
you input. This will take you back to the Home
Screen. You’ve now set the timer but still
need to put the heater in timer mode.
Now the heater will begin a countdown timer to turn on. Note from above in step 2 that inputted
was 08.0. This means the heater is set to come on in 8 hours time from whatever time its activated.
The heater will remember the last time inputted so on the next setup you can jump straight to step
4. Remember that the number after the decimal is a decimal hour. So .1 would be 6 minuets, .2
would be 12 minuets, .3 would be 18 minuets and so on. The turn on timer can only be activated
while the heater is not running.
Step 4. The countdown will only begin once
you set the heater to timer mode. Hold the
“SETTINGS BUTTON” and “UP ARROW” at the
same time until a little clock appears next to
the temperature, this should ash “ON”.
Step 2: Now input the countdown timer. Cycle
through the digits using one tap of the power
button. How the numbers work are Hours:then
the third number is decimal hours, so each “1”
represents 6 minuets.
TIMER FUNCTION:
5
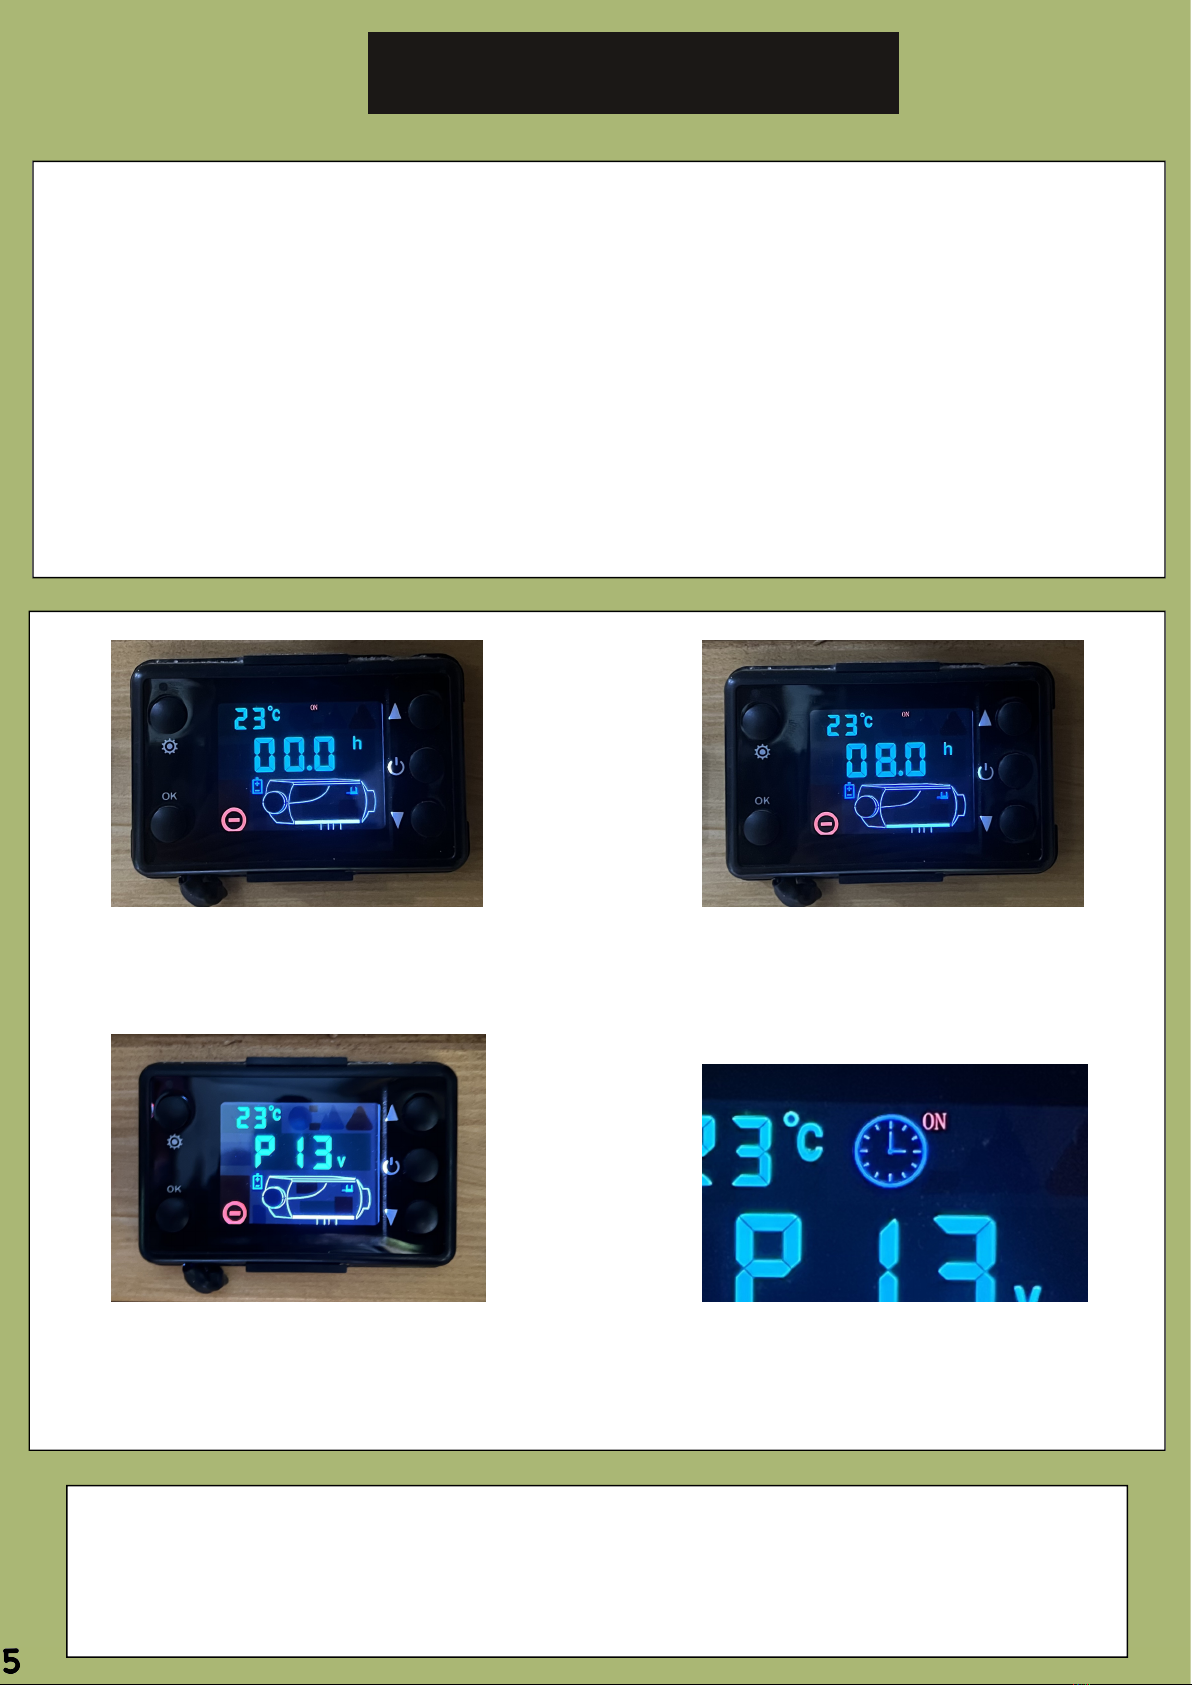
6:1 Setting A Turn Off Timer:
The timer function on these heaters can be tricky to understand. It might not be valuable for
everyone but perfect for customers who use their vans regularly and want to leave their heaters
running to turn off automatically after a preset time. Now, the way the timer works is on a
countdown rather than entering a specic time. This differs to the turn on timer as you set this
one while the heater is running. For example: regardless of what time it currently is, you simply
enter the amount of hours you want the heater to run for before it’ll turn off. So using the
instrustions below you’d enter 01:0 into the heater to turn off in 1 hours time. This may all make
more sense after reading through the step by step guide below. This is separate to the turn on
timer and they unfortunately can’t be combined to work together.
Step 1: With the heater ON - Hold the “OK” and
“DOWN ARROW” simultaneously until ##.#H
appears. You should see a clock ashing with
“OFF” at the top of the screen. If it ashes with
“ON” press the settings button once to change.
Step 3: Press the OK button to save the time you
input. This will take you back to the Home Screen.
You’ve now set the timer but still need to put the
heater in timer mode.
Step 4: With the heating running. Repeat step
4 from the previous page and the clock will
now ash with “OFF”. This has begun your
timer. To turn off.
Now the heater will begin a countdown timer to turn off. Note from above in step 2 that inputted
was 01.0. This means the heater is set to turn itself off in 1 hours time. The heater will remember
the last time inputted so on the next setup you can jump straight to step 4. Remember that the
number after the decimal is a decimal hour. So .1 would be 6 minuets, .2 would be 12 minuets, .3
would be 18 minuets and so on. The ON/OFF timers are separate and cannot be run together.
Step 2: Now input the countdown timer to
turn off at. Time can be done when the
heaters running too, and the time input works
the same as step 2 on the previous page. This
OFF timer will start from whenever its
activated in step 4.
TIMER FUNCTION:
6
7:1 What does alpine mode do?
Alpine mode is designed for use at high altitude. Nowhere in the UK or even Europe will require
you to use this mode. It can severely damage the unit if used incorrectly. What it does is reduce
the amount of fuel sent to the unit to compensate for the thinner air. If this fuel to air ratio is
modied when it’s not needed, the unit won’t be burning cleanly and will eventually soot up causing
a smokey exhaust, unusually high levels of carbon monoxide and have the potential to damage the
unit beyond repair. If this mode is accidentally activated, please deactivate alpine mode.
Step 1: Hold the “Settings Button” and “Ok
Button” simultaneously until the mountain
symbol has disappeared.
Most installations will come with a switch next to the controller. This
switch is like a “summer switch”. The purpose is to cut the power to the
display when you’re not using the heater. This use is optional and its
mainly to prevent the bright LCD light when you’re driving or sleeping at
night. It’s not necessarily there for the battery drain. It never has to be
turned off, it’s just an option. Think of it like your TV at home with the
red standby light, if you want to get rid of that, you turn it off by the
wall, this is the same principle. This switch will unfortunately have to
remain on if you are using the heater but it will prevent the remote from
working or the heater turning on with accidental input.
Not all installs will come with a switch. There are different ways of installing this switch but the
installer will have explained if it differs from the above. Please seek advice from your installer if you
have any questions or concerns regarding this.
Step 2: The mountain symbol should’ve
disappeared. This can be done with the heater
on or off.
7:1 ALPINE MODE:
7:2 CONTROLLER SWITCH:
7

8:1 Priming the fuel pump:
8:2 Replacing the fuel pump:
8:3 Fuel Pickup and Usage:
The fuel pump is a little cylindrical silver/gold component under the vehicle. The heater communicates
to the pump to provide the correct amount of fuel for the setting you’re currently running on. You
may hear a ticking noise from this, this is a normal function but may be heard more when the
heaters running on a low setting.
If you’re having a E:8 fault with the heater, it’s likely the heater has air in the fuel line. The best
way to prime the fuel lines would be to make sure the vans parked at, you have enough fuel and
then turn the heater on 4-5 times and let the start up cycle prime the fuel itself. You might get
some white smoke from the exhaust, but this will clear. You can manually prime the fuel by holding
down the “UP ARROW” and “DOWN ARROW” at the same time BUT this is never advised. Doing
this can risk over priming the heater resulting in ooding the unit with fuel making it difcult to
restart. Manual priming will only stop when you let go and has no automatic cut off. If the previous
advice doesn’t work, please just get in touch with us directly.
The fuel pumps are very reliable and rarely need replacing. They’re held on (on most vans) with a
rubber bracket which will likely need to be replaced before the pump itself. This is easy to replace.
Undo the rubber hose connectors to the fuel pump with a 7mm socket or at screwdriver and
press the metal spring in to release the plug, you should then be able to slide the pump out the
bracket. There will also be a 10mm nut and large washer holding the bracket in place.
These heaters are very efcient when it comes to their fuel consumption. Most won’t even notice
the fuel needle drop after usage and they can easily run all night using as little as 1 litre of
diesel, even with the price of fuel at the time of writing this, that’s good. To go through more
detailed numbers: The heater would use around 130ml fuel an hour on its lowest setting (1), climbing
to around 500ml on the highest (6).
The heaters are connected to the vehicles fuel tank with a separate pickup pipe (on most vans),
keeping it completely separate to any feeds or return from the vehicle’s engine. The heaters should
pick up fuel all the way into the red but will always run out of fuel before the van - giving you
the peace of mind it won’t run the tank dry and you’ll still be able to start the van after use. If
the van isn’t parked at, the level of fuel pickup may differ, obviously when you’re sleeping in the
vehicle, you’re going to try be on a at surface anyway. For those keeping their vehicles on sloped
driveways, it’s advised to park at or facing uphill if you’re wanting to use the diesel heaters while
low on fuel.
FUEL PUMP INFORMATION:
8
9:1 DISPLAY LABELS:
9:2 REMOTE FOB:
7. Ambient Temperature
8. Timer Symbol
9. Alpine Mode
10. Fault Active
11. Display Option
12. Running Part Graphics
1. Up Arrow
2. Power Button
3. Down Arrow
4. Settings Button
5. OK Button
6. Heater Mode
Normal Heater Off Screen Running On Thermostat Running On Fan Speed
Case Temperature Display
While the heater is running you
can change the display info by
pressing the OK button to cycle
through the modes. Pressing it
once will show the internal case
temperature of the heater. This
will range from ambient all the
way up to 220oc. Pressing again
will show the supply voltage
while running, similar to the
Home Screen when the heaters
not in use. Supply Voltage Display
Linking new fobs: While the
heater is turned off. Hold the
“Power Button” and “Down
Arrow” simultaneously until the
letters “OC#” appear. The
number represents the channel,
you can have more than one fob
linked by changing the channel
of each. While “OC#” shows, hold
the “ON BUTTON” on the fob and
it should link.
You will have to hold the ON/OFF
buttons for 2 seconds for the
remote fob to register your input.
The fob has a range of up to 50
meter but this depends on
obstructions and signal strength.
The range may reduce with age. To
replace the battery, undo the 3
small Philips screens and you’ll see
a small 27A battery - available
widely in shops or on Amazon.
9
10:1 ERROR CODES:
10:2 COMMON FAULTS:
CODE
E:1
E:2
E:3
E:4
E:5
E:6
E:7
E:8
E:9
E:10
- - -
ERROR MESSAGE
Over Voltage
Under Voltage
Glow Plug
Fuel Pump
Overheating
Fan
Controller
Fuel
Temprture Sensor
Repeat Error
Controller
LCD POSSIBLE FIX
This usually means the battery being over charged either by a faulty solar charge controller
or wrongly congured split charge system.
Your battery is likely too low to safely run the heater. Try again with the engine running if
you have a split charger or charge/replace the battery by other means.
Sometimes relates to a low battery but if not will either be a glow plug or heater control
board fault. Unlikely to be an immidiate x without replacement parts.
Try disconnecting the fuel pump and cleaning the connections by blowing. Could also be a
faulty pump itself or on rare occasions a faulty controller.
A rare fault either caused by a faulty temperature sensor or because the heater vent/s is
blocked or needs cleaned. Make sure intake is clear of clutter.
If the fan doesn’t turn on at all, it’s either jammed on the heater housing or a replacement
control board is needed. If the fan does turn it, it may be a faulty temperature sensor.
Try disconnecting power for 30 seconds, if not a new controller may be needed.
The heater isn’t receiving fuel, please see section 8:1 on a previous page.
Can sometimes be related to a low battery, if not a new temperature will be needed.
Usually a repeat of E:8 after multiple failed start ups. Follow advice in E:8.
The controller isn’t receiving a signal from heater control board. Check blue wire at plugs.
New controller/control board may be needed.
E8/E10 (FUEL ISSUE): By far the most common fault this is usually easily xed (See section 8:1).
This error can be caused by a handful of reasons but more often than not its due to recent low
fuel or prolonged driving without usage of the heater. Air can get trapped in the heaters fuel line
as the fuel sloshes around in the fuel tank, this isn’t something to worry massively about but can
be prevented by keeping the fuel tank above 1/4 at all times. The heaters fuel pickup pipe is cut
to length and reaches to about 1cm from the bottom of your fuel tank. As the fuel in the tank
sloshes around, if the pickup pipe isn’t in diesel it will lose its vacuum and fuel will slowly fall back
in the tank. This fault code can also be caused by a faulty fuel pump, blocked fuel lines or low
voltage.
E3 (GLOW PLUG ISSUE): Less common but more so with age, the glow plugs inside the unit can
become old and trigger a fault due to low performance. These are required to start the heater
up. These can also be caused by electrical faults with the heater control board due to power surges
or extreme low voltage. They’re easily replaced but do require a special tool - sometimes its just
a faulty control board and not a faulty glow plug.
E4 (FUEL PUMP FAULT): The fuel pumps are normally pretty invincible, they’re mounted externally
and are designed to withstand the road elements. This is most commonly caused by bad fuel quality
or loose wiring. For a possible quick x, disconnect the fuel pump plug by pressing in on the metal
spring and blowing into the connections in an attempt to clean.
E5 (OVERHEATING ISSUE): This rarely does any prolonged damage to the unit but is triggered
due to a lack of air ow, blocked or dusty intake fan or its simply too hot inside the vehicle.
E9 or FAN RUNNING CONSTANTLY: If your heaters fan is running constantly, even while not in
use, this will be a fail safe from a faulty temperature sensor. These can be replaced with ease
with a pair of pliers. Even though the sensor is faulty, it may not always throw a error code. It’s
suspected that low battery voltage causes this to trigger, the only x is a replacement sensor.
FUSE BLOWING: This is extremely rare and most likely caused by bear wiring from the heater
catching the vehicles chassis. Other causes are faulty fuel pumps, glow plugs or circuit boards.
10
CRAFT’A’CAMPER
CONTACT INFO
JOSH@CRAFTACAMPER.COM
Vist website for full t&c’s,
updates, FAQs and our lastest
work.
www.craftacamper.com
11
Table of contents
Popular Heater manuals by other brands

Rinnai
Rinnai RHFE-1510F Operating and installation instructions

Mini
Mini E-90 Technical documentation operation manual

Helo
Helo 1107-60-040511 product manual

Clas Ohlson
Clas Ohlson DF-HT5390P manual
 RJL Installation, comissioning and servicing instructions")
Reznor
Reznor RHC 8000(m) RJL Installation, comissioning and servicing instructions

Biddle
Biddle DF2 Installation, operating and maintenance manual


Space-Ray
Space-Ray CBU09 Installation, servicing and operating instructions

Hatco
Hatco Flav-R-Savor FS3HAC Series Installation and operating manual

VITAE
VITAE DIR-1300-R Instructions for installation and use

ELARABY
ELARABY TORNADO TPH-2000T owner's manual

ORIGO
ORIGO FH-T48P instruction manual

tomado
tomado THF2001B instruction manual