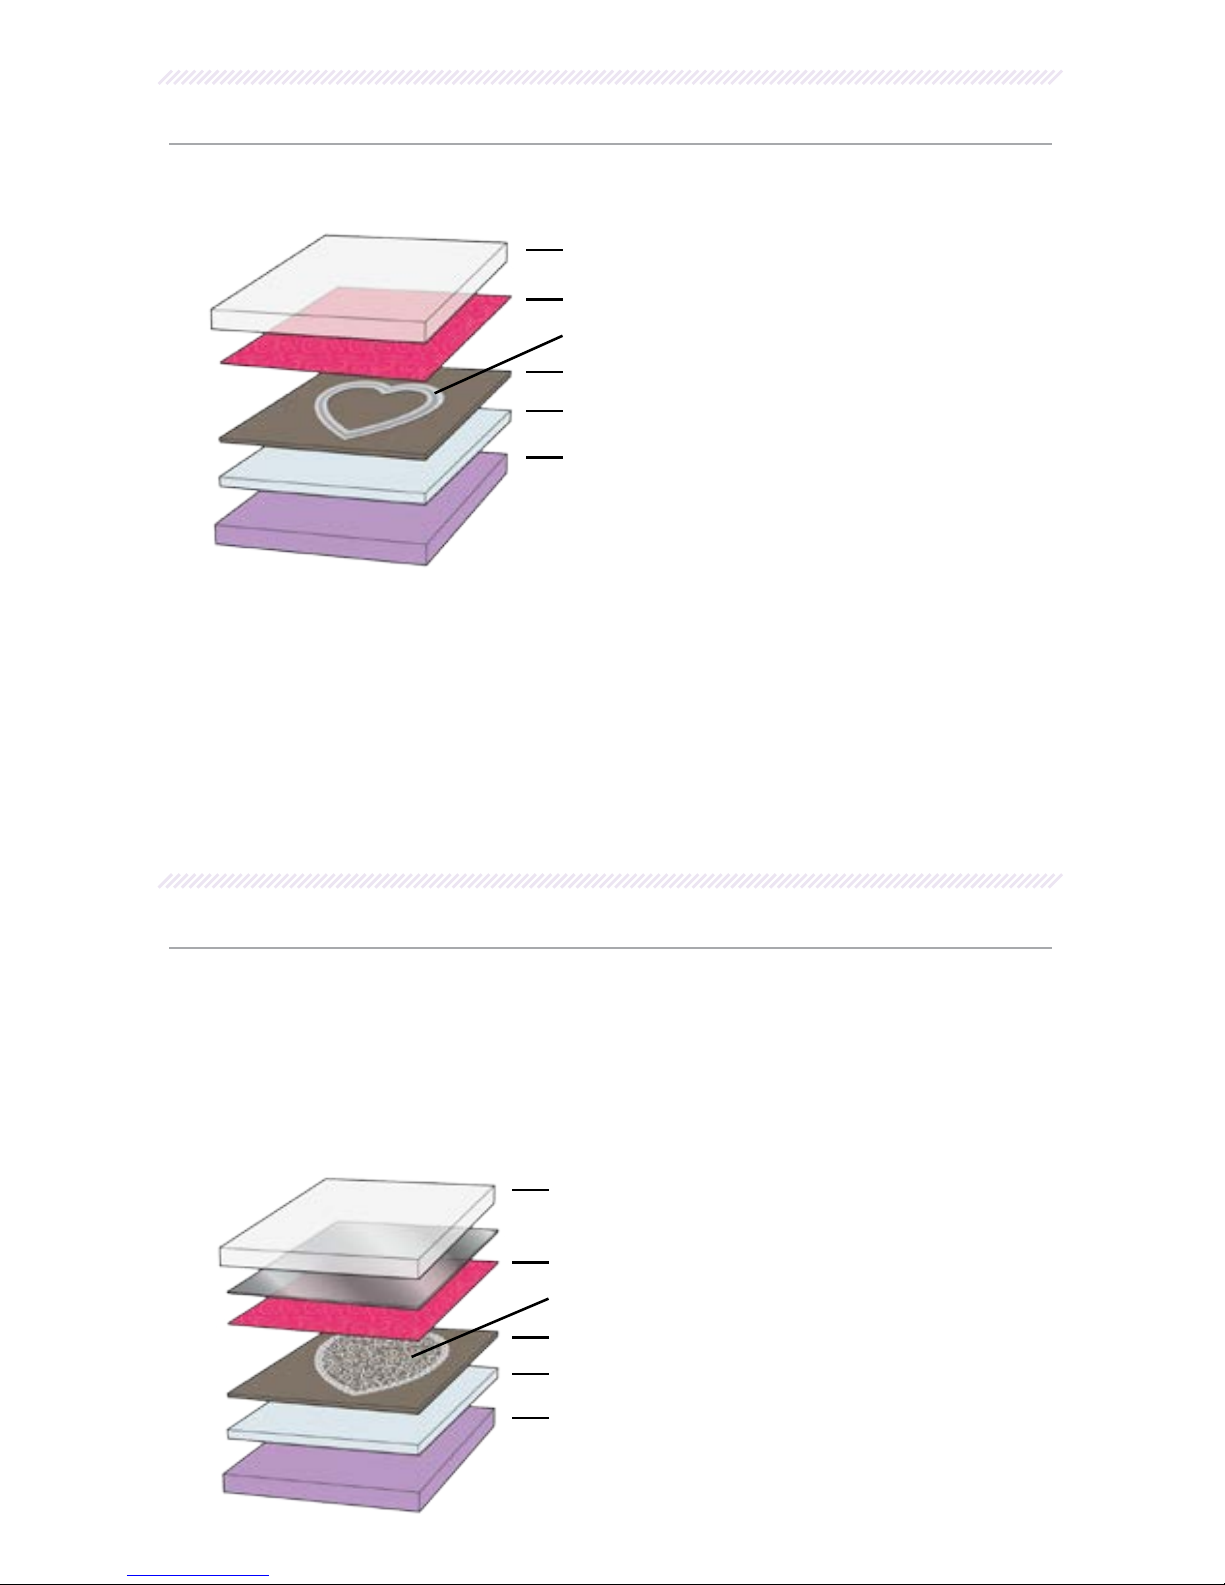
Crafter's Companion Gemini User manual

USER GUIDE
TWIN-FUNCTION
DIE CUTTER & EMBOSSER

Congratulations on purchasing the Gemini™ Twin-Function Die Cutting & Embossing
Machine. Offering an extra wide opening and oversized platforms, the Gemini™
provides edge-to-edge cutting of letter and A4 size materials such as thick paper,
card, vinyl, fabric and foil.
Perfect for all kinds of decorative and craft applications – Scrapbooking, Card Making,
Paper or Fabric Embellishments, Table Décor & much more.
IN THE BOX
• Gemini™ Die Cutter & Embosser
• Clear Cutting Plate
• Base Cutting Plate
• Metal Cutting Plate
• Magnetic Shim
• Plastic Shim
• Rubber Embossing Mat
• 16 Die’sire Dies™
• 3 Embossalicious™ Embossing
Folders
• Power Cord
• User Guide
A NOTE ABOUT PRESSURE
The Gemini™ is very powerful and designed to exert a lot of pressure – which allows
for cutting very intricate dies. The amount of pressure on the die can be increased or
decreased depending on the combination of plates and shims you use.
SANDWICHING THE PLATES
To feed a die through the Gemini™ you must first sandwich it between the included
plates and shims. The Cutting Plate and the Base Cutting Plate should always be the
top and bottom plates of this sandwich. These are the only two plates which should
ever touch the rollers. The combination between the cutting plates is flexible. The
standard starting combination is as follows (top down):
• Clear Cutting Plate
• Material to be cut
• Die (blade side up)
• Magnetic Shim
• Plastic Shim
• Base Cutting Plate
This combination is suitable for most thin metal dies. Thicker metal dies (such as
Crafter’s Companion™ mixed media dies, or other brands of deep-dish dies) will need
a different configuration (see pages 4-6). Our suggestion is that you always start with
this sandwich when using a new style or brand of thin metal die – then, if you require
more or less pressure you can adjust your sandwich accordingly.
NOTE: Because of the high level of pressure in the machine, the cutting plates will naturally
bow over time – this does not affect the performance of the plates or the machine, but
you can reduce bowing on the plates by rotating and flipping them between each pass.
Replacement plates are also readily available at crafterscompanion.com.
ENG-1
ENG
USER GUIDE

USING SHIMS
For very intricate dies you may want to add additional shims to your sandwich to
increase the amount of pressure on your die. The 2 additional shims provided in your
box are as follows:
• The Metal Shim: This thin shim can be added at any level of the sandwich to
increase pressure, but when placed above the material you are cutting you will
get a stronger cut.
• The Magnetic Shim: The best use for the Magnetic Shim is beneath your die
as a positioning plate for holding your die in place. This shim should never be
used above your die, as the die can cut directly through the Magnetic Shim.
• NOTE: For thinner dies, you can increase the pressure very slightly by simply using a
piece of paper as an additional shim between the Plastic Shim and the Base Cutting Plate.
Our recommendation is that you adjust the plate and shim combination depending
on the level of intricacy of the die. Some especially intricate dies may need to be fed
through the machine 2-3 times.
NOTE: Additional shims aren’t recommended for simple dies, as they would create too
much pressure. Over-pressuring a die can cause the material you are cutting to buckle or
warp, as well as increase the bowing of the cutting plates. We recommend when using a
new die for the first time, to try various shim combinations until you achieve the result you
require and are happy with.
OPERATING YOUR GEMINI™
Power Pause /Resume Reverse
• Place the Gemini™ on a dry, level surface.
• Connect the power plug to the back of the machine.
• Press the Power Button to turn the unit on.
• Insert the platform combination into the front of the machine.
• The motor will start and pull the platforms into the machine.
• The motor will stop automatically.
• Remove the platform combinations from the back of the machine after the
motor stops.
• To stop the forward motion of the platforms, press the Pause/Resume button.
• To resume forward motion, press Pause/Resume again.
• To reverse out the platforms, press the Reverse button.
The Gemini™ is equipped with safety sensors to prevent accidental motor activation.
Only use Gemini™ platforms in order to correctly operate the machine.
Do not force platforms into the Gemini™. In the event that the Gemini™ senses that
the combination is too thick to run through the rollers, it will stop the forward motion
and reverse automatically. Verify the platform combination before feeding it into the
machine again. Also check that you are not trying to cut or emboss too many layers
of material at one time.
ENG-2

ENG-3
CUTTING THIN METAL DIES
Recommended Combination: Base Cutting Plate on the bottom, then the Plastic
Shim, Magnetic Shim, Die, Material to be cut, and Clear Cutting Plate on top.
• Start with the Base (Purple) Cutting Plate on the bottom.
• Place the Plastic Shim on top of it.
• Place the Magnetic Shim on top of the Plastic Shim, magnet side up.
• Position the cutting die, blade side up, with the smooth side facing the
Magnetic Shim.
• Place your Material on top of the die.
• Place the Clear Cutting Plate on top of the Material to be cut.
• Align the platform combination and feed it into the Gemini™.
• Release your hold on the platform combination once the motor begins to pull it
into the machine.
CUTTING VERY INTRICATE DIES
Very intricate dies, may by the very nature of their design, require the addition of the
metal cutting plate into the sandwich to improve cutting performance and may also
require being passed through the machine two or three times. This is not related to
how much “pressure” is applied to the die in cutting, but by the detail in the design of
the die you are cutting.
Recommended Combination: Base Cutting Plate on the bottom, then the Plastic
Shim, Magnetic Shim, Die, Material to be cut, Metal Cutting Plate, and Clear Cutting
Plate on top.
Clear Cutting Plate
Metal Cutting Plate
Material to be cut
Die (blade side up)
Magnetic Shim
Plastic Shim
Base Cutting Plate
Clear Cutting Plate
Material to be cut
Die (blade side up)
Magnetic Shim
Plastic Shim
Base Cutting Plate

• Start with the Base (Purple) Cutting Plate on the bottom.
• Place the Plastic Shim on top.
• Place the Magnetic Shim on top of the Plastic Shim, magnet side up.
• Position the die, blade side up, with the smooth side facing the Magnetic Shim.
• Place your Material on top of the die.
• Place the Metal Cutting Plate on top of the Material to be cut.
• Place the Clear Cutting Plate on top of the Metal Cutting Plate.
• Align the platform combination and feed it into the Gemini™.
• Release your hold on the platform combination once the motor begins to pull it
into the machine.
DIE’SIRE™ MIXED MEDIA DIES
Die’sire™ Mixed Media Dies are manufactured deeper than traditional thin metal dies,
which allow you to cut a variety of different materials for your mixed media projects.
Because they’re a little deeper you will need to alter the plate configuration to
accommodate for this.
Recommended Combination: Base Cutting Plate on the bottom, then the Plastic
Shim, Die, Material to be cut, and Clear Cutting Plate on top.
• Start with the Base (Purple) Cutting Plate on the bottom.
• Place the Plastic Shim on top of it.
• Position the cutting die, blade side up, with the smooth side facing the Plastic
Shim.
• Place your Material on top of the die (up to 6 pieces of thin fabric).
• Place the Clear Cutting Plate on top of the Material to be cut.
• Align the platform combination and feed it into the Gemini™.
• Release your hold on the platform combination once the motor begins to pull it
into the machine.
NOTE: The illustration above shows 6 layers of thin cotton fabric – Die’sire™ Mixed Media
Dies will cut a variety of different materials, however we recommend that the total thickness
of the material you are cutting should be no more than 2mm. Performace of the die and
machine will differ depending on the density of the material, take care when trying new
materials.
ENG-4
Clear Cutting Plate
Material to be cut
Die (blade side up)
Plastic Shim
Base Cutting Plate

EMBOSSING WITH CRAFTER’S COMPANION™ DIES
Recommended Combination: Base Cutting Plate on the bottom, then the Plastic
Shim, Die, Material to be embossed, Rubber Embossing Mat, and
Clear Cutting Plate on top.
• Start with the Base (Purple) Cutting Plate on the bottom.
• Place the Plastic Shim on top of it.
• Position the cutting die, blade side up, with the smooth side facing the Plastic
Shim.
• Place your Material on top of the die. Important: If you have just cut the
die your Material will still be inside the die – do not remove it. Remove the
Magnetic Shim and/or the Metal Cutting Plate, and continue as follows with
your die in place:
• Place the Rubber Embossing Mat on top of the Material.
• Place the Clear Cutting Plate on top of the Rubber Embossing Mat.
• Align the platform combination and feed it into the Gemini™.
• Release your hold on the platform combination once the motor begins to pull it
into the machine.
EMBOSSING WITH FOLDERS
Recommended Combination: Base Cutting Plate on the bottom, then the Embossing
Folder with the Material inside, and Clear Cutting Plate on top.
• Place the Material to be embossed inside the embossing folder.
• Place the embossing folder between the Base (Purple) and Clear plates.
• Align the platform combination and feed it into the Gemini™.
• Release your hold on the platform combination once the motor begins to pull it
into the machine.
NOTE: If you are embossing very thin material (such as vellum or acetate), you can
decrease the pressure by placing a piece of thin copy paper inside the embossing folder.
ENG-5
Clear Cutting Plate
Embossing Folder with
Material inside
Base Cutting Plate
Clear Cutting Plate
Material to be embossed
Rubber Embossing Mat
Die (blade side up)
Plastic Shim
Base Cutting Plate

TROUBLE SHOOTING
No Power: If the Gemini™ does not turn on, check that the plug is inserted completely
into the back of the machine, and that the plug is fully inserted into the wall socket.
Check that the wall socket is live by plugging in another device.
The Gemini™ Stops and Reverses: Verify the platform combination before feeding
it into the machine again. Check that the plates are aligned correctly and that no
material is protruding or touching the inside of the machine. Also check
that you are not trying to cut or emboss too many layers of material
at one time.
The Gemini™ stops after 60 minutes of continuous use: The Gemini™ is equipped
with a heat sensor to protect the motor. Allow the unit to cool down for 25 minutes
before resuming operation.
Shallow Emboss or Cut: Verify that your folder or die is not damaged. Add a shim on
top of the Base Cutting Plate to increase pressure.
GENERAL CARE AND SAFETY WARNINGS
• To clean, wipe the exterior with a soft, dry cloth. Do not use abrasive cleaners
or rough surface sponges.
• This product is intended for children aged 14+ and should not be used by
younger children without adult supervision.
• Keep hands away from plates and other parts in motion.
• Be aware that loose fitting clothing can get caught between plates and be
pulled into the machine.
• Do not disable the safety sensors and override the motor controls.
LIMITED WARRANTY
Crafter’s Companion™ warrants the Gemini™ against defects in materials and
workmanship under ordinary consumer use for one year (or longer depending on
country specific regulations) from the date of original retail purchase. During this
warranty period, if a defect arises in the Gemini™, and you follow the instructions for
returning the Gemini™, we will at our option, to the extent permitted by law, either (i)
repair the Gemini™ using either new or refurbished parts, (ii) replace it with a new or
refurbished machine that is equivalent to the machine to be replaced, or (iii) refund to
you all or part of the purchase price of the machine. All replaced parts and machines
for which a refund is given shall become our property. This limited warranty applies
only to hardware components that were not subject to accident, misuse, neglect, fire
or other external causes, alterations, repair, or commercial use. For complete details
of the Limited Warranty, visit www.crafterscompanion.co.uk or
www.crafterscompanion.com.
ENG-6

Felicitaciones por la compra de la Máquina Troqueladora y Repujadora de Función
Doble Gemini™. Con una apertura extrancha y plataformas de gran tamaño, la
Máquina Gemini permite cortar de forma completa diferentes materiales, como papel
grueso, cartón, vinilo, tela y papel metálico, de tamaño carta y A4.
Es ideal para todo tipo de aplicaciones decorativas y manualidades, por ejemplo, para
diseñar álbumes de recortes, fabricar tarjetas, crear adornos de papel o tela, hacer
decoraciones para mesas y mucho más.
CONTENIDO DE LA CAJA
• Máquina Troqueladora y
Repujadora Gemini™
• Placa de corte transparente
• Placa de corte de base
• Placa de corte metálica
• Calce magnético
• Calce de plástico
• Tabla de repujado de hule
• 16 Troqueles Die’sire™
• 3 Carpetas de Repujado Embossalicious™
• Cable de alimentación
• Guía del usuario
AVISO SOBRE LA PRESIÓN
La Máquina Gemini™ es muy potente y está diseñada para ejercer mucha presión. Esto
permite cortar troqueles muy complejos. Se puede aumentar o disminuir la presión
que se ejerce sobre el troquel según la combinación de placas y calces que se utilicen.
PILA DE PLACAS
Para pasar un troquel a través de la Máquina Gemini™, primero se debe colocar entre
las placas y los calces incluidos. La placa de corte y la placa de corte de base siempre
deben ser las placas superior e inferior de la pila. Estas son las únicas dos placas
que deben estar en contacto con los rodillos. La combinación de placas de corte es
flexible. La combinación inicial estándar es la siguiente (desde arriba hacia abajo):
• Placa de corte transparente
• Material a cortar
• Troquel (con el lado de
la hoja hacia arriba)
• Calce magnético
• Calce de plástico
• Placa de corte de base
Esta combinación es apropiada para la mayoría de los troqueles de metal delgados.
Los troqueles de metal más gruesos (como los troqueles para medios diversos
Crafter’s Companion™ o troqueles profundos de otras marcas) necesitan una
configuración diferente (ver páginas 4 a 6). Sugerimos comenzar siempre con esta
combinación de placas al utilizar un nuevo tipo o marca de troquel de metal delgado.
Luego, si se necesita más o menos presión, se puede modificar la pila según sea
necesario.
NOTA: Debido al alto nivel de presión en la máquina, es normal que las placas de corte
se arqueen con el paso del tiempo. Esto no afecta el rendimiento de las placas ni de la
máquina. Sin embargo, es posible reducir el arqueamiento de las placas. Para ello, se deben
rotar y voltear entre una pasada y otra. También hay placas de reemplazo disponibles en
crafterscompanion.com.
ESP-1
ESPAÑOL
GUÍA DEL USUARIO

USO DE LOS CALCES
En el caso de los troqueles muy complejos, se recomienda agregar calces adicionales
a la pila para aumentar la presión ejercida sobre el troquel. Los dos calces adicionales
incluidos en la caja son los siguientes:
• El calce metálico: Este calce delgado puede agregarse en cualquier nivel de la
pila para aumentar la presión, pero cuando se lo coloca sobre el material que
se está cortando, se obtiene un corte más fuerte.
• El calce magnético: La mejor forma de utilizar el calce magnético es debajo
del troquel como placa de posicionamiento para mantener el troquel en su
lugar. Este calce nunca debe usarse sobre el troquel, ya que el troquel puede
cortar directamente el calce magnético.
• NOTA: En el caso de los troqueles más delgados, puede aumentarse la presión muy
levemente simplemente colocando un trozo de papel como calce adicional entre el calce
plástico y la placa de corte de base.
Recomendamos ajustar la combinación de placas y calces según el nivel de
complejidad del troquel. En el caso de algunos troqueles particularmente complejos,
es posible que sea necesario pasarlos dos o tres veces por la máquina.
NOTA: No se recomienda usar los calces adicionales para los troqueles simples, ya que
generarían demasiada presión. Si se ejerce demasiada presión sobre un troquel, es posible
que el material que se esté cortando se tuerza o deforme, y que, además, se intensifique
el arqueamiento de las placas de corte. Al utilizar un nuevo troquel por primera vez,
recomendamos probar varias combinaciones de calces hasta obtener el resultado deseado.
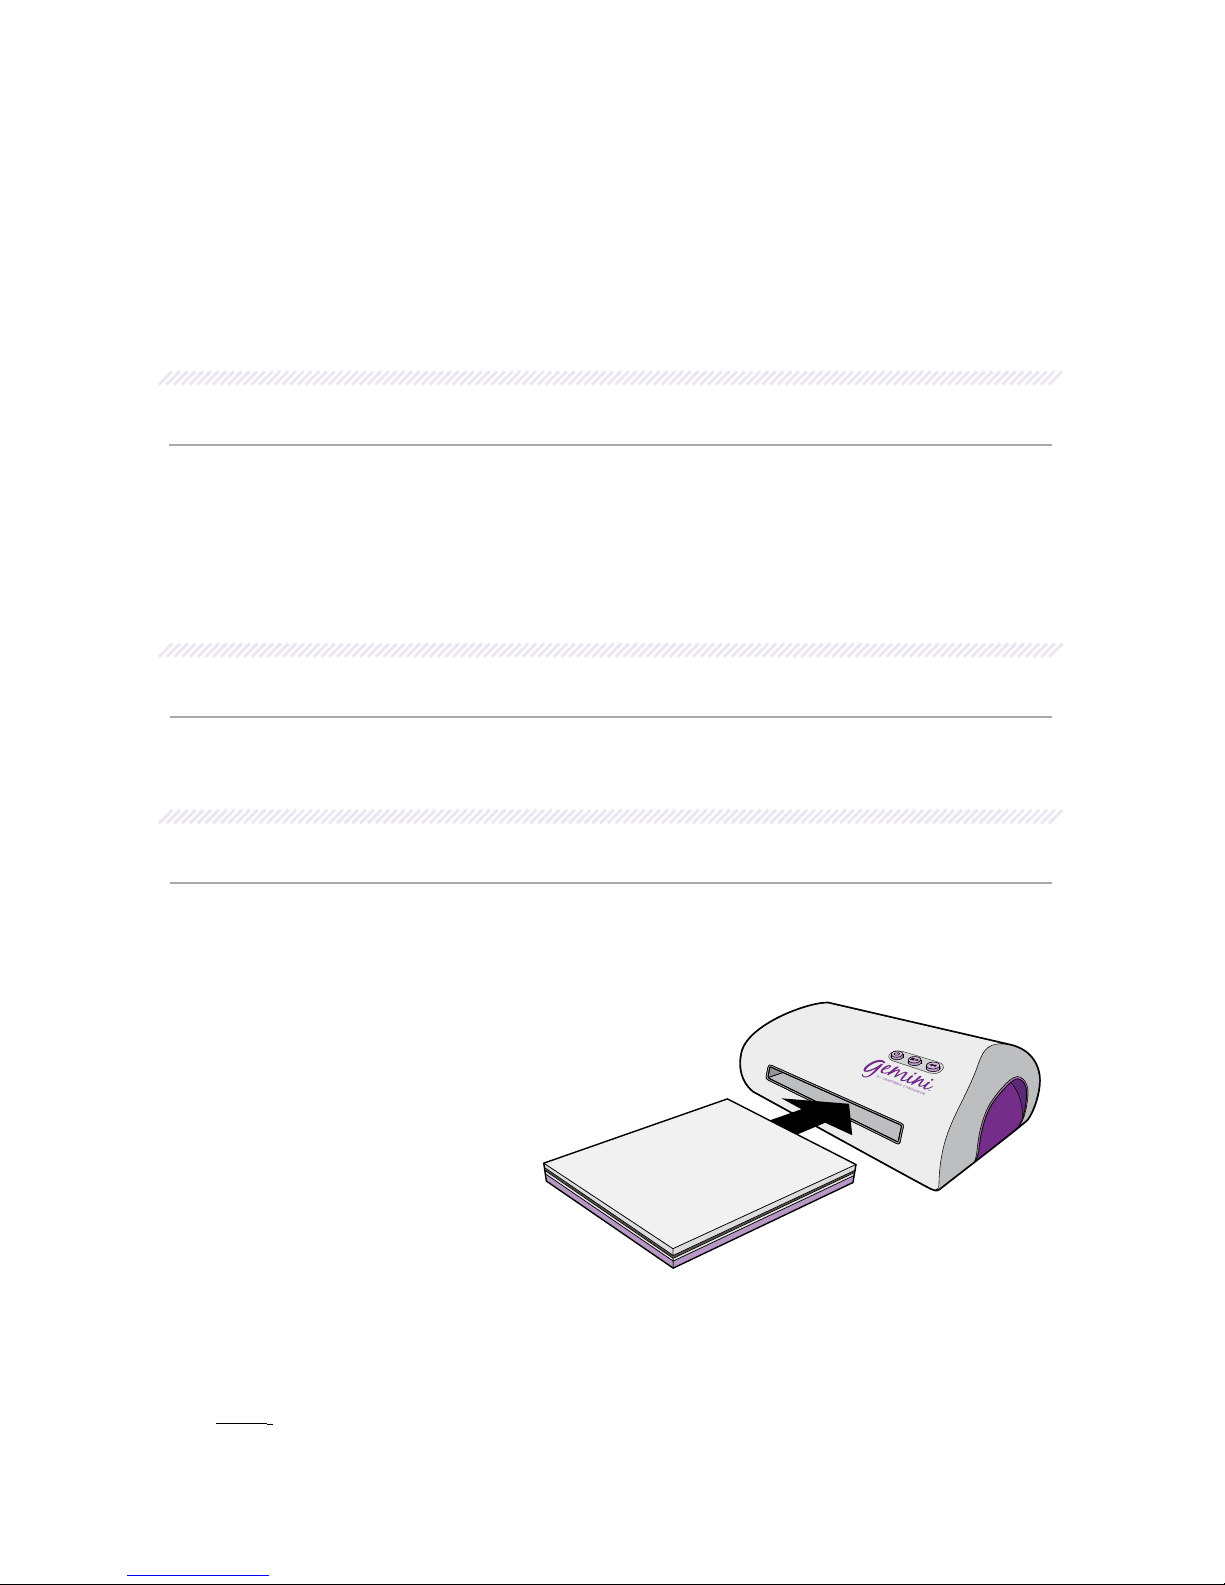
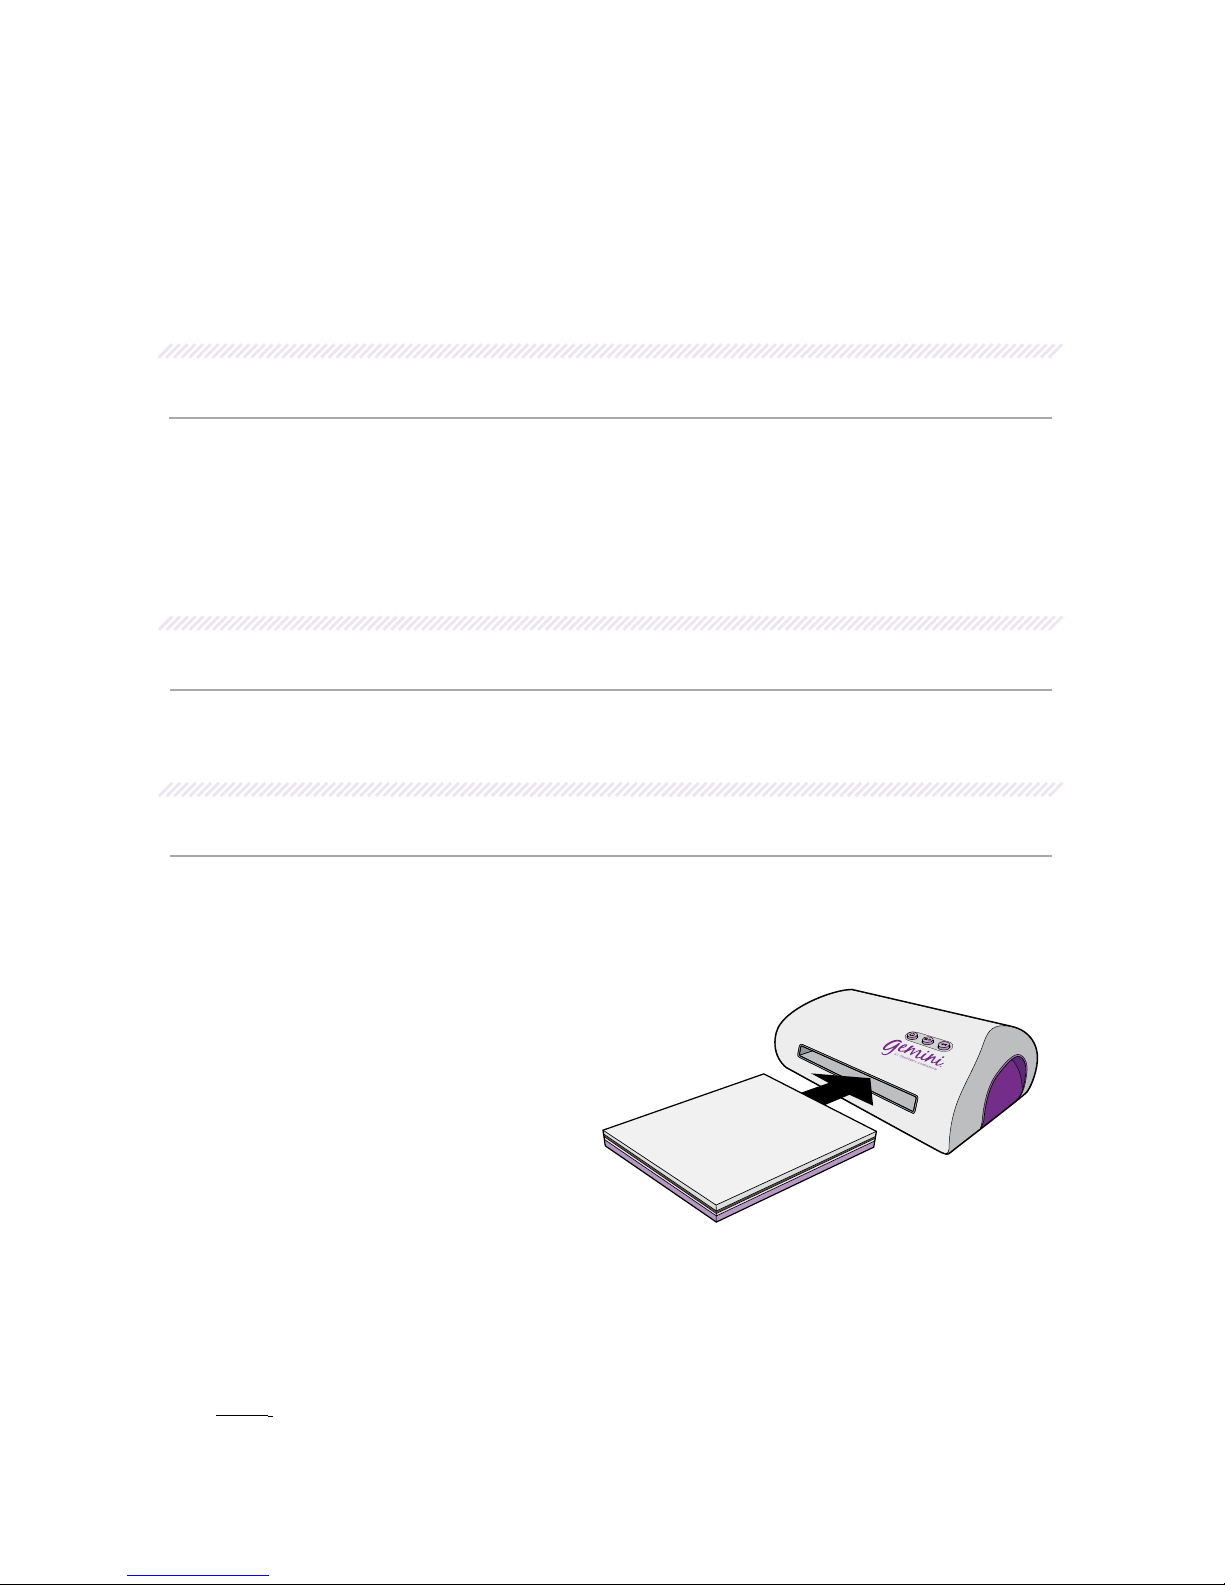
FUNCIONAMIENTO DE LA MÁQUINA GEMINI™
Encendido Pausar/reanudar Retroceder
• Colocar la Máquina Gemini™ sobre una superficie seca y nivelada.
• Conectar el enchufe de alimentación a la parte posterior de la máquina.
• Presionar el botón de encendido para prender la unidad.
• Insertar la combinación de placas en la parte delantera de la máquina.
• El motor se pondrá en marcha y las placas se introducirán en la máquina.
• El motor se detendrá automáticamente.
• Quitar la combinación de placas de la parte posterior de la máquina después
de que el motor se detenga.
• Para detener el movimiento hacia adelante de las placas, presionar el botón
para pausar/reanudar.
• Para reanudar el movimiento hacia adelante, presionar nuevamente el botón
para pausar/reanudar.
• Para invertir la dirección de las placas, presionar el botón para retroceder.
La Máquina Gemini™ está equipada con sensores de seguridad para evitar la
activación accidental del motor. Solo utilizar las plataformas de la Máquina Gemini™
si se hará un uso correcto del dispositivo.
No insertar a la fuerza las plataformas en la Máquina Gemini™. En el caso de que
la Máquina Gemini™ detecte que el conjunto es demasiado grueso para pasar por
los rodillos, se detendrá el movimiento hacia adelante y la plataforma retrocederá
automáticamente. Controlar el conjunto de plataforma antes de insertarlo
nuevamente en la máquina. Verificar también que no se intentan cortar o repujar
demasiadas capas de material a la vez.
ESP-2

ESP-3
CORTE DE TROQUELES DE METAL DELGADOS
Conjunto recomendado: Placa de corte de base en la parte inferior, luego calce
de plástico, calce magnético, troquel, material que se pretende cortar y placa de corte
transparente en la parte superior.
• Comenzar colocando la placa de corte de base (color morado) en la parte
inferior.
• Colocar el calce de plástico sobre dicha placa.
• Colocar el calce magnético sobre el calce de plástico, con el imán hacia arriba.
• Colocar el troquel de corte, con la hoja hacia arriba y el lado sin filohacia abajo.
• Colocar el material sobre el troquel.
• Colocar la placa de corte transparente sobre el material que se pretende cortar.
• Alinear la combinación de placas e insertarla en la Máquina Gemini™.
• Soltar la combinación de placas una vez que el motor comience a introducirlas
en la máquina.
CORTE CON TROQUELES MUY COMPLEJOS
Es posible que los troqueles muy complejos, quizás por la naturaleza de su diseño,
requieran la incorporación de la placa de corte metálica a la pila para mejorar el
rendimiento del corte. Además, puede que sea necesario pasarlos por la máquina dos
o tres veces. Esto no depende de la “presión” que se ejerce sobre el troquel al cortar,
sino que se relaciona con los detalles del diseño del troquel que se está cortando.
Conjunto recomendado: Placa de corte de base en la parte inferior; calce de plástico,
calce magnético, troquel, material que se pretende cortar, placa de corte metálica y
placa de corte transparente sobre la placa de corte de base.
Placa de corte transparente
Material que se pretende cortar
Troquel (con la hoja hacia arriba)
Calce magnético
Calce de plástico
Placa de corte de base
Placa de corte transparente
Material que se pretende cortar
Troquel (con la hoja hacia arriba)
Calce magnético
Calce de plástico
Placa de corte de base

• Comenzar colocando la placa de corte de base (color morado) en la parte
inferior.
• Colocar el calce de plástico sobre dicha placa.
• Colocar el calce magnético sobre el calce de plástico, con el imán hacia arriba.
• Colocar el troquel, con la hoja hacia arriba y el lado sin filo hacia abajo.
• Colocar el material sobre el troquel.
• Colocar la placa de corte metálica sobre el material que se pretende cortar.
• Colocar la placa de corte transparente sobre la placa de corte metálica.
• Alinear la combinación de placas e insertarla en la Máquina Gemini™.
• Soltar la combinación de placas una vez que el motor comience a introducirlas
en la máquina.
TROQUELES PARA MEDIOS DIVERSOS DIE’SIRE™
Los Troqueles para Medios Diversos Die’sire™ son más profundos que los troqueles
de metal delgados tradicionales. Esto permite cortar una gran variedad de materiales
diferentes para proyectos con medios diversos. Debido a que son un poco más
profundos, es necesario modificar la configuración de las placas.
Recommended Combination: Base Cutting Plate on the bottom, then the Plastic
Shim, Die, Material to be cut, and Clear Cutting Plate on top.
• Comenzar colocando la placa de corte de base (color morado) en la parte
inferior.
• Colocar el calce de plástico sobre dicha placa.
• Colocar el troquel de corte, con la hoja hacia arriba y el lado sin filo hacia
abajo.
• Colocar el material sobre el troquel (hasta 6 trozos de tela delgada).
• Colocar la placa de corte transparente sobre el material que se pretende cortar.
• Alinear la combinación de placas e insertarla en la Máquina Gemini.
• Soltar la combinación de placas una vez que el motor comience a introducirlas
en la máquina.
NOTA: La ilustración de arriba muestra 6 capas de tela de algodón delgada: los Troqueles
para Medios Diversos Die’sire cortan una amplia variedad de materiales diferentes; sin
embargo, recomendamos que el grosor total del material que se pretende cortar no supere
los 2 mm. El rendimiento del troquel y de la máquina varía según la densidad del material.
Se debe ser cauteloso al probar materiales nuevos.
ESP-4
Placa de corte transparente
Material que se pretende cortar
Troquel (con la hoja hacia arriba)
Calce de plástico
Placa de corte de base

REPUJADO CON TROQUELES CRAFTER’S COMPANION™
Conjunto recomendado: Placa de corte de base en la parte inferior, luego calce
de plástico, troquel, material que se pretende repujar, tabla de repujado de hule y
placa de corte transparente en la parte inferior.
• Comenzar colocando la placa de corte de base (color morado) en la parte
inferior.
• Colocar el calce de plástico sobre dicha placa.
• Colocar el troquel de corte, con la hoja hacia arriba y el lado sin filo hacia
abajo.
• Colocar el material sobre el troquel. Importante: Si se acaba de realizar un
corte con el troquel, el material seguirá dentro del troquel; no quitarlo. Extraer
el calce magnético o la placa de corte metálica y proceder de la siguiente
manera con el troquel en su lugar:
• Colocar la tabla de repujado de hule sobre el material.
• Colocar la placa de corte transparente sobre la tabla de repujado de hule.
• Alinear la combinación de placas e insertarla en la Máquina Gemini.
• Soltar la combinación de placas una vez que el motor comience a introducirlas
en la máquina.
REPUJADO CON CARPETAS
Conjunto recomendado: Placa de corte de base en la parte inferior, luego la carpeta
de repujado que contenga el material y la placa de corte transparente en la parte
superior.
• Colocar el material que se pretende repujar dentro de la carpeta de repujado.
• Colocar la carpeta de repujado entre la placa de corte de base (color morado)
y la placa de corte transparente.
• Alinear la combinación de placas e insertarla en la Máquina Gemini.
• Soltar la combinación de placas una vez que el motor comience a introducirlas
en la máquina.
NOTA: Si se repuja un material muy delgado (como vitela o acetato), se puede disminuir la
presión. Para ello, colocar un trozo de papel de imprenta delgado dentro de la carpeta de
repujado.
ESP-5
Placa de corte transparente
Carpeta de repujado
que contenga el material
Placa de corte de base
Placa de corte transparente
Material que se pretende repujar
Alfombrilla de repujado de hule
Troquel (con la hoja hacia arriba)
Calce de plástico
Placa de corte de base

SOLUCIÓN DE PROBLEMAS
La Máquina Gemini no enciende: Si la Máquina Gemini™ no enciende, verificar que
la ficha esté bien conectada a la parte posterior de la máquina y que el enchufe esté
bien insertado en el tomacorriente. Verificar que haya corriente en el tomacorriente;
para ello, enchufar otro dispositivo.
La Máquina Gemini se detiene y las placas retroceden: Controlar el conjunto de
plataforma antes de insertarlo nuevamente en la máquina. Verificar que las placas
estén alineadas correctamente y que ningún material sobresalga ni toque la parte
interior de la máquina. Verificar también que no haya demasiadas capas para cortar o
repujar al mismo tiempo.
La Máquina Gemini se detiene después de 60 minutos de uso continuo: La Máquina
Gemini está equipada con un sensor térmico que protege el motor. Dejar que la
unidad se enfríe durante 25 minutos antes de reanudar el funcionamiento.
La Máquina Gemini realiza repujados o cortes superficiales: Verificar que la carpeta
o el troquel no estén dañados. Agregar un calce sobre la placa de corte de base para
aumentar la presión.
ADVERTENCIAS GENERALES DE CUIDADO Y SEGURIDAD
• Para limpiar, aplicar un paño suave y seco sobre el exterior. No usar limpiadores
abrasivos ni esponjas con superficies ásperas.
• Este producto está destinado únicamente para personas mayores de 14 años y
no debe ser utilizado por niños menores sin la supervisión de un adulto.
• Mantener las manos lejos de las placas y otras piezas en movimiento.
• Tener en cuenta que la ropa suelta puede atascarse entre las placas e
insertarse en la máquina.
• No desactivar los sensores de seguridad ni inhabilitar los controles del motor.
GARANTÍA LIMITADA
Crafter’s Companion™ garantiza la Máquina Gemini™ contra cualquier defecto de
material o fabricación, en condiciones de uso normales por parte del consumidor,
durante un año (o un período más prolongado, en virtud de normas específicas del
país) a partir de la fecha original de compra al por menor. Durante dicho período
de garantía, si surge un defecto en la Máquina Gemini™ y se siguen las instrucciones
para devolver la Máquina Gemini™, a nuestro exclusivo criterio y en la medida en
que lo permita la ley, (i) repararemos la Máquina Gemini™ usando piezas nuevas o
restauradas; (ii) reemplazaremos la Máquina Gemini™ por una nueva o restaurada
equivalente a la máquina que se debe reemplazar; o (iii) reembolsaremos la
totalidad o parte del precio de compra de la máquina. Todas las piezas y máquinas
reemplazadas por las cuales se otorgue un reembolso pasarán a ser de nuestra
propiedad. Esta garantía limitada se aplica solo a los componentes de ferretería que
no estuvieron sujetos a accidentes, usos indebidos, actos de negligencia, incendios u
otras causas externas, modificaciones, reparaciones o usos comerciales. Para obtener
información detallada sobre la garantía limitada, visitar www.crafterscompanion.co.uk
or www.crafterscompanion.com.
ESP-6

Gefeliciteerd met de aankoop van de Gemini™ multifunctionele stans- en embossing-
machine. De Gemini™ heeft een extra brede opening en extra grote platforms en zorgt
voor haarscherp snijden van brief- en A4-formaatmaterialen zoals dik papier, karton,
vinyl, stof en folie.
Perfect voor allerhande decoratieve en handwerktoepassingen - scrapbooking,
kaarten maken, decoraties van papier en textiel, tafeldecoratie en veel meer.
IN DE VERPAKKING
• Gemini™ stansmachine en embosser
• Doorzichtige snijplaat
• Basis snijplaat
• Metalen snijplaat
• Magnetische tussenplaat
• Plastic tussenplaat
• Rubberen embossingmat
• 16 Die’sire Dies™
• 3 Embossalicious™ Embossing
• Mappen
• Voedingskabel
• Gebruikershandleiding
EEN OPMERKING OVER DRUK
De Gemini™ is erg krachtig en ontworpen om veel druk te genereren – waardoor
zeer moeilijke vormen te snijden zijn. De hoeveelheid druk op het mes kan worden
vergroot of verkleind afhankelijk van de door u gebruikte combinatie van platen en
tussenplaten.
DE PLATEN OP ELKAAR LEGGEN
Om een vorm door de Gemini™ te voeren, moet u deze eerst tussen de platen en
tussenplaten leggen. De transparante snijplaat en de basis snijplaat moeten altijd
aan boven en onderzijde van deze stapel liggen. Dit zijn de enige twee platen
die de rollers mogen raken. De combinatie tussen de snijplaten is flexibel. De
standaardcombinatie is als volgt (van boven naar beneden):
• Doorzichtige snijplaat
• Te snijden materiaal
• Stansvorm (snijgedeelte van
het mes naar boven)
• Magnetische tussenplaat
• Plastic tussenplaat
• Basis snijplaat
Deze combinatie is geschikt voor de meeste dunne metalen vormen. Dikkere metalen
vormen (zoals Crafter’s Companion™ gemengde mediavormen, of andere merken met
diepliggende vormen) hebben een andere configuratie nodig (zie pagina 4-6). Wij
raden u aan om altijd te starten met deze samenstelling als u een nieuwe stijl of merk
of dunne metalen vorm gebruikt – om vervolgens, als u meer of minder druk nodig
hebt, de stapel aan uw wensen aan te passen.
LET OP: Door de hogedruk in de machine zullen de snijplaten na verloop van tijd uiteraard
krom worden – dit zal geen invloed hebben op de prestaties van de platen of de machine,
maar u kunt het buigen van de platen verminderen door ze te draaien en keren tussen elke
doorvoer. Vervangende platen zijn ook kant-en-klaar verkrijgbaar via crafterscompanion.com.
DUT-1
DUT
GEBRUIKERSHANDLEIDING

GEBRUIK VAN TUSSENPLATEN
Bij erg moeilijke vormen wilt u wellicht extra tussenplaten toevoegen aan uw stapel
om de hoeveelheid druk op de snijvorm te verhogen. De 2 extra tussenplaten die in de
verpakking zitten zijn:
• De metalen tussenplaat: Deze dunne tussenplaat kan op elke plaats in de
stapel worden toegevoegd om voor extra druk te zorgen, maar bij plaatsing
boven het materiaal dat u snijdt, krijgt u een sterkere snijhandeling.
• De magnetische tussenplaat: De beste plaats voor de magnetische tussenplaat
is onder uw vorm ter positionering, waarmee uw vorm op de plaats wordt
gehouden. Deze tussenplaat mag nooit gebruikt worden boven uw stansvorm,
omdat de snijvorm direct door de magnetische tussenplaat kan snijden.
• LET OP: Voor dunnere snijvormen kunt u de druk heel licht verhogen door simpelweg een
stuk papier als extra tussenplaat te gebruiken tussen de kunststof tussenplaat en de basis
snijplaat.
Wij raden u aan om de samenstelling van platen en tussenplaten aan te passen aan
de moeilijkheidsgraad van de vorm. Sommige echt moeilijke vormen moeten 2-3 keer
door de machine worden gevoerd.
LET OP: Voor eenvoudige vormen worden geen extra tussenplaten aanbevolen, omdat deze
te veel druk veroorzaken. Te veel druk op een vorm kan zorgen voor rafels of kronkels in
het gebruikte materiaal evenals extra buiging van de snijplaten. Wij raden u aan om bij het
eerste gebruik van een nieuwe vorm diverse combinaties te proberen totdat u het resultaat
hebt dat u nodig hebt en waar u tevreden over bent.
BEDIENING VAN UW GEMINI™
Aan/ui Pauze/verder Achteruit
• Plaats de Gemini™ op een droge en vlakke ondergrond.
• Sluit de voedingskabel aan op de achterzijde van de machine.
• Druk op de Aan/uit-knop om het apparaat aan te doen.
• Voer de plaatcombinatie in aan de voorzijde van de machine.
• De motor start en trekt de platformcombinatie door de machine.
• De motor stopt vanzelf.
• Haal de platformcombinaties uit de achterzijde van de machine nadat de motor
is gestopt.
• Druk om de voorwaartse beweging van de platforms te stoppen op de Pauze/
verder-knop.
• Druk om voorwaartse beweging te hervatten nog een keer op de Pauze/
verder-knop.
• Druk om de platforms achteruit te laten gaan op de Achteruit-knop.
De Gemini™ is uitgerust met veiligheidssensoren om onopzettelijke activatie van de
motor te voorkomen. Gebruik alleen platforms van Gemini™ om de machine op de
juiste wijze te bedienen.
Probeer de platforms niet in de Gemini™ te forceren. In het geval de Gemini™ merkt
dat de combinatie te dik is om tussen de rollers door te gaan, zal deze de voorwaartse
beweging stoppen en automatisch achteruitgaan. Controleer de platformcombinatie
voor deze weer in de machine in te voeren. Zorg er ook voor dat u niet te veel lagen
materiaal in één keer probeert te snijden en te embossen.
DUT-2

DUT-3
SNIJDEN MET DUNNE METALEN STANSVORMEN
Aanbevolen combinatie: Basis snijplaat onderop, vervolgens de plastic tussenplaat,
magnetische tussenplaat, stansvorm, te snijden materiaal en de doorzichtige snijplaat
bovenop.
• Start met de (paarse) basisplaat onderop.
• Plaats de plastic tussenplaat daar bovenop.
• Plaats de magnetische tussenplaat op de plastic tussenplaat, met de
magnetische zijde naar boven.
• Plaats de stansvorm, met het snijgedeelte van het mes naar boven en de
gladde kant naar demagnetische tussenplaat gericht.
• Plaats uw materiaal bovenop de stansvorm.
• Plaats de doorzichtige snijplaat bovenop het te snijden materiaal.
• Leg de platformcombinatie precies op één lijn en voer deze in de Gemini™.
• Laat de platformcombinatie los zodra deze door de motor in de machine wordt
getrokken.
SNIJDEN VAN INGEWIKKELDE STANSVORMEN
Erg ingewikkelde vormen, kunnen door hun aard, het toevoegen van een extra
metalen snijplaat aan de combinatie vereisen om het snijvermogen te vergroten en
daarbij is het wellicht nodig dat de combinatie twee of drie keer door de machine
moet worden gevoerd. Dit ligt niet aan hoe veel ‘druk’ wordt toegepast op het mes
tijdens het snijden, maar aan de details van het ontwerp van de vorm die u snijdt.
Aanbevolen combinatie: Basis snijplaat onderop, dan de plastic tussenplaat,
magnetische tussenplaat, stansvorm, te snijden materiaal, metalen snijplaat en de
doorzichtige snijplaat bovenop.
Doorzichtige snijplaat
Metalen snijplaat
Te snijden materiaal
Stansvorm (snijgedeelte van het mes naar boven)
Magnetische tussenplaat
Plastic tussenplaat
Basis snijplaat
Doorzichtige snijplaat
Te snijden materiaal
Stansvorm (snijgedeelte van het mes naar boven)
Magnetische tussenplaat
Plastic tussenplaat
Basis snijplaat

• Start met de (paarse) basisplaat onderop.
• Plaats de plastic tussenplaat erbovenop.
• Plaats de magnetische tussenplaat op de plastic tussenplaat, met de
magnetische zijde naar boven.
• Plaats de stansvorm met het snijgedeelte van het mes naar boven met de
gladde kant naar de magnetische tussenplaat gericht.
• Plaats uw materiaal bovenop de stansvorm.
• Plaats de metalen snijplaat bovenop het te snijden materiaal.
• Plaats de doorzichtige snijplaat bovenop de metalen snijplaat.
• Leg de platformcombinatie precies op één lijn en voer deze in de Gemini™.
• Laat de platformcombinatie los zodra deze door de motor in de machine wordt
getrokken.
DIE’SIRE™ MIXED MEDIA STANSVORMEN
Die’sire™ Mixed Media stansvormen zijn dieper gemaakt dan traditionele dunne
metalen stansvormen, waarmee u een veelvoud aan verschillende materialen voor uw
projecten met gemengde media kunt snijden. Omdat deze iets dieper zijn, moet u de
platformconfiguratie hierop aanpassen.
Aanbevolen combinatie: Basis snijplaat onderop, vervolgens de plastic tussenplaat,
stansvorm, te snijden materiaal en de doorzichtige snijplaat bovenop.
• Start met de (paarse) basisplaat onderop.
• Plaats de plastic tussenplaat daar bovenop.
• Plaats de stansvorm, met het snijgedeelte van het mes naar boven en de
gladde kant naar de plastic
• tussenplaat.
• Plaats uw materiaal bovenop de vorm (tot 6 stukken dun textiel).
• Plaats de doorzichtige snijplaat bovenop het te snijden materiaal.
• Leg de platformcombinatie precies op één lijn en voer deze in de Gemini™.
• Laat de platformcombinatie los zodra deze door de motor in de machine wordt
getrokken.
LET OP: De afbeelding hierboven laat 6 lagen van dun katoen zien – Die’sire™ Mixed
stansvormen zal een keur aan verschillende materialen snijden, hoewel we u aanraden dat
de totale dikte van de materialen die u snijdt niet meer mag zijn dan 2 mm. Prestatie van de
snijvorm en de machine zal afhangen van de dichtheid van het materiaal; wees voorzichtig
bij het proberen van nieuwe materialen.
DUT-4
Doorzichtige snijplaat
Te snijden materiaal
Stansvorm (snijgedeelte van het mes naar boven)
Plastic tussenplaat
Basis snijplaat

EMBOSSEN MET STANSVORMEN VAN CRAFTER’S COMPANION™
Aanbevolen combinatie: Basis snijplaat onderop, vervolgens de plastic tussenplaat,
stansvorm, te snijden materiaal, rubberen embossingmat en de doorzichtige snijplaat
daar bovenop.
• Start met de (paarse) basisplaat onderop.
• Plaats de plastic tussenplaat daar bovenop.
• Plaats de stansvorm, met het snijgedeelte van het mes naar boven en de
gladde kant naar de plastictussenplaat.
• Plaats uw materiaal bovenop de stansvorm. Belangrijk: Als u net met de
stansvorm gesneden hebt, zit het materiaal nog steeds in de stansvorm - haal
het er niet uit. Verwijder de magnetische tussenplaat en/of de metalen snijplaat
en ga als volgt verder met uw stansvorm op zijn plaats:
• Plaats de rubberen embossingmat bovenop het materiaal.
• Plaats de doorzichtige snijplaat bovenop de rubberen embossingmat.
• Leg de platformcombinatie precies op één lijn en voer deze in de Gemini™.
• Laat de platformcombinatie los zodra deze door de motor in de machine wordt
getrokken.
EMBOSSEN MET MAPPEN
Aanbevolen combinatie: Basis snijplaat onderop, dan de embossing map met het
materiaal erin, en de doorzichtige snijplaat er bovenop.
• Plaats het te embossen materiaal binnen in de embossingmap.
• Plaats de embossingmap tussen de basis snijplaat (paars) en de doorzichtige
snijplaten.
• Leg de platformcombinatie precies op één lijn en voer deze in de Gemini™.
• Laat de platformcombinatie los zodra deze door de motor in de machine wordt
getrokken.
LET OP: Als u heel dun materiaal aan het embossen bent (zoals velijn of acetaat), kunt u de
druk verminderen door een stuk dun kopieerpapier in de embossingmap te plaatsen.
DUT-5
Doorzichtige snijplaat
Embossingmap met
materiaal erin
Basis snijplaat
Doorzichtige snijplaat
Te embossen materiaal
Rubberen embossingmat
Stansvorm (snijgedeelte van het mes naar boven)
Plastic tussenplaat
Basis snijplaat

PROBLEEMOPLOSSING
Geen stroom: Als de Gemini™ niet inschakelt, controleer dan of de voedingskabel
geheel aan de achterzijde is ingestoken, en dat de stekker geheel in het stopcontact
zit. Controleer of het stopcontact onder spanning staat door een ander apparaat in te
steken.
De Gemini™ stopt en gaat achteruit: Controleer de platformcombinatie voor deze
weer in de machine in te voeren. Controleer of de platen op één lijn liggen en of er
geen materiaal uitsteekt of de binnenkant van de machine aanraakt. Controleer ook
of u niet te veel lagen van materiaal in één keer probeert te snijden of te embossen.
De Gemini™ stopt na 60 minuten doorlopend gebruik: De Gemini™ is uitgerust
met een warmtesensor om de motor te beschermen. Laat het apparaat 25 minuten
afkoelen voordat u de werking hervat.
Oppervlakkig embossen of snijden: Controleer of uw map of stansvorm niet
beschadigd is. Voeg een tussenplaat toe bovenop de basis snijplaat om de druk te
verhogen.
ALGEMEEN ONDERHOUD EN VEILIGHEIDSWAARSCHUWINGEN
• Veeg om deze schoon te maken de buitenzijde af met een zachte, droge doek.
Gebruik geen schuurmiddelen of sponzen voor ruwe oppervlakken.
• Dit product is bedoeld voor kinderen van 14 jaar en ouder en mag niet worden
gebruikt door jongere kinderen zonder toezicht van een volwassene.
• Houd handen uit de buurt van de platen en andere bewegende delen.
• Let op dat loshangende kleding tussen de platen in kan geraken en in de
machine getrokken kan worden.
• Schakel de veiligheidssensoren en de motorbesturing niet uit.
BEPERKTE GARANTIE
Crafter’s Companion™ geeft op de Gemini™ garantie op materiaal- en
fabricagedefecten bij normaal consumentengebruik voor de periode van één jaar
(of langer volgens plaatselijke voorschriften) vanaf de datum van de oorspronkelijke
aankoop. Als tijdens de garantieperiode een defect ontstaat in de Gemini™, en u volgt
de instructies voor het retourneren van de Gemini™, zullen we naar eigen goeddunken,
voor zover toegestaan door de wetgeving, ofwel (i) de Gemini™ repareren met nieuwe
of gebruikte onderdelen, (ii)ruilen met een nieuwe of gerepareerde machine die
gelijkwaardig is aan de te vervangen machine, ofwel (iii) u het gehele of gedeeltelijke
bedrag van de aankoopprijs terugbetalen. Alle vervangen onderdelen en machines
waarvoor een terugbetaling is gedaan worden ons eigendom. Deze beperkte garantie
is alleen van toepassing op hardware-onderdelen die niet geleden hebben onder
schade, misbruik, nalatigheid, brand of andere externe oorzaken, aanpassingen,
reparaties of commercieel gebruik. Bezoek voor complete details over de beperkte
garantie www.crafterscompanion.co.uk or www.crafterscompanion.com.
DUT-6

Herzlichen Glückwunsch zum Kauf von Gemini™, einer Stanz- und Prägemaschine
in einem. Durch die besonders breite Öffnung und durch übergroße Plattformen
ermöglicht Gemini™ das Stanzen von Kante zu Kante bei Werkstoffen wie dickem
Papier, Karton, Stoffen, PVC- und Metallfolie im Letter- und DIN-A4-Format.
Bestens geeignet für alle Anwendungen im dekorativen und handwerklichen
Bereich: Scrapbooking, Herstellen von Karten, Verzierung von Papier und Stoffen,
Tischdekoration und vieles mehr.
IM LIEFERUMFANG ENTHALTEN
• Stanz- und Prägemaschine Gemini™
• transparente Schneidplatte
• Schneidgrundplatte
• Schneidplatte aus Metall
• magnetische Ausgleichscheibe
• Ausgleichscheibe aus Kunststoff
• Prägematte aus Gummi
• 16 Die’sire™-Stanzschablonen
• 3 Embossalicious™-Präge-
• schablonen
• Netzanschlusskabel
• Bedienungsanleitung
KURZE ANMERKUNG ZUM DRUCK
Gemini™ ist ein leistungsstarkes Gerät, dessen hoher Druck das Schneiden
ausgesprochen detailreicher Schablonen ermöglicht. Der Druck auf die
Schablone kann abhängig von der Kombination der verwendeten Platten und der
Ausgleichscheiben erhöht oder verringert werden.
KOMBINIEREN DER PLATTEN
Um eine Schablone in Gemini™ einzuführen, muss sie zunächst zwischen die
mitgelieferten Platten und Ausgleichscheiben gelegt werden. Bei diesem Verfahren
müssen sich Schneidplatte und Schneidgrundplatte immer an oberster bzw.
unterster Steller befinden sein. Nur diese beiden Platten dürfen mit den Walzen in
Berührung kommen. Die Kombination zwischen den Schneidplatten ist jedoch flexibel.
Standardstartkombination (von oben nach unten):
• transparente Schneidplatte
• zu stanzender Werkstoff
• Schablone
(Schneideseite nach oben)
• magnetische Ausgleichscheibe
• Ausgleichscheibe aus Kunststoff
• Schneidgrundplatte
Diese Kombination eignet sich für die meisten dünnen Metallschablonen. Stärkere
Metallschablonen (wie z. B. verschiedene Crafter’s Companion™-Mixed Media-
Schablonen oder tiefe Schablonen anderer Marken) benötigen eine andere
Konfiguration (siehe Seiten 4-6). Wir empfehlen, dass Sie grundsätzlich mit dieser
Plattenkonfiguration beginnen, wenn Sie eine neue Art oder Marke von dünnen
Metallschablonen verwenden. Sollte mehr oder weniger Druck erforderlich sein, kann
die Konfiguration entsprechend angepasst werden.
BEACHTEN SIE: Aufgrund des hohen Drucks im Inneren des Geräts werden sich die
Scheidplatten mit der Zeit automatisch verformen. Dies beeinflusst jedoch nicht die
Funktionsfähigkeit der Platten oder des Geräts. Sie können diese Verformung der Platten
jedoch reduzieren, wenn Sie sie zwischen den einzelnen Druckläufen drehen und wenden.
Ersatzplatten sind darüber hinaus auf crafterscompanion.com erhältlich.
DEU-1
DEU
BEDIENUNGSANLEITUNG
Table of contents
Languages: