Craftsman Marine SIRIUS User manual

Boating technology by craftsman marine
SIRIUS DEck hatch
manual
deck equipment

2 Boating Technology By CRAFTSMAN MARINE
1 Preface
Thank you very much for purchasing a Craftsman Marine escape or
ventilation hatch. You have made an excellent choice and our
Craftsman Marine Service Team will gladly be of the best possible
assistance, if and when you will need us.
The hatches made by Craftsman Marine are designed and
developed by engineers who are fully aware of all requirements in a
marine environment.
Manufacturing and assembly are entirely done in-house, which
ensures constant quality and a perfectly reliable product.
All features and characteristics of a Craftsman Marine hatch are
fully in accordance with the European Recreational Craft Directive
94/25/EC.
Enjoy your boating with Craftsman Marine products on board!
Craftsman Marine B.V.
This page gives a survey of all pictograms, used throughout this
manual.
Notes referring to safety issues show this symbol:
DANGER
ATTENTION
Please adhere strictly to the recommendations in this chapter and
instruct all other persons, who may be operating or servicing the
hatch, to do likewise. These are the safety recommendations.
Symbols related to the text below:
Pay attention to the symbols and read the instructi-
ons in the text.
Attention
(especially with a view to a safety risk for man or
material)
Safety 2
Explanation of symbols

Boating Technology By CRAFTSMAN MARINE 3
Table of contents 3
Table of contents
1 Introduction 4
2 Safety precautions 5
3 Practical installation tips 5
4 Operation 7
Opening and closing 7

4 Boating Technology By CRAFTSMAN MARINE
4 Introduction
Craftsman Marine hatches are made of special, seawater resistant
aluminium profiles, hand polished to eliminate the surface pores (no
collection of dirt) and thereafter anodized. This process also
enhances the resistance against corrosion.
The panes are made of unbreakable acrylic of 12 mm thickness,
colour: smoke grey.
The clamps are made of synthetic and other non-corrosive
materials.
Craftsman Marine deck hatches, type sirius, are CE-certified, Area
II a (RINA)
Drawing 1
Boating Technology By CRAFTSMAN MARINE 5
Take the required safety measures when fitting this
equipment, especially while cutting into the deck: smoke,
dust and glass fiber particles should be kept away by
wearing goggles, a dust mask and gloves.
The hatch is designed for outward opening only.
Make sure that the part of the boat (deck) into which the
hatch is fitted will be absolutely flush and not curved or
dented, so as to ensure proper watertightness. The
maximum tolerance is +/- 1mm.
Before cutting out the hole, verify the cut-out size of the
hatch. The hatch is hand-made and the dimensions may
show a tolerance on the cut-out size of +/- 2mm.
Sand the cut-out section to be flush (g.r.p.), or make it
free from burrs (steel).
Position the hatch into the cut-out and mark the places of
the bolt holes on deck.
Take the hatch away, drill the fixation holes and remove
the burrs.
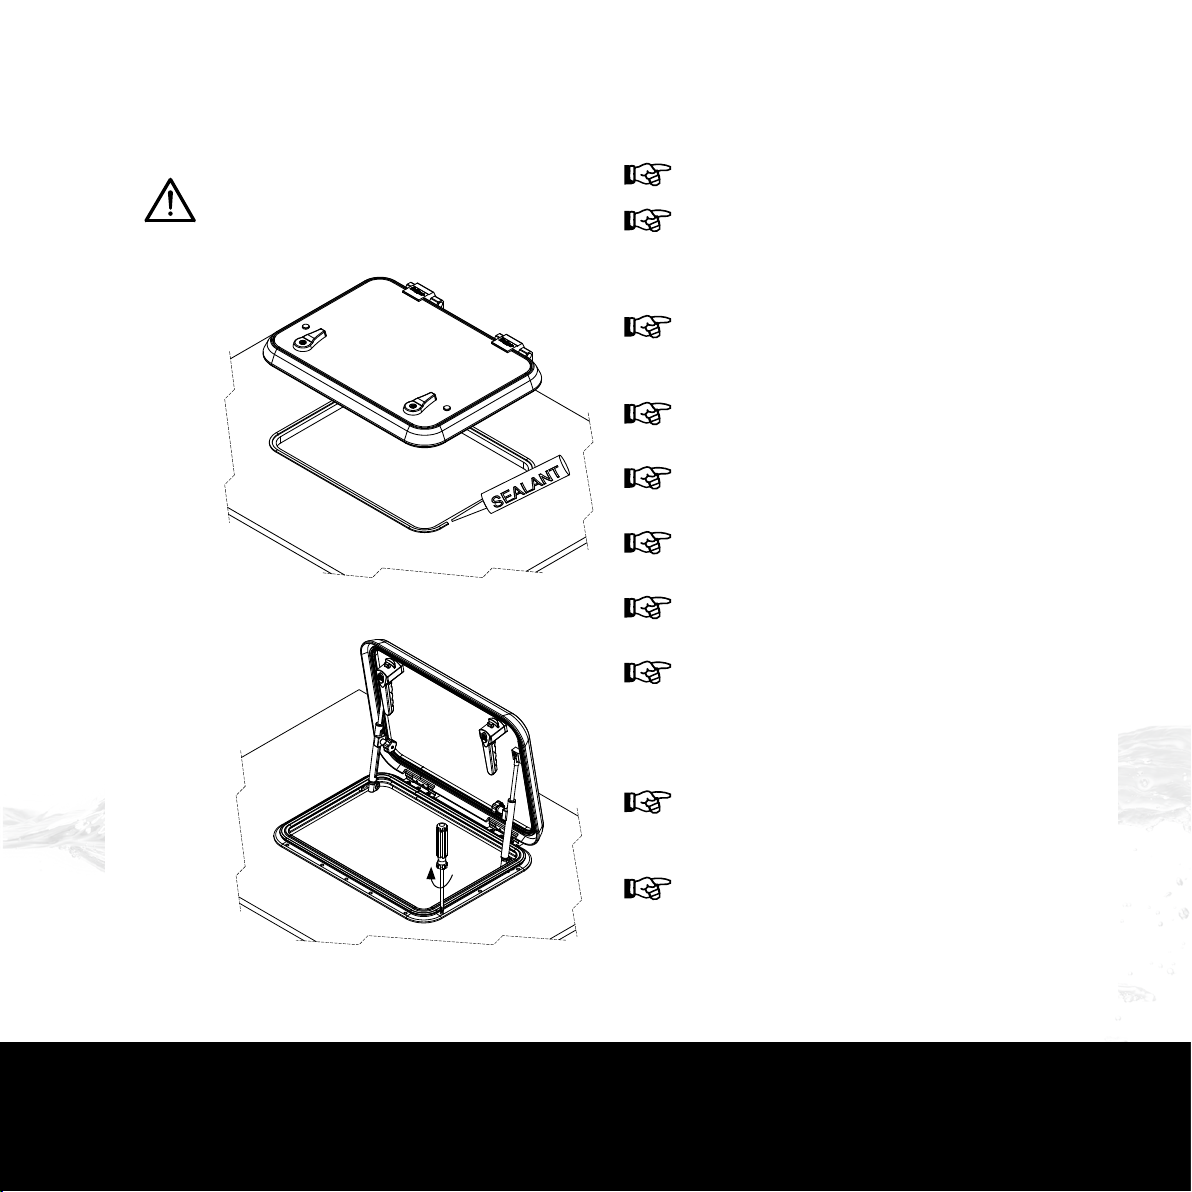
Use marine grade sealant and apply it liberally onto the
side of the cut-out hole.(drawing 2)
Reposition the hatch, seal the bottom frame as well and
tighten the hatch onto the deck by using stainless steel
screws or bolts. Tightening by hand with a fitting screw
driver is preferred over an electric tool, as stainless steel
screws tend to break somewhat easily.(drawing 3)
Use stainless steel self tapping screws 4,2 mm in
diameter for polyester or stainless steel M5 bolts for a
steel deck.
Do not use alkaline or acidic cleaning agents for removing
any excess sealant from the deck.
5 Safety precautions Practical installation tips 6
Drawing 2
Drawing 3

6 Boating Technology By CRAFTSMAN MARINE
Never use abrasive paper for cleaning the aluminium
profiles. Water and a mild detergent will do just fine.
Do not use petroleum-contained cleaners for the acrylic.
Also here: water and a mild detergent.
After cleaning of the aluminium profiles, apply a thin layer
of transparent boat wax for additional protection.
If there is no use for it, do not tamper with the hinges; the
factory setting is the right one.
6 Practical installation tips

Boating Technology By CRAFTSMAN MARINE 7
Operation 7
Opening and closing:
1. Shift the knob on the handles towards you, to unlock the handles
(drawing 4).
2. Turn the handle approximately 90 degrees, as shown in the picture.
3. Push the hatch open into the chosen position and tighten the knob
on the mechanical stay(s). Always tighten the stays rmly because
unexpected closing of the pane may do serious damage to body
parts that are in the way!(drawing 5)
4. The hatch can also be locked in the position shown in drawing 6, in
order to get an ideal ventilation position.
5. Keep all hatches rmly closed (but not locked up) while boating!
Make sure that all handles are in the unlocked position whilst sailing!
This allows access into the boat from outside in life threatening si-
tuations (the foregoing only applies if it concerns a full-sized escape
hatch.).
When the boat is left alone for a prolonged period of time, shift the
knob on the handles to the lock-up position, also when the ventilation
position of the escape hatch is selected. In doing so, you will minimize
the risk of breaking and entering!
B
B
Drawing 5
Drawing 4
Drawing 6

Boating technology by craftsman marine
ZD-010-009.2.1.06.10
www.craftsmanmarine.com Printed in the Netherlands
Table of contents


