manuals.online logo
Brands
  1. Home
  2. •
  3. Brands
  4. •
  5. Craftsman
  6. •
  7. Power Tools
  8. •
  9. Craftsman 13918 User manual

Craftsman 13918 User manual

Clicker Style Digi-Click™
TorqueWrench
Owner’s Manual Model No’s:
39 8, 39 9
SAFETY RULES
1. STUDY THIS BOOKLET CAREFULLY BEFORE ATTEMPTING
TO OPERATE THIS WRENCH.
2. Never appl more torque than the maximum scale
reading.
3. This torque wrench is designed for manual tightening of
threaded fasteners onl . DO NOT USE IT AS A NUT-
BREAKER OR FOR ANY OTHER PURPOSE.
4. Over-torqued or defective fasteners and sockets ma
suddenl break. Ratchets that are improperl engaged,
worn out, damaged, or over-torqued ma slip or break.
TO PREVENT INJURY, KEEP PROPER FOOTING AND
BALANCE AT ALL TIMES. DO NOT USE THE WRENCH IN
PLACES FROM WHICH YOU MAY FALL OR SLIP, OR
AROUND OPERATING MACHINERY.
5. This wrench will not prevent ou from appl ing more
torque than set, it is not a torque limiting tool. The LCD
displa will flash “STOP” if ou exceed either the lower or
upper limit of intended use. At low settings the release is
gentle and there usuall is no audible ‘click’ signal. Learn
how different amounts of torque ‘feel’, so ou will reduce
the possibilit of damage and/or injur due to accidental
over-torquing.
6. APPLY FORCE TO THE GRIP ONLY. DO NOT USE ‘CHEATER
BARS’ (a piece of pipe placed over the hand grip).
7. There are no user-serviceable components inside the
wrench. Disassembling the wrench or making an
adjustments will result in the loss of accurac , and will
void the warrant .
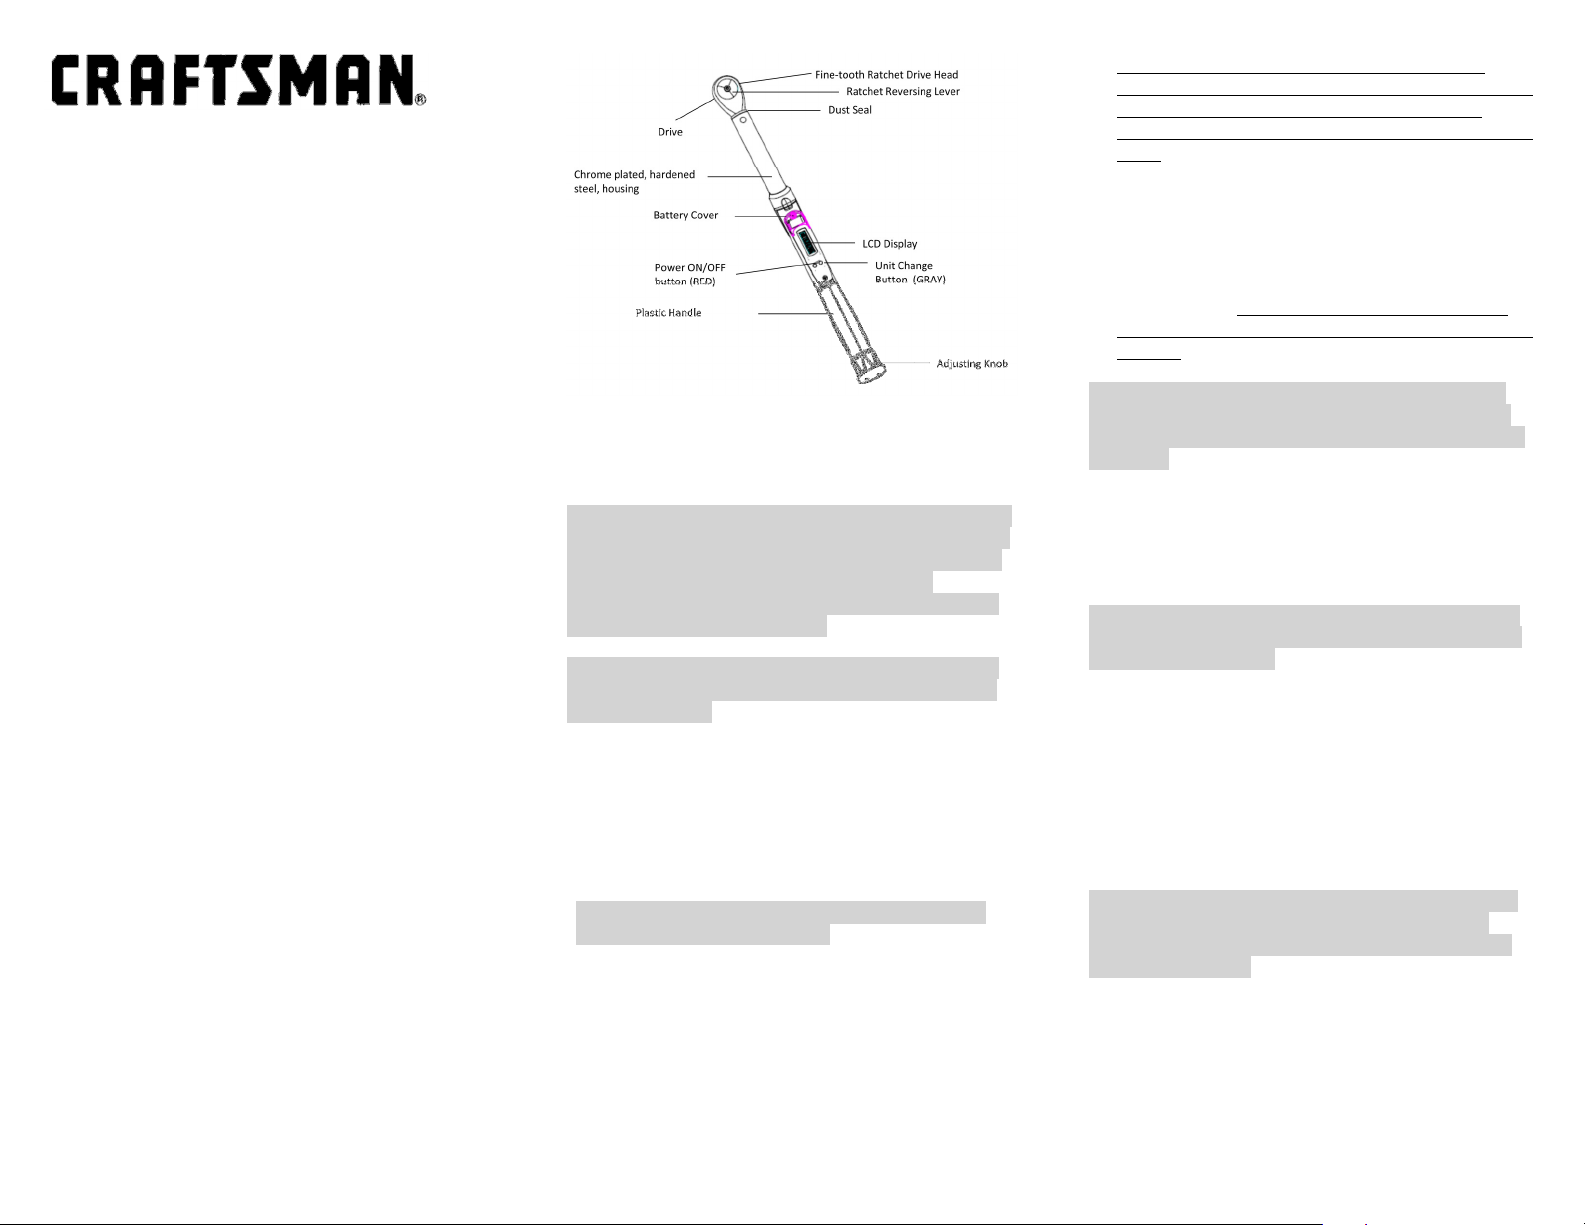
OPERATING INSTRUCTIONS
Before adjusting the wrench to the desired torque setting,
make sure that ou are using the correct torque units.
Torque values ma be displa ed in units of Inch Pounds, Foot
Pounds, Newton Meters, or Centimeter Kilograms.
Your CRAFTSMAN DIGI-CLICK™ Torque Wrench is calibrated
in Foot-Pounds (default on the LCD displa ) and can be
changed to other units as desired.
WARNING: DO NOT turn the adjusting knob either below the
lowest scale reading or above the highest scale reading. The
LCD displa will show torque settings be ond the calibrated
upper and lower limits of our DIGI-CLICK™torque
wrench,these are intended for adjusting purposes onl and
are not within the calibrated range.
WARNING: DO NOT use the wrench when batteries are not
installed or when batteries do not have sufficient power to
operate the wrench
TO SET TORQUE
1. Press the red PWR button to turn the wrench on.
2. At initial power up, the LCD displa will flash all icons
twice and then show the current torque setting. When
stored or not in use, the wrench should be set to less
than 25% of the maximum capacit .
NOTE: The batter level indicator on the LCD displa will
indicate the remaining batter life.
3. Press the gra UNIT button to toggle through desired
units (ft-lb, in-lb, N-m, kg-cm)
4. Pull the adjusting knob out to unlock the adjusting
mechanism.
5. While holding the adjusting knob unlocked, turn it
clockwise to increase the torque, and counterclockwise
to decrease torque. Keep turning until the desired
TARGET torque reading is displa ed on the LCD screen.
6. If during a torque setting adjustment the intended
TARGET value is exceeded on the LCD displa , the torque
wrench should be first adjusted back to below the
TARGET value, and then back up to the intended TARGET
value.
7. Lock the setting b releasing and, if necessar , pushing
the adjusting knob in. The knob can be turned slightl
back and forth without changing the torque setting to
assure proper engagement of teeth in the locking
mechanism.
8. Press and hold the red PWR button for 2 seconds to turn
the wrench off. This torque wrench has an automatic
shut off feature and will power down after 10 minutes of
non-use.
NOTE: The TARGET torque setting and units will be saved
after shut off. If the torque is adjusted while the power is
off, the correct torque target will be displa ed at the power
on screen .
TO APPLY TORQUE
1. Attach the proper socket or other attachment to the
drive. Set the reversing lever of the proper direction of
the operation.
NOTE: If special attachments are used, torque setting must
be corrected in accordance with the directions given below
in the extensions section.
2. Place the socket or attachment onto the fastener to be
torqued.
3. Utilizing the ratcheting head, ou ma ‘spindown’ the
fastener until resistance is felt.
4. Holding the wrench BY THE GRIP ONLY*, appl SLOW
AND STEADY pull until a momentar release impulse or
‘click’ is felt. Release tightening pressure immediatel
when the release is felt.
WARNING: At low torque settings the release is gentle and
there usuall is no audible ‘click’ signal. Learn how the
release feels BEFORE ou torque to avoid accidental over-
tightening or damage.
*When using long sockets or extensions, the wrench ma be
supported at the head (onl at the head) with onl negligible
effects on accurac .
5. The wrench resets automaticall and is read for the next
operation.
EXTENSIONS
At times, it is impossible or impractical to use regular
sockets, (a good example being the tightening of threaded
tubing connectors) and a special attachment must be
utilized. Such attachments change the calibration of the
torque wrench, and it is necessar to calculate the correct
settings using the following formulas.
NOTE: Regular socket extensions which extend directl under
the drive head along the axis of rotation of the ratchet do not
affect the calibration of the torque wrench.
E – Effective Length of extension measured along the center
line of the torque wrench
L – Lever length of the wrench – center of grip to center of
drive
TW TEL
L  E
TE TWL  E
L
CARE AND MAINTENANCE
1. The CRAFTSMAN DIGI-CLICK™Torque Wrench is a
precision instrument and should be handled and stored
with care. It should never be used as a hammer or pry
bar.
2. DO NOT appl more torque than the rated capacit of the
torque wrench. DO NOT use it as a nut-breaker!!
3. When the wrench is not in use, keep it set below 25% of
capacit . If ou leave the wrench set to over 50% of the
wrench capacit for more than a few hours, set the
wrench to the lowest setting and leave it for a few
minutes before using it again.
4. The wrench is lubricated for life with a special lubricant.
Do not oil it in an manner. The ratchet head ma be
lubricated as needed for smooth operation.
5. This wrench uses three (3) 1.5v (LR44 or equivalent)
batteries.
6. To install and replace batteries as necessar , remove the
batter cover b removing the screw on the batter
cover, located to the left of the LCD. Place the new
batteries with all three facing the same direction, the
positive (flat) side facing the user. Replace the batter
cover b tightening the screw for the batter holder.
7. Remove batteries when wrench is stored for extended
periods.
8. When not in use, store the torque wrench in its
protective case.
9. The rubberized grip is not affected b petroleum
products, but it will be damaged b Acetone and certain
industrial solvents. It ma be cleaned with a clean cloth
wetted in mineral spirits or denatured alcohol. Never
immerse the wrench or any portion of it in any liquid.
Clean b wiping with a dr cloth.
10. Periodicall , the wrench should be checked for accurac .
This should be done if the wrench is used frequentl or is
subjected to abnormal handling or storage. In assembl
line t pe of usage, the wrench should be checked ever
5,000 torque applications. Calibration service is available
b returning it to our Sears store.
11. With the exception of the ratchet mechanism, the
wrench is not user serviceable. Return it to the nearest
Sears store for service.
12. The ratchet head ma be repaired b ordering repair kits
#44525 for 3/8” drive and #43445 for ½” drive models
from Sears, Dept. 98, Source 449.3
SPECIFICATIONS
Operating
Temperature Range
40
°
F
-
0
°
F (5
°
C
-
42
°
C)
Model No.
39 8
39 9
Drive
3/8” Ratchet
1/2” Ratchet
Calibrated
Capacity
†
5
-
80 ft
-
lbs
60 – 960 in-lbs
6.78 – 108.48 N-m
69.1 – 1105.6 kg-cm
25
-
250 ft
-
lbs
300 – 3000 in-lbs
33.9 – 339 N-m
345.5 – 3455 kg-cm
Increments
& Display
Resolution
0.25 ft
-
lbs
3.0 in-lbs
0.25 N-m
3.0 kg-cm
0.5ft
-
lbs
6.0 in-lbs
0.5 N-m
6.0 kg-cm
Dimensions
1
9
.
3
” x 1.6” x
2.2
”
2
3.3
” x 1.6” x
2.4
”
Weight, lb/oz (gm)
1
/
11
(
767
)
2/7 (1110)
Lever Length*
1
5.
0”
1
8.9
”
† LCD will displa settings above and below the calibrated
range, for adjusting purposes onl .
*Center of drive to center of handle
ACCURACY: ±4%on clockwise or right-hand readings greater
or equal to 20% of capacit . Complies with American
National Standard B107.14M and International Standard ISO
6789
NOTE: The wrench will not actuate or ‘click’ when used in
the counter-clockwise or left-hand direction
FULL 90-DAY WARRANTY ON CRAFTSMAN DIGI-
CLICK™ TORQUE WRENCH
If this electronic Craftsman DIGI-CLICK™ torque wrench fails
due to a defect in material or workmanship within 90 da s
from the date of purchase, return it to an Sears store or
other Craftsman outlet for free repair (or replacement if
repair proves impossible).
If this electronic Craftsman DIGI-CLICK™ torque wrench
needs re-calibration within 90 da s from the date of
purchase, return it to an Sears Parts & Repair Service
Center, Sears store, or other Craftsman outlet for free re-
calibration
This warrant gives ou specific legal rights, and ou ma also
have other rights which var from state to state.
P/N: 10345A
06-2012

This manual suits for next models

1

Other Craftsman Power Tools manuals

Craftsman 124.34986 User manual

Craftsman

Craftsman 124.34986 User manual

Craftsman 26462_0 User manual

Craftsman

Craftsman 26462_0 User manual

Craftsman 113.213832 User manual

Craftsman

Craftsman 113.213832 User manual

Craftsman 315.115860 User manual

Craftsman

Craftsman 315.115860 User manual

Craftsman 143.213150 User manual

Craftsman

Craftsman 143.213150 User manual

Craftsman 328.12190 User manual

Craftsman

Craftsman 328.12190 User manual

Craftsman 171.264630 User manual

Craftsman

Craftsman 171.264630 User manual

Craftsman 900.277303 User manual

Craftsman

Craftsman 900.277303 User manual

Craftsman Colovos 351.181700 User manual

Craftsman

Craftsman Colovos 351.181700 User manual

Craftsman 320.17255 User manual

Craftsman

Craftsman 320.17255 User manual

Craftsman CMXEDAR300 User manual

Craftsman

Craftsman CMXEDAR300 User manual

Craftsman 113.213843 User manual

Craftsman

Craftsman 113.213843 User manual

Craftsman 320.2768 User manual

Craftsman

Craftsman 320.2768 User manual

Craftsman CMCF934 User manual

Craftsman

Craftsman CMCF934 User manual

Craftsman CMES612 User manual

Craftsman

Craftsman CMES612 User manual

Craftsman 113.213213 User manual

Craftsman

Craftsman 113.213213 User manual

Craftsman 152.229020 User manual

Craftsman

Craftsman 152.229020 User manual

Craftsman 103.20660 User manual

Craftsman

Craftsman 103.20660 User manual

Craftsman 103.20620 User manual

Craftsman

Craftsman 103.20620 User manual

Craftsman 21914 - 12 in. Drill Press User manual

Craftsman

Craftsman 21914 - 12 in. Drill Press User manual

Craftsman 137.219000 User manual

Craftsman

Craftsman 137.219000 User manual

Craftsman 875.191174 User manual

Craftsman

Craftsman 875.191174 User manual

Craftsman 320.28212 User manual

Craftsman

Craftsman 320.28212 User manual

Craftsman CMXEQWX3232 User manual

Craftsman

Craftsman CMXEQWX3232 User manual

Popular Power Tools manuals by other brands

Cleco 48EA Series parts manual

Cleco

Cleco 48EA Series parts manual

Toolex 597438 instruction manual

Toolex

Toolex 597438 instruction manual

Hilti TE 30-A36 operating instructions

Hilti

Hilti TE 30-A36 operating instructions

Sealey AK6290 instructions

Sealey

Sealey AK6290 instructions

Sienna SPP-0669 instruction manual

Sienna

Sienna SPP-0669 instruction manual

Bosch GBH 36 V-EC Compact Professional Original instructions

Bosch

Bosch GBH 36 V-EC Compact Professional Original instructions

Porter-Cable 643 instruction manual

Porter-Cable

Porter-Cable 643 instruction manual

Makita RP0910 instruction manual

Makita

Makita RP0910 instruction manual

Makita DTR180 instruction manual

Makita

Makita DTR180 instruction manual

Campbell Hausfeld AF010400 operating instructions

Campbell Hausfeld

Campbell Hausfeld AF010400 operating instructions

Beteze Isabelle Assembly instructions

Beteze

Beteze Isabelle Assembly instructions

Racing RAC52CDORG instruction manual

Racing

Racing RAC52CDORG instruction manual

Hilti DX460 operating instructions

Hilti

Hilti DX460 operating instructions

TJEP CN 70 manual

TJEP

TJEP CN 70 manual

Laguna Tools DAKE 33-672 instruction manual

Laguna Tools

Laguna Tools DAKE 33-672 instruction manual

Draper 63220 instructions

Draper

Draper 63220 instructions

Ryobi RMT200 Original instructions

Ryobi

Ryobi RMT200 Original instructions

Ferm FBF-6E user manual

Ferm

Ferm FBF-6E user manual

manuals.online logo
manuals.online logoBrands
  • About & Mission
  • Contact us
  • Privacy Policy
  • Terms and Conditions

Copyright 2025 Manuals.Online. All Rights Reserved.