manuals.online logo
Brands
  1. Home
  2. •
  3. Brands
  4. •
  5. Crane
  6. •
  7. Watch
  8. •
  9. Crane AA4-GPS-3A User manual

Crane AA4-GPS-3A User manual

Quick Start Guide
GPS-watch with heart rate measurement and compass
____________________________________________________________________________________________________________________________________________________________________________
Read the safety instructions in the manual before you start.
1Area of use
The GPS watch has a navigation system. When using the satellite network, which sur-
rounds the earth, the position of the user can be determined. This is possible at any time
and anywhere in the world.
The GPS watch can also be used as a training aid to measure and display your heart rate.
The GPS watch is not a medical device.
2Safety information
Please read this chapter carefully and follow all of the instructions stated. This will
guarantee reliable operation longevity of your GPS watch.
Attention: Due to suffocation hazard, the display protection film must be kept away
from babies and toddlers!
Hazards for children and individuals needing assistance
This GPS watch is not intended for use by children or individuals with limited
physical, sensory or emotional capacities or limited experience and / or
knowledge unless they are supervised by an individual responsible for their
safety or receive instructions from the latter as to how the wristwatch should be
used and have understood the dangers arising from it. Children should be su-
pervised in order to ensure that they do not play with the GPS watch. Cleaning
and user maintenance may not be performed by children without supervision.
For more information, please visit www.produktservice.info.
3Function buttons
3.1 Start up
The watch is delivered in switched-off mode. Hold the "LAP/RESET"
button for approx. 5 seconds, to switch on the GPS watch. The time mode
will be shown as the first mode:
Key lock:
By pressing the "light" and "view" button at the same time, you can activate and/or
deactivate the key lock. If the key lock is activated before training, then inadvertent
pressing of buttons during training can be avoided.
Key lock activated Key lock deactivated
Display illumination
By pressing the "LIGHT" button the display is illuminated for approx. 5 sec-
onds.
3.2 Charging up the rechargeable battery of the GPS watch
The GPS watch has a built in lithium polymer rechargeable battery. Charge this for at
least 2-3 hours, before the first use of the GPS watch. Attach the clip of the USB cable to
the GPS watch, as shown in the following illustration. Plug the USB cable into a live USB
port in your computer. It is not necessary to install a driver to charge the rechargeable
battery.
During the charging process, the following symbol will
appear on the display:
CAUTION
Please make sure to connect the USB
cable so that the metal pins of the
cable are locked in place at the connec-
tions of the watch. Incorrect connec-
tion of the cable may lead to overheat-
ing of the watch or the cable!
3.3 Chest strap
Adjust the elastic belt so that the sensors fit firmly on the
chest, underneath the chest muscles.
4Modes of the GPS watch
The GPS watch has the following main function modes, which can be changed by a short
press of the "MODE" button, and will be described in more detail in the next few chap-
ters.
Time mode
GPS training mode
GPS navigation mode
Compass mode
Settings mode:In addition to these 4 modes, the watch is equipped with a Settings
mode. Keep the MODE button pushed in the Time mode in order to enter the Set-
tings mode.
In the Settings mode, you can set all available functions such as "Time/Date", "Timer",
Alarm" and all user and system settings via an easy to use menu navigation.
4.1 Time mode
In Time mode, the exact time, date and the day of the week are displayed. By pushing the
"VIEW" button, the functions Battery Level, Timer, Alarm and Second Time can be
accessed.
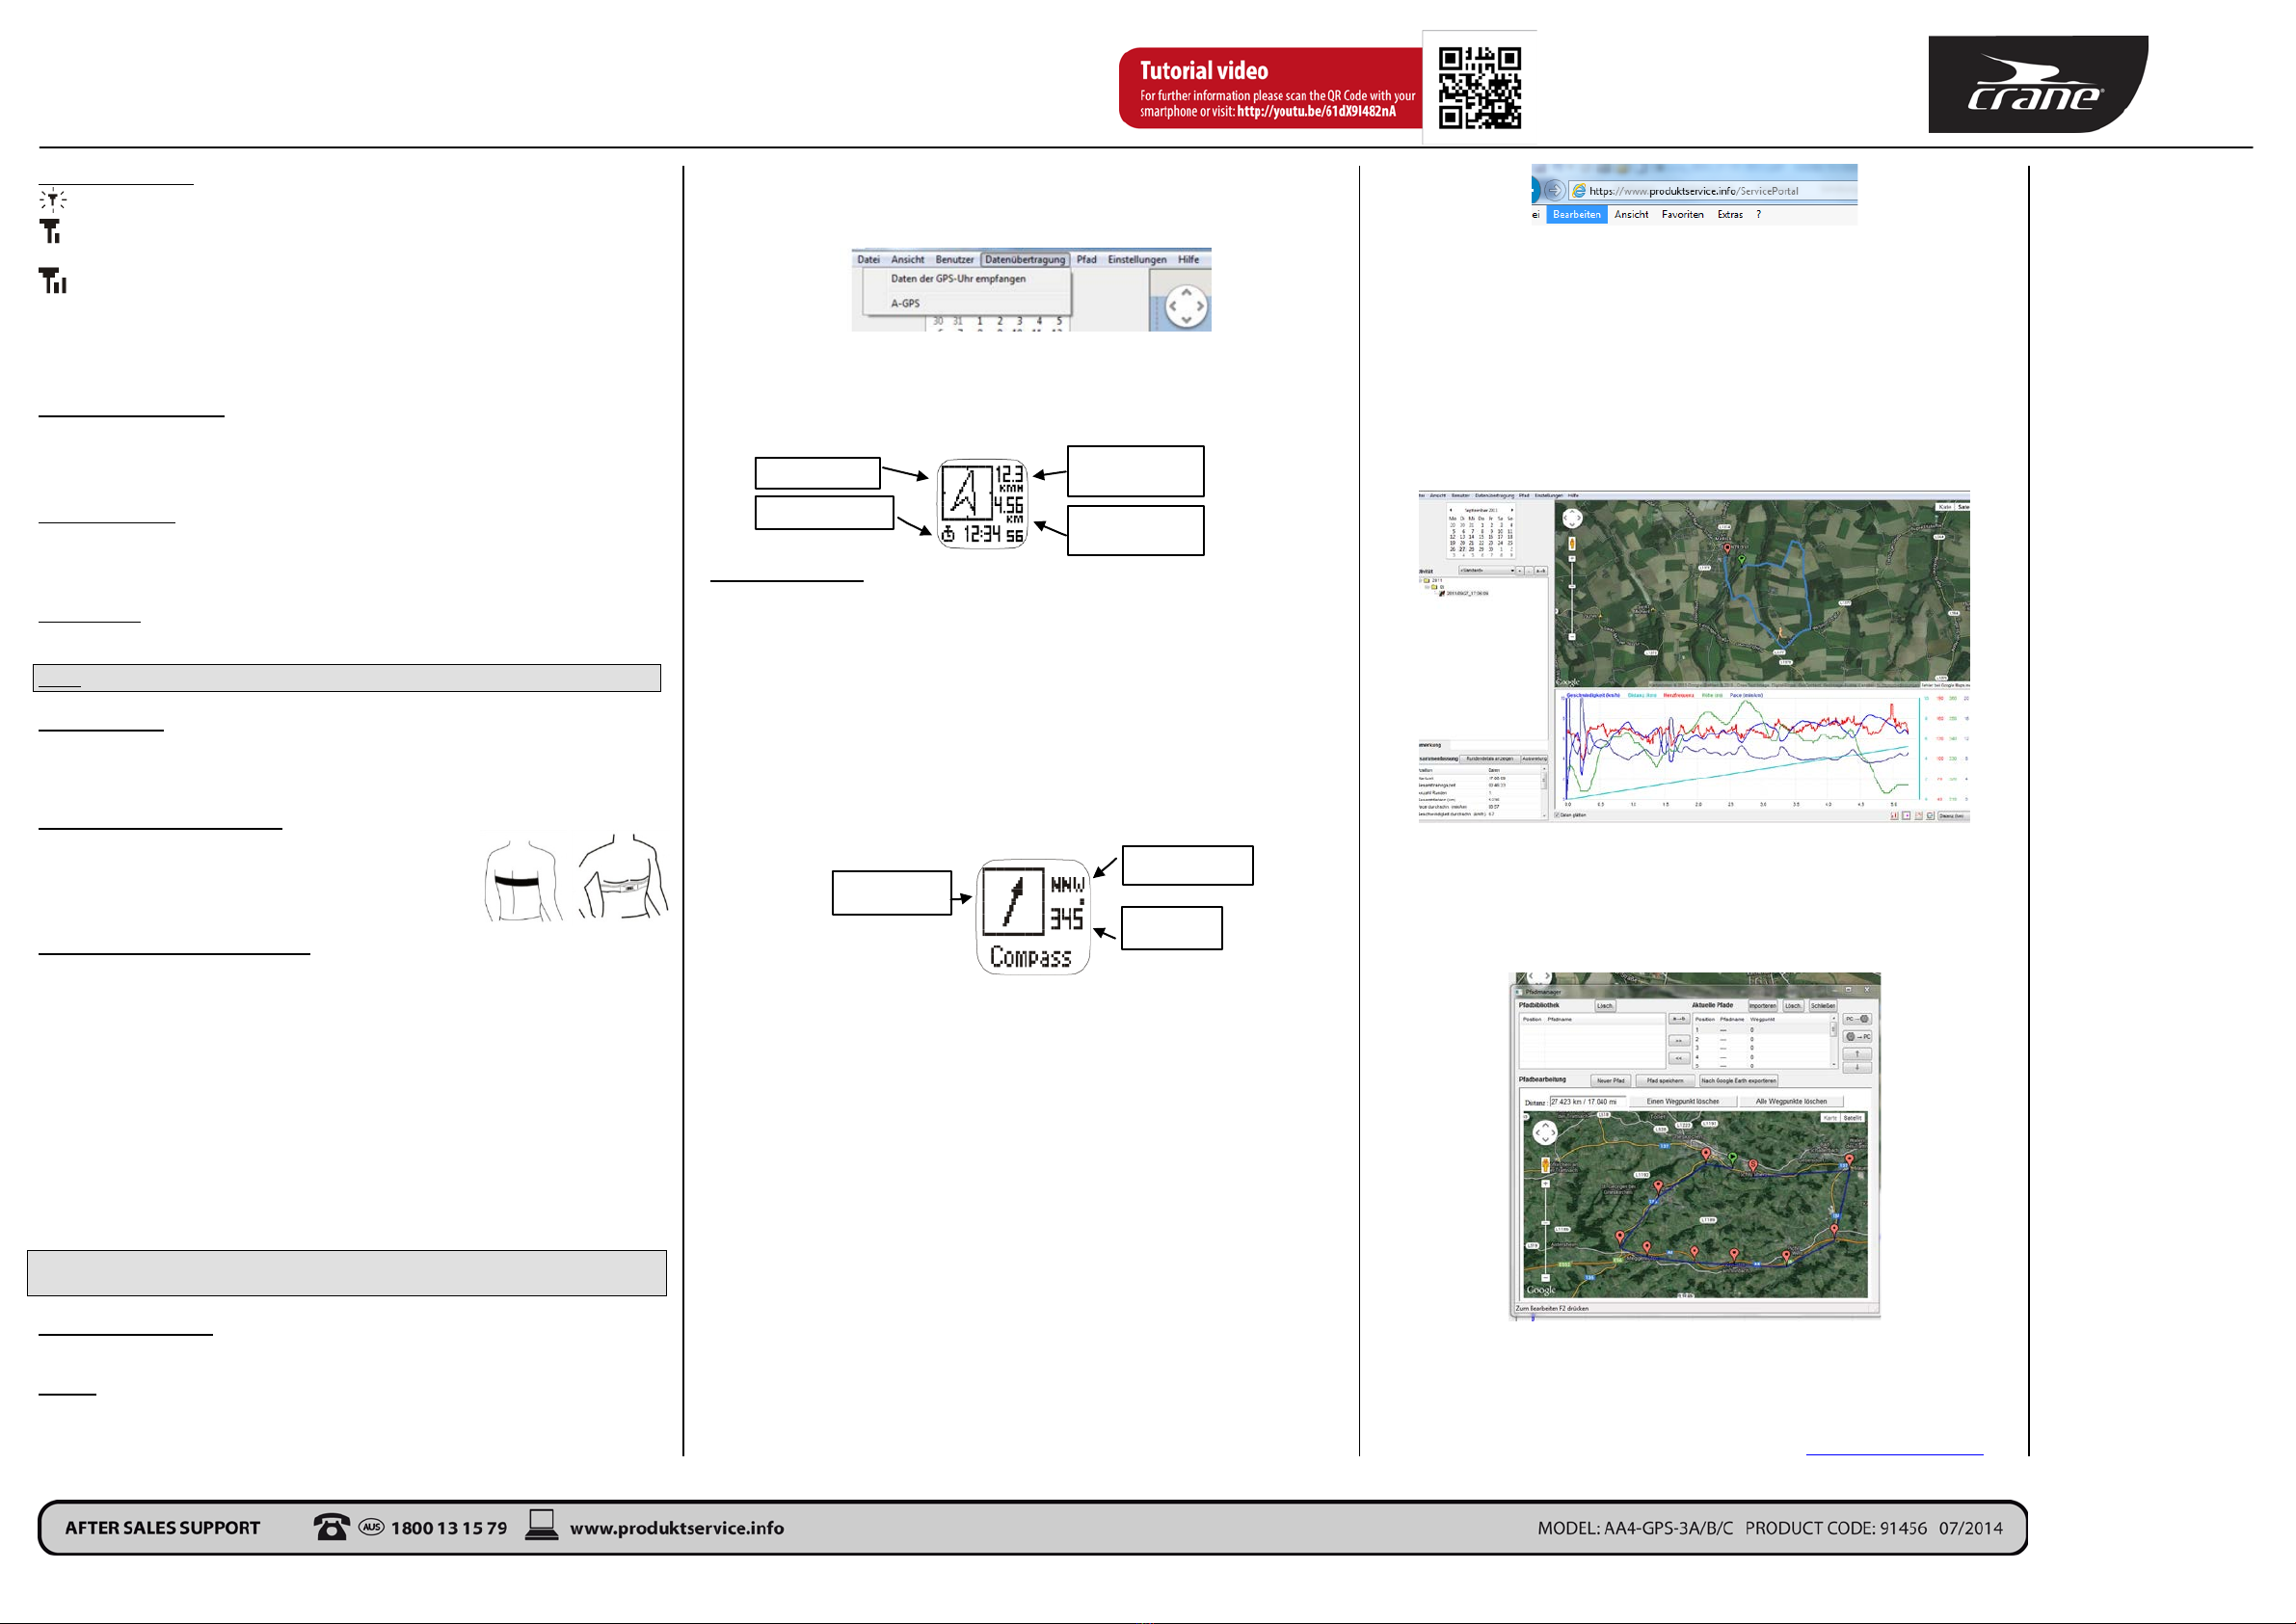
4.2 GPS training mode
Press the "MODE" button until you are in the GPS training mode. This can be seen in the
following display (example of a display):
In the GPS training mode, speed, distance, training time, heart rate and other data is rec-
orded, which you can later view on the computer using GPS-Master.
The GPS training mode works closely together with the GPS navigation mode. The func-
tions "start training" and "stop training" and taking lap times can be carried out in both
modes.
Training profile and training data
The GPS watch has 5 different training profiles:
running, cycling, hiking, sailing, "User"
Select workout profile
Select the menu point "Workout" "Profiles" "Select" in the adjustment mode.and set
one of the five workout profiles.
There are 3 displays for each workout profile. Each display consists of 3 lines for the
workout data. The selection is quicker and easier via GPS-Master.
Press the "VIEW" button in the GPS training mode to manually change between the 3
displays.
Select workout data
Select the menu point "Workout" "Profiles" "Customize" in the adjustment mode.
4.2.1 Recording training
Switch on GPS
Tip: Even before you start your running training and/or your journey, place your GPS
watch in an open space with a clear view of the sky (e.g. on the window sill or the car
roof) and start the search for satellites.
In order to search for satellites, keep the "VIEW" button pushed in the GPS training
mode. As soon as GPS reception has been established, "GPS fixed" will be displayed.
Battery case
Training data line 1
Training data line 2
Training data line 3
Sensor contact areas
"
ST./STP
"
button
"VIEW"button
"LAP/RESET"
button
"MODE"button
"LIGHT"button
Quick Start Guide
GPS-watch with heart rate measurement and compass
____________________________________________________________________________________________________________________________________________________________________________
North pole
display
Cardinal direction
Expression
of degree
GPS-Status displays:
Antenna symbol flashes - search for satellites.
"GPS fixed" appears on the display, the GPS watch has found a 2D position (i.e.
the height is still missing).
If this symbol appears, enough satellites have been found, so that the GPS watch
can determine a 3D position (with height).
If satellites have been lost and no position can be determined, "GPS lost" will appear on
the display, until a button is pressed.
Switch off GPS manually
To turn off the search for satellites manually, hold the "VIEW" button in the training
mode "GPS OFF"appears.
Start/stop training
Press the "ST./STP." button in the GPS training mode to start or stop the training. In this
way, the search for a GPS signal and the heart rate measurement will be automatically
activated (if this has not already been done manually beforehand).
ATTENTION: After stopping your training with the "ST./STP." button, you can save it
by keeping the "LAP/RESET" button pushed. "Hold to Save" and "Done" is displayed.
Note: GPS reception remains active!
Record lap times
Press the "LAP/RESET" button during training to record a lap time. The maximum
number of lap times for each training is 99.
Activate heart rate measurement
Wear the chest strap as described under point 2.4 "chest
strap". Select the menu point "HRM" "On/off" in adjust-
ment mode, set it to "on" The heart rate measurement
will be activated.
Coupling chest strap and GPS watch
Each chest strap has its own ID, and was coupled with the GPS watch in the factory, in
order to avoid defects. If you replace the GPS watch or the chest strap, they must be re-
coupled. Select the menu point "HRM" "On/off" "HRM off" in the adjustment
mode.
Select the menu point "HRM" "Pairing" in the adjustment mode.
Touch the sensor contact surface of the chest strap for a few seconds.
When the pairing is successfully completed, the notification "Done!" will appear.
If the notification "Failed!" appears, then the coupling has not worked. Try again,
by proceeding as described above.
After the coupling, switch the HRM function back on.
4.2.2 General about GPS reception
Perfect satellite signal reception can only be guaranteed in clear weather conditions
(clear sky) and suitable reception area - open area with clear view of the sky.
Cold start – warm start
A cold start is when the GPS watch is being used for the first time. After that there is
only the warm start, and in an optimum case this takes approx. 10 seconds.
A-GPS:
The GPS watch is equipped with an A-GPS function, which can be used to speed up the
GPS signal reception, particularly during inclement weather conditions. To use this
function, please download the A-GPS data as described below.
Connect the watch to the computer using the USB cable. In the menu bar of the GPS
Master, click on data transfer and then on A-GPS. The current A-GPS data will be trans-
ferred to the watch.
4.2.3 GPS-Navigation mode
Press the "MODE" button until you are in the GPS navigation mode. This can be seen
through the following display:
Paths and waypoints
10 paths can be saved in the GPS watch. Only one path can be worked on at once. Each
path can consist of a maximum of 99 waypoints. Waypoints within a path can be linked
together and form a route, but could also be just individual waypoints.
There are two sub functions in the GPS navigation mode. Using the "VIEW" button you
can change between them:
Navigation display
Go to display
4.2.4 Compass mode
Press the "MODE" button until you are in the compass mode. You can see this through
the following display:
4.2.4.a Calibrating the compass
The compass of the GPS watch should be calibrated:
If the watch is being used for the first time.
If the compass is being used in a location which is not identical to the location where
the compass was calibrated.
In order to calibrate the compass, select the menu point "Settings" "System" 
"Compass" "Calibrate".
Hold the GPS watch parallel to the ground and turn clockwise until "Done!" appears
on the display.
5Data download and data upload
GPS-Master software is for downloading /uploading the recorded data from your training
sessions.
5.1 Download installation file for GPS-Master
You can download the installation file for GPS-Master and the driver for the USB cable
from the following website: https://www.produktservice.info
Click on the field "product information" and enter the EAN code: 20014414 into the
window that opens.
The GPS Master programme is easy to operate and self-explanatory. A detailed pro-
gramme description can be accessed in the menu bar at “Help” “Quick guide”.
5.2 Data download
GPS-Master software is for downloading the recorded data from your training sessions
and the analysis of this data. The communication between GPS-Master and the GPS-
watch takes place via the USB cable.
5.3 Data upload
It is also possible to transfer routes that you created in Google Earth to your watch using
the “path manager” function. The path manager is divided in three main sections: current
path, path library and path editor.
6Important note
Please refer to the operating manual for further information on functions and operation of
the GPS watch. Please also observe the FAQs that form part of the manual.
All documents can be downloaded from our service website (www.produktservice.info).
Direction arrow
Current speed
Distance from
active waypoint
Navigation data

This manual suits for next models

2

Other Crane Watch manuals

Crane AA5-CDSM-3A User manual

Crane

Crane AA5-CDSM-3A User manual

Crane AU4-PF-6LA User manual

Crane

Crane AU4-PF-6LA User manual

Crane H05-GPS-6A User manual

Crane

Crane H05-GPS-6A User manual

Crane AE5-GPS-6A User manual

Crane

Crane AE5-GPS-6A User manual

Crane AU4-PF-7GA User manual

Crane

Crane AU4-PF-7GA User manual

Crane AE5-CDSM-3A User manual

Crane

Crane AE5-CDSM-3A User manual

Crane PULSE WATCH User manual

Crane

Crane PULSE WATCH User manual

Popular Watch manuals by other brands

Eurotops Versand 23423 instruction manual

Eurotops Versand

Eurotops Versand 23423 instruction manual

Casio 2744 user guide

Casio

Casio 2744 user guide

Leap TF-C300 user manual

Leap

Leap TF-C300 user manual

Artfone Watch 8 user manual

Artfone

Artfone Watch 8 user manual

Casio 4343 Operation guide

Casio

Casio 4343 Operation guide

Casio 1803 General guide

Casio

Casio 1803 General guide

PowerWatch 2 Series user manual

PowerWatch

PowerWatch 2 Series user manual

Police PL-12175JSBR/02A instruction manual

Police

Police PL-12175JSBR/02A instruction manual

HEAD HE-101 instruction manual

HEAD

HEAD HE-101 instruction manual

Tissot NAVIGATOR WATCHES user manual

Tissot

Tissot NAVIGATOR WATCHES user manual

FOREVER CAREME KW-400 manual

FOREVER

FOREVER CAREME KW-400 manual

Casio 3063 Operation guide

Casio

Casio 3063 Operation guide

Casio QW-1170 user guide

Casio

Casio QW-1170 user guide

Timex CR1216 User information

Timex

Timex CR1216 User information

Lotus Chronograph ILMOS30 instruction manual

Lotus

Lotus Chronograph ILMOS30 instruction manual

Dugena 4460913 General instruction manual

Dugena

Dugena 4460913 General instruction manual

Pulsar W540 manual

Pulsar

Pulsar W540 manual

TMI Products VK63A Technical guide & parts catalogue

TMI Products

TMI Products VK63A Technical guide & parts catalogue

manuals.online logo
manuals.online logoBrands
  • About & Mission
  • Contact us
  • Privacy Policy
  • Terms and Conditions

Copyright 2025 Manuals.Online. All Rights Reserved.