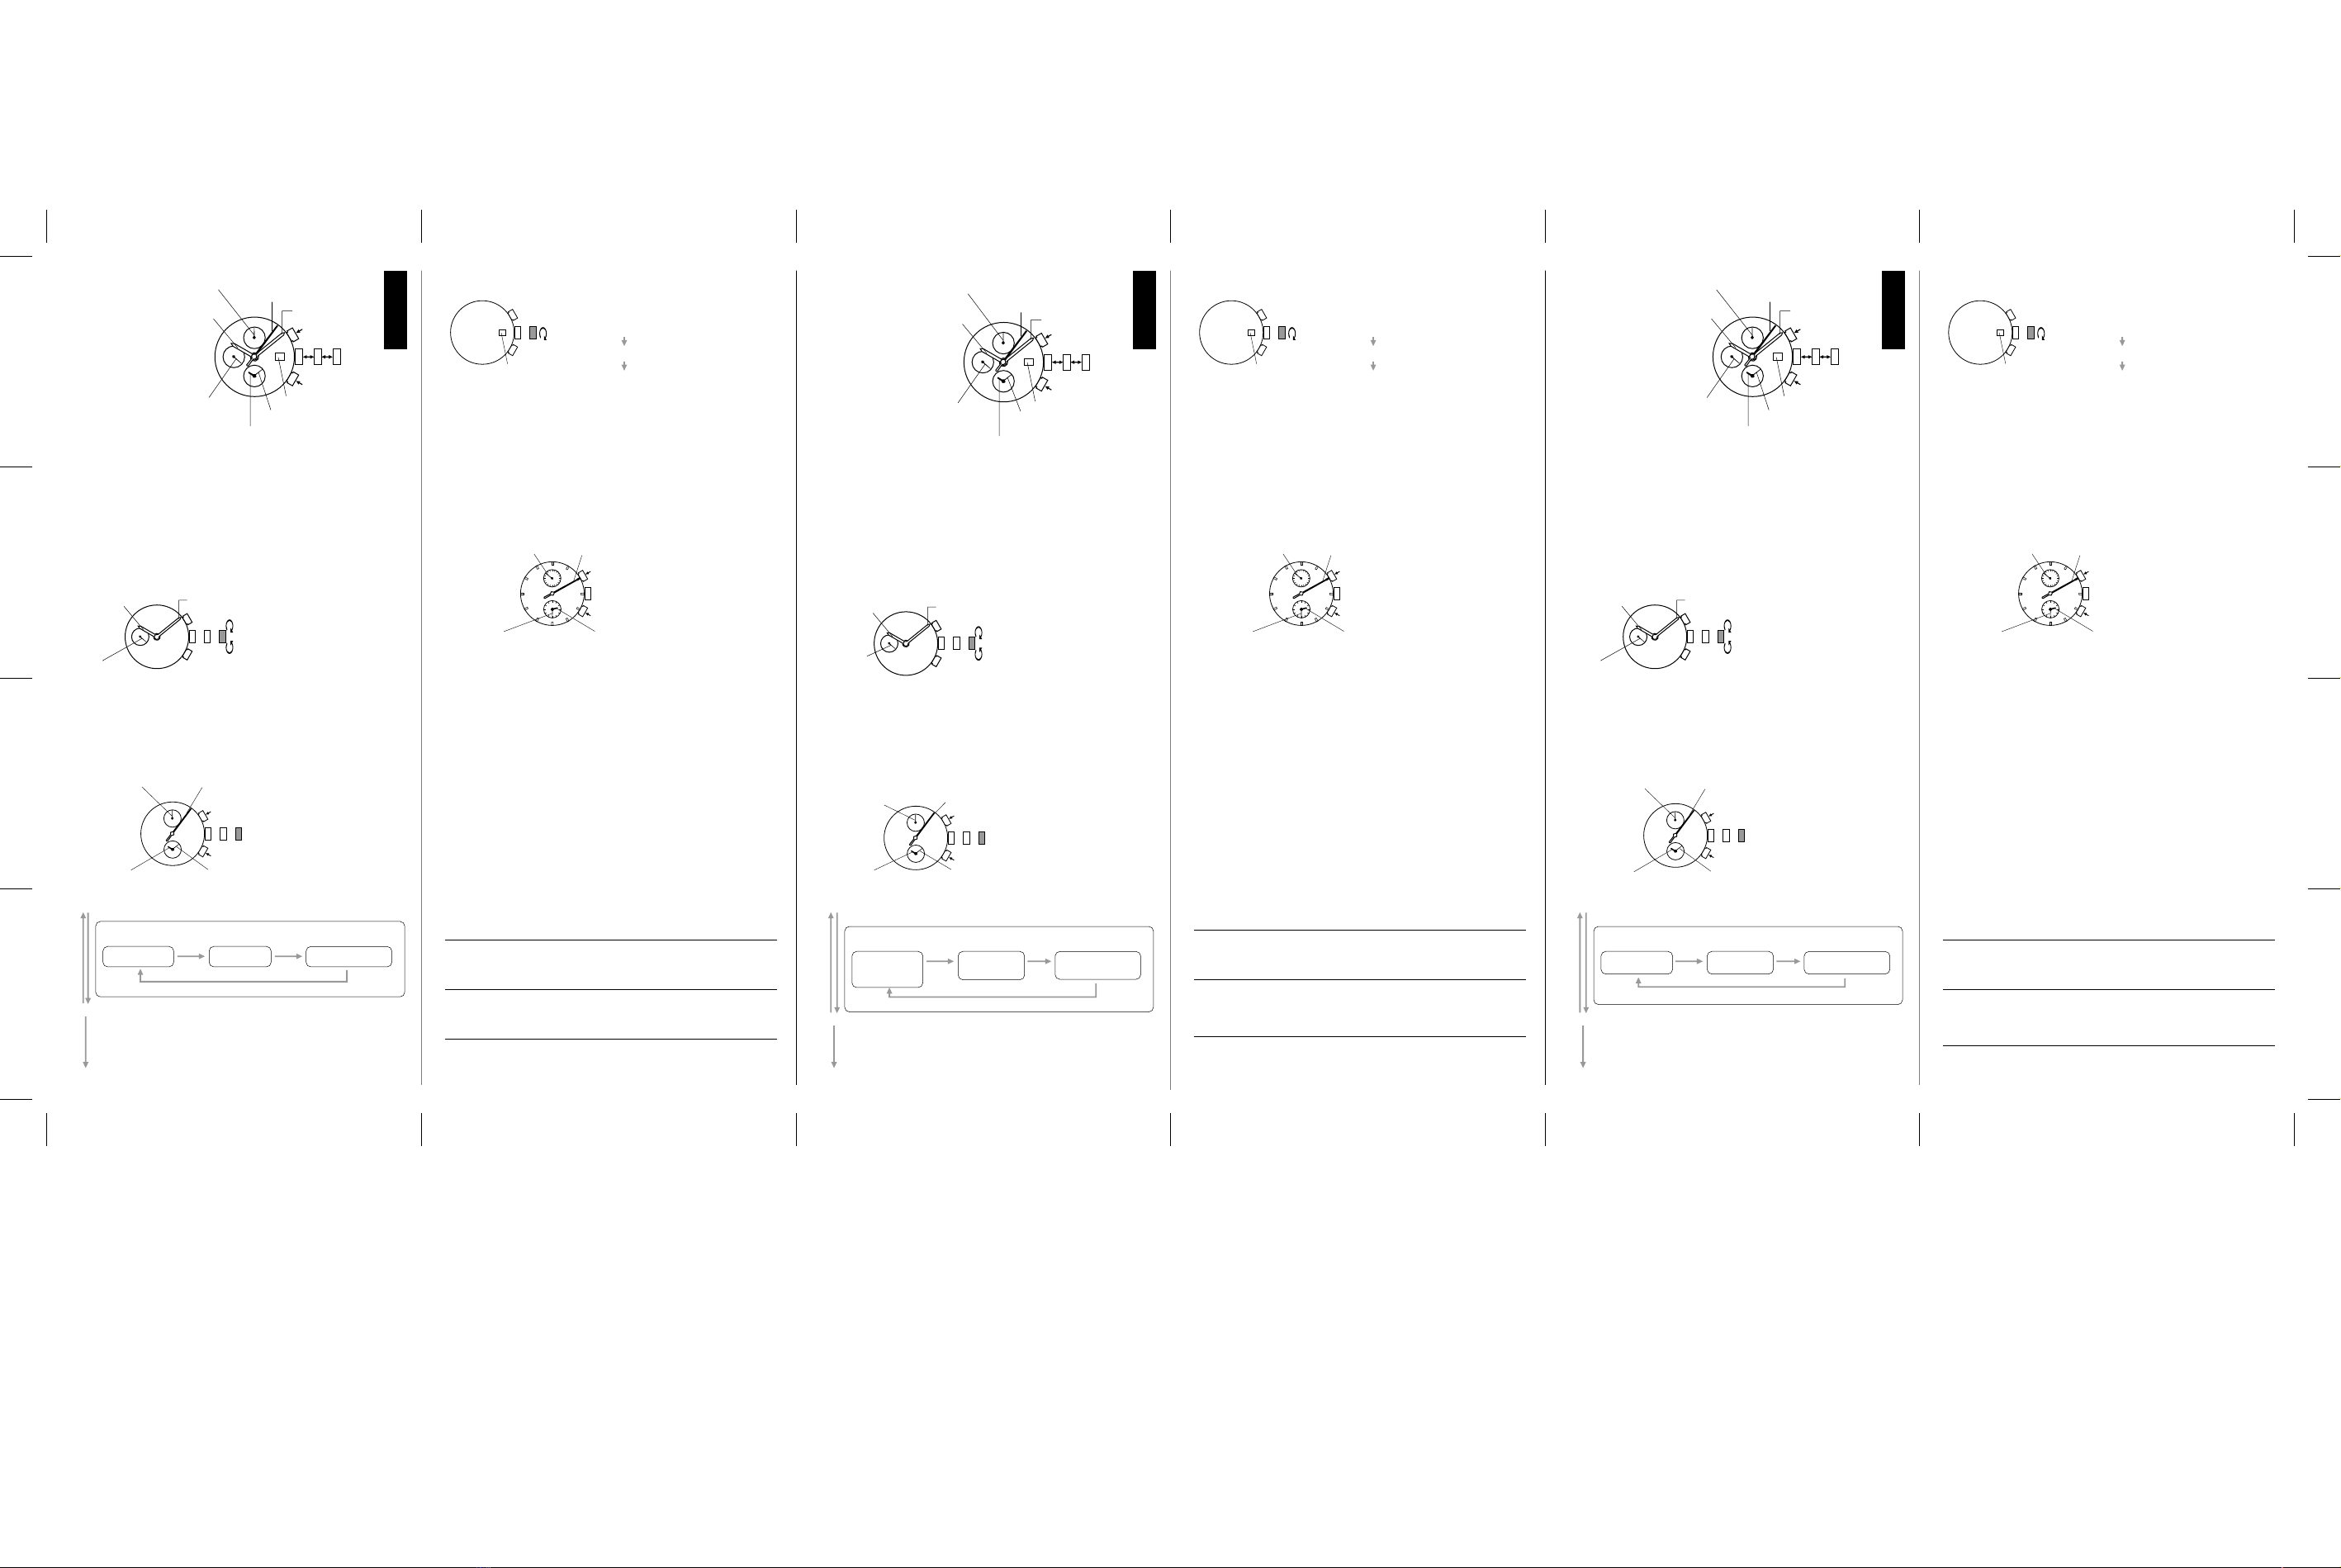
• TIME / CALENDAR
• STOPWATCH
Measures up to 12 hours
in 1/20 second increments.
Split time measurement
is possible.
STOPWATCH 1/20 second hand
Hour hand
STOPWATCH minute hand
STOPWATCH hour hand
STOPWATCH second hand
Minute hand
Small second hand
a b c
A
B
Date
a: Normal position
b: First click
c: Second click
SETTING THE TIME AND ADJUSTING THE STOPWATCH HAND
POSITION
• This watch is so designed that the following are all made with the crown at the second
click position
1) time setting
2) stopwatch hand position adjustment
Once the crown is pulled out to the second click, be sure to check and adjust the time. If
needed, the position of the stopwatch hands should also be adjusted then.
CROWN: Pull out to second click when the second hand is at the 12 o’clock position.
CROWN
Hour hand Minute hand
Small second hand
CROWN: Turn to set the hour and minute hands.
1. When the stopwatch is or has been measuring or is stopped, if the crown is pulled out to the second
click, it will automatically reset the STOPWATCH hands to “0”.
2. It is recommended that the hands be set to the time a few minutes ahead of the current time, taking
into consideration the time required to adjust the STOPWATCH hand position if necessary.
3. When setting the hour hand, be sure to check that AM/PM is correctly set. The watch is so designed
that the date changes once in 24 hours.
4. when setting the minute hand, first advance it 4 to 5 minutes ahead of the desired time and then turn
it back to the exact minute.
2. STOPWATCH HAND POSITION ADJUSTMENT
vIf the STOPWATCH hands are
not in the “0” position, follow the
procedure below to set them to the
“0” position.
APress for 2 second to select STOPWATCH hand(s) to be adjusted.
B
SETTING THE DATE
• Before setting the date, be sure to set the main time.
Date
CROWN Pull out to first click.
Turn clockwise until the desired
date appears.
Push back in to normal position.
1. It is necessary to adjust the date at the end of february and 30-day months.
2. do not set the date between 9:00 p.m. and 1:00a.m. Otherwise, the date may not change properly.
STOPWATCH
• The stopwatch can measure up to 12 hours in 1/20-second increments.
• When the measurement reaches 12 hours, the stopwatch automatically stops counting.
Standard measurement
A 4A 4B
START STOP RESET
Accumulated elapsed time measurement
A 4A 4A •••4 A 4B
START STOP RESTART STOP RESET
* Restart and stop of the stopwatch can be repeated by pressing button A.
Split time measurement
A 4B 4B •••4 A 4B
START SPLIT SPLIT RELEASE STOP RESET
* Measrement and release of split time can be repeated by pressing button B.
Measurement of two competitors
A 4B 4A •••4 B 4B
START FINISH TIME OF
1ST COMPETITOR 2ND COMPETITOR
FINISHES RESET
FINISH TIME OF
2ND COMPETITOR
ENGLISH
ITALIANO
DEUTSCH
• Selection of the hand(s) can be made in the following order by pressing button Afor 2
seconds.
STOPWATCH
1/20-second hand STOPWATCH
second hand STOPWATCH
hour and minute hands
CROWN
* After all the adjustments are completed, check that the main time and alarm hands indicate the
same time
Push back in to normal position in accordance with a time signal.
• ORA E CALENDARIO
• CRONOMETRO
Può misurare sino a 12 secondi
in unità di 1/20 di secondo.
Sono anche possibili le
misurazioni dei tempi parziali.
Lancetta dei ventesimi di
secondo del CRONOMETRO
Lancetta delle ore
Lancetta dei minuti
del CRONOMETRO
Lancetta delle ore del CRONOMETRO
Lancetta dei minuti
Piccola lancetta
dei secondi
a b c
A
B
Data
a: Posizione normale
b: Primo scatto
c: Secondo scatto
PREDISPOSIZIONE DELL'ORA E REGOLAZIONE DELLA POSIZIONE
DELLE LANCETTE DEL CRONOMETRO
• L'orologio è stato studiato in mode che le seguenti operazioni vengano tutte eseguite con la corona
nella posizione estratte sino al secondo scatto:
1) predisposizione dell'ora
2) regolazione della posizione delle lancette del cronometro
Una volta che la corona sia stata estratta al secondo scatto prodedere a verificare e regolare l’ora.
Se del caso, procedere anche alla regolazione della posizione delle lancette del cronometro.
CORONA: Estrarla al secondo scatto nel momento in cui la lancetta dei secondi viene a trovarsi in
corrispondenza dell'indicazione delle ore 12.
CORONA
Lancetta delle ore Lancetta dei minuti
Piccola lancetta
dei secondi
CORONA: Ruotarla opportunamente sino a
predisporre le lancette delle ore
a dei minuti come desiderato.
1. Se il cronometro si trova, o si trovava, in corso di misurazione, o se è in posizone di arresto, estraendo la corona
sino al secondo scatto le lancette del CRONOMETRO vengono automaticamente riazzerate alla posizione
iniziale "0".
2. Si consiglia di predisporre le lancette di alcuni minuti in anticipo rispetto all'ora correntz reale del momento,
per tenere in considerazione il tempo necessario a regolare la posizione delle lancette del CRONOMETRO,
qualora necessario.
3. Predisponendo la lancetta delle ore, controllare che la posizione sia quella corretta per le ore antimeridiane o
pomeridiane desiderate. L'orologio è costruito in modo che la data cambi ogni 24 ore.
4. Predisponendo la lancetta dei minuti, farla avanzare di 4 o 5 minuti rispetto all'ora voluta, e farla poi retrocedere
sino all'esatto minuto desiderato.
2. REGOLAZIONE DELLA POSIZIONE DELLE LANCETTE DEL CRONOMETRO
PREDISPOSIZIONE DELLA DATA
• Prima di predisporre la data si deve procedere alla regolazione dell'ora principale.
Data
CROWN Estrarla sino al primo scatto.
Ruotarla in senso orario sino alla
comparsa della data desiderata.
Rispingerla in dentro nella sua
posizione normale.
1. La data deve essere riregolata alla fine del mese di febbraio e dei mesi di 30 giorni.
2. Non procedere alla regolazione della data nell'intervllo di tempo compreso fra le 9.00 di sera e1'1.00 del
mattino del giorno successivo. In caso contrario il cmbiamento di data potrebbe non aver luogo in modo
corretto.
CRONOMETRO
• II cronometro può misurare sino a 12 ore, in unità di ventesimi di secondo.
• Quando la misurazione raggiunge le 12 ore, il cronometro si arresta automaticamente.
vPrima di passare all'uso del cronometro, verificare che la corona si trovi nella sua posizione
normale, e che le lancette del CRONOMETRO si trovino sulla posizione inizale"0".
* Se le lancette del CRONOMETRO non ritornano alla posizione iniziale "0" quando il cronometro
viene riazzerato, eseguire la procedura descritta al paragrafo "PREDISPOSIZIONE DELL'ORA E
REGOLAZIONE DELLA POSIZIONE DELLE LANCETTE DEL CRONOMETRO".
Misurazione normale
A 4A 4B
AVVIO ARRESTO AZZERAMENTO
Misurazione del tempo trascorso, in accumulazione
A 4A 4A •••4 A 4B
AVVIO ARRESTO RIPRESA ARRESTO AZZERAMENTO
* La ripresa e 1'arresto del cronometro possono essere effettuati ripetutamente, sempre agendo sui tasto A.
Misurazione di un tempo parziale
A 4B 4B •••4 A 4B
AVVIO TEMPO PARZIALE RIPRESA ARRESTO
DEFINITIVO AZZERAMENTO
* La misurazione e la ripresa dopo la misurazione del tempo parziale possono essere effettuati ripetutamente,
sempre agendo sul tasto B.
Misurazione dei tempi di due concorrenti
A 4B 4A •••4 B 4B
AVVIO
TEMPO FINALE
DEL 1
CONCORRENTE
IL2
CONCORRENTE
GINUGE AL
TRAGUARDO
VISUALIZZAZIONE
DEL TEMPO FINALE
DEL 2 CONCORRENTE
CORONA Rispingerla in dentro nella sua posizione normale in concomitanza con un segnale orario.
1. TIME SETTING 1. PREDISPOSIZIONE DELL'ORA
AZZERAMENTO
• UHRZEIT/KALENDER
• STOPPUHR
Misst bis zu 12 Stunden in
Schritten von 1/20 Sekunden.
Zwischenzeitmessung
ist auch möglich.
STOPPUHR-Sekundenzeiger
Stundenzeiger
STOPPUHR-Minutenzeiger
STOPPUHR-Stundenzeiger
STOPPUHR-1/20-Sekunden-Zeiger
Minutenzeiger
kleiner Sekundenzeiger
a b c
A
B
Datum
a: Normalposition
b: 1. Einrastposition
c: 2. Einrastposition
EINSTELLEN DER UHRZEIT UND DER STOPPUHR-ZEIGERPOSITION
• Diese Uhr ist so konstruiert, dass die folgenden mit der Krone in der 2. Einrastposition
ausgeführt wird.
1) Einstellen der Uhrzeit
2) Einstellen der Stoppuhr-Zeigerposition
Wenn die Krone zur 2. Einrastposition herausgezogen wurder, prufen
Sie die Uhrzeit und stellen Sie sie erforderlichenfalls ein. Gegebebefalls muss dann auch die
Position der Stoppuhrzeiger eingestellt werden.
KRONE: Zur 2. Einrastposition herausziehen, wenn der Sedundenzeiger sich an der
12-Uhr-Position befindet.
KRONE
Stundenzeiger Minutenzeiger
kleiner
Sekundenzeiger
KRONE: Drehen, um den Stunden-und
Minutenzeiger einzustellen.
1. Wenn die Stoppuhr eine Messung durchführt oder durchführte oder gestoppt wurde und die Krone
zur 2. Einrastposition herausgezogen wird, werden die STOPPUHR-Zeiger automatisch auf "0" zuruckgestellt.
2. Es wird empfohlen, die Zeiger einige Minuten weiter als die Uhrzeit einzustellen, um die Zeit zu
berücksichtigen, die gegebenenfalls zum Einstellen der STOPPUHR- Zeiger erforderlich ist.
3. Beim Einstellen des Stundenzeigers muss darauf geachtet werden, dass vor/nach Mittag richtig eingestellt
wird. Die Uhr ist so konstruiert, dass das Datum einmal in 24 Stunden weiterruckt.
4. Der Minutenzeiger muss zum Einstellen 4 bis 5 Minuten weiter als die Uhrzeit und dann zurück auf
die genaue Minute gedreht werden.
2. EINSTELLEN DER STOPPUHR-ZEIGERPOSITION
vWenn die STOPPUHR-Zeiger nicht in
der Position "0" sind, stellen Sie sie wie folgt
auf die Position "0" ein.
EINSTELLEN DES DATUMS
• Vor dem Einstellen des Datums muss die Uhrzeit eingestellt werden.
Datum
KRONE Zur 1. Einrastposition herausziehen.
1m Uhrzeigersinn drehen, bis das
gewünschte Datum erscheint.
Zurück in die Normalposition drücken.
1. Am Ende des Februars und am Ende von Monaten mit 30 Tagen muss das Datum eingestellt werden.
2. Stellen Sie das Datum nicht zwischen 21:00 und 1:00 Uhr ein, weil das Datum sonst möglicherweise
nicht einwandfrei weiterrückt.
STOPPUHR
• Die Stoppuhr kann bis zu 12 Stunden in Schritten von 1/20 Sekunden messen.
• Wenn die Messung 12 Stunden erreicht, hört die Stoppuhr automatisch auf zu laufen.
vVergewissern Sie sich vor Verwendung der Stoppuhr, dass die Krone sich in der
Normalposition befindet und dass die STOPPUHR-Zeiger auf die Position "0" zuruckgestellt
wurden.
* Wenn die STOPPUHR-Zeiger bei der Ruckstellung der Stoppuhr auf "0" nicht zur Position "0"
zurückkehren, führen Sie das Verfahren in "EINSTELLEN DER UHRZEIT UND DER STOPPUHR-
ZEIGERPOSITION" aus.
Standardmessung
A 4A 4B
START STOP RÜCKSTELLUNG
Aufaddierende Zeitmessung
A 4A 4A •••4 A 4B
START STOP FORTSETZUNG STOP RÜCKSTELLUNG
* Fortsetzung und Stop der Stoppuhr konnen durch Drücken der Taste A wiederholt werden.
Zwischenzeitmessung
A 4B 4B •••4 A 4B
START ZWISCHENZEIT ZWISCHENZEIT
-FREIGABE STOP
* Messung und Freigabe der Zwischenzeit können durch Drücken der Taste B wiederholt werden.
Messung von zwei Wettbewerbern
A 4B 4A •••4 B 4B
START
ENDZEIT DES 1.
WETTBEWERBERS 2. WETTBEWERBER
ERREICHT ZIEL ENDZEIT DES 2.
WETTBEWERBERS
KRONE
* Prüfen Sie nach Durchführung der Einstellungen, dass der Uhrzeit-Stunden-und-Minutenzeiger
die Uhrzeit richtig anzeigen.
Bei einem Zeitzeichen zurück in die Normalposition drücken.
1. EINSTELLEN DER UHRZEIT
RÜCKSTELLUNG
RÜCKSTELLUNG
* The selected hand(s) turn(s) a full circle.
Press repeatedly to set the selected STOPWATCH hand(s) to the “0” position.
* The hand(s) move(s) quickly if button Bis kept pressed.
STOPWATCH 1/20 second hand STOPWATCH second hand
STOPWATCH minute hand STOPWATCH hour hand
( Ex.: 2 hours, 30 minutes and 10,85 seconds)
A
B
Movement of STOPWATCH 1/20-second hand
• After the stopwatch is started, STOPWATCH 1/20-second hand moves for about 10 minutes
and automatically stops at the “0” position.
• When the measurement is stopped or split time is measurement, it moves to indicate the
elapsed 1/20 seconds.
• After the stopwatch is started or split time is released, STOPWATCH 1/20-second hand moves
for about 10 minutes and stops automatically.
• In the same manner, if the stopwatch is stopped and restarted repeatedly or split time is
measured and released repeatedly, STOPWATCH 1/20-second hand moves for about 10 minutes
and stops automatically.
vBefore using the stopwatch, be sure to check that the crown is set at the normal position and
that the STOPWATCH hands are reset to the “0” position.
* If the STOPWATCH hands do not return to the “0” position when the stopwatch is reset to “0”, follow
the procedure in “SETTING THE TIME AND ADJUSTING THE STOPWATCH HAND POSITION”.
Lancetta dei secondi
del CRONOMETRO
STOPWATCH 1/20 second hand STOPWATCH second hand
A
B
STOPWATCH minute handSTOPWATCH hour hand
A
B
vSe le lancette del CRONOMETRO non si
trovano sulla posizione iniziale "0", ricondurvele
agendo come segue.
Lancetta dei ventesimi di
secondo del CRONOMETRO
Lancetta dei minuti del CRONOMETRO
Lancetta delle ore del CRONOMETRO
Lancetta dei secondi del CRONOMETRO
APremerlo per 2 secondi per selezionare la lancetta (o lancette) del CRONOMETRO che
si vogliono regolare.
B
• La selezione della lancetta (o lancette) viene effettuata nel seguente ordine, ad ogni
successiva pressione del tasto Aper circa 2 secondi.
Lancetta dei
ventesimi di
secondo del
CRONOMETRO
Lancetta dei
secondi del
CRONOMETEO
Lancette delle ore e dei
minuti del
CRONOMETRO
* Al termine di tutte le regolazioni, verificare che le lancette delle ore e dei minuti indichino l’ora
esatta del momento.
* La lancetta (o lancette) selezionata(e) compie (o compiono) un giro completo.
Agire ripetutamente su questo tasto sino a portare la lancetta (o lancette) del CRONOMETRO
selezionata(e) alla posizione iniziale “0”.
* Tenendo premuto il tasto B la lancetta (o lancette) si sposta(no) rapidamente.
( Es.: 2 ore, 30 minuti e 10,85 secondi)
A
B
Lancetta dei ventesimi di
secondo del CRONOMETRO
Lancetta dei minuti del
CRONOMETRO Lancetta delle ore del
CRONOMETRO
Lancetta dei secondi
del CRONOMETRO
Movimento della lancetta dei ventesimi di secondo del CRONOMETRO
• Dopo l’avvio del cronometro, la lancetta dei ventesimi di secondo del CRONOMETRO conteggia il
tempo per circa 10 minuti e si arresta poi automaticamente in corrispondenza della posizione “0”.
•Arrestando la misurazione, o agendo sui tasti per misurare un tempo parziale, la lancetta si sposta a
visualizzare i ventesimi di secondo trascorsi.
• Riavviando il cronometro dopo un arresto, o riprendendo la misurazione normale dopo la
misurazione di un tempo parziale, la lancetta dei ventesimi di secondo del CRONOMETRO si rimette
a conteggiare il tempo per circa 10 minuti e si arresta poi di nuovo automaticamente in
corrispondenza della posizione “0”.
• Allo stesso modo, se il cronometro viene arrestato e riavviato ripetutamente, o se si procede
spesso alla misurazione del tempo parziale con successiva ripresa della misurazione normale, ogni
volta la lancetta dei ventesimi di secondo del CRONOMETRO riprende a conteggiare il tempo per
circa 10 minuti e si arresta poi automaticamente in corrispondenza della posizione “0”.
STOPPUHR-Sekundenzeiger
STOPPUHR-MinutenzeigerSTOPPUHR-Stundenzeiger
STOPPUHR-1/20-Sekunden-Zeiger
A
B
AFür 2 Sekunden drücken, um die einzustellenden STOPPUHR-Zeiger zu wählen.
B
• Die Wahl der einzustellenden Zeiger in der nachstehenden Reihenfolge erfolgt durch
Drücken der Taste Afür 2 Sekunden.
STOPPUHR-1/20
Sekunden- Zeiger STOPPUHR-
Sekundenzeiger STOPPUHR-Stunden-
und-Minutenzeiger
* Der gewählte Zeiger dreht sich um einen vollen Kreis.
Wiederholt drücken, um den gewählten STOPPUHR-Zeiger auf die Position “0”
zurückzustellen.
* Die Zeiger laufen schneller, wenn die Taste B gedrückt gehalten wird.
STOPPUHR-Sekundenzeiger
STOPPUHR-Minutenzeiger STOPPUHR-Stundenzeiger
STOPPUHR-1/20-Sekunden-Zeiger
A
B
( Beispiel.: 2 Stunden, 30 Minuten und
10,85 Sekunden)
Bewegung des STOPPUHR-1/20-Sekunden-Zeigers
• Nach dem Starten der Stoppuhr läuft der STOPPUHR-1/20-Sekunden-Zeiger für etwa
10 Minuten und stoppt dann automatisch an der Position “0”.
• Beim Stoppen der Messung oder Messen der Zwischenzeit zeigt er die verstrichenen
1/20 Sekunden an.
• Nachdem die Messung der Stoppuhr fortgesetzt oder die Zwischenzeit freigegeben wurde, läuft
der STOPPUHR-1/20- Sekunden-Zeiger für etwa 10 Minuten und stoppt dann automatisch.
• Wenn die Messung der Stoppuhr wiederholt gestoppt und fortgesetzt oder die Zwischenzeit
wiederholt gemessen und freigegeben wird, läuft der STOPPUHR-1/20-Sekunden-Zeiger in der
gleichen Weise für etwa 10 Minuten und stoppt dann automatisch.


