Crazy3DPrint CZ-300 User manual

CZ-300
USER MANUAL
Version 1.2 from January 2019 © Crazy3DPrint Group
ENGLISH
Please always refer to the updated version of CZ-300 user manual:
https://www.crazy3dprint.com/support

1
Crazy3DPrint CZ-300
SAFETY AND COMPLIANCE -------------------------------------------- 2
USED SYMBOLS -----------------------------------------------------------2
SAFETY INFORMATION ----------------------------------------------------2
SAFETY PRECAUTIONS --------------------------------------------------- 2
HAZARDS ------------------------------------------------------------------ 3
INTRODUCTION ---------------------------------------------------------- 4
OUR PRINTER ------------------------------------------------------------- 4
PRODUCT FEATURES ----------------------------------------------------- 4
CZ-300 APPEARANCE ----------------------------------------------------- 5
SPECIFICATIONS ---------------------------------------------------------- 5
UNPACKING AND INSTALLATION --------------------------------------6
UNBOXING ----------------------------------------------------------------- 6
ACCESSORY CHECKLIST ------------------------------------------------- 6
INSTALLATION ------------------------------------------------------------- 7
OPERATION --------------------------------------------------------------- 16
LCD PANEL CONTROL ---------------------------------------------------- 16
PRINT BED CALIBRATION ------------------------------------------------ 19
SOFTWARE SETTINGS --------------------------------------------------- 21
FIRST PRINT -------------------------------------------------------------- 22
MAINTENANCE ---------------------------------------------------------- 24
PRINTER LUBRICATION ------------------------------------------------- 24
EXTRUDER MODULE CLEANING ---------------------------------------- 24
PRINT BED GLASS CLEANING ------------------------------------------ 24
TROUBLE SHOOTING -------------------------------------------------- 25
ERROR MESSAGE ------------------------------------------------------ 25
CONTENTS
CONTENTS

2
Crazy3DPrint CZ-300
This manual is designed for users to understand how to use the CZ-300 3D printer in a safe manner. Please
read through all sections, especially the safety instructions carefully before unpacking, assembling, operating,
replacing, and removing any part of this product.
Provides important and additional information, tips, and/or hints that help users understand the content of this
user manual with ease.
Warns of a situation that may cause permanent device damage and/or unintentional personal injuries if you do
not follow the safety instructions.
This manual contains warnings and safety notices.
• The device is intended for indoor use only. Do not store or operate the printer in a dusty and humid environment.
• Always place the printer on a at and stable surface to prevent it from falling or tipping over.
• The device is supplied from 110 or 220 VAC. Make sure to select the correct power-supply voltage based on your
region and area before operating the printer.
• Do not leave the device and power cord to a place where children can reach in order to prevent personal injury and
electric shock.
• Do not allow children access to the tools and accessories kit in case of any possible injuries and harm.
• Do not connect the device to an unknown power supply, which may cause a malfunction or permanent damage to
the printer.
• Never place any liquid-containing items on top of the device or power supply. If any liquid spills into the unit, re or
electric shock may result.
• The device may generate some odors during the printing process. It is recommended to use the printer in an open
and well-ventilated area for comfortable working atmosphere.
• Do not touch the extruder module, nozzle tip, or heated print bed during the printing process or heating up process.
It is noted that the nozzle tip can reach temperatures of up to 260 °C; and the print bed can reach temperatures of
up to 100 °C. High temperatures can cause harm to human body.
• Always do parts replacement after the device cooling down.
• Do not move the device when it is powered on.
• The motherboard is a precision electronic component. Please be careful not to damage by static electricity or
external force when disassembling and assembling; for example, wearing appropriate equipment such as antistatic
bracelet before manipulating the motherboard.
• Do not clean the device with alcohol and ammable chemicals to avoid the risks or danger.
USED SYMBOLS
SAFETY INFORMATION
SAFETY PRECAUTIONS
SAFETY AND COMPLIANCE
SAFETY AND COMPLIANCE
This label indicates that:
Always unplug the main power supply from the socket before carrying out maintenance
or intervention of this product.
Children under 14 years of age
Must Not
to use this product in order to prevent any
possible injuries and harm.
CAUTION: PLEASE SELECT THE SWITCH 110/220V BEFORE POWER ON

3
Crazy3DPrint CZ-300
Indicates that 115/230V is selected by switch. Before power on, please check input volt-
age avoiding damage.
CAUTION: PLEASE SELECT THE SWITCH 110/220V BEFORE POWER ON
Indicates that users Must Not put hands on the extruder module during the printing
process.
WARNING: DO NOT TOUCH THE HOT SURFACE
HAZARDS
RISK OF BURNS
FEDERAL COMMUNICATIONS COMMISSION NOTICE
Before turning the power on, do make sure to switch the AC input at either 110 or 220 volts depending on the
region/area’s voltage.
There is a risk of burns from touching the heated-up device unit during the printing process. This is because the
nozzle tip can reach temperatures of up to 260 °C; and the print bed can reach temperatures of up to 100 °C.
High temperatures can cause harm to human body.
This device complies with Part 15 of the FCC Rules. Operation is subject to the following two conditions: (1) This
device may not cause harmful interference. (2) This device must accept any interference received, including
interference that may cause undesired operation.
SAFETY AND COMPLIANCE

4
Crazy3DPrint CZ-300
INTRODUCTION
OUR PRINTER
PRODUCT FEATURES
Thank for your choosing the CZ-300 3D printer. We always believe that creativity can be simple but not ordinary
while making it a reality. Crazy3DPrint was born by enthusiasts of 3D printing with one goal in mind – to building solid
objects from scratch for the maker community with cost-effective.
This manual is designed for users to understand how to use the CZ-300 3D printer in a safe manner. Please comply
with the instructions of important information and relevant safety precautions.
Every effort has been made to ensure the accuracy and completeness of the contents of this manual. If you have any
questions or discover any errors or inaccuracies in the document, please notify us by email so that we can make the
amendments from your valuable feedback.
Crazy3DPrint can make your scratch design become solid objects with generated G-code from 3D les by using free
and open source software with multiple options (e.g., Slic3r and Cura etc.). The CZ-300 is made based on the 3D
printing technology of FFF (Fused Filament Fabrication) that offers rapid and cost-effective prototyping.
The CZ-300 is an easy-to-use 3D printer designed with simple frame structure that separates in two parts (upper and
lower frames) for you to start with. You can easily assemble this kit yourself and instantly build it from anywhere at any
time. This printer is not heavy, and particularly, it does not occupy too much space. You can hand carry our CZ-300 to
anywhere to do your 3D printing job.
The printing process is that a spool of lament material is loaded and fed through the heated print nozzle. Then, the
motor pushes molten lament out of the nozzle tip onto the print bed glass, where cools it down and makes it solidied
as an object layer by layer along the specied coordinates.
Please always refer to the updated version of CZ-300 user manual
https://www.crazy3dprint.com/support
INTRODUCTION
Children under 14 years of age Must Not to use this product in order to prevent any possible injuries and
harm.
Before turning the power on, do make sure to switch the AC input at either 110 or 220 volts depending on the
region/area’s voltage.
• Easy installation & operation
• Large build size
• Easily module replacement design
• Heated print bed & constant temperature control
• LCM graphical interface
• Supported multiple laments
• Product safety certication
5
Crazy3DPrint CZ-300
1
9
2
10
11
15
34
7
7
7
7
5
8
6
12
13
14
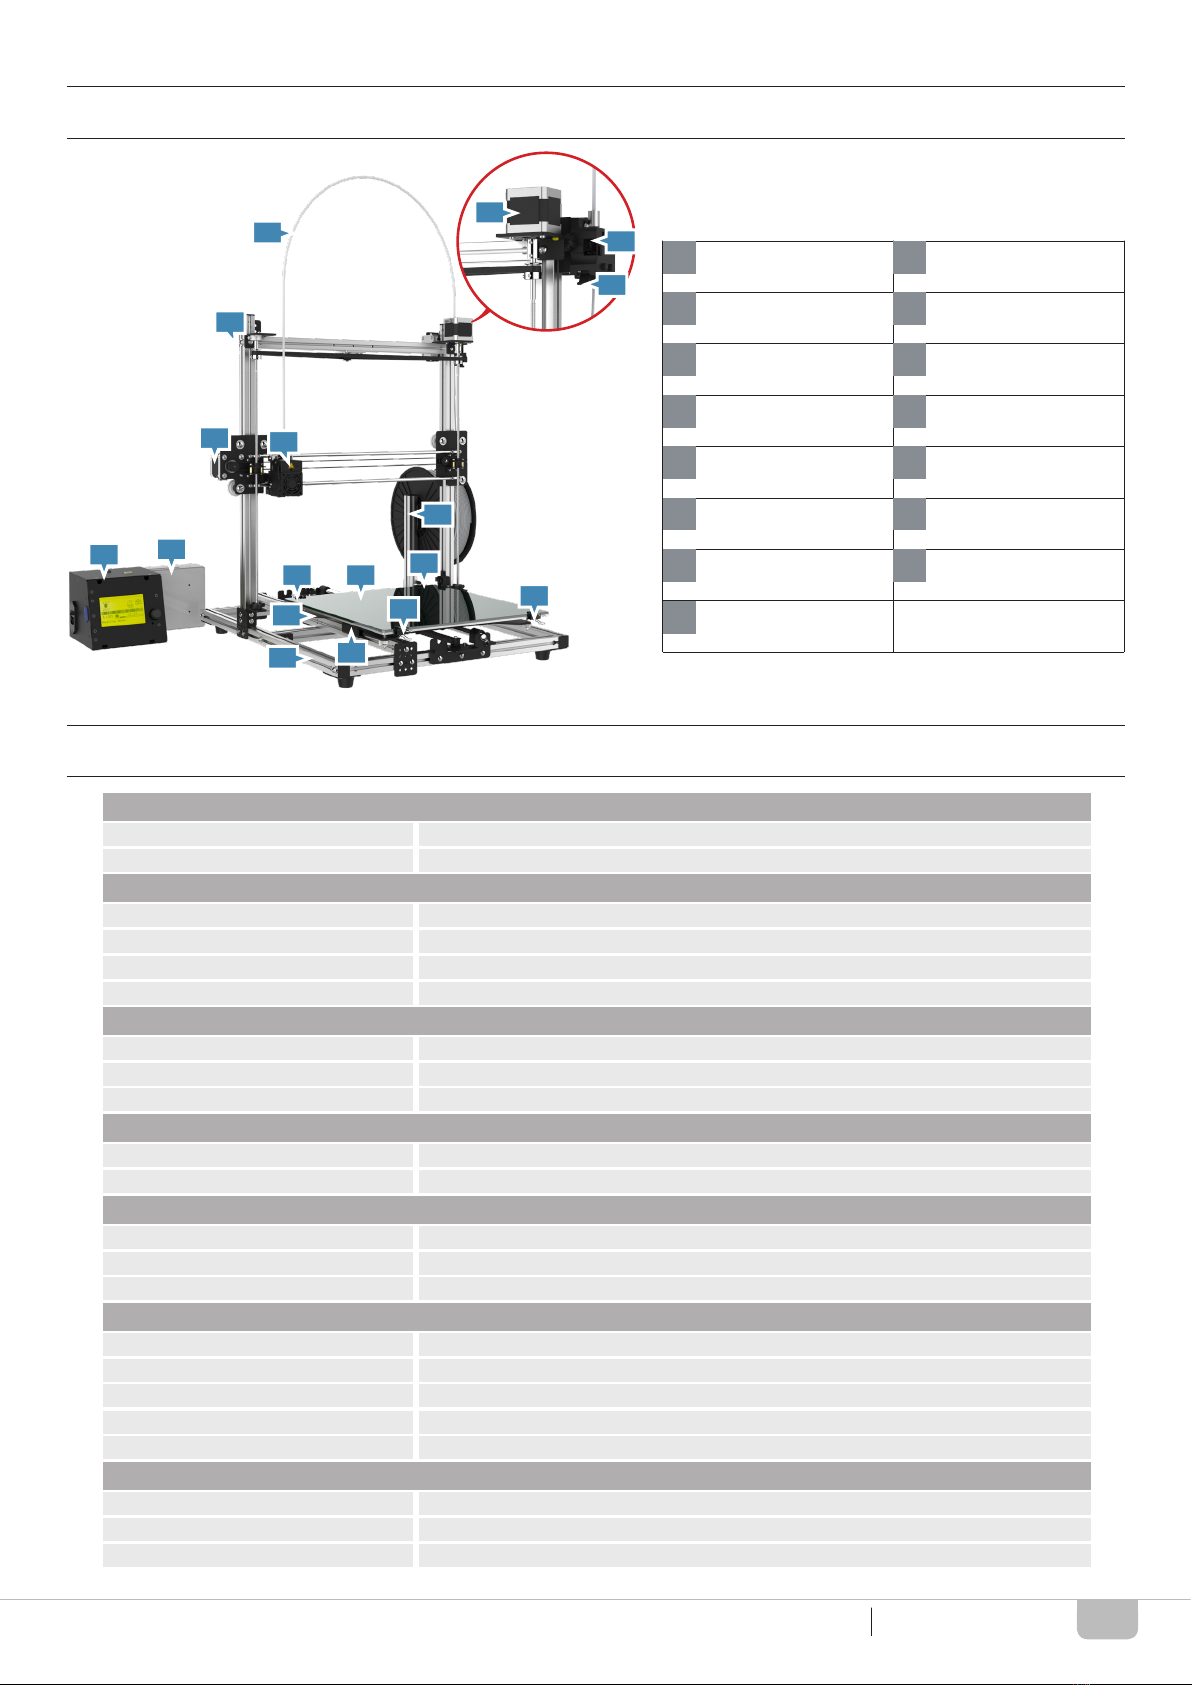
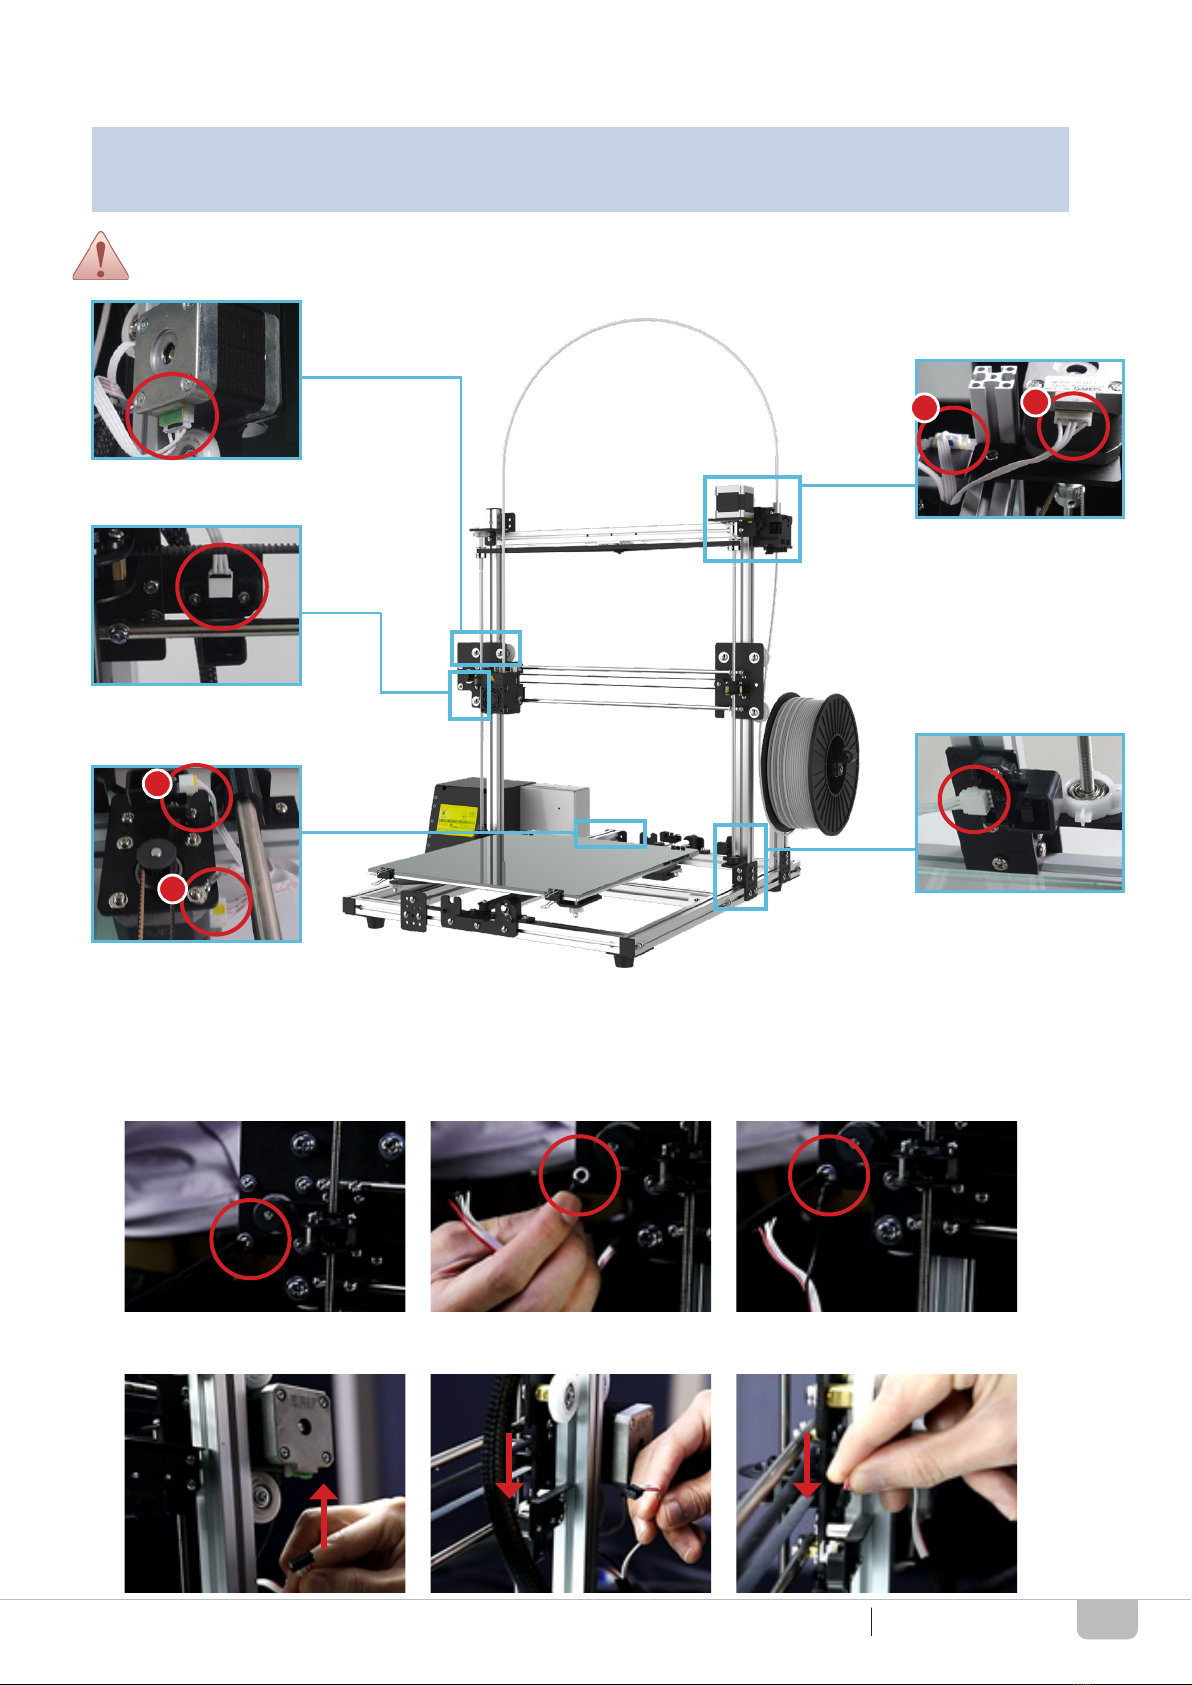
CZ-300 APPEARANCE
SPECIFICATIONS
Upper Frame
X-Motor
Control Box
Power Supply
Lower Frame
Y-Motor
Platform Clips x4
Filament Tube
Extruder Module
Print Bed Glass
Heated Bed
Z-Motor
Extruder Motor
Release Arm
Spool Holder
1
2
3
4
5
6
7
8
9
10
11
12
13
14
15
PRINTING
DIMENSIONS & WEIGHTS
PERFORMANCE
MATERIALS
OPERATING REQUIREMENTS
HARDWARE
SOFTWARE
Product Name
Machine Dimensions (WxDxH)
Build Size (WxDxH)
Printing Materials
Power Requirements
Nozzle Diameter
Host Software (Slicers)
Print Technology
Packing Dimensions (WxDxH)
Layer Resolution
Filament Diameter
Operating Temperature
Nozzle Temperature
Supported File Type
Storage Temperature-Filament
Print Bed
Operating System(s)
User Interface
Transmission
Gross Weight
Alignment Precision
Net Weight
CZ-300 3D Printer
534 x 503 x 582 mm (21.0 x 19.8 x 22.9 in)
300 x 300 x 300 mm (11.8 x 11.8 x 11.8 in)
PLA, ABS, PETG, Carbon Fiber PLA*, Metallic PLA* etc. (*Option Extruder)
110V / 220V (Switch)
0.4 mm
Open source with multiple options (e.g., slic3r / Cura etc.)
FFF (Fused Filament Fabrication)
558 x 592 x 295 mm (22.0 x 23.3 x 11.6 in)
0.1 - 0.4 mm
1.75 mm
15~32 °C / 59~89.6 °F
Max. 260°C
STL / G-code
0~38 °C / 0~104 °F
Non-removable; Heated (40-90 °C)
Win7 / Mac OS 10.7 or higher
3”LCD
USB2.0 / SDHC (Storage Range: 2GB to 32GB)
16.5 kg (36.4 lbs)
X/Y: 0.0125 mm
14.5 kg (32.0 lbs)
INTRODUCTION

6
Crazy3DPrint CZ-300
UNPACKING AND INSTALLATION
UNPACKING AND INSTALLATION
UNBOXING
ACCESSORY CHECKLIST
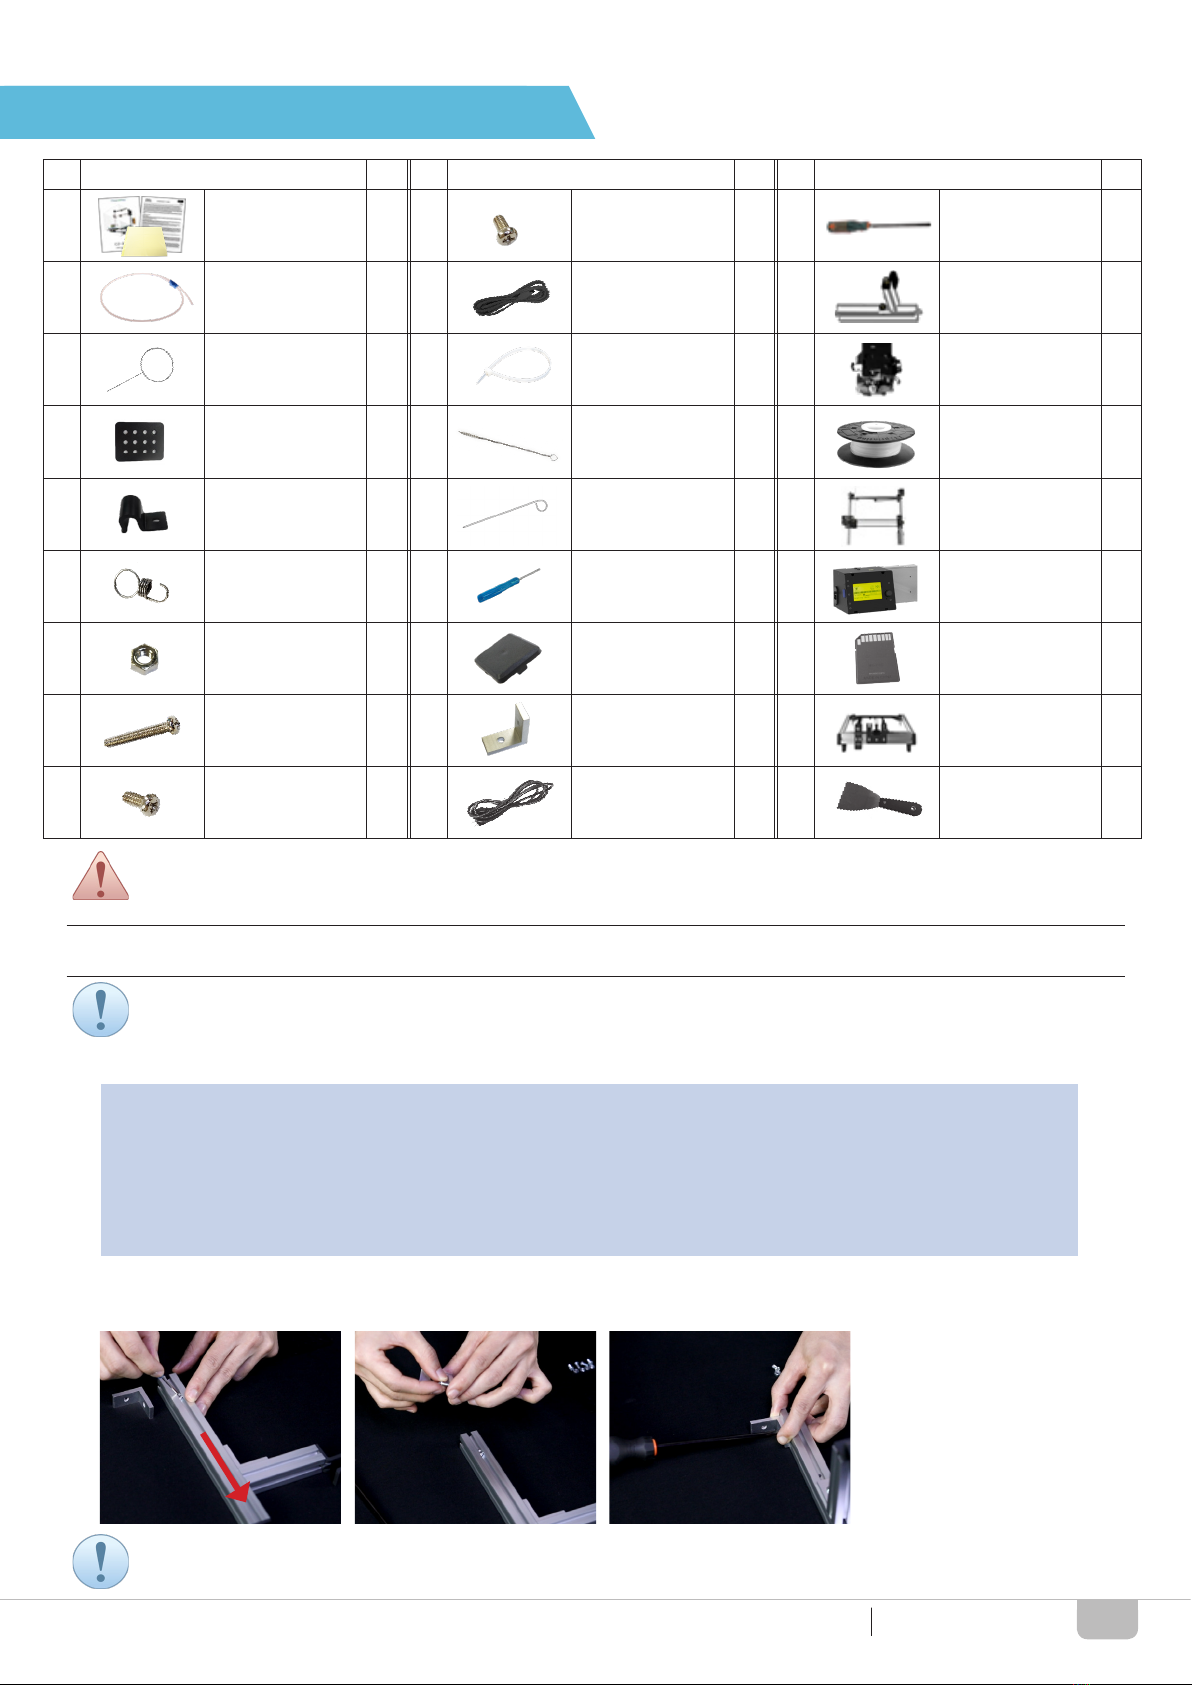
(1) Remove the outer carton box packaging material; following use a cutting tool to remove the tape.
(2) Open the box and take out the whole set of CZ-300 3D printer; following cut the pp strap off.
Lifting up the set of printer gently to prevent intentional damage of the device and loss of the accessories.
Also be careful the print bed glass and avoid to damage as well as get hurt.
(3) Remove all tapes and foam packaging; following place the printer parts on a at and stable table.
Following items include extra amount that is reserved for the buffer: No. 3-3, 3-4, 3-5, 3-7, 3-8, 4-2, 4-6.
35
4
6
7
8
9
10 11
12
13 14
1
2
MIDDLE
BOTTOM
TOP
7
Crazy3DPrint CZ-300
UNPACKING AND INSTALLATION
UNPACKING AND INSTALLATION
Do not fully tighten both screw and nut rst, and keep it freely moving.
Each superscript number refers to the tools kit listed in the table of ACCESSORY CHECKLIST.
(1) Insert a nut into the spool holder groove; following insert a screw M4x10 into the corner bracket hole and lock up
onto the spool holder by using a screwdriver.
INSTALLING SPOOL HOLDER
Accessory Preparation
Tools Preparation (may use own tools if desired)
Metal Plate (*1)
Flathead Screwdriver (*1)
Corner Bracket (*1)
Nut M4x3.2 (*6)
Spool Holder (*1)
Screw M4x10 (*2)
Crosshead Screwdriver (*1)
Lower Frame (*1)
Screw M4x8 (*4)
3-2
4-5
4-7
3-5
7
3-7
6
13
3-8
INSTALLATION
NO NO NO
1
2
3-1 4-25 13 18
4-11 1 17
3-81 11 16
3-2 4-31 1 19
3-3 4-42 1 110
3-4 4-52 1 111
3-5 4-614 1 112
3-6 4-72 1 113
3-7 54 1 114
ITEM
Print Bed Tape*2
& Warranty Card
& Quick Guide
Screw M4x8 Crosshead
Screwdriver
Filament Tube USB Cable Spool Holder
Clean Spring Cable Tie Extruder Motor
Metal Plate Dust Brush
Random Color
PLA Filament
(300g)
Holder Lock Clean Pin Upper Frame
Shaft Spring Hook Flathead
Screwdriver
Control Box &
Power Supply
Nut M4x3.2 End Cap SD Memory Card
Screw M4x30 Corner Bracket Lower Frame
Screw M4x10 Power Cord Scraper
ITEM ITEM
QTY. QTY. QTY.
The use of accessories listed above is required an adult supervision and assistance for proper functioning.
Do not allow children access to those tools in case of any possible injuries and harm.

8
Crazy3DPrint CZ-300INSTALLATION
(2) Insert two nuts to the lower frame groove; following insert two screws M4x8 through the bottom metal plate and lock the
metal plate to the nuts. Insert other two screws M4x8 through the upper-middle holes of the metal plate and lock up by
the nuts.
(3) Insert a nut to the frame groove; following move the nut inside the frame groove to a proper place for later installation.
(4) Slide the spool holder set (with installed corner bracket) into the lower frame groove; following insert a screw M4x10 and
lock to the nut. Then slightly tighten all screws and nuts.
Users may take out the end cap in case difcult of inserting nuts to the groove. Also, do not fully tighten all
screws and nuts rst, and keep the metal plate freely moving.
Users may use the provided athead screwdriver to move the nut if necessary.
INSTALLING UPPER FRAME & LOWER FRAME
Accessory Preparation
Tools Preparation (may use own tools if desired)
Nut M4x3.2 (*4)
Flathead Screwdriver (*1)
Screw M4x30 (*2) Screw M4x8 (*4)
Crosshead Screwdriver (*1)
Lower Frame (*1)
Upper Frame (*1)
3-5
4-5
3-6 3-8
6
13
10
For locking up, you may use tools if desired. Do not fully tighten all screws and nuts rst, and keep the metal
plate freely moving.
(1) Insert two screws M4x8 through the upper-middle metal plate hole and lock up by the nuts for both sides of the
lower frame respectively.

9
Crazy3DPrint CZ-300
(2) Slide the upper frame groove into the metal plates installed with nuts and tighten the screws by using a screwdriver.
(3) Turn over the whole frame module to one side; following install two screws M4x30 into the bottom of the lower
frame for both sides and lock up tightly by using a screwdriver.
Be careful the print bed glass and avoid to damage as well as get hurt. All screws on the metal plates can be
fully tightened up (but not including the ones of the spool holder.
Before the installation, make sure the orientation of upper frame as following.
INSTALLATION
10
Crazy3DPrint CZ-300
INSTALLATION
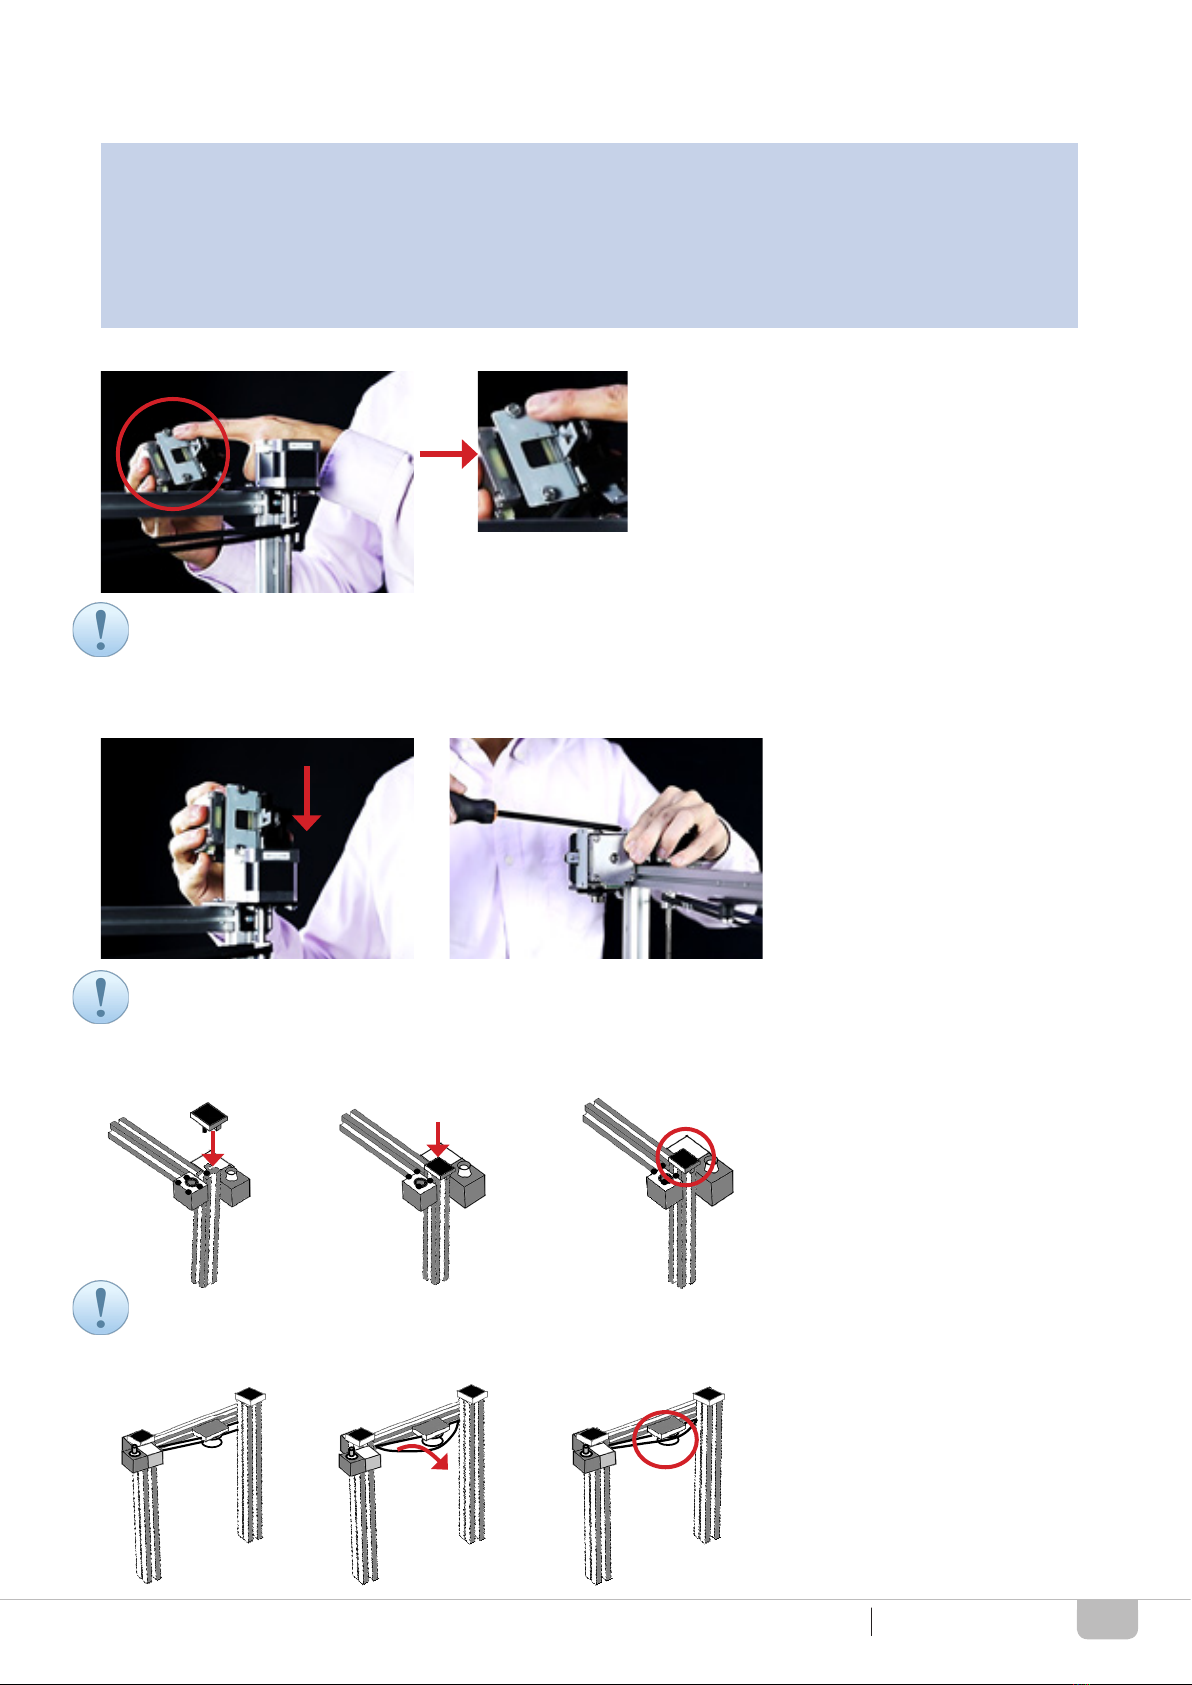
(2) Slide the extruder motor into the upper frame groove behind the Z-motor; following fully tighten the screws by using
a screwdriver.
(3) Insert the end cap into the upper frame hole and groove.
(4) Install the Z axis driving belt to the upper frame pulley.
The 3D printer parts can be referred to the names in the table of CZ-300 APPEARANCE. The height of extruder
motor should be parallel to the upper frame end – avoiding collision to the release arm when Z shaft rising.
Users may use hand hardly press the end cap into the upper frame.
(1) Insert two screws M4x8 through the holes on the metal plate of the extruder motor and lock up by the nuts.
Do not fully tighten screws and nuts rst, and keep it freely moving.
INSTALLING EXTRUDER MOTOR
Accessory Preparation
Tools Preparation (may use own tools if desired)
Nut M4x3.2 (*2) End Cap
Crosshead Screwdriver (*1)
Screw M4x8 (*2) Extruder Motor (*1)
Upper Frame (*1)
3-5 4-6
6
3-8 8
10
11
Crazy3DPrint CZ-300
INSTALLING EXTRUDER MODULE
Accessory Preparation
Tools Preparation (may use own tools if desired)
Holder Lock (*1)
Flathead Screwdriver (*1)
Screw M4x10 (*1) Control Box & Power Supply (*1)
Crosshead Screwdriver (*1)
3-3
4-5
3-7 11
6
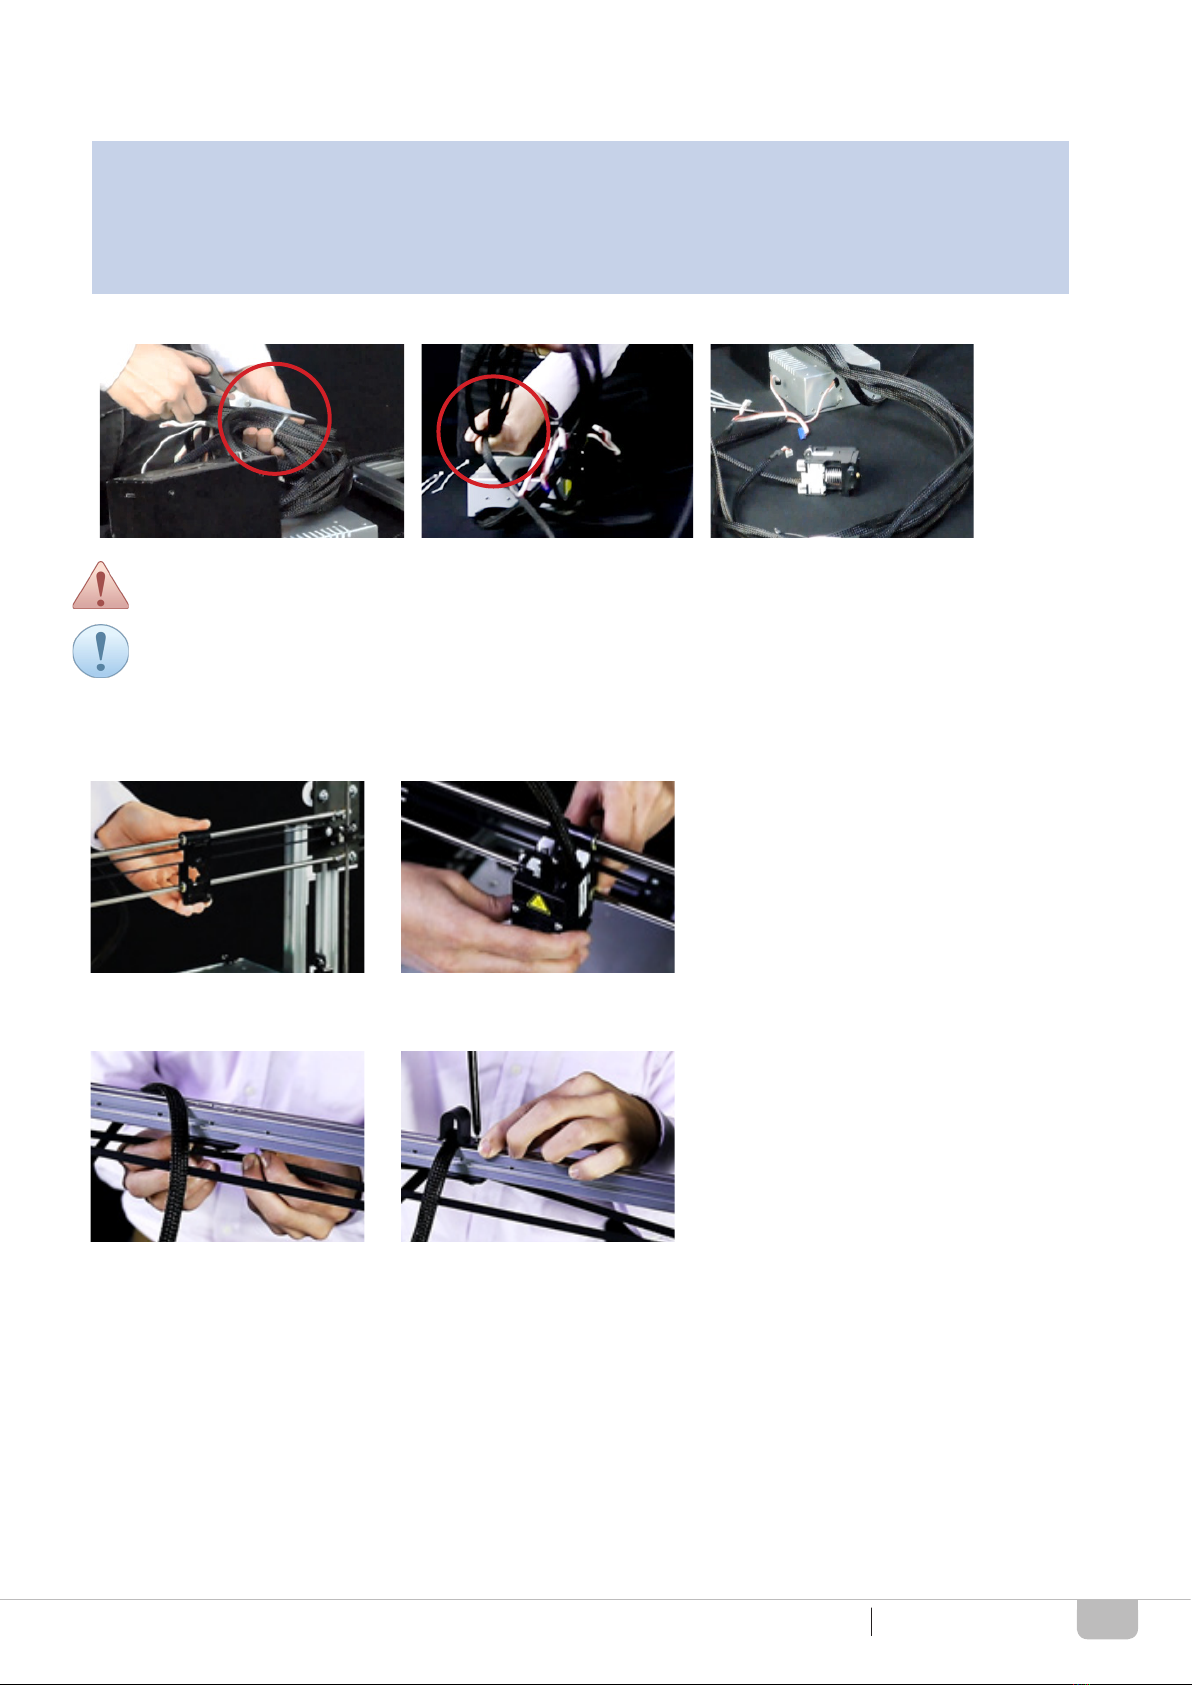
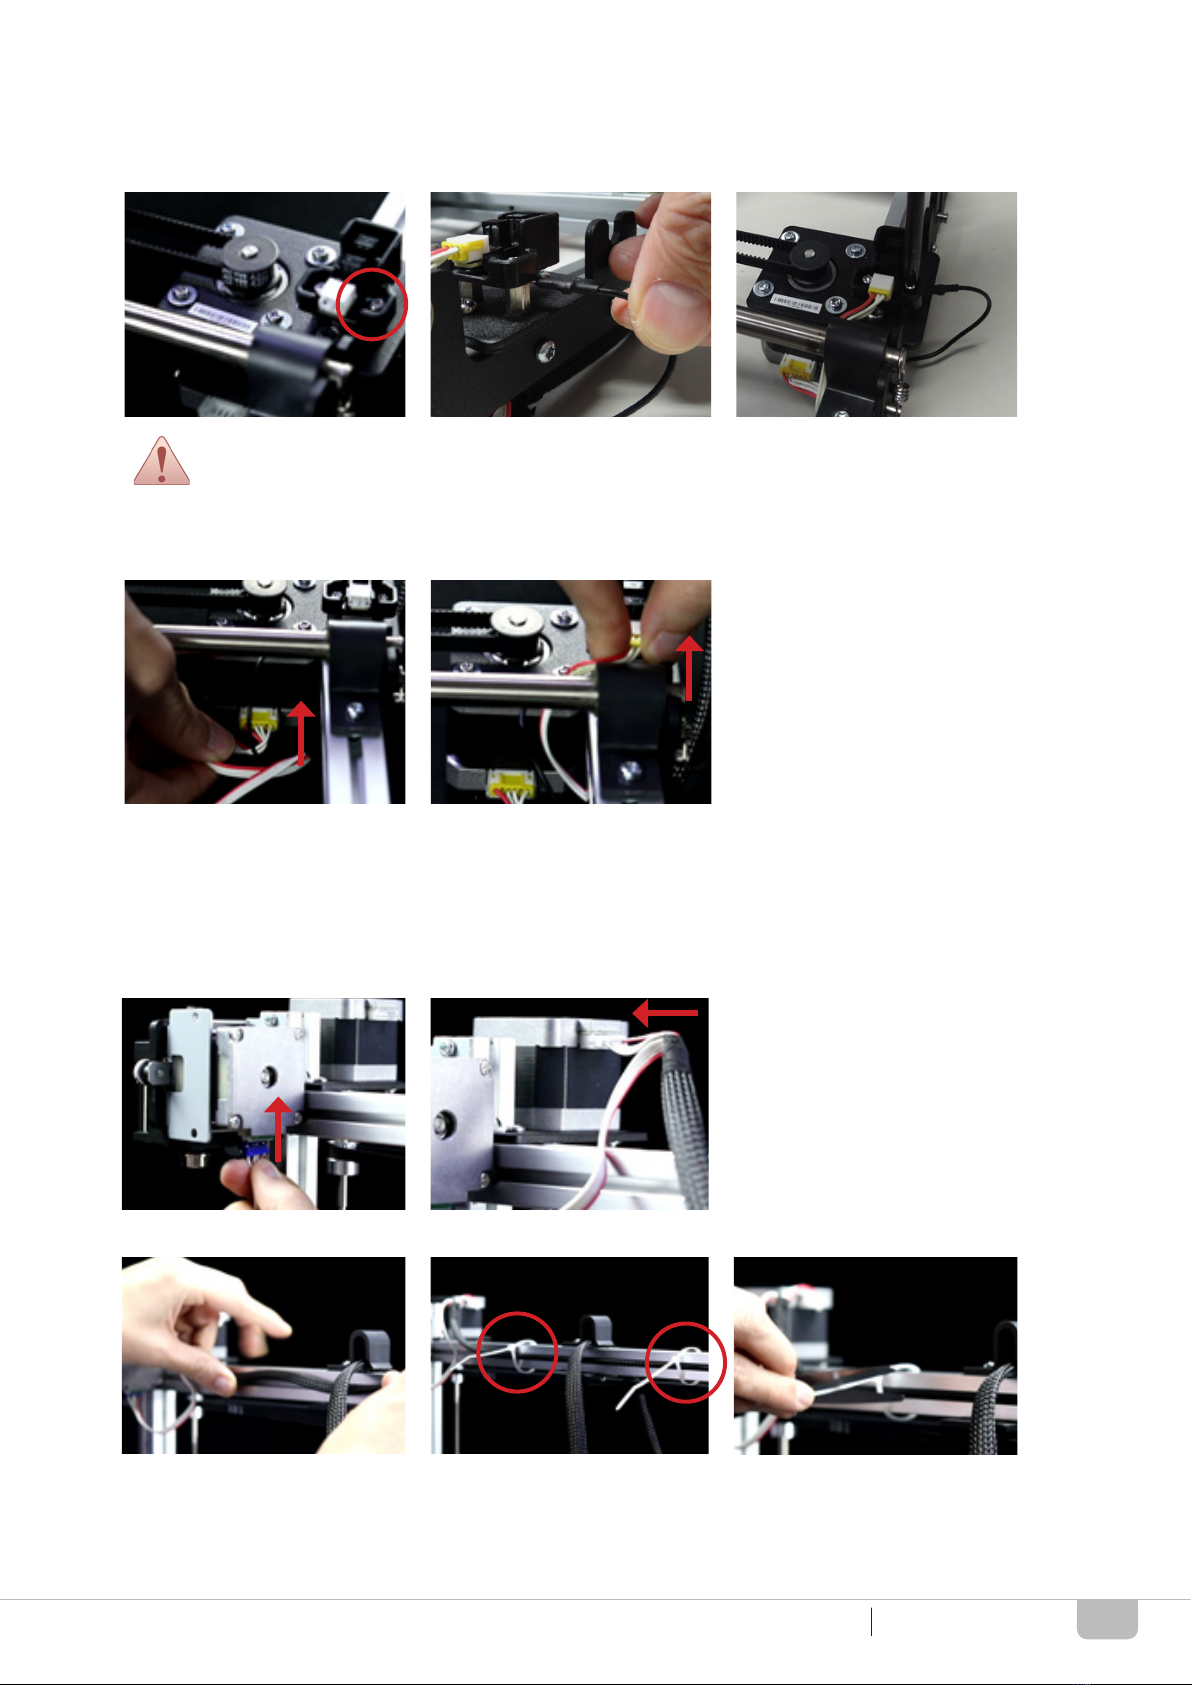
(1) Use a cutting tool to remove the cable tie and place all the cable with the extruder module on a table.
The 3D printer parts can be referred to the names in the table of CZ-300 APPEARANCE.
Please hold the end of cable near the control box to prevent unintentional pulling of the device causing any
electrical damage while placing and arranging the cable.
(2) Move the extruder module holder to the middle of the roller shaft; following directly mount the extruder module on the
holder.
(3) Mount the driving belt to the pulley locating on the upper frame; following place the holder and lock up with a screw
M4x10 and the inside nut to secure the extruder motor cable.
12
Crazy3DPrint CZ-300INSTALLATION
INSTALLING ELECTRICAL PARTS
Accessory Preparation
Control Box & Power Supply (*1) Cable Tie (Min. *4)
11 4-2
Must Not turning on the power supply during the assembly, it easily gets electric shock. For easy identica-
tion, users may refer to the color marking for installation.
X Axis Motor
(6PIN Black Housing)
C: Extruder Motor
(6PIN Blue Housing)
D: Z Axis Motor
(6PIN White Housing)
Z Axis Sensor
(3PIN White Housing)
X Axis Sensor
(3PIN Black Housing)
A: Y Axis Motor
(6PIN Yellow Housing)
B: Y Axis Sensor
(3PIN Yellow Housing)
A
B
CD
• X-Motor & X-Sensor (Black Marking)
1) Remove the screw from the X-motor; following place the ground wire ring on the screw hole and tighten by the screw.
1) Plug the 6-pin black housing into the X-motor socket; following plug the 3-pin black housing into the X-sensor socket.
13
Crazy3DPrint CZ-300INSTALLATION
• Y-Motor & Y-Sensor (Yellow Marking)
1) Remove the screw from the Y-motor plastic cover; following place the ground wire ring under the plastic cover and
insert back the screw as well as tighten it.
2) Plug the 6-pin yellow housing into the Y-motor socket; following plug the 3-pin yellowing housing into the Y-sensor
socket.
The cable should be placed underneath the lower frame to prevent accidental pulling by the rod and the
print bed while printing.
• Extruder Motor & Z-Motor (Blue & White Marking)
1) Plug the 6-pin blue housing into the extruder motor socket; following plug the 3-pin white housing into the z-motor
socket.
2) Press the cable into the groove; following tie-up cable ties and cut them to a proper length.

14
Crazy3DPrint CZ-300
• Extruder Motor & Z-Motor (Blue & White Marking)
1) Plug the 3-pin white housing into the Z-sensor socket.
2) Press the cable into the groove; following tie-up cable ties and cut them to a proper length.
INSTALLATION
SECURING PRINT BED CABLE
(1) Take out the platform clip; following install the cable with it and clip back to the print bed.
INSTALLING FILAMENT TUBE
Accessory Preparation
Filament Tube (*1)
2
(1) Fully insert the lament tube into the extruder motor and the extruder module.
15
Crazy3DPrint CZ-300INSTALLATION
FINAL CHECKING
Accessory Preparation
Tools Preparation (may use own tools if desired)
Random Color PLA Filament (300g) Control Box & Power Supply (*1)
Crosshead Screwdriver (*1)
5 11
6
• Spool Holder Adjustment
• Extruder Module Cable Adjustment
1) Place the lament on the installed spool holder; following adjust it to a suitable position then tighten the screws to
secure the holder with the lament.
1) Make sure the length of the extruder module cable is placed at least 20cm from the holder lock to the module; so
that the extruder module can be left-right moving freely while printing.
It is suggested that the lament spool should maintain 2 ngers interval to the upper frame.
Accessory Preparation
Power Cord Control Box & Power Supply
5 11
1) Insert the power cord to the control box; following check the two caution labels.
• Power Switch Checking
Do make sure all the screws are fully tightened at this stage, and all the printer parts and cables are
secured to the right position.
Before turning the power on, do make sure to switch the AC input at either 110 or 220 volts depending
on the region/area’s voltage.
It is suggested to use extra cable ties to secure the extruder module harness while printing; they can
be tightened onto the aluminum extrusion, lament tube and holder locker where suitable.

16
Crazy3DPrint CZ-300
OPERATION
LCD PANEL CONTROL
OPERATION
MAIN MENU
Info Screen P17
P18
P18
P19
P19
P19
P19
P17
P22
P17
P17
Prepare Main
Auto home
Set home offsets
Set Origin
Level Bed
Move axis
Disable steppers
Preheat PLA
Preheat ABS
Cooldown
MainControl
Temperature
Prepare
Autotemp: On
Prepare ABS Bed
Preheat PLA conf
Preheat ABS conf
No SD card/
Print from SD
Init. SD card/
Change SD card
Prepare
Move 10mm
Move 1mm
Move 0.1mm
Prepare
Control
Prepare PLA
Nozzle: 210
Prepare PLA Bed
Bed: 70
Prepare ABS
Fact: 000.10
Min: 210
Max: 240
FUNCTIONAL MENU ADVANCED SETTING PAGE
-------------------------------------------------------------------------------------------
--------------------------------------------
--------------------------------------------
--------------------------------------------------------------------------------------------
--------------------------------------------------------------------------------------------
--------------------------------------------------------------------------------------------
--------------------------------------------------------------------------------------------
17
Crazy3DPrint CZ-300
The functions may really depend on the usage of users’ preference and needs during printing. This manual
describes the general use with suggested settings for guide purpose only.
SD Memory Card Specication V2.0 (SDHC) - Storage Range: 2GB to 32GB.
INSTALLING FILAMENT TUBE
INIT. SD CARD
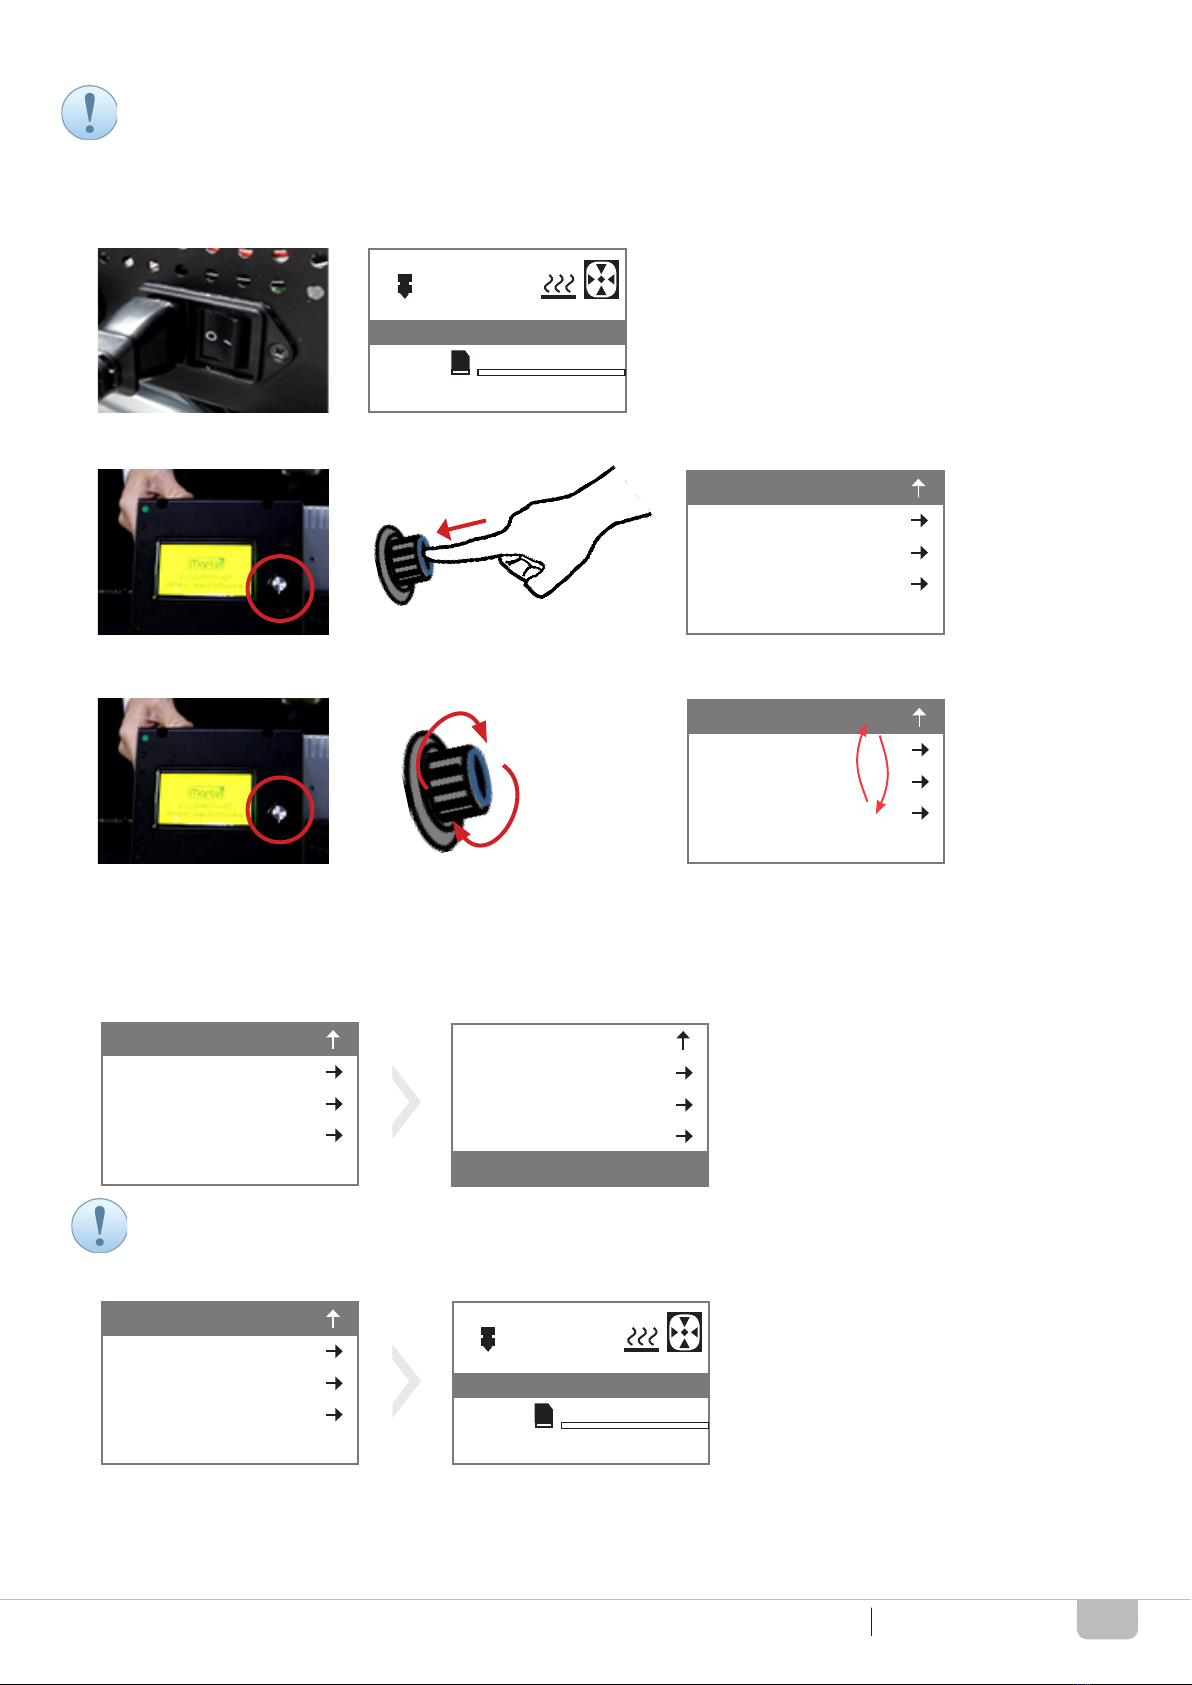
(1) Turn on the control box power and the panel will immediately display.
(1) After tuning on the power, insert a SD card to the slot; following turn the knob to “Init. SD card” and press the knob.
(2) Select “Info Screen” and press the knob to be back to the main menu.
(3) Select “Change SD card” to change another SD card if needed by following the same steps.
(2) Knob control: Press = enter the function
(3) Knob control: Turn = scroll up or down for selection.
CZ-300 ready.
CZ-300 ready.
0°
0°
0°
0°
38°
38°
100%
100%
00:00
00:00
F
R
F
R
X 0 Y 0 Z 0
X 0 Y 0 Z 0
21°
21°
Info Screen
Prepare
Control
No SD card
Init. SD card
Info Screen
Prepare
Control
No SD card
Init. SD card
Info Screen
Info Screen
Prepare
Prepare
Control
Control
No SD card
Print from SD
Init. SD card
Init. SD card
Info Screen
Prepare
Control
No SD card
Init. SD card
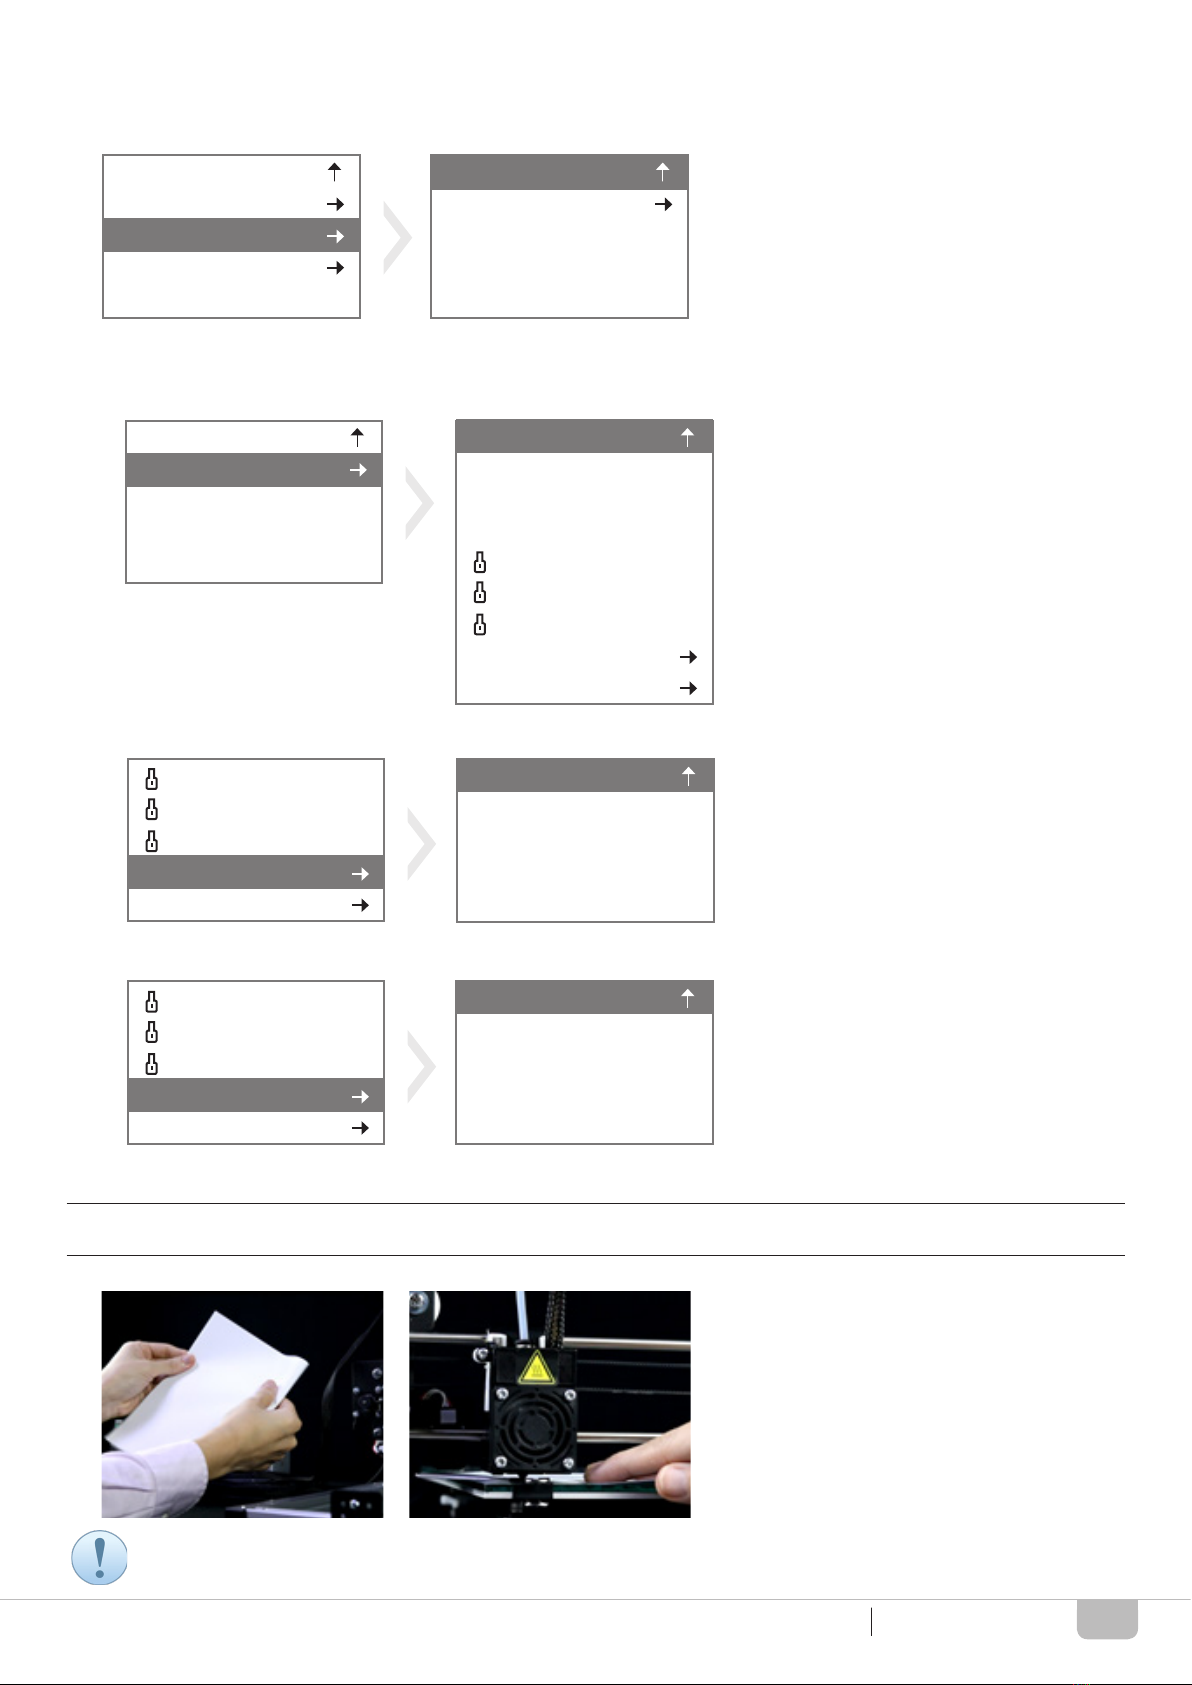
INFO SCREEN

18
Crazy3DPrint CZ-300PREPARE
PREPARE
(1) Select “Prepare” and press the knob to show the functional menu.
Info Screen
Prepare
Main
Control
Auto home
Print from SD
Set home offsets
Change SD card
Set Origin
Level Bed
Move axis
Disable steppers
Preheat PLA
Preheat ABS
Cooldown
• Move axis
1) Select “Move axis” and press the knob to show the advanced setting menu.
2) Turn the knob to “Move 10mm” and press the knob to adjust print head X-Y axis movement.
3) Turn the knob to “Move X” and press the knob after setting.
4) Turn the knob to “Move Y” and press the knob after setting.
Prepare
Move
10
mm
Move
1
mm
Move
0.1
mm
Main
Auto home
Set home offsets
Move axis
Disable steppers
Move axis
Move X
MoveY
Prepare
Move
10
mm
Move
1
mm
Move
0.1
mm
Turn Clockwise “ + ” increase the value.
Move axis
Move X
MoveY Move X : +140.0
Turn Anti-Clockwise “ - ” decrease the value.
Move axis
Move X
MoveY : +150.0
MoveY
For the adjustment of Z axis and extruder movement, users may turn the knob to “Move 1mm” or “Move 0.1mm”
for further setting.
19
Crazy3DPrint CZ-300
CONTROL
(1) Select “Control” and press the knob to show the functional menu.
(1) Prepare a sheet of A4 paper for calibration.
Info Screen Main
Prepare Temperature
Control
Print from SD
Change SD card
• Temperature
1) Select “Temperature” and press the knob to show the advanced setting menu.
2) Select “Preheat PLA conf” and press the knob for pre-heating when using PLA lament.
3) Select “Preheat ABS conf” and press the knob for pre-heating when using ABS lament.
Main Control
Temperature Nozzle : 210
210
240
000.10
70
Bed :
Preheat PLA conf
Autotemp :
Min :
Max :
Fact :
On
Preheat ABS conf
Temperature
210
210
240
240
000.10
000.10
180
70
Nozzle :
Bed :
Preheat PLA conf
Preheat PLA conf
Min :
Min :
Max :
Max :
Fact :
Fact :
Preheat ABS conf
Preheat ABS conf
Temperature
240
90
Nozzle :
Bed :
PRINT BED CALIBRATION
CONTROL
It is suggested to use a standard folded A4 paper for printing material of PLA; non-folded for ABS.
Table of contents


