Creator LAN G15 User manual
User
User’
’s
sManual
Manual
LAN
LAN G15
G15 Programmable
Programmable Touch
Touch Screen
Screen
V1.1
CREATOR Corporation (CHINA)
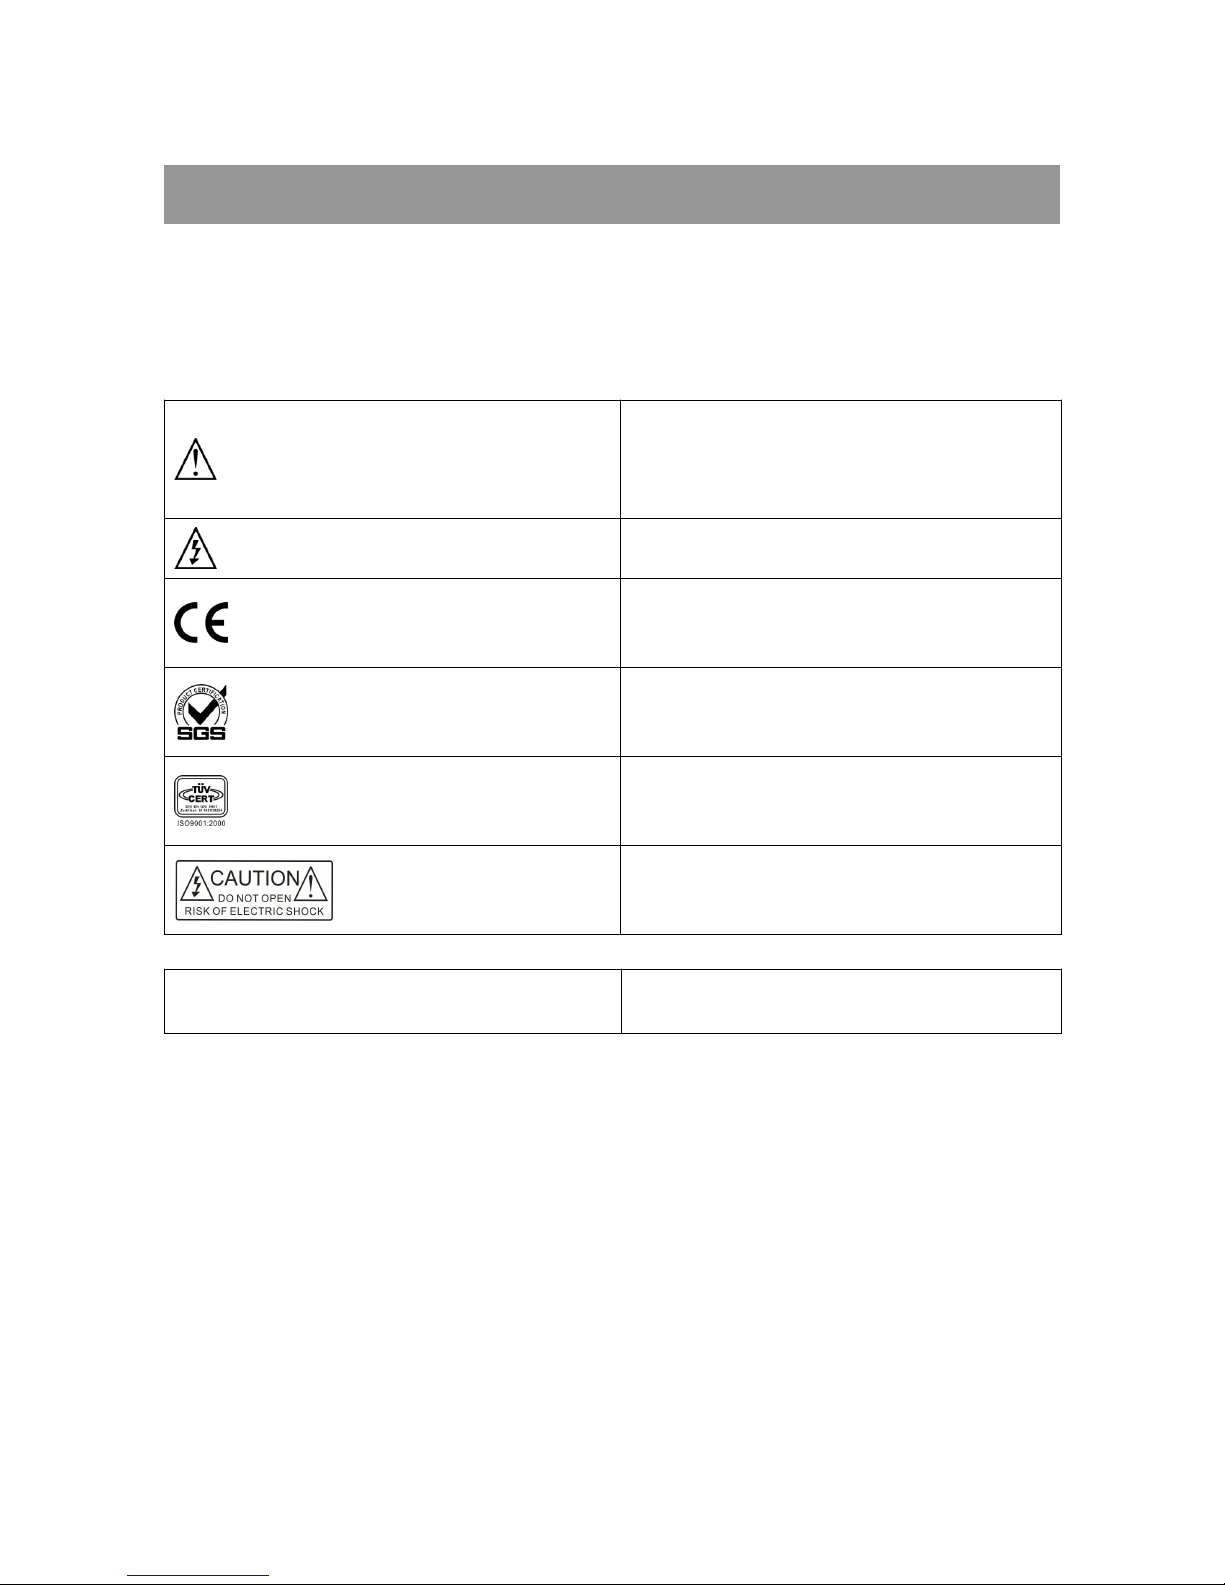
Meaning of the icons
■Safety Instruction
Symbols are used in the Manual and devices, referring to the possible risk to users or others ,as well as the
damage to property, for helping you to safely and properly use the devices. The instruction and the implications
are as follows. Please make sure your correct understanding of these instructions before using the Manual.
To remind user to conduct according to the attached
operation and maintenance instructions. If ignore
these information, death or injury could possibly
happen.
To remind the user that the risky uninsulated voltage
in the device could caused electric shock to human.
CE authentication indicates the product is in line
with the EU safety regulation, and for assurance of
safety use.
SGS Authentication indicates the product has
reached the QC standard of the global-biggest Swiss
universe surveyor.
This product has acquired the ISO9001 International
Quality Authentication (Authentication authority:
Germany Rheinland TUV)
Caution: To avoid electric shock, please don't open
the case, nor put the useless parts in it. Please
contact with qualified service staff.
■General information instruction List the situation could cause unsuccessful operation
or setup, and relevant information needed to notice.

Important Notices
Caution
To ensure the device in reliable use and personal
safety, please abide by the following items when in
installation, use and maintenance:
Notice in installation
◆Please DO NOT use the product in following
places: the places with dust, oily smoke, electrical
conductive dust, corrosive gas, inflammable gas; the
places with high temperature, due, rain and wind
exposures; the places endangered by shock and
vibration. Electric shock, fire and incorrect operation
could also cause damage and deterioration to the
product.
◆When conducting screw drilling and wiring
process, DO NOT let metal irons and wire lead drop
into the controller and air vent, which could possibly
cause fire, failure and accidental operation.
◆After finishing the installation, it is necessary to
ensure there is no foreign matter including the
packing material like contact paper on the ventilation
surface, otherwise, it could cause poor heat
dissipation while running, as well as fire, failure and
accidental operation.
◆Avoid conducting wiring and plugging in/out
cable socket with electricity, otherwise, electric shock,
circuit damage could easily happen.
◆Installation and wiring should be firm and reliable.
Poor contact could cause malfunction.
◆With regard to the application situations with
strong interference, shielded cable should be used for
the input and output of HF signal, to improve the
anti-interference performance of the system.
Note in Wiring
◆Installation and wiring shouldn't be conducted
until external electric power is cut off, otherwise,
electric shock or device damage could happen.
◆The product is grounded by the earth lead of the
power cable. To avoid electric shock, the earth lead is
necessary to be connected with the ground. Before
making connection with the output end or input end
of the product, please ensure it is correctly grounding.
◆Upon finish wiring, remove the sundries. Please
cover up the terminal plate for avoiding electric
shock.
Note for Operation and Maintenance
◆Please DO NOT touch the terminal when with
electricity, otherwise, electric shock could happen.
◆Don't clean up and screw the terminal tight
before power is off. Such operation could cause
electric shock when with electricity.
◆Please turn off the power before connecting or
disconnecting the communication signal cable,
peripheral modules or control units, otherwise, device
could be damaged and accidental operation could
happen.
◆Please DO NOT disassemble the device, so as to
avoid internal electric components damage.
◆It is necessary to read through the Manual and
fully ensure the safety, before altering the program,
trial running, starting and stopping operation.
◆Button battery shouldn't be replaced before the
power is off. If it has to be replaced when the
device is running, it should be conducted by

professional electric technician wearing insulated
gloves.
Note for declaration of worthless.
When declaring of worthless, please note
◆Explosion of electrolytic capacitor on the circuit
board could happen when burning it.
◆Please classify and dispose it. Don't dispose it
into household garbage.
◆Please deal it as industrial waste, or in
accordance with local environmental protection
regulation.
Forward
User’s Manual of LAN G15 Programmable Touch Screen primarily introduces the operation of CR-LAN
G15, key functions and parameters, as well as common troubles shooting.
The Manual serves as user's operation instruction, rather than for maintenance service purpose. Since the date of
release, any function or relevant parameter alteration will be in supplement instruction. Please refer to the
manufacturer or dealers for inquiry.
CREATOR Electronics own the copyright of the Manual. Without permission, any unit or person shall not take
part or total of the Manual for business purpose.
The copyright of the Manual is protected by Copyright Law of People’s Republic of China and other Intellectual
Property Law. Without written permission, any copy or distribution is prohibited.

Index
Chapter 1 Overview......................................................................................................................................................1
1.1 System Introduction....................................................................................................................................... 1
1.2 Functions and Features...................................................................................................................................1
1.3 Regular Operations.........................................................................................................................................1
1.4 LAN G15 Dimension..................................................................................................................................... 2
1.5 Installation of Touch Screen Driver............................................................................................................... 2
1.5.1 Touch Screen Driver under Windows XP........................................................................................ 2
1.5.2 Touch Screen Driver under Other Windows Systems......................................................................4
Chapter 2 Touch Screen................................................................................................................................................5
2.1 Panel Instruction..............................................................................................................................................5
2.2 System Configuration......................................................................................................................................5
2.2.1 Login Page........................................................................................................................................5
2.2.2 Main Page.........................................................................................................................................6
2.2.3 Date & Time..................................................................................................................................... 6
2.2.4 LAN..................................................................................................................................................7
2.2.5 Volume..............................................................................................................................................7
2.2.6 Language........................................................................................................................................ 7
2.2.7 Power Manage..................................................................................................................................7
2.2.8 Misc Settings.................................................................................................................................... 8
2.2.9 About US.......................................................................................................................................... 8
2.2.10 Exit................................................................................................................................................. 8
2.3 Use of TouchPanel G Series Software............................................................................................................ 8
2.3.1 Download(Update)Firmware......................................................................................................8
2.3.2 Update Data......................................................................................................................................9
2.4 System Connection Diagram.........................................................................................................................11
Chapter 3 Technical Parameters.................................................................................................................................12
Chapter 4 Common Troubles Shooting......................................................................................................................13
Chapter 5 Maintenance ............................................................................................................................................ 14

CREATOR CHINA 2011-09 WWW.CREATOR1997.COM
1
User’s Manual of LAN G15 Programmable Touch Screen
Chapter 1 Overview
1.1 System Introduction
CR-LAN G15 Programmable Touch Screen is
with full-color super large display, communicated
with PC via Ethernet port, with brightness sensor
and infrared sensor, in 800X600 pixels, fast
download of project, supporting 3D button effect.
CR-LAN G15 is compatible with the latest
generation of PGMIII programmable host, with
the following major advantages:
◆Adopt high-End Touch Lens Technology
High-end Smooth Touch Lens technology
perfectly integrate Lens with Touch Panel, making
the surface of touch screen and case entirely
smooth, with excellent hand-feel and outlook, as
well as the features of long life, high recognition,
advanced and beautiful structure. Also, the high
degree of light transmittance determines good
visual effect on the screen.
◆Exquisite Outlook
Fashion and compact design, perfect combination
of highlight and matte texture material, sbq quality
alloy aluminum fiber-drawing, with distinct
gradation.
◆Intelligent Core
Dual-core CPU with GHz at 667mhz
◆Adopt Wince System
Dual-control function, move your slim finger on
screen at will, making everything so simple.
◆USB 2.0 Download Mode
Adopt high-speed USB 2.0 for download, at
several dozen times of speed of USB 1.1,
convenient for the download of programmed
multiple language control picture and information
picture.
CR-LAN G15 Wired Programmable Touch Screen
is suitable for using in the command control
centers at all scales, multi-media conference hall,
multi-media classroom, luxury resort and hotel etc.
One screen could help you to control everything
easily.
1.2 Functions and Features
◆65K true color TFT LCD monitor, with
resolutions of 800X600;
◆Touch screen with size of 15.0 inches;
◆Via RJ45 port, directly connect with CR-PGMIII
control host to make a perfect control system;
◆Wired control mode for direct communication
with PC via Ethernet, with faster speed for project
download.
◆With jumping page and sub-page display
function and Chinese-English Display;
◆Programmable operation interface, graphic
interface supports picture, graphic, text, vivid 3D
animation and 3D button display effect;
◆With touch screen coordinate correcting
function;
◆1G memory;
◆Adopt high-end Touch Lens technology, with
CREATOR CHINA 2011-09 WWW.CREATOR1997.COM
2
User’s Manual of LAN G15 Programmable Touch Screen
fashionable and beautiful outlook design.
1.3 Regular Operation
◆Turn on
Directly touch the screen area to turn it on.
◆Turn off
Configure the property setup of touch screen to
delay power off.
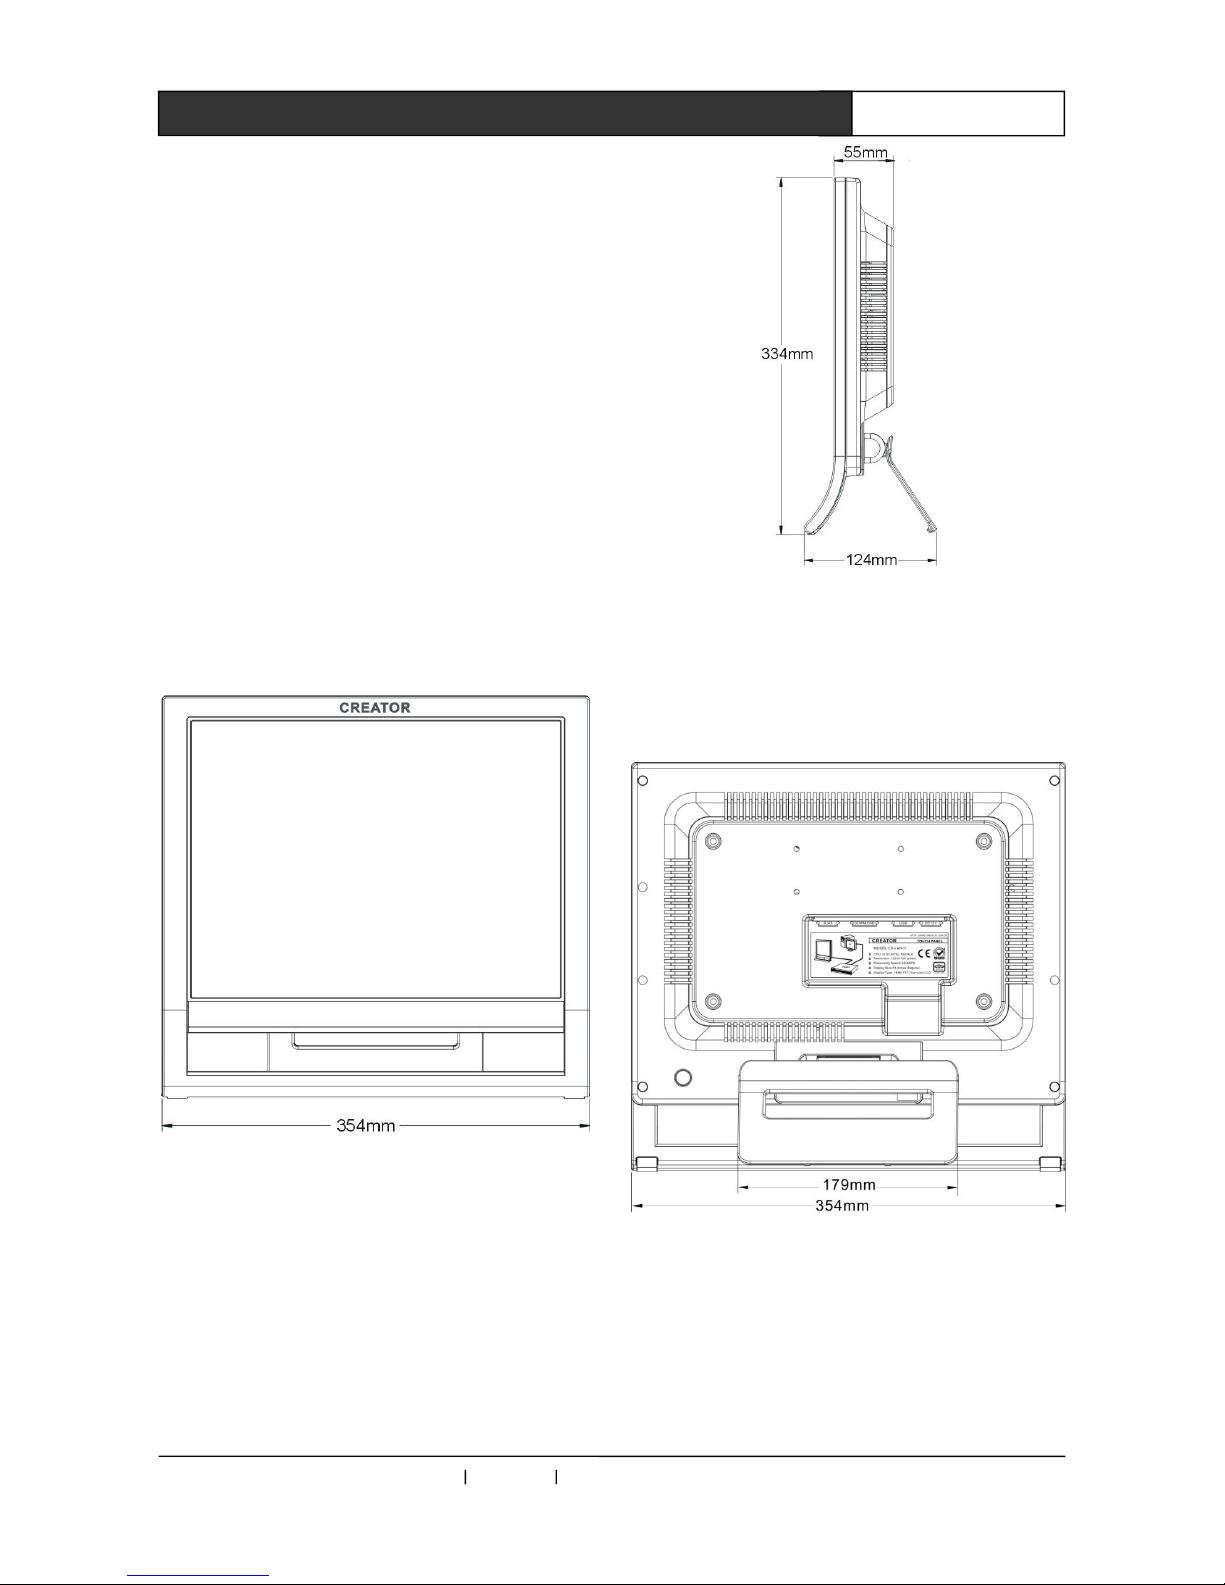
1.4 LAN G15 Dimension
Front view:
Side view:
Rear view:
Dimension of CR-LAN G15 Wired Programmable
Touch Screen:
354(L)X334(W)X55(H)mm

CREATOR CHINA 2011-09 WWW.CREATOR1997.COM
3
User’s Manual of LAN G15 Programmable Touch Screen
1.5 Installation of Touch Screen
Driver
1.5.1 Touch Screen Driver under
Windows XP
1.Prepare the following objects: touch screen
(complete touch screen, properly install the
battery (not necessary)), 12V power, USB data
cable, touch screen driver (driver is in CR-LAN
G15 Driver folder), as picture 1-1:
Picture 1-1
2. To place the folder into the PC installed with
ThinkDraw software, e.g. C :\CR-LAN G15
Driver
3. Start touch screen, connect USB cable with
PC, dialogue box of “new hardware
detected “is prompted, as well as “Find
new hardware wizard”, as picture 1-2:
图1-2
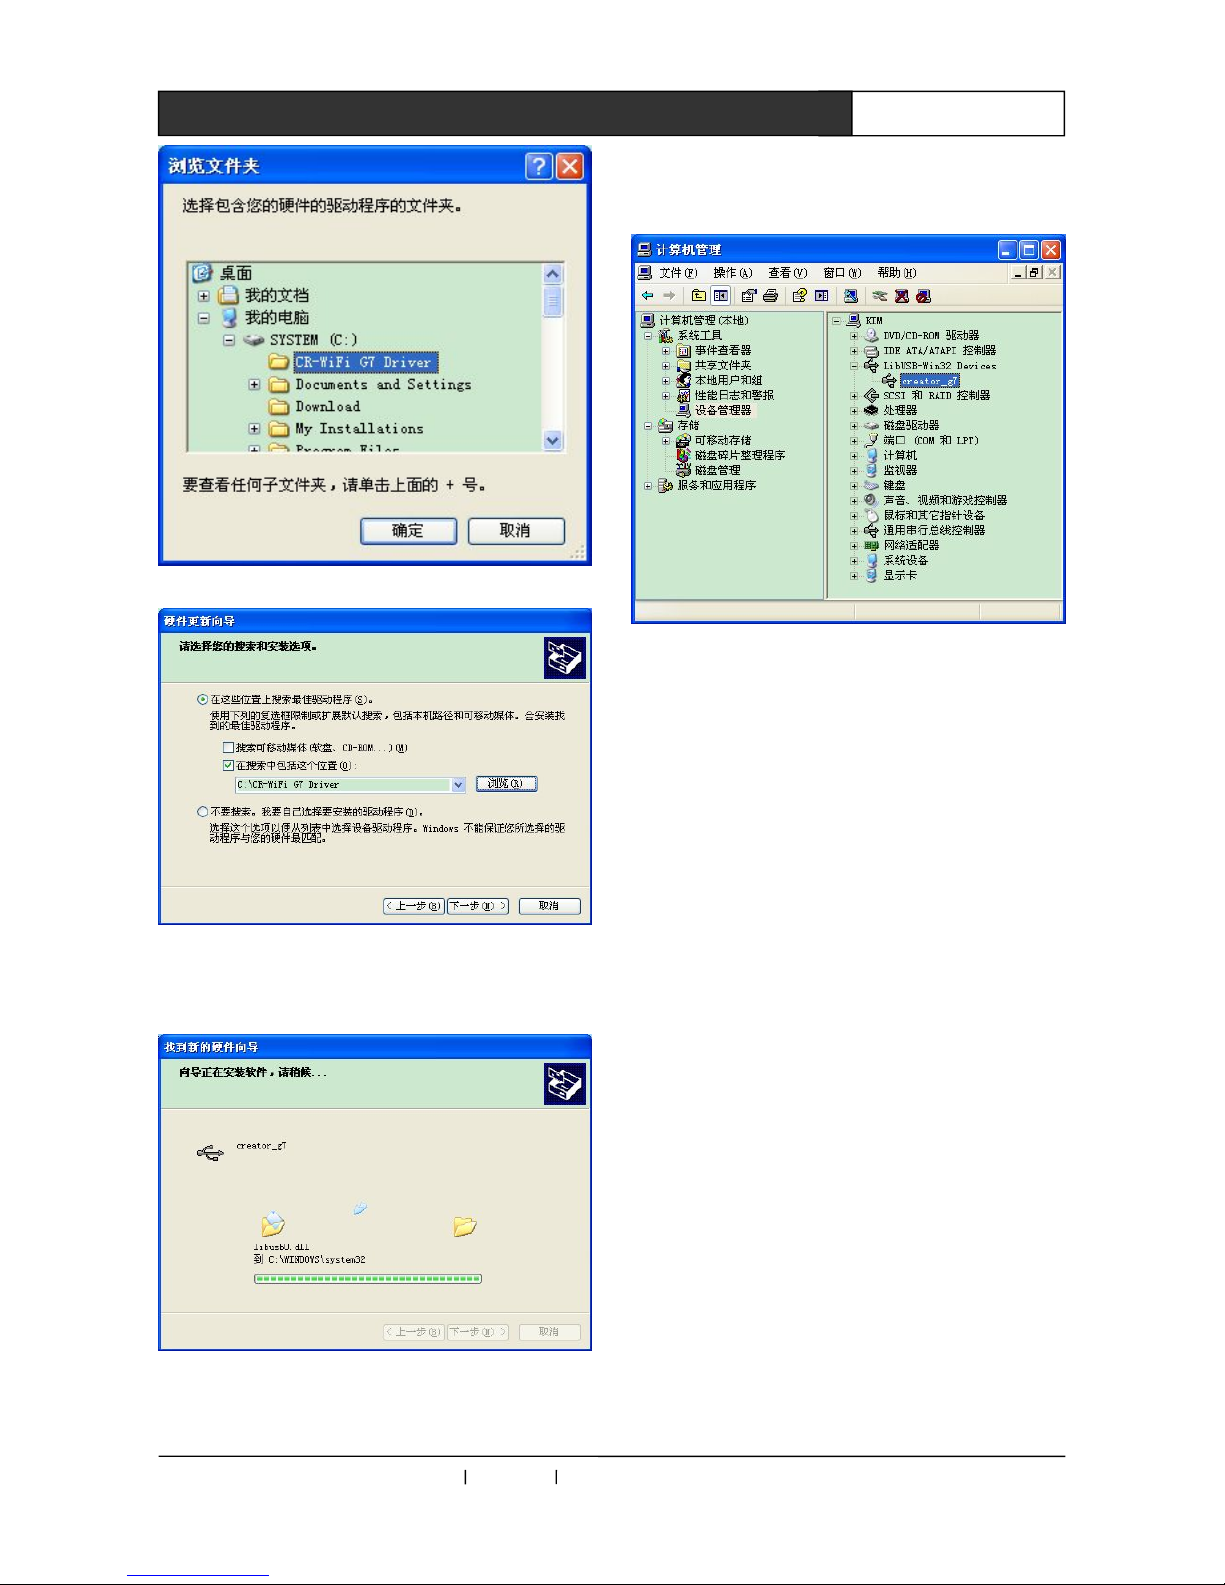
4.Select “install from list or appointed position
(premier)(s)”, click on “Next step”to see
“hardware update wizard”dialogue box, as
picture 1-3:
Picture 1-3
Remove the tick before “Search portable media
(soft disc, CD-ROOM), and then tick “include this
position in searching (0)”, click on “Navigate”to
select a saving path of the driver, click on
“Confirm”, as picture 1-4 and picture 1-5:
CREATOR CHINA 2011-09 WWW.CREATOR1997.COM
4
User’s Manual of LAN G15 Programmable Touch Screen
Picture 1-4
Picture 1-5
5. Click on “Next step”to start installation of the
driver, as picture 1-6:
Picture 1-6
6.click on “finish”to finish the installation of touch
screen driver, then Creator_g7 will be displayed in
device manager, as seen in picture 1-7
Picture 1-7
7. Open PC editing software Think Draw,
customize your unique user interface and update
it to touch screen for experience.
1.5.2 Touch Screen Driver under Other
Windows Systems
Installation of touch screen driver in other
Windows system is basically the same as that of
Windows XP. We won’t repeat the description.
CREATOR CHINA 2011-09 WWW.CREATOR1997.COM
5
User’s Manual of LAN G15 Programmable Touch Screen
Chapter 2 Touch Screen
2.1 Panel Instruction
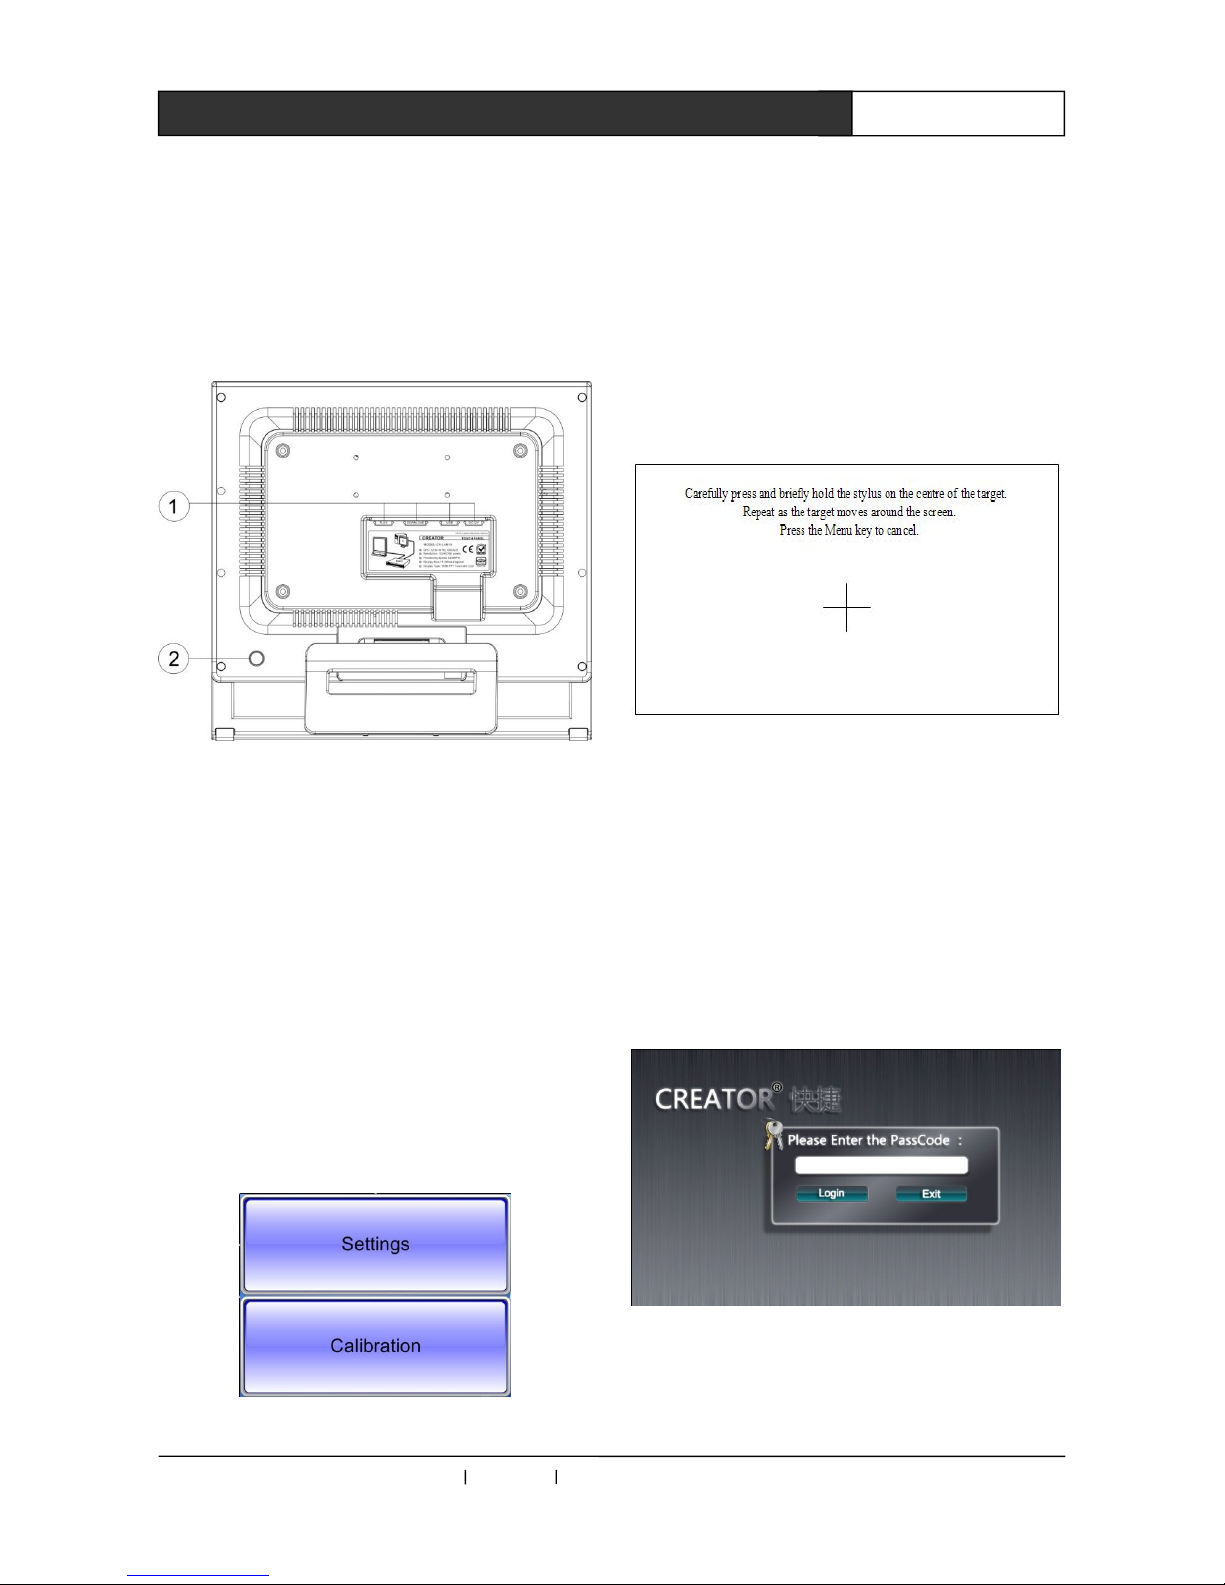
Rear Panel:
①RJ45:Network port,for connecting to PC or
central host.
DOWNLOAD :Download key, for system
upgrade
USB:USB port
DC 12V:Power input port, support DC 12V
input of power supply to touch
screen.
② System reset key.
2.2 System Configuration
Press and hold the control interface of main program
until the following picture is displayed:
Picture 2-1
1. Select Calibration key to have system
calibration, as seen in the picture. And calibrate it
as per the instructions.
Picture 2-2
2. Select settings to access to background
program, for detailed operation, please refer to
2.2.1
2.2.1 Login Page
1. Access to setting programs, you will see an
interface as picture 2-3 when Pass code is
needed:
Picture 2-3
2. Click on pass code input box to see a pop-up
keyboard, as picture 2-4:

CREATOR CHINA 2011-09 WWW.CREATOR1997.COM
6
User’s Manual of LAN G15 Programmable Touch Screen
Picture 2-4
This keyboard comprises of input bar, characters
zone and functional bar. Select your needed
value in characters bar, you will see relevant digit
displayed, with limitation of up to 20 characters.
When finishing input, press confirm to exit, pass
code “*”will be displayed in log-in dialogue box.
“SPACE”:Space key;
“ENTER”:Confirm key;
“←”Backspace key
“123 ”: This is an input method switching key.
Click on it to switch it into number and symbol
selection interface, as picture 2-5:
Picture 2-5
“ABC”:This is input method switching key. Click
on it to switch it into English character selection
interface, as picture 2-4.
3. After finishing input, press “Login”key to
directly access to setting main page if with correct
pass code, otherwise, you will be asked to
re-input it.
4. “Exit ”key is for the exit of system setting
program.
2.2.2 Main Page
Picture 2-6
1、As seen in picture 2-6, the main page
comprises of the options of Date & Time, Wi-Fi,
Volume, Language, Power Manage, Misc
Settings, About US and Exit, touch the option to
access to respective setting interface.
2、Touch the screen, catch the focus on
corresponding option, move away (while not
away from the screen) to lost the focus, access to
the focus of the option when leaving screen. If
focus is not on any option, no any operation will
be taken.
3、Select Exit to leave setting program, at the
meantime, Control Center is started.
2.2.3 Date & Time
Picture 2-7

CREATOR CHINA 2011-09 WWW.CREATOR1997.COM
7
User’s Manual of LAN G15 Programmable Touch Screen
1、As seen in picture 2-7, the page is for
adjusting date and time, with date ranging from
the year 2009 to 2049.
2、Touch the relevant area of date and time, it
will be activated.
3、When leaving in activated state, adjustment
pulley pops up at the right side (as seen in picture
2-7).
4、When adjusting the right-side pulley, the
corresponding region is displaying the adjustment
state in real time, but without taking effect. Click
on the right-top button on the pulley to confirm the
operation, if not, the alteration will be abandoned.
5. Press the right-bottom icon to return to
main page.
2.2.4 LAN
Picture 2-8
1. In main page,
click on LAN icon to access LAN configuration
interface, as seen in picture 2-8.
Corresponding parameters are displayed at right
side, such as the local IP, subnet mask, gateway,
DNS, host IP, port and channel.
2、When you need to alter the network
parameter at right side, click on corresponding
parameters region to see a pop-up keyboard,
input you desired value, press enter key to
confirm it. If it is void, original value will be kept
and preserved.
3、Press right-bottom icon to return to the
main page.
2.2.5 Volume
Picture 2-9
1. As seen in picture 2-9, the page is for
adjusting the button click volume and turning
on/off screen click sound.
2、Drag button click volume adjustment bar(min
at left, max at right)
3、Click on the switch to turn on/off screen
sound.
4. Click on right-bottom icon to return to
main page.
CREATOR CHINA 2011-09 WWW.CREATOR1997.COM
8
User’s Manual of LAN G15 Programmable Touch Screen
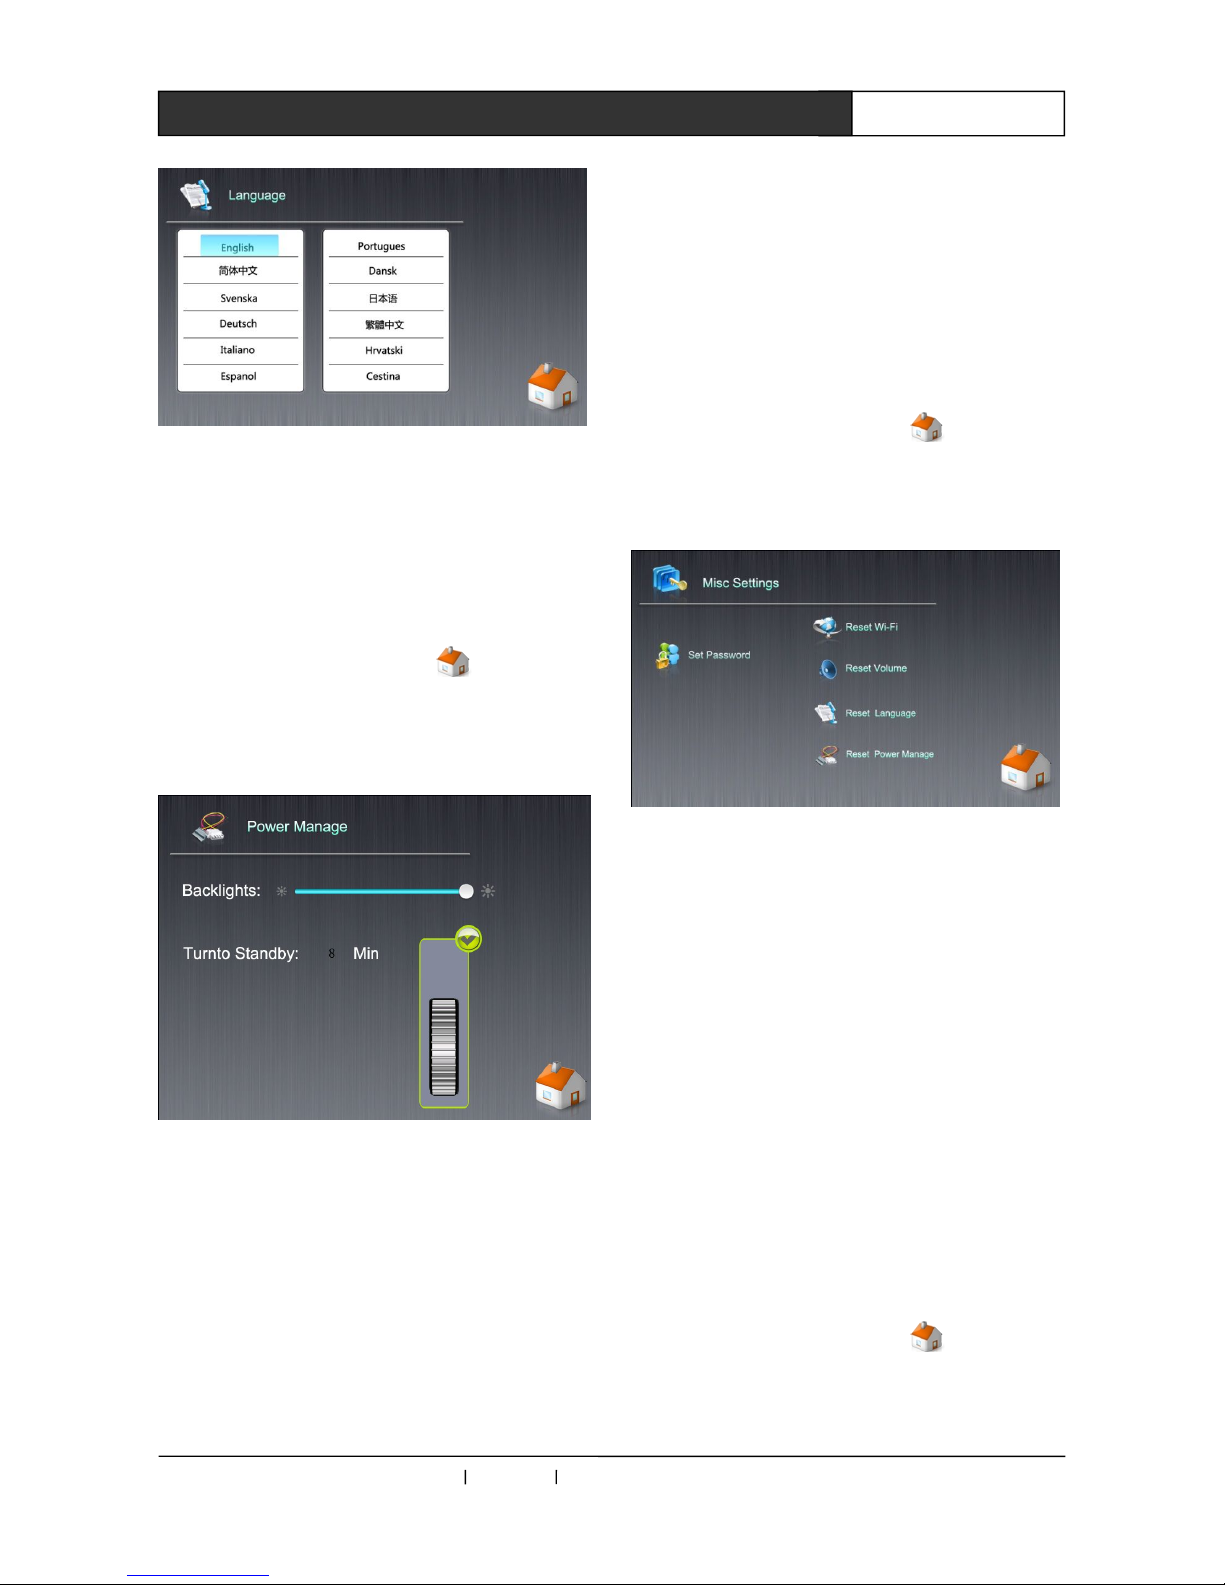
2.2.6 Language
Picture 2-10
1、As seen in picture 2-10, the page is for
selecting language on the screen. Click on the
desired language, which will take effect after
exiting this page. (Temporarily only with English
available, other languages will be added later on).
2. Click on right-bottom icon to return to
main page.
2.2.7 Power Manage
Picture 2-11
As seen in picture 2-11, the page is about
power management, for adjusting the backlight of
touch screen, stand-by time and battery indicator,
if battery is installed, and if using external power
for battery charging.
1. In backlights option, drag the bar to adjust the
brightness of backlights.
2. Click on Turn To Standby digit region to see
an pulley for adjusting standby time (0 to 10
minutes). System initial value is 8 minutes, i.e.
accessing to digital album after 8 minutes.
Rotate playing the pictures in appointed local or
mini SD card folder, and shut down the screen
after 2 minutes, automatically power off the
device after further 10 minutes.
3. Click on right-bottom icon to return to
main page.
2.2.8 Misc Settings
Picture 2-12
As seen in picture 2-12, this page comprises of
miscellaneous settings, for password setup and
resets of Wi-Fi parameters, volume, language
and power management.
1、Click Set Password to see a pop-up
keyboard, input password. If it is void, password
will be cancelled---starting setting won’t access to
log-in page.
3. Others are for the respective resets of factory
default. Click on it and follow the instruction
(input “ok” to confirm reset). The system will
prompt your successful operation, otherwise,
it is ineffective.
3. Click on right-bottom icon to return to
main page.
CREATOR CHINA 2011-09 WWW.CREATOR1997.COM
9
User’s Manual of LAN G15 Programmable Touch Screen
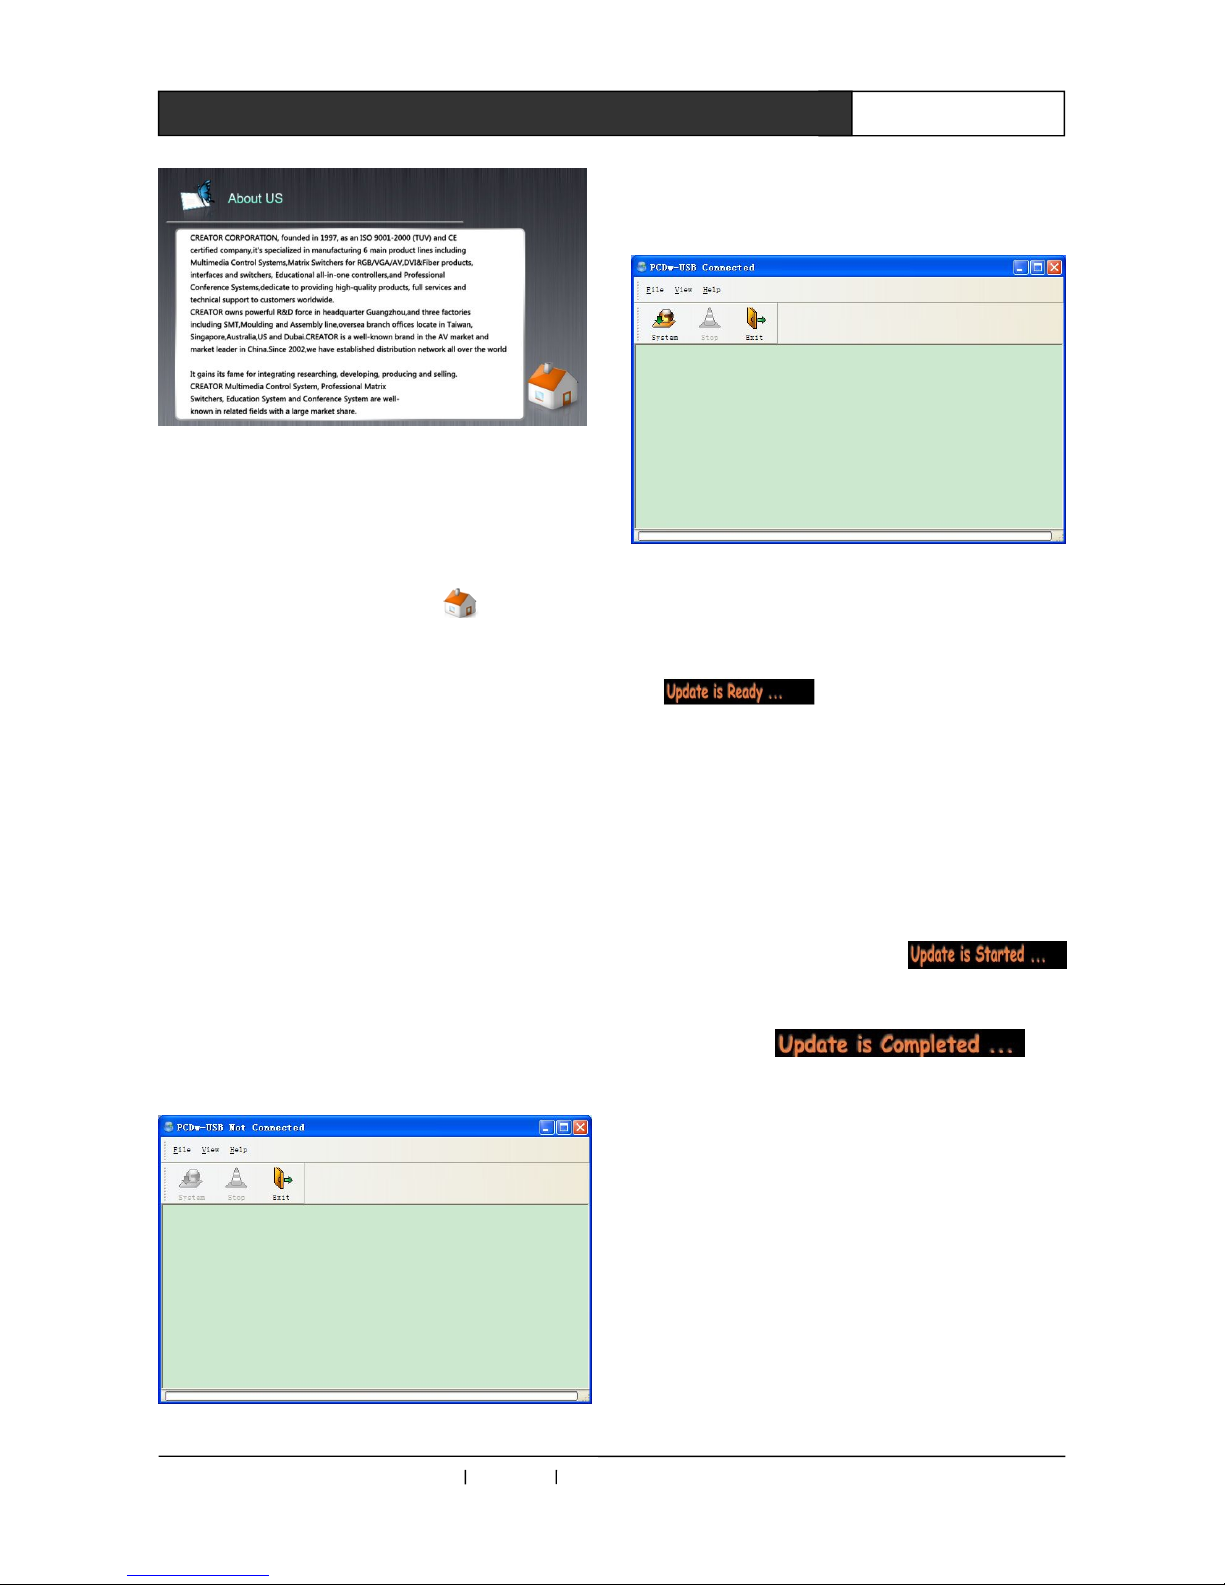
2.2.9 About US
Picture 2-13
As seen in picture 2-13, this page displays
the history of our company and contacts (subject
to you need), without making any configuration.
Click on right-bottom icon to return to
main page.
2.2.10 Exit
Exit this program to return to control
interface.
2.3 Use of Touch Panel G Series
Software
2.3.1 Download Update) Firmware
Prepare the following objects: touch screen
【complete touch screen, install battery in correct
way(not necessary)】, 12V power cable, USB data
cable, PC download software-Downtool
(integrated into PC editing software-ThinkDraw),
as seen in picture 2-14:
Picture 2-14
1. Correctly connect to power and USB data
cable, run the system, software system icon is
on, as seen in picture 2-15
Picture 2-15
2、Press and hold the menu key at the
right-back of touch screen, restart the screen to
see .
The device status of PC download software
shows “Date”, System”, Exit”. When “Stop” icon is
in grey, the device is connected and ready for
system update.
3. Press the “System” key in PC software, select
the firmware file to update,
appears, until the download is finished with
following prompt .
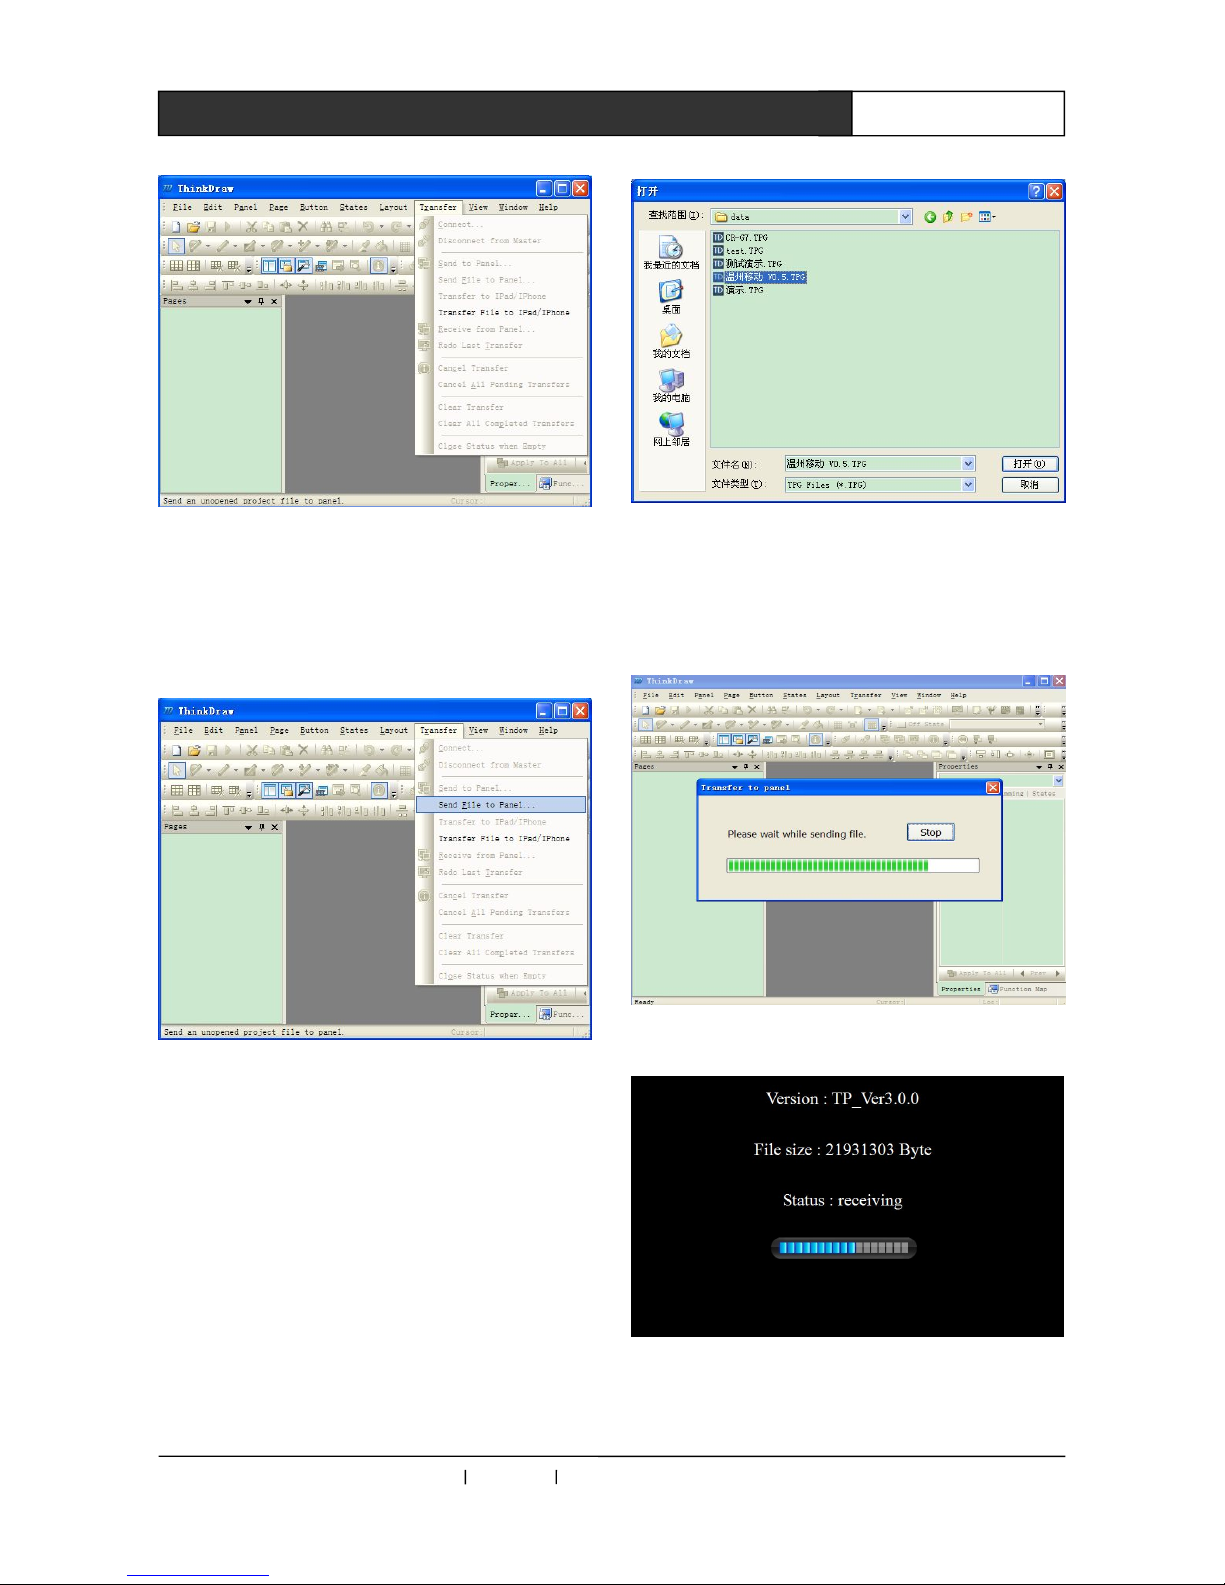
2.3.2 Update Data
Prepare the following objects: touch screen
【complete touch screen, correctly install battery
(not necessary) 】, 12V power, USB cable, PC
edition software-ThinkDraw (Update user
interface is integrated into ThinkDraw), as seen in
picture 2-16:
CREATOR CHINA 2011-09 WWW.CREATOR1997.COM
10
User’s Manual of LAN G15 Programmable Touch Screen
Picture 2-16 ThinkDraw Editing Software
Interface
1. Correctly connect to power and USB cable,
run the system to see “Transfer--》Send File
to Panel”is activated, as seen in picture 2-17:
Picture 2-17
2. Select“Transfer--》Send File to Panel”to see
an “open” pop-up dialogue box. Choose to
update file and then click on “open” button, as
seen in picture 2-18.
Picture 2-18
3.PC editing software ThinkDraw will display the
process of data transmission, as seen in pictures
2-19 and 2-20.
Picture 2-19
Picture 2-20
Version is about the system version. File Size

CREATOR CHINA 2011-09 WWW.CREATOR1997.COM
11
User’s Manual of LAN G15 Programmable Touch Screen
refers to the size of update data. Status refers to
current states. And the bar indicates the
percentage of current running process.
4. When finishing update, the program will
automatically jump to control interface.
For other operations about programmable
touch screen software—ThinkDraw, please
refer to User’s Manual of Touch Panel G
Series.
2.4 System Connection Diagram
CREATOR CHINA 2011-09 WWW.CREATOR1997.COM
12
User’s Manual of LAN G15 Programmable Touch Screen
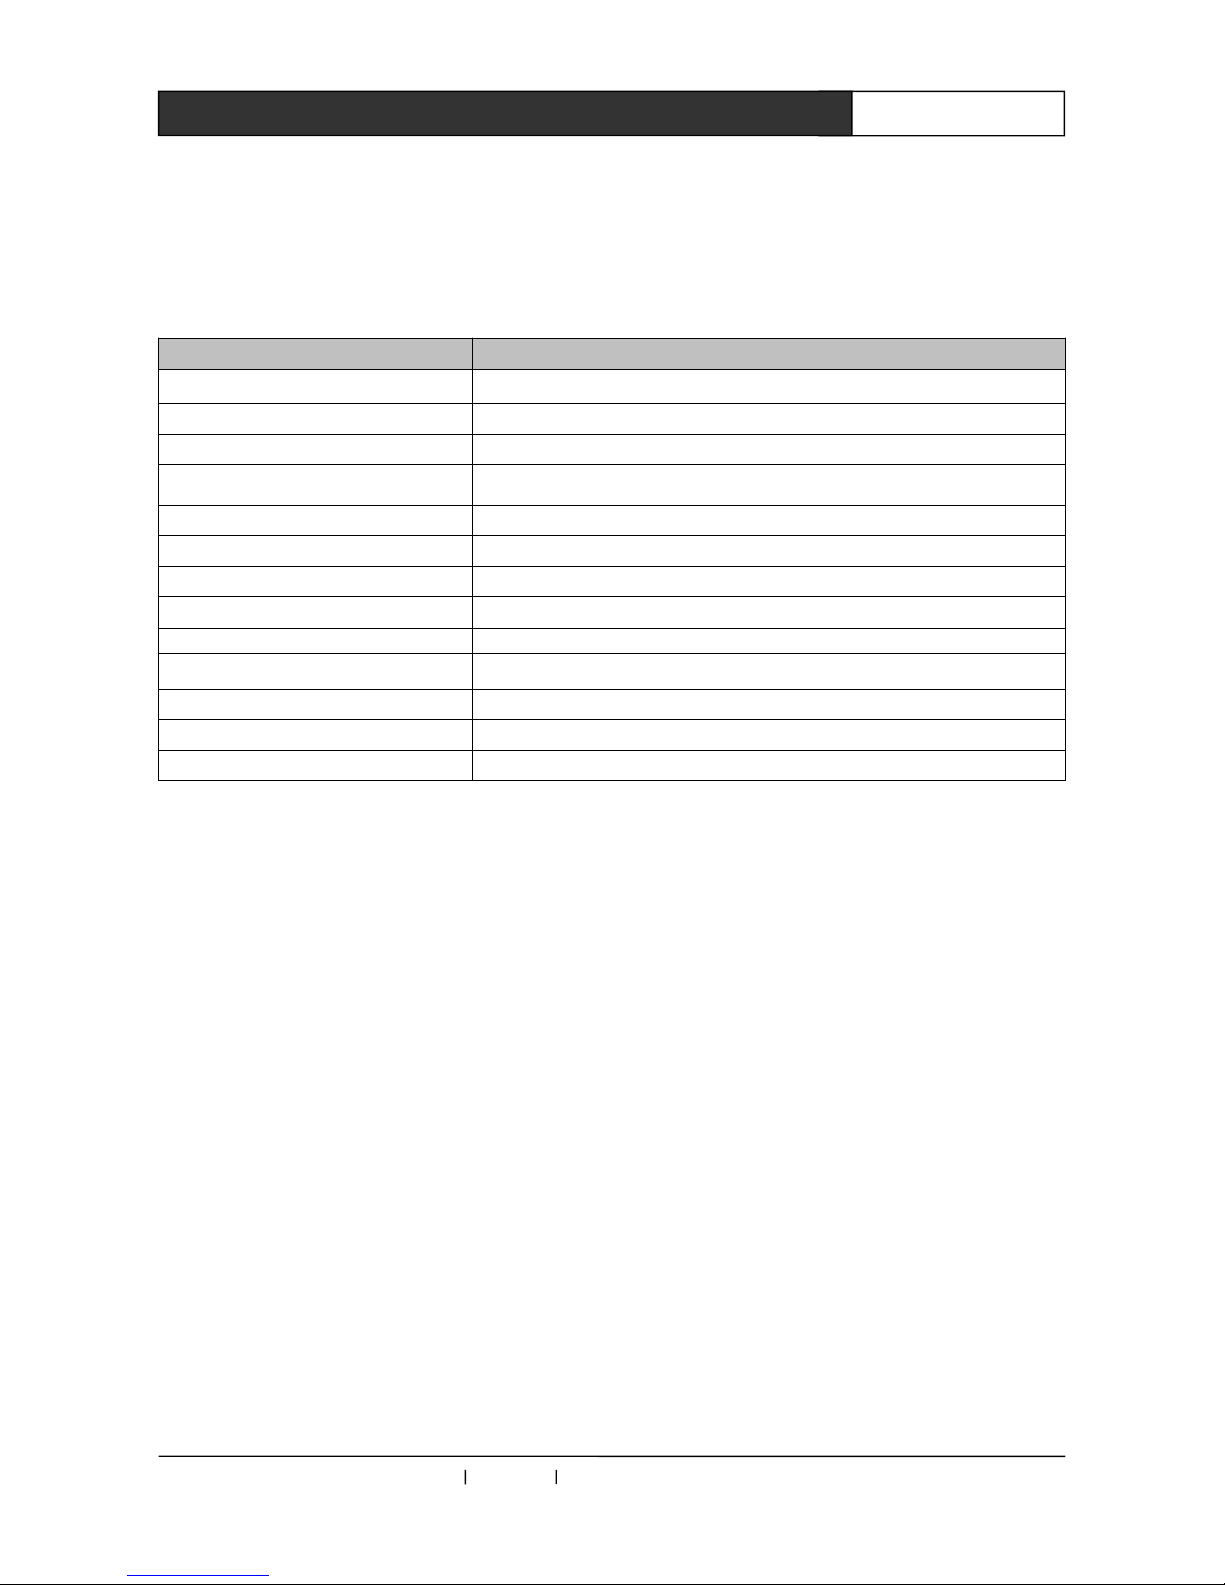
Chapter 3 Technical Parameters
Parameters CR-LAN G15
Display mode TFT LCD true color
Screen resolution 800X600
Control mode Wired
Application range For connecting to CR-PGMIII control system
Touch screen backlight LED
Communication port Ethernet port
Memory 1G
Radio transmission frequency Wired
Distance of remote control >100m
Control mode Wired control
Dimension (mm)
354LX334WX55D
Weight 4000g
External power DC12V/3.3A
CREATOR CHINA 2011-09 WWW.CREATOR1997.COM
13
User’s Manual of LAN G15 Programmable Touch Screen
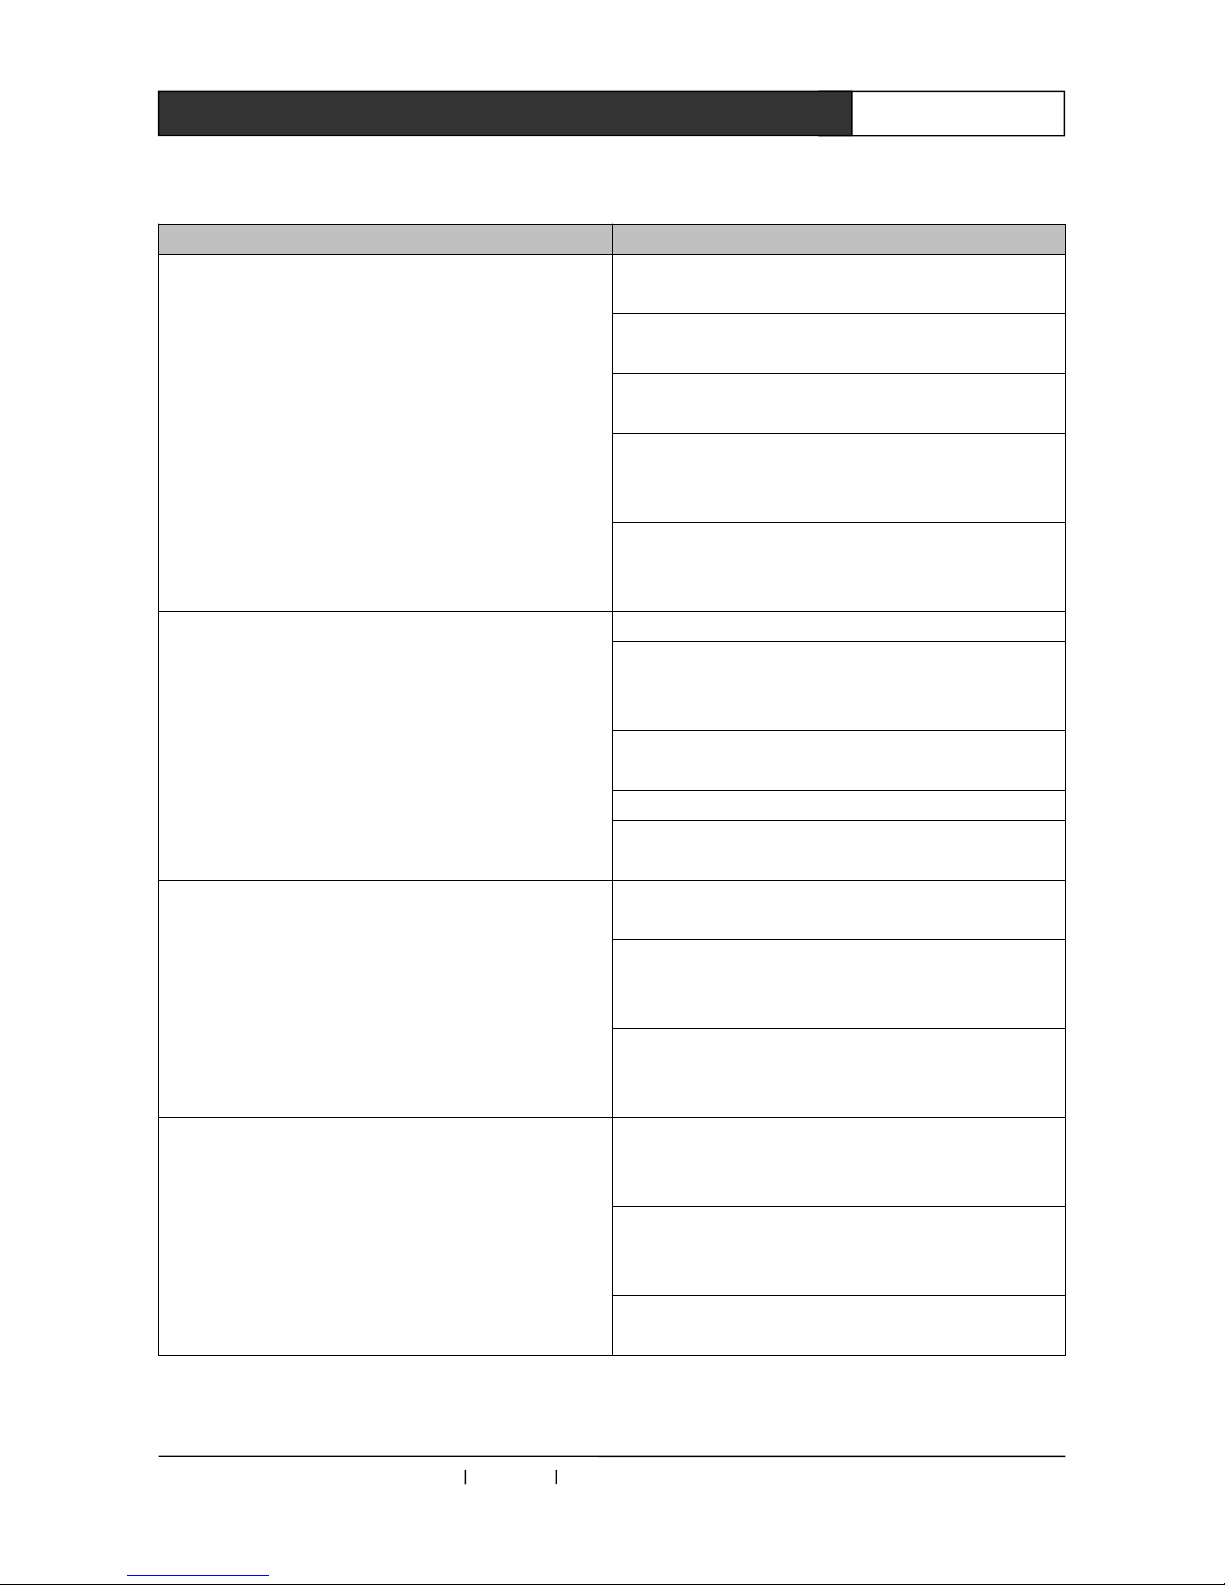
Chapter 4 Common Troubles Shooting
Failure Resolution
Host cannot be controlled by touch screen
● Check to see if the Join No. value of touch screen
project button is the same as that in host program;
● Check to see if touch screen ID the same as that of
touch screen in host program;
● Check to see if the receiver and control host are
correctly connected by cable.
● Check to see if the receiver is installed with antenna, if
the touch screen and receiver are within effective
distance.
● Check to see if the receiver can control the touch screen
in short distance, if not, maybe one of them is out of order,
please refer to the professionals for maintenance.
PC is unable to download program for touch screen ● Check to see if USB data cable is correctly connected;
● Check to see if the driver of touch screen has been
successfully installed. Reinstall the driver to resolve the
problem;
● Check to see if touch screen user program is with the
same model as touch screen;
● Check to see if USB port in PC can work normally;
● Check to see if the touch screen has been connected to
power and turned on.
No display on touch screen ● Maybe battery power in touch screen has run out,
please recharge it;
● When the touch screen is recharging power, please
make sure the power adaptor has been correctly
connected;
● Check to see if touch screen battery has been
improperly installed. If yes, please take it out and reinstall
it.
No response after touching touch screen button
● Maybe the touch screen is with drifting phenomenon,
please access to the setup page to re-adjust the
coordinate;
● In touch screen user program, check to see if the button
is mistaken by text, alter the button to resolve the
problem.
● Check to see if power is running out in touch screen,
recharge it in due course.

CREATOR CHINA 2011-09 WWW.CREATOR1997.COM
14
User’s Manual of LAN G15 Programmable Touch Screen
Chapter 5 Maintenance
1、Use soft dry cloth to wipe out the dust on touch screen;
2、Avoid placing the touch screen under sunshine, but it should be placed at dry area.
3、Please keep good ventilation at the place where touch screen is working, avoid using it under direct
sunlight and humidity.
4、Please avoid using sharp, coarse or hard object to hit on the surface of touch screen, finger and
special touching pen are recommended for touching;
5、Use appropriate strength when touching screen. Hitting with excessive strength could destroy the
screen;
6、Touch screen battery is for touch screen only. Use for other purpose could damage the battery;
7、The battery has a certain lifetime of use. Repeated power charging will shorten the lifetime of
battery;
8、When not in use for a long time, it is recommended to take out the battery, and pack it with plastic
sealed bag for reservation in dry and cool places.
9、Do not put the old battery with general waste, as avoiding danger.

CREATOR CORPORATION(CHINA)
Copyright by CREATOR
Last Revision:09/2011
Table of contents


