Creche Innovations MicroCool User manual

The MicroCool™ LED Examination Light
User Manual
Instructions for Use & Maintenance

Table of Contents
Please read this manual carefully before starting the machine. Keep it
in a safe place for future reference. If the device is resold, this manual
must be handed over to the purchaser along with the device.
Table of Contents
1. Technical Description & Specifications……………………………………3
2. Technical Information…………………………………………………..…...4
3. Set-Up and Operation…………………………………………………........5
4. Wall Mount Assembly..…………………….………………………..……...6
5. Maintenance……………….………………………………………………...7
6. Preventative Maintenance and Cleaning …..…………………………….8
7. Replacement Parts & Symbols and Warnings.………………….…….....9
8. Troubleshooting Guide…..…………………………………………………10
10. Warranty and return policy……………………………………………......11
2

Technical Description & Specifications
The MicroCool™ LED Examination Light is durable, attractive light designed to deliver
high quality illumination in modern hospital or clinics for examination applications. Its
design offers excellent dual brightness, color rendition, large field size and convenient
positioning with easy-grip handles. Use fixture only as intended, any other use will void
the warranty.
The fixture projects a beam of visible light practically devoid of infrared and ultraviolet
energy, but with high intensity. It provides a 7-7.5 inch spot size at a distance of 18 inches.
The light head is mounted on a spring arm system which will not sag. The light head swivels
about the arm ± 90°. The mounting system allows the light head to swing through a radius
arc of approximately 45 inches, and project a beam on any location of a human subject.
Easy grip handles at the sides of the light head assist positioning. The light head features a
cool-temperature housing.
Power is supplied through a European-harmonized grounded 8-foot SJT cord, having a
NEMA 5-15 hospital-grade North American plug. An On-Off-On switch operates the light at
The base of the light head. The light is ETL listed and made in the USA.
Specifications
The light is intended for use in the modern hospital or clinic for examination applications.
This unit has been tested and classified to UL 60601-1. The exposed metal parts that screw
on the head are not grounded, nor do they have to be, since the metal parts are adequately
isolated from the high voltage supply. All other exposed metal is grounded.
Power to the fixture is controlled from a power supply at the base of the arm, which contains
internal fuses. Effective working distance between patient and light head is from 0.2 to 0.6
meters. Two easy grip handles at the sides of the light head assist positioning. A 3-way switch
safely controls the power to the two LED modules. Users have the option to have either one
or two LED sources, power on, middle position is off.
There are no known contraindications to use this equipment.
There are no hazardous material in this product and it’s safe to dispose of after its service life.
3

Technical Information
Classification
Type of protection against electric shock……………………………………………….…………...……...Class 1
Allowable leakage current…………………………………………………………..……..does not exceed 200µa
Reliability of earth protection………………………………………….………………does not exceed 0.1 ohm
Mode of operation………………………………………………………………………………..................continuous
Protection against explosion hazards.…..not to be used in presence of flammable anesthetics
Protection against hazardous parts and ingress of liquids………………………………………………..IP20
Safety tests…………………….…UL 60601-1, 3rd Edition; IEC 60601-1-2, CSA/CAN C22.2 No. 601.1
Electrical
Input……………………………………………………………………………...100V-240VAC, 50/60HZ 9W or 18 W
LED……………………………………………………………………………………………………………..2 x 3 LED Modules
Power cord…………………………………………………………..8ft (2.4m), NEMA 5-15, hospital grade plug
Fuses (2)…………………………………….…..T 0.5A L (250V) each, located inside transformer housing
Environmental Conditions
Transport and Storage
Ambient temperature…………………………………………………………………………………...0° C to 70° C
Relative humidity………………………………………………………………….……….10% to 75% (keep dry)
Atmospheric pressure………………………………………………………………………..500hPa to 1060hPa
Shipping Container Markings……………………………………………………………………….Fragile, Keep Dry
Operation
Ambient temperature…………………………………………………………………………………..10° C to 40° C
Relative humidity………………………………………………………………….……………………..….30% to 75%
Atmospheric pressure……………………………………………………………….………..700hPa to 1060hPa
Weights and Dimensions
Net weight (Light head, flexible arm, transformer housing, cord)……………………………7lbs (3kg)
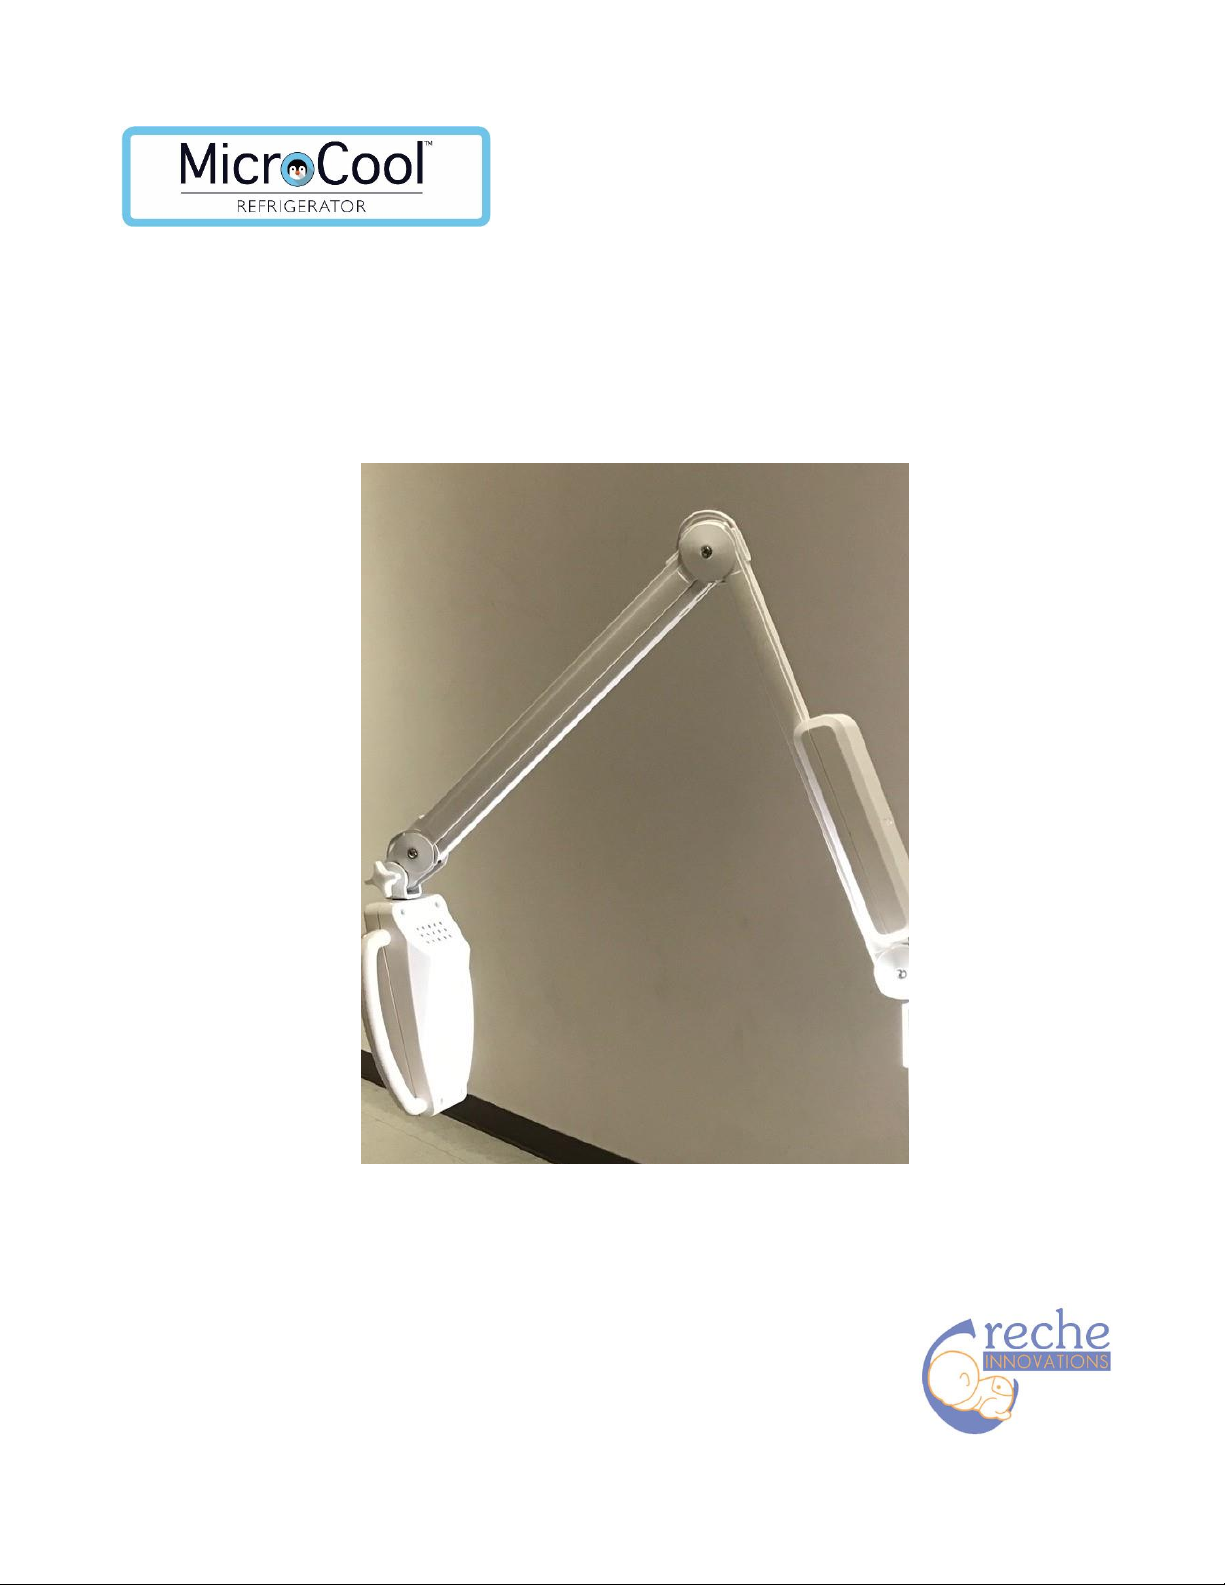
Light head width, including handles………………………………………………………………………9 in (23cm)
Light head length, including neck……………………………………………………………………… 10 in (28 cm)
Arm length………………………………………………………………………………………………………..41 in (104 cm)
Effective swing radius from Pivot to front of Light head/…………………………………..51 in (130 cm)
Colors………………………………………………………………………………………………………………………….…White
Optical Performance
Central Illuminance, One LED Module, Ec at 18 in. (46 cm)……………………………….……25,000 Lux
Central Illuminance, Two LED Module, Ec at 18 in. (46 cm)………………………………..…..50,000 Lux
Central Illuminance, Ec at 1 meter……………………………………………………………….9,000 Lux (840 fc)
Total Irradiance at 1 meter…………………………………………………………………………………………30W/m2
Total Irradiance at 18 in. (46 cm)………………………………………………………………………….…..131W/m2
Ultraviolet radiation……………………………………………………………………………………………… 0.02W/cm2
Color temperature……………………………………………………………………………………………………..4600° K
CRI (Color Rendering Index) ……………………………………………………………………………………………….93
LED Operating Life………………………………………………………………………………………………….40,000 hrs
4

Set-Up and Operation
1.1 Pre-Assembly
1.1.1. Remove the product and accessories from the shipping container(s).
Save the packaging in case hidden damage is revealed. If there is product
damage caused during transit, contact the shipping company, not Creche
Innovations.
1.1.2. Inspect the Head/Arm for possible damage:
The head should be able to rotate within its stops and tighten to desired
angle with the friction adjustment knob between the head and flexible arm.
The cord should feel secure at the connection to the transformer housing.
1.1.3. Before Reporting Shortages
Be sure that you have received the correct number of boxes, cartons, etc. as
shown on the bill of lading.
Check the entire shipment against the packing slip, which is enclosed in
one of the boxes. Should there be parts missing, please contact Creche
Innovations Customer Service.
Items indicated in the column headed “Back order” are not included in the
Shipment and will follow later.
Be sure that nothing has been removed from the carton(s) before they are
checked by the individual in charge. Retain all packaging until you verify that
contents are satisfactory. Any product returned to Creche Innovations should
be in its original container(s).
1.1.4 If Shortage or Damage Occurs
You, the receiver, NOT CRECHE INNOVATIONS, are responsible for filing any
claim(s) with the freight carrier within five (5) days after receipt of the shipment.
If damage or shortage occurs in transit, the freight carrier is required by law to
make notation of a shortage or damage. This notation is to be made on the bill
of lading.
If, in your opinion, there may be concealed damage, an agent from the freight
carrier is obligated to make an inspection after the goods are unpacked.
Do not destroy packing material until after the agent has made out his/her
Report.
All claims must be made to the carrier, not Creche Innovations.
An RA (Return Authorization) form and number must be obtained from Creche
Innovations before merchandise can be returned for a replacement or service.
Should you require a Return Authorization form, please call (913) 948-6290,
between the hours of 8:30 a.m. to 4:30 p.m. (Central Time), M-F, excluding
holidays.
5

Wall Mount Assembly
Wall Mount Assembly
1.2.1. Creche Innovations recommends a wall mounting height of 55-60 inches
(140-152.4 cm) from floor plane.
1.2.2. Attach the provided Wall Mount to a suitable vertical surface, it should go
into wood support that may need to be constructed. It should not be
anchored to the drywall alone.
Use four (4) #10 round-head wood screws, which are 1.5” long into wood
surfaces, or 2” long through wall board into wood studs. When attaching the
mount to the metal, use #10 round or pan-head self-tapping or machine screws,
1” long, or as indicated by the application.
1.2.3. Make certain the applicable hole for the fixture shaft is oriented up to accept
the light.
1.2.4. Insert the fixture into the clamp and tighten the lever at the base of the transformer
housing until the head/arm remains in position.
6

Maintenance
Maintenance
2.1 Fuse Replacement
If this product is operated according to procedures in this manual, the fuses that
are located internally at the base of the transformer housing may never need
replacing. But, if one or more system abnormalities do occur, the protective current
fuse (s) will fail and need to be replaced.
NOTE: Before replacing a blown fuse(s), a complete system check should be
Undertaken to reveal the underlying cause(s) for the failure. Appropriate corrective
action should be taken to prevent future occurrences.
2.1.1. Turn the power switch off (O) and disconnect the fixture from the mains supply
to avoid electrical shock.
2.1.2. Loosen the single screw on the transformer housing where the power cord enters.
Remove cover by lifting this end up and away, it will naturally pivot around the clip
at the opposite end.
2.1.3. Check and replace fuses located on the terminal block by pulling the black fuse holder,
tab up.
2.1.4. Reverse the above procedure to restore the fixture to proper operation.
2.2 LED Replacement
Note: The LED module will outlast the life expectancy of the device (10 years) under
normal conditions and it’s therefore not needed to replace before this time period.
LED module replacement must be replaced by a Creche Innovations appointed
technician.
2.2.1. Turn the power switch off (O) and disconnect the fixture from the mains supply.
If the fixture was operating just prior to the LED failure, the heat sink is probably
to hot to handle. Allow at least 20 minutes for it to cool.
2.2.2. Remove the arm from the mount and lay it down on a flat surface, remove the four
screws on the front face of the light head and carefully separate the two halves, do
not over stress the wires from the switch to the LED module.
2.2.3. Remove the broken LED module with heat sink by first removing the four screws
around the heat sink, then disconnect the black and red wires from the LED board.
2.2.4. Insert the black and red wire into the new LED module and secure it to the housing
with the four screws from the previous step.
2.2.5. Secure the two halves of the light head. Ensure that wires are NOT being pinched.
2.2.6. Re-attach the light to the mount.
7

Maintenance
2.3 Preventative Maintenance Checklists
2.4 Cleaning
2.4.1. Disconnect the fixture from the mains supply.
2.4.2. Suggested cleaning technique is to use a soft cloth and mild detergent solution
in water or isopropanol 70% solution. Do not let any solution run into the
transformer housing. After cleansing, dry all surfaces promptly with a soft cloth
or towel.
2.4.3. For especially stubborn stains, rubbing or denatured alcohol can be used.
2.4.4. External surfaces are polycarbonate, or power painted. Do not use cleaning agents,
chemicals or solvents that can attack and damage polycarbonate material or stress
corrosion cracking (SCC) will occur voiding the warranty. Under no circumstances should
cleaning agents containing ester or a ketone solvents such as paint thinners, Methyl
Ethyl Ketone-(MEK) MEK, acetonitrile, acetone, ethyl acetate be used. Always check
the MSDS sheets. Use polycarbonate friendly cleaner
8
Check
Corrective Action
Weekly
Check overall operation of the fixture:
Do the switch and LED’s operate
properly?
Does the light head stay in position (no
drift) when the arm is moved up and
down or to the sides?
Do all components appear secure (light
head, arm attachment points)?
If the answer to any of these
questions is NO, do not use the
product. Consult with your
maintenance personnel before
operating the light.
Monthly
Check the arm to mount for “wobble.” If it
is loose…
Wall: tighten screws to wall
Annually
Check same items as for weekly and
monthly maintenance, plus inspect the
power cord for external abrasion. Lightly
pull and twist the cord at the inlet strain
relief to test for internal conductor
breakage when the light is energized.
Check electrical connectors for evidence
of overheating (charring, discoloration)
and chafed insulation.
Any flickering is indicative of an
intermittent break, and the cord
should be replaced.
Replace as necessary.

Replacement parts, Symbols and Warnings
2.5 Replacement Parts
Part Number: CI-RP00001 = Handle
Part Number: CI- RP00002 = Switch
Part Number: CI –RP00003 = Fuse T 0.5. Amp L
Part Number: CI –RP00004 = LED Module
Symbols and Warnings
3.1 Symbols
1.1 OThis symbol on the power switch is “OFF.”The rocker switch, when
positioned to the “O”side, turns off power to the light.
1.2 This symbol on the power switch is “ON.”The rocker switch, when
Positioned to the “I”or “II”side, turns on power to the light.
1.3 This symbol references “ground”or “earth”connection.
1.4. This is the international symbol for “alternating current,”i.e. “AC.”
1.5 This symbol refers to “Reference the manual for information.”
3.2 Cautions
3.2.1. Always disconnect the equipment from the mains before starting any repair.
3.2.2. Move the light head up or down by grasping the handle.
3.2.3. Do not force the light head past its stops.
3.3 Warnings
3.3.1. To avoid the risk of electrical shock this equipment must only be connected
to a supply mains with protective earth.
3.3.2. Separable plug must always be accessible.
3.3.3. Failure to properly follow installation and preventative maintenance
Instructions may result in mechanical failure.
3.3.4. No modifications of this equipment is allowed.
3.3.5. Do not use this fixture in the presence of flammable anesthetics or in an oxygen
rich environment.
3.3.6. If EMC or RF interference is shown with this equipment to effect some sensitive
equipment, move the light further away or turn the light off before proceeding.
9

Troubleshooting
Troubleshooting Guide
10
Symptoms
Probable Cause
Remedy
No Light Output
Not plugged in.
Switch not “on”(I or II).
LED failed.
Fuses failed:
Because of internal short.
Because of high mains
Voltage, or high voltage
spikes.
Because of single
Occurrence of lightening
strike.
Break in wiring.
Short or open circuit in
power supply.
Switch failure
Plug into a suitable
hospital-grade grounded
socket.
Turn switch on (I), left or
right.
Replace with new LED
module.
Replace with new fuse(s).
Locate short and fix it.
Put voltage regulator
on line.
Check condition of
transformer and wiring.
Locate and replace wires.
Determine failure mode
and replace transformer.
Replace switch.
Poor (low) Light Output
Loose or corroded
connectors.
Faculty LED module.
Check all connections;
clean/replace as
necessary.
Replace power supply.
Replace LED module.
Light head does not hold
position
Weak arm
Lever not tightened
enough
Worn or missing
components.
Replace arm
Tighten lever as required.
Replace as necessary.

Warranty and Return Policy
Creche Innovations warrants the MicroCool™LED Examination Light to be free from
Defect in materials and workmanship for a period of two years from the date of shipment
to the user. If the product fails to perform in accordance with the product
specifications, Creche will repair or replace, at its option, the defective materials
or parts. Creche will pay customary freight charges from Creche to the customer
location only. This warranty does not cover damage caused by accident, misuse,
abuse, alteration and other defects not related to material or workmanship. To
exercise your rights under this warranty, contact Creche Innovations.
The user/owner must operate the equipment in strict accordance with the most
recent User Manual and any additional training or training materials provided
by Creche designated representatives.
The user/owner of this equipment shall have sole responsibility and liability for
any injury to person or damage to property resulting from: 1) Operation not in
accordance with supplied operating instructions, 2) Maintenance not in accordance
with authorized maintenance instructions, 3) Service by anyone other than a factory
authorized representative, 4) Modification of the equipment or accessories,
5) Use of damaged or unauthorized components and accessories and 6) Improper
installation.
11

17745 Metcalf
Building One
Stilwell, KS 66085
913-948-6290
www.crecheinnovations.com
Other manuals for MicroCool
2
Table of contents
Popular Lighting Equipment manuals by other brands

MESTAR
MESTAR FLEXA 3 installation manual

Luminaire led
Luminaire led CMP Series installation guide

Accessory Power
Accessory Power ENHANCE MoodBRIGHT S user guide

Signal Mate
Signal Mate 3NMMHDKW owner's manual

STERNO HOME
STERNO HOME GL29408 quick start guide

EuroLite
EuroLite LED FE-60 IR Flower Effect user manual