Creda C60THX User manual

60CM T SHAPED COOKER
HOOD
User Manual
V 1.0
MODEL/S
C60THX

User Manual
You’ll soon be enjoying your new CredaCooker Hood!
It all begins here, with your instructions. Don’t worry, there’s nothing
too technical coming up. Just simple, step-by-step guidance to get you
up and running quickly. Sound good? Then let’s get started.
Help and Guidance
We’re here to help you get the most from your Cooker Hood. Should you require any guidance, a simple
solution can often be found online at:
www.creda.co.uk
If you still require further assistance, call one of our experts on 01759 487836.
If you require any technical guidance or find that your product is not operating as intended, a simple solution
can often be found in the Troubleshooting section of these instructions, or online at www.creda.co.uk If you
still require further assistance, call one of our experts on 01759 487836.

3
Contents
PAGE
4
5
5
6
7
9
10
10
11
12
—
SAFETY INTRODUCTIONS
INTRODUCTION AND TECHNICAL DRAWING OF
THE CHIMNEY HOOD
INSTALLATION OF CHIMNEY HOOD
MOUNTING THE CHIMNEY HOOD ON THE WALL
FUNCTIONS OF THE CHIMNEY HOOD
OPERATING THE CHIMNEY HOOD
REPLACING THE BULB
MAINTENANCE OF THE CHIMNEY HOOD
TROUBLE SHHOTING GUIDE
HELP AND ASSISTANCE

4
INSTRUCTION
MANUAL
SAFETY INSTRUCTIONS
IMPORTANT SAFETY INSTRUCTIONS READ CAREFULLY AND KEEP FOR
FUTURE REFERENCE
•This product is designed for domestic use.
•Product Voltage is 220-240 Volts 50Hz.
•Power cord of your product is fitted with grounded plug. This cord must be plugged into a grounding socket.
•All electrical installation must be done by a qualified electrician.
•Installation by unqualified persons may lead the product run with lower performance, be damaged or cause
accidents.
•Power supply cord should not be jammed or crushed. Power cord should not be close to hobs, etc, otherwise it
may melt and cause fire.
•Do not plug in the product into a socket before the installation is complete.
•Make sure the mains switch is easily accessible in order to cut the power of the product in case of any danger.
•Do not touch the bulbs of your product if used for a long period of time. The bulbs will be hot and may burn
your hand.
•Kitchen chimneys are designed for domestic use. If used for other purposes, it may lead to a failure and not be
covered under the warranty.
•Follow the authorized agencies' rules and regulations regarding letting out the air. (This warning does not apply
to usage with non-ducted chimney hoods.)
•Food that may burst into flames should not be cooked under the device.
•Turn on the product after you place pots, pans, etc on the hobs. Otherwise, excess heat may cause
deformation of some parts of your product.
•Do not leave hot oil on the hobs. Pans with hot oil inside may cause self-ignition.
•When cooking i.e. deep frying, hot oil may burst into flames. Be careful on your curtains and cloths.
•Make sure you replace the filters at the recommended intervals. Filters not replaced on time carry fire risk due
to increase of grease on them.
•Do not use non-fire-resistant materials instead of filters.
•Keep the potentially dangerous packaging materials away from children.
•Do not use your product without a filter, do not remove filters when the product is operating.
•In case of start of flames, cut off the power of the chimney fan and cooker. (Cut off the power by unplugging the
device).
•Turn off the hobs before you remove pots, pans, etc.
•If the cleaning is not done periodically, your product may carry fire risk.
•Cut off the power supply before any maintenance work. (Cut off the power by unplugging the device.)
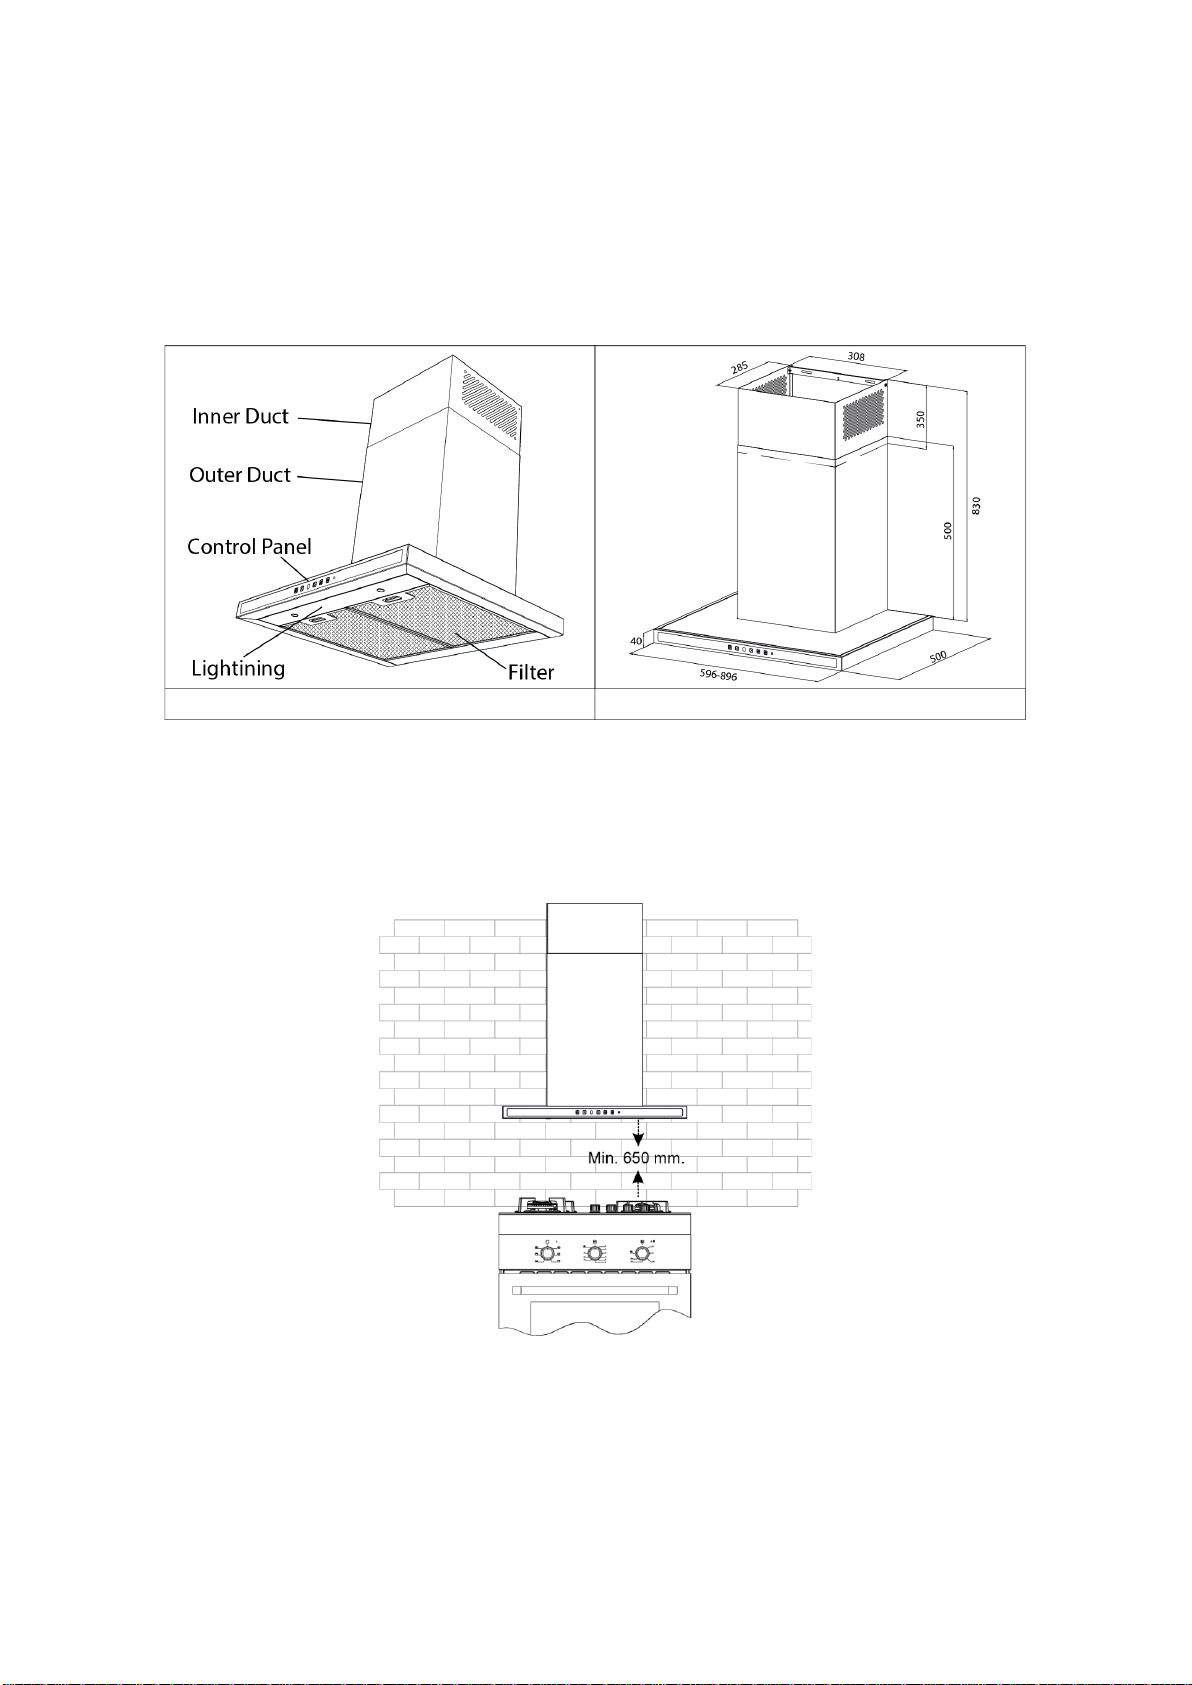
•For duct-out chimney hoods, use pipes with a diameter of 150mm or 120mm. You should minimize the ducting
distance with minimum bends.
•Make sure your children do not play with the product. Do not let young children operate the product.
•If the power cord is damaged, the damaged cord should be replaced by the manufacturer or its service agent
or similarly specialized personnel in order to avoid a dangerous situation.
•In case of start of flames, cut off the power of the chimney fan and cooker and cover the flame. Do not use
water to extinguish the fire.
Install "MAX 6 A" fuse for the extractor fan.

5
INSTRUCTION
MANUAL
INTRODUCTION AND TECHNICAL
DRAWING OF THE CHIMNEY HOOD
Location of the Chimney Hood
INSTALLATION OF CHIMNEY HOOD
LOCATION OF THE CHIMNEY HOOD
Fix the 2 (two) Mounting brackets among the installation accessories to the chimney hood with one 1 screw nut as
shown in Figure 1. Make sure mounting brackets are inserted in motor box.

6
INSTRUCTION
MANUAL
Installation of Wall Mounting Bracket
3 drywall (8mm) anchors are nailed into the holes drilled according to installation template (A,B,C). They are fixed
into the wall with 2 brackets as shown in Figure 2.
Installation of Inner Duct Mounting Bracket
2 fixing holes are drilled on the wall with Ø6mm electric drill at a suitable height and place to fix the inner duct
hanger plate onto the wall. 6mm drywall anchors are nailed into those holes and inner duct mounting brackets are
pinned down.
At the last step of chimney hood installation, the inner duct is screwed on the inner duct mounting brackets.
MOUNTING THE CHIMNEY HOOD ON THE
WALL
Lift the chimney hood body and fix the hanger plates onto the wall anchors as shown in Figure 3.
Leveling the Chimney Hood
If the chimney hood is inclined on one side, the chimney hood can be leveled with the adjustment screws as shown
in Figure 4.
Once the balancing is complete, the screws shown in Figure 5 must be fixed tightly.
After this, fix the body with one screw through the hole on the body.

7
INSTRUCTION
MANUAL
Mounting the Aluminum Pipe
Place the aluminum pipe on the plastic duct. Place the other end of the pipe into the air outlet in the kitchen.
Figure 6
Twists and bends on the aluminum pipe may cause minimizing the air suction so avoid unnecessary bends and
twists as much as possible.
Place the inner duct and outer duct carefully on the product. Fix the inner duct to inner duct connection plate with 2
screws. (Figure 9)
FUNCTIONS OF THE CHIMNEY HOOD
CONTROL PANEL
•Touch Control: Touch the symbols on the glass surface. If you press a symbol longer (more 3 sec) may operate
various functions.
•Digital Control: touch the symbols on the keys. (On/Off function and timer are on the same key; if pressed for 1
sec on-off function will operate. If pressed for 3 sec. 15 minutes timer will operate.

8
INSTRUCTION
MANUAL
SYMBOLS FUNCTIONS
Note: When the product operates for a certain time, the aluminum filters get dirty and the digital display shows "C"
Clean sign. This means the filters should be cleaned. Press the speed reduction key for 5 secs in order to delete
"C" sign from the display.
•Push Button: Pressing the buttons will enable different functions. In order to disable them, press only the button
OFF
SYMBOLS FUNCTIONS
Push Pull: If the button is in its hole. It means that lighting system is turned off. When you push on the button, the
button comes out and it means that lighting system is turned on. While the button is position of “0", motor doesn’t
work. If you turn to button clockwise, motor speed increases. If you turn to button anti clockwise, motor speed
decreases.
•Switches on and off the motor. (Except for the lighting)
•Decreases the speed when the motor is running.
•Display
•Increases the speed when the motor is running.
•If pressed this symbol, the motor turns itself off 15 minutes later.
•Only switches on and off the lighting system.
•Stops the motor, except for the lighting system.
•Low speed
•Medium speed
•Intense speed
•It turns on and off the lighting system only.

9
INSTRUCTION
MANUAL
OPERATING THE CHIMNEY HOOD
Chimney hood is used in ducted and non-ducted kitchens.
In ducted use;
In ducted use, extractor fan should be connected to an air outlet to send the air out. To use your chimney hood
efficiently, make sure length of the pipe system between the chimney hood and the air outlet should be short. Your
product has been manufactured suitable for ducted and non-ducted use.
Round Charcoal Filter
In kitchens with no duct, a round charcoal filter should be reintroduced the clean air into the kitchen. You can obtain
the round filter from your service or dealer.
Use of Charcoal Filter
•Our products allow the installation of charcoal filter
•Regardless of use of charcoal filters or not, grease filters should be installed on the product. Do not use your
product without grease filter.
•Use of charcoal filter is as follows.
•Cut off the device power before replacing charcoal filter.
•Charcoal filter is used in the kitchens with no duct therefore should be replaced in every 3-5 months depending
on the frequency of use.
•Charcoal filter should never be washed.
•
Installation of Charcoal Filter
•Charcoal filters are used in the kitchens with no duct.
•Charcoal filters are installed onto both sides of the fan as shown in Figure 10 by turning 10 degrees clock-
wise.
•When uninstalling, reverse the same procedure. Use Of Aluminum Cartridge Filter
Aluminum cartridge filter holds dust and grease in the air. Chimney hood should never be used without aluminum
cartridge filter. (Figure 11)

10
INSTRUCTION
MANUAL
REPLACING THE BULB
Always switch off the electrical supply before carrying out any operation.
LED
•LED bulb does not operate is possible to remove as shown in Figure 12
•A new bulb to be supplied from service points is replaced with the same reoperation.
•Cables are designed with sockets. The plug in should be made according to previous connection.
Candle Type Halogen Bulb
•Bulb does not operate is possible to remove as shown in.
•A new bulb with the same features is replaced with removed bulb.
Note: Remove the holder on the LED bulb. Put the new LED bulb on the holder housing of the LED bulb you
removed as shown in Figure 13.
MAINTENANCE OF THE CHIMNEY HOOD
•Device should be unplugged or switch should be turned off before cleaning and maintenance procedures.
•Metal filter should be cleaned once a month with hot soapy water or in the dishwasher, if possible. (60 °C)
•Remove the aluminum cartridge filter by pressing on the spring catches on the side. Do not refit before
drying after wash.
•Outer surface of the extractor hood should be wiped with a damp cloth soaked with soapy water.
•Make sure electronic parts do not contact with water or similar materials.
•For inox products, using inox cleaning and maintenance products available in the market will provide longer
usage life for your device.
•Aluminum filters can be washed in dishwasher. After several washes, aluminum filters may change colour.
This is normal and filters do not need to be replaced.
WARNING When used with devices which use fuel (heaters working with gas, diesel fuel, coal or firewood, water
heaters, etc) and the air in the environment; should be used cautiously. The chimney hood sending the air out in
the environment may affect the burning adversely.
•This warning is not applicable to non-ducted use.
Efficient use of Chimney Hood
•When installing the chimney hood to the air duct, use 150/120 mm diameter pipes and use bends as minimum
as possible.
•Be ware of cleaning periods of metal filters and replacing times of charcoal filters.
•When dense suction power is not required, use the product in medium setting.
•For right ventilation, the windows in the kitchen leading to the outside should be kept closed.

11
INSTRUCTION
MANUAL
TROUBLE SHOOTING GUIDE
Before contacting the service, make sure the product is plugged and the fuse in the electrical installation is working.
Do not do anything that may harm the product.
When you contact your service or dealer to ask for any spare parts, notify them of product model name shown in
the product label. When you remove the aluminum cartridge filter, you will see the product label.
Before contacting your service provider, check your chimney hood against the table below. If problem persists,
contact your authorised service provider.
Check electricity connection (mains voltage
should be 220-240 V, Chimney hood should
be connected to grounding socket.)
Check motor switch (Motorswitchshould be
on.)
Check bulb switch (Bulb switch should be
on.)
Check aluminum filter (Aluminum cartridge
filtershould be washed once a month in
normal use.)
Check bulbs (Bulbs should be inworking
condition.)
Check air outlet shaft (Air outlet shaft should
be unblocked.)
Check charcoal filter (Charcoal filters should
bereplaced quarterly in normal use.)
Chimney Hood does not
work
X
X
Light bulb is not
working
X
X
X
Chimney hoodair suction is
poor
X
X
X
Donotsendairout(in non-
ductedcases)
X
X

12
INSTRUCTION
MANUAL
Help and Assistance
If you require any technical guidance or find that your Freestanding Cooker is not operating as intended,
a simple solution can often be found in the Troubleshooting section of these instructions or online at
www.creda.co.uk
Ifyou still require further assistance, call one of our experts on01759 487836.Tohelp give us give you a
fast and efficient service please have the following information ready:
You can find the following on the rating plate - a small information panel (usually a sticker or metal
plate) on the rear of your appliance.
Model Ref.
__________________________________________________________________
Serial Number
__________________________________________________________________
Date of Purchase (this will be on your receipt)
__________________________________________________________________
Local call rates apply*
Lines open 9am-5:30pm Monday to Friday
*Calls to Creda enquiry lines may attract a charge and set up fee from residential lines depending on your call plan/tariff.
Mobile and other providers costs may vary, see www.bt.com/pricing for details.
For Security and training purposes, telephone calls to and from customer service centres maybe recorded and monitored. Calls
from Republic of Ireland will attract international call charges.

13
INSTRUCTION
MANUAL
Call us now and activate your 3 years guarantee
Thank you for choosing Creda. Your new product is guaranteed against faults and
breakdowns for 3 years. Don’t forget to register it with us today so we can provide you
with our best possible after-sales service and useful updates.
www.creda.co.uk
01759 487836
Your Creda Guarantee
This product is guaranteed for 3 years from the date of original purchase. Any defect that arises due to faulty
materials or workmanship will be repaired free of charge (or if applicable the product will be replaced or the
purchase price refunded) where possible during this period by the dealer from who you purchased the unit.
The guarantee is subject to the following provisions:
•The guarantee does not cover accidental damage, misuse, cabinet parts, knobs or consumable
items.
•The product must be correctly installed and operated in accordance with the instructions contained in
the manual.
•It must be used solely for domestic purposes. The guarantee will be rendered invalid if the product is
re-sold or has been damaged by inexpert repair.
•Specifications are subject to change without notice.
•Creda disclaim any liability for loss or damage arising from the breakdown of the product.
•This guarantee is in addition to and does not diminish your statutory or legal rights.
Important Data Protection Information
To find out how we use your data please refer to the guarantee registration material or visit
www.creda.co.uk

14
INSTRUCTION
MANUAL
Declaration of conformance to product standards
This appliance conforms to all relevant standards applicable to domestic appliances sold in the UK.
Disposal
This appliance/fitting is marked according to the European directive 2012/19/EU on Waste Electrical
and Electronic Equipment (WEEE).
By ensuring this product is disposed of correctly, you will help prevent potential negative
consequences for the environment and human health, which could otherwise be caused by
inappropriate waste handling of this product.
The symbol on the product, or on the documents accompanying the product, the crossed out wheelie
bin symbol, indicates that this appliance/fitting may not be treated as household waste. Instead, it
shall be handed over to the applicable collection point for the recycling of electrical and electronic
equipment.
Disposal must be carried out in accordance with local environmental regulations for waste disposal.
For more detailed information about treatment, recovery and recycling of this product, please contact
your local authority, your household waste disposal service or the retailer where you purchased the
product.
Table of contents
Other Creda Ventilation Hood manuals