Crestline Motiv3 Extensive User manual
2 3
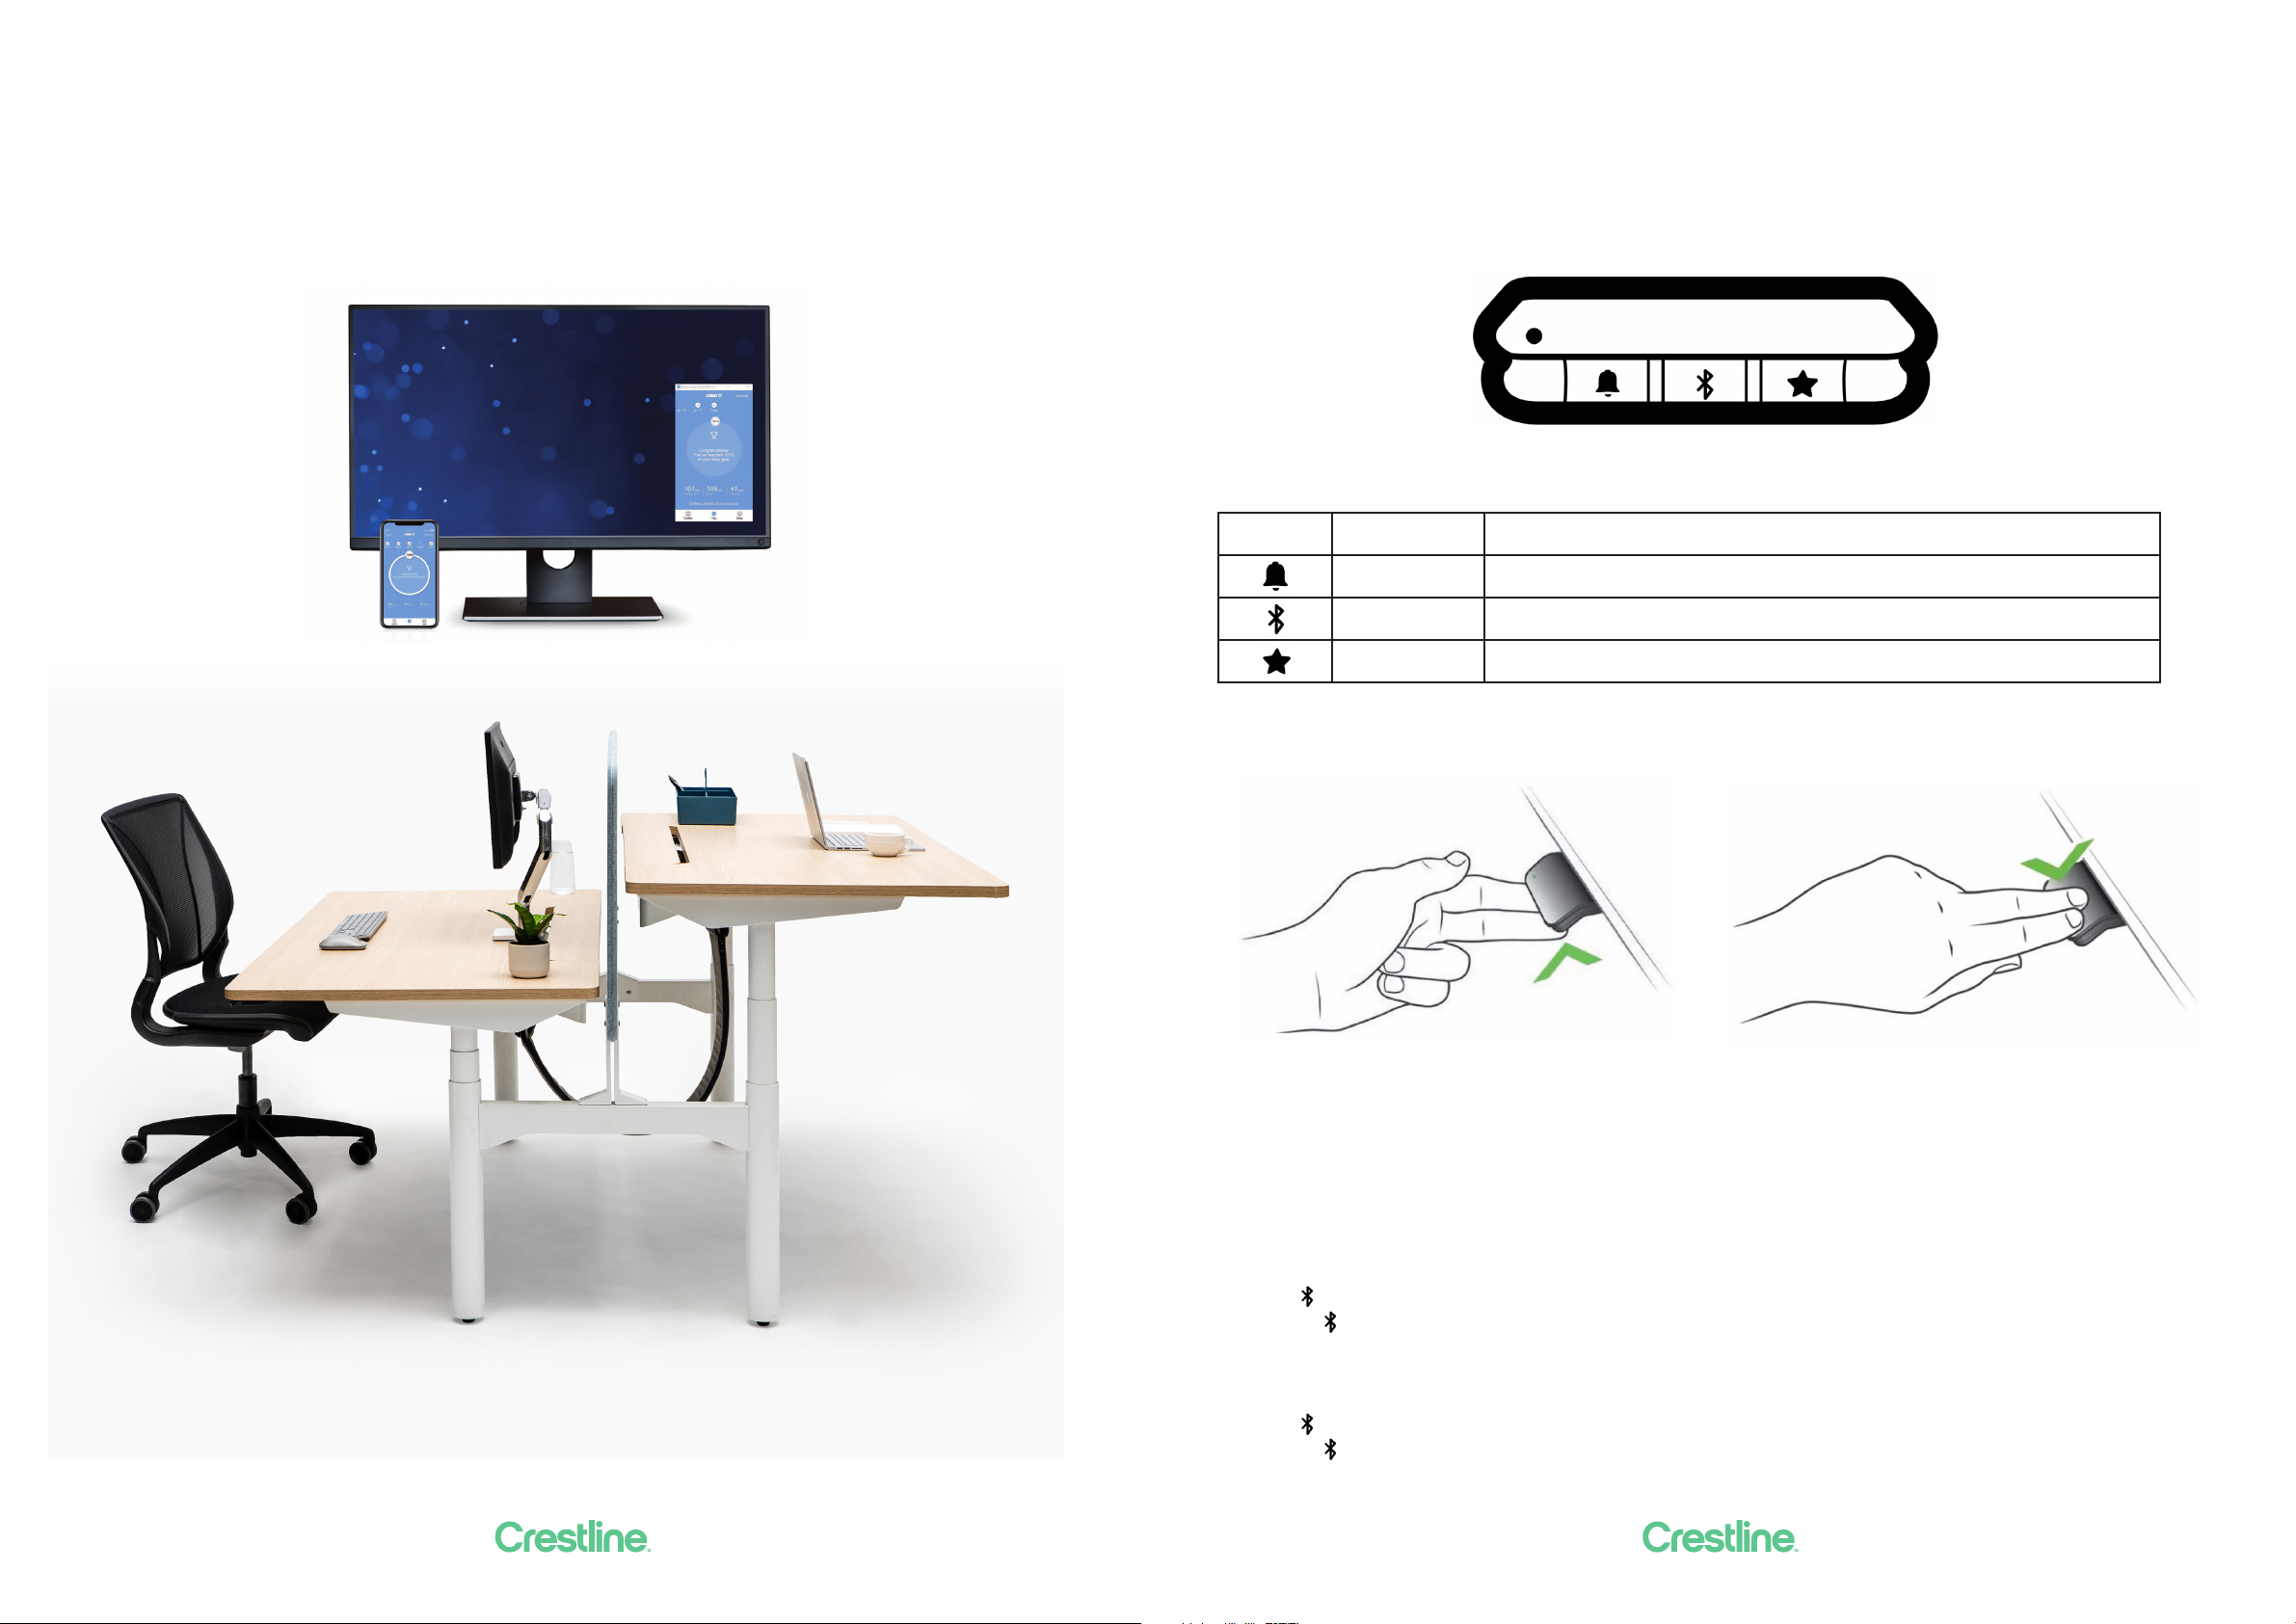
Motiv3 Extensive User Manual. Controls & Connectivity.
DPG1M Controller Panel
The DPG1M has three operation buttons.
Figure 7: DPG1M operation buttons
Each button has a speciic function:
Symbol Description Function
Reminder Setting reminders
Bluetooth Connecting the Desk Control App via Bluetooth wireless techology
Favourite Saving favourite positions
Operate the desk panel by tilting it.
1. Tilt and hold up DPG1M to drive desk up, press and hold down DPG1M to drive desk down.
2. Release DPG1M when you have reached your requested position.
Figure 8: Tilt and hold the DPG1M to drive the desk up Figure 9: Press and hold the DPG1M to drive he desk down
Desk height limits
In case the desk cannot be operated in its entire span (e.g. a shelf is blocking the upwards movement or
a iling cabinet is placed under the desk and blocking the downwards movement), it is possible to set an
upper limit and a lower limit for the desk height.
Setting upper limit
1. Adjust desk to maximum allowable height.
2. Press and tilt DPG1M up at the same time until light lashes.
3. Release and DPG1M.
Setting lower limit
1. Adjust desk to minimum allowable height.
2. Press and press DPG1M down at the same time until light lashes.
3. Release and DPG1M.

4 5
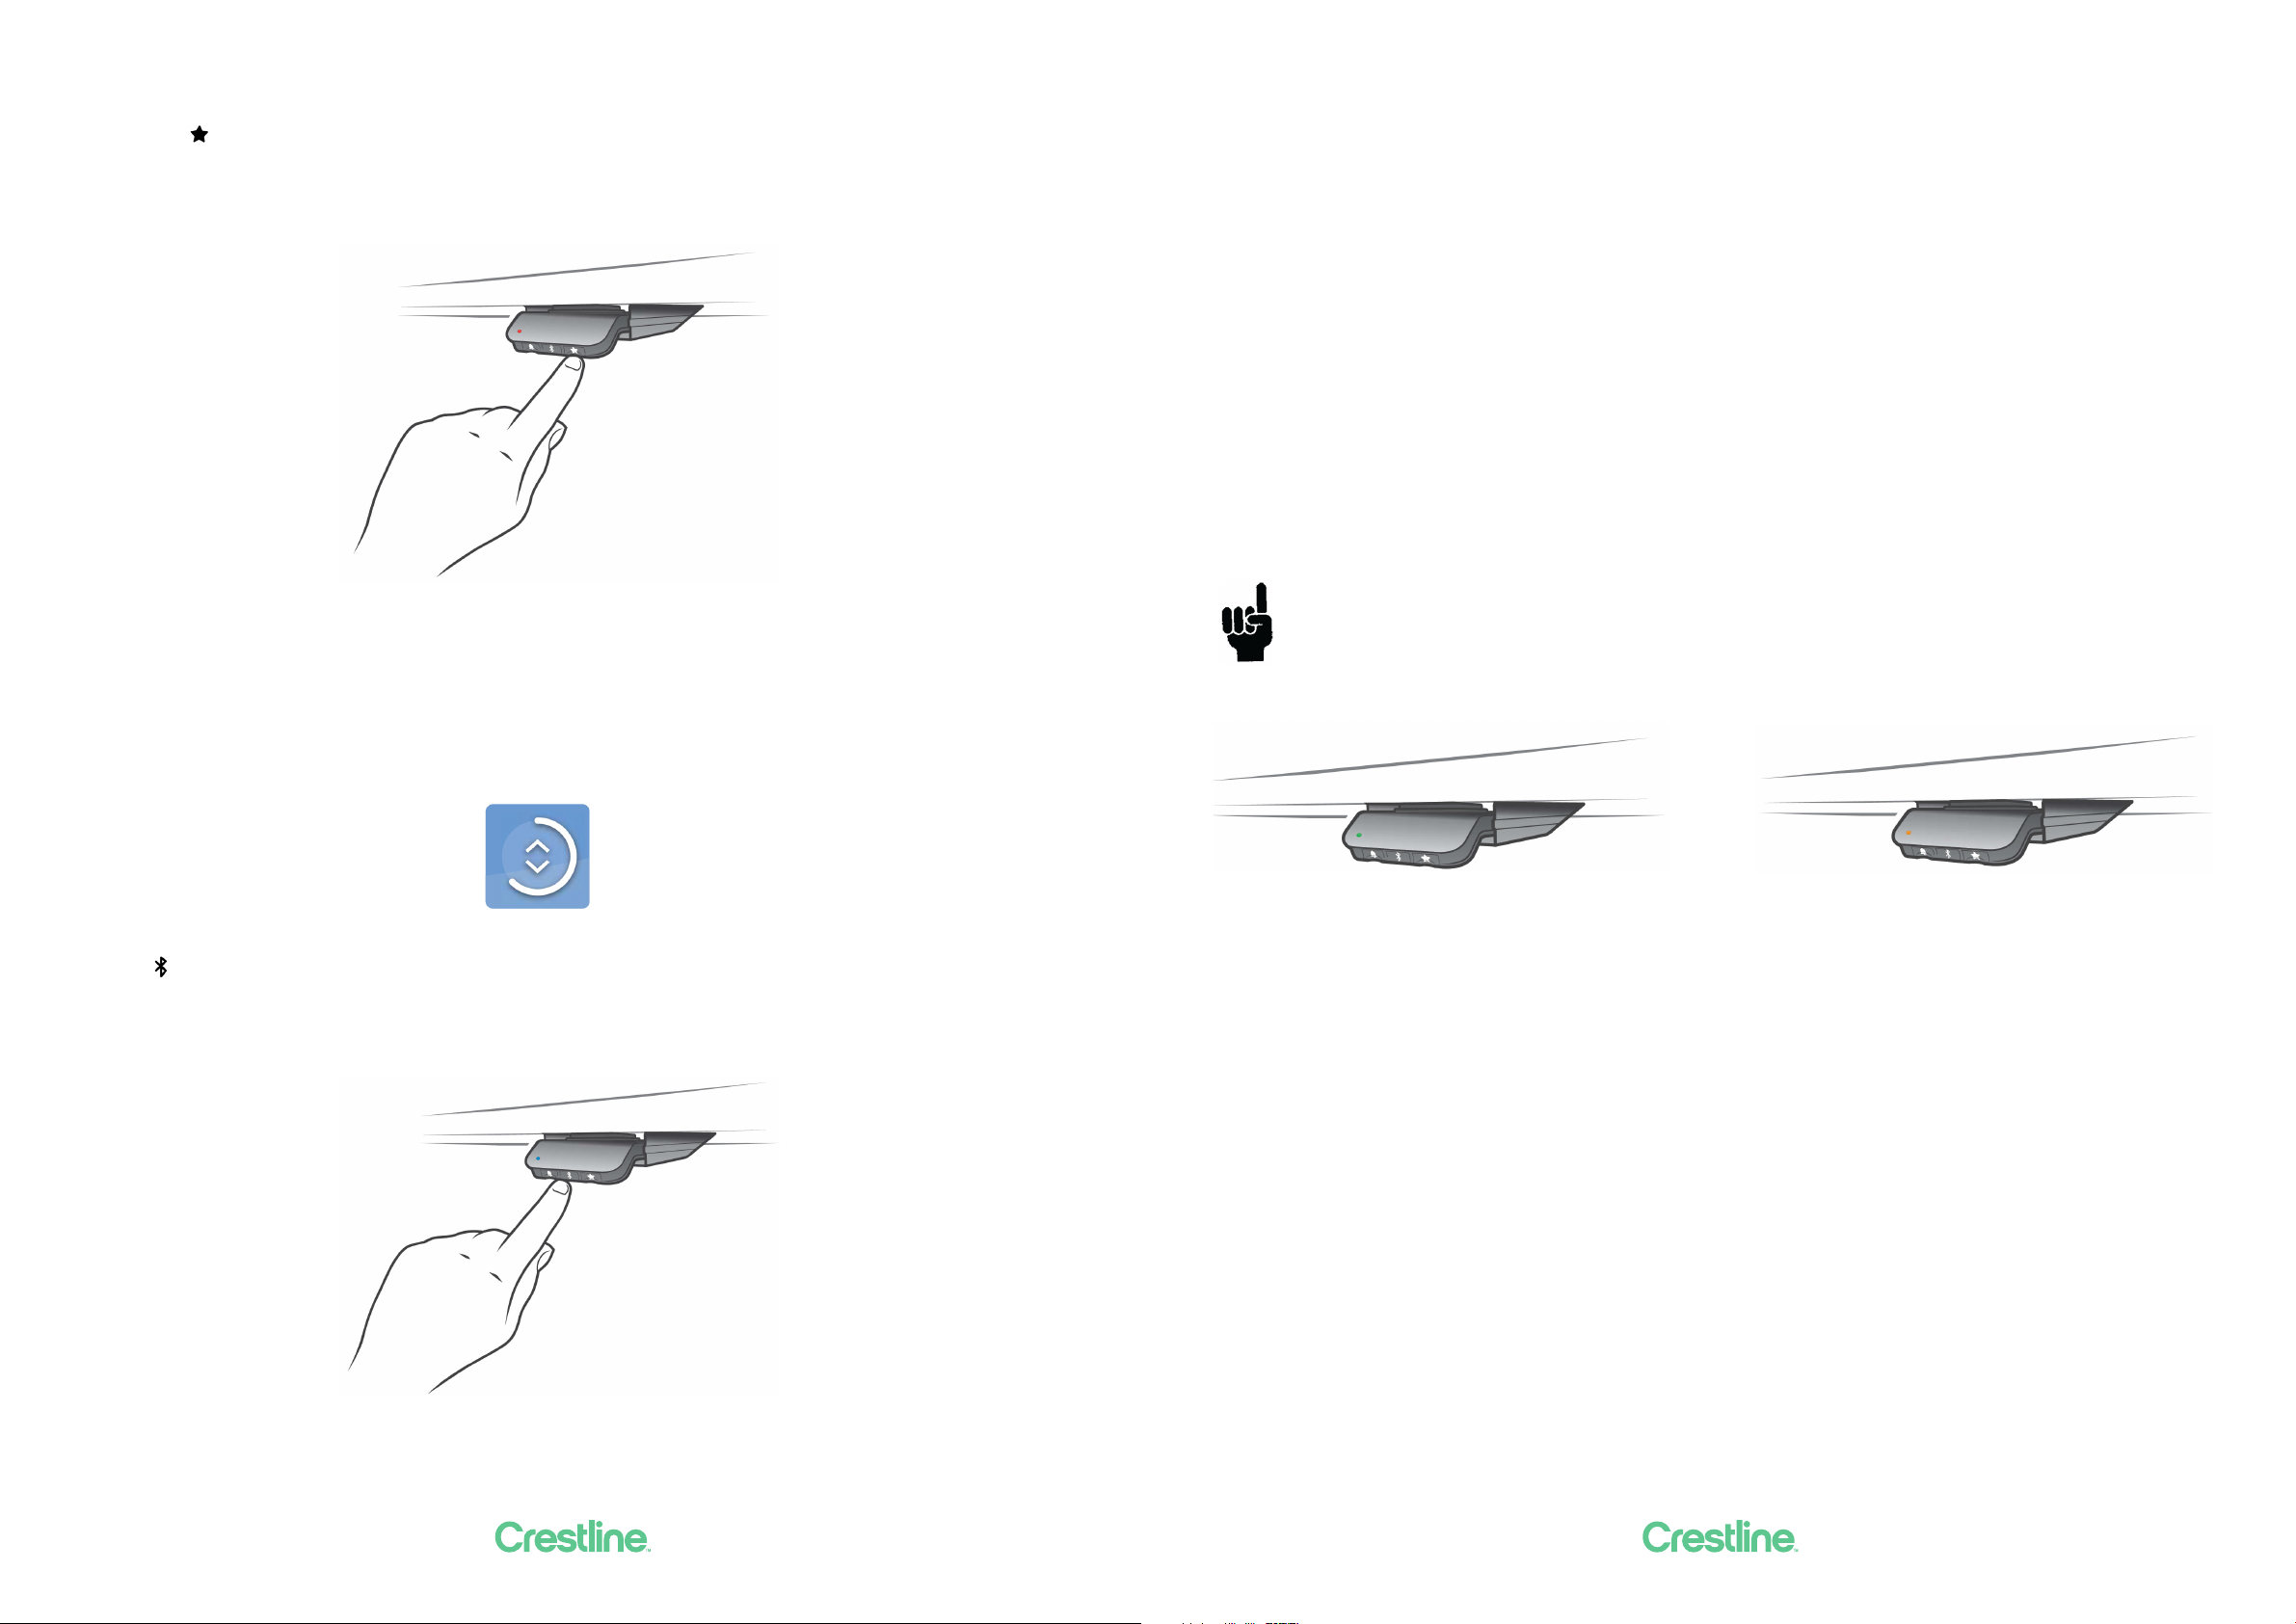
Favourite positions
Saving favourite positions
1. Adjust desk to a preferred position.
2. Press button for two seconds.
Figure 10: Saving favourite positions
The LED lashes white two times to indicate that saving the position is in progress. Not until the LED
becomes static white, has the position been saved.
If the user adjusts the desk to another position and saves this position, it will overwrite the favourite
position closest to the current position.
Driving to favourite positions
After saving the favourite positions, the user can reach the positions simply by tilting/pressing the DPG1M.
1. Tilt/press and hold - when a saved position has been reached, the desk stops.
2. Release DPG1M within one second.
This way the user can easily change between sitting and standing height without looking at the DPG1M in
the meantime.
When the desk stops at a favourite position the user can,
• continue to til/press the DPG1M for one second
or
• release the DPG1M and immediately tilt/press it again.
The desk will move past the favourite position and continue its movement.
Figure 11: Tilt/press to drive desk
Automatic driving to favourite positions
(Only possible for “Full version” with “Automativ drive” enabled in the app)
1. Double-tap DPG1M to let desk adjust automatically to irst position in direction of double-tap.
2. Simply tap DPG1M once to stop driving of desk between two favourite positions.
Figure 12: Double-tap to automatically adjust the desk to a favourite position
6 7
Erasing favourites
1. Press the button for eight seconds to erage all saved favourite positions.
The LED lashes red when all the favourite positions are erased.
Figure 13: Erase favourite positions
Connecting Bluetooth®
1. The apps are called “Desk ControlTM and they have the following app logo in
iTunes and Apple App store, Google Play store, and Microsoft Store:
2. Press button in the middle for two seconds to enable pairing mode.
The LED lashes blue while the desk panel is in pairing mode.
Figure 14: Connect Bluetooth®
Reminder
The reminder LED is placed in the lower left corner of the DPG1M. The LED is intended to indicate the
position of the desk (sitting or standing height). The indication depends on the reminder interval chosen.
While the user is sitting for an appropriate amount of time according to the set interval, the LED calmly
pulsates green. When the sitting interval runs out, the calm pulsating green turns into fast pulsating
orange for one minute hereafter into static orange to indicate that the user should adjust the desk to
standing height. In standing height, the LED pulsated green until a potential timeout. When the desk is
adjusted back to sitting height, the LED pulsates green until the reminder goes o again.
Reminder restart
The reminder automatically restarts when the desk is lowered to sitting height.
Reminder timeout
After four hours without any action, the LED will time out. When the DPG1M is tilted, the green light turns
back on.
When the LED is enabled for reminders, the DPG1M is no longer in ZEROTM mode as long as the
light is on/active.
Figure 15: Pulsating green LED indicates no need to
drive desk up
Figure 16: Pulsating orange LED indicates that the user needs
to drive his/her desk up

8 9
Reminder intervals
The LED lights up in three dierent intensities each representing an interval.
The three standard intervals are:
- Interval 1: Reminder after 55 minutes sitting
- interval 2: Reminder after 50 minutes sitting
- interval 3: Reminder after 45 minutes sitting
The default interval is reminding after 55 minutes, which means the LED lights up in the weakest intensity.
Adjusting the reminder interval
1. Press button to adjust interval of getting reminded to change position.
2. Toggle through intervals by pressing button.
When the LED is not lit, the reminder is turned o.
Through the app, it is possible to personalise the three intervals to custom values.
Setting reminder interval Reminder o
Figure 17: Set the reminder
Resetting the reminder
Press symbol for eight seconds to reset reminder to default values.
The LED lashes red when the reminder is reset.
Figure 18: Reset reminder
Key lock
The operation of the DPG1M can be locked to prevent unintended driving of the desk. As default the key
lock is disabled. If enabled, it automatically locks the DPG1M after a conigured amount of time. The key
lock function can also be conigured to indicate attempt to operate the locked DPG1M by showing a red
light.
Unlocking DPG1M
Press , and in sequence (max. one second between each button press).
Factory reset
Press and hold the and buttons for eight seconds to set the DPG1M to factory default. The LED/light
strip lashes red three times to indicate the reset is done. If a factory reset is performed, it sets the DPG1M
back to the conigured state, i.e. all conigurations made in the DPG1M conigurator will not be reset - only
the setting changed directly on the DPG1M or in the app by the end users will be reset.
Figure 43: Reset to factory default
10 11
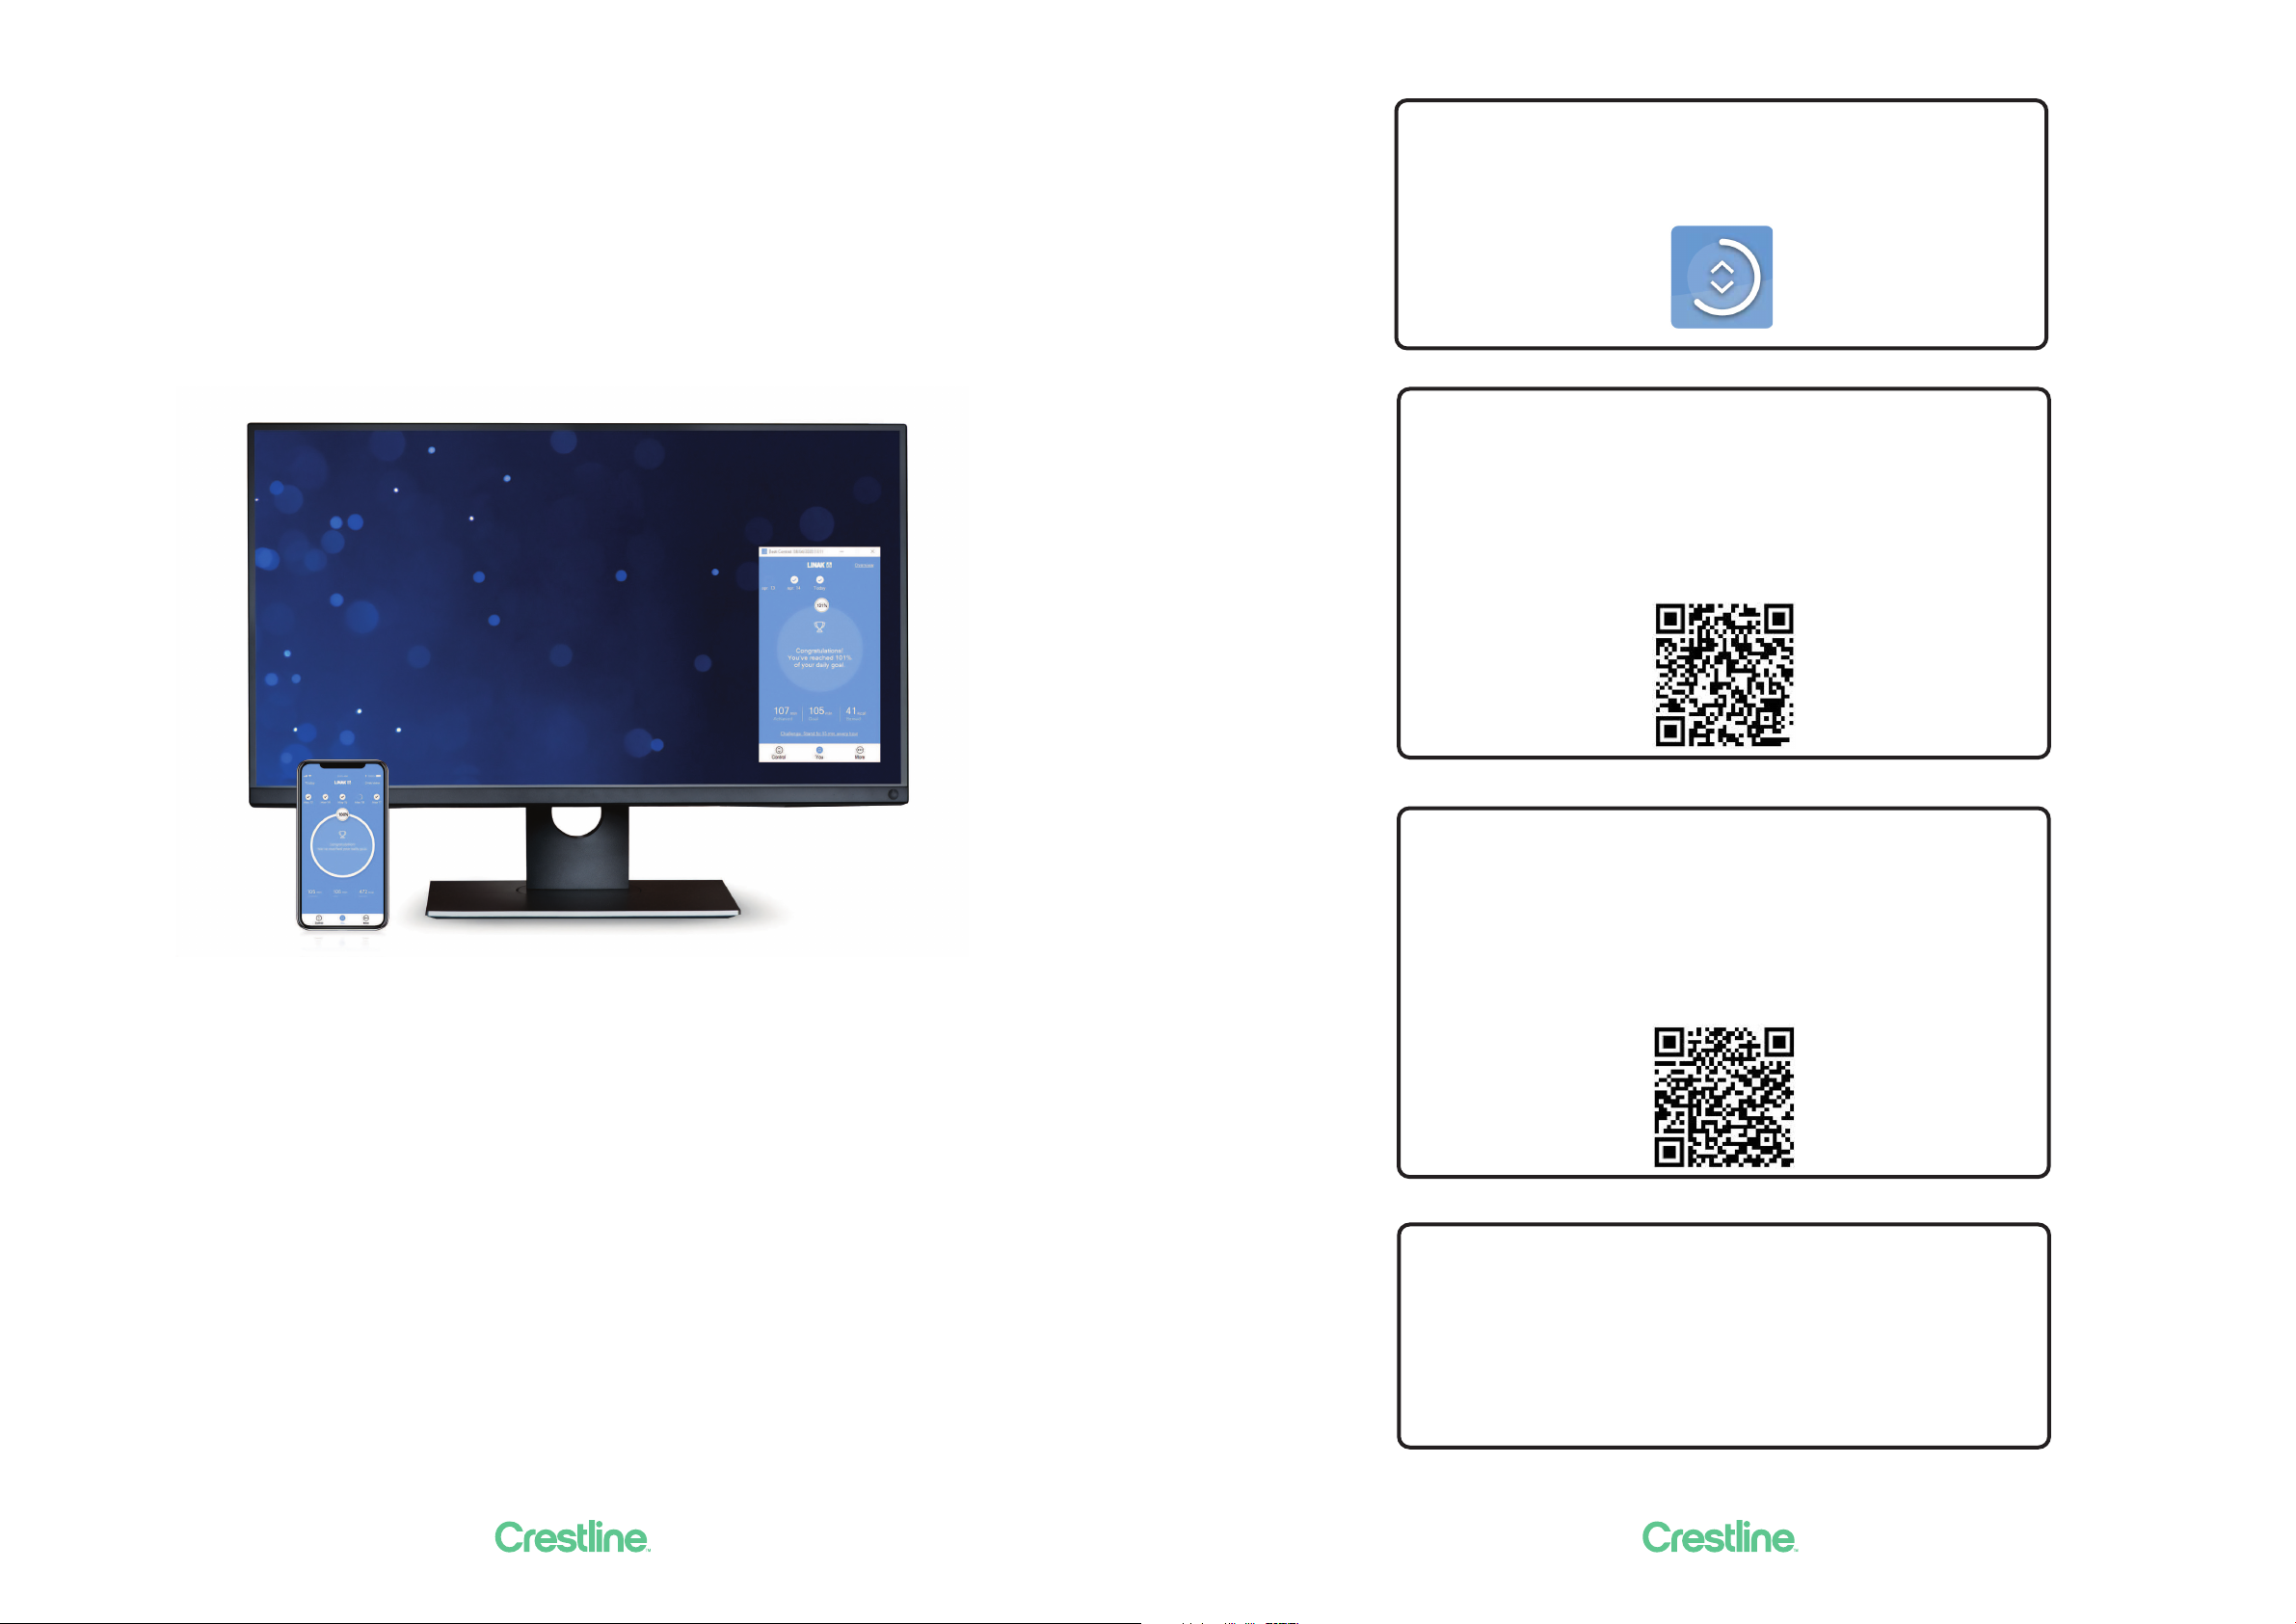
Desk ControlTM App
The Desk Control™ App is developed for users of sit-stand desks, who want to come one step closer to
changing the prolonged sitting behaviour. Friendly reminders urge you to change position and extensive
statistics show you your daily achievements - all to help you build a healthy routine during the workday. Via
the app the desk can also be adjusted, and the user can drive to pre-stored memory positions.
The app is available for three dierent platforms: iOS for iPhones and iPads, Android for Android
smartphones and tablets, and a desktop version for Windows 10. The Desk Control™ app comes in multiple
languages, which can be selected in the app.
The app is connected to the desk via Bluetooth® wireless
technology integrated in the LINAK® DPG1M Desk Panel.
Downloading apps
The apps are called “Desk Control™” and they have the following
app logo in iTunes and Apple App store, Google Play store, and
Microsoft Store:
How to download the App for iOS:
Step 1: Use your iPhone or iPad to log into Apple App store
Step 2: Type “Desk Control” in the search column
Step 3: Select the “Desk Control” app
Step 4: Click install to download the app to your device
You can also scan this QR code to reach the Apple App Store:
How to download the App for Android:
Step 1: Use your Android device to log into Google Play Store
Step 2: Type “Desk Control” in the search column
Step 3: Select the “Desk Control” app
Step 4: Click install to download the app to your device
You can also scan this QR code to reach the Google Play Store:
How to download the App for Windows:
Step 1: Click on the Windows icon on your computer and go to
Microsoft Store
Step 2: Type “Desk Control” in the search ield
Step 3: Select the “Desk Control” app
Step 4: Click “Get” to download the app to your computer
12 13
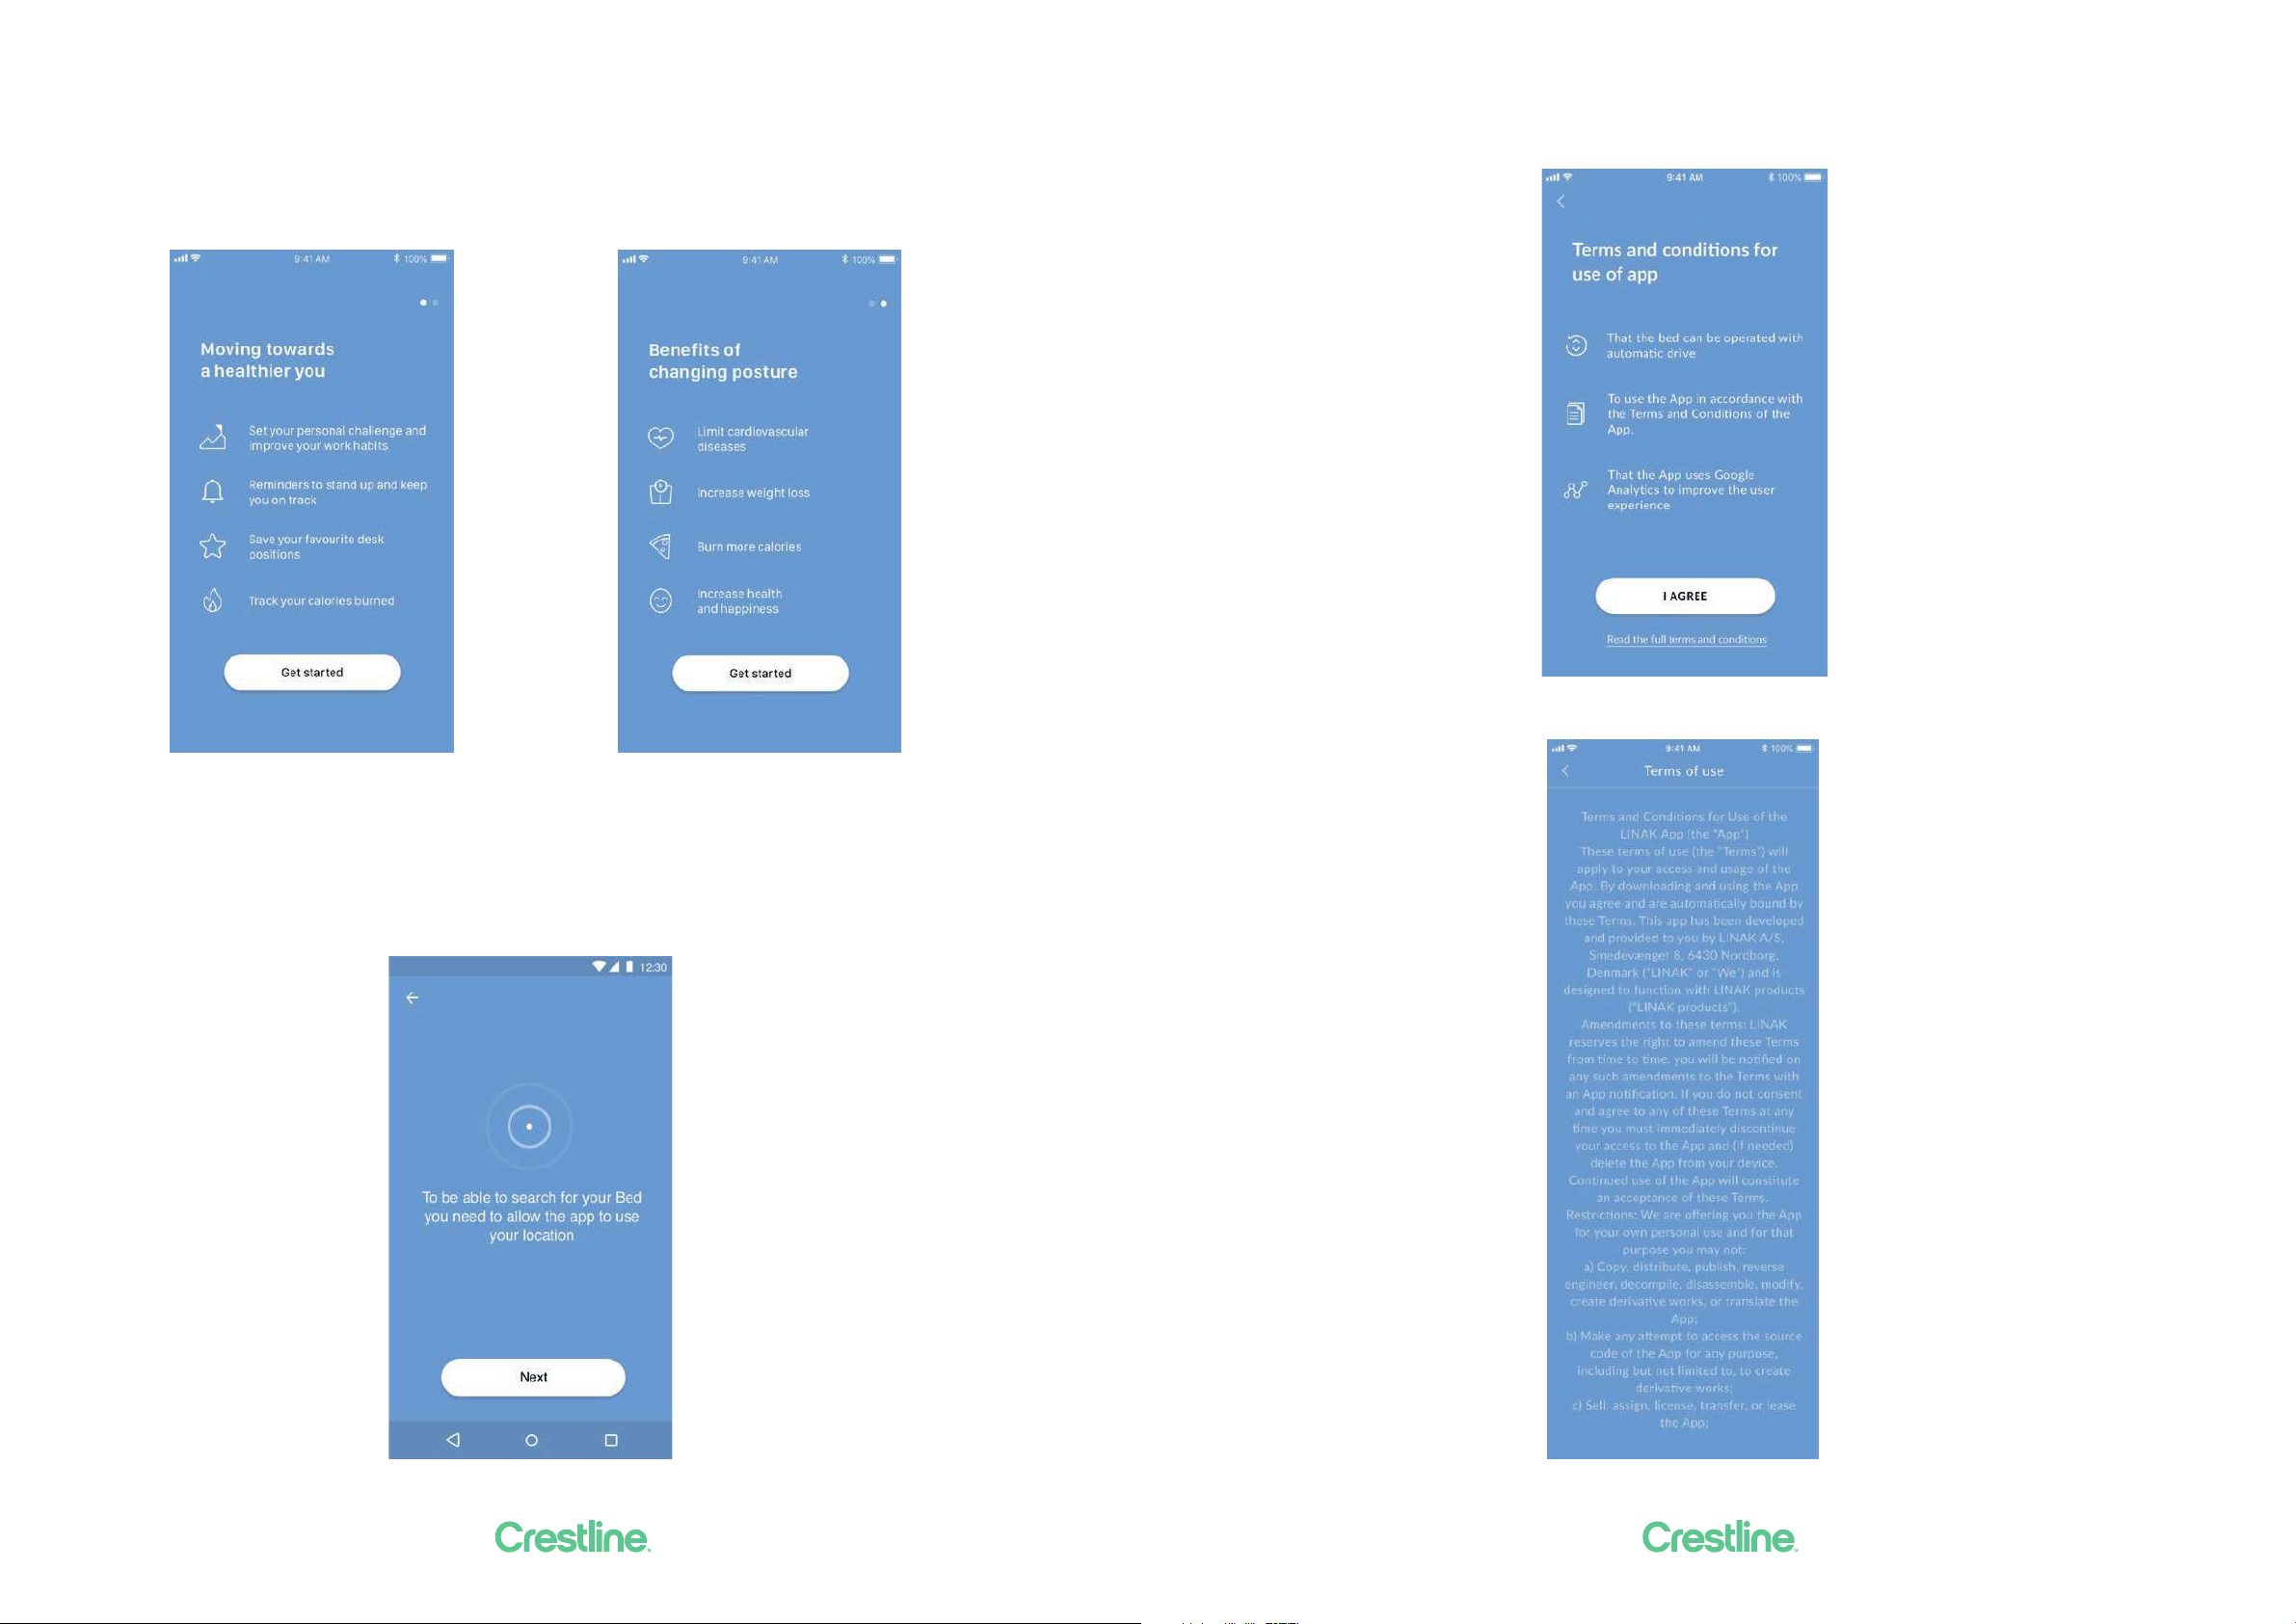
Getting started
When you open the app, a list of options available in the app is displayed. If you swipe to the left on your
smart device or click on the white dot with your mouse, a list of beneits of changing posture during the
day displays.
Press/click “Get started” on either screen.
For Android only:
Enable GPS location to allow the app to scan for Bluetooth® devices. If not done, the app will not be able
to detect desks nearby in pairing mode and thus not work.
Terms and Conditions
Before you can start using the app, you need to agree to the Terms and Conditions for use of the app.
Press “Read the full terms and conditions” to read the terms before pressing “I AGREE”.
14 15
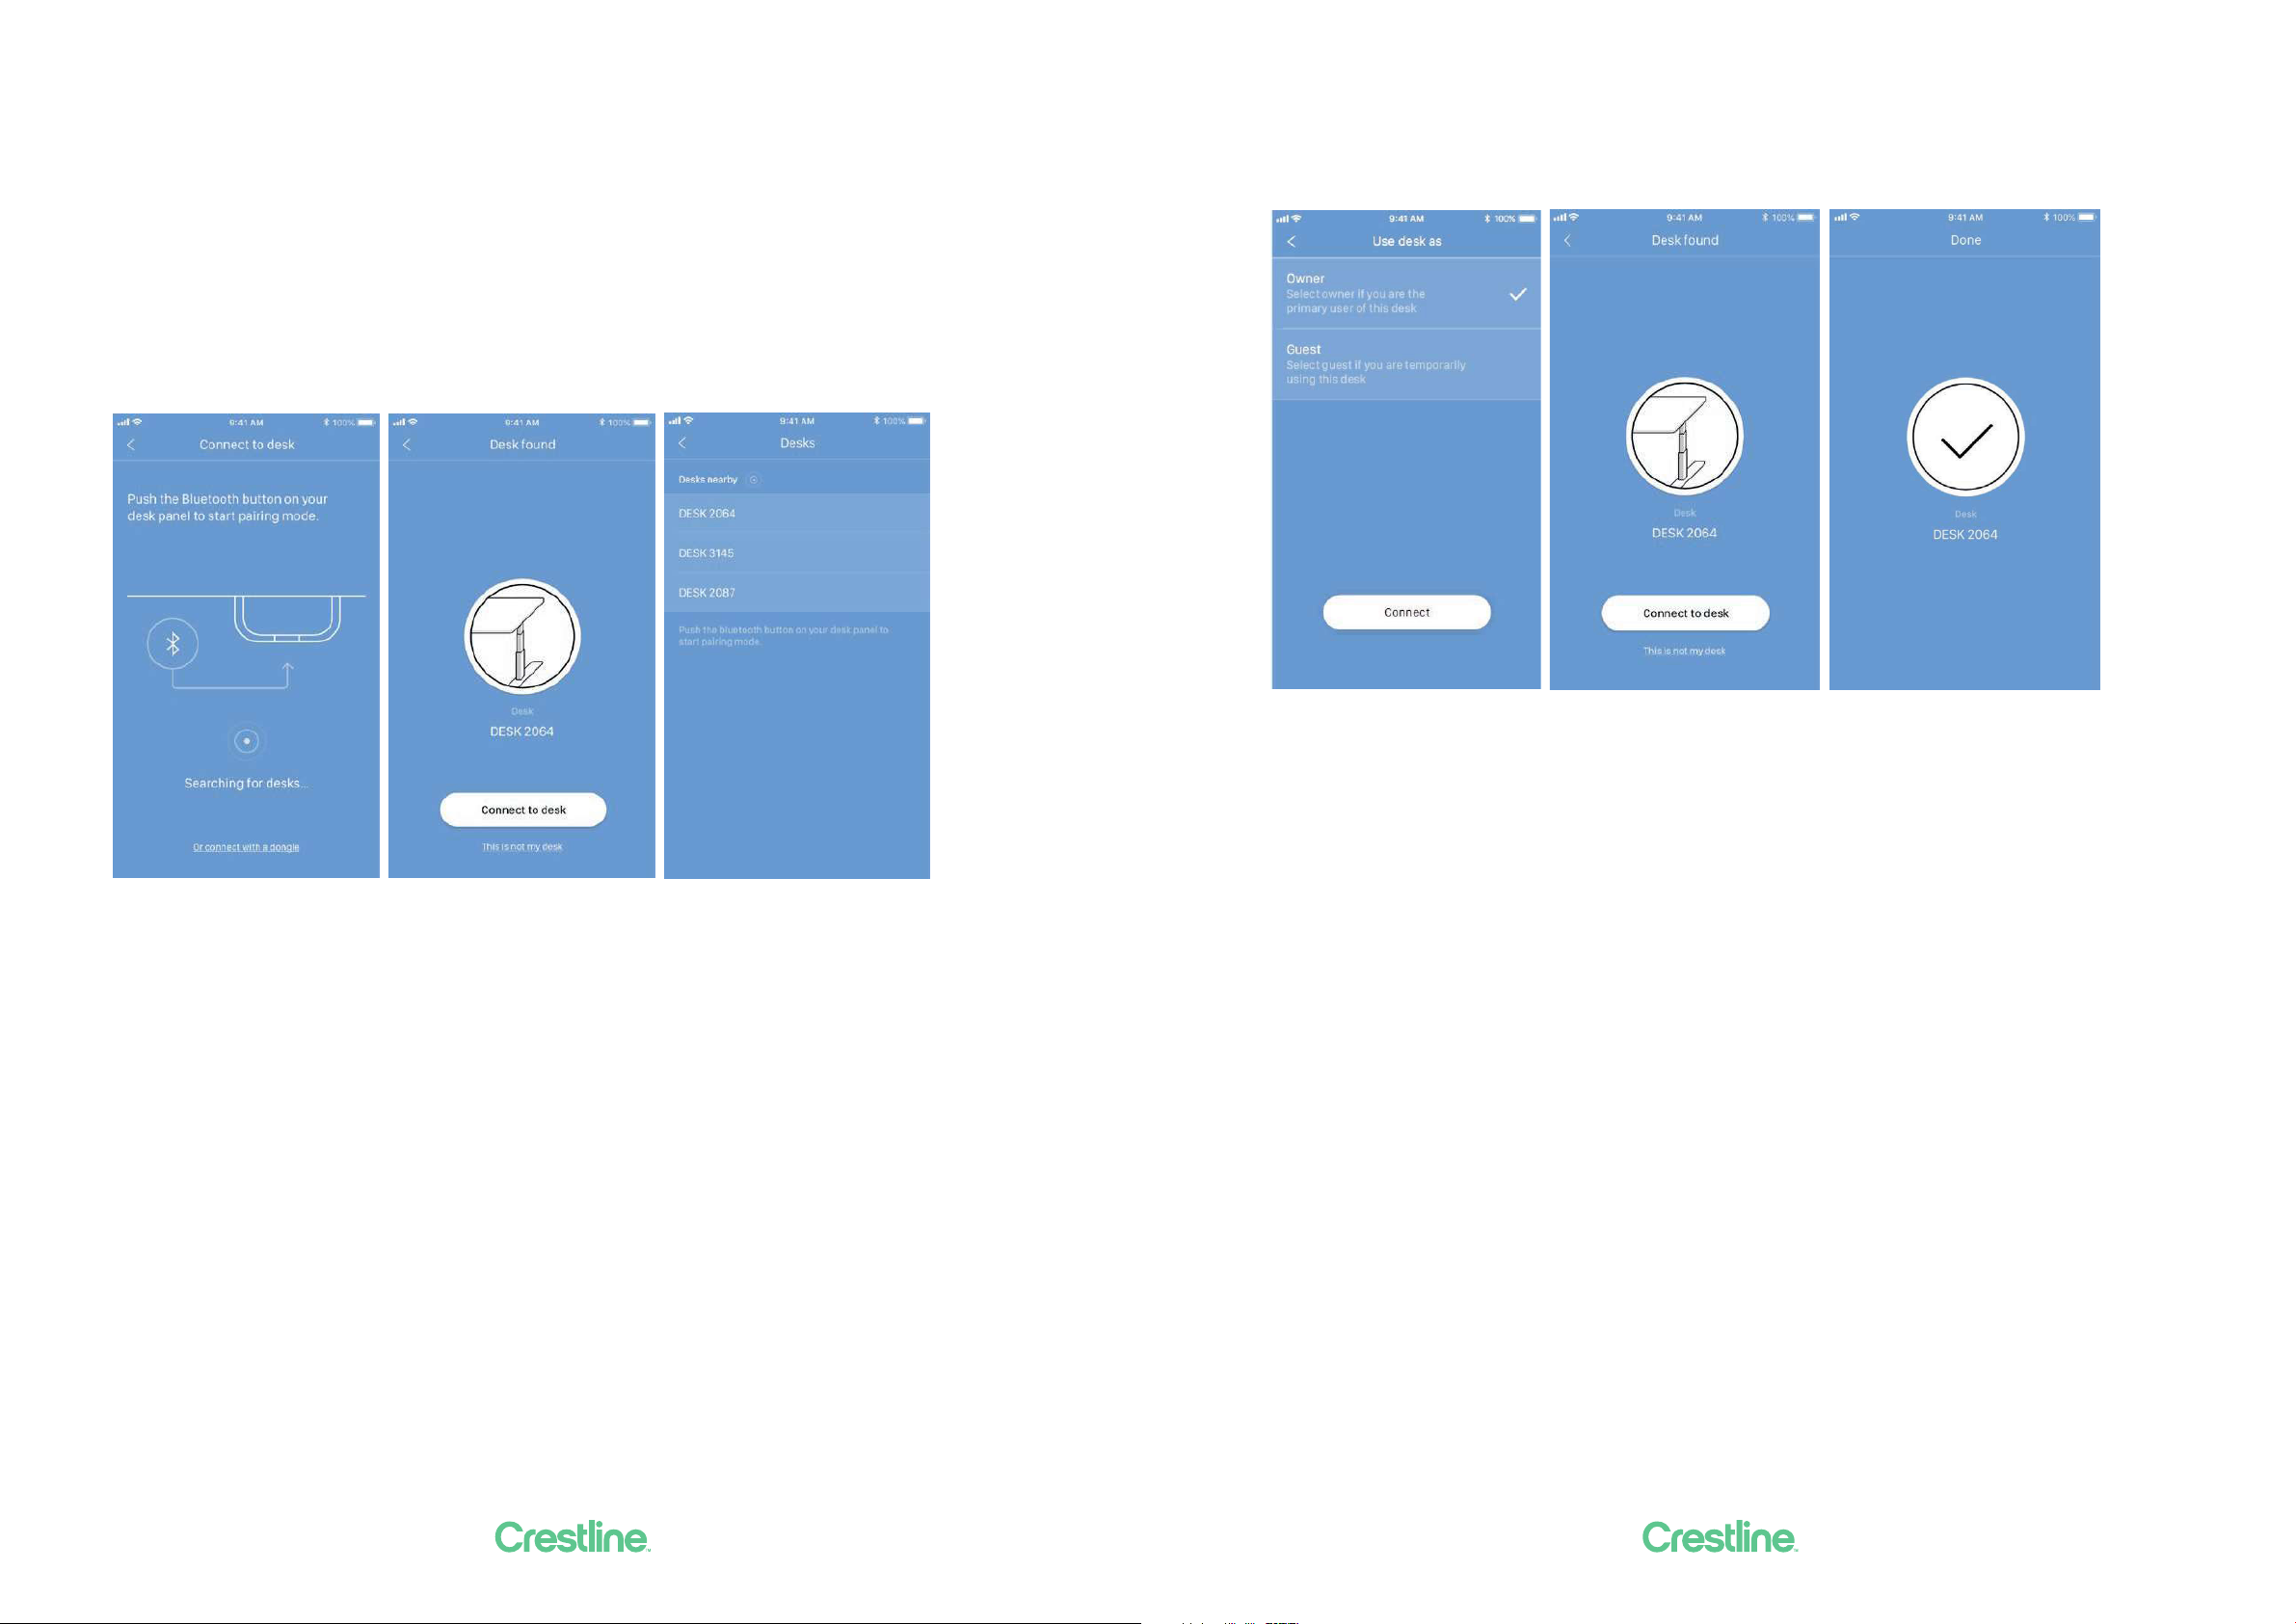
Onboarding low
The app now automatically starts searching for desks in pairing mode nearby in and the ID of the irst desk
found is displayed. If this is the desk you want to use, press/click “Connect to desk”. If not, press/click “This
is not my desk” to view a list of desks nearby. If the desk is not on the list, set the desk panel in pairing
mode to get the desk added to the list.
Press the Bluetooth® button on the front of the DPG1M desk panel for two seconds. The LED light lashes
blue to indicate that the desk panel is in pairing mode.
The DPG1M has an ID named “DESK” followed by a four-digit number.
Press/click on any desk ID to connect to that desk.
Before the app is connected to the desk selected, you must select whether this is your primary desk
(select “Owner”) or if you use this desk temporarily (select “Guest”). Press/click “Connect” to connect the
app to the desk.
You can connect to several desks, either as “Owner” or as “Guest”.
• If you connect as “Owner”, your reminder and favourite settings are stored in the DPG1M Panel on the
desk and your app will automatically connect to this desk when you arrive at it and track the statistic
stand data throughout the day.
• If you connect as “Guest”, your reminder and favourite settings are stored on your smart device/
computer and when you connect to a desk, these settings will relect in the DPG. You need to pair
the app on your smart device/computer with the desk every morning. When the app has been
disconnected from the desk for two hours, the DPG1M Panel will go back to the settings it had before
you connected, however, the rest of the day the app will automatically connect to this desk and send
standing notiication and keep track of stand data.
16 17
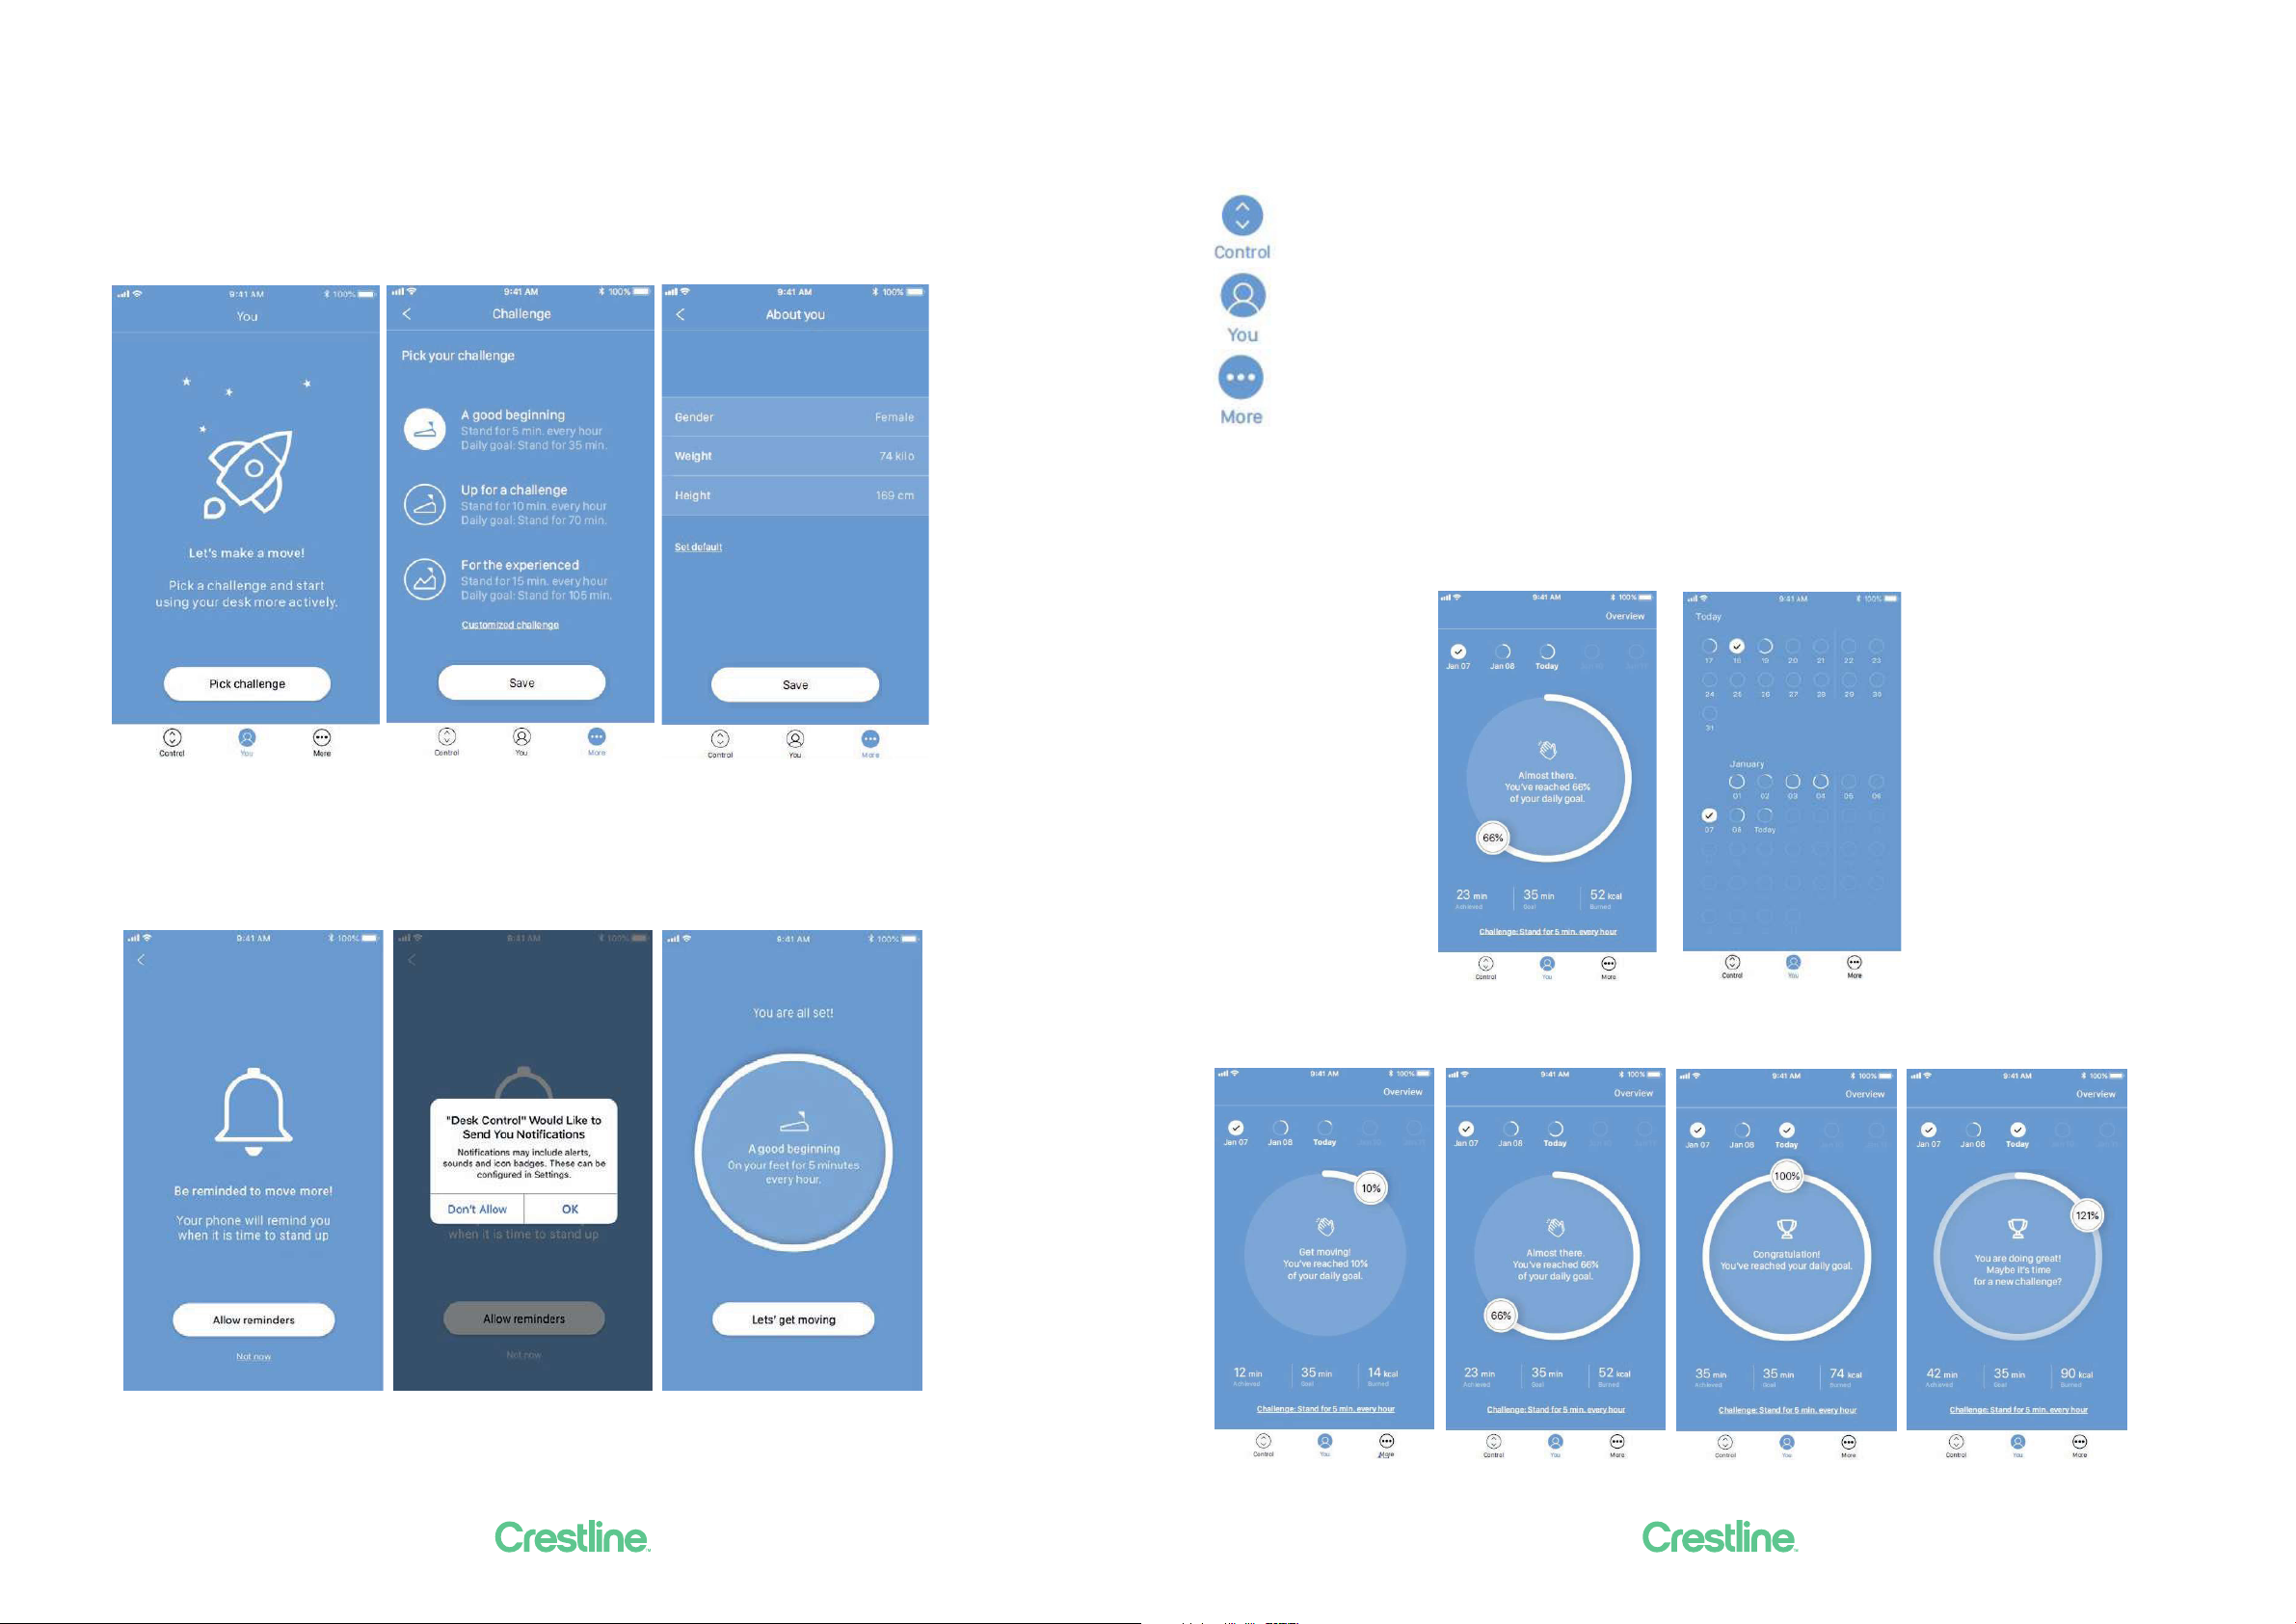
Setting your challenges
When the app on your smart device/computer is connected to the desk, you are prompted to pick a
challenge and start using your desk more actively. You can choose between three standard challenges.
Select one and press/click “Next”. If desired, you can enter your gender, weight and height and ind out
how many calories you burn while standing during the day. If you choose the default settings, you will still
see the calories burned, however, they will be based on the default gender, weight and height.
Please note that if an interval for standing/sitting has already been chosen via the DPG, these settings will
be shown in the app. Either keep these or select a new challenge.
Once you have set your challenge, you can choose to get reminders when it is time to stand up. To receive
reminders on iOS and Android devices, you need to allow the Desk Control™ app to send notiications.
(Only iOS and Android)
Now you are ready to become a healthier you.
Operation
How to use the app
The Desk Control™ App consists of three dierent tabs to navigate between: “You”, “Control” and “More”.
Adjustment of the desk (if supported by connected the device)
Your goal and the statistics of your daily achievements
All settings
You
When your settings are done, you will see the main page, “You”, giving you a fast overview of today’s
statistics together with a motivating text and icon to keep you going. Press/click “Overview” to get a
calendar overview of your daily achievements. Press/click “Today” to get back to the main page.
“You” is the page where you can view how close you are to reaching your daily goal. The progress is shown
in percentage of your set goal and you will also see an incentive text and an icon. Should you stand more
than your set goal, you will see an encouragement to pick a new challenge.

18 19
If you press/click “Overview”, you will see your daily achievements in a calendar overview. You can scroll to
see older data.
Press/click any of the dates to see your achievement for that day.
Control
The screen below shows when the app is connected to the DPG1M panel.
The graphics will adjust to the possibilities.
Height
Actual desk height. In case an error occurs, the error code will be displayed instead of the height (does not
apply To the Windows app).
Up/down drive
Press/click and hold the button to move the desk up/down.
Favourite positions
The stars symbolise the favourite positions.
Actual desk height
Up/down drive of the desk
Save up to four favourite positions

20 21
You
In the “You” section you can learn more about the beneits of changing position during the workday, or
you can pick a new challenge. You also have the possibility of changing your personal information or your
reminder settings.
Setting a favourite position
1. Drive the desk to preferred position.
2. Press/click one of the circles with a star inside.
A pop-up notiication asks if the position should be saved as a favourite position, press/click “Yes,
please” to save the position. The circle now shows the height of the favourite position.
3. Drive the desk to a favourite position by pressing/clicking and holding the button.
The DPG1M Panel will relect the favourite positions saved through the app, so you can change desk height
via the desk panel instead of using the app.
Press/click star to save Conirm choice Two saved positions Driving to a
favourite position
iOS/Android Windows
More
Press/click “More” to get access to a list of setting options and information arranged in ive groups (the
graphics below show a split view).
Change challenge
Here you can select between the three standard challenges, or you can deine a personal challenge. Press/
click “Customized challenge” and set your goals for standing/sitting by pressing/clicking the up/down
arrows. When inished, press/click “Done” and then “Save”.
About you
Here you can set/change your gender, weight and height. The default settings are Male, 83 kg, and 181 cm.
Set reminders
Enable or disable reminders as pop-up notiications.
If it is supported by the connected product, e.g. the DPG1 B, you can enable or disable the light strip as a
reminder function.
See also “Reminder notiications”.

22 23
Desk settings
In the “Desk settings” section you can change your favourite positions, change the desk name, connect to
another desk, set the actual desk height, enable/disable “Automatic drive”, and switch between “Owner”
and “Guest”.
Connecting to another desk
Steps 1 and 2 are only to be performed if the app is already connected to a desk.
1. Press/click on the connected desk to disconnect.
2. Conirm that you want to disconnect.
3. Press/click on a new desk to connect.
4. Choose between “Owner” and “Guest”.
5. Wait until the app is connected to the desk.
Set desk name
Change the name of the connected product to personalise the user experience of the app. Changing the
desk name in the app will aect the Bluetooth® ID so the new name will be shown on the smart device and
in the DPG1C display.
Set desk height
Set the actual height of the desk. An illustration guides you on how to measure. Choose height units (cm
or inches).
Automatic drive
If “Automatic drive” is enabled, you can make the desk adjust non-stop to any favourite position by just
pressing/clicking the relevant button once. This function is called “one-click-drive”.
If you use the app to adjust the desk height, the desk will not stop at any intermediate favourite positions
as it does if you use the DPG1M Panel for desk height adjustment.
You have to accept the terms, i.e. accept the responsibility of any danger that can occur under these
circumstances, in the pop-up notiication before this feature can be enabled.
If you press/click any button, close the app or tilt the DPG1M Panel during this automatic drive, you will
interrupt the drive of the desk.
System
In the “System” section you can switch language. The language is default set to the language of the
operating system of your smart device/computer. Choose between eight dierent languages in the app.
The available languages are: English, Korean, Japanese, Chinese, French, Italian, German, and Spanish.
You also have the possibility of changing the units. Switch between “cm” and “inch”for height and “kg” and
“lbs” for weight.
Support
In the “Support” section you can ind a pairing guide which helps you pair the app to a desk.
About
The “About” section contains the terms and conditions for using the Desk Control™ app as well as the
LINAK privacy policy.
According to the privacy policy, LINAK respects your privacy and does not access or use any data entered
in the app (such as favourite positions, gender, height and weight) or collected by the app (statistics). The
information is stored only on your device and can therefore only be accessed in your device.
About
Use your desk
Link to the “Made to Move” site where you can get guidance on how to use a sit/stand desk correctly.
Product information
Link to the LINAK website with information about this app.
Support
Link to the LINAK website with troubleshooting videos on the DPG products.

24 25
Reminder notiications
When reminder notiications are enabled, notiications will pop up to remind you when you need to
change position. The reminders will appear based on your settings. On your smart device they will show
on a locked or unlocked screen; on your computer they will show in the lower right corner of your monitor.
On your computer the reminders are not saved in the notiications overview.
The notiications depend on two types of data. They pop up as a result of either time-based data or data-
based data.
Time-based Data-based Time-based
(Only iOS and Android) (Only PC)
The time-based notiications are available for all and pop up based on the time the desk has been in sitting
position. Press/click on the notiication to open the app, or slide to the left on your smart device to see the
three options:
• Snooze for 10 minutes (press/click to be reminded again in ten minutes)
• No more reminders today (press/click and neither your smart device/computer nor the DPG1M Panel
will show any reminders for the rest of the day)
• Open app (press/click to adjust the desk height - or use the DPG)
The data-based notiications are personalised and pop up based on your set challenge.
Achievement Notiication
0% Let’s get started.
On your feet and move it a bit.
1 to 66% Get moving!
You’ve reached X% of your daily goal.
67 to 99% Almost there.
You’ve reached X% of your daily goal.
100 to 115% Congratulation!
You’ve reached your daily goal.
> 115% You are doing great!
Maybe it’s time for a new challenge?
The notiications are based on your challenge set under ‘You’. If the challenge is set to 10 minutes standing
and 50 minutes sitting, the notiication will be sent after your desk has been in sitting position for 50
minutes.
If you have saved two favourite positions, these will count as sitting and standing heights. If you have
saved no favourite positions, the trigger point is the desk minimum height plus 30 cm (adds up to
approximately 95 cm).
When the desk is moved above the trigger point, the DPG1M Panel and the app see the desk in standing
position until it is moved down again. When the desk reaching sitting position (below the trigger point), the
notiication is being reset and a new notiication will appear after 50 min.
Notiications ONLY appear, when you are sitting – not when you are standing.
Timer reset
The notiication timer will automatically be reset when:
• the desk is driven from standing to sitting position
• the app connects to the desk in the morning
• you reconnect to the desk after having been away from the desk for more than one hour
• you start a new challenge
• you adjust a challenge
• you have been connected as “Guest” (the reset will take place at midnight)
Statistics
The Desk ControlTM App collects data in the background while connected to your desk. Each time you
enter the app, the data is updated within 30 seconds.
As long as the app is connected to your desk, it registers the desk height even though you are not at your
desk. This means that the statistical data is not always exact.
Recommendations on how to use Desk Control™
Overriding a learned sedentary behaviour is a true behavioural challenge. We have put together a guide to
learn how to break up with your chair during your workday.
If you are not used to standing up and work, start with short intervals focusing on learning and getting into
a habit. When this behaviour is starting to become a habit, continue to stand for longer periods e.g. using
the guide below or simply testing what feels comfortable for you.
How to vary between standing and sitting while you work
The most important thing is to vary your position and to move around, preferably three times an hour.
Instead of sitting for too long at a time, you can switch between standing and sitting positions.
Remember good posture and to stand with your body weight evenly distributed on both legs.
• Start by raising your desk and stand for 5 minutes each hour before you go to lunch.
• Raise your desk just before your lunch break. Then your desk will be in the right position when you get
back from lunch.
• Just after lunch, stand for 5 minutes before lowering your desk to sit for 55 minutes.
• Raise your desk again every hour so that you stand up working for 5 minutes each hour for the rest of
the day.
• Raise your desk before you leave for the day – then it is ready for the next day.
Important reservations when varying between standing and sitting position:
If you are pregnant, have varicose veins or have a health condition that may prevent you from
standing for 5 to15 minutes at a time every hour, you should contact your doctor to make sure
that this will not be detrimental to your health.
If you are not used to standing, start with a few minutes at a time and extend this standing period
as you get used to work standing up.

26 27
Misc. on the DESKLINE® system
Warranty
This DESKLINE product is subject to warranty pursuant to the terms of LINAK DESKLINE Warranty Paper,
available on the LINAK website www.linak.com/warranty.
Maintenance
Clean dust and dirt from the outside of the system at appropriate intervals and inspect for damage and
breaks. Inspect connections, cables, and plugs without disconnecting, and check functioning as well as
ixing points.
Cleaning the desk panel
Clean your desk panel with a soft damp cloth. Universal cleaning detergents may be used.
For disinfection of the desk panel, use a 70 percent isopropyl alcohol either as a wipe or add a small
amount to a soft cloth.
The desk panel is not a sealed unit and there are electronics inside it.
If liquids or moisture enter an opening, the PCB may be damaged, and the desk panel ruined.
Thus:
• Avoid moisture penetrating any openings as this may damage the PCB inside the desk panel
• Avoid spraying the cleaning agent or disinfectant directly on the desk panel as moisture may penetrate
openings damaging the PCB inside the desk panel
• Cleaning agents and disinfectants must not be highly alkaline or acidic (pH value must be 6 to 8), and
they must not contain bleach or chlorine
• Do not use hand sanitizer gel as a cleaning agent
Crestline’s Motiv workstations are a high-tech product based on many
years of experience in the development of ergonomic worksystems.
We are sure your Crestline system will give you many years of problem-
free operation, with minimal maintenance (as below) helping to keep it
looking good.
Desk Tops
Melamine laminated panels are versatile pre-decorated panels with a durable melamine surface on both sides.
Never use any of the following abrasive cleaners: Jif, Ajax, Chemico, Brasso, oven cleaners, neat Janola, wire
wool, scourer pads, sandpaper.
Cleaning
• A soft cloth should always be used and apply cleaning products to the cloth rather than directly onto the
product.
• Wash down with warm water with a small amount of detergent. For best results use streak free glass cleaner
with a soft cloth.
• For textured inishes (pearl, woodgrain and puregrain) the periodic use of a soft brush may be necessary for
the removal of dirt build-ups and residues left by some spray on cleaners.
Spillages
• Hair rinse, Janola (neat) Harpic, oven cleaners – wash with hot soapy water, then wipe dry.
• Fabric dye – wash with cold water, then wipe dry. Then apply methylated spirits and wipe dry.
• Battery acid, hydrogen peroxide, glue hardeners – wash with cold water then wipe dry.
• Hair dye – wash with methylated spirits then wipe dry.
• Leather dye – wash with methylated spirits then wipe dry. Follow with mineral turpentine, wash and wipe dry.
Stain and mark removal
• Stubborn marks or stains – apply Handy Andy or diluted Janola (one part to three parts water), then wipe
down with a warm damp cloth.
• Smearing, inger marks, marking from cold or hot dishes, stickiness – apply one or two applications of
acetone (available at pharmacies) and wipe over with a dry cloth.
• Newsprint – use methylated spirits or mineral turpentine.
• Rust – use vinegar or lemon juice.
• Pencil – use water and a damp cloth.
• Felt pen or dry marker - use methylated spirits or acetone.
• Paint – use acetone or Duco Lacquer thinners (from a paint shop).
• Glue – contact type – use Ados Solvent N (from a paint shop).
Once again with any of the above, use streak free glass cleaner to remove any residues.
28 29
Desk Frames
Regularly clean dust and dirt from lifting columns. To ensure all surfaces are thoroughly cleaned, make sure the
lifting columns are fully extended to their maximum height. Also, be sure to inspect cables and lifting columns
for damage. Check all connections for both correct function and secure mounting.
Caution: A damp cloth is recommended. To protect the painted surfaces, use a cleanser that is not highly
alkaline or acidic. A pH-neutral product is ideal.
The lifting columns of adjustable desks are designed to be ‘sealed for life’ and in normal use will not require
additional lubrication of guide bushes or any other parts for the lifetime of the product.
Irrespective of the load, the duty cycle 10% ~ 6 min./ hour or max. 2 min. at continuous use stated in the data
sheets, must NOT be exceeded as this will result in an overheating of the motor and control box. Exceeding the
duty cycle will result in a dramatic reduction of the life of the system.
Screen Fabrics
Spot cleaning
Treat spills and stains as soon as possible. Test on hidden area to ensure fabric and colour are not removed.
Gently scrape any soil or mop any liquid from the surface of the fabric. Use of soap or detergent with water
should be approached with caution since overzealous rinsing to remove soap residue may result in over-
wetting, water marking and possible wetting of screen substrate (this may create other stains or damage
products).
• For non-oil-based stains use warm water and non-toilet soaps which do not contain optical brighteners
(consider Velvet soap, Lux Flakes, Softly). Mix a small amount of soap and warm water solution and apply to
the stain, rubbing gently. Blot dry with a clean towel. Apply cool water (preferably iltered or distilled water)
and blot dry again. Then with a hair dryer, working out from the centre of the stain, dry quickly to prevent
rings forming. It is generally preferable to clean whole panels of fabric in this way rather than trying to spot
clean speciic areas.
• For oil-based stains following the same basic guidelines as above, apply a proprietary brand solvent based
cleaner and try to clean generally in panels rather than spot cleaning speciic areas. A helpful industry ‘secret’
for spot removal of oil based biro marks is by the application of conventional hair spray. To further enhance
spot cleaning results, Warwick have introduced the Halo Fabric Care Kit which includes Halo spot cleaner
for most household stains, Halo fabric deodoriser to help neutralise pet and general odours and Halo fabric
protector to restore liquid repellency on fabric sections that have been spot cleaned.
For treatment of speciic stains, see Stain Removal.
Persons who do not have the necessary experience or knowledge of the product/products
must not use the product/products. Besides, persons with reduced physical, sensory or mental
abilities must not use the product/products, unless they are under surveillance or they have been
thoroughly instructed in the use of the apparatus by a person who is responsible for the safety of
these persons.
Only for Non EU markets
Ergonomics
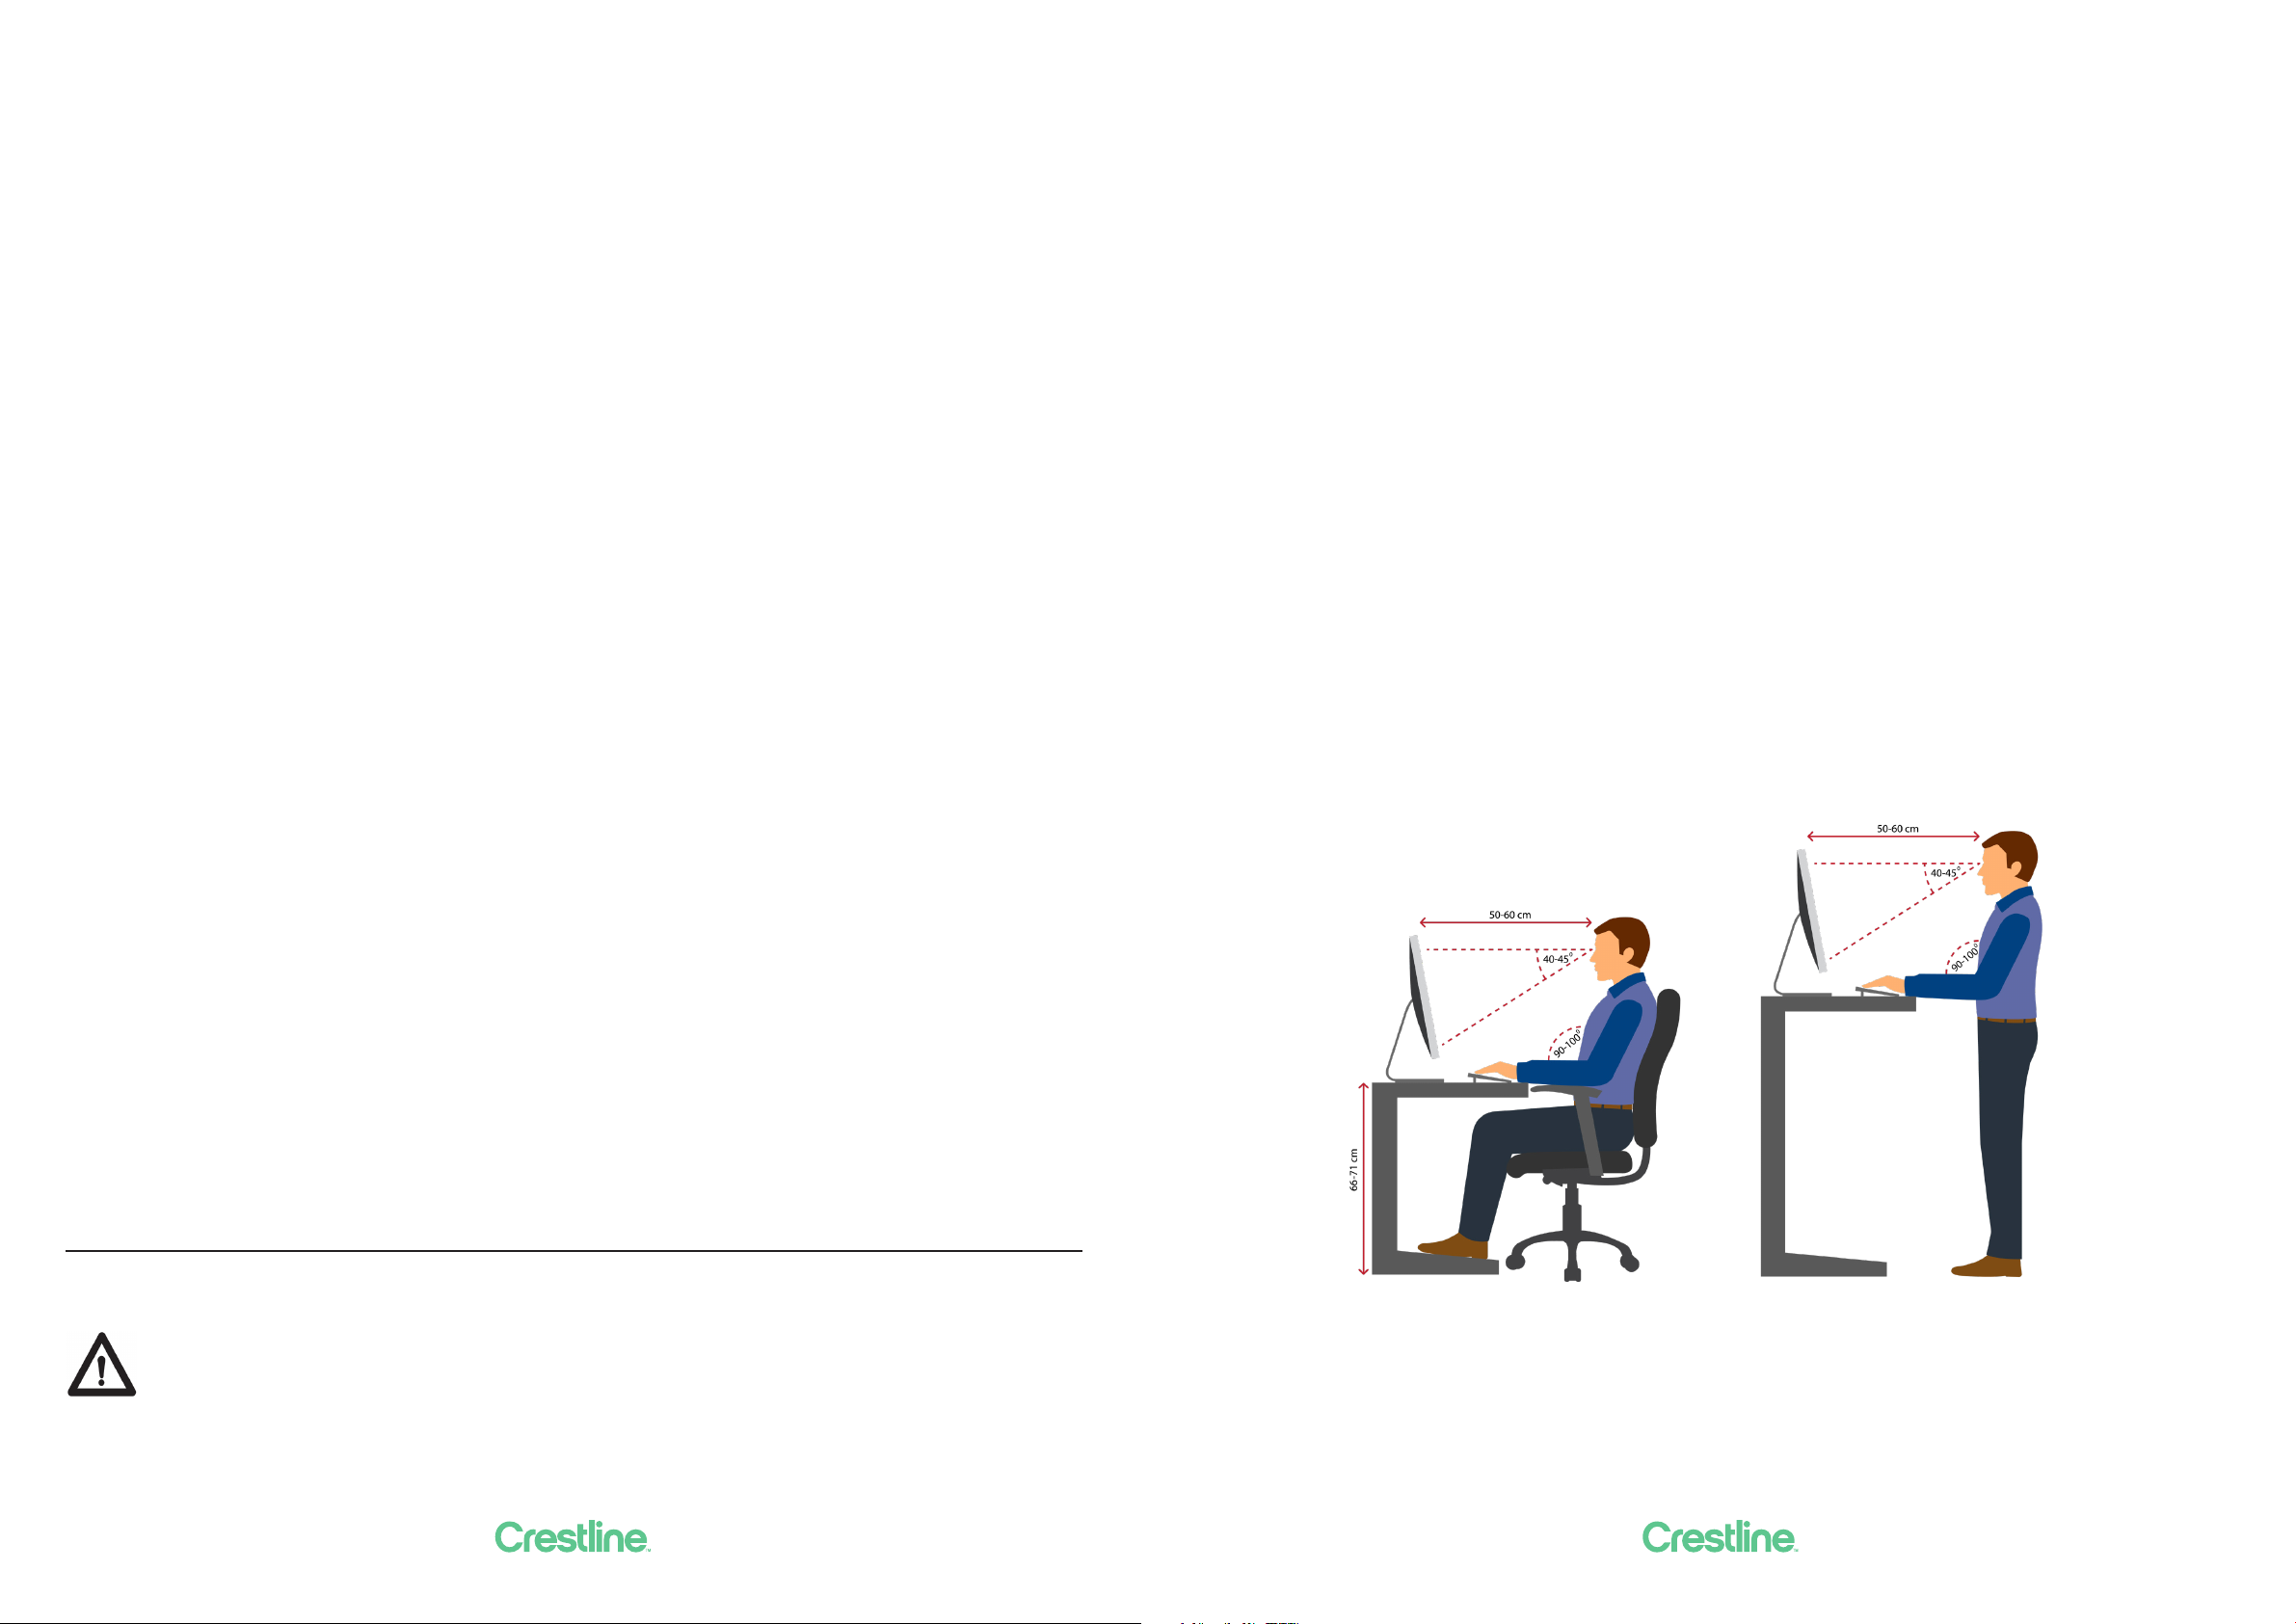
Before setting your desk up please make sure to set your seat height. The below two steps should help you
with that.
1. When sitting, make sure both feet are on the loor. The chair should be at a height where your thighs
touch the seat. There should be no gaps between your thigh and your seat.
2. Make sure there is a 23 inger gap from the front edge of your seat to the back of your knees.
Now that you have sorted your seat height out, we can set your desk up for the sitting position.
1. Sitting height.
Lower you desk down until your arms make a 90degree angle. Then lower the desk height again by
about 12 ingers. Your forearms should have a slight downward angle to them.
(Remember if the desk is too high your shoulders will get sore, and if your desk is to low then your
elbows and wrists will get sore as these areas take the most weight. (You can pre-set the desk to your
desired height using the app on your phone)
2. Standing height for typing
For the standing height for typing, please raise your desk until your belly button. ( Please remember this
should be the height for typing not writing. The is height does not put a lot of strain on your elbows,
wrist of shoulders. But if you try to write at this height you will get back ache if you do it for long peri-
ods) ( You can pre-set the desk to this height using the app on your phone)
3. Standing height for writing
For the standing height for typing, please raise your desk until just below where you ribcage ends and
your stomach starts.

30
Hamilton
HQ & Showroom
19 The Boulevard
Te Rapa, Hamilton 3210
New Zealand
64 7 855 9932
Auckland
Showroom
L 1, 73 The Strand
Parnell, Auckland 1010
New Zealand
64 9 257 5015
Wellington
Showroom
14 Allen St
Te Aro, Wellington 6011
New Zealand
64 4 333 1689
Workspaces so good
you’ll look forward to
Monday mornings.
Table of contents
Other Crestline Indoor Furnishing manuals

Popular Indoor Furnishing manuals by other brands


Notável Móveis
Notável Móveis PAINEL NT 1010 Assembly instructions

Safavieh Furniture
Safavieh Furniture AMH4010A manual

Micasa
Micasa FlexCube manual

LIBERTY HOUSE TOYS
LIBERTY HOUSE TOYS 5L-206 Assembly instructions

IKTAM
IKTAM ERO Handling manual

OSP furniture
OSP furniture DESIGNIab OUT25 operating instructions


