Cretors MD Series Installation and operating instructions

MD-A/E-OS
February 11, 2020
1
176 MITTEL DRIVE, WOOD DALE, IL 60191
Mini Display Warmer
Model MD
Operation-Service Manual
READ and UNDERSTAND these servicing, and safety
instructions before servicing this popcorn machine

MD-A/E-OS
February 11, 2020
2
TABLE OF CONTENTS
I. Safety Alert Symbol…………………………………………………………3
II. Safety First………………………………………………………………… 3
III. Introduction………………………………………………………………...4
IV. Product Specifications……………………………………………………..4
V. Installation Instructions……………………………………………………5
VI. Operating Instructions……………………………………………….…….6
VII. Sanitation Instructions…………………………………………………..…6
VIII. Parts List……………………………………………………………………..7
IX. Service Instructions…………………………………………………………8
MD-A/E-OS
February 11, 2020
3
I. SAFETY ALERT SYMBOL
The symbol shown below is used to call your attention to instructions concerning your personal safety
and the safety of others. Watch for this symbol. It points out important safety precautions. It means
ATTENTION! Become Alert! Your personal safety is involved! Read the message that follows and
be alert to the risk of personal injury or death.
II. SAFETY FIRST
This manual is filled with time-saving and money-saving information regarding your Cretors snack
warmer machine. There is nothing more important than the safety aids and warnings that are
throughout this document. The Safety Alert Symbol is used to identify topics of primary safety concern
wherever they appear.
If, after reviewing this manual, anything is unclear or technical problems are encountered, contact the
distributor from whom you purchased your machine for assistance. If there are any additional
questions, feel free to contact our Customer Service Department at the address and/or phone number
listed on back cover of this manual. Always have the model and serial number of your machine
available to assist in obtaining the correct information.
The information in this manual is essential for the safe installation and maintenance of
your Cretors snack warmer machine. The manual must be read and understood before
installing and operating the equipment, or equivalent training must be provided.
"The employer shall instruct each employee in the recognition and avoidance of unsafe
conditions, as well as, regulations applicable to his work environment, to control or
eliminate any hazards, or other exposure to illness or injury". Ref.: 29 CFR 1926.20
(b)(4)(a)(2)
It is understood that safety rules within individual companies vary. If a conflict exists
between the safety procedures contained in this manual and the rules of a using company,
the more stringent rule should take precedence.
IMPORTANT: THIS SNACK WARMER IS NOT FOR THE
STORAGE OR DISPLAY OF POTENTIALLY HAZARDOUS
FOODS!!!
MD-A/E-OS
February 11, 2020
4
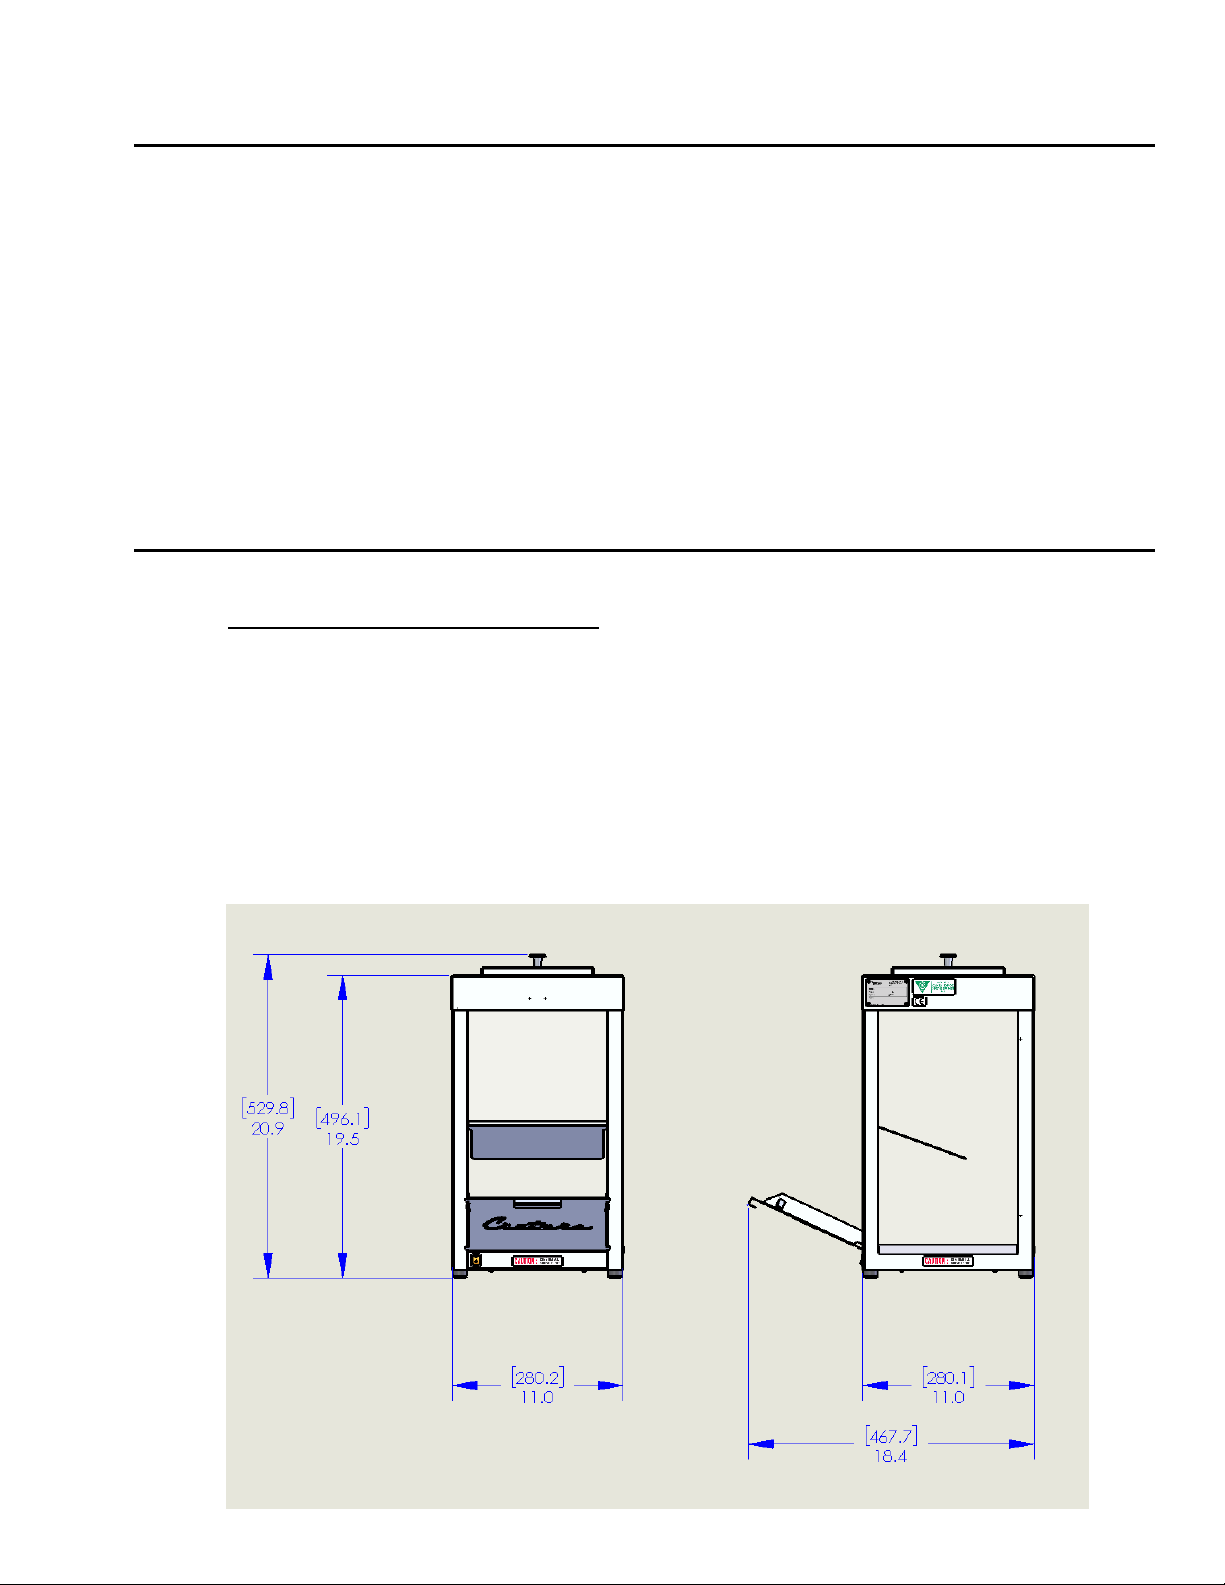
III. INTRODUCTION
The MINI DISPLAY Warmer is designed to warm and display snack products. The warmer is also
proved an integrated 55° C thermostat to allow for a steady control temperature of stored products.
The MINI Display warmer features:
Top-Load Design
Interior LED Lighting
An integral baffle to assure product rotation.
Removable Drop Shelf for product access.
IV. PRODUCT SPECIFICATIONS
CRETORS SNACK WARMER MACHINE:
MODEL: MDAXX-X (120 V)
MODEL: MDE-XX-X (230 V)
ELECTRICAL SPECIFICATIONS:
120 Volt, Single Phase, 60 Cycle 110 Watts
230 Volt, Single Phase, 50 Cycle 110 Watts
MECHANICAL SPECIFICATIONS:
Net Weight: 8 kgs

MD-A/E-OS
February 11, 2020
5
V. INSTALLATION INSTRUCTIONS
1. Location
Choose a location for your Cretors machine to maximize the ease of operation and maintenance
procedures. Check your local building and fire codes for location restrictions.
2. Power Supply
Check the nameplate to determine the required power supply.
Connect your warmer only to the correct power source. Failure to do so may result in
personal injury or death and may damage your warmer.
Make certain the Rocker Switch on the warmer is in the 'OFF' position when plugging
into power source.
MD-A/E-OS
February 11, 2020
6
3. After Connecting Warmer to Power Supply
The unit's operation can be controlled by the backlit rocker switch located above the pass thru
door on the rear of the cabinet.
VI OPERATING INSTRUCTIONS
Do not attempt to operate your Cretors warmer until you have read and understood
this manual. Failure to do so may result in serious injury or death.
Do not attempt to operate your Cretors warmer unless the installation instructions
have been strictly adhered to. Failure to do so may result in serious injury or death.
Operate your warmer only if it is in sanitary condition (SANITATION
INSTRUCTIONS). Failure to do so may result in illness to your customers.
1. Turn Rocker Switch “ON” to light cabinet and turn on heating system.
2. The heating system will automatically control the bottom surface to maintain
approximately 55°C to keep the stored snack products warm.
VII. SANITATION INSTRUCTIONS
Be certain the machine is turned ‘OFF’ and power is unplugged before sanitizing this
machine. Failure to do so could result in injury or death.
Do not clean heated surfaces until they have been given sufficient time to cool.
Failure to do so may result in serious burns.
1. Open the access drop door and top fill door. The drop down door can be easily removed
to aid in cleaning. Clean out crumbs and debris daily. Heavy or continuous operation of
the machine will require more frequent cleaning.
2. The cabinet should be cleaned with any good grade glass or household cleaner suitable
for stainless steel surfaces. A cleaning agent that is acceptable for food contact surfaces is
recommended. Do this as required.
3. The glass can be cleaned with any good grade glass cleaner suitable for glass surfaces.
MD-A/E-OS
February 11, 2020
7
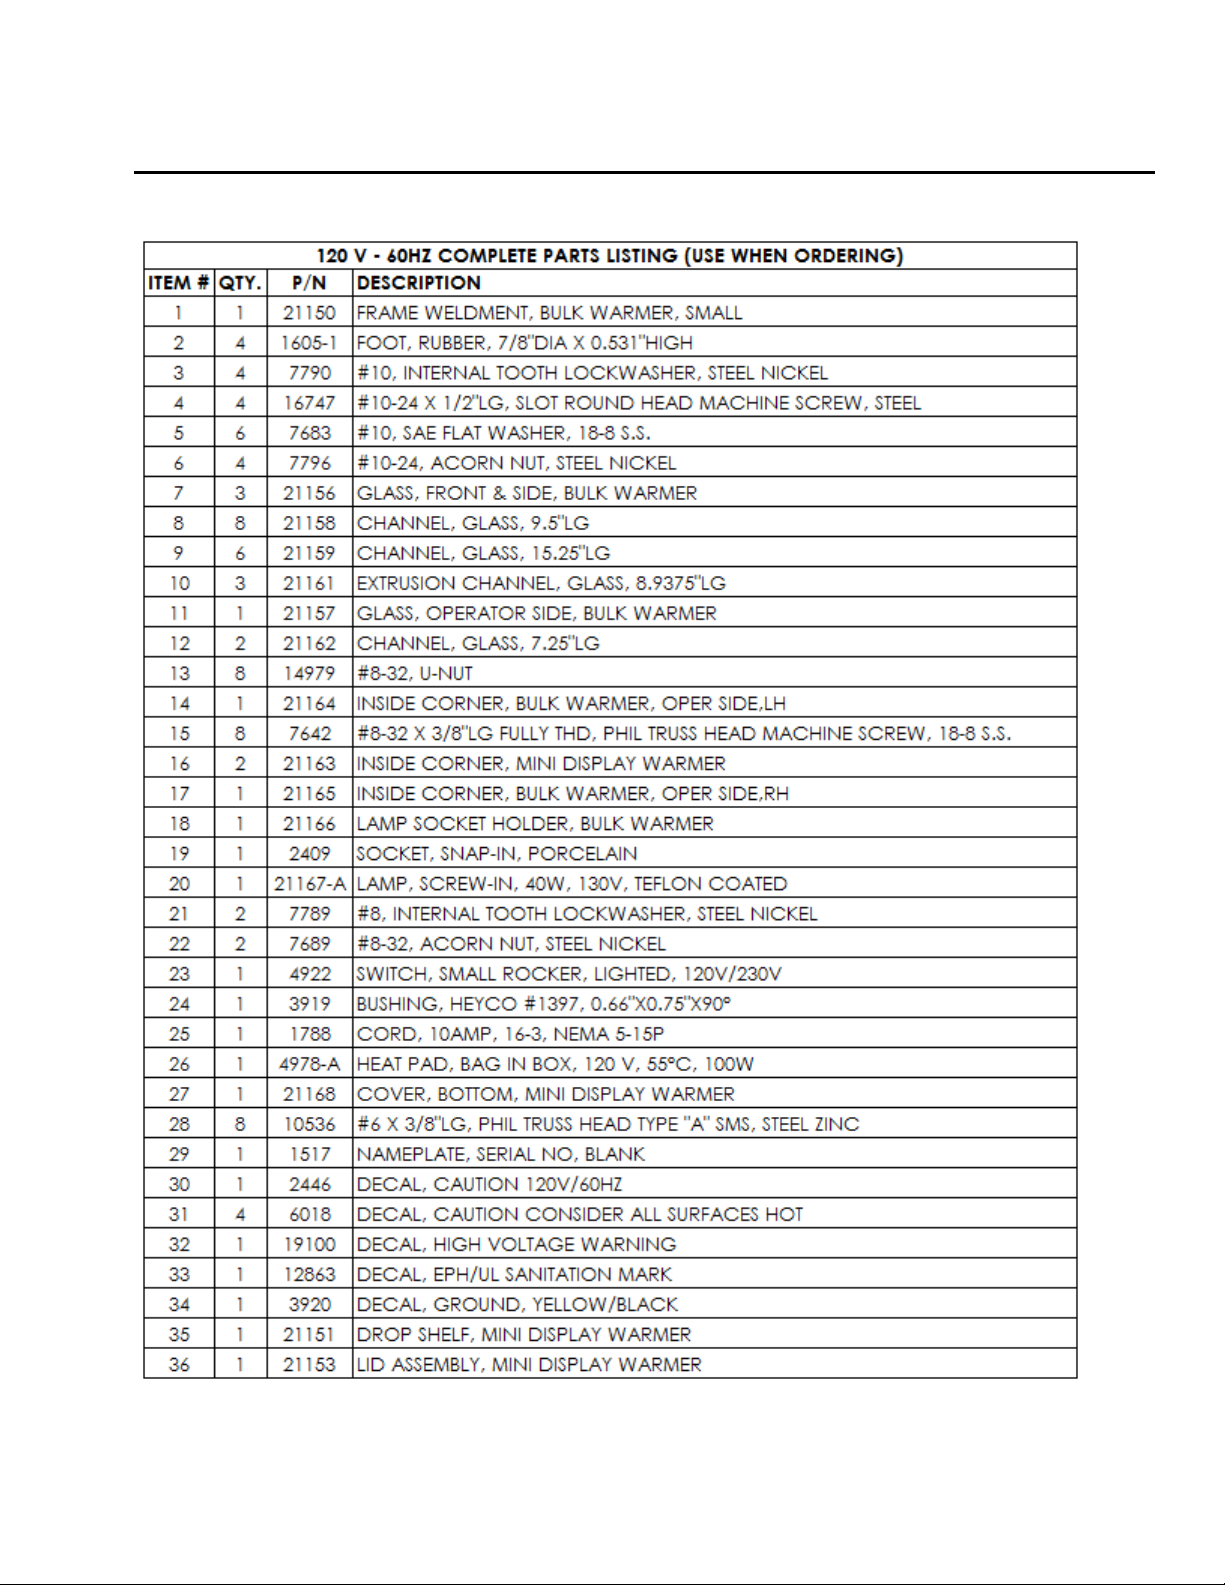
VIII. PARTS LISTING

MD-A/E-OS
February 11, 2020
8
230 V-50HZ COMPLETE PARTS LISTING (USE WHEN ORDERING)
ITEM
#
QTY.
P/N
DESCRIPTION
1
1
21375
FRAME WELDMENT, MINI DISPLAY WARMER
2
4
1605-1
FOOT, RUBBER, 7/8"DIA X 0.531"HIGH
3
4
7790
#10, INTERNAL TOOTH LOCKWASHER, STEEL NICKEL
4
4
16747
#10-24 X 1/2"LG, SLOT ROUND HEAD MACHINE SCREW, STEEL
5
4
7683
#10, SAE FLAT WASHER, 18-8 S.S.
6
4
7796
#10-24, ACORN NUT, STEEL NICKEL
7
3
21156
GLASS, FRONT & SIDE, BULK WARMER
8
6
21159
CHANNEL, GLASS, 15.25"LG
9
8
21158
CHANNEL, GLASS, 9.5"LG
10
3
21161
EXTRUSION CHANNEL, GLASS, 8.9375"LG
11
1
21157
GLASS, OPERATOR SIDE, BULK WARMER
12
2
21162
CHANNEL, GLASS, 7.25"LG
13
1
21377
BAFFLE, MINI DISPLAY WARMER
14
2
7625
#10-32, ACORN NUT HIGH CROWN, STEEL NICKEL
15
2
7880
#10-32 X 3/8"LG, SLOT TRUSS HEAD MACHINE SCREW, 18-8 S.S.
16
1
21378
LED STRIP, 10"LG, W/LEADS & POWER SUPPLY
17
2
21163
INSIDE CORNER, MINI DISPLAY WARMER
18
4
5829
#6 X 1/2"LG, PHIL ROUND HEAD TYPE "AB" SMS, STEEL NICKEL
19
3
2123
BUSHING, HEYCO #2030, 1/4"
20
1
4922
SWITCH, SMALL ROCKER, LIGHTED, 120V/230V
21
1
4978-E
HEAT PAD, BAG IN BOX, 230V, 55°C, 100W
22
1
2852
CORD, 10AMP, 3X1.0MM, EUROPEAN
23
1
3919
BUSHING, HEYCO #1397, 0.66"X0.75"X90°
24
1
21168
COVER, BOTTOM, BULK WARMER
25
8
10536
#6 X 3/8"LG, PHIL TRUSS HEAD TYPE "A" SMS, STEEL ZINC
26
1
1517
NAMEPLATE, SERIAL NO, BLANK
27
1
3920
DECAL, GROUND, YELLOW/BLACK
28
1
12863
DECAL, EPH/UL SANITATION MARK
29
1
19100
DECAL, HIGH VOLTAGE WARNING
30
1
5666
DECAL, CE MARK, SMALL
31
4
6018
DECAL, CAUTION CONSIDER ALL SURFACES HOT
32
1
6270
DECAL, CAUTION 230V/50 HZ
33
1
21151
DROP SHELF, MINI DISPLAY WARMER
34
1
21153
LID ASSEMBLY, BULK WARMER
MD-A/E-OS
February 11, 2020
9
IX. SERVICE INSTRUCTIONS
Only a qualified person should perform the following diagnostic checks, and, if
necessary, corresponding adjustments and repairs. Many of the following procedures
may present an electrical shock hazard and can cause serious injury or death.
Perform work only on de-energized circuits. Failure to do so may lead to electrical
shock resulting in personal injury or death.
A. Parts
When ordering parts, refer to the parts list included with this manual. Always supply the serial
number and model number of your machine.
B. Check Unit Periodically
Periodically check electrical switch and cord for signs of wear. Check all screws and rivets for
tightness.
C. To Access Electrical Components
To access all electrical components, unplug power cord from outlet, and then lay unit on its side
and remove the four screws from the bottom cover, exposing heating element, switch, and
wiring. THIS UNIT IS NOT FUSED.
D. Troubleshooting
PROBLEM
POSSIBLE CAUSE
ACTION
Unit will not heat.
Machine unplugged or not
switched on.
Plug unit in. Turn on power.
Loose connection to heat
element or failure.
Blower unplugged or blocked
Thermostat/Heat Pad failed
Repair connection or replace
element
Check for any blockage and
clear
Replace Heat Pad

MD-A/E-OS
February 11, 2020
10
This manual is filled with time-saving and money-saving information regarding your Cretors snack
warmer machine. There is nothing, however, more important than the safety aids and warnings found
throughout this document.
If you have any questions regarding the operation or cleaning of your Cretors snack warmer machine,
contact your local distributor. Should you have any difficulties or are unable to reach them, feel free to
contact the Customer Service Department at C. Cretors and Company.
Additional copies of this manual can be obtained from C. Cretors and Company at the address listed
below. Please provide model and serial number when requesting additional copies of this manual.
There will be a nominal charge for additional copies.
Cretors guarantees this machine to be free of defects in parts, materials and workmanship for two
years. Please take this time to fill out the factory registration card and return it to the factory to activate
your warranty. If you have any questions concerning the Cretors' warranty, please contact your local
distributor or the Customer Service Department at C. Cretors and Company.
C. CRETORS AND COMPANY
176 MITTEL DRIVE
WOOD DALE, IL 60191
PHONE (773) 588-1690, (800) 228-1885, FAX (847) 616-6970
Cretors joins the information age! Check out our links http://www.twitter.com
http://www.facebook.com/pages/Chicago-IL/C-Cretors-Co/90143449620
This manual suits for next models
2
Table of contents


