OfficeMaster CMS 218T User manual

User Guide
CMS 218T Electronic Cash Register
3 new “AA” batteries must be installed in the cash register to
prevent data and user-programmed settings from being erased in
the event AC power is disconnected, or in case of power failure.
Please Read This Before Proceeding
!
om218 T_UG_051219

12 Programming for System Functions 15
13 REG Operations
13.1 Department Entry note 17
13.2 Error Prompt note 17
13.3 Electronic Journal (EJ) notes 17
13.4 EJ Balance and Time Displays 17
13.5 Sample Receipts 18
Sample Receipt 1 and 2 18
Sample Receipt 3 and 4 19
13.6 Department Entries 20
13.7 PLU Entries 20
13.8 Minus ( – ) Operations 21
13.9 Discount [ – % ] Key Operations 21
13.10 VOID / Correction Key Operations 22
13.11 Merchandise Return Operations 22
13.12 Received On Account Operations 23
13.13 Paid Out Operations 23
13.14 Non-Add # Print Operations 23
13.15 No Sale Operations 23
13.16 Cash Tender Operations 24
13.17 Check Tender Operations 24
13.18 Charge Tender Operations 24
13.19 Split Tender Operations 25
13.20 Card Tender Operations 25
13.21 After Receipt Operations 25
13.22 Receipt ON/OFF 25
14 Management Reports
14.1 Programming the Z-Report Code 26
14.2 Printing Reports (Quick Reference) 26
14.3 Financial Report 27
14.4 PLU Report 27
14.5 CLERK Report 28
14.6 EJ Report – X & Z Modes 28
14.7 Full Report for EJ 29
14.8 Oldest Report for EJ 30
14.9 Oldest Report for EJ 30
14.10 Daily Report for EJ 30
15 Balancing Formulas 31
16 Troubleshoot – Print Function 31
17 Warranty Policy 32
Warranty Registration (Back Cover)
To be completed by the Purchaser, cut out and
return portion to the address provided.
System Features 1
1 Getting Started
1.1 Safety Notes and Precautions 2
1.2 Data backup Batteries 2
1.3 Printer Mechanism Notes 2
1.4 Connecting to the Power Supply 2
1.5 Installing Batteries 3
1.6 Installing Paper Roll 3
1.7 Using Paper Reel 3
1.8 Keyboard Layout 4
1.9 Control Key Positions 5
1.10 Display Layout and Indicators 5
1.11 Department Shift Key Function 5
2 Date and Time Settings
2.1 Programming the Date 6
2.1aChanging the Date Format 6
2.2 Programming the Time 6
2.2aChanging the Time Format 6
2.2bChanging the Time Print Setting 6
2.2cView the Time during Operations 6
3 Clerk Settings
3.1 Programming Clerk System ON/OFF 7
3.2 Programming Clerk Security Code 7
3.3 Clerk Log On with PIN Code 7
3.4 Clerk Log On with PIN Code not assigned 7
4 Department Settings
4.1 Programming the Tax Rates 8
4.2 Department Shift Key Function 8
4.3 Programming Department Status 8
5 PLU (Price Look Up) Settings
5.1 Programming PLU item price 9
5.2 Programming PLU status 9
5.3 PLU Dump Report
6 Discount Rate (-%) Key Setting 10
7 Grand Total & Z Counter Clear 10
8 Reset Memory, Reports and Data
8.1 Partial Reset 10
8.2 Full Reset Reports 10
8.3 Full Reset All Data 10
9 Foreign Currency Settings & Operations
9.1 Foreign Currency (FC) Settings 11
9.2 FC Conversion Operations 11
10 Calculator Settings & Operations
10.1 Calculator Mode Password Setting 12
10.2 Calculator Mode Operations 12
11 Caption Settings
11.1 Character Allocation Chart 13
11.2 Control Options for Character Inputting 13
11.3 Selecting Caption Programming Modes 14
11.4 Selecting a Caption Number 14
11.5 Inputting Text for a Caption 14
CONTENTS
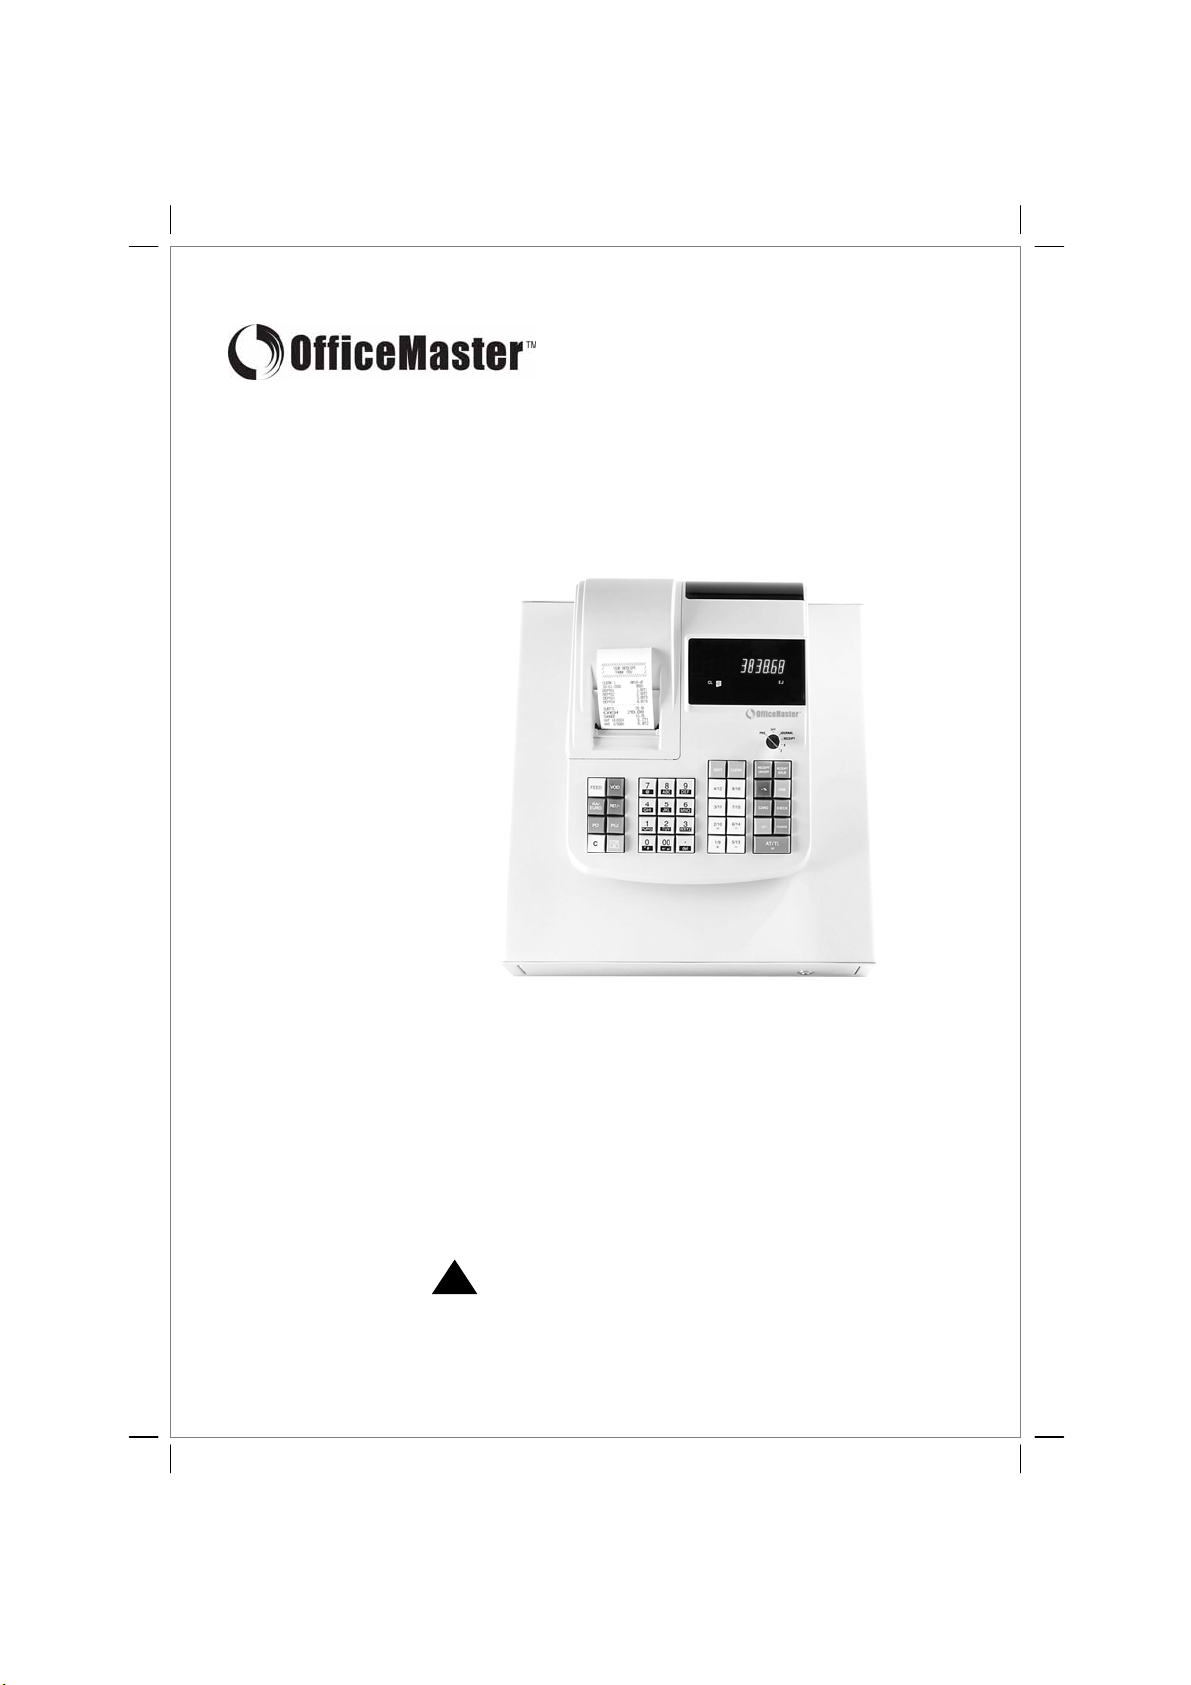
User Guide: OFFICEMASTER CMS-218 T
© 2005 Loginet Technologies SB

System Features
CMS-218 TUSER GUIDE:
Department : 16 (DEPT shift system)
PLU : 200
Clerk : 8 Clerks
Tax : Value add TAX mode (4 VAT's)
Payment : Cash, Check, Charge, Card
Management Report
●X/Z Financial report ●X/Z PLU report ●X/Z Clerk report ●X/Z Full report for Electronic Journal (EJ)
●X/Z Oldest report for EJ ●X/Z Latest report for EJ ●X/Z Daily report for EJ
Printer
●SII LTPZ225 - LINE THERMAL PRINTER ●Print Speed : 5.2 line/sec Note: [DEPT01 1.00] data & 25℃
●No. of Columns : 24 Columns ●Paper Width : 57.5 ±0.5mm ●MCTF : About 6150000 LINES
Display
●Alpha & Numeric (Union-Jack) Display (10 digits)
Programmability
●Date (Month-day-year/Day-month-year) & Time (24 hr / 12 hr) - Time will print
●TAX rate - VAT .......... 0 - 99.999%
●Department - Price (Max.7 digits) / Caption / Taxable / Single item cash
●PLU - Price (Max.7 digits) / Caption / Link DEPT / Sub-department / Dump report
●% rate (0 - 99.99%)
●FC - Caption / Rate preset
●Grand total & Z counter clear
●Z report security code (4 digits)
●Clerk – Caption / System (Active/Inactive) / Security code (3 digits)
●Decimal point position (0./0.0/0.00/0.000)
●Language select (English/French/German/Spanish/Dutch/Danish/Portuguese/Swedish)
●Zero price entry setting
●European rounding (Normal/Swiss/Swedish/Denmark)
●Rounding method for VAT calculation (Round down/Round off/Round up)
●Multiple receipt issuing (Allow/Not Allow)
●Zero skip printing preset
●Print total VAT amount (Non print/Print)
●Print Taxable amount splited per rate (Non print/Print)
●Print total Taxable amount (Non print/Print)
●Print Taxable amount out of VAT splited per rate (Non print/Print)
●Print total Taxable amount out of VAT (Non print/Print)
●Print tax symbol at right hand side of amount (Non print/Print)
●Tax details print (Before tender/After tender)
●EJ is Active/Inactive
●Transaction in REG mode is buffered to EJ memory (All transaction /Only sales transaction)
●Warning beep for nearly full of EJ memory will be sound (Yes/No)
●Warning beep for nearly full of EJ memory will be sound at the start (Yes/No)
●Consecutive counter will not be reset in Z financial report (Yes/No)
●Calculation machine mode password (4 digits)
●Store header (4 lines)
1

Getting Started
CMS-218 T
USER GUIDE:
1.1 Safety Notes & Precautions
Ensure that the mains power supply corresponds
to that specified on the rating label of the ECR.
Use only batteries of the same type as supplied!
Use of other types may cause malfunction.
Install the supplied batteries according to the
polarity (as displayed on the battery compartment). Do not place the ECR next to liquid dispensing
equipment e.g. wash basin, soda machine, etc.
Dispose off the batteries in an environmentally
friendly manner, according the local regulation.
Clean any dust from the cash register by wiping it
gently with a dry cloth. Never use water or
solvents such as thinner, spirits, etc.
Never attempt to repair the ECR yourself.
Repairs by authorised service agent only.
,
6
#
+
-
aNever insert objects, such as screwdriver, paper
clip, etc. in the ECR. This could damage the ECR
and exposes you to the risk of an electric shock.
ÃDo not expose the ECR to extreme temperatures.
E.g. – direct sunlight, cooking equipment, etc.
LThis cash register is exclusively intended for use
in processing cash register business indoors. Any
other use is considered unintended use.
1.3 Printer Mechanism Notes
To ensure long, trouble-free operation, observe the following instructions:
Never
• print without any paper installed.
• pull the paper while printer is operating.
• use poor quality paper.
• insert used paper rolls.
• tamper with the printer using hard objects.
• move the printer drive by hand.
Pay attention to the markings indicated at the end of the paper roll. Change the paper roll immediately.
Have the ECR/printer mechanism serviced regularly by an authorised service agent.
1.2 Data Backup Batteries
Three new “AA” batteries must be installed in the cash register to prevent data and user-programmed
settings from being erased from the memory in the event AC power is switched off, or accidentally
disconnected, or in case of power failure.
1.4 Connecting to the Power Supply
Before connecting the cash register to the mains power supply, please make sure that the voltage and
frequency specified on the rating label matches with the local power supply.
Data retention:
The power outlet must be near the cash register and easily accessible. This allows you to
disconnect the power supply to the cash register quickly in case of emergency.
With data backup batteries installed, all data in the machine is retained when the power
supply is disconnected. The length of time data will be retained without continuous mains
power supply depends on the level of power available in the batteries.
Safety note:
2

CMS-218 TUSER GUIDE:
1.5 Installing Batteries
1.6 Installing Paper Roll
Install the batteries supplied to ensure that data is retained in the event of a power failure.
1. Remove the printer cover.
2. Pull the paper transport cover ‘A’ up.
3. Insert a thermal paper roll (57 mm Width and max. 70 mm Diameter).
4. Draw the leading edge of the paper over the tear-off edge.
5. Push the paper transport cover ‘A’ down, locking it in place.
6. Depending on the required use (receipt or journal),
a) for Receipt use – tear off the paper at the tear-off edge of the printer mechanism, or
b) for Journal use – feed the paper onto the paper reel. See details on section 1.7
7. Replace the printer cover.
1.7 Using Paper Reel
1. Open the printer cover.
2. Thread the end of the journal paper into the slit in the paper reel.
3. Insert the paper reel into the reel guides.
4. To remove the journal paper after it has been rolled up on the reel, remove the paper reel and pull the
journal roll off.
5. Reinsert the paper reel.
6. Close the printer cover.
1. Open the printer lid.
2. Open the battery compartment cover (black flap) behind the paper compartment.
3. Insert the three AA round cell batteries. Pay attention to the correct polarity of the batteries.
4. Close the battery compartment cover
5. Close the printer lid.
Replacing batteries: To ensure data retention, replace the batteries once a year with the cash register
switched on.
Getting Started
AStep 2 Step 5
Keyboard Side
Step 6 (a)
AStep 2
Keyboard Side
Paper Reel
Printer mechanism
Printer mechanism
Paper roll
3

del
SP/
TUV
PQRS
MNO
@
CMS-218 TUSER GUIDE:
AT / TL = - The Amount Tendered/TOTAL key is used for cash tender transaction.
CHARGE - The Charge key is used for charge tender transaction.
C- The Clear key will clear an entry made on the numeric keypad or Qty/Time key before it is finalized on a department or
function key. The Clear key is also used to clear error conditions.
FEED - Depressing the FEED key will advance the receipt or journal paper one line, or continuously until the key is released.
REF/- - The Ref/- key is used to subtract an amount from the sale total. The financial report records the (-) key total. As the Ref/-
key, this is used for refund operation. The financial report records the refund total.
-% - The -% key is used to subtract a percentage from the sale total. The financial report records the -% key total.
SUBTOTAL - Depressing the Subtotal key will display the sales total.
PO - The PAID OUT key is used to remove media from the cash drawer. It carries its own total on the financial report.
RA / EURO - The RECEIVED ON ACCOUNT key is used to record a media payment, or loan to the cash drawer. The
financial report records the received on account total. As the (RA/FC) key, this is used for FC conversion operation.
CHECK - The Check key is used for check tender transaction.
CARD - The Card key is used for card tender transaction.
PLU - Price look up function.(200 Kinds)
X / TIME / dbl - The Qty/Time key is used to multiply department or (-) key entries. Inform remaining buffers for EJ.
DEPT 1/9-8/16 - Department key is used to select non-taxable sales at the pre-programmed tax rate.
DEPT - Department SHIFT key is used for select a department 9-16. See pages 5 & 8 for details.
# / NS - # / NO SALE key is used as a non-add numberkey and non sale key.
CLERK - Clerk key is used for assign a Clerk.
VOID - The void key used to erase an incorrect entry, or for error correct operations. The financial report records the void total.
Receipt ON/OFF - The Receipt ON/OFF key is used to saving paper or not. It is switched to reverse by depressing again.
Receipt ISSUE - The Receipt Issuekey is used to postreceipt or multiple receipt. (Multiple receipt is usefulfor changing paper roll)
1.8 Keyboard Layout
FEED
RA /
EURO
PO
C
VOID
REF/-
PLU
X/TIME
7 8 9
4
1
5
2
6
•
3
000
4 / 12 8 / 16
3 / 11
2 / 10
1 / 9 5 / 13
6 / 14
7 / 15
DEPT CLERK
-% # / NS
CARD
ST
AT / TL
=
CHARGE
CHECK
RECEIPT
ON/OFF
RECEIPT
ISSUE
X
+
:
dbl
ABC
WXYZ
DEF
GHI JKL
“#
Getting Started
4

CMS-218 TUSER GUIDE:
1.9 Control Key Positions
PRG
OFF
REG 1 (Journal)
REG 2 (Receipt)
X
Z
OFF - The system is inoperable.
REG 1 - Registration mode. Papers are used as journal.
Receipt ON/OFF does not work inthis mode. (Receipt as ON always)
REG 2 - Registration mode. Papers are used as receipt.
X- The X position is used for reading the financial report.
Z- The Z position is used to read the financial report.
PRG - The PRG position is used for all programming.
CL
1.10 Display Layout and Indicators
Receipt ON/OFF
;EJ
When receipt printing is switched OFF, an indicator
is lighted here
For Receipt On/Off operation, see page 25.
Electronic Journal (EJ) is “Nearly Full”
When EJ memory is “Nearly Full”, an indicator
is lighted here
For EJ warning details, see page 17. CL ;EJ
Calculator Mode is activated
When register is in Calculator mode, an indicator
is lighted here
For Calculator operation, see page 12. CL ;EJ
1.11 Department Shift Key Function
Examples:
To select DEPT 9 : DEPT 1 / 9 +
To select DEPT 16: DEPT 8 /16
To select DEPT 10: DEPT 2 /10 x
This function can be used on both REG and PRG modes.
The shift key is used when you want to select department numbers 9 to 16.
DEPT
Error Prompt
When an incorrect key is pressed or an incorrect
key sequence is entered, a warning tone is
activated with an “E” symbol displayed. To resume
operation, press the [ C ] key. (see page 17). CL ;EJ
E
Getting Started
5

CMS-218 TUSER GUIDE:
2 Date and Time Settings
Date/Time Settings
2.1 Programming the Date
Example: To set the date as 30th January 2006
# / NS
3001.06
P FUNCTIONS 0.70
2.2 Programming the Time
Example: To set the Time as 1:18pm i.e. 13:18 hours
PM01-18
X / TIME / dbl
A vertical bar here to denote PM
CLERK 1 PM01:18
PRG
OFF
REG 1
REG 2
X
Z
Key sequence : < PRG > →{ ddmmyy } →[ # / NS ]
PRG
**Print
Key sequence : < PRG > →{ hhhh } →[ X / TIME / dbl ] hhhh = in military standard time (24:00)
PRG 13.18 **Print
2.1a Changing the Date Format
Key sequence : < PRG > →{ function # = 7 } →{ option # } →[ RA ]
Options # : { 0 } = mm - dd - yy; { 1 } = dd - mm - yy (default)*
Example: To change 30-01-06 (default) Date format to 01-30-06
RA / EURO
0.70
PRG
30-01-06
**Print
Note : The default Time display and print is in 12-hour format i.e.: ι1-18
P FUNCTIONS 0.40
**Print
2.2a Changing the Time Format
Key sequence : < PRG > →{ function # = 4 } →{ option # } →[ RA ]
Options # : { 0 } = 24hr format; { 1 } = 12hr format (default)*
Example: To change 1.18pm (default) Time format to 13:18 hours
P FUNCTIONS 2.31
**Print
2.2b Changing the Time Print Setting
Key sequence : < PRG > →{ function # = 23 } →{ option # } →[ RA ]
Options # : { 0 } = Time will print (default); { 1 } = Time will not print
Example: To change Time will print (default) to Time will not print
2.2c Viewing the Time during operations
Key sequence : < REG 1 or 2 > →[ X / TIME / dbl ]
Example at 1.18 PM: In REG1 or 2 X / TIME / dbl ι1-18 (** You must be LOG ON as a clerk)
This operation is not allowed during a transaction.
Note : Pressing the [ X/Time/ dbl ] again will display the EJ balance. See page 17 for details.
date input { 300106 }
function # { 7}option # { 0}
time input { 1318 }
RA / EURO
0.40
PRG function # { 4}option # { 0}
RA / EURO
2.31
PRG function # { 23 }option # { 1}
PRG
OFF
REG 1
REG 2
X
Z
LKEY legend : < > = Control key position; { } = numeric key entry; [ ] = function key entry
LIn PRG mode, you can exit/ESC any time during programming by pressing the [ AT/TL = ] key.
6

CMS-218 TUSER GUIDE:
3 Clerk Settings
Clerk Settings & Operations
3.3 Clerk LOG ON with PIN Code
Note: It is not possible to change the current assigned Clerk while a transaction is in progress.
CLERK
To log off, CLERK
( If the 3-digit PIN # is not correctly entered, an error sign will appear on the display )
Clerk # display
↓
Key sequence : < REG 1 or 2 > →{ 1-digit Clerk # } →{ 3-digit PIN # } →[ CLERK ]
Example: To Log On Clerk 1 with PIN code ‘456’
3.2 Programming Clerk Security PIN code
function # { 4 4 4 4 4 4 }
CLERK
Clerk # input { 1}
Example : To programme PIN code ‘456’ for Clerk 1
to save.
PRG
PIN # { 4 5 6 }
PRG
OFF
REG 1
REG 2
X
Z
3.1 Programming Clerk System – ON/OFF
function # { 4 4 4 4 4 }status to OFF { 0}
444.44
Example: To turn Clerk System OFF (default is ON)
4444.40 AT / TL =
Note: With "Clerk System OFF“, Clerk LOG ON operation is not required. Under OFF
mode, the register prints “Clerk 1" on receipts, journals and reports. All of sales will
be put together into Clerk 1 and Clerk report covers only sales for Clerk 1.
PRG
PRG
OFF
REG 1
REG 2
X
Z
Key sequence : < PRG > →{ function # = 4 4 4 4 4 } →{ Status # : 0 = OFF; 1 = ON } →[ AT/TL = ]
Key sequence : < PRG > →{ function # = 4 4 4 4 4 4 } →[ AT/TL = ] →{ Clerk # } →{ 3-digit PIN } →[ CLERK ]
4444.44 AT / TL =
REG
14.56
14.56
E
3.4 Clerk LOG ON with PIN Code not assigned
C01 0.00
Example: To Log On Clerk 1 with PIN code not assigned
REG 0.01 CLERK C01 0.00
Key sequence : < REG 1 or 2 > →{ 1-digit Clerk # } →[ CLERK ]
PRG
OFF
REG 1
REG 2
X
Z
PRG
OFF
REG 1
REG 2
X
Z
The Clerk System allows you to assign up to 8 clerks for the ECR and all transactions will be recorded
by the respective Clerk # assigned. You also have the option to switch the Clerk System OFF.
With the “Clerk System ON” (factory default), a Clerk code must be LOG ON before the register can be
operated in REG1 (Journal) or REG2 (Receipt) mode.
Unless the Clerk LOG OFF, the Clerk code entered is retained even if any other operation is done in
PRG, X, or Z modes. The current Clerk is required to LOG-OFF before another Clerk can LOG ON.
For security purpose, a 3-digit Personal Identification Number (PIN) can be assigned to each Clerk.
You can assign a name/caption e.g. Clerk 1 = DEBBIE. See page 14 for Caption programming.
**Non-Print
0.01
**Print
{ 1}ClerkPIN{4 5 6 }
{ 0}
0.01
{ 1}
LKEY legend : < > = Control key position; { } = numeric key entry; [ ] = function key entry
LIn PRG mode, you can exit/ESC any time during programming by pressing the [ AT/TL = ] key.
4444.40
7

CMS-218 TUSER GUIDE:
4 Department Settings
Department Settings
4.3 Programming Department Status
Status S1: { 0 } = Normal department(default)
{ 1 } = Single item cash
Example 1: DEPT 1 is a Normal department Taxable by VAT 1 (free pricing), and
DEPT 16 is a Normal department Non-taxable (free pricing).
PRG CHECK
1 / 9 + to assign to DEPT 1.
Key sequence : < PRG > →{ status S1, S2 } →[ CHECK ] →{ price* } →[ Department # ]
DEPT
Status S2: { 00 } = Non-taxable (default)
{ 01 } = Taxable by VAT 1
{ 02 } = Taxable by VAT 2
{ 03 } = Taxable by VAT 3
{ 04 } = Taxable by VAT 4
to assign to DEPT 16.
P DEPARTMENT 0.01
DEPT01 0.01T1
P DEPARTMENT 0.00
DEPT16 0.01
shift key 8 /16
Price* : for ‘free pricing’, key in { 1 } otherwise input actual price.
0.01
PRG
OFF
REG 1
REG 2
X
Z
**Print
Examples:To select DEPT 9 : DEPT 1 / 9 +To select DEPT 10: DEPT 2 /10 x
The shift key is used when you want to select department numbers 9 to 16.
DEPT
4.2 Department Shift Key Function (can be used on both REG and PRG modes)
The Department System allows you to organise various items into the 16 departments provided, where
each department can be assigned with different status. ( see section 4.3 )
The status’ factory default for all departments are ‘normal department’ and ‘non-taxable’.
Before you change the status from the default status, it is advisable to programme the tax rate first.
You can assign a name/caption e.g. Dept 1 = FRUITS See page 14 for Caption programming.
4.1 Programming the Tax Rates
A maximum of four different tax rates can be programmed {T1, T2, T3 & T4}.
Example: To enter T1 as tax rate 14% and T2 as 8.5%
CARD 14.000
PRG
OFF
REG 1
REG 2
X
Z
Key sequence : < PRG > →{ Tax # } →[ CARD ] →{ Tax Rate } →[ AT/TL = ]
AT / TL =
Tax # : { 1 } = VAT 1 ; { 2 } = VAT 2 ; { 3 } = VAT 3 ; { 4 } = VAT 4
PRG
8.000 AT / TL =
Tax # { 1}Tax # { 1 4 0 0 0 }
CARD
Tax # { 2}Tax # { 8 5 0 0 }
* Taxrate ~( 0.001 %to 99.999 %)
S1 # { 0}S2 # { 0 1 }
price* { 1}
CHECK
0.00
S1 # { 0}S2 # { 0 0 }
price* { 1}0.01
0.001 % →{ 1}
0.012 % →{ 1 2 }
0.123 % →{ 1 2 3 }
1.234 % →{ 1 2 3 4 }
12.345 % →{ 1 2 3 4 5 }
14.000 % →{ 1 4 0 0 0 }
LKEY legend : < > = Control key position; { } = numeric key entry; [ ] = function key entry
LIn PRG mode, you can exit/ESC any time during programming by pressing the [ AT/TL = ] key.
**Print
14.000T1
8.500T2
8
0.01

CMS-218 TUSER GUIDE:
5 PLU (Price Look Up) Settings
PLU Settings
The PLU System allows you to assign fixed item price and department for assorted items.
You can also assign the PLU as a Sub-Department (operate with free pricing).
A caption can be assigned for each PLU e.g. PLU 001 = APPLE See page 14 for Caption programming.
5.1 Programming PLU item price
Example: PLU123 priced at 10.00 Rand which belongs to DEPT 1.
PLU
PRG
1 / 9 +DEPT 1
5.2 Programming PLU status
Status # : { 0 } = Treat as a PLU (fixed price) – default
{ 1 } = Treat as a Sub-Department (free pricing)
Example: PLU125 to be treated as a Sub-department which belongs to DEPT 2.
PRG
OFF
REG 1
REG 2
X
Z
Key sequence : < PRG > →[ X / TIME / dbl ] →{ PLU # } →[ PLU ] →{ price } →[ DEPT ] →[ X / TIME / dbl ]
X / TIME / dbl P001 0.00 P123 0.00
P123 10.00
Note: This step is only necessary for PLUs which operate with free pricing.
Key sequence : < PRG > →[ PO ] →{ PLU # } →[ PLU ] →{ status # } →[ DEPT ] →[ PO ]
PRG
OFF
REG 1
REG 2
X
Z
PLU
PRG
DEPT 2.
P001 0.00 P125 0.00
P125 0.01
PO
2 /10 x
5.3 PLU Dump Report
CLERK 1 PM12-29
30-01-2006 0002
P PLU 001 STATUS 0
FRUITS 1.00T1
APPLE
P PLU 002 STATUS 0
DEPT02 2.00T2
COKE
P PLU 003 STATUS 1
DEPT03 3.00T3
P PLU 004 STATUS 0
FRUITS 4.00T1
MELON
A list of the programmed PLUs can be printed out.
PLU PLU Status
PLU Price
& Tax status
PLU Number 001
Assigned DEPT with caption
PLU 001 with caption
< PRG > →[ PLU ]
PRG
OFF
REG 1
REG 2
X
Z
PLU 002 with caption
DEPT without caption
PLU 003 without caption
DEPT without caption
PRG
LKEY legend : < > = Control key position; { } = numeric key entry; [ ] = function key entry
LIn PRG mode, you can exit/ESC any time during programming by pressing the [ AT/TL = ] key.
PLU # { 1 2 3 }
price { 10.00 }**Non-Print
After you pressthe [DEPT] key, you can loop back and input a preset price, which will be assigned to the next PLU #
displayed, or you can start programming by inputting a new PLU # which is different fromthe assigned # displayed.
P124 0.00
PLU # { 1 2 5 }
status # { 1}
9
PO
ª
ª

CMS-218 TUSER GUIDE: Settings
6 Discount Rate (-%) Key Setting
You can enter a discount value from 0.01 - 99.99%.
10.00 -%
Note: The attribute of [ -% ] in the REG mode is identical with the attribute of the item (Dept or PLU) registered just before.
When [ -% ] is used after Subtotal, it attributes to all the items registered by then.
PRG
OFF
REG 1
REG 2
X
Z
Key sequence : < PRG > →{ 4 digits rate } →[ -% ]
Example: To set an index discount rate at 10% ( = 10.00 ).
PRG P DISCOUNT 10.00%-
**Print
7 Grand Total & Z Counter Clear
PRG RA / EURO0 “#2 TUV 0.20 **Print
Key sequence : < PRG > →{ 20 } →[ RA / EURO ]
PRG
OFF
REG 1
REG 2
X
Z
LKEY legend : < > = Control key position; { } = numeric key entry; [ ] = function key entry
LIn PRG mode, you can exit/ESC any time during programming by pressing the [ AT/TL = ] key.
discount rate { 1 0 0 0 }
P FUNCTIONS 0.20
8 Reset Memory, Reports And Data
All working memory will be cleared, after that, return to idle status.
A partial reset deletes the last malfunction. The programming is retained.
Power OFF the machine. Then holding down and keys Power ON
C7 @
All working memory, all report data will be cleared.
All sales are deleted. The programming is retained.
Then holding down and keys Power ON
C7 @9 DEF
All working memory, all report data,all program data will be cleared.
All programming and sales are deleted. The cash register is reset to its default factory settings.
Power OFF the machine. Then holding down and keys Power ON
C7 @3 WXYZ
8.1 Partial Reset
8.2 Full Reset Reports
Power OFF the machine.
8.3 Full Reset All Data
Reset System
10

11
CMS-218 TUSER GUIDE: FC Settings & Operations
9.1 Foreign Currency (FC) Settings
A maximum of 4FC presets can be programmed. The following must be entered for the programming :
→{ FC # } – 1, 2, 3 or 4
→{ Exp } – For setting decimal place of FC rate : 0 to 8
→{ D.P. } – For setting decimal place of converted amount : 0 to 3
→{ RATE } – Exchange rate : 6-digit entry from 000001 to 999999
PRG
Key sequence : < PRG > →{ FC # } →{ Exp } →{ D.P. } →{ RATE } →[ ST ] Subtotal key
ST
PRG
OFF
REG 1
REG 2
X
Z
P FC RATE 1320001.35
P FC RATE 2220000.16
P FC RATE 3320190.59
FC # { 1 }EXP # { 3 }DP # { 2 }rate { 0 0 0 1 3 5 }1320001.35
EXP
FC # 1 →R1.00 = 0.135 Euro ( i.e. LOCAL = 0.135 LOCAL)
FC # 2 →R1.00 = 0.16 USD
FC # 3 →R1.00 = 19.059 Yen
( Rates used for demo purpose only )
Example: To preset the following FC rates
ST
FC # { 2 }{2 }{ 2 }{ 0 0 0 0 1 6 }2220000.16
ST
FC # { 3 }{3 }{ 2 }{ 0 1 9 0 5 9 }3320190.59
EXP
**Print
9.2 FC Conversion Operations
Subtotal Amount ×FC exchange rate = Converted Amount
Sequence : < REG > →{ PLU Entry } →[ ST ] →{ FC # } →[ RA / EURO ] →{ FC amt tendered } →[ AT/TL = ]
PRG
OFF
REG 1
REG 2
X
Z
9.2a Example: Direct Tender
9.2b Example: Over Tender
E.g. FC exchange rate : 0.16 (D.P = 2)FC # 2 Caption = FC-2 SYSTEM D.P = 2
ST
PLU # { 1}PLU
AT / TL =
01 10.00
Subtotal key S 10.00
FC # { 2}RA / EURO
RA / EURO S 10.00
FC # { 2}RA / EURO 1.60
=1.60
10.00 x 0.16 =1.60
FC# 2 total
FC cash amount
ST
price { 10.00 }
AT / TL =
01 10.00
Subtotal key S 10.00
FC # { 2}RA / EURO 1.60
2.00
C2.50
10.00 x 0.16 =1.60
Total in FC
Change amount in FC-2
1 / 9 +
E.g. FC exchange rate : 0.16 (D.P = 2)FC # 2 Caption = FC-2 SYSTEM D.P = 2
Non-print
FC amt tendered { 2.00 }Amt. tendered in FC
//////////////////////
/ YOUR RECEIPT /
/ THANK YOU /
//////////////////////
CLERK 1 PM12-29
30-01-2006 0020
PLU 001 10.00
------------
SUBTTL 10.00
FC-2 *0.16 1.60
CASH FC-2 1.60
//////////////////////
/ YOUR RECEIPT /
/ THANK YOU /
//////////////////////
CLERK 1 PM12-29
30-01-2006 0021
DEPT01 10.00
------------
SUBTTL 10.00
FC-2 *0.16 1.60
CASH FC-2 2.00
CHANGE 2.50
CHANGE FC-2 0.40
Change amt. in Rand
Sequence : < REG > →{ Dept Entry } →[ ST ] →{ FC # } →[ RA / EURO ] →{ FC amt tendered } →[ AT/TL = ]
*
*
*
1.60
Change amount in Rand
Amount tendered in FC
CL ;EJ
Subtotal value is shown on the display using FC
exchange rate. Original value and converted value are
shown in turn each time when depressed the key. 1. 6 0
Converted amount is displayed
with a ‘square box’ lighted here

CMS-218 TUSER GUIDE: Calculator Settings & Operations
In REG1 or 2 idle mode (i.e. when a "Sales Transaction“ is not in progress) the calculator mode can be
activated following the steps below.
REG
function # { 8 }
C
{ 1 2 3 4 5 }
Example: To set the calculator mode password as 1234.
PRG RA / EURO
10.1 Calculator Mode Password Setting
Key sequence : < PRG > →{ function # = 8 } →{ 4-digit password } →[ RA / EURO ]
PRG
OFF
REG 1
REG 2
X
Z
P FUNCTIONS 812.34
**Print
password # { 1 2 3 4 }
10.2 Calculator Mode Operations
PRG
OFF
REG 1
REG 2
X
Z(1) Key in the preset password. If a wrong password is used, this mode will not activate.
Calculator mode can be activated without a password if the password is programmed to "0000".
(2) Press [ AT/TL = ] and hold down. Then press [ C ] while the [ AT/TL = ] key is being held down.
(3) To exit Calculator mode, repeat step (2).
Note: If the password # is programmed to "0000“, Calculator mode can be activated without keying in the password.
Example 1: Password = ‘1234’
and hold down AT / TL =
Example 2: Password = ‘0000’
REG Cand hold down AT / TL =
To exit C
and hold down AT / TL =
To exit C
and hold down AT / TL =
to enter Calculator mode.
In Calculator mode, an indication bar is lighted here
In this mode, print function is not operational.
During Calculator operation, key tone is muted.
When a result from a division includes figures below zero, it will be rounded to a nearest integer after
rounding up/down ( 5/4 ) the first place after the decimal point.
Operation Notes
Key Functions
1 PQRS
0 “#
2 TUV 3 WXYZ
4 GHI 5 JKL 6 MNO
7 @8 ABC 9 DEF
00 SP/
C
1 / 9 +
5 /13 –
2 /10 x
6 /14 :
AT / TL =
CL ;EJ
ECR display
→Clear
→=
→+
→–
→x
→:
{ Numeric } entry keys
........+) 12345
…….+) 10
…….- ) 2
…….- ) 100
…….=) 12253
……… 0
1 / 9 +
5 /13 –
{ 1 0 }
{ 2 }
5 /13 –{ 1 0 0 }
AT / TL =
Input Demo
C
500 x 2 = 1000
{ 5 0 0 }2 /10 xAT / TL =
500 / 2 = 250
{ 5 0 0 }AT / TL =6 /14 :
{ 2 }
{ 2 }
password # { 1 2 3 4 }
12

L
CMS-218 TUSER GUIDE: Caption Settings
11 Caption Settings
11.1 Character Allocation Chart
In Caption programming mode, each numeric key is allocated various numbers of characters. You can
scroll through the list by pressing the same numeric key repeatedly. After the last character allocated is
displayed, the offset starts from the first character again. To select a character, stop pressing at the
required character and then continue to select another character.
1 PQRS
0 “#
2 TUV
3 WXYZ
4 GHI
5 JKL
6 MNO
7 @
8 ABC
9 DEF
·
7
9
8
_
6
5
4
y
2
r
&
6
Ð
Á
{
Ń
Ł
G
z
Ú
s
'
7
Ė
A
Ñ
ł
Ġ
3
Ű
1
(
8
ëêéèeėÊÈÉĘfedFED
ćcäâàąáÇĆCßÄÂÀÅĄcbaCBA
↑」「ⅢⅡⅠ¿¨ŒÆØΣ←→§¡~}^]∖[@7
òöôόōőóńñÖÔόŌŐÓonmONM
lkj
ìígÏÎİÍihgIHG
zźZŹÝxwZYXW
úùûűüůÜÛÙŮvutVUT
śşрŚŞqpSRQP
?>=<;:/.-,+*)%$#"!0
654321098765432109543
1
Offset →
Ş
11.2 Control Options for Character Inputting
00 SP / ENT
•DEL
Double Width character shift key. Press this key preceding each Double Width character you wish to input.
X Y
Offset value for the numeric key
Display format
Allocated character
1 time 0 J
5 JKL
2nd time
5 JKL 1 K
3rd time
5 JKL 2 L
Dual function control key.
1) As a character ‘SPACE’ key. Press this key once to allocate a space, and the press again to move the
cursor to the next position for character input. For multiple spaces press this key repeatedly.
2) As a character ‘ENTER’ key. A same character cannot beinputted consecutively without using thiskey.
This key is used to fixed a character before the same character can be inputted again
For example “AAA”. After inputting the 1st “A”, press the [ SP/ENT ] key to move the cursor to the next
character location. Then key in the 2nd “A”. Press [ SP/ENT ] again and the 3rd “A”.
Deleting character entry/input like back-space of PC i.e. to delete the last character displayed one at a time.
You can programme captions or names for PLU items, Departments, Clerks, Receipt Header and Foreign
Currencies.
X / TIME / dbl
*
*
13
J K
20

CMS-218 TUSER GUIDE: Caption Settings
11.3 Selecting Caption Programming Modes
Normal programming mode
0.00
# / NS
Set key to PRG.
1 time P001 PLU caption mode
# / NS 2nd time D01 DEPT caption mode
# / NS 3rd time C01 CLERK caption mode
# / NS 4th time H01 Header message mode
# / NS 5th time F01 Foreign currency mode
# / NS 6th time 0.00 Back to Normal programming mode
11.4 Selecting a Caption Number
After a Caption mode has been selected, the individual caption number in that Caption mode can be
selected using the plus and minus keys.
1 / 9 +5 /13 –
Example: If you are in the PLU caption programming mode
P001 PLU caption mode
1 / 9 +P002
1 / 9 +P003
Use the [ + ] key
to move forward
to higher number
P002 [ - ] key to move to
lower number
5 /13 –
Mode Numbers/mode
PLU P001 P200
Department D01 D16
Clerk C01 C08
Header H01 H04
Foreign Currency F01 F04
You can exit any time during the programming sequence by AT / TL =
PRG
OFF
REG 1
REG 2
X
Z
PRG
OFF
REG 1
REG 2
X
Z
11.5 Inputting Text for a Caption
Example: To key in a text caption “APPLE” for PLU 001
# / NS
3 times to input ‘L’
1 time for ‘A’
The next caption number appears
CHECK
Caption mode.
Max. no. of characters/mode. PLU Department Clerk Header Foreign Currency Footer
12 12 12 24 10 24
5 JKL
8 ABC
9 DEF
P001 0 A 1 time for ‘P’
1 PQRS 0 AP
00 SP/to fix ‘P’ and move the cursor 1 PQRS again for another ‘P’
0 AP 0 APP
2 APPL 1 APPLE
2 times for ‘E’
P002
1 / 9 + 5 /13 –Note: Before [ AT/TL = ] key is pressed, you can use and keys to toggle up/down the PLU caption numbers.
You can exit any time during the programming sequence by AT / TL =
# / NS
PRG
PRG
OFF
REG 1
REG 2
X
Z
Key sequence : < > = Control key position [ ] = depressing one of the function keys isnecessary
< PRG > →[ # / NS ] to toggle between the different programming modes.
Key sequence : < > = Control key position { } = entry from the numeric keypad is necessary [ ] = depressing one of the function keys is necessary
< PRG > →[ # / NS ] to toggle →{ input text } →[ CHECK ]
You can exit during the programming sequence by AT / TL =
14

CMS-218 TUSER GUIDE: System Options
12 Programming Options for System Functions
You have the options to change the settings/formats for the various system functions available in the ECR.
Key sequence: < PRG > →{ 1 or 2 digits System Function # } →{ 1 digit Option # } →[ RA ]
PRG 4 GHI RA / EURO
Example : To change the Time display format from 12-hour (default) to 24-hour format.
< PRG > →{ Function # = 4 } →{ Option # = 0 } →[ RA ]
0 “# 0.40 to confirm.
2 = European rounding - Swedish
3 = European rounding - Danish
4 = Language – Dutch
5 = Language – Danish
6 = Language – Portuguese
7 = Language – Swedish
0 = Rounding method for VAT calculation – Round down
1 = Rounding method for VAT calculation – 5/4 (Default)
2 = Rounding method for VAT calculation – Round up
14
0 = No European rounding (Default)
1 = European rounding - Switzerland
13
0 = Zero price entry will not be allowed (Default)
1 = Zero price entry will be allowed
12
0 = Language - English (Default)
1 = Language - French
2 = Language - German
3 = Language - Spanish
11
Reserved10 Reserved9Reserved8
0 = Date format - Month-Day-Year
1 = Date format - Day-Month-Year (Default)
7
Reserved6
0 = Print X/Z report header – NON PRINT
1 = Print X/Z report header – PRINT (Default)
5
0 = Time display - 24HR indication
1 = Time display - 12HR indication (Default)
4
1 = Add-on TAX
2 = VAT TAX (Default)
3
Reserved
2
0 = Decimal point position – n
1 = Decimal point position – n.n
2 = Decimal point position – n.nn (Default)
3 = Decimal point position – n.nnn
1
Option #Function #
Note 2
PRG
OFF
REG 1
REG 2
X
Z
Note : When European rounding is selected, the payment value is rounded as following method.
Rounding is performed when press total key or subtotal key.
Swiss Rounding
0.01 – 0.02 = 0.00
0.03 – 0.07 = 0.05
0.08 – 0.09 = 0.10
Swedish Rounding
0.00 – 0.24 = 0.00
0.25 – 0.74 = 0.50
0.75 – 0.99 = 1.00
Denmark Rounding
0.00 – 0.12 = 0.00
0.13 – 0.37 = 0.25
0.38 – 0.62 = 0.50
0.63 – 0.87 = 0.75
0.88 – 0.99 = 1.00
15

CMS-218 TUSER GUIDE:
12 Programming Options for System Functions
Key sequence: < PRG > →{ 1 or 2 digits System Function # } →{ 1 digit Option # } →[ RA ]
0 = Multiple Receipt issuing is allowed (Default)
1 = Multiple Receipt issuing is not allowed
15
0 = Zero skip printing Z report (Default)
1 = No zero skip printing Z report
16
0 = Print total VAT amount – Non print (Default)
1 = Print total VAT amount – Print
17
0 = Print Taxable amount splited per rate – Non print (Default)
1 = Print Taxable amount splited per rate – Print
18
5 = 1.75 mm
6 = 2.00 mm
7 = 2.25 mm
8 = 2.5 mm
9 = 2.75 mm
0 = Warning beep for ‘EJ nearly full’ issued at start of transaction. (Default)
1 = Warning beep for ‘EJ nearly’ full NOT issued at the start of transaction.
29
0 = Consecutive counter will not be reset in Z financial report. (Default)
1 = Consecutive counter will be reset in Z financial report.
30
Character size for printing 0 = 7(W) x 12(H) Font (Default)
1 = 5(W) x 10(H) Font - small size
97
Line space width for printing
0 = 0.5 mm
1 = 0.75 mm
2 = 1.00 mm (Default)
3 = 1.25 mm
4 = 1.5 mm
98
0 = Warning beep for ‘EJ nearly full’ issued at end of transaction. (Default)
1 = Warning beep for ‘EJ nearly’ full NOT issued at the end of transaction.
28
0 = All transaction in REG mode is buffered to EJ memory. (Default)
1 = Only sales transaction in REG mode is buffered to EJ memory. In other words, RA,
PO and Non-sale is not buffered to EJ memory.
27
0 = EJ is Active. (Default)
1 = EJ is not Active.
26
0 = Tax details print – Before tender
1 = Tax details print – After tender (Default)
25
Reserved (Do not enter 1 as status, only allow to enter 0 as status)
24
0 = Time will print (Default)
1 = Time will not print
23
0 = Print tax symbol at right hand side of amount – Non print
1 = Print tax symbol at right hand side of amount – Print (Default)
22
0 = Print total Taxable amount out of VAT – Non print (Default)
1 = Print total Taxable amount out of VAT – Print
21
0 = Print Taxable amount out of VAT splited per rate – Non print (Default)
1 = Print Taxable amount out of VAT splited per rate – Print
20
0 = Print total Taxable amount – Non print (Default)
1 = Print total Taxable amount – Print
19
Option #Function #
PRG
OFF
REG 1
REG 2
X
Z
System Options
16

CMS-218 TUSER GUIDE: Register Operations
This section gives information regarding the operation.
13 Register Operations
All operations is performed with the Control Switch in the REG 1 or 2 position
The term ‘department entry’ is used in many times in the operating sequences. This refers to a normal
department entry - remember that an amount must be entered via the numeric keypad before depression
of a department key.
An error prompt is shown as symbol ‘E’ which appears on the display, follow by an
error tone which is cleared by pressing the Clear key. An error prompt indicates an
incorrect key sequence, or a compulsory function has not been performed.
E 0.00
This ECR has 3000 lines for EJ memory. Those are used for REG mode transaction and Z financial report.
Therefore, other transaction like X report and programming dump report will not be buffered to EJ memory.
Warning indicator for ‘Nearly Full’ EJ
‘Nearly Full’ means less than 500 lines
remaining in buffer memory.
13.1 Department Entry note
13.2 Error Prompt note
13.3 Electronic Journal (EJ) notes
In case of ‘Nearly Full’ EJ in REG mode
When the EJ memory is ‘nearly full’, the indicator will be lit. Warning beep ( about 2 seconds) will be
emitted. There are two programmable options – (1) Beep at the end of transaction. (2) Beep at the start of
transaction. See page 16 -- Function # 28 & 29.
In case of ‘Full’ EJ in REG mode
When the EJ memory is full, the message will be displayed as
This is displayed at the start of transaction. And, a warning beep ( about 2 secs ) will be sounded.
At this time, ECR will wait some input.
If key is inputted, the transaction will be able to start.
This transaction will not be saved to EJ memory and Consecutive counter will not be updated in this case.
If key is inputted, the transaction will be escaped.
‘Full’ EJ memory means to less than 150 lines for remaining in buffer memory.
.
EJ FULL
C
VOID
13.4 EJ Balance and Time Displays
In REG mode, when you are LOG ON as a Clerk, you can view the Time and EJ balance by using the
[ X / TIME / dbl ] key as a toggle.
X / TIME / dbl ι1-18
1st time. The Time will be displayed.
X / TIME / dbl 11.00
2nd time. The EJ balance will be displayed.
X / TIME / dbl ι1-18
again. The Time will be displayed again.
i.e. the free capacity of EJ
17
CL ;EJ
ECR display

CMS-218 TUSER GUIDE: Operations
System function options at factory default** (refer Options chart at pages 15 and 16)
13.5a Sample Receipt 1
17=0 Print total VAT amount – Non print
18=0 Print Taxable amount splited per rate – Non print
19=0 Print total Taxable amount – Non print
20=0 Print Taxable amt out of VAT splited/rate – Non Print
21=0 Print total Taxable amount out of VAT – Non print
22=1 Print tax symbol at right hand side of amount – Print
Store Header (4 Line)
Double Character..12/Line
Std Character..24/Line
Time
Consecutive Number
Taxable 1 Department
Taxable 2 Department
Taxable 3 Department
Taxable 4 Department
Non-taxable Department
Subtotal
Cash Amount
Change
VAT 1 Amount
VAT 2 Amount
VAT 3 Amount
VAT 4 Amount
Clerk Name
Date
Department Caption
13.5b Sample Receipt 2
System function options
17=1 Print total VAT amount –Print
18=0 Print Taxable amount splited per rate – Non print**
19=0 Print total Taxable amount – Non print**
20=0 Print Taxable amt out of VAT splited/rate – Non Print**
21=0 Print total Taxable amount out of VAT – Non print**
22=1 Print tax symbol at right hand side of amount – Print**
Total VAT Amount
5 /13 –
2 /10 x
3 /11
4 /12
Control Key position < RECEIPT >
1 / 9 +
price { 1.00 }Dept 1
price { 2.00 }Dept 2
price { 3.00 }Dept 3
price { 4.00 }Dept 4
price { 5.00 }Dept 5
ST Subtotal cash tendered { 20.00 }
AT / TL = to conclude transaction
5 /13 –
2 /10 x
3 /11
4 /12
Control Key position < RECEIPT >
1 / 9 +
price { 1.00 }Dept 1
price { 2.00 }Dept 2
price { 3.00 }Dept 3
price { 4.00 }Dept 4
price { 5.00 }Dept 5
ST Subtotal cash tendered { 20.00 }
AT / TL = to conclude transaction
PRG
OFF
REG 1
REG 2
X
Z
PRG
OFF
REG 1
REG 2
X
Z
18
** Factory default setting
Other manuals for CMS 218T
1
Table of contents
Other OfficeMaster Cash Register manuals