CRM Solar Shower User manual

User’s Manual
Installation Instructions for your CRM Solar Shower
Before you begin, read these instructions carefully.
Instructions pour installer votre douche solaire CRM
Veuillez lire attentivement ces instructions avant de commencer.
Pub. No. 01-019. Rev.01
Note to installer. Be sure to leave these instructions with the customer.
Note pour la personne procédant à l'installation. Assurez-vous de bien laisser
ces instructions au client.
Manuel d’utilisation
®

English
Français
OWNER’S MANUAL
Your Solar Shower has been engineered, manufactured and assembled in Spain.
Votre douche solaire a été conçue, fabriquée et assemblée en Espagne.
Please follow the instructions indicated in this document and make sure you solve any doubts you have
during the CRM Solar Shower assembly.
You can contact us by calling +34 925 869 909 or send us an e-mail to:
Suivez les instructions indiquées dans ce document et veillez à résoudre toutes les questions que vous
pourriez avoir lors de l'installation de la douche solaire CRM.
Vous pouvez nous contacter en appelant le +34 925 869 909 ou en nous envoyant un e-mail à:
ROYCE TECNOLOGÍAS EFICIENTES, S.L.
Polígono Industrial Torrehierro
Calle Gutenberg, 343-345
Talavera de la Reina, Toledo (SPAIN)
Phone: (+34) 925 869 909
www.industriascrm.com
2
5
WARNING!
Small parts. Not for Children under 3 years.
ATTENTION!
Ce produit contient des petites pièces. Ne convient pas aux enfants de
moins de 3 ans.
Manuel d’installation, d’utilisation et de maintenance
Manual for the Installation, Use and Maintenance
© 2018 ROYCE TECNOLOGIAS EFICIENTES, S.L. All rights reserved. This document is subject to change without notice.
Todos los derechos reservados. Este documento está sujeto a cambios sin previo aviso.

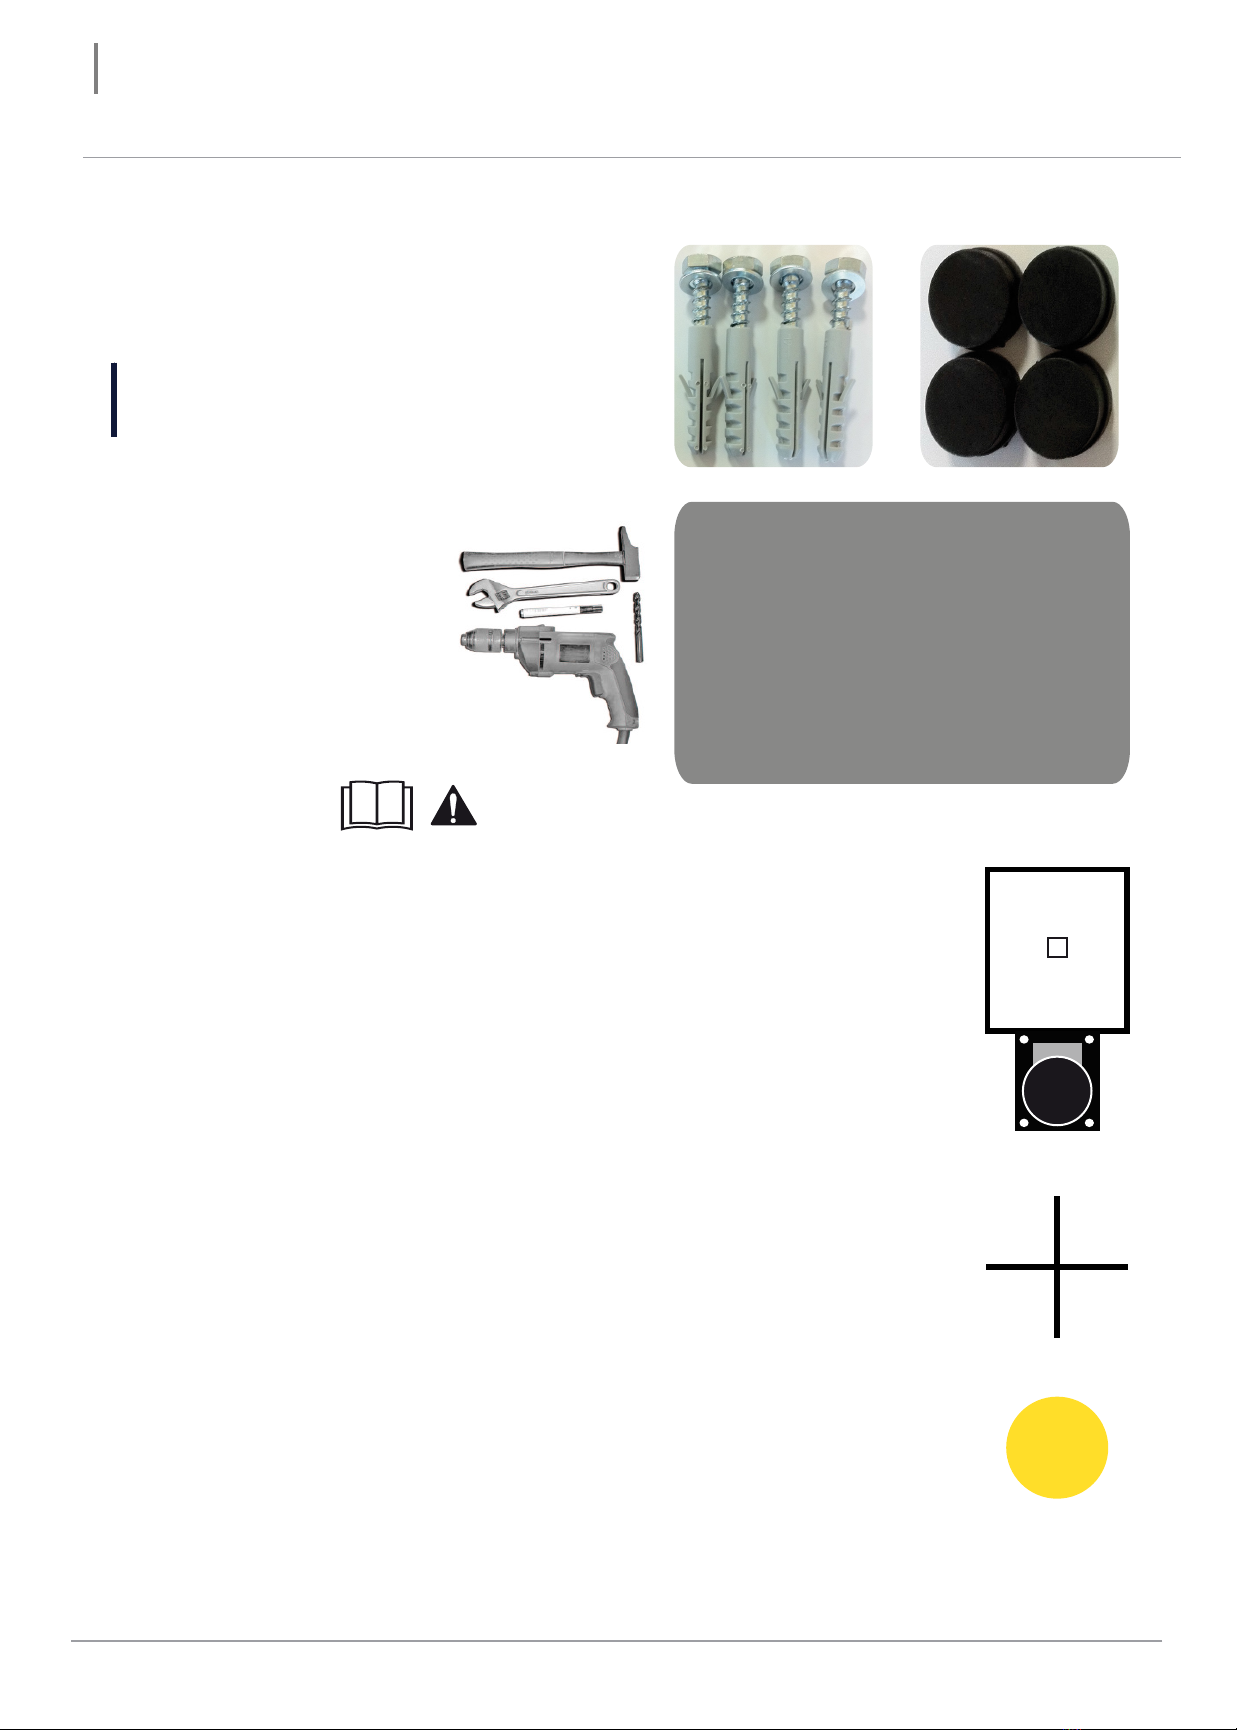
TOOLS NEEDED
. Hammer
. Monkey wrench
. Power drill
. 12mm Bit
. Marking pen
Make the most of your outdoor living space and enjoy a warm shower thanks to sun’s energy.
2
INSTALLATION
N
E
S
W
The following accessories are included:
1Fixing set
4 screws
4 expansion plugs
4 washers
ACCESORIES
When using tools, take care of your new
solar shower.
CRM recommends using a cloth or plastic
between wrench and shower parts to
avoid damage.
SUN
In the northern hemisphere, in order to face the sun and obtain maximum
solar gain, the solar shower’ collector would face the south. In the southern
hemisphere, however, the solar collector should be placed facing the north.
1. Choose the place where you would like to put the shower. Remember to
choose a flat, solid and firm place.
2. Lay the shower box in a safe and solid ground and place it with the stapled
flap facing up. Start taking off the staples carefully, so you don´t damage
yourself or the shower.
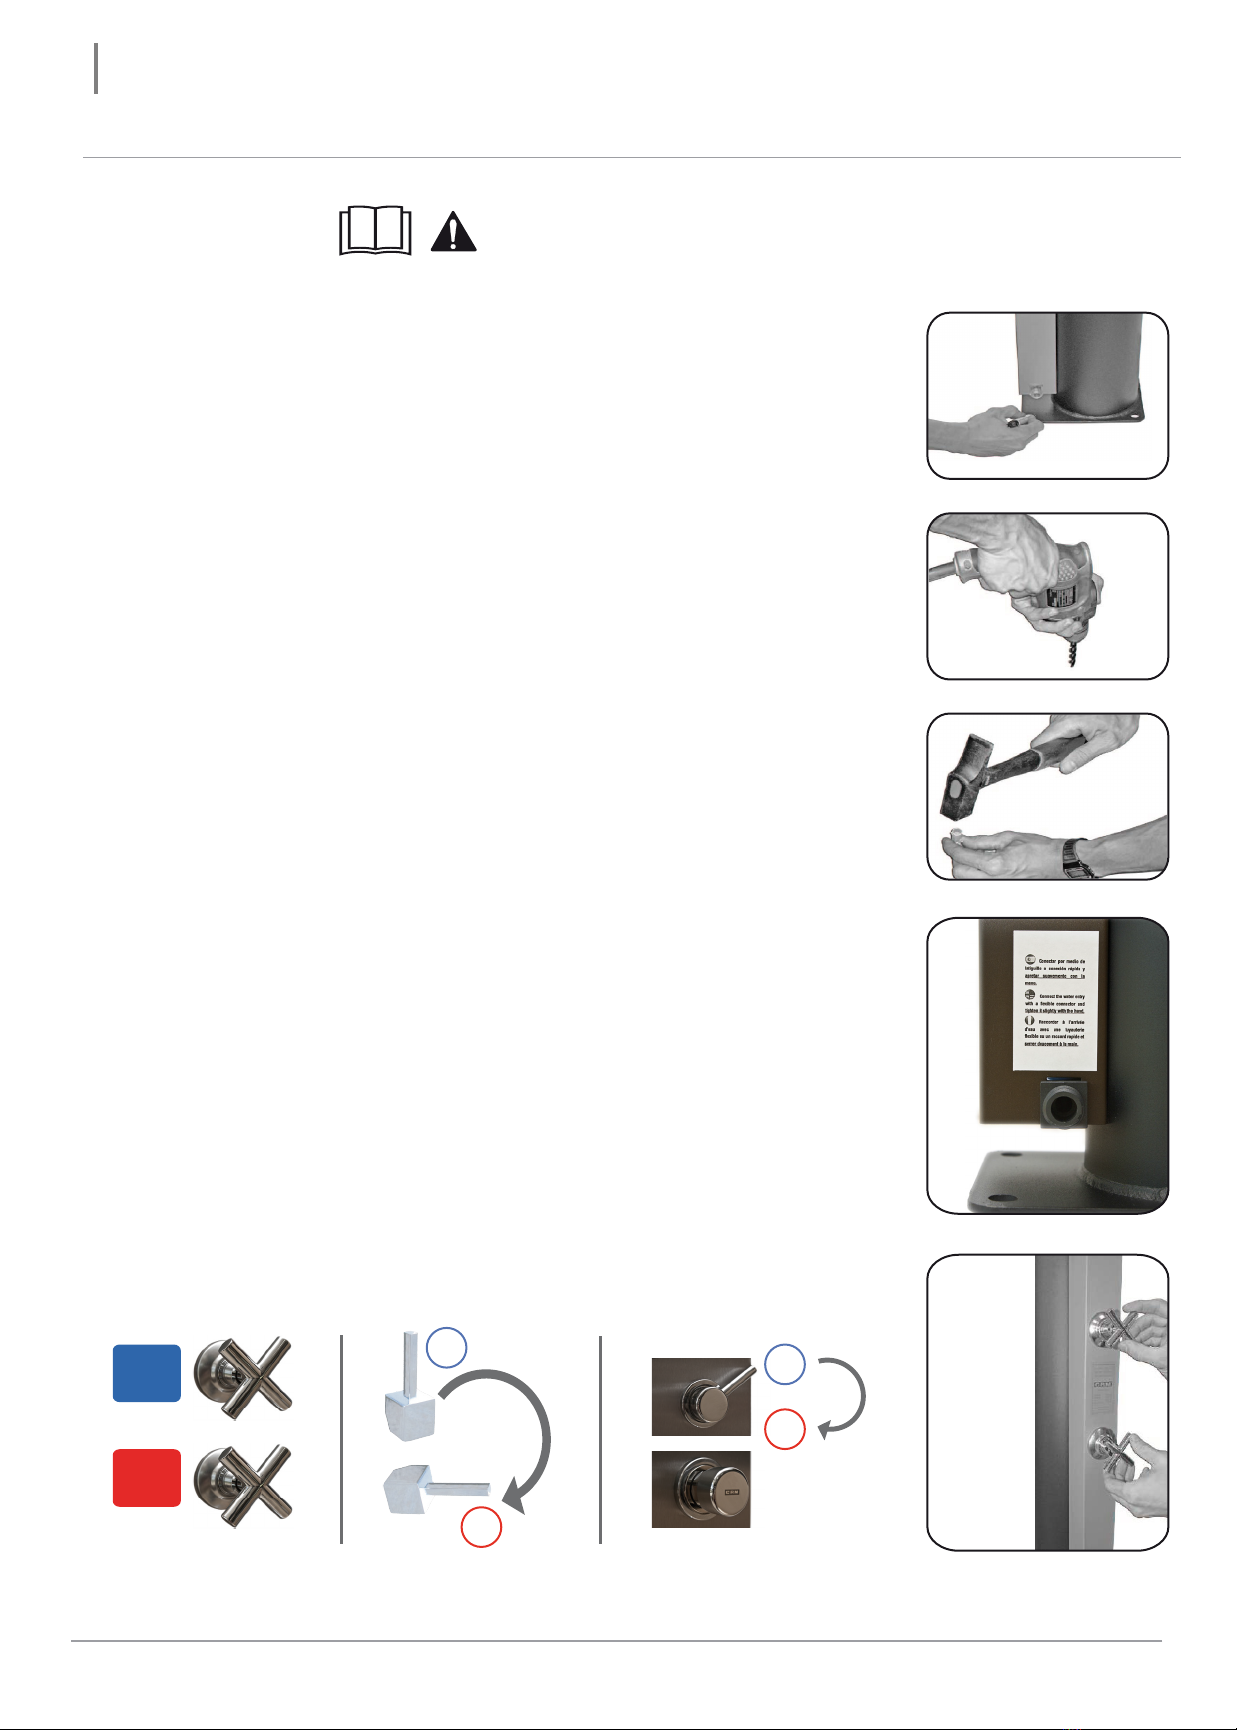
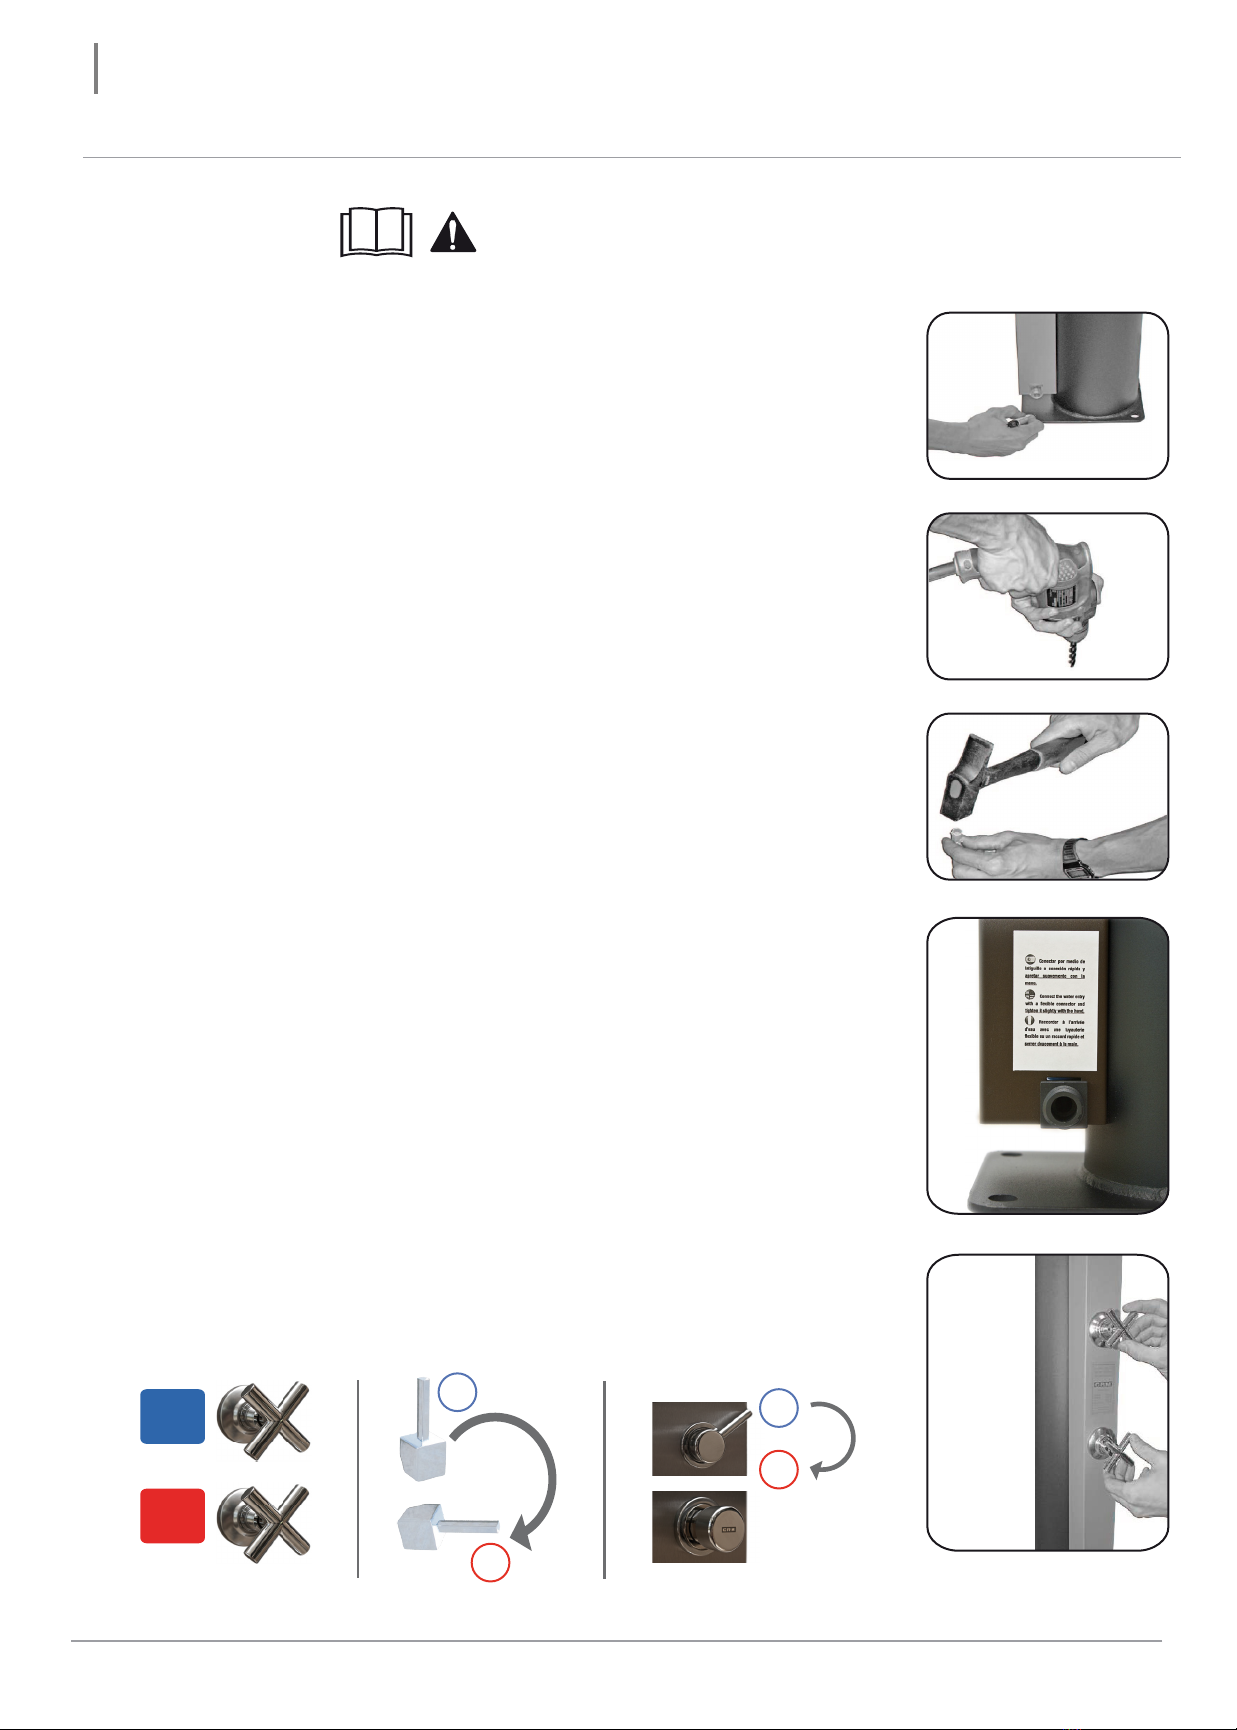
3. Take the showerhead and shower arm that is supplied with the Solar
Shower and fit it into the water outlet. Twist it clockwise by hand to secure
it into place. Once the showerhead is secure, use an adjustable wrench and
a cloth to tighten the shower arm nut. Use a rag to prevent scratching the
front panel.
4. Install the solar shower vertically and place it in a flat and firm surface.
5. Take a marker and indicate the four holes of the holding board, where the
screws will be placed, and we put the shower back in the box in horizontal
position to avoid any damage.
Manuel d’installation, d’utilisation et de maintenance
Manual for the Installation, Use and Maintenance
Make the most of your outdoor living space and enjoy a warm shower thanks to sun’s energy.
3
INSTALLATION
CONTROL KNOBS POSITION
Cold
Hot
H
cc
H
MIXER TAP POSITION
6. Drill 4 holes of 60 mm of depth using the base of the shower and marks
as a reference.
7. Take the bag with the screws, insert 4 expansion plugs into holes.
8. Bring the shower back to its vertical position, on top of the holes you just
made. Hold the shower, by the front with the hand, while you place the
screws into holes and tight them slightly with the other hand. This way we
will avoid the shower to move.
9. Once the 4 screws are in, grab a wrench and finish tightening the screws.
Do not overtighten, they may crack.
10. Make sure the solar shower is perpendicular to the ground.
11. Let the water run before attaching the connecting tube to the main water
supply to prevent clogs in any part of the system caused by sediment from
the water system that could be introduced into the shower’s pipe system.
12. Connect the Solar Shower to the main water supply with a 1/2” flexible
connector. Tighten it with the hand. A quick connect adaptor can be used for
the water inlet.
13. Open the hot water knob until water comes out from the showerhead.
This way we will know that the tank is full.
14. Close the hot water knob and the shower will be ready to use. The water
will take a few hours to heat up for the first time. Afterwards, while you use
the shower, it fills up and it warms up at the same time.
Turn on the cold water first, then adjust the water temperature. If you start
opening the hot water first, you may get scalded!
MIXING TAP POSITION
Manuel d’installation, d’utilisation et de maintenance
Manual for the Installation, Use and Maintenance

®
Make the most of your outdoor living space and enjoy a warm shower thanks to sun’s energy.
4
MAINTENANCE
IMPORTANT NOTES
Warning: this article is
not guaranteed for
damage incurred due
to freezing, hard
water or salt water.
When the shower is only used sporadically (weekends, holidays, etc.) it is
recommended to let the hot water run for about three minutes, so that all
the water in the solar collector is renewed. This way you allow the chlorine
or other sanitary treatments to be removed from the system.
Winterize your Solar Shower
In winter, the entire system must be totally drained. Empty the shower as
indicated below:
1.Close the stopcock.
2.Open the back drain plug (hexagonal screw at the bottom) to empty the
solar collector.
3.Loosen up the connector of inlet water (main water supply) to let the
water drain out.
4.Turn on both taps or mixer tap to empty out the water.
Winterize your outdoor solar shower to prevent damage outdoors as you do when caring for your outdoor
furniture. Empty out the water to avoid freeze damage, cover or store your shower in a sheltered area.
Please read this before you even think of your solar shower has a leak.
When the water is heated by the sun, may drop from the showerhead. This is normal. When turning on
hot water, the tank fills up with cold water, and due to the warming up, the volume of the water increases
and the showerhead could drip. It is possible that water continues to dribble out of the showerhead
after turning the water off. This is normal and it stops within a few seconds.
Do not tighten hard. Over tightening the handle when turning off the tap, it could cause damage to the
brass stem assembly.
The pipes may get dirty with sediments therefore it is likely that the shower water filter could get dirty.
Twist the showerhead off and clean the filter screen. Make sure all debris is removed from the filter.
Manuel d’installation, d’utilisation et de maintenance
Manual for the Installation, Use and Maintenance
OUTILS
. Marteau
. Clé anglaise
. Perceuse
. Foret de 12 mm
. Marqueur
Make the most of your outdoor living space and enjoy a warm shower thanks to sun’s energy.
Manuel d’installation, d’utilisation et de maintenance
Manual for the Installation, Use and Maintenance
5
INSTALLATION
N
E
S
W
Livré avec les accessoires suivants:
1 kit de fixation:
4 vis
4 chevilles
4 rondelles
ACCESSOIRES
Lorsque vous utilisez des outils, faites
attention à la nouvelle douche solaire.
CRM recommande de placer un chion ou
un plastique protecteur entre la clé
anglaise et les éléments de la douche pour
éviter tout dommage.
Utilisez un morceau de tissu pour éviter de
rayer le devant de la douche.
SOLEIL
Dans l'hémisphère nord, pour qu’il soit orienté vers le soleil et capte de
manière optimale le rayonnement solaire, le capteur de la douche solaire
doit être orienté vers le sud. Dans l'hémisphère sud, le capteur solaire doit
par contre être orienté vers le nord.
1. Choisir l'emplacement où vous souhaitez installer la douche. Il est
recommandé de choisir une surface plane, solide et stable.
2. Placer la boîte dans un endroit sûr et stable, avec le rabat agrafé vers le
haut. Commencer à enlever les agrafes avec précaution afin de ne pas vous
faire mal et de ne pas endommager la douche.
3. Prendre le pommeau de douche et le bras qui sont fournis avec la douche
solaire et visser sur la sortie d'eau située sur le devant, sur la partie
supérieure. Tourner avec la main dans le sens des aiguilles d’une montre
pour bien positionner le pommeau de douche. Après avoir installé le
pommeau, utiliser un chiffon ou quelque chose d’équivalent et une clé
anglaise réglable pour serrer l'écrou du système de douche.
4. Mettre la douche solaire en position verticale et la placer sur une surface
lisse et stable.
5. Prendre un feutre et marquer l’emplacement des 4 trous du socle, là où les
vis seront placées. Remettre la douche dans la boîte, en position horizontale
pour éviter qu’elle ne s’abîme.
Make the most of your outdoor living space and enjoy a warm shower thanks to sun’s energy.
6
INSTALLATION
POSITION DES ROBINETS
Cold
Hot
H
cc
H
POSITION DU ROBINET
MÉLANGEUR POSITION DU ROBINET MITIGEUR
Manuel d’installation, d’utilisation et de maintenance
Manual for the Installation, Use and Maintenance
6. Percer 4 trous de 60 mm de profondeur dans le socle de la douche, à
l’endroit où vous avez fait les marques.
7. Prendre le sachet contenant les vis et insérer les 4 chevilles dans les trous.
8. Remettre la douche en position verticale. Mettre les vis dans les trous en
soutenant bien le devant de la douche avec la main, puis serrer délicatement
avec l'autre main. Cela permet de ne pas faire bouger la douche.
9. Lorsque les 4 vis sont bien en place, finir de les serrer avec une clé
anglaise. Ne pas serrer trop fort, cela pourrait casser les chevilles.
10. S’assurer que la douche est bien perpendiculaire au sol.
11. Laisser couler de l’eau avant de raccorder le tuyau à l'arrivée d’eau du
réseau pour éviter que les sédiments qui pourraient pénétrer dans le système
de tuyauterie n’obstruent ou n’endommagent une partie du système.
12. Raccorder la douche à l’arrivée d'eau avec un tuyau de 1/2”. Visser à la
main. Il est possible d’adapter un connecteur rapide à l'arrivée d'eau de la
douche.
13. Tourner le robinet d'eau chaude jusqu'à ce que de l'eau sorte du pommeau.
Cela permet de savoir que le réservoir est plein.
14. Fermer le robinet d'eau chaude après avoir vérifié que la douche était
prête à l'emploi. L'eau mettra quelques heures à chauffer lors de la première
utilisation. Par la suite, le réservoir se remplit en utilisant la douche et l'eau
chauffe en même temps.
Tourner d'abord le robinet sur la position « eau froide » avant de l’ouvrir puis
régler la température de l'eau à votre convenance. Si vous commencez par
ouvrir le robinet d'eau chaude, vous pouvez vous brûler!

®
7
ENTRETIEN
OBSERVATIONS IMPORTANTES
Attention: la garantie
ne couvre pas les
dommages causés
par le gel, l’eau dure
ou l'eau salée.
Préparer la douche solaire pour l’hiver
En hiver, le système doit être entièrement vidé.
Vider la douche comme indiqué ci-dessous:
1. Fermer le robinet d'arrêt (réseau d’alimentation).
2. Retirer la vis de vidange (vis hexagonale) située à l’arrière, au bas du
réservoir solaire.
3. Desserrer le raccord d'arrivée d'eau de la douche (tuyau) pour vider
l'ensemble de la tuyauterie à l’intérieur du système.
4. Ouvrir les 2 robinets d'eau chaude et d’eau froide, le mélangeur ou le
bouton-poussoir temporisé, si la douche en est équipée, afin de vider
entièrement les tuyaux à l’intérieur du système.
Lorsque la douche est utilisée sporadiquement (le week-end, pendant les
vacances, etc.), il est recommandé de laisser couler l'eau chaude pendant 5
minutes de manière à renouveler entièrement l'eau du réservoir. Cela permet
ainsi d’éliminer le chlore ou tout autre traitement sanitaire présent dans le
système.
Préparer la douche solaire pour l’hiver pour éviter qu’elle ne soit endommagée en restant dehors, de
la même manière que vous le faites lorsque vous prenez soin de votre mobilier extérieur.
Vider l'eau pour éviter les dommages causés par le gel, couvrir la douche ou même la stocker dans
un endroit abrité.
Veuillez lire ceci avant de penser que votre douche solaire perd de l'eau.
Lorsque l'eau est chauffée par le soleil, il est possible que le pommeau de douche goutte un peu.
Cela est tout à fait normal. En ouvrant le robinet d'eau chaude, le réservoir se remplit d'eau froide. En
chauffant, le volume de l’eau augmente et il est alors possible que la douche goutte. Il est possible
que le pommeau de douche continue à goutter après avoir fermé les robinets d'eau. Cela est normal,
l’eau va s'arrêter de goutter au bout de quelques secondes.
Ne pas forcer pour fermer le robinet. Le fait de trop serrer les robinets en les fermant pourrait
endommager la soupape en laiton.
Des sédiments peuvent salir les tuyaux, le filtre du pommeau de douche peut donc également être
sali. Dévissez le pommeau et nettoyez le filtre en vous assurant de bien retirer toutes les impuretés
du filtre.
Manuel d’installation, d’utilisation et de maintenance
Manual for the Installation, Use and Maintenance

®
Customer First.
We have a Customer Relationship Management Policy called CRM².
We like to have customer proximity and provide only products we can be proud of. For this reason, we
are committed to oer quality products and a service focused on maintaining a long-term client relation-
ship.
Le client est notre priorité. Customer First.
Nous avons une politique de gestion de la relation client (Customer Relationship Management) appelée
CRM².
Nous aimons être proches de nos clients et n'orons que des produits dont nous pouvons être ers, c’est
pourquoi nous nous engageons à orir des produits de qualité et un service visant à entretenir avec nos
clients des relations à long terme.
MANUAL FOR THE INSTALLATION, USE AND MAINTENANCE
MANUEL D’INSTALLATION, D’UTILISATION ET DE MAINTENANCE
2
Customer Care

NOTES


Manual de Usuario
User’s Manual
®
@solar_showers
Pub. No. 01-019. Rev.01
Table of contents
Languages:
Other CRM Bathroom Fixture manuals

Popular Bathroom Fixture manuals by other brands


Bradley
Bradley ABP-1WCA Installation

Sanela
Sanela SLU 08LNB Instructions for use

HERMITAGE BATH
HERMITAGE BATH 97 Series installation manual

Fantini Rubinetti
Fantini Rubinetti CUPOLINO HAMMAM 9100W098 instructions

INDA
INDA B740X-Z S installation instructions

Porcelanosa
Porcelanosa noken Giro 100089932 Installation and Maintenance

Decolav
Decolav 1437-CWH Use and care guide

Dornbracht
Dornbracht BigRain 41 400 979 FF installation instructions

URIDAN
URIDAN ADMIRAL KH-10 installation instructions

Novellini
Novellini DIVINA W Instructions for installation, use and maintenance manual

Hewi
Hewi 802 Series operating instructions

Luca Varess
Luca Varess Nona 5414599490688 installation guide