CROWNFUL 19QT User manual

0
CROWNFUL AIR FRYER OVEN 19QT
INSTRUCTION MANUAL
Model: TO5712T-UL
Read this manual thoroughly before using and save it for future reference.
For product concerns, please contact support@crownful.com

1
IMPORTANT SAFEGUARDS
When using this electrical appliance, basic safety precautions should always be followed,
including the following:
1. Read all instructions, product labels and warnings before using the air fryer oven.
2. Do not touch the hot surfaces. The temperature of the door or the outer surface could
be hot when the air fryer oven is operating. Always use oven mitts when handling hot
materials, and allow metal parts to cool down before cleaning. Allow the units to
thoroughly cool before putting in or taking off any parts. Always use the handle when
opening or closing the cooking compartment or the door.
3. Unplug the air fryer oven from the wall outlet, when the unit is not used and before
cleaning.
4. To protect against the risk of electrical shock, do not immerse the unit in water or other
liquid.
5. Do not operate any appliance when the plug or cord is damaged or when the appliance
malfunctions or got broken in any manner. Return the appliance to the nearest
authorized service facility for examination, repair or adjustment.
6. The use of accessory that is not recommended by the manufacturer may cause injury to
the user or may damage the appliance.
7. Do not store or use anything in the air fryer oven especially if it is not recommended by
the manufacturer.
8. Do not use outdoors or for commercial purposes. Do not use this air fryer oven for
other functions except the intended purposes.
9. Do not let the cord hang over the edge of table or counter. Store it properly.
10.Do not place the appliance near any stove top, hot gas, electronic burner, near other
toaster oven or hot equipment for this may cause damage to the unit or fire.
11.A fire may occur if the air fryer oven gets near flammable liquid or materials. Avoid

2

3
KNOW YOUR AIR FRYER OVEN
Housing
F r y B a s k e t
G l a s s d o o r
C r u m b t r a y
G r i l l
P a n
C o n t r o l p a n e l
D o o r h a n d l e
4
.
6
5REHEAT: Both the upper 2, the lower heat elements and the fan will be activated
during operation. You can turn off the fan by pressing fan button. Default time and
temperature is 15mins 320
Adjustable time range is 1min-2 hours. Adjustable temperature range is 120-450 .
6TOAST: Both the upper 2 and the lower heat elements will be activated during the
operation.
Adjustable toast pieces:1-6. Adjustable toast color: 1-6.
7PIZZA: Both the upper 2, the lower heat elements and the fan will be activated
during the operation. You can turn off the fan by pressing fan button.
Default time and temperature is 20mins 375
Adjustable time range is 1min-60mins. Adjustable temperature range is 120-400 .
8BROIL: Both the upper heat element and the fan will be activated during the
operation. Default time and temperature is 20mins 400
Adjustable time range is 1min-20mins.
There are 2 adjustable temperature settings: the low setting is at 300 , the high
setting is at 400 .
9DEHYDRATE: Both the upper 2 heat elements and fan will be activated during
operation. Default time and temperature is 6 hours 120
Adjustable time range is 30mins-72 hrs. Adjustable temperature range is 85-175 .
10 WARM: Both the upper 2 and lower heat elements will be activated during the
operation. Default time and temperature is 1 hour 160 .
NOTE:
E1:
E2:
7
Fan button: If the function you choose has the fan activated already, you can press the fan
button to turn off the fan. If the fan is not running (OFF), press the fan button to activate
the fan.
NOTE: You can’t change the fan status when you are using the following modes: Airfry,
Bagel, Toast, Broil and Dehydrate mode.
Lamp button: You can press lamp button at any time to turn on or turn off the lamp.
TIME/TEMP button: You can press time temp button, and then turn the function knob
clockwise to add time temperature (+), turn function knob counter clockwise to decrease
time temperature (--).
If you choose Bagel and Toast mode, you can press time temp button, and then turn the
function knob clockwise to add pieces toast color (+), turn function knob counter
clockwise to decrease pieces toast color (--).
NOTE: You can’t change the time temperature when you are using the following modes:
Bagel and Toast mode.
Menu button: In standby and pause mode, if you need to choose or change the cooking
preset mode, you can press menu button.
Start/Stop button: You may stop the cooking process by short pressing the start stop
button at any time, and you can adjust the time and temperature when the unit is at
pause stand by status. During the cooking process, you can long press the start stop
button to go back to the main menu.
Remove packing materials and any stickers. Remove the detachable accessories from
air fryer oven. Wash in soapy water, rinse and dry with a cloth or paper towel.
Return all the detachable accessories back in the oven.
Select a location for the unit. Do not place the unit under cabinets or too close to the
wall or other equipment to allow the heat to flow. Plug the unit into a designated
electrical outlet.

8
NOTE:
1. Initial start-up operation may produce a smell and smoke (For about 15 mins.). This is
normal. It is due to the protective substance on heating elements which protects them
while they are stored. Cook slices of lemon at 400 for 5-10 minutes to minimize the
smell.
2. There should be at least 30mm space between the food and the upper heating element.
Observe proper spacing. Do not overfill the unit with the food.
3. The baking pan can be placed on the grill rack slot.
4. Always monitor the food when cook at high setting to ensure that you are not
overcooking. Check or turn over halfway through the cooking process.
5. The inner compartment is equipped with different height of slots for variations of
cooking in order to get a perfect result.
6. Make sure that the crumb tray is in place before using.
USING YOUR AIR FRYER OVEN
1. Plug the power cord into the outlet.
2. LCD display lights up, the default mode is the AIRFRY function. You can choose the
function you need by turning the function knob.
3. There are 10 preset functions to choose from: airfry, toast, bagel, pizza, bake, broil,
roast, dehydrate, reheat, warm. Turning the knob once changes the functions.
Note: If you choose the Roast function, you should take out the roasting cage, chicken
roasting fork (roasting spit) or other rotisserie tools after the unit has totally cooled down
to avoid burning.
If you want French fries, you can choose the Airfry function, we suggest you use the
fry basket. If you want to toast meat or other food, better use the toast pan, not fry
basket.
Dehydrate function is used to dry vegetable and fruit. You can use fry basket to cook.

9
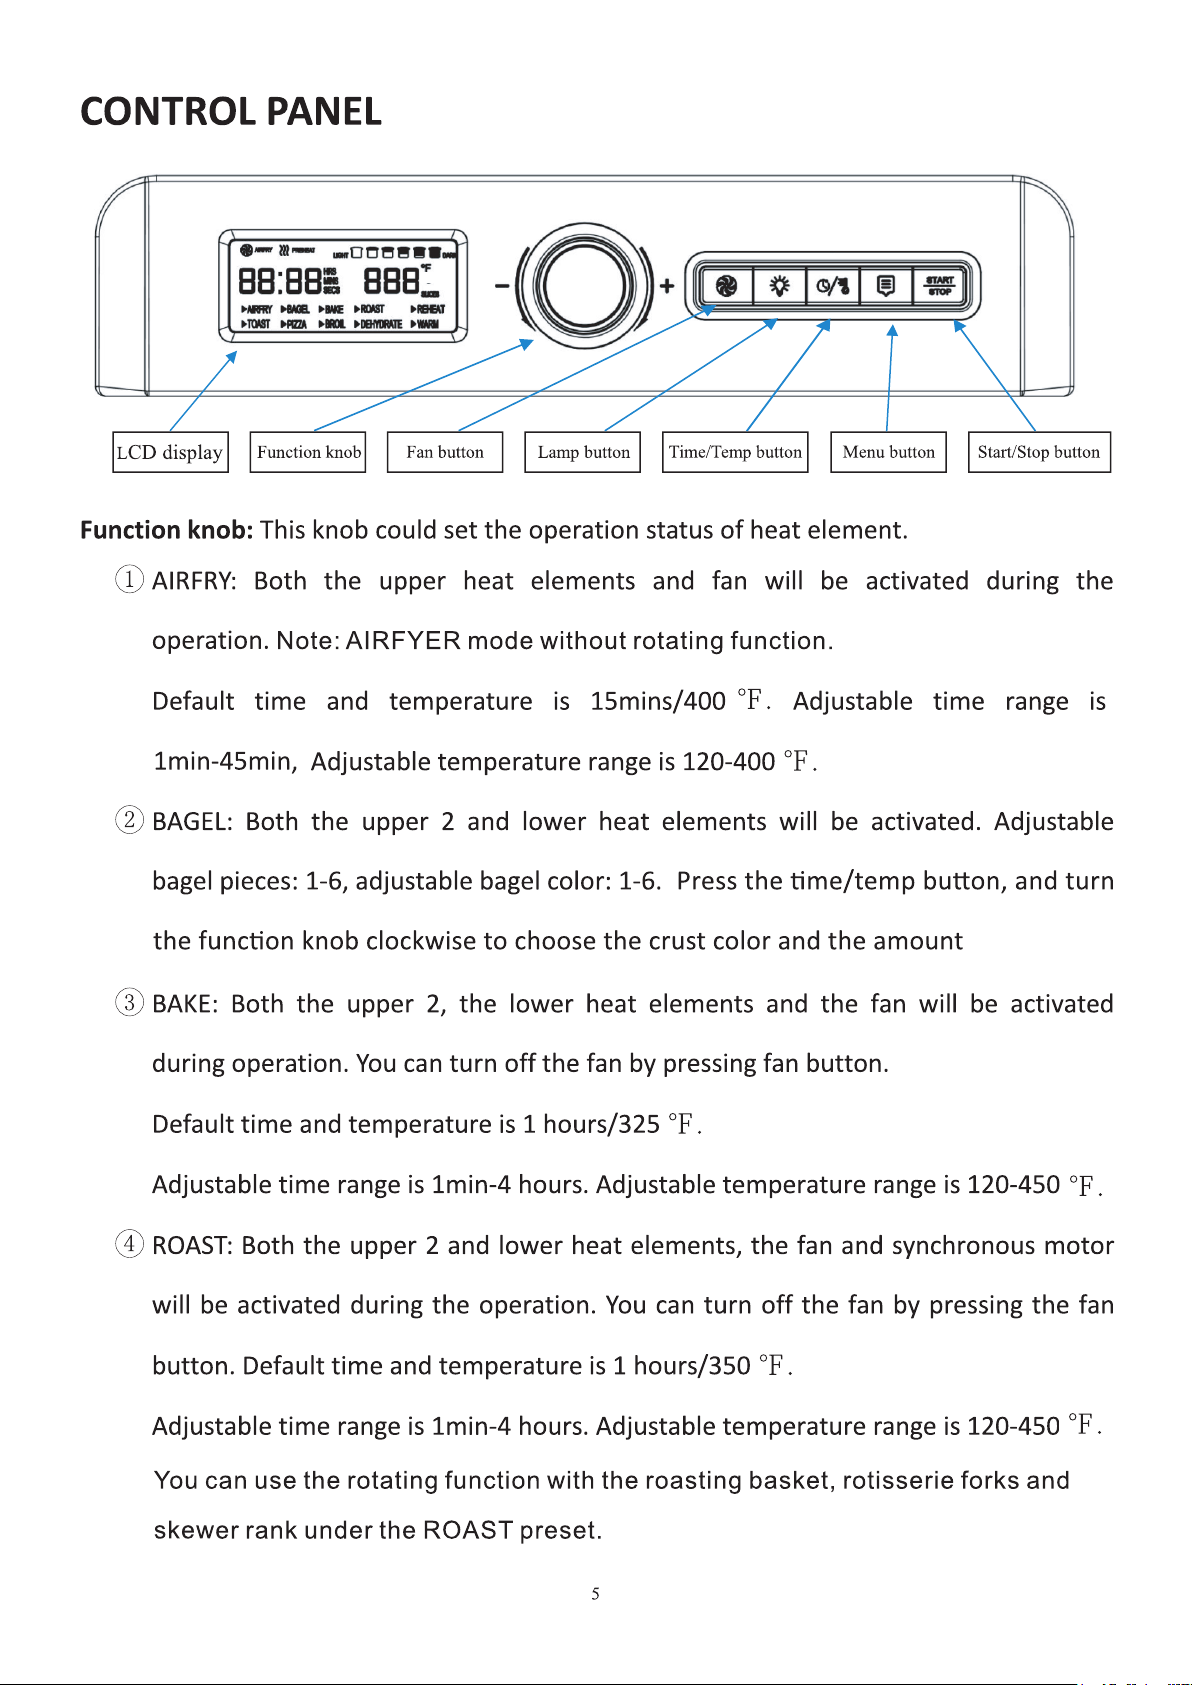
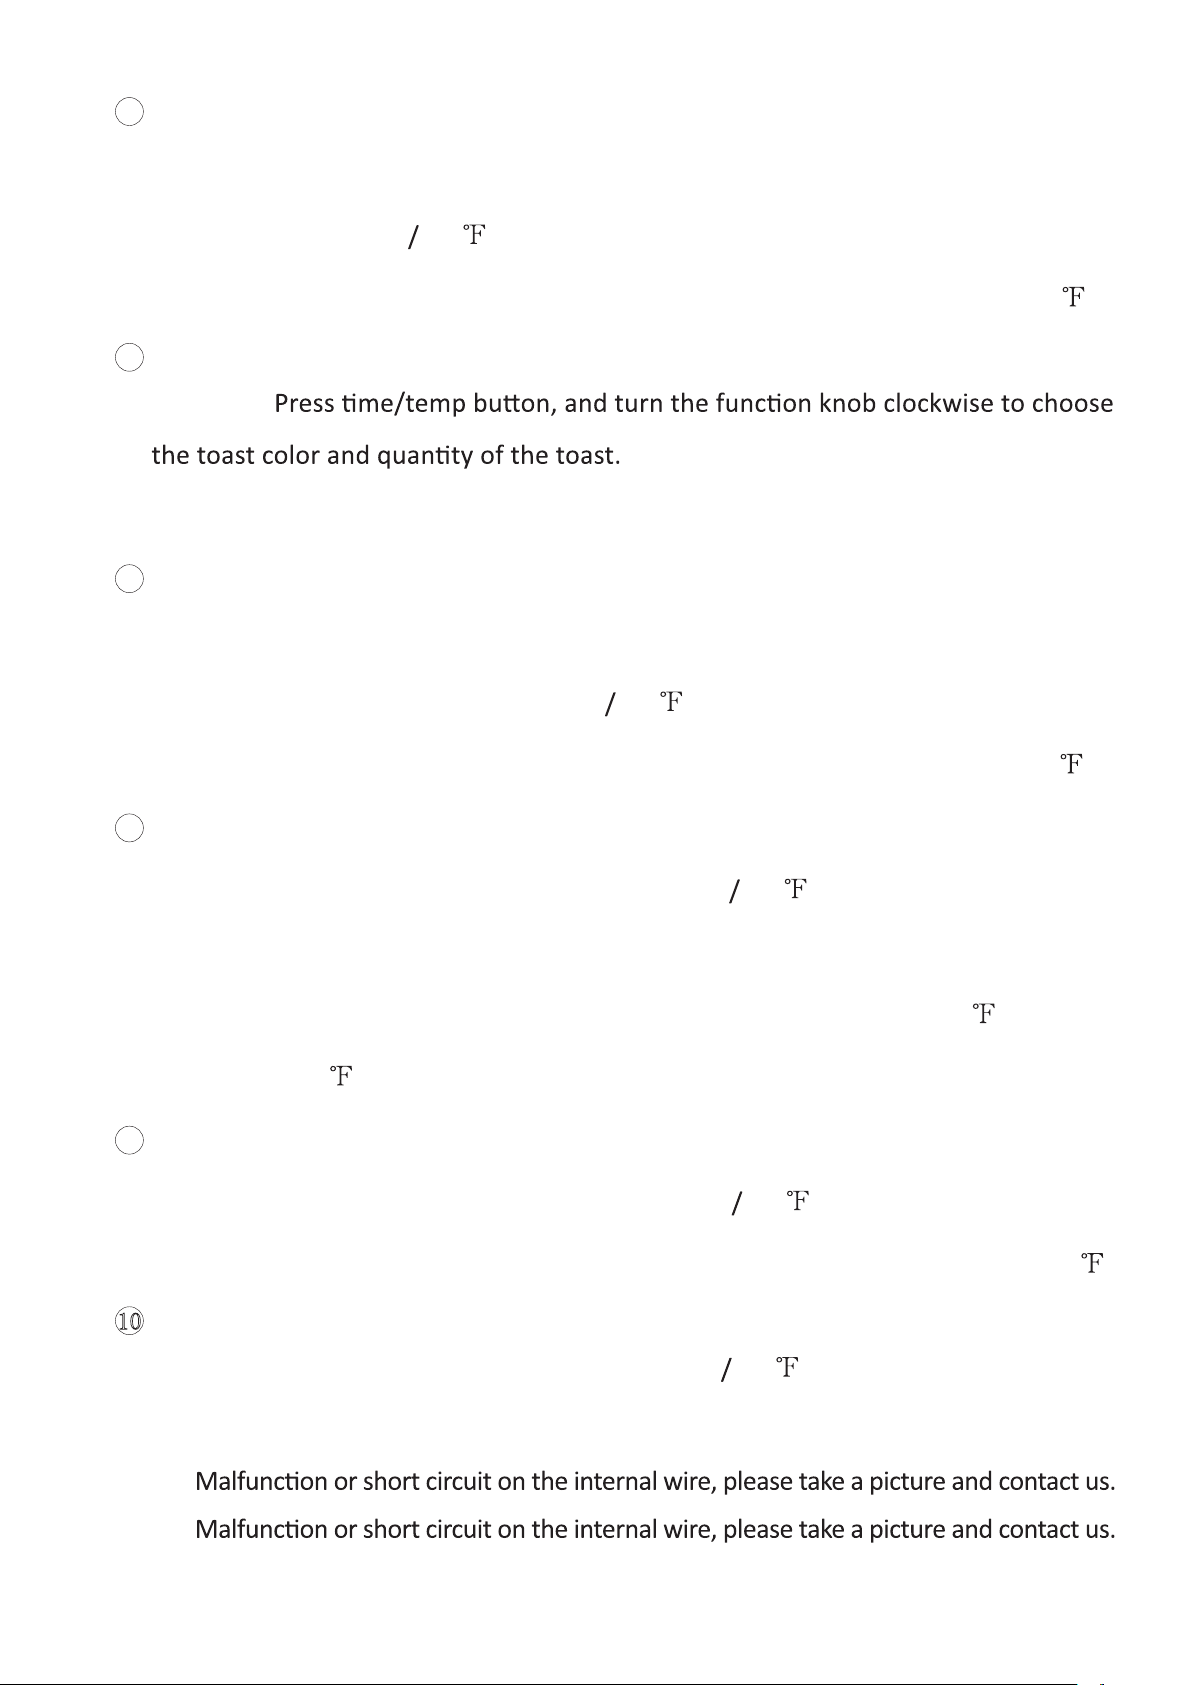
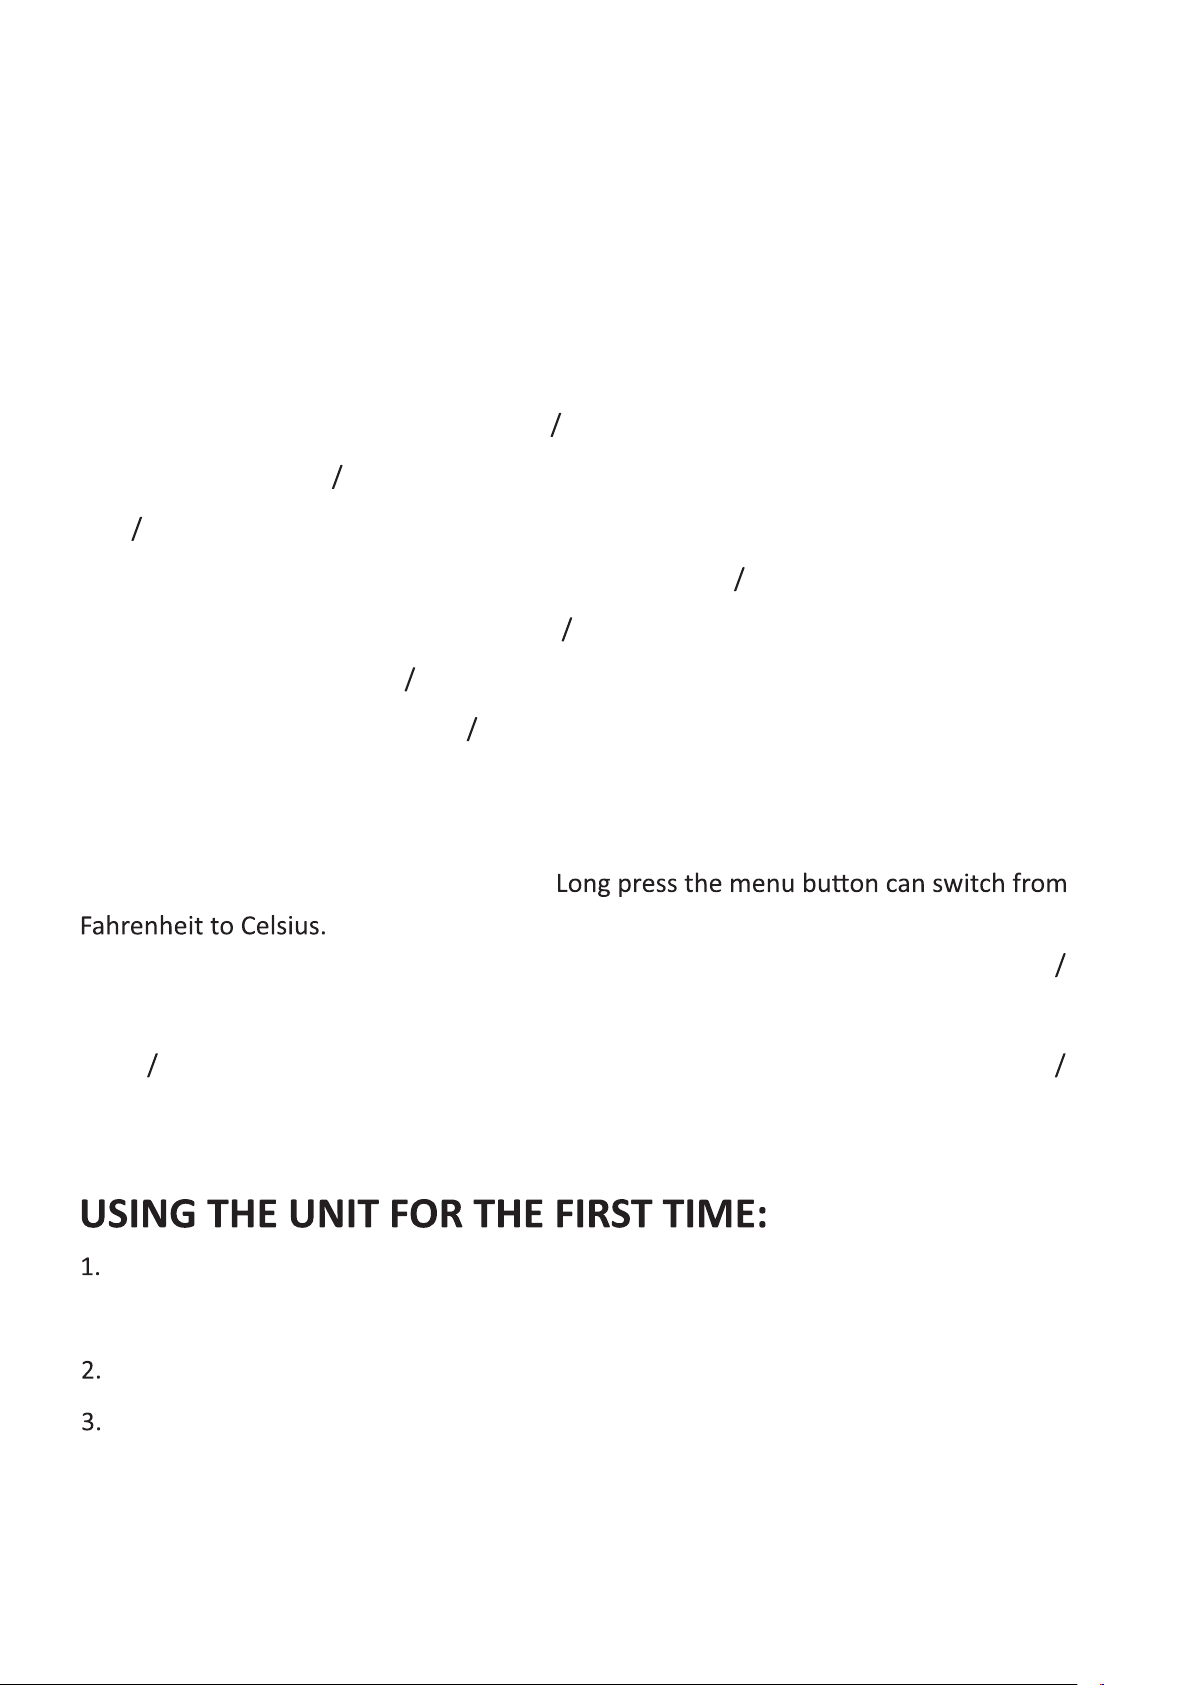
Roasting cage is used for roasting nuts and coffee beans.
Rotisserio is used for roasting sausage and chunky meat.
Chicken roasting fork is used for roasting whole chicken around 1250g and roasting
cooking chicken wings.
4. After choosing the function you need, you can press start stop button to start working,
The unit will work in its default time and temperature.
If you need to adjust the time or temperature, you can do that in a standby or pause
status.
Press TIME TEMP button, and turn the function knob to choose the time you need, then
press TIME TEMP button again to confirm the time and the display will show the
temperature adjusting mode.
Adjust temperature by turning function knob (+) or (-).
Once set, press start stop button again to start cooking.
5. Unplug the unit from the outlet after use.
USEFUL TIPS
1. Condensation or moisture may appear on the air fryer oven’s door while cooking some
foods. This is normal.
2. Cook food immediately after defrosting.
3. Frozen foods and thick meat will take longer to cook. Add cooking time if necessary.
4. Avoid opening the air fryer oven’s door too frequently to prevent heat loss.
5. When baking, smoke will likely to appear. Removing excess fat prior to baking can
reduce this.
6. Air fryers are popular for making healthy fried foods. People would assume that no oil is
to your food.
10
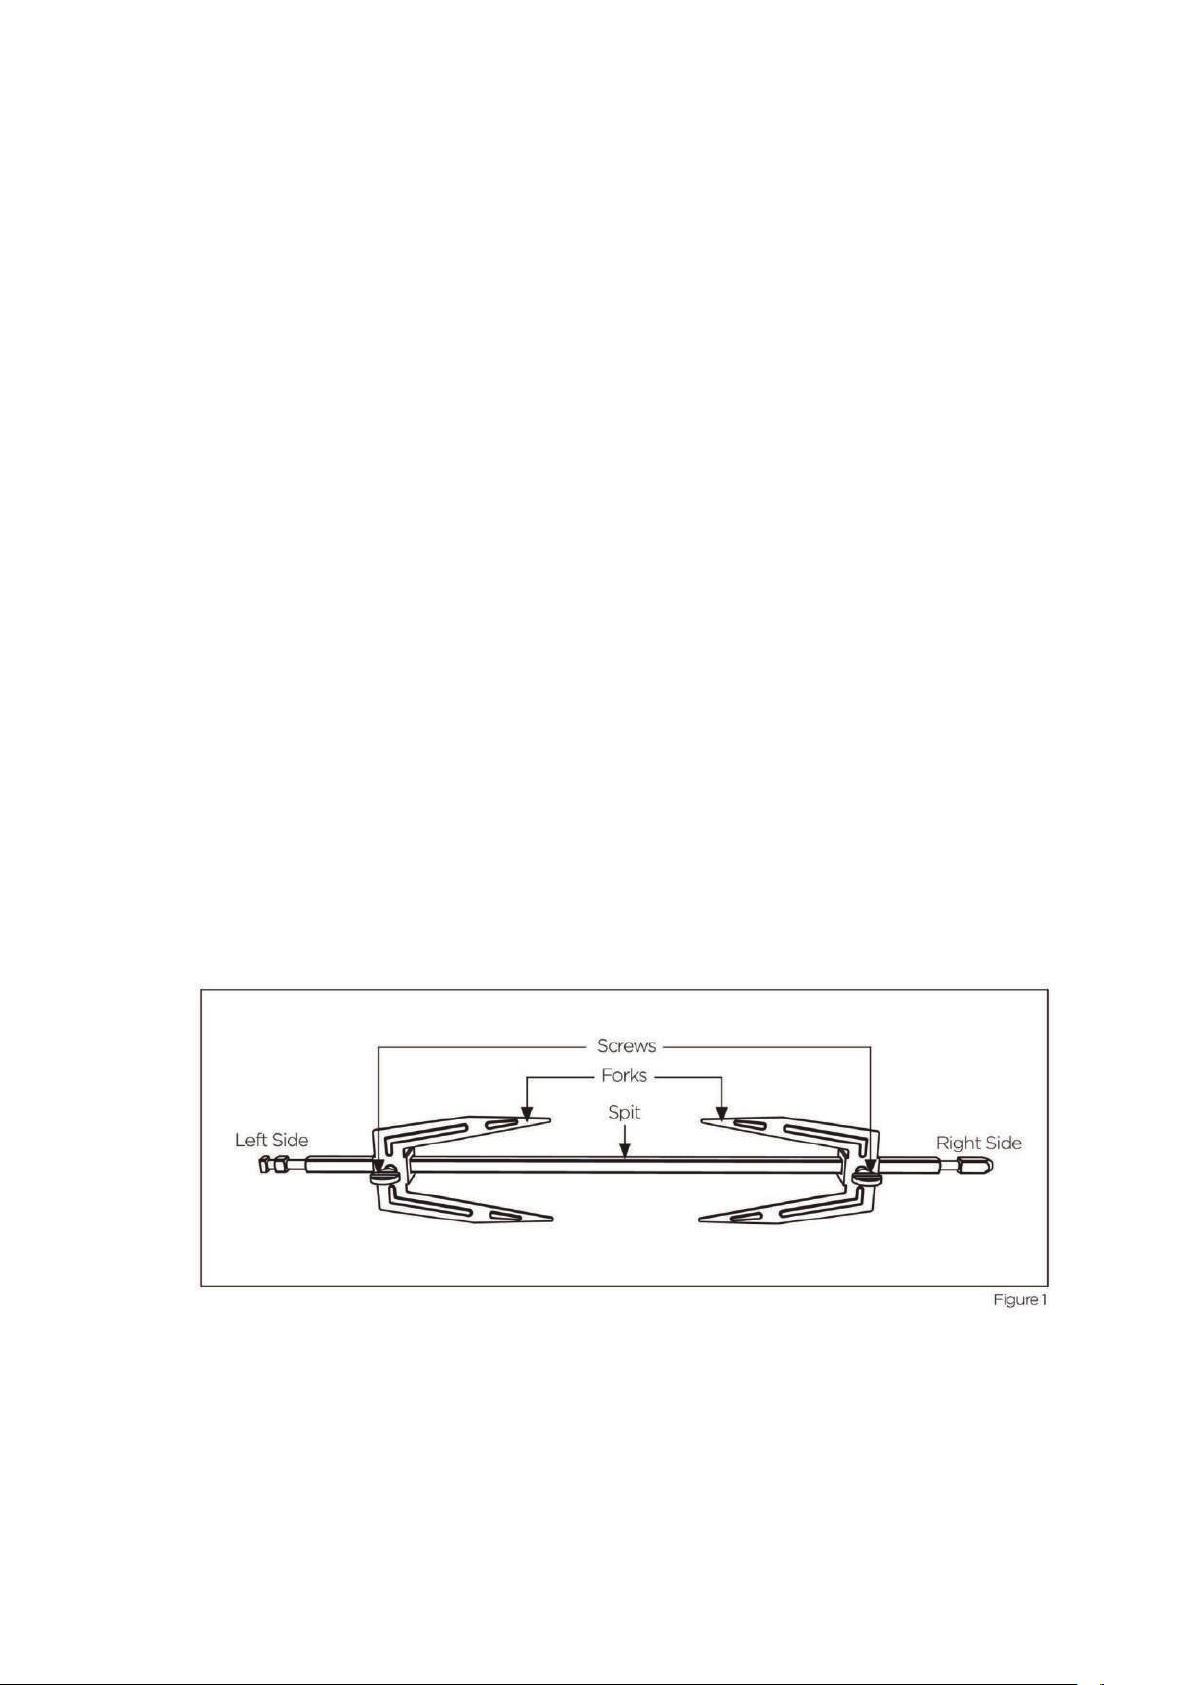
How to Roast
1. Place the Air Fryer Oven, on a flat, stable, level surface. Ensure that the oven is
2 to 4 inches away from the wall or any other objects.
2. Ensure that the Removable Crumb Tray is placed beneath the bottom heating
elements when using your Air Fryer Oven.
3. Place one Rotisserie Fork on the end of the Rotisserie Spit with the Fork facing
the center and tighten the Rotisserie Screw.
4. Slide the solid end of the Rotisserie Spit through the center of the food to be
cooked.
5. Place the other Rotisserie Fork on the other end of the Rotisserie Spit with the
Rotisserie Fork facing the roast.
6. Adjust the roast so that it is centered on the Rotisserie Spit. Make sure the
Rotisserie Forks secure the roast on the Rotisserie Spit and tighten the Rotisserie
Screws.
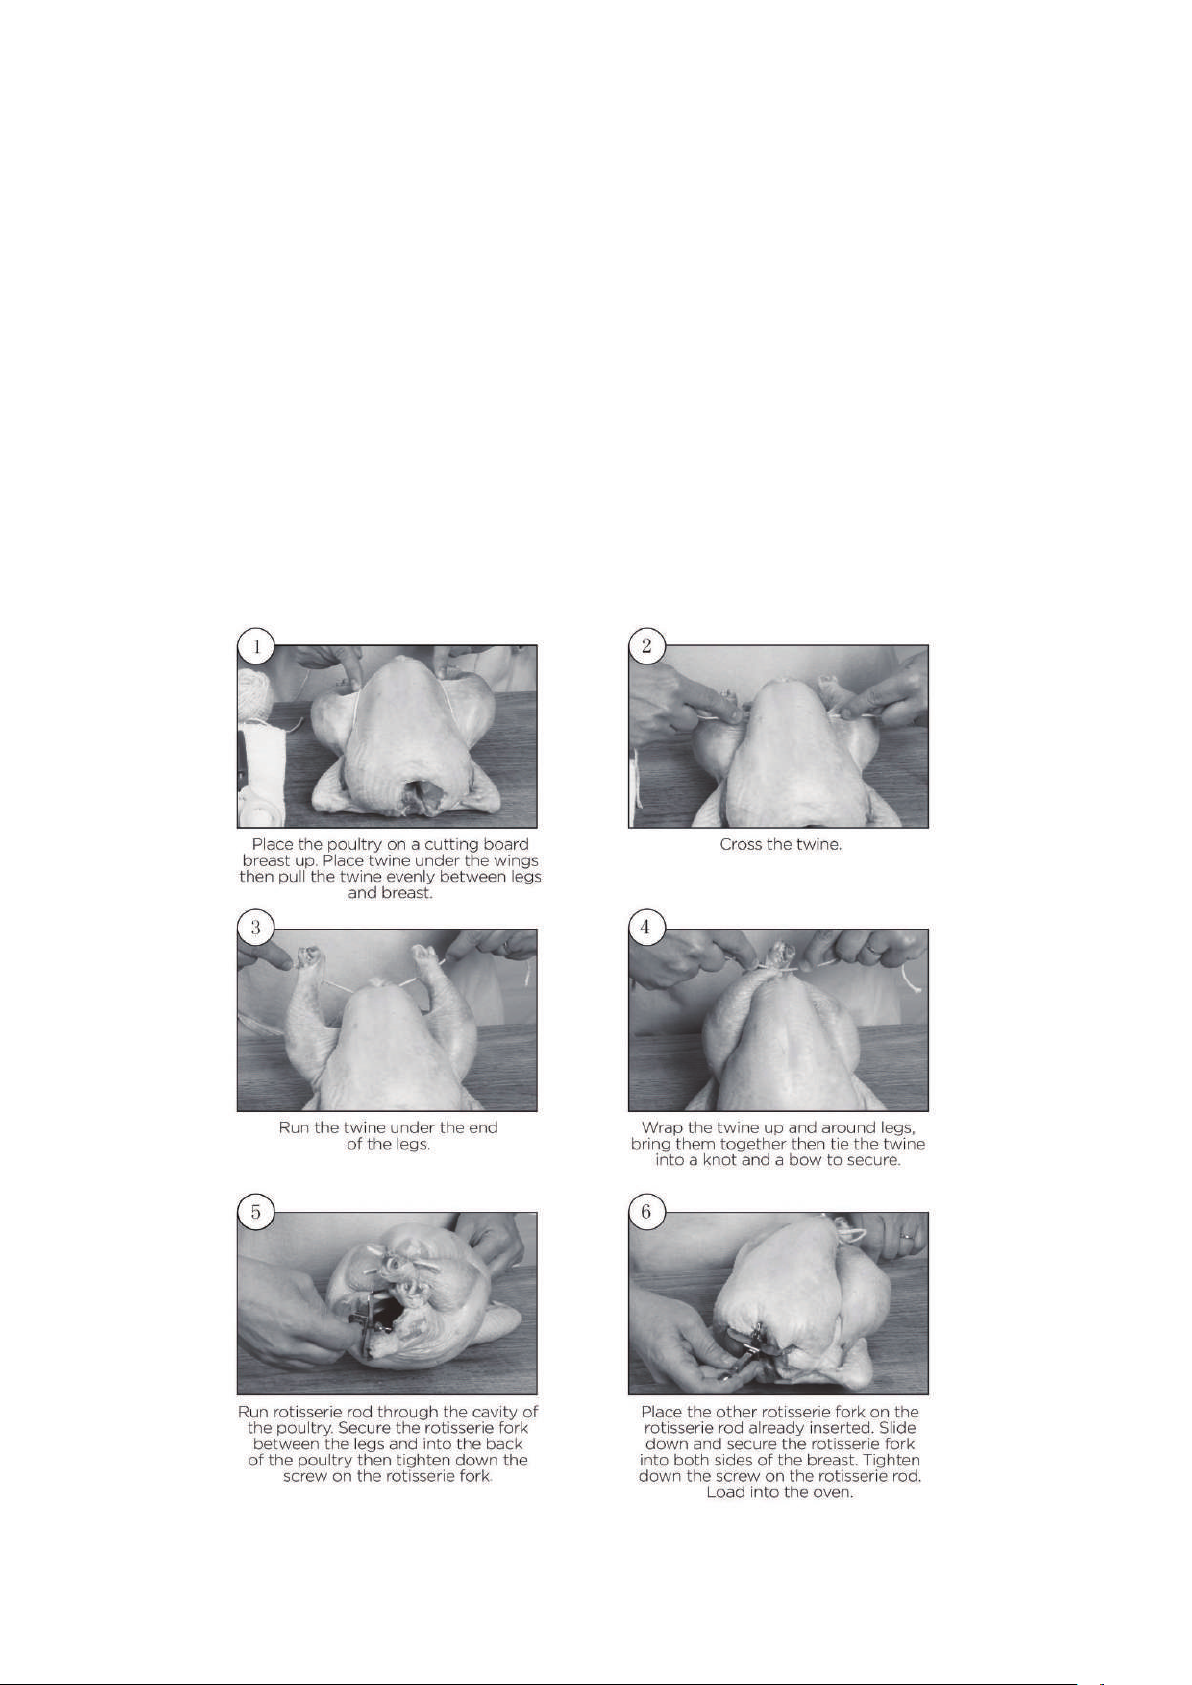
7. When cooking poultry, it is necessary to truss or tie the legs and wings to the
body with string to make the roast as compact as possible for smooth movement
of the Rotisserie Spit (See trussing instructions).
8. Season or baste the roast as desired.
9. Put the solid end of the Rotisserie Spit in the drive socket on right interior wall
of the oven.
10. Place the grooved end of the Rotisserie Spit on the left interior wall of the oven.
11. Plug on the oven with power, LED shows OFF.
12. Turn function knob, select rotisseries function, Time, temperature and fan
speed display as below.
11
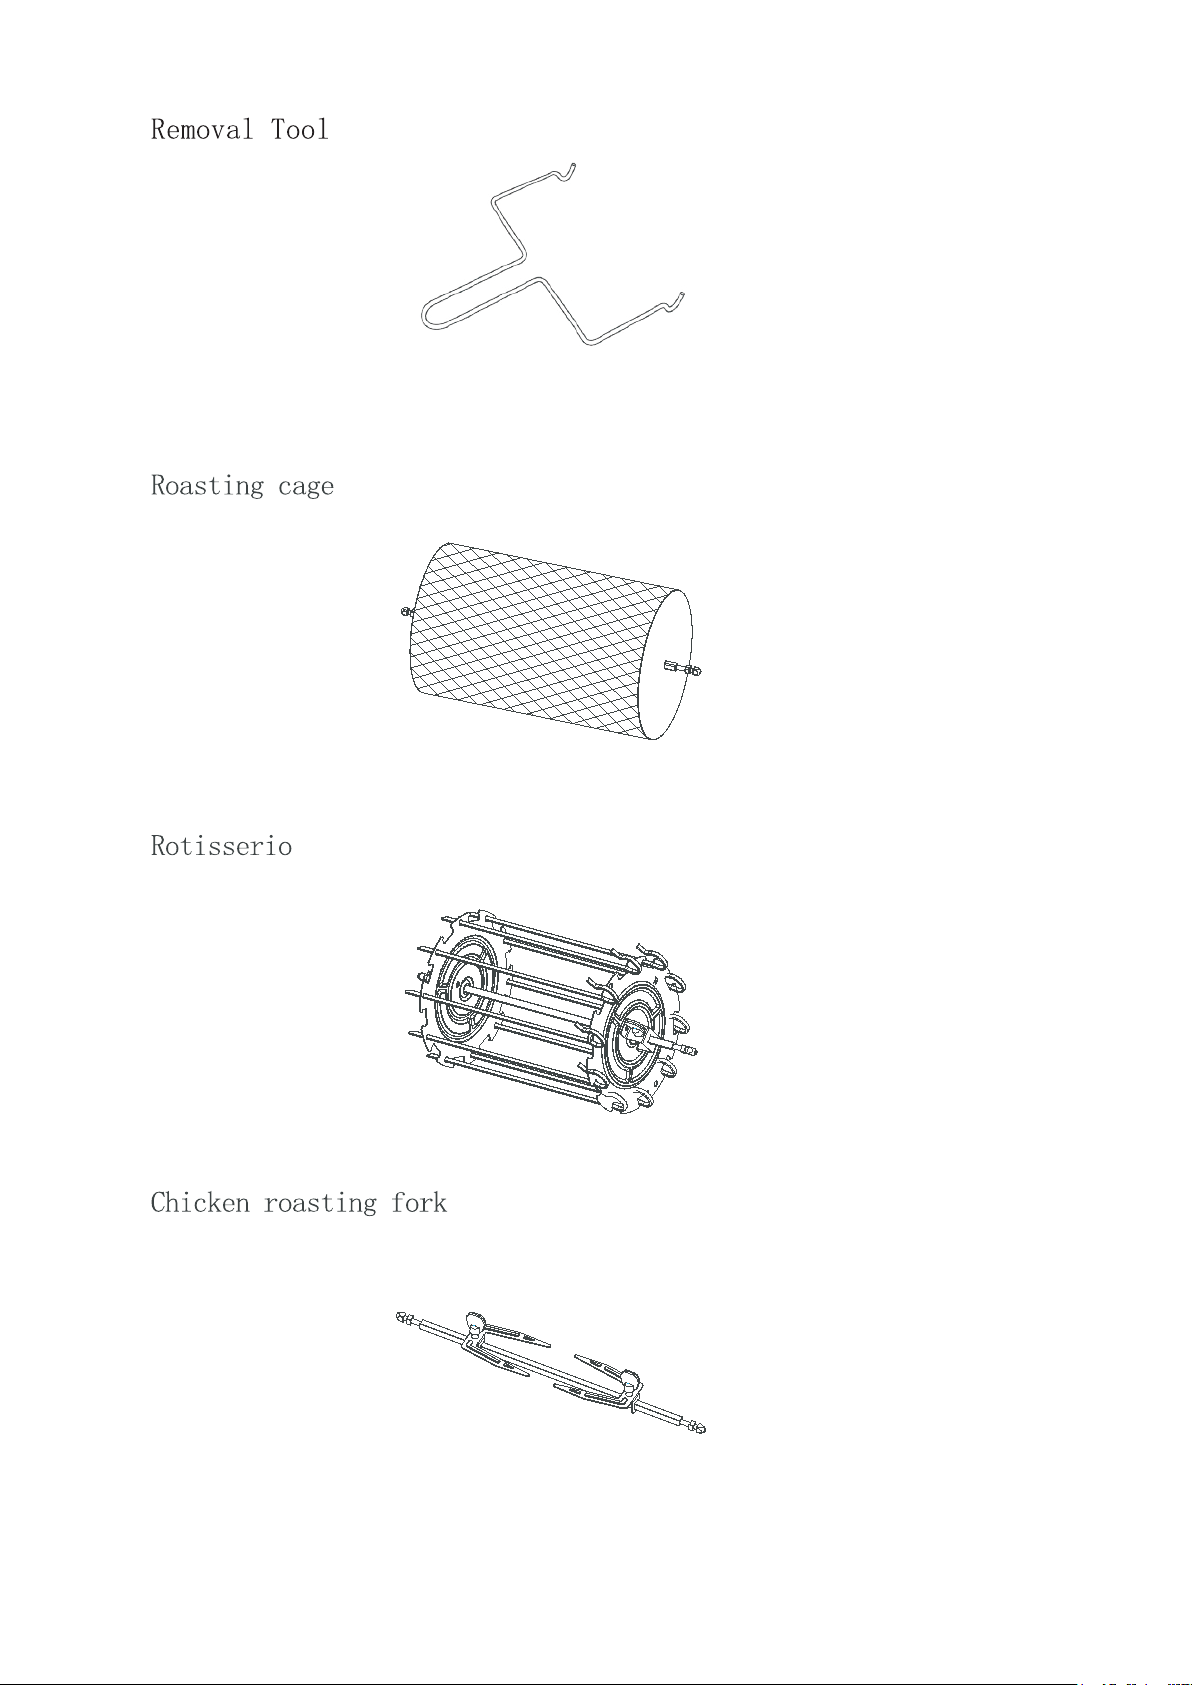
13. Remove the roast from the oven using the Rotisserie Removal Tool by placing
the tool underneath the grooved edges of the Spit. Lift the left side up and
towards you at an angle and slide the right side of the Spit out of the Rotisserie
Socket.
14. Place the roast on a cutting board or platter and allow to stand for 10-15
minutes.
15. Using a pot holder, loosen the Rotisserie Screws on the Rotisserie Forks and
remove the Rotisserie Spit from the roast.
16. Carefully remove the Rotisserie Forks and carve the roast.
Trussing Poultry

12
CLEAN AND MAINTENANCE
Caution: Before cleaning the air fryer oven unplug it and allow it to cool completely.
1. Wash all the attachments with mild soap and water.
2. Use a damp soft cloth to clean the inner of the oven, remember to clean it regularly.
3. Clean the door by using a warm cloth with soap.
4. Do not immerse the unit in the water to clean the appliance.
5. When cleaning the crumb tray, open the air fryer oven door and simply pull out crumb
tray outwards.
Wipe the crumb tray with a damp cloth. After cleaning, push the crumb tray back into
its position.
6. DO NOT use the dishwasher to clean any of the accessories that are included with this
product.
7. DO NOT use any abrasive cleaning products.
8. CLEAN accessories with a soft cloth in warm water with liquid detergent or soap.
9. Do not wipe the heating elements.
10. Do not install the wire rack or baking pan on the lower heating element directly.
11. Do not use any metal pad to clean the surfaces of the oven to avoid damaging the
finish and the surface.
CAUTION
To prevent the countertop from any damage, the air fryer oven must be operated with the
crumb tray properly in place, securely closed and free of any excess food or grease.
Never operate your air fryer oven with the opened oven door.
Never put the baking pan (or any other accessory) directly on any of the heating
components. Use the tracks or the slots and observe proper spacing of the attachments
and the food inside.
The crumb tray should be placed at themof the airfryer oven
under the heng elements. Do not place directly on the heng components.

This manual suits for next models
1
Table of contents
Other CROWNFUL Fryer manuals


Popular Fryer manuals by other brands


Dean
Dean D20 Series Installation & operation manual

Lenoxx
Lenoxx Healthy Choice AF1200 manual

Morphy Richards
Morphy Richards Harry Ramsden’s 45362 instructions

Roller Grill
Roller Grill FD 30 Instructions for use and installation

Insignia
Insignia NS-AF10DSS2 user guide

Black & Decker
Black & Decker BXAF3500E Instructions for use


