CSC FT750-26 User manual
FT750-26 and FT750-20 Owner’s Manual

FT750-26 and FT750-20 Owner’s Manual
1
Contents
A Word From Steve...............................................................................................................................................2
Safety ....................................................................................................................................................................3
Caution and Warning Symbols..............................................................................................................................4
Pre-Ride Safety Checks..........................................................................................................................................4
General Information..............................................................................................................................................5
Operation..............................................................................................................................................................5
Electric Bicycle Components.................................................................................................................................6
LCD Displays and Switch Functions.......................................................................................................................7
Switching On Electric Bicycle ................................................................................................................................8
Turning Headlight and Taillight On and Off...........................................................................................................8
Changing LCD Display Mode .................................................................................................................................8
Illuminating Display Backlight ...............................................................................................................................9
Toggling Between Imperial and Metric Units......................................................................................................10
Pedal-Assist System.............................................................................................................................................10
Thumb Throttle...................................................................................................................................................11
Displaying Mileage and Time, and Resetting the Trip Meter..............................................................................11
Maximum Electric Motor Bicycle Speed.............................................................................................................11
Shifting Drive Gears ............................................................................................................................................12
Braking ................................................................................................................................................................12
Charging the Battery...........................................................................................................................................13
Battery Range......................................................................................................................................................14
Battery Status......................................................................................................................................................14
Battery Disposal..................................................................................................................................................14
Front Suspension ................................................................................................................................................15
Adjusting Your Bicycle to Fit You.........................................................................................................................16
Tire Pressure and Tire Maintenance...................................................................................................................18
Assembling Your Electric Bicycle.........................................................................................................................19
Troubleshooting..................................................................................................................................................36
Torque Specifications..........................................................................................................................................37
Bicycle Specifications ..........................................................................................................................................38
Warranty .............................................................................................................................................................40

FT750-26 and FT750-20 Owner’s Manual
2
A Word From Steve
Thank you for purchasing your new CSC electric bicycle. Your CSC FT26 or FT20 is a great bicycle and we
are very proud of it. Your CSC electric bicycle is easy to maintain, it’s reliable, and it’s fun. You’ve made a
wise purchase decision.
I want you to know that we value the trust and confidence you have in CSC. Our guiding principle will
always be that our customers come first.
We wish you many miles of safe and enjoyable riding on your new electric bicycle. If there’s anything we
can do to enhance your ownership experience, please let us know.
Thank you again,
Steve Seidner
Founder and CEO
CSC Electric Bicycles, LLC
1331 W. Foothill Boulevard
Azusa, California 91702
909 445 0900
www.CSCMotorycles.com
FT750-26 and FT750-20 Owner’s Manual
3
Safety
Read this Owner’s Manual in its entirety before attempting to ride your new electric bike.
Always wear a helmet, gloves, and shoes while riding the bicycle. Wear brightly-colored clothing so other
vehicles can see you.
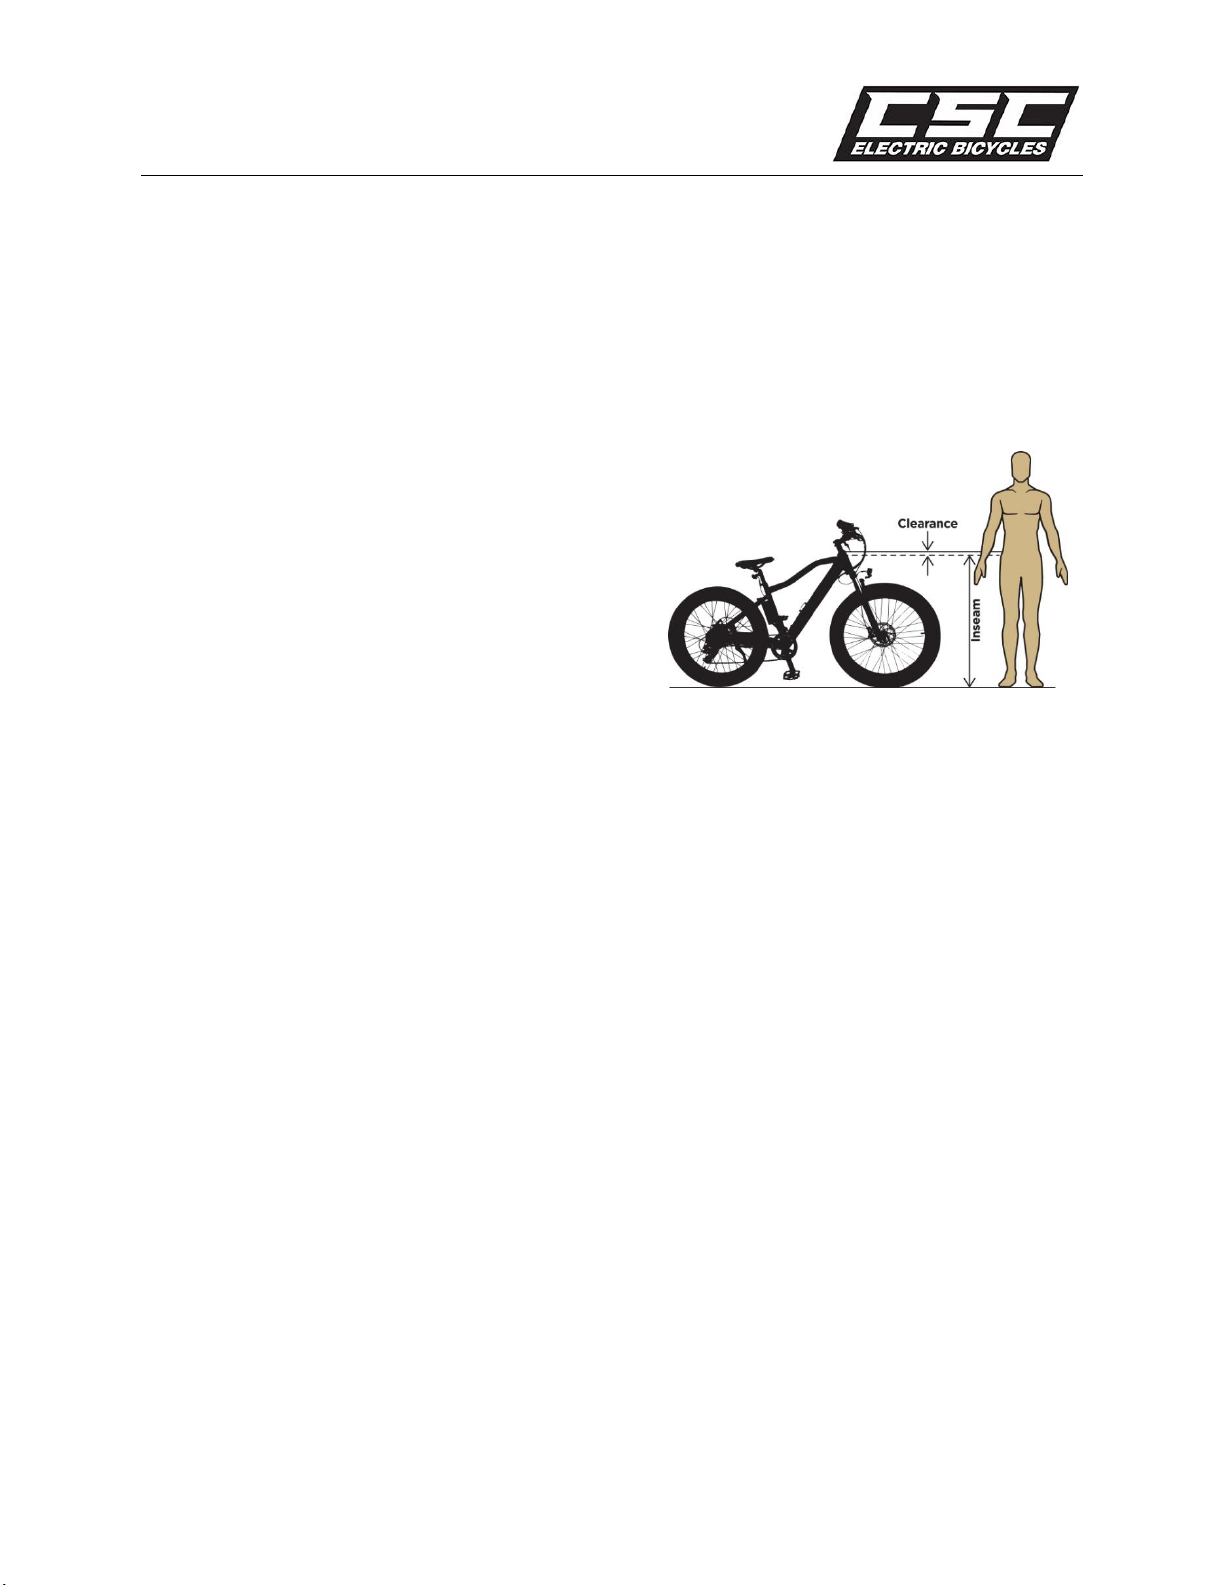
Make sure there is no less than 1-inch clearance
between the rider’s inseam area and the bicycle top
tube when the rider straddles the bicycle with both feet
flat on the ground.
If the bicycle is too large, the rider may not be able to
reach the pedals or the ground, which may result in loss
of control and a crash.
Adjust the seat height such that you can comfortably reach the pedals when they are at the bottom of
their stroke.
Do not allow others who are unfamiliar with the electric bike’s operation to ride the bike.
Do not ride the bicycle in high wind, rain, ice, or snow conditions. Do not ride the bicycle if the
temperature is below 15 oF or above 95 oF. Exercise caution if riding the bicycle when it is dark outside.
Do not exceed the bicycle’s maximum weight capacity: 330 pounds for the FT750-26; 264 pounds for the
FT750-20.
Be aware of the battery’s charge state, and do not ride such that the battery power is depleted and you
do not have the ability to make it to your destination.
Make sure the battery is adequately charged before every trip.
Charge the battery at least once monthly if the electric bicycle is in storage.
Do not enter puddles or other bodies of water such that electrical components become wet.
Do not attempt to modify the electrical circuits.

FT750-26 and FT750-20 Owner’s Manual
4
Dispose of the battery in accordance with applicable battery disposal regulations.
Always ride with both hands on the handgrips.
Use the charger provided with your electric bicycle. Never attempt to use an unauthorized charger.
Charge the battery in a well-ventilated area.
Do not install a child seat on your electric bicycle.
Caution and Warning Symbols
Caution and warning symbols in this manual are as follows:
The Caution! symbol indicates a condition that may lead to electric bicycle damage.
The Warning! symbol indicates a condition that may lead to injury or death.
Pre-Ride Safety Checks
Prior to every ride, please check the following items to make sure your electric bicycle is ready for you to
ride:
The battery is fully charged.
Both tires are inflated to 20 psi.
Both the front and rear brake are operational.
The front fork skewer is secure.
The rear wheel nuts are secure.
The handlebar is secure.
The seat post clamp is secure.

FT750-26 and FT750-20 Owner’s Manual
5
General Information
Your CSC electric bicycle is an electric-motor-assisted bicycle equipped with pedals and an electric motor.
At Level 0, no pedal assist is provided. Levels 1 through 5 provide increasing levels of pedal assist. The
electric motor pedal-assist function is activated by pedaling the bicycle when assist Levels 1 through 5
have been selected (additional motive power is provided when you pedal the bicycle). In Levels 1
through 5, the handlebar-mounted thumb switch engages the electric motor to drive the bicycle even
without pedaling.
Caution! Do not activate the handlebar-mounted thumb switch if you are not on the bicycle and the
pedal-assist function is set to any level, as the electric motor will propel the bicycle forward.
Your electric bicycle includes a frame-mounted battery that should be recharged as required.
The bicycle includes a rear set of sprockets with a derailleur that allow for 7 different gear ratios. You can
shift gears using a handlebar-mounted index shifter like you would do on a regular bicycle.
The bicycle includes front and rear hydraulic disc brakes, which are independently operated by
handlebar-mounted levers.
The bicycle includes a front suspension that is adjustable for spring preload and damping. It can also be
locked to simulate a rigid front suspension.
The bicycle includes a headlight and a taillight that must be manually switched on. These should be
turned on when the bicycle is ridden to provide for optimal rider visibility.
Operation
Readying your bicycle for use involves turning the LCD on after performing the safety checks outlined in
the Pre-Ride Safety Checks in this Owner’s Manual.
Please read this manual in its entirety prior to operating your CSC electric bicycle. Please refer to the
electric bicycle components section (shown on the next page) when reading each section of this Owner’s
Manual.

FT750-26 and FT750-20 Owner’s Manual
6
Electric Bicycle Components
1. Frame Top Tube
2. Frame Down Tube
3. Front Fork
4. Headlight
5. Brake Levers
6. Stem
7. Water Bottle Holder
8. Battery
9. Seat
10. Seatpost
11. Taillight
12. Seatpost Clamp
13. Front Tire and Wheel
14. Rear Tire and Wheel
15. Rear Derailleur
16. Chain
17. Kickstand
18. Chainring
19. Crank
20. Pedals
21. Rear Disc Brake
22. Controller
23. Thumb Throttle
24. LCD Instrument Display
25. Front Disc Brake
FT750-26 and FT750-20 Owner’s Manual
7
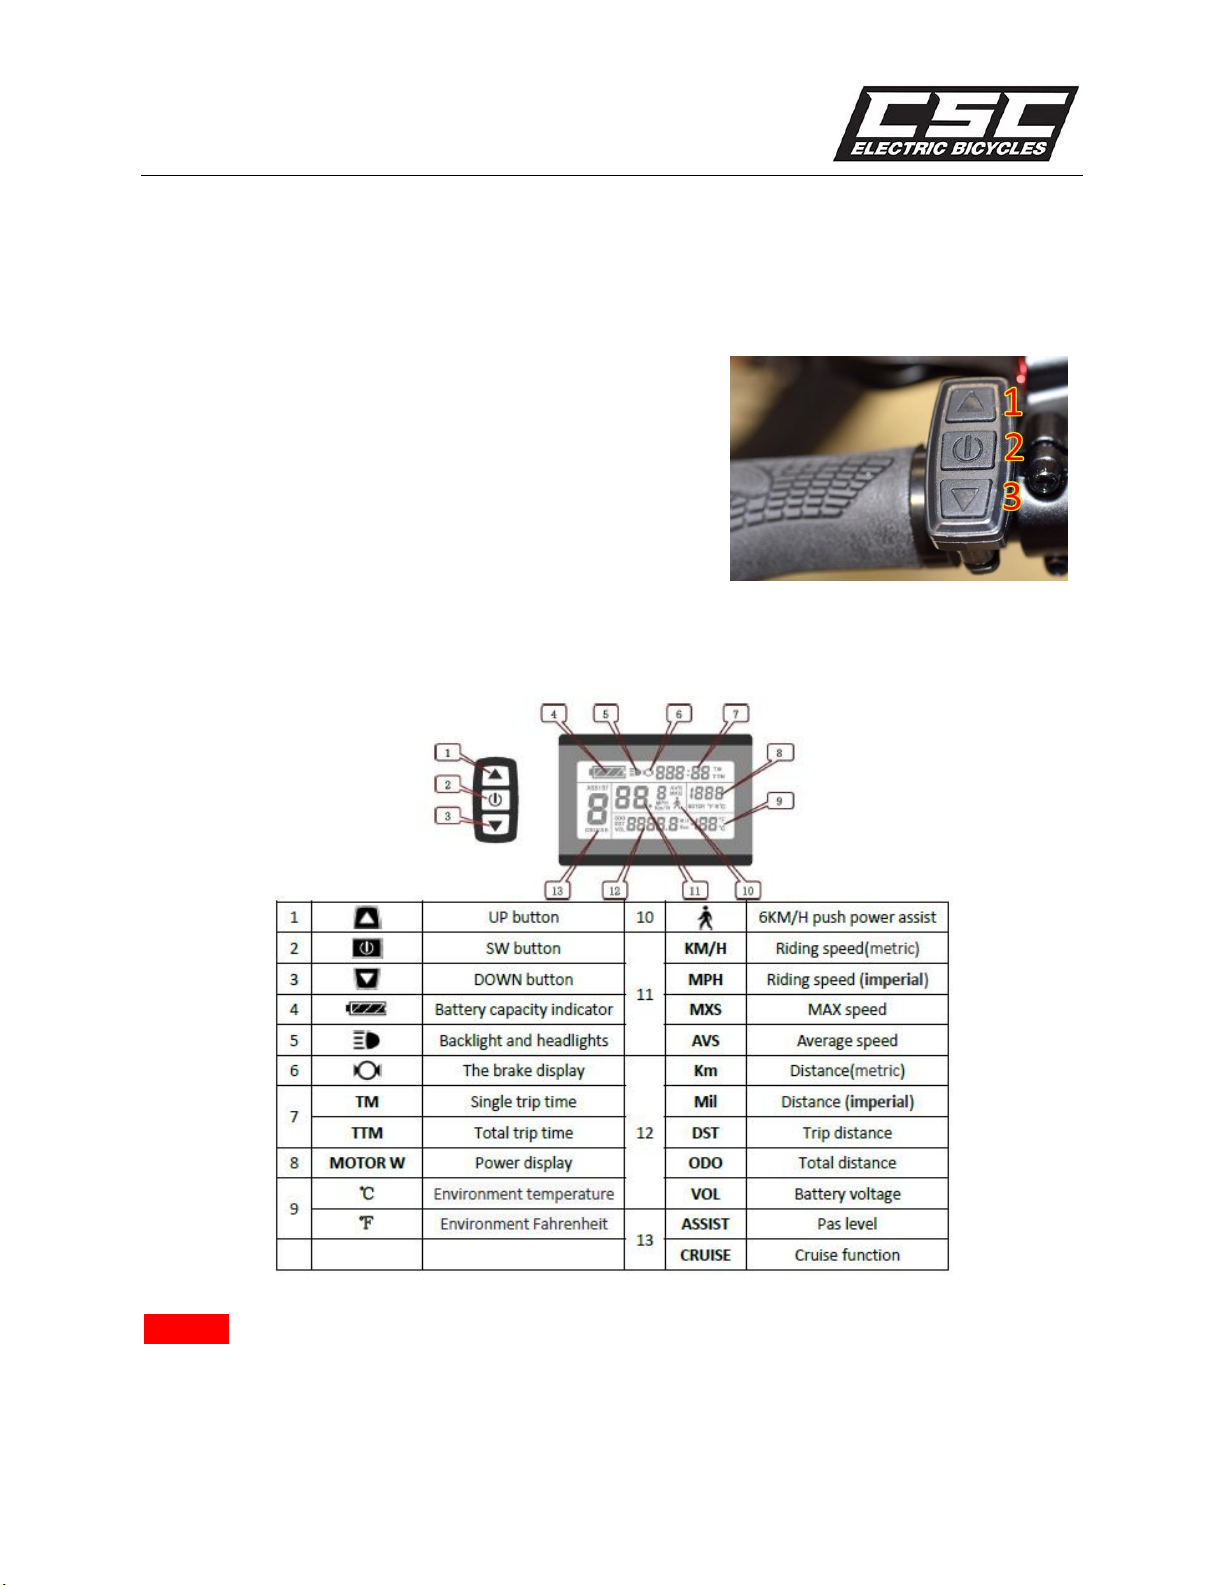
LCD Displays and Switch Functions
The LCD (mounted in the center handlebar area) provides a
large array of information in several display modes. Turning the
bicycle’s LCD on, making electric motor power available to
drive the bicycle, LCD display information, and numerous
bicycle settings are all controlled by three switches contained
in a switch housing on the left handlebar (shown to the right).
The switches are referred to as Switch 1 (the UP switch),
Switch 2 (the power switch), and Switch 3 (the DOWN switch).
The switch and LCD displays are shown in the illustration below.
Warning! Take care when activating Switches 1, 2, and 3 while riding your electric bicycle. Lack of
attention to riding your electric bicycle while actuating the switches may result in a crash.

FT750-26 and FT750-20 Owner’s Manual
8
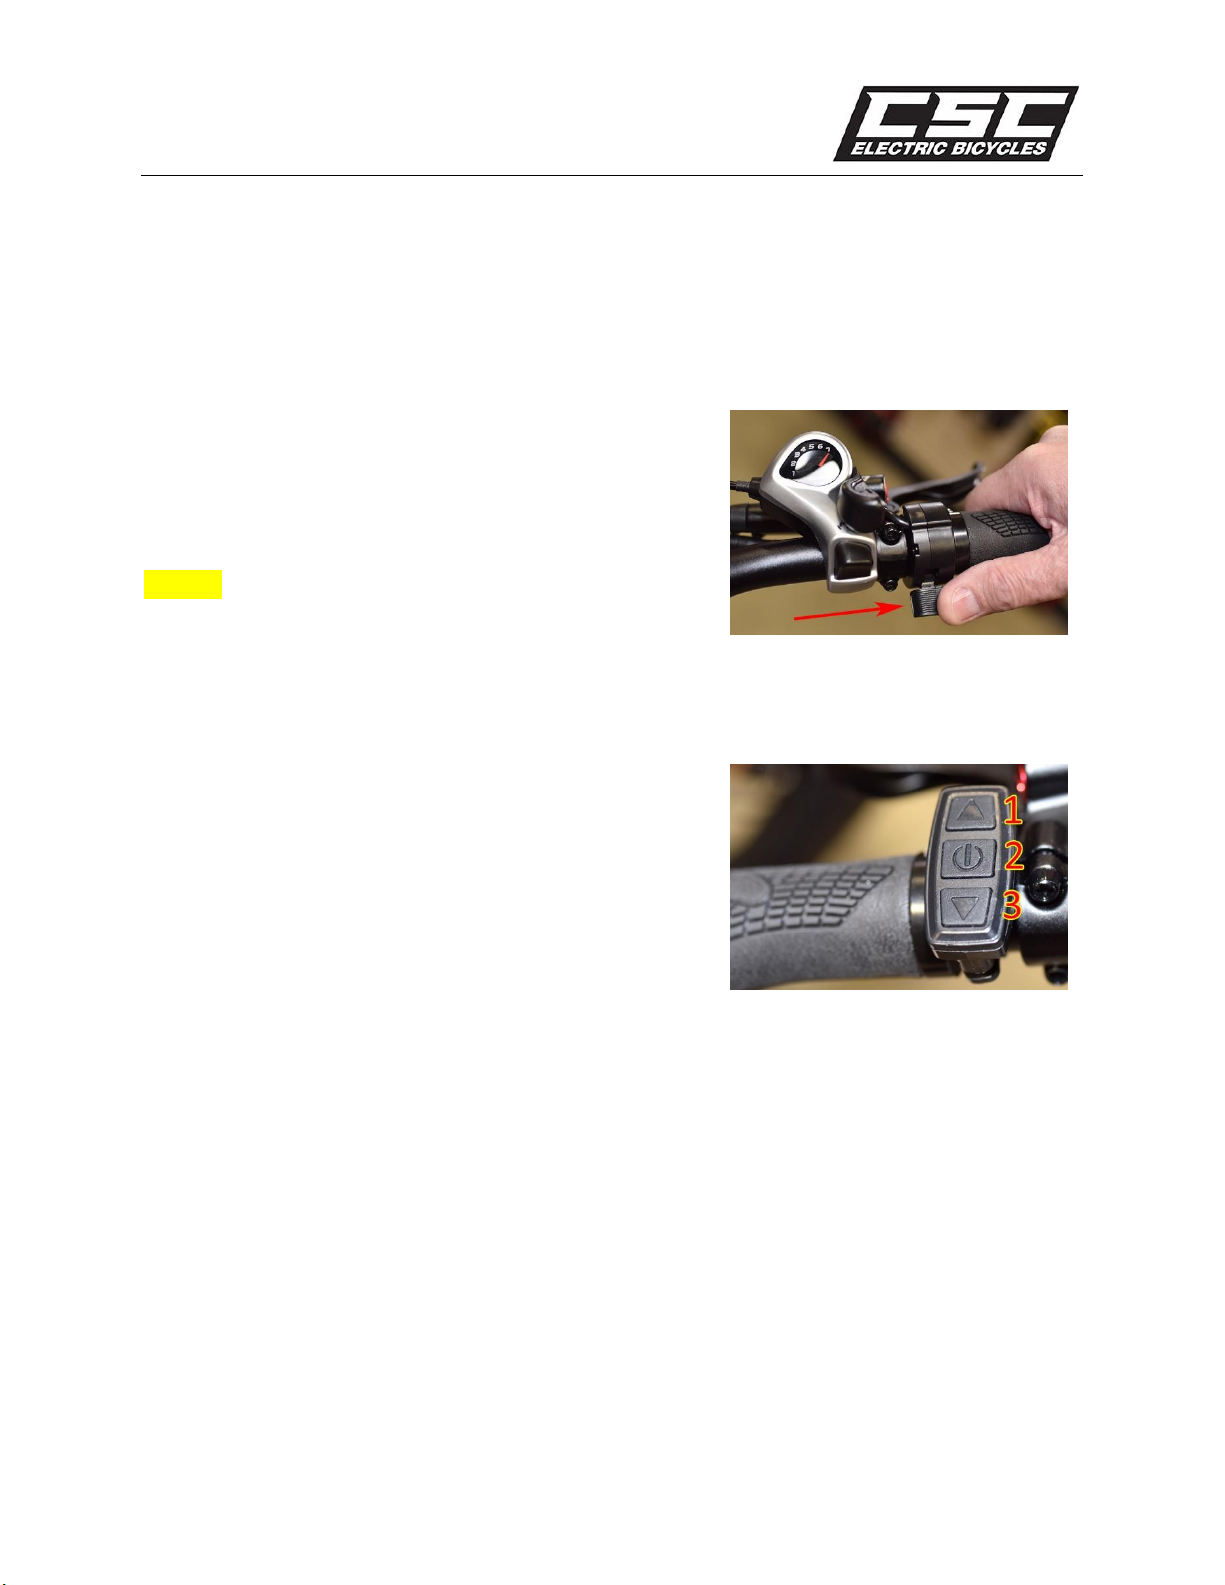
Switching On Electric Bicycle
Turn on the bicycle by depressing Switch 2 in the photo shown
to the right until the LCD illuminates. Turning off the bicycle
requires depressing Switch 2 and holding it down a second
time.
The bicycle LCD, the electric motor pedal assist functions, and
thumbswitch electric motor actuation will turn off
automatically if the bicycle is not used for 5 minutes.
Turning Headlight and Taillight On and Off
To turn on the headlight and taillight, depress Switch 1 until
the lights illuminate. To turn off the headlight and taillight,
depress Switch 1 until the lights turn off.
Changing LCD Display Mode
The LCD mounted in the center of the handlebars has three
display modes: Display 1, Display 2, and Display 3. You can
cycle through Display 1, Display 2, and Display 3 by pressing
Switch 2 momentarily after the LCD has been turned on. By
default, Display 1 is shown when you first turn on your electric
bicycle.

FT750-26 and FT750-20 Owner’s Manual
9
Display 1 shows actual speed, as indicated by the red arrow in
the photo to the right. Display 1 also shows other information
as shown in the photo to the right.
Display 2 shows average speed during the ride, as indicated by
the red arrow in the photo to the right. Display 2 also shows
other information as shown in the photo to the right.
After showing Display 2, the display changes to Display 1 after
riding the bicycle for 5 seconds.
Display 3 shows maximum speed attained during the ride, as
well as other information as shown in the photo to the right.
After showing Display 3, the display changes to Display 1 after
riding the bicycle for 5 seconds.
Illuminating Display Backlight
After the LCD has been turned on, you can illuminate the
backlight on the LCD by holding Switch 1 on continuously for 5
seconds. You can do this from any of the display modes.
To turn the backlight off, hold Switch on 1 continuously for 5
seconds.

FT750-26 and FT750-20 Owner’s Manual
10
Toggling Between Imperial and Metric Units
Within 15 seconds of turning the LCD on, depress Switches 1 and
3 for 5 seconds until you see the screen start to flash. At this
point, by repeatedly depressing Switch 2 you can toggle through a
top speed setting (do not adjust this), wheel diameter (this is set
at the factory) and choices for four options you can cycle through
by depressing Switches 1 or 2:
1. MPH & Fahrenheit units
2. KM/H & Fahrenheit units
3. MPH & Celsius units
4. KM/H & Celsius units
After selecting your desired measurement units, depress Switch 2
for 5 seconds to return to Display 1.
Pedal-Assist System
To change the amount of pedal assist (electric motor power
provided during the pedaling effort), depress Switches 1 or 3
to change from Level 0 (no pedal assist) to Level 5 (maximum
amount of pedal assist). Pressing Switch 1 increases the pedal
assist level (more assistance from the motor is provided);
pressing Switch 3 decreases the pedal-assist level (less
assistance is provided).
The Pedal-Assist Level selected (0 through 5) will be displayed
on the LCD’s left side as shown in the photograph to the right.
FT750-26 and FT750-20 Owner’s Manual
11
Thumb Throttle
Actuating the handlebar-mounted thumb throttle after the electric bicycle has been turned on will cause
the electric motor to propel the bike forward.
The thumb throttle is shown in the photo to the right.
Pushing the thumb throttle down increases the amount of
power provided to the drive motor, thereby increasing the
bicycle’s speed.
Caution! Do not activate the handlebar-mounted thumb
switch if you are not on the bicycle, as the electric motor will
propel the bicycle forward.
Displaying Mileage and Time, and Resetting the Trip Meter
To display trip mileage and time, depress Switch 1 and 3
simultaneously for 5 seconds. The trip mileage and riding time
will be displayed on the LCD.
To reset the displays to zero, depress Switch 2 until the LCD
mileage and time revert to zero.
Maximum Electric Motor Bicycle Speed
Your CSC electric bicycle’s maximum speed that can be attained through electric motor power is 20 mph.
You can attain higher speeds by pedaling the bicycle with higher rear derailleur gears selected, but no
additional electric power will be provided above 20 mph. As explained above, electric motor power will
be provided by:
Thumb throttle activation if you have selected pedal-assist levels of Level 1 through Level 5, or
The pedal-assist function to assist manual pedaling if you have selected pedal assist levels of
Level 1 through Level 5, or
Both of the above

FT750-26 and FT750-20 Owner’s Manual
12
Beyond 20 mph, though, no additional electric motor power will be provided to drive your electric
bicycle to higher speeds.
Shifting Drive Gears
Drive gear changes are accomplished through the use of the gear selector located on the handlebar near
the right handgrip.
Changing to a higher gear (for higher bicycle speeds) requires
clicking the gear selector lever forward (shown by the upper
arrow) with your thumb.
Changing to a lower gear (for climbing hills or pedaling into the
wind) requires pressing the gear downshift button (shown by
the lower arrow) with your thumb.
Caution! You should only change gears while pedaling to allow the rear derailleur to move the chain
from one rear sprocket to another. Attempting to change gears while not pedaling puts undue stress on
the rear derailleur.
Braking
Your electric bicycle has front and rear hydraulically actuated disc brakes. The brakes are controlled by
handlebar mounted brake levers. The left brake lever operates the rear brake and the right brake lever
operates the front brake. During normal operation, both the front and rear brakes should be used to
decelerate or to stop the electric bicycle.
Warning! Do not apply the brakes too vigorously or you may induce a skid and crash. Do not apply the
front brake too vigorously as you may lift the rear wheel off the ground and lose control.
Warning! When riding in wet weather, braking distances will increase due to decreased friction on the
brake rotors and decreased tire traction. Take this into consideration when riding in wet weather.
Warning! Check both the front and rear brake for proper operation prior to each ride.
FT750-26 and FT750-20 Owner’s Manual
13
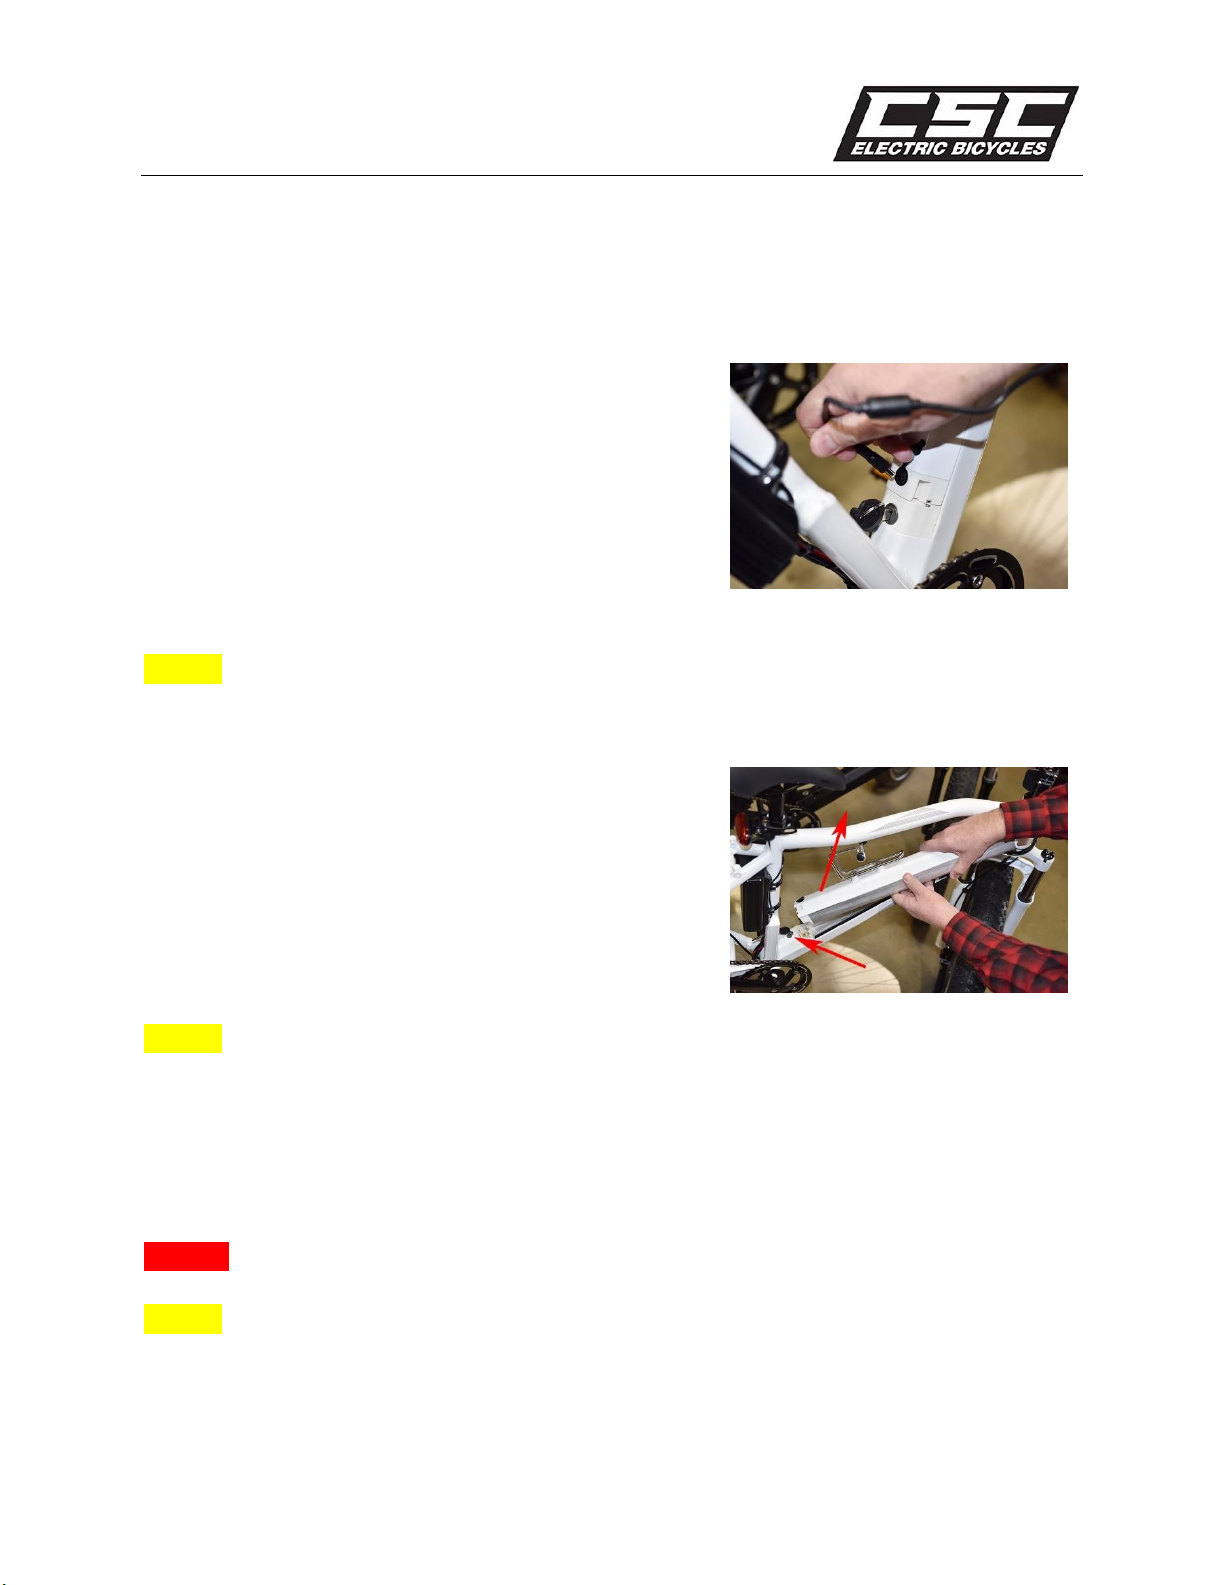
Charging the Battery
The battery may be charged either on or off the bicycle.
To charge the battery on the bicycle:
Connect the charger’s plug with the AC power supply
first (the plug on the wall).
Connect the output plug of the charger with the
charging port of the battery, as shown in the photo to
the right.
Caution! Do not connect the charger to the battery before first connecting the charger to the wall
outlet. Doing so may damage the circuit.
To charge the battery off the bicycle:
Insert the key in the battery lock, turn the key to the
left, and then lift the battery’s lower end away from
the frame.
Connect the charger’s plug with the AC power supply
first, then connect the output plug of the charger with
the charging port of the battery.
Caution! Do not connect the charger to the battery before first connecting the charger to the wall
outlet. Doing so may damage the circuit.
When the battery is charging, the power indicator of the battery and the charger will illuminate.
Charging is complete when the indicator turns from red to green. Attaining a full charge typically requires
6 to 8 hours.
Warning! Charge the battery in a well ventilated, cool, and dry area.
Caution! After charging, first disconnect the charger input plug from the battery, and then disconnect
the charger output plug.

FT750-26 and FT750-20 Owner’s Manual
14
Caution! Do not allow the charger to remain connected after the battery is fully charged, as this may
shorten battery life.
Caution! Always charge your battery in temperatures between 50 °F –80 °F (10 °C –25 °C) and ensure
the battery and charger are not damaged before initiating a charge cycle. If you notice anything unusual
while charging, discontinue charging and do not use the bicycle. Contact CSC for help.
Battery Range
Your electric bicycle’s range is a function of many factors, including your weight, your pedal assist setting,
how much pedal effort you provide, the speeds at which you ride, the terrain (uphill or downhill versus
level ground), the road surface, prevailing winds, and temperature.
Caution! Do not ride so far that you have insufficient charge to complete your trip. You should always
leave with a fully charged battery, and observe the state of charge during your ride such that adequate
charge remains to assist you to your destination.
Battery Status
Battery charge status is shown on the LCD display in the upper
right corner of the LCD, as shown in the photograph to the
right.
Battery Disposal
When your battery is no longer serviceable, please contact CSC for a replacement at 909-445-0900. Do
no throw your battery away as normal trash. Dispose of the battery in an approved battery disposal
facility.
FT750-26 and FT750-20 Owner’s Manual
15
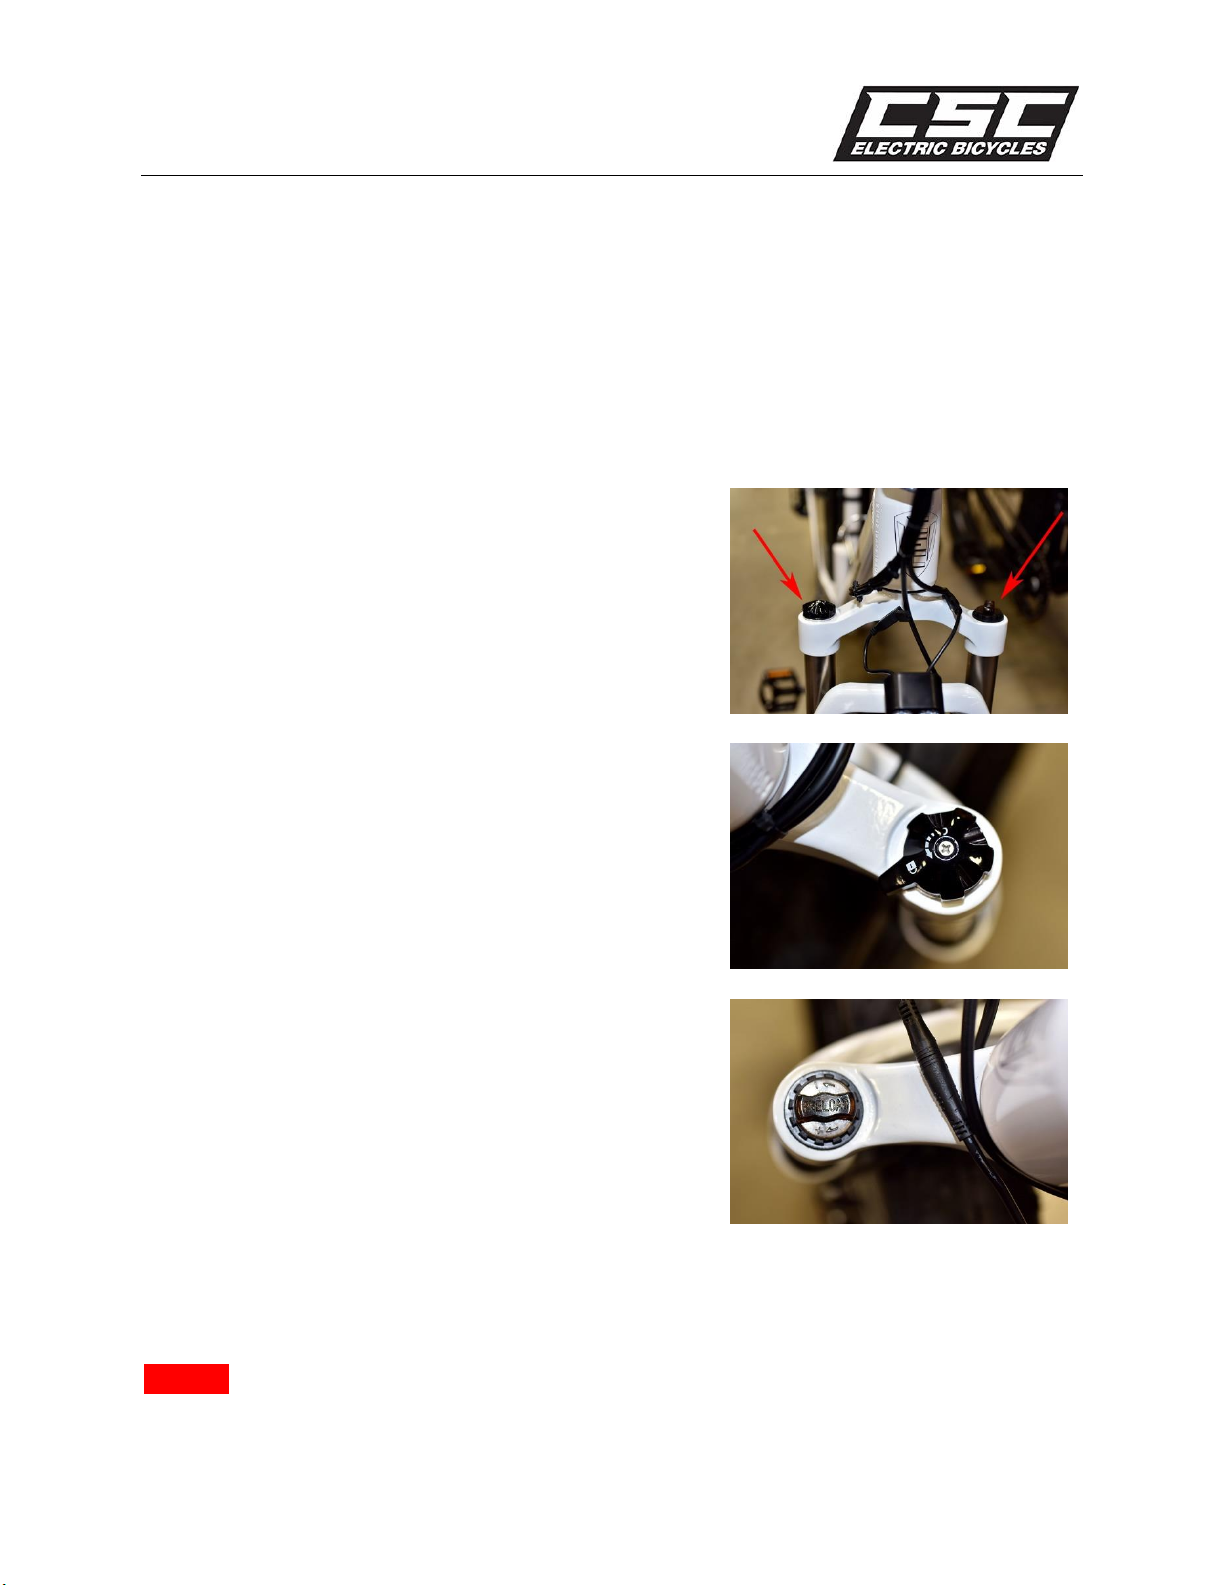
Front Suspension
The FT750’s front suspension is adjustable for spring preload and damping. Preload refers to the how
much the front springs are compressed initially. Damping refers to how quickly the suspension can
compress or rebound. Preload and damping are controlled with two rotary knobs, each located atop the
fork as shown below. The damping control can be rotated all the way counterclockwise to lock the front
suspension such that no fork compression can occur, which can be helpful when climbing steep hills.
Front suspension damping and adjustment controls. The
damping adjuster is on the right side of the fork (as viewed by
the rider). The preload adjuster is on the left side of the fork.
The damping adjuster is located at the top of the right fork leg
(as viewed by the rider). The adjuster can be rotated
counterclockwise through eight positions to adjust the
damping, from minimum to maximum. One click further past
maximum locks the suspension rigidly.
The preload adjuster is located at the top of the left fork leg. It
operates through a series of 10 clicks (five full turns). Preload is
increased when the adjuster is rotated clockwise. Preload is
decreased when the adjuster is rotated counterclockwise.
The preload should be adjusted such that a small amount of fork compression occurs when the rider sits
on the electric bicycle. Increased preload will suit heavier riders. If the fork completely compresses when
hitting bumps or irregularities in the road surface, increase the preload.
Warning! Only make preload or damping adjustments when you are stopped. Never attempt to make

FT750-26 and FT750-20 Owner’s Manual
16
these adjustments while riding, as doing so may cause you to crash.
Adjusting Your Bicycle to Fit You
Your electric bicycle can be adjusted for fit to your body by making adjustments to seat height, seat
position, seat angle, handlebar angle, and brake lever positions. Your objective should be to adjust the
bicycle such that it fits you comfortably.
Seat fore and aft position can be adjusted by loosening the
clamp beneath the seat and sliding the seat to the front or to
the rear. Most people are comfortable with the seat
approximately centered over the seat post.
Warning! Make sure the bolt is tight after making any
adjustments. A loose bolt could cause you to crash.
Seat angle can be also adjusted by loosening the bolt beneath
the seat and rotating the seat angle. You should adjust the seat
angle such that the seat is approximately parallel to the
ground. You may wish to make minor angular adjustments to
move the front of the seat up or down to suit your
preferences.
Warning! Make sure the bolt is tight after making any
adjustments. A loose bolt could cause you to crash.
Seat height can be adjusted by loosening the seat post clamp
and moving the seat post up or down in the frame. You should
adjust the seat height such that when the pedal is at its lowest
position, your knee is very slightly bent. The seat should be
pointed forward, without the nose of the seat biased to the
left or the right.
Warning! Never adjust the seat height so high such that the
seat post is extended beyond the warning line inscribed on the
seat post. This can result in the seat post failing.

FT750-26 and FT750-20 Owner’s Manual
17
The handlebars should be adjusted such that they point
straight ahead for most people. If your arms are of slightly
unequal length, you can adjust the angle of the handlebars
with respect to the fore-and-aft axis of the bicycle such that
you can easily reach each handgrip.
Warning! Make sure the bolts in the photo shown to the
right are secure. If they are loose, you can lose control of the
bicycle and crash.
Handlebar angular position can be adjusted by loosening the
handlebar clamp and rotating the handlebar up or down. You
should adjust the handlebar such that it is a comfortable to the
handlebar grips.
Warning! Make sure the handlebar mounting bolts are
secure. If they are loose, the handlebars can shift position and
cause a crash.
Brake lever angle can be adjusted to loosening the brake lever
clamps and rotating the levers up or down on the handlebars.
You should adjust the levers such that it is a comfortable reach
to the levers.
Warning! Make sure the brake levers are secure. If they are
loose, the levers can shift position and cause a crash.

FT750-26 and FT750-20 Owner’s Manual
18
Tire Pressure and Tire Maintenance
Your tires should be inflated to 20 psi. They can be deflated as low as 10 psi to better suit riding in soft
terrain. You should check tire pressure prior to each ride. Tires are normal wear items, and it is routine
for tires to require replacement after significant use. When the tread is worn down or the tire sidewalls
are cracked, or if the tire has been torn, you should replace your tires and your tubes. It’s also a good
idea to carry a tire repair kit and a tire pump (or CO2cartridges) with you whenever you ride your bicycle.
When you need any of these items, please contact CSC at 909-445-0900.
Caution! You should check tire pressure prior to each ride. Do not ride the bicycle if the tires are
underinflated.
Caution! Do not ride your bicycle without carrying a tube repair kit, tube repair tools, and a means of
tire inflation.
Warning! Do not overinflate your tires. This could cause the tire to burst, resulting in a crash.
Warning! Do not ride your bicycle if the tread is severely worn, if the tire sidewalls are cracked, or if
there is a tear in the tire.
FT750-26 and FT750-20 Owner’s Manual
19
Assembling Your Electric Bicycle
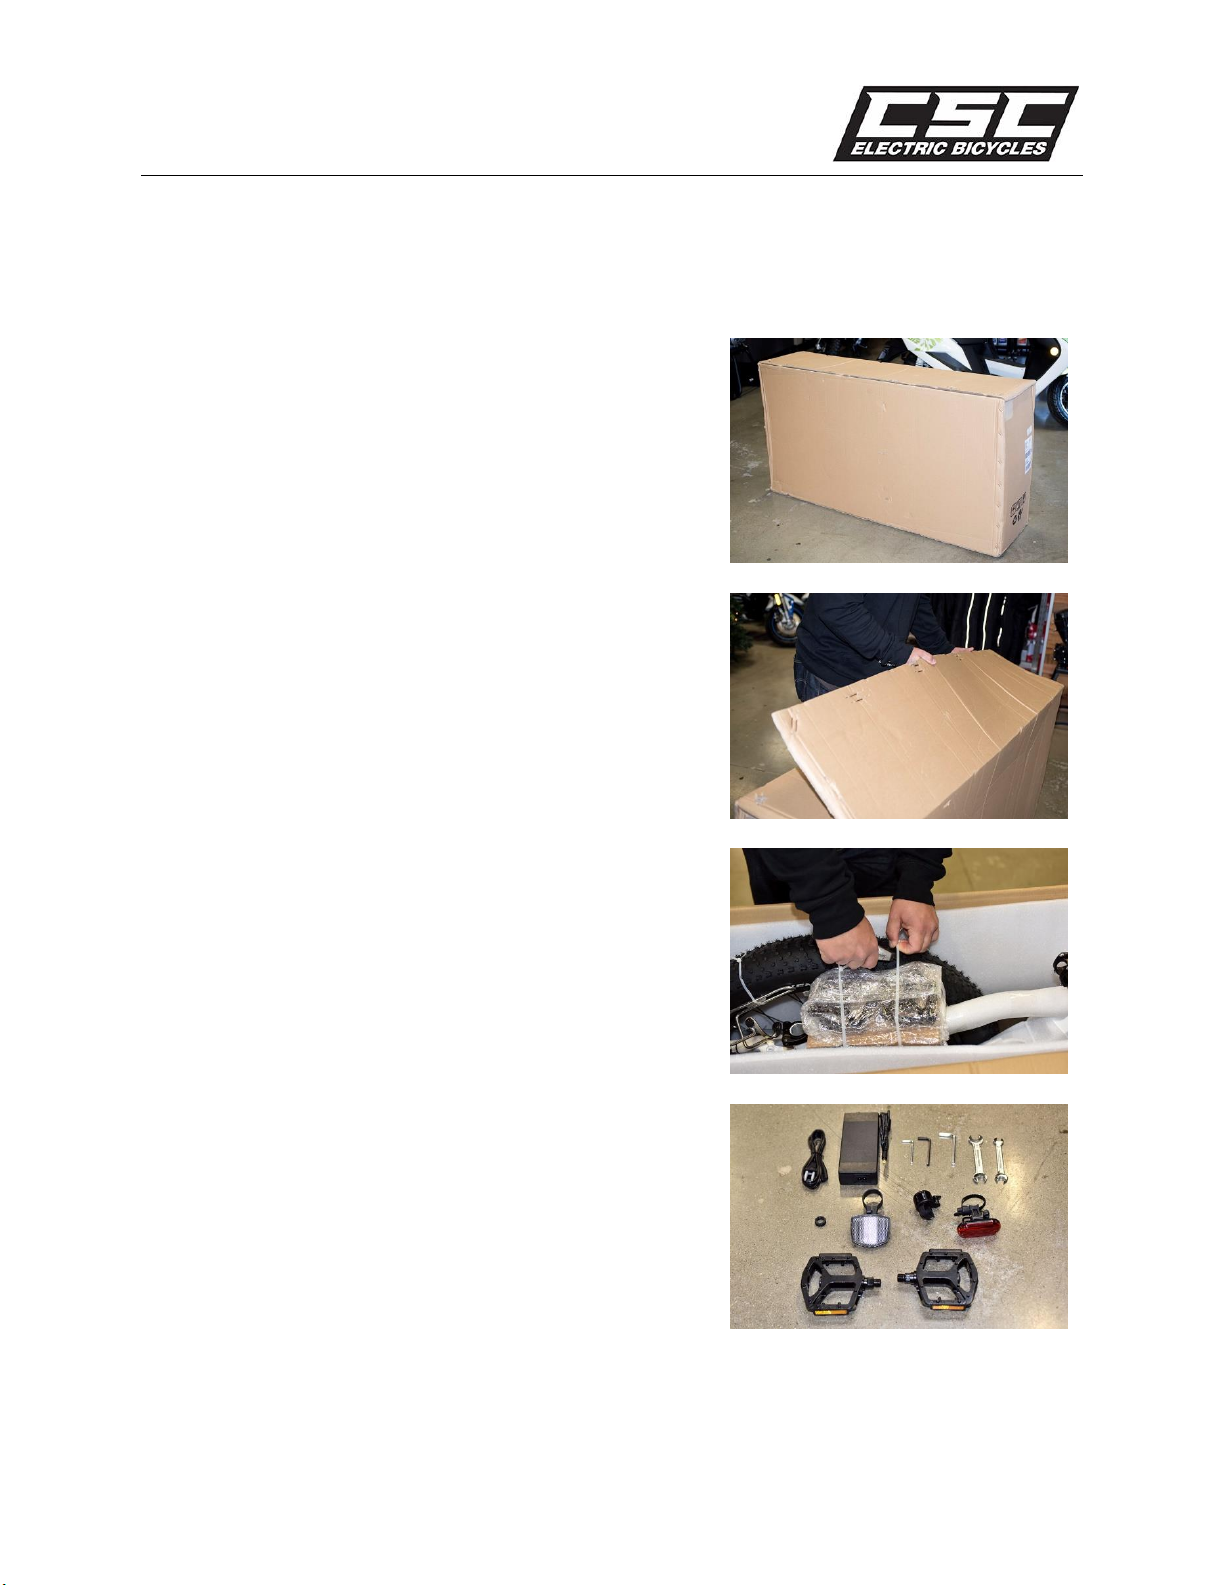
Uncrating
Your CSC electric bicycle will be delivered in a cardboard box as
shown here.
Open the box top.
Using a wire cutter, remove the zip ties securing the boxed and
wrapped components container.
You will have a charging cord, a charger, three Allen wrenches,
two open-end wrenches, a plastic nut, the front reflector, the
bell, the taillight, and two pedals.
This manual suits for next models
1
Table of contents
Other CSC Bicycle manuals


