CTA LT-MCRFS User manual

Medical Rolling Cart with Articulating Arm
and Storage for Laptops
LT-MCRFS
INSTRUCTION - MANUAL
CONTENTS:
INSTALLATION:
888-733-4448
x1 x1 x1 x1 x5
BCDEF
A
x1
x1
G
1A. Take one wheel (G) and align it to
the leg arm holes on the underneath of
the base (A). Initially you can use your
hands and manually rotate the wheel
until slightly tightened. Then use the
provided wrench tool (B) at the hex
shaped area and rotate it securely to
tighten the rest of the way.
A
G
BD
A
C
F
2A. Align the bottom of pole
body (D) to the top center of
the base (A). While pieces
are connected, securely flip
over so you can see the
bottom. Align washer (C) to
the hole on the bottom.
Using your hands, identify
L-shaped component (F)
and rotate through the
washer into the hole until
securely tightened. Pole
body and base should now
be securely attached to
each other.
1B. Press the wheel lever up or down to
place wheels in locked or unlocked mode
depending if you want to be in a mobile or
stationary setup. Make sure you adjust all
wheels at the same time or it won’t properly
be set up.
1. Attaching Wheels to Heavy Duty Base 2. Attaching Base to Body
3. Cable Routing through Body
1. Set the pole to the lowest position. Insert cable head through the bottom opening of pole and push upward.
2. Fish the cable to the opening at the top and take cable end and pull out of opening.
3. Carefully pull the cable out and connect end to device.
x1
x2
x2
x1 x2
HIJKLM
x1
N
x1
O
x1 x1
P
Q
x1
R
x2
S
x4
TU
x4 x1
M6 MM
Screw
M6 MM
Hex Nut
M6
Allen Key
**COMPONENTS ARE NOT TO SCALE
AND JUST GRAPHIC REPRESENTATIONS
D
M5x12
Screw
M8 MM
Washer M8 MM
Bolt
M5
Hex Nut M5
Screws
M6
Washer
V
x1
888-733-4448
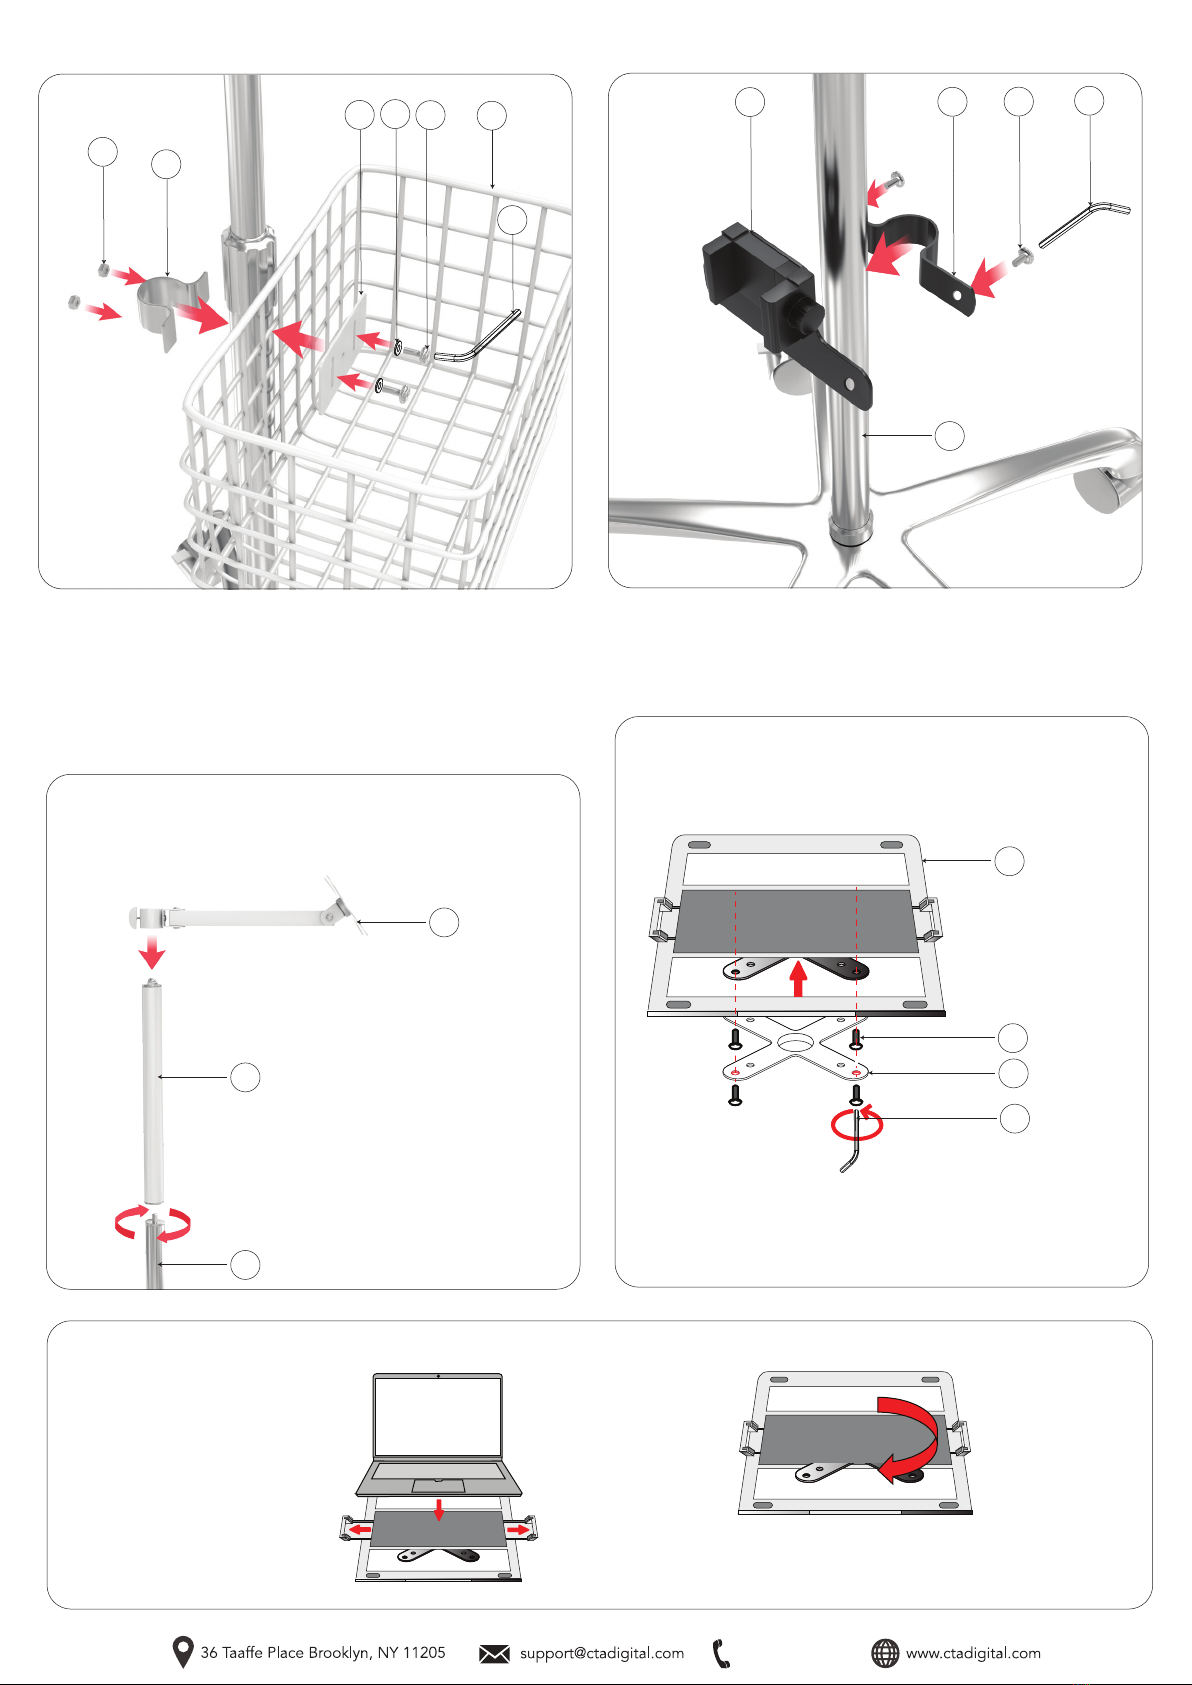
4. Attaching Basket to Pole Body
4A. Find the portion of the pole body beneath the tightening knob in the center to
begin mount as illustrated. Position the basket (N) first, then sandwich the U-clamp
(L) from behind and the metal plate (H) from within the basket. Insert and rotate in
the screw (K) with washer (J) while holding the hex nuts from behind (I) with your
hands. Rotate the screw using provided tool (M) until securely tightened. It may be
easier to start the installation at the very bottom of the pole body where the basket
can rest of the base (A). When everything is semi-tight, slide the entire installation
upwards towards the desired location, then continue to tighten everything until
securely fastened.
L
I
HJKN
5A. Find the power strip holder component and first remove the screws with
provided tool (M) . Take the two halves (P+Q) and wrap them around the body
pole as illustrated above. Using the provided tool (M), rotate the screw until
securely tightened. No hex nuts are needed because the holder is threaded and
will hold the tightened screw.
5. Attaching Power Strip Holder to Pole Body
6. Attaching Pole Extender &
Articulating Arm
O
E
D
6A.Attach pole extender component (E)
onto the main pole body (D) by simply
screwing on the male to female connector
ends. Rotate until securely tightened.
Then, take the articulating arm (O) and
first loosen the grip by turning the knob at
the end. Slide it over the top of the pole
extender and move it down to the desired
height. When moved to preferred height,
turn knob until securely tightened and
holding the arm in place.
M
PQR
D
M
7. Connecting Laptop Holder VESA plate to
the Articulating Arm VESA Plate
V
S
O
U
7A. Align the VESA plate of the laptop holder(V) to that of the vesa plate of the
articulating arm (O). Then from behind, rotate in screws (S) using provided tool (U)
until securely tightened. The VESA plate of the laptop holder is threaded so no hex
nuts will be required.
8. Adjusting Laptop Holder
**LAPTOPS ARE JUST FOR
ILLUSTRATION AND
NOT INCLUDED
8A. (LEFT IMAGE) Slide
open the arms of the
laptop holder (V) , then
place your laptop into
position. Release the
arms to hold the laptop
in place.
8B. (LEFT IMAGE) The
VESA joint allows you to
rotate 360 degrees for
the optimal orientation
preferred.
Other CTA Laptop Accessories manuals


