CTS 200LX User manual

OWNER’S MANUAL
TUFFSTUFF FITNESS EQUIPMENT
1325 E. Franklin Ave., Pomona, CA 91766, USA
PH: 909-629-1600 FX: 909-629-4967
www.tuffstuffitness.com ·email: info@tuffstuff.net
110V

14
MANUAL INSTALL
At ready time press TV/DVD button to select the TV MODE and the press the TV MODE 3 BUTTON to
enter full screen mode. Press MENU button and the press VOL+ button to enter TV parameter adjusting.
1. Press TV/DVD button to activate the menu. The red color shows
the adjusting item and the other items is black color.
2. Press CH- button to select the item .When the MANUAL INSTALL
turns the red color enters the MANUAL INSTALL
3. Press TV/DVD button to activate the menu. Press CH- to select
the ‘SEARCH’ item. Press the TV/DVD button to search channel.
During this time the CHANNEL NUM shows the channel number.
4. Press CH- button after searching. When the STORE in red color
red color press the TV/DVD button. Choose YES item and press
TV/DVD button to confirm. (C)
AUTO INSTALL
At ready time press TV/DVD button to select the TV MODE and the press the TV MODE 3 BUTTON to
enter full screen mode. Press MENU button and the press VOL+ button to enter TV parameter adjusting.
1. Press TV/DVD button to activate the menu. The red color shows
the adjusting item and the other items is black color.
2. Press CH- button to select the item .When the AUTO INSTALL
turns the red color enters the AUTO INSTALL(D)
3. Press TV/DVD button to search channel.(E)
4. After AUTO INSTALL, the channel will save in the treadmill.
ADJUST THE SCREEN
At ready time press TV/DVD button to select the TV MODE or DVD MODE .Press the TV MODE 3
BUTTON to enter full screen mode. Press MENU button to enter PICTURE PARAMETRS adjusting.
Press TV/DVD button to activating the mEnu.
1. BRIGHTNESS ADJUST: Press CH-/CH+ button to select the
item .When the BRIGHTNESS item in red color ,you can press
VOL+/VOL- button to adjust the value.(F)
2. CONTRAST ADJUST:
Refer to the first step.
3. SHARPNESS ADJUST:
Refer to the first step.
7
The TV mode 1 button
9.4 inch TV screen + Exercise information
The TV mode 2 button
Exercise information in 17 inch TV full screen
The TV mode 3 button
17 inch TV full screen.
The volume button
Adjust the volume.
The channel button
Press the button to change the channel.
The TV/DVD button
Select the TV, DVD or s·video mode.
The menu button
It is operated at TV screen only and adjusts the monitor screen.
During The TV mode 3, press this button to enter adjusting mode .
The incline button (On the left handrail)
Adjust the incline.
The speed button (On the right handrail)
Adjust the incline.
The fan button
Fan switch

15
DAILY MAINTENANCE
The running belt of the treadmill is imported which was made from special materials with lower coefficient
of friction and higher of tensile strength; the running board is with double shock-absorb system and
which surface is smooth and hard wearing.
Clean
It can prolong the life of treadmill to keep it in clean situation, so it’s necessary to clean usually the
treadmill and keep the area around the treadmill clean, include the underneath the treadmill.
1) Wipe down the treadmill with a clean soft towel weekly. Spray liquid with mild cleaner on towel and use
towel to wipe. NEVER spray directly on surfaces of the treadmill.
CAUTION:USE only Mild Cleaners: NEVER use Cleaners with:
·Formula 409 ·Alcohol
·Fantastic ·Ammonia
·Simple Green ·Solvents
2)Clean the exposed running board and side foot-board usually, wipe running belt by soft cloths with
water, please pay attention to prevent the water from the underside of belt and over.
3)Clean under motor cover by vacuum cleaner with attachments every 6 months. Vacuum areas usually
covered by the motor cover and reach into all nooks and crannies with the vacuum cleaner. Reconnect
any wires knocked loose by accident and remove the motor cover completely after your cleaning.
CAUTION:Disconnect treadmill power cord from the wall outlet.
Lubricating
The treadmill uses the auto-lubricating system. When the console test the total distance reached the
pre-set distance in the system, the lubricating motor begins to work. During using, user should check the
auto-lubricating system timely. Add the oil quickly if find the oil bottle is empty. If the auto-lubricating
system doesn’t work well, please call the dealer quickly.
This treadmill also has the function of manual lubricate. The button of manual lubricate is on the back of
the monitor.
More attention: The superfluous lubrication is not good. Please remember: reasonable
lubricating is an important factor for prolonging the lifetime of treadmill!
Evaluation of friction:
The friction between running belt and board will be increased due to the dust or reduced lubrication, this
state perhaps can harm motor and controller. The increased friction is with following characters:
1)After shutting off the power, the running belt can move or it’s difficult to move;
2)Pull out safety key when the treadmill runs at middle-speed under load state, the running belt stops at
once;
3)The increased friction maybe harm motor or controller, open circuit and blow the fuse.
Adjust running belt tension
The running belt was adjusted before it left the factory and after assembling, but after a period of usage,
the belt will become loose, this circumstance is out of guarantee to be repaired. The user can adjust it by
oneself.
Check Running Belt Tension
Set the treadmill on the 0.9 mph speed. While walking on the running belt , attempt to stop the running
belt by stepping hare with on foot into the oncoming belt, just in front of the lower cover. The running
belt should not slip. If the running belt slips it means the running belt is too loose. The loose belt will slip,
but over much tight belt perhaps harms the motor, roller and itself.
Solution
Remove the key and UNPLUG THE POWER CORD. Using the Allen wrench, turn both rear roller
adjustment bolts counterclockwise, 1/4 of a turn. When the walking belt is properly tightened, you should
be able to lift each side of the walking belt 5 to 6 cm off the walking platform. Be careful to keep the
walking belt centered. Plug in the power cord, insert the key and run the treadmill for a few minutes.
Repeat until the walking belt is properly tightened (A).
6
CONSOLE
Main Display
The start button
Start the machine or start the program.
The stop button
Stop the machine.
The program button
Press the key to enter the program mode.
The program select button
Select the program and press the START key to start the program.
The incline button
Press ‘INCLINE-’ to decrease the incline.
Press ‘INCLINE+’ to increase the incline.
The incline choice button
Adjust the incline quickly.
The speed button
Press ‘SPEED -’ to decrease the speed.
Press ‘SPEED +’ to increase the speed.
The speed choice button
Adjust the speed quickly.
16
More attention: it’s not over much tight, much better.
The walking belt is off-centre
All the running belt were adjusted before the treadmill left the factory or after assembling, but after a
period of usage, the belt will off-centre, this circumstance is from the following causes:
1)The treadmill is not horizontal.
2)The feet of user do not stand on the center of running belt.
3)The two feet of user are with different strengths.
Solution
Usually it can return after several minutes’ moving, but if it can’t, please adjust the bolt which is at the end
of treadmill at unit of half-circle by an allen wrench. If the belt slant to left, please adjust the left bolt
clock-wisely or adjust the right bolt counter clock-wisely(B).If the belt slant to right, it’s adjusted
oppositely(C).Repeat until the walking belt is centered(The side of running belt in the label’s green color)
(D).
The excentric running belt is out of warranty. The user can adjust it by oneself.
More attention: The excentric belt will strictly harm itself, so the user must adjust it once find this
circumstance.
NOTE: Any other servicing should be performed by an authorized service representative.
5
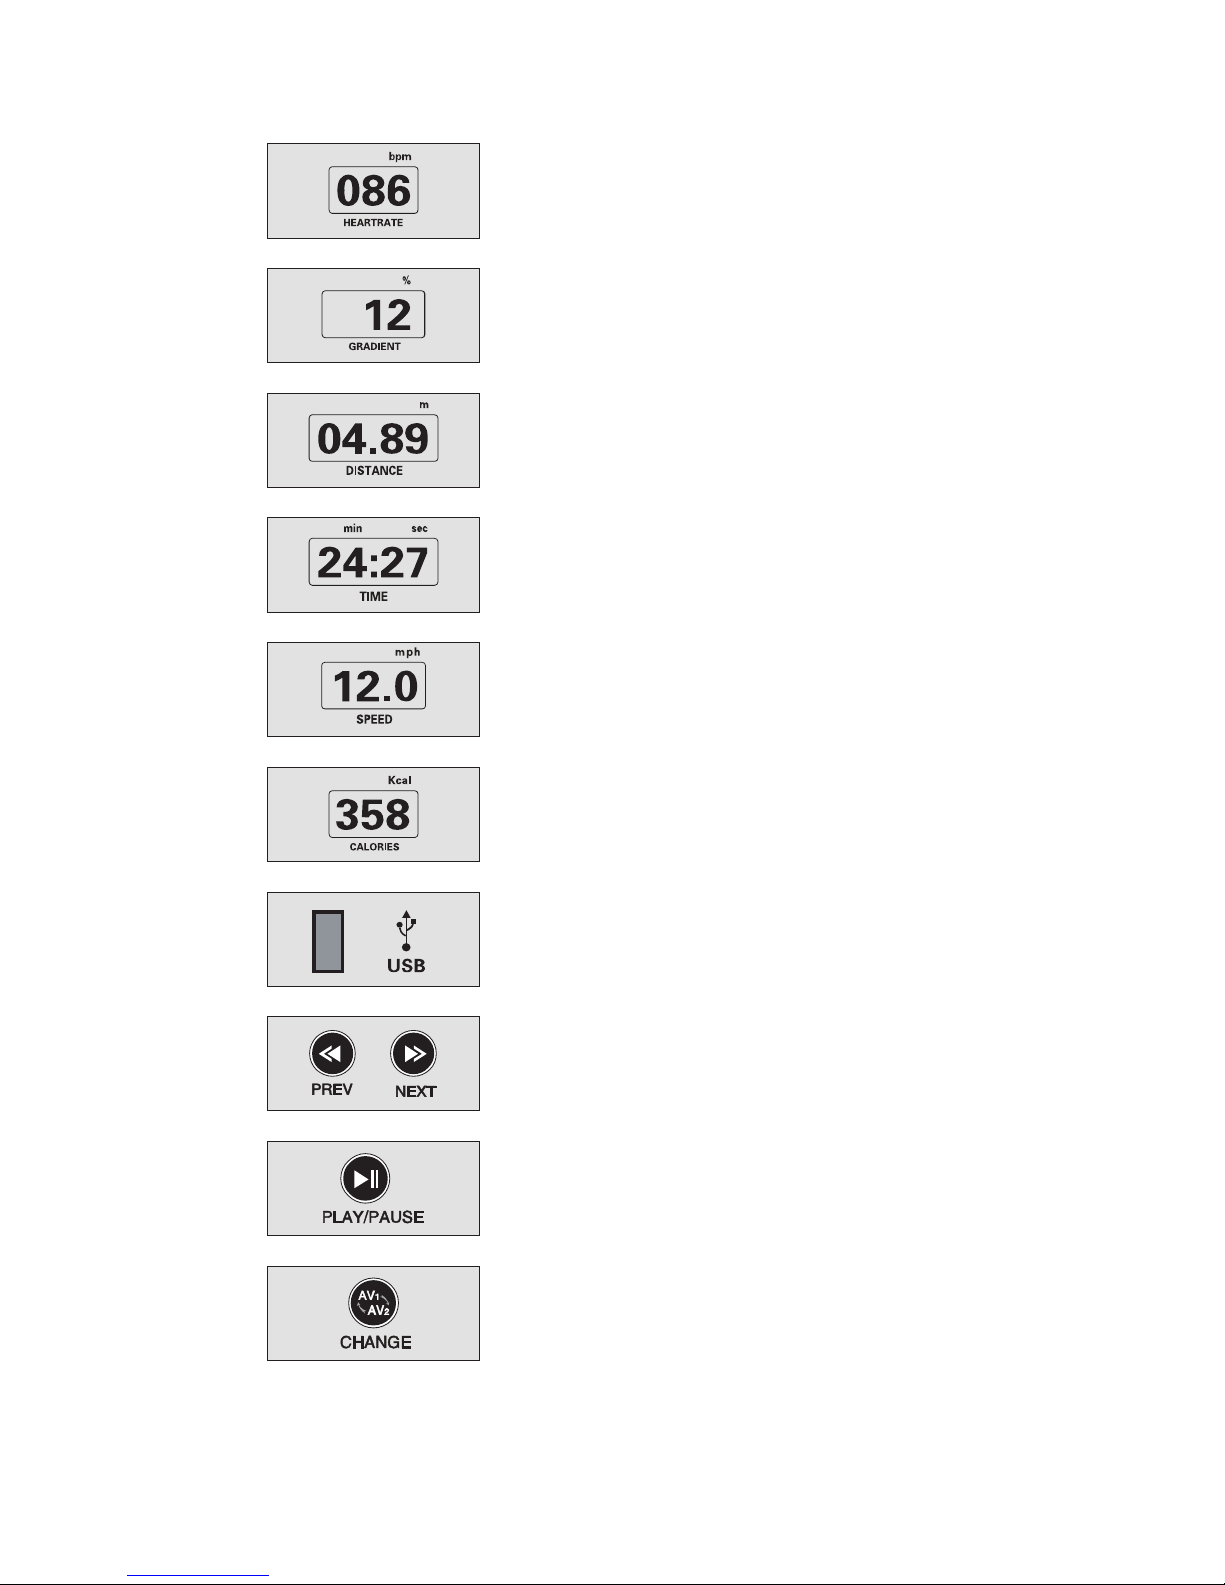
The heart rate displa
y
When heart rate be input indicates the practicing value.
The incline displa
y
1. Ready time indicates the setting value.
2. During running indicates the practicing value.
The distance displa
y
1. Radix Point will automatically more backward when exceed 9.99or 99.99
2. During running indicates the practicing value.
The time displa
y
During running indicates the practicing time.
The speed displa
y
1. Ready time indicates the setting value.
2. During running indicates the practicing speed.
The calorie displa
y
During running indicates the practicing calorie.
The USB Input
During running indicates the practicing calorie.
The PREV/NEXT Ke
y
1. During playing MP4, press the PREV or NEXT key to choose the program directly ;
2. When the “PLAY/PAUSE” key is pressed you will enter the file list and now you can
press the PREV or NEXT key to choose the program. Then you can press the
“PLAY/PAUSE” key again to play the file you chose.
The PLAY/PAUSE Key
The CHANGE Ke
y
To switch the player (DVD player or MP4 player).
17
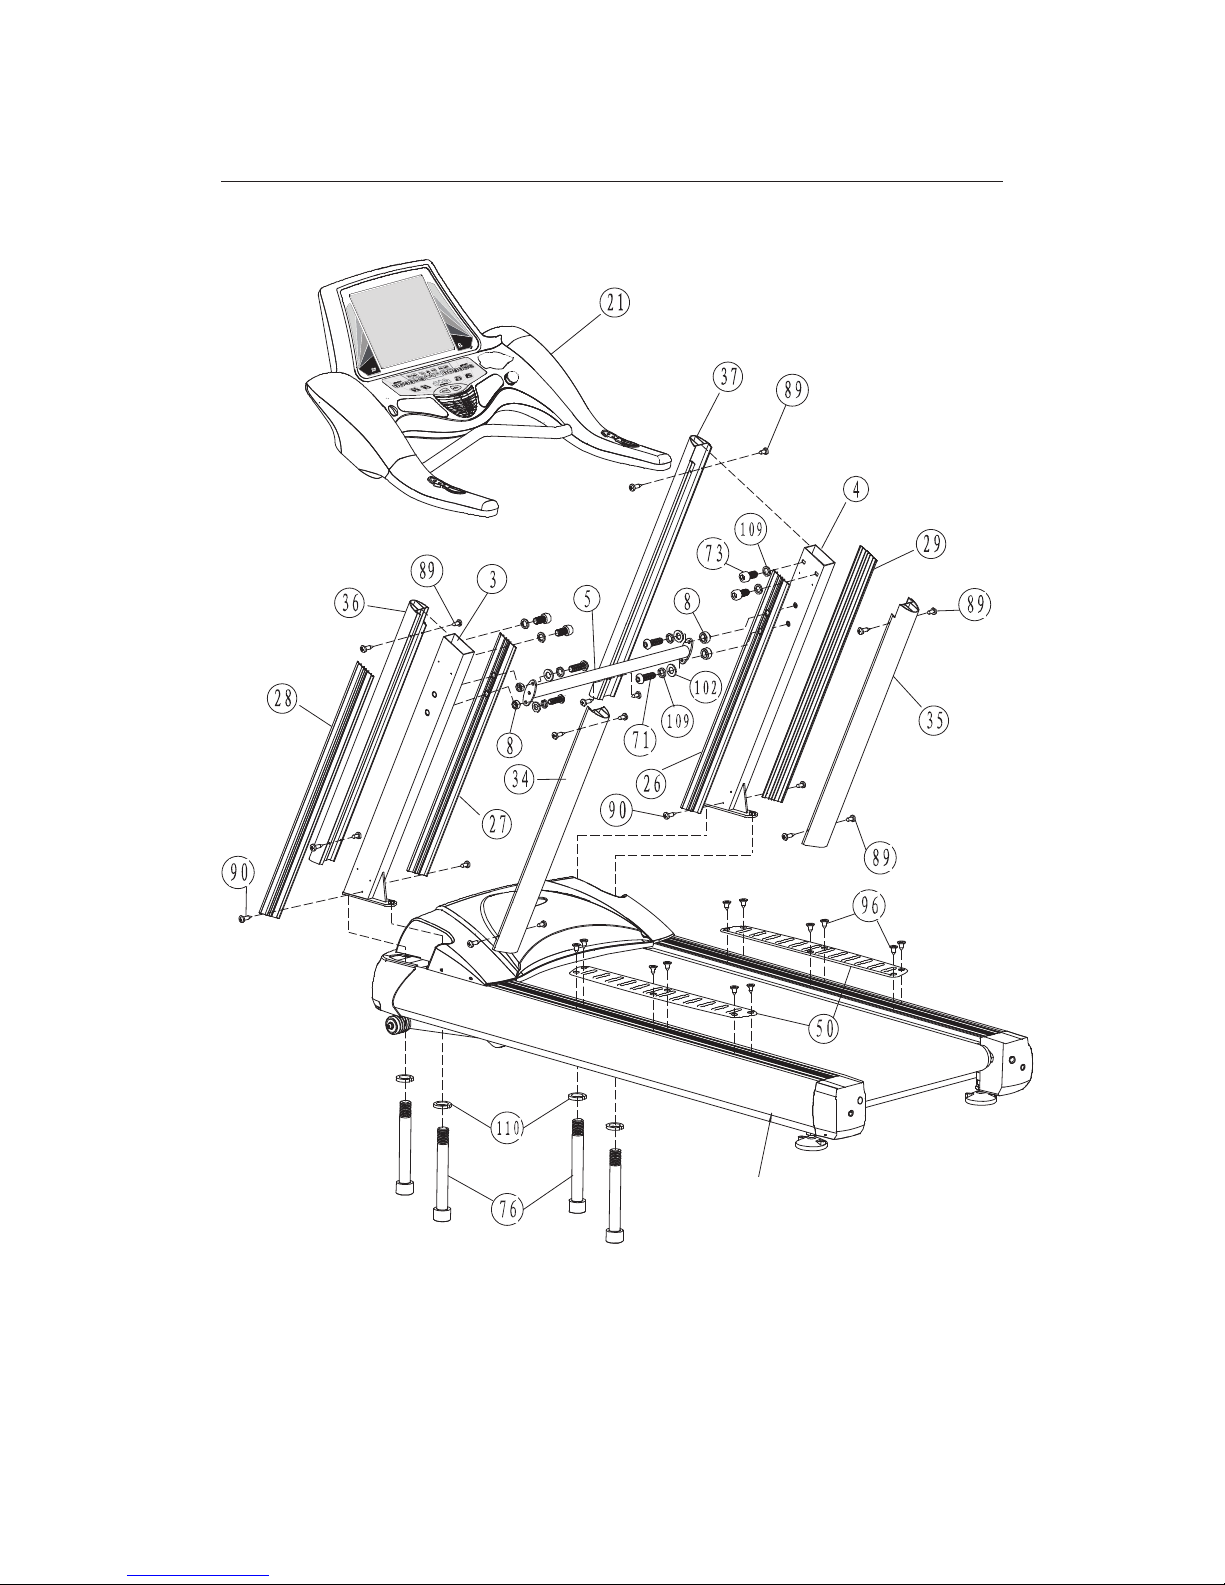
PART LIST
To locate the parts listed below, refer to the EXPLODED DRAWING attached in the end of the manual.
Key No. Designation Qty. Description Key No. Designation Qty. Description
1 Bottom Frame 1 30 Plastic Rail 2 83.4*7*1530
2 Life Frame 1 31 Left Trail 1 180.7*44*1966
3 Left Vertical Frame 1 32 Right Trail 1 180.7*44*1966
4 Right Vertical Frame 1 33 Upper Rail 2 115*40*1530
5 Horizontal Bar 1 34 Upright Rail 1 72.5*62*997
6 Belt Tighten Frame 1 35 Upright Rail 1 72.5*62*997
7 Washer 2 φ44*φ11*4 36 Upright Rail 1 72.5*62*1057
8 Spacing Tuber 4 φ18*φ11*8 37 Upright Rail 1 72.5*62*1057
9 Trail Supporting Board 6 34*19.5*1.5*500 38 Running Board 1 1500*684*25
10 Motor 1 2.2KW 39 Running Belt 1 3460*580*4.5
11 Incline Motor 1 JS25,220V,1/8HP 40 Front Roller 1 φ75*655*φ25*728(711)
12 Transducer 1 2.2KW,220V 41 Rear Roller 1 φ75*615*φ25*713(695)
13 Power Board 1 42 Damping Column 6 φ30*30*M8
14 Incline Board 1 43 Damping Column 2 φ30*30*M8
15 Filter 1 250VAC,10A 44 Plastic Washer 2 Φ38*Φ25.6*1.8
16 Reactor 1 10A 45 Wheel 2 φ60*φ36*60
17 Breaker 1 AC250V, 50Hz, 16A 46 Guiding Wheel 2 φ36*φ32*62
18 Transformer 1 220V/18VAC1A 47 Pipe Plug 6 口25*50*2.5
19 Oil Pump 1 12V 48 L Rubber Washer 2 50*30*17*5
20 Power Cord 1 1.5mm2*2200 49 Rubber Washer 4 φ38*φ13*5
21 Console 1 50 Skid Proof Washer 2 800*108*6.5
22 Motor Cover 1 543*860*159 51 limpet Washer 2 φ12.5*φ18*0.4
23 Left End cap 1 120*139*182 52 Adjustable Support 2 φ100*M20*100
24 Right End cap 1 120*139*182 53 Motor Belt 1 260J10
25 Front-cap 1 908*258*188 54 Bearing with block 2 UCFLU205
26 Plastic Rail 1 83.4*7*975 55 Oilless Bearing 4 SF-1F 10070
27 Plastic Rail 1 83.4*7*975 56 Oilless Bearing 4 SF-1 3220
28 Plastic Rail 1 83.4*7*1030 57 Rolling Bearing 4 6201RZ
29 Plastic Rail 1 83.4*7*1030 58 Rolling Bearing 2 6205RZ
4
MONITOR
Main Display
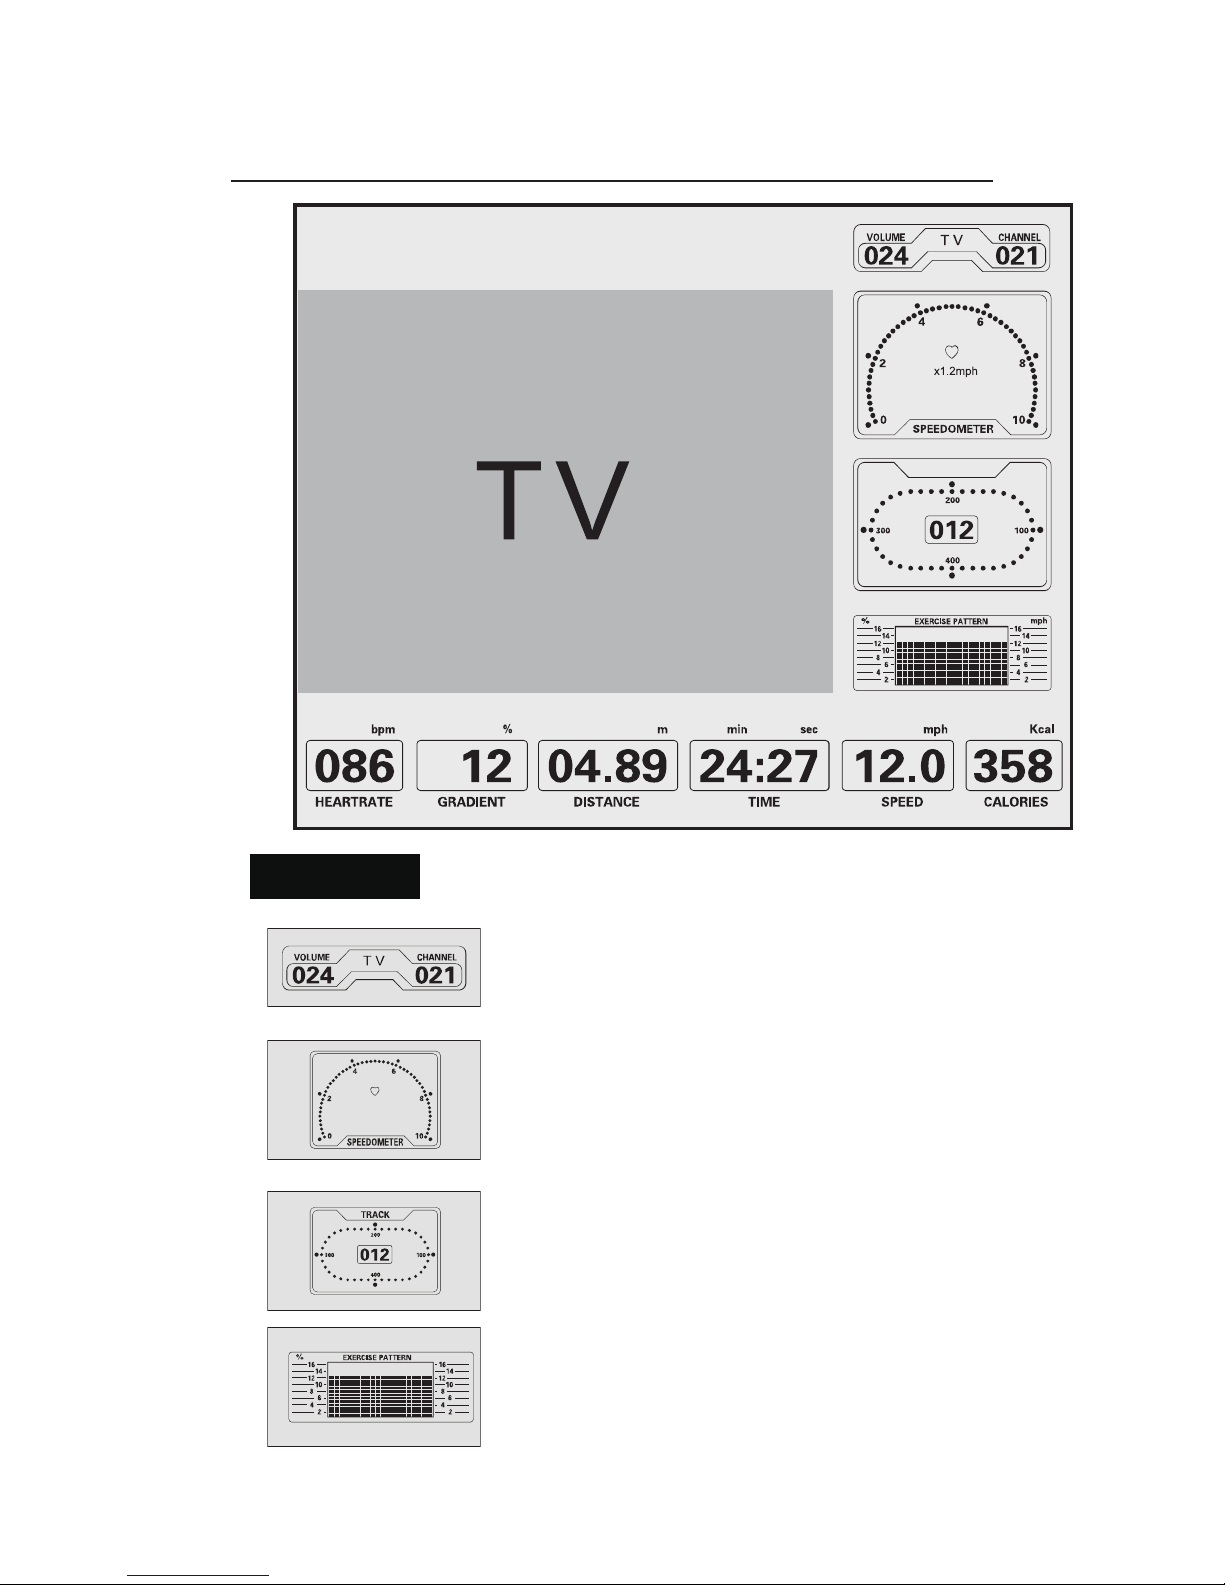
The volume and the channel display
1. The volume value will be changed when you press “VOL+” “VOL-” key.
2. The channel value will be changed when you press “CH+” “CH-” key..
The speed displa
y
1. During running indicates the practicing value in green colour.
2. The heartrate sign will flashes when console test the user’s heartrate.
The track displa
y
1. During running indicates the practicing value in green colour.
2. The figure in the middle is the current circle.
The exercise pattern display
1. During running indicates the practicing value in green colour.
2. Indicates the program value when the program running.
x1.2mph
mph

18
Key No. Designation Qty. Description Key No. Designation Qty. Description
59 Elastic Collar 2 φ12*1 92 Screw 6 ST4.2*45
60 Gyro Shaft 1 φ30*φ25*42 93 Screw(Big Head) 18 ST4.2*12
61 Guide Shaft 2 φ12*90*M8 94 Screw(Big Head) 2 ST4.8*12
62 Axle Pin 1 φ14*φ10*64 95 Screw(Big Head) 4 ST4.8*16
63 1gnirpS φ20*φ2.5*70 96 Platform Screw 12 ST4.2*9.5
64 1niP φ3.2*25 97 Flat Washer 7 M3
65 Oil Bottle 1 φ80*180(500ml) 98 Flat Washer 8 M4
66 Oil Tube 1.08m φ6*φ4 99 Flat Washer 20 M5
67 Platform Inner Hex Bolt 8 M8*35 100 Flat Washer 15 M8
68 Platform Inner Hex Bolt 2 M8*45 101 Flat Washer 9 M10
69 Platform Inner Hex Bolt 1 M8*15 102 Flat Washer 6 M10
70 Platform Inner Hex Bolt 2 M10*40 103 Flat Washer 12 M12
71 Platform Inner Hex Bolt 4 M10*30 104 Flat Washer 1 φ28*φ8.5*2
72 Column Inner Hex Bolt 1 M8*40 105 Grower Washer 5 M3
73 Column Inner Hex Bolt 4 M10*20 106 Grower Washer 2 M4
74 Column Inner Hex Bolt 1 M10*75 107 Grower Washer 6 M5
75 Column Inner Hex Bolt 2 M10*95 108 Grower Washer 3 M8
76 Column Inner Hex Bolt 4 M12*90 109 Grower Washer 10 M10
77 Outer Hex Bolt 1 M10*45 110 Grower Washer 8 M12
78 Outer Hex Bolt 1 M10*70 111 Taper Faced Washer 8 M8
79 Outer Hex Bolt 4 M12*30 112 Nylon Nut 12 M8
80 Outer Hex Bolt 4 M12*35 113 Nylon Nut 2 M10
81 Adjustable Bolt 1 M8*85 114 Nylon Nut 4 M12
82 Philips Screw 2 M3*45 115 Hex Nut 2 M3
83 Philips Screw 2 M4*6 116 Hex Nut 1 M10
84 Philips Screw 2 M5*10 117 Hex Nut 2 M8
85 Philips Screw 4 M5*12 118 Column Inner Hex Bolt 4 M5*40 丝15
86 Philips Screw(Big Head) 9 M5*12 119 Nylon Nut 4 M5
87 Philips Screw(Big Head) 7 M6*12 120 Permanent Peat 2 22*16*10*φ6
88 Philips Screw(Big Head) 2 M6*20 121 Belt Control Patch 2 55*48*1.5
89 21*5.3TS61wercS
90 61*5.3TS4wercS
91 61*2.4TS5wercS
3
Technical Parameter
1. Input voltage: AC110V(60HZ)
2. Rated Current: 18A
3. Motor power: 5.8HP
4. Speed scope: 0.5-12(mph)
5. Incline scope: 1-16%
6. Time scope:00:00-99:59(Min.:Sec.)
7. Distance scope:0.00-620(Mile)
8. Calorie:000-999(Kilocalorie)
Packing List
No. Description Quantity
1 Main Body 1PC
2 Monitor 1PC
3 Vertical Frame 2PCS
4 Horizontal Bar 1PC
5 M10*30 Bolt 4PCS
6 M10*20 Column Bolt 4PCS
7 M12*90 Column Bolt 4PCS
8 M10 Spring Washer 8PCS
9 M12 Spring Washer 4PCS
10 M10 Flat Washer 4PCS
11 Rings 4PCS
12 Tooling 1PC
13 Safety Key 1PC
14 Owner’s Manual 1PC
Parts Diagram
Water Bottle Holder
LCD Display
Our company keeps the right of improving any parts and will not advice when we make improvement.

19
EXPLODED DRAWING —CTS200LX
CTS200LX-01
2
19) Stop using the treadmill in case of discomfort or when there is something wrong with the treadmill.
20) Long-haired user should pay more attention to your hair while using the treadmill.
21) Never operate the treadmill if it has a damaged cord or plug, if it is not working properly, if it has been
dropped or damaged, or dropped into water. If the supply cord is damaged, it must be replaced by
the manufacturer or its service agent or a similarly qualified person in order to avoid a hazard.
22) Keep the cord away from heated surfaces.
23) Close supervision is necessary when this massager is used by, on, or near children, invalids, or
disabled persons.
24) Do not operate where aerosol (spray) products are being used or where oxygen is being
administered.
25)
26)
T
Please use the belt lubricant provided by the original factory only. If any damage of the treadmill
because of using the other belt lubricant, our company will not take any responsibility.
o disconnect, turn all controls to the off position, then remove plug from outlet.
SAVE THESE INSTRUCTIONS
CAUTION: Before beginning this or any exercise program, consult your
physician. This is especially important for persons over the age of 35 or persons with pre-existing
health problems. Read all instructions before using.

20
EXPLODED DRAWING —CTS200LX - 01
1
IMPORTANT SAFETY INSTRUCTIONS
When using this treadmill, basic precautions should always be followed, including the following:
Read all instructions before using this treadmill:
DANGER – To reduce the risk of electric shock:
1) Always unplug this appliance from the electrical outlet immediately after using and before cleaning.
WARNING – To reduce the risk of burns, fire, electric shock, or injury to persons:
1) The treadmill should never be left unattended when plugged in. Unplug from outlet when not in use
and before putting on or taking off parts.
2) The treadmill has a user maximum capacity of 150kg for one person at a time.
3) For commercial use. Do not use outdoor.
4) The treadmill should be properly grounded and make sure that the outlet can supply enough
electricity to the treadmill. See Grounding Instructions.
5) Do not put any objects around the treadmill to avoid any possible of injuries.
6) Keep the treadmill stably and carefully while changing position or moving.
7) Keep treadmill away from water, humid, heated and fire.
8) Never drop or insert any object into any opening.
9) Use this treadmill only for its intended use as described in this manual. Do not use attachments not
recommended by the manufacturer.
10) Wear training clothes and shoes which are suitable for running on the treadmill. Don’t use the
treadmill in bare feet.
11) Risk of Injury to Persons – To Avoid Injury, stand on the siderails before starting treadmill.
12) The display of the heart rate is for reference only; it is not medical device and may be affected by
many unknowable factors.
13) The user who has problems with his heart should use the treadmill under the doctor’s directions.
14) Please select the right running speed according to your own physical condition.
15) Keep children and pets away from the treadmill all time.
16) To avoid electric shock, do not use this unit during a lightning storm.
17) Do not keep the treadmill running overloaded for a long time, the overload may damage the motor
and the controller and also it reduce the service lifetime of bearing, belt and deck.
18) Do not touch any moving parts.

IMPORTANT SAFETY INSTRUCTIONS……………………………………… 1
TECHNICAL PARAMETER……………………………………………………... 3
PACKING LIST……………………………………………………....…………... 3
PARTS DIAGRAM……………………………………………………....……….. 3
MONITOR……………………………………………………...…………............ 4
CONSOLE……………………………………………………....………….......... 6
ASSEMBLY……………………………………………………....…………........ 8
USAGE GUIDE……………………………………………………....………….. 12
MEASURE THE HEARTRATE…………………………………………………. 12
HOW TO USE THE PROGRAM……………………………………………….. 12
VIDEO MODE……………………………………………………………………. 13
DAILY MAINTENANCE…………………………………………………………. 15
PART LIST……………………………………………………....…………......... 17
EXPLODED DRAWING……………………………………………………........ 19
TABLE OF CONTENTS

13
VIDEO MODE
DVD SIGNAL PLAY
Connect the DVD and the treadmill with the lines (A),Press the “TV/DVD”button on the console to
choose the video mode. When the VOLUME & CHANNEL WINDOW shows ‘DVD’, then press the
button to enter AV2 mode. And now the display will show the DVD signal. Press VOL+/VOL- button to
adjust the volume.
SIGNAL INPUT BY THE USB SOCKET PLAY
After inserting the memorizer into the USB socket, press the “TV/DVD” button on the console to choose
the video mode .When the VOLUME & CHANNEL WINDOW shows ‘DVD’. Then press the button to
enter AV2 mode. And now the display will show MP4 file.
TV SIGNAL PLAY
Connect the TV LINE to the treadmill(B),Press the ‘TV/DVD’button on the console to choose the video
mode .When the VOLUME & CHANNEL WINDOW shows ‘TV, the display to shows the TV signal. Press
VOL+/VOL- button to adjust the volume and press the CH+/CH- to adjust the channel.
8
ASSEMBLY
1. Open the package and unload the body
machine with the 6MM wrench. (Attention to
keep the bolts and the washer for next
step.
)
2. Fix up the bolts to the machine with the
6MM wrench. (Attention the procedure
according the picture instruction.)
M10*40 bolt Big flat washer
M10 spring washer Rolling wheel
M10 flat washer
3. Connect the wire which out from left
mainframe together with the wire in console,
provide with electric power, push button of
incline “12” on the console directly. After that,
please shut electric power directly from the
treadmill, let treadmill in rising status so that
more easy for assembly. Then, disconnect the
wire which out from left main frame and the wire
in console. (If you can’t follow this, and you can’t
connect electricity, you also can do next step of
assembly directly.)
3. Make the wire of Main Body go through
out of the Left Vertical Frame by the guide
line along the arrows as show.
14
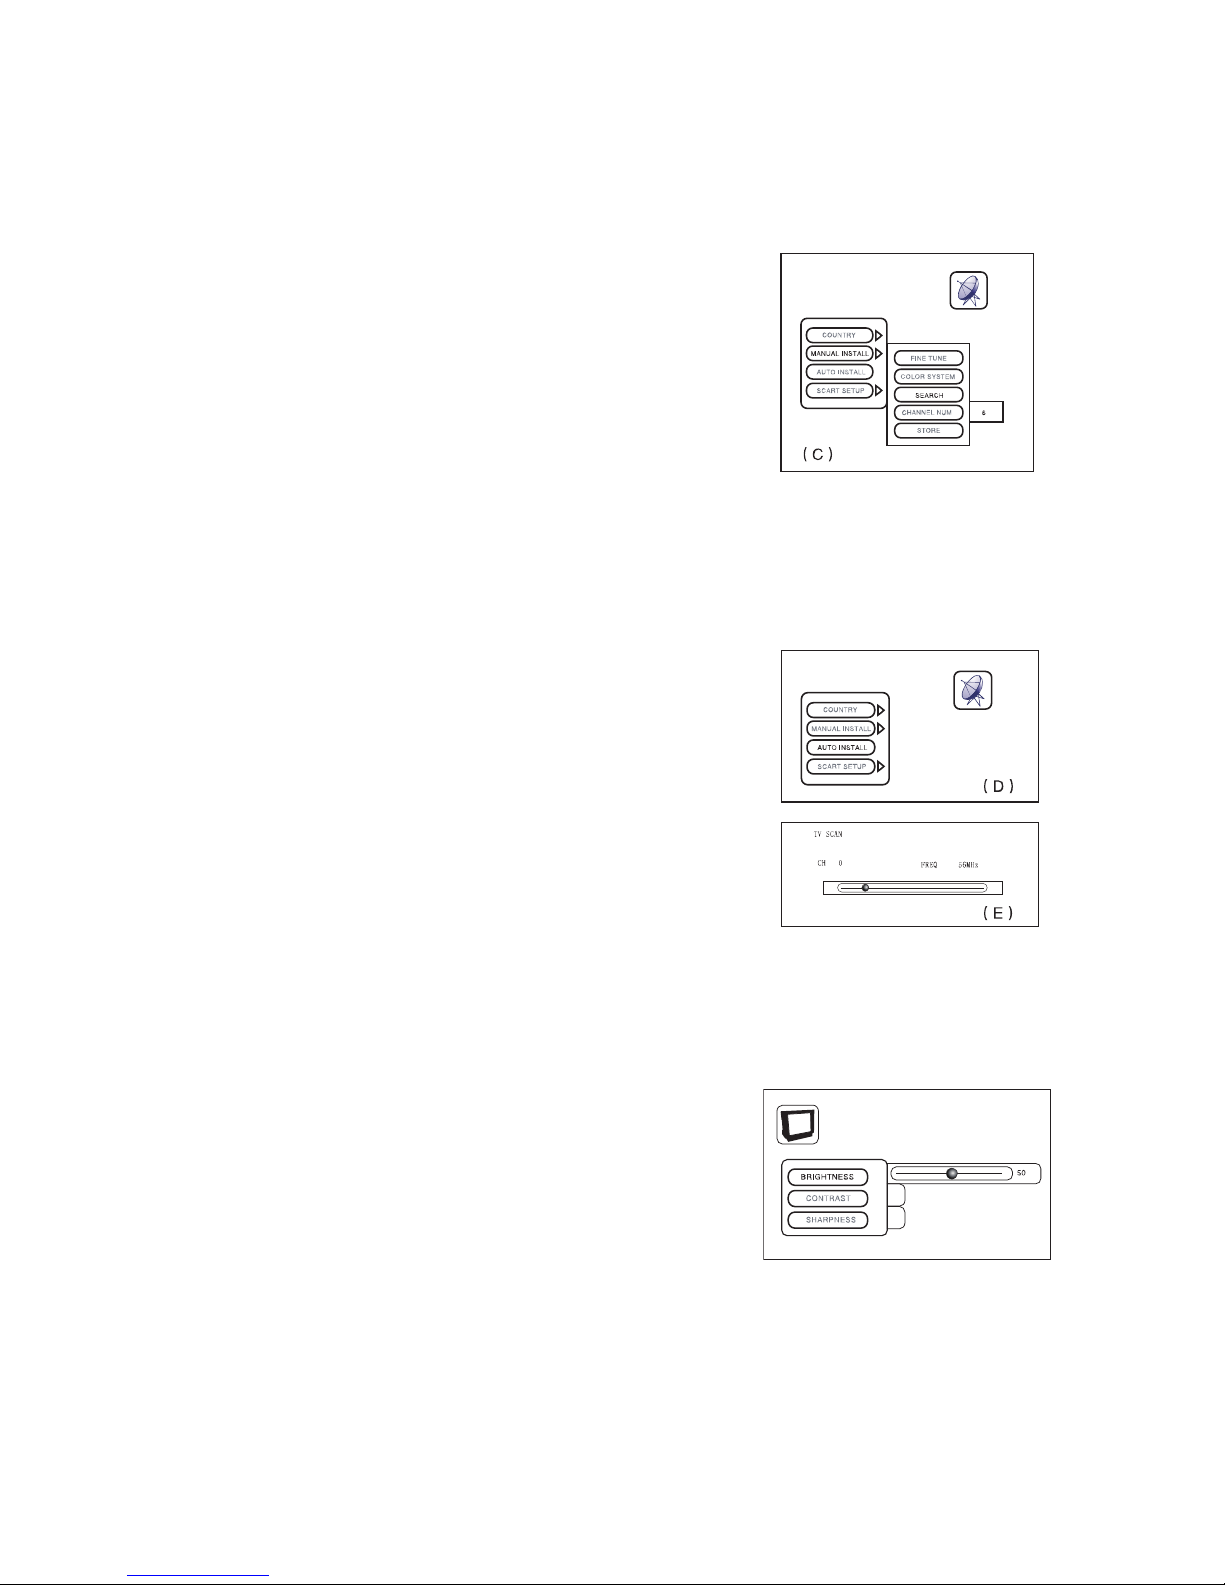
MANUAL INSTALL
At ready time press TV/DVD button to select the TV MODE and the press the TV MODE 3 BUTTON to
enter full screen mode. Press MENU button and the press VOL+ button to enter TV parameter adjusting.
1. Press TV/DVD button to activate the menu. The red color shows
the adjusting item and the other items is black color.
2. Press CH- button to select the item .When the MANUAL INSTALL
turns the red color enters the MANUAL INSTALL
3. Press TV/DVD button to activate the menu. Press CH- to select
the ‘SEARCH’ item. Press the TV/DVD button to search channel.
During this time the CHANNEL NUM shows the channel number.
4. Press CH- button after searching. When the STORE in red color
red color press the TV/DVD button. Choose YES item and press
TV/DVD button to confirm. (C)
AUTO INSTALL
At ready time press TV/DVD button to select the TV MODE and the press the TV MODE 3 BUTTON to
enter full screen mode. Press MENU button and the press VOL+ button to enter TV parameter adjusting.
1. Press TV/DVD button to activate the menu. The red color shows
the adjusting item and the other items is black color.
2. Press CH- button to select the item .When the AUTO INSTALL
turns the red color enters the AUTO INSTALL(D)
3. Press TV/DVD button to search channel.(E)
4. After AUTO INSTALL, the channel will save in the treadmill.
ADJUST THE SCREEN
At ready time press TV/DVD button to select the TV MODE or DVD MODE .Press the TV MODE 3
BUTTON to enter full screen mode. Press MENU button to enter PICTURE PARAMETRS adjusting.
Press TV/DVD button to activating the mEnu.
1. BRIGHTNESS ADJUST: Press CH-/CH+ button to select the
item .When the BRIGHTNESS item in red color ,you can press
VOL+/VOL- button to adjust the value.(F)
2. CONTRAST ADJUST:
Refer to the first step.
3. SHARPNESS ADJUST:
Refer to the first step.
7
The TV mode 1 button
9.4 inch TV screen + Exercise information
The TV mode 2 button
Exercise information in 17 inch TV full screen
The TV mode 3 button
17 inch TV full screen.
The volume button
Adjust the volume.
The channel button
Press the button to change the channel.
The TV/DVD button
Select the TV, DVD or s·video mode.
The menu button
It is operated at TV screen only and adjusts the monitor screen.
During The TV mode 3, press this button to enter adjusting mode .
The incline button (On the left handrail)
Adjust the incline.
The speed button (On the right handrail)
Adjust the incline.
The fan button
Fan switch

13
VIDEO MODE
DVD SIGNAL PLAY
Connect the DVD and the treadmill with the lines (A),Press the “TV/DVD”button on the console to
choose the video mode. When the VOLUME & CHANNEL WINDOW shows ‘DVD’, then press the
button to enter AV2 mode. And now the display will show the DVD signal. Press VOL+/VOL- button to
adjust the volume.
SIGNAL INPUT BY THE USB SOCKET PLAY
After inserting the memorizer into the USB socket, press the “TV/DVD” button on the console to choose
the video mode .When the VOLUME & CHANNEL WINDOW shows ‘DVD’. Then press the button to
enter AV2 mode. And now the display will show MP4 file.
TV SIGNAL PLAY
Connect the TV LINE to the treadmill(B),Press the ‘TV/DVD’button on the console to choose the video
mode .When the VOLUME & CHANNEL WINDOW shows ‘TV, the display to shows the TV signal. Press
VOL+/VOL- button to adjust the volume and press the CH+/CH- to adjust the channel.
8
ASSEMBLY
1. Open the package and unload the body
machine with the 6MM wrench. (Attention to
keep the bolts and the washer for next
step.
)
2. Fix up the bolts to the machine with the
6MM wrench. (Attention the procedure
according the picture instruction.)
M10*40 bolt Big flat washer
M10 spring washer Rolling wheel
M10 flat washer
3. Connect the wire which out from left
mainframe together with the wire in console,
provide with electric power, push button of
incline “12” on the console directly. After that,
please shut electric power directly from the
treadmill, let treadmill in rising status so that
more easy for assembly. Then, disconnect the
wire which out from left main frame and the wire
in console. (If you can’t follow this, and you can’t
connect electricity, you also can do next step of
assembly directly.)
3. Make the wire of Main Body go through
out of the Left Vertical Frame by the guide
line along the arrows as show.

12
USAGE GUIDE
1. Before switch on the power, check the voltage, grounding line, and check if there is a noise when pull
the belt.
2. Switch on the power, the operation reminder says “Emergency stop”. Insert the safety key into
corresponding socket, the reminder will flash 3 times and then turn to “Select program, target or start”.
Press START button, the motor will work at the speed of 1.0km/h. And then check whether the motor
and the monitor work normally.
3. Press “SPEED +” and “SPEED-” button to check whether they are ok.
4. Press “INCLINE” and “DECLINE” button to check whether they are ok.
5. Press STOP button and check if the machine will stop working.
6. The volume of the TV should not be over much, otherwise this will destroy the announciator.
MEASURE THE HEARTRATE
1. Wear the chest belt in training, the pulse windows will indicate the heartbeat dig.
2. If you don’t wear the heartrate belt, put your hands on the pulse sensor, the pulse windows will indicate
the heartbeat dig after 5 seconds.
(Note: The frequency of the chest belt is 5KHz.)
HOW TO USE THE PROGRAM
Select one of the six preset programs.
Press the PROGRAM key at ready time. And then press key or key to choose the program
which one you want .Press PROGRAM key again to enter program setting mode.At this time the TIME
WINDOW flashing default dig ‘05:00”. Press key or key to adjust the time, After that press
PROGRAM key to enter the gradient adjusting.When the gradient window flashing, press key or
key to adjust the max incline in the program. After that press PROGRAM key to enter speed
adjusting.When the speed window flashing, press key or key to adjust the max speed in the
program .Press the START key to start the program.
Each program is divided into several time segments of different lengths. The Time display shows the time
by time accounting down. One speed setting and one incline setting are programmed for each segment.
The speed setting for the first segment will be shown in the EXERCISE PATTERN display. (The incline
settings are not shown in the program display.)
When the first segment has been passed the second segment will flash and indicates the practicing
value .When the speed has been changed, the column will increase or decrease.
When the incline has been changed the practicing value will display in the incline window.
If the speed or incline setting for the current segment is too high or too low, you can manually reset the
setting by pressing the SPEED or INCLINE buttons .Every few times one of the SPEED buttons is
pressed, the current columns will be changed. Note: If you manually reset the speed or incline setting for
the current segment, when the segment ends the treadmill will automatically adjust to the speed and
incline settings for the next segment.
9
6. Link the left frame wire to the console
wire (Attention to the direction). Fix up the
console to the frames. (Attention not to cut
off the control wire)
7. Make the console holes in a line with the
frame holes. Fix up the bolts with 8MM
wrench. (Attention not to be tight)
Column Bolt M10*20 4 pcs
Spring washer M10 4 pcs
8. Using 6MM wrench and the bolts to link
the vertical frame to the front bar. Then
tighten the bolts in step 5 and 7.
Bolt M10*30 4 pcs
Spring washer M10 4 pcs
Flat washer M10 4 pcs
Rings M10 4 pcs
5. Make the screw holes of the left and right
frame in a line with the holes in the body
machine. (Attention not to cut off the
control wire). Fix up four bolts with 10 MM
wrench. (Attention not to be too tight)
Column Bolt M12*90 4 pcs
Spring washer M12 4 pcs

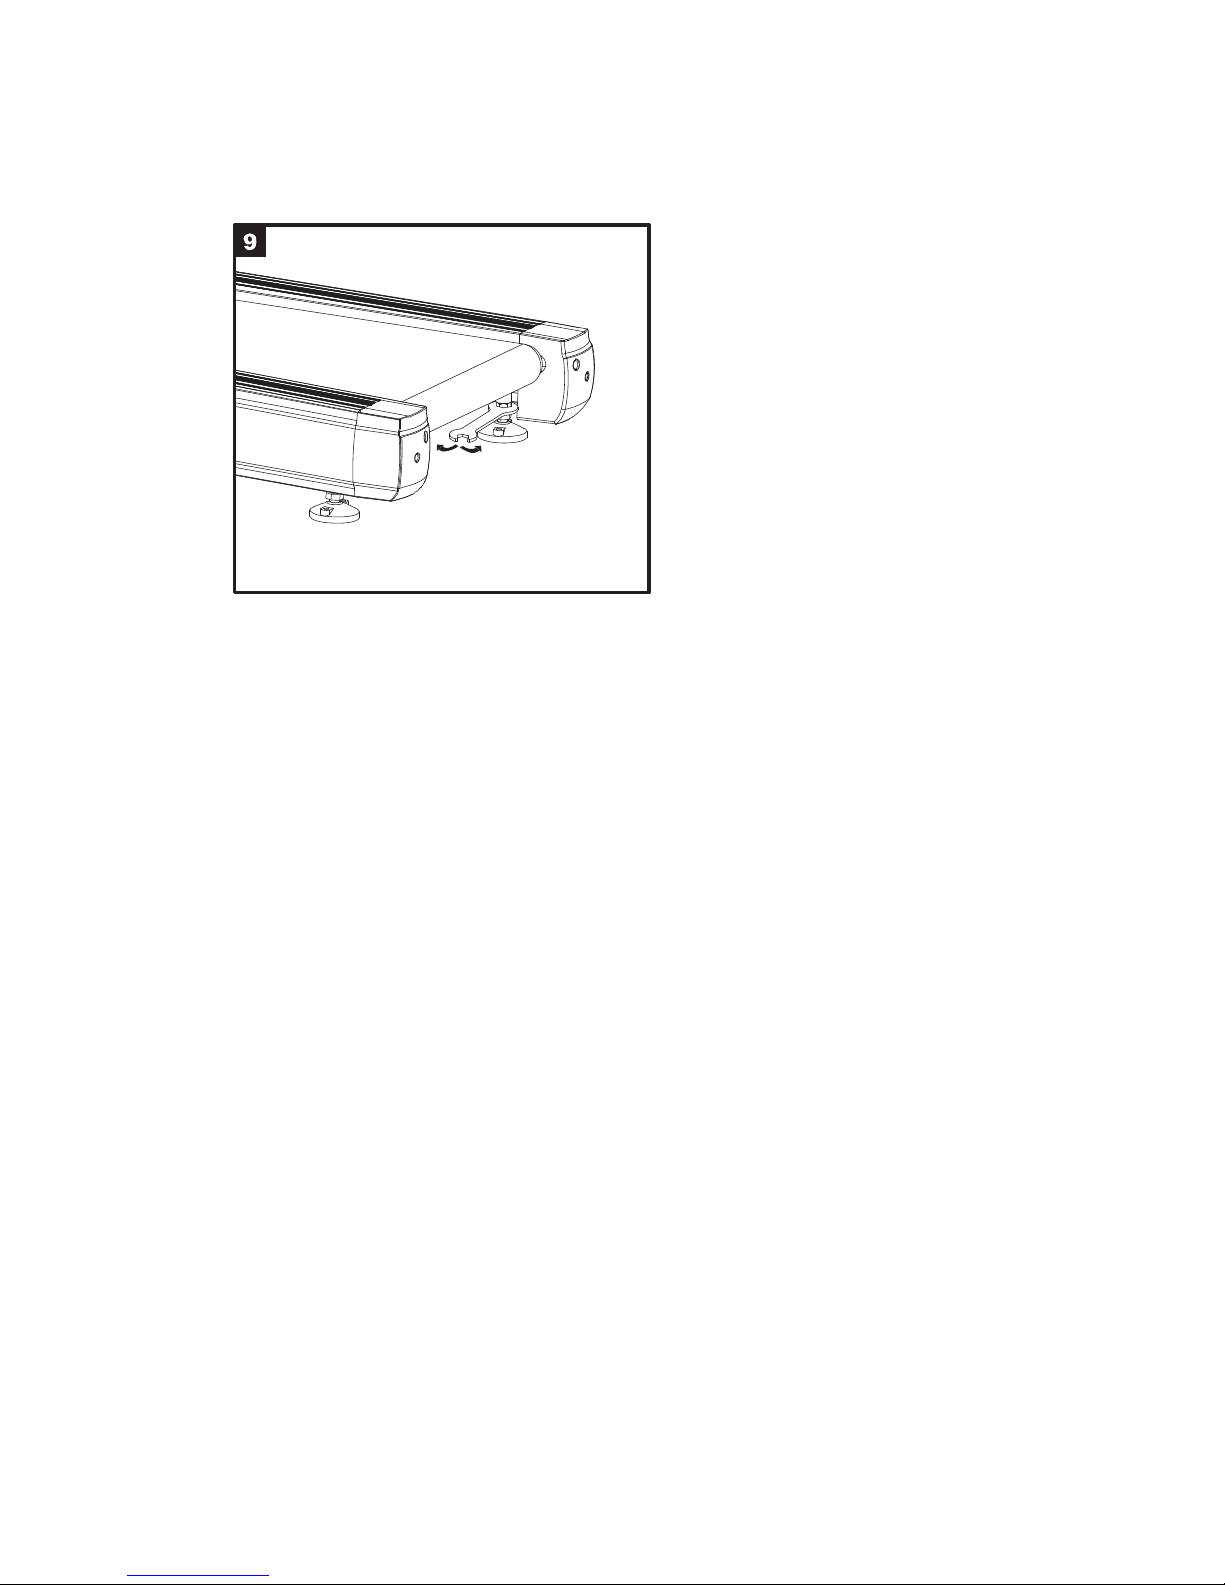
10
9. Using Wrench to adjust the adjusting down
nut until the machine is level off then tighten
the up nut.
11
ELECTRICAL POWER REQUIREMENTS
The Tuff Stuff Fitness CTS 200 Series Treadmill requires a dedicated* line according to the electrical
configurations listed in the chart.
*One individual branch circuit for each treadmill per NEC article 210-21 (b) (1) and 210-23 (or other
appropriate, county specific electrical compliance guidelines). The hot, neutral and ground wires must
each be routed independently (not looped or tied to other circuits.)
NOTE: Do not modify the plug provided with this product. If
the plug does not fit into an available electrical outlet, have a proper
outlet installed by a qualified electrician.
GROUNDING INSTRUCTIONS
The Tuff Stuff Fitness CTS 200 and 300 Series product must be properly grounded. If the unit
malfunctions or breaks down, proper grounding provides a path of least resistance for the electric current,
which reduces the risk of shock to anyone touching or using the equipment. Each unit is equipped with an
electrical cord, which includes equipment grounding conductor and a grounding plug. The plug must be
inserted into an outlet that has been properly installed and grounded in accordance with all local codes
and ordinances.
A temporary adapter MUST NOT BE USED to connect this plug to a two-pole receptacle. If a
properly grounded, 20-amp outlet is not available, one must be installed by a qualified electrician.
Models drawing 16 amps or more must be installed on a dedicated line.
DANGER: A risk of electrical shock may result from improper connection of the
equipment-grounding conductor. Check with a qualified electrician if in doubt as to proper
grounding technique. DO NOT modify the plug provided with the product. If it will not fit an
electrical outlet, have a proper outlet installed by a qualified electrician. Any modification to the
electrical plug will result in a voided warranty.
18ANEMA PLUG 18A NEMA OUTLET
Supply
Voltage
(VAC)
Frequency
(HZ)
Rated
Current
(AMPS)
100 50/60 18
120 50/60 18

12
USAGE GUIDE
1. Before switch on the power, check the voltage, grounding line, and check if there is a noise when pull
the belt.
2. Switch on the power, the operation reminder says “Emergency stop”. Insert the safety key into
corresponding socket, the reminder will flash 3 times and then turn to “Select program, target or start”.
Press START button, the motor will work at the speed of 1.0km/h. And then check whether the motor
and the monitor work normally.
3. Press “SPEED +” and “SPEED-” button to check whether they are ok.
4. Press “INCLINE” and “DECLINE” button to check whether they are ok.
5. Press STOP button and check if the machine will stop working.
6. The volume of the TV should not be over much, otherwise this will destroy the announciator.
MEASURE THE HEARTRATE
1. Wear the chest belt in training, the pulse windows will indicate the heartbeat dig.
2. If you don’t wear the heartrate belt, put your hands on the pulse sensor, the pulse windows will indicate
the heartbeat dig after 5 seconds.
(Note: The frequency of the chest belt is 5KHz.)
HOW TO USE THE PROGRAM
Select one of the six preset programs.
Press the PROGRAM key at ready time. And then press key or key to choose the program
which one you want .Press PROGRAM key again to enter program setting mode.At this time the TIME
WINDOW flashing default dig ‘05:00”. Press key or key to adjust the time, After that press
PROGRAM key to enter the gradient adjusting.When the gradient window flashing, press key or
key to adjust the max incline in the program. After that press PROGRAM key to enter speed
adjusting.When the speed window flashing, press key or key to adjust the max speed in the
program .Press the START key to start the program.
Each program is divided into several time segments of different lengths. The Time display shows the time
by time accounting down. One speed setting and one incline setting are programmed for each segment.
The speed setting for the first segment will be shown in the EXERCISE PATTERN display. (The incline
settings are not shown in the program display.)
When the first segment has been passed the second segment will flash and indicates the practicing
value .When the speed has been changed, the column will increase or decrease.
When the incline has been changed the practicing value will display in the incline window.
If the speed or incline setting for the current segment is too high or too low, you can manually reset the
setting by pressing the SPEED or INCLINE buttons .Every few times one of the SPEED buttons is
pressed, the current columns will be changed. Note: If you manually reset the speed or incline setting for
the current segment, when the segment ends the treadmill will automatically adjust to the speed and
incline settings for the next segment.
9
6. Link the left frame wire to the console
wire (Attention to the direction). Fix up the
console to the frames. (Attention not to cut
off the control wire)
7. Make the console holes in a line with the
frame holes. Fix up the bolts with 8MM
wrench. (Attention not to be tight)
Column Bolt M10*20 4 pcs
Spring washer M10 4 pcs
8. Using 6MM wrench and the bolts to link
the vertical frame to the front bar. Then
tighten the bolts in step 5 and 7.
Bolt M10*30 4 pcs
Spring washer M10 4 pcs
Flat washer M10 4 pcs
Rings M10 4 pcs
5. Make the screw holes of the left and right
frame in a line with the holes in the body
machine. (Attention not to cut off the
control wire). Fix up four bolts with 10 MM
wrench. (Attention not to be too tight)
Column Bolt M12*90 4 pcs
Spring washer M12 4 pcs

15
DAILY MAINTENANCE
The running belt of the treadmill is imported which was made from special materials with lower coefficient
of friction and higher of tensile strength; the running board is with double shock-absorb system and
which surface is smooth and hard wearing.
Clean
It can prolong the life of treadmill to keep it in clean situation, so it’s necessary to clean usually the
treadmill and keep the area around the treadmill clean, include the underneath the treadmill.
1) Wipe down the treadmill with a clean soft towel weekly. Spray liquid with mild cleaner on towel and use
towel to wipe. NEVER spray directly on surfaces of the treadmill.
CAUTION:USE only Mild Cleaners: NEVER use Cleaners with:
·Formula 409 ·Alcohol
·Fantastic ·Ammonia
·Simple Green ·Solvents
2)Clean the exposed running board and side foot-board usually, wipe running belt by soft cloths with
water, please pay attention to prevent the water from the underside of belt and over.
3)Clean under motor cover by vacuum cleaner with attachments every 6 months. Vacuum areas usually
covered by the motor cover and reach into all nooks and crannies with the vacuum cleaner. Reconnect
any wires knocked loose by accident and remove the motor cover completely after your cleaning.
CAUTION:Disconnect treadmill power cord from the wall outlet.
Lubricating
The treadmill uses the auto-lubricating system. When the console test the total distance reached the
pre-set distance in the system, the lubricating motor begins to work. During using, user should check the
auto-lubricating system timely. Add the oil quickly if find the oil bottle is empty. If the auto-lubricating
system doesn’t work well, please call the dealer quickly.
This treadmill also has the function of manual lubricate. The button of manual lubricate is on the back of
the monitor.
More attention: The superfluous lubrication is not good. Please remember: reasonable
lubricating is an important factor for prolonging the lifetime of treadmill!
Evaluation of friction:
The friction between running belt and board will be increased due to the dust or reduced lubrication, this
state perhaps can harm motor and controller. The increased friction is with following characters:
1)After shutting off the power, the running belt can move or it’s difficult to move;
2)Pull out safety key when the treadmill runs at middle-speed under load state, the running belt stops at
once;
3)The increased friction maybe harm motor or controller, open circuit and blow the fuse.
Adjust running belt tension
The running belt was adjusted before it left the factory and after assembling, but after a period of usage,
the belt will become loose, this circumstance is out of guarantee to be repaired. The user can adjust it by
oneself.
Check Running Belt Tension
Set the treadmill on the 0.9 mph speed. While walking on the running belt , attempt to stop the running
belt by stepping hare with on foot into the oncoming belt, just in front of the lower cover. The running
belt should not slip. If the running belt slips it means the running belt is too loose. The loose belt will slip,
but over much tight belt perhaps harms the motor, roller and itself.
Solution
Remove the key and UNPLUG THE POWER CORD. Using the Allen wrench, turn both rear roller
adjustment bolts counterclockwise, 1/4 of a turn. When the walking belt is properly tightened, you should
be able to lift each side of the walking belt 5 to 6 cm off the walking platform. Be careful to keep the
walking belt centered. Plug in the power cord, insert the key and run the treadmill for a few minutes.
Repeat until the walking belt is properly tightened (A).
6
CONSOLE
Main Display
The start button
Start the machine or start the program.
The stop button
Stop the machine.
The program button
Press the key to enter the program mode.
The program select button
Select the program and press the START key to start the program.
The incline button
Press ‘INCLINE-’ to decrease the incline.
Press ‘INCLINE+’ to increase the incline.
The incline choice button
Adjust the incline quickly.
The speed button
Press ‘SPEED -’ to decrease the speed.
Press ‘SPEED +’ to increase the speed.
The speed choice button
Adjust the speed quickly.

20
EXPLODED DRAWING —CTS200LX - 01
1
IMPORTANT SAFETY INSTRUCTIONS
When using this treadmill, basic precautions should always be followed, including the following:
Read all instructions before using this treadmill:
DANGER – To reduce the risk of electric shock:
1) Always unplug this appliance from the electrical outlet immediately after using and before cleaning.
WARNING – To reduce the risk of burns, fire, electric shock, or injury to persons:
1) The treadmill should never be left unattended when plugged in. Unplug from outlet when not in use
and before putting on or taking off parts.
2) The treadmill has a user maximum capacity of 150kg for one person at a time.
3) For commercial use. Do not use outdoor.
4) The treadmill should be properly grounded and make sure that the outlet can supply enough
electricity to the treadmill. See Grounding Instructions.
5) Do not put any objects around the treadmill to avoid any possible of injuries.
6) Keep the treadmill stably and carefully while changing position or moving.
7) Keep treadmill away from water, humid, heated and fire.
8) Never drop or insert any object into any opening.
9) Use this treadmill only for its intended use as described in this manual. Do not use attachments not
recommended by the manufacturer.
10) Wear training clothes and shoes which are suitable for running on the treadmill. Don’t use the
treadmill in bare feet.
11) Risk of Injury to Persons – To Avoid Injury, stand on the siderails before starting treadmill.
12) The display of the heart rate is for reference only; it is not medical device and may be affected by
many unknowable factors.
13) The user who has problems with his heart should use the treadmill under the doctor’s directions.
14) Please select the right running speed according to your own physical condition.
15) Keep children and pets away from the treadmill all time.
16) To avoid electric shock, do not use this unit during a lightning storm.
17) Do not keep the treadmill running overloaded for a long time, the overload may damage the motor
and the controller and also it reduce the service lifetime of bearing, belt and deck.
18) Do not touch any moving parts.
19
EXPLODED DRAWING —CTS200LX
CTS200LX-01
2
19) Stop using the treadmill in case of discomfort or when there is something wrong with the treadmill.
20) Long-haired user should pay more attention to your hair while using the treadmill.
21) Never operate the treadmill if it has a damaged cord or plug, if it is not working properly, if it has been
dropped or damaged, or dropped into water. If the supply cord is damaged, it must be replaced by
the manufacturer or its service agent or a similarly qualified person in order to avoid a hazard.
22) Keep the cord away from heated surfaces.
23) Close supervision is necessary when this massager is used by, on, or near children, invalids, or
disabled persons.
24) Do not operate where aerosol (spray) products are being used or where oxygen is being
administered.
25)
26)
T
Please use the belt lubricant provided by the original factory only. If any damage of the treadmill
because of using the other belt lubricant, our company will not take any responsibility.
o disconnect, turn all controls to the off position, then remove plug from outlet.
SAVE THESE INSTRUCTIONS
CAUTION: Before beginning this or any exercise program, consult your
physician. This is especially important for persons over the age of 35 or persons with pre-existing
health problems. Read all instructions before using.

18
Key No. Designation Qty. Description Key No. Designation Qty. Description
59 Elastic Collar 2 φ12*1 92 Screw 6 ST4.2*45
60 Gyro Shaft 1 φ30*φ25*42 93 Screw(Big Head) 18 ST4.2*12
61 Guide Shaft 2 φ12*90*M8 94 Screw(Big Head) 2 ST4.8*12
62 Axle Pin 1 φ14*φ10*64 95 Screw(Big Head) 4 ST4.8*16
63 1gnirpS φ20*φ2.5*70 96 Platform Screw 12 ST4.2*9.5
64 1niP φ3.2*25 97 Flat Washer 7 M3
65 Oil Bottle 1 φ80*180(500ml) 98 Flat Washer 8 M4
66 Oil Tube 1.08m φ6*φ4 99 Flat Washer 20 M5
67 Platform Inner Hex Bolt 8 M8*35 100 Flat Washer 15 M8
68 Platform Inner Hex Bolt 2 M8*45 101 Flat Washer 9 M10
69 Platform Inner Hex Bolt 1 M8*15 102 Flat Washer 6 M10
70 Platform Inner Hex Bolt 2 M10*40 103 Flat Washer 12 M12
71 Platform Inner Hex Bolt 4 M10*30 104 Flat Washer 1 φ28*φ8.5*2
72 Column Inner Hex Bolt 1 M8*40 105 Grower Washer 5 M3
73 Column Inner Hex Bolt 4 M10*20 106 Grower Washer 2 M4
74 Column Inner Hex Bolt 1 M10*75 107 Grower Washer 6 M5
75 Column Inner Hex Bolt 2 M10*95 108 Grower Washer 3 M8
76 Column Inner Hex Bolt 4 M12*90 109 Grower Washer 10 M10
77 Outer Hex Bolt 1 M10*45 110 Grower Washer 8 M12
78 Outer Hex Bolt 1 M10*70 111 Taper Faced Washer 8 M8
79 Outer Hex Bolt 4 M12*30 112 Nylon Nut 12 M8
80 Outer Hex Bolt 4 M12*35 113 Nylon Nut 2 M10
81 Adjustable Bolt 1 M8*85 114 Nylon Nut 4 M12
82 Philips Screw 2 M3*45 115 Hex Nut 2 M3
83 Philips Screw 2 M4*6 116 Hex Nut 1 M10
84 Philips Screw 2 M5*10 117 Hex Nut 2 M8
85 Philips Screw 4 M5*12 118 Column Inner Hex Bolt 4 M5*40 丝15
86 Philips Screw(Big Head) 9 M5*12 119 Nylon Nut 4 M5
87 Philips Screw(Big Head) 7 M6*12 120 Permanent Peat 2 22*16*10*φ6
88 Philips Screw(Big Head) 2 M6*20 121 Belt Control Patch 2 55*48*1.5
89 21*5.3TS61wercS
90 61*5.3TS4wercS
91 61*2.4TS5wercS
3
Technical Parameter
1. Input voltage: AC110V(60HZ)
2. Rated Current: 18A
3. Motor power: 5.8HP
4. Speed scope: 0.5-12(mph)
5. Incline scope: 1-16%
6. Time scope:00:00-99:59(Min.:Sec.)
7. Distance scope:0.00-620(Mile)
8. Calorie:000-999(Kilocalorie)
Packing List
No. Description Quantity
1 Main Body 1PC
2 Monitor 1PC
3 Vertical Frame 2PCS
4 Horizontal Bar 1PC
5 M10*30 Bolt 4PCS
6 M10*20 Column Bolt 4PCS
7 M12*90 Column Bolt 4PCS
8 M10 Spring Washer 8PCS
9 M12 Spring Washer 4PCS
10 M10 Flat Washer 4PCS
11 Rings 4PCS
12 Tooling 1PC
13 Safety Key 1PC
14 Owner’s Manual 1PC
Parts Diagram
Water Bottle Holder
LCD Display
Our company keeps the right of improving any parts and will not advice when we make improvement.
Table of contents


