INTERSPORT ENERGETICS PR 40.1 User manual

1
ENERGETICS
PR 40.1
ENGLISH MANUAL

2
Please read all precautions and instructions in this manual in detail
before using this equipment. Save this manual for future reference.
When using this product, basic precautions should always be followed, including the following:
Please read the instruction carefully before starting to use this product.
Danger To reduce the risk of electric shock:
Always unplug this product from the electrical outlet immediately after using and before cleaning.
Warning To reduce the risk of burns, fire, electric shock, or physical injury:
1. The product should never be left unattended while plugged in. Unplug the product from the outlet when not in use.
2. Close supervision is necessary when this product is used by or near children, invalids, or disabled persons.
3. Be sure to use the product only for its intended use as described in this manual. Do not use any attachment not
recommended by the manufacturer in order to avoid any danger or accidents.
4. Never operate the product if it has a damaged cord or plug, if it is not working properly, if it has been damaged, or dropped
into water. Please return the product to the service center of seller for examination and repair.
5. Do not carry this product by the supply cord or use the cord as a handle.
6. Keep the cord away from hot surfaces or ground.
7. Never operate the product with the air vents blocked. Keep the air vents free of lint, hair, etc.
8. Never drop or insert any objects into any openings.
9. Do not use or operate outdoors.
10. Do not operate where aerosol (spray) products are being used or where oxygen is thin.
11. Before turning the product power off, turn all controls to the off position then remove the plug from the outlet.
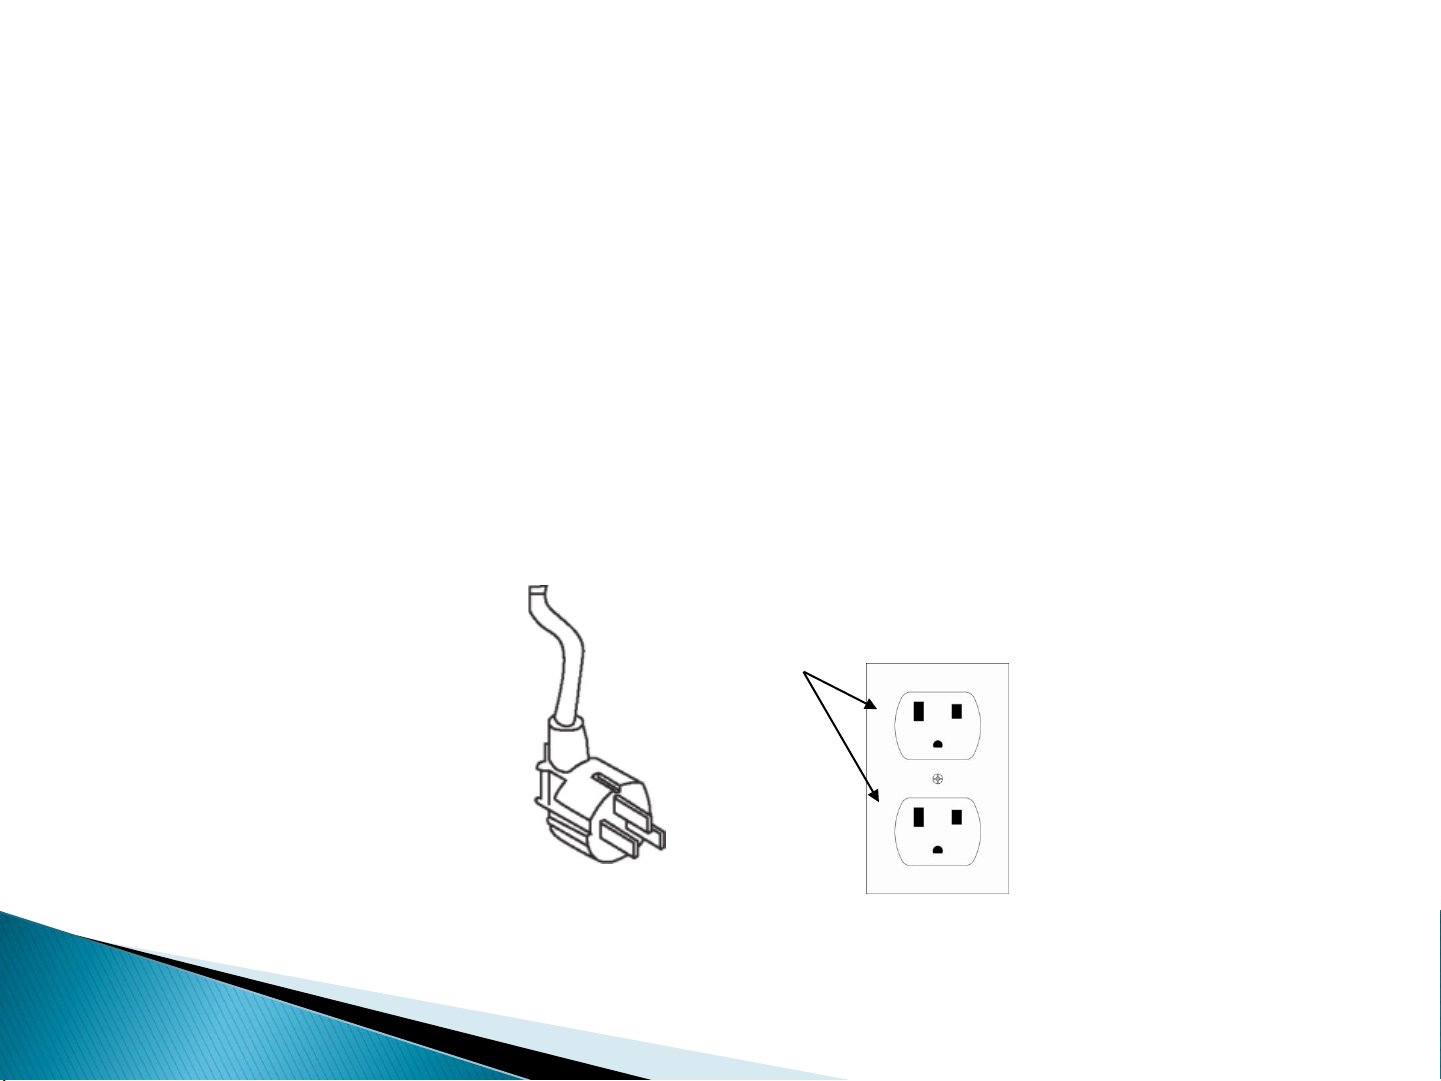
12. Connect the product to a properly grounded outlet only.
13. If the treadmill is foldable, when user finishes using the treadmill, the elevation needs to be back to original position.
14. When user is using the treadmill, it cannot be folded at the same time.
15. Keep a safety zoom of 2000mm x 1000mm away from the treadmill.
16. This machine is only intended for household use.
17. For the treadmill with folding function and electric elevation, be sure that the elevation is 0 before folding (To avoid
interference of the components).
18. Stop using the treadmill if you feel faint, dizzy, or short of breath.
19. Wear appropriate exercise clothes when using the treadmill. Do not wear loose clothes that could become caught in the
treadmill. Athletic support clothes are recommended for both men and women. Always wear athletic shoes. Never use the
treadmill with bare feet, wearing only stockings, or in sandals.

3
GROUNDED PIN
GROUNDED OUTLET
Figure
Grounding methods
GROUNDING INSTRUCTIONS
The products must be grounded first. If malfunction or breakdown occurs, grounding will provide a path of least
resistance for electric current to reduce the risk of electric shock.
The product is equipped with a cord having an equipment-grounding conductor and a grounding plug.
The plug must be plugged into an appropriate outlet that is properly installed and grounded in accordance with all local
codes and ordinances.
DangerImproper connection of the equipment-grounding conductor can result in a risk of electric shock. Check
with a qualified electrician or serviceman if you are in doubt as to whether the products are properly grounded. Do not
modify the plug provided with the product if it will not fit the outlet, have a proper outlet install by a qualified
electrician.
The products is for use on nominal 220-240 volt and has a grounding plug that looks like the plug illustrated in the
figure . Make sure that the product is connected to an outlet having the same configuration as the plug.
There is no need to use any adapter for this product.

4
OPEN THE BOX YOU CAN FIND THE ALL PARTS AS BELOW.
Part list
No.
Description
Quantit
y
No.
Description
Quanti
ty
1
MAIN FRAME
1PCE
11
FLAT WASHER M8
4PCS
2
LEFT UPRIGHT
1PCE
12
ARC WASHER
2PCS
3
RIGHT UPRIGHT
1PCE
13
SAFETY KEY
1PCE
4
CONSOLE SET
1SET
14
LUBRICATION OIL
1PCE
5
BASE COVER-L
1PCE
15
SCREWDRIVER
1PCE
6
BASE COVER-R
1PCE
16
WRENCH 6MM
1PCE
7
BOLT M10*50MM
2PCS
17
WRENCH 5MM
1PCE
8
BOLT M8*15MM
4PCS
18
FRAME WHEEL
COVER-L
1PCE
9
SCREW M5*12MM
4PCS
19
FRAME WHEEL
COVER-R
1PCE
10
FLAT WASHER
M10
4PCS

5
Please note that this treadmill need at least 2 people to
finish assembly.
Open the carton box, and take out all the protection
foam and assembly parts.
3. As the photo shows, take out the running deck from
the box, lay it on the flat floor, and then cut the belt.
STEP 1
STEP 2
1. Lift up the left upright(2) and right upright(3),and
then use the #6 wrench(16) to fasten each
upright onto the base with each 3pcs of bolt
M10*50mm(7) and flat washer M10(10)
2. Do not tightly fasten all the bolts and screws at
this step.

6
STEP 3
STEP 4
1. Connect the signal wire from console to
the signal wire of the left and right
uprights.
2. Use the 5# wrench (17) to fasten the
console to the left and right upright with
each 4pcs M8x15 bolts (8) and flat
washers M8(11)
Pay attention to the connection of the
cable, a wrong connection or rough
operation would cause damage of the
connector
3. Tightly fasten all the bolts at step 2 and
step 3
1.Use the screwdriver(15) to fasten the
left base cover(5) and right base cover(6)
onto the left and right uprights with 4pcs
bolt M5*12(9).
2.Use the screwdriver(15) to fasten the
left frame wheel cover(18) and right frame
wheel cover(19) onto the main frame(1)
with 4pcs of bolt M6*10.

7
NOTE: For your safety and comfort, please check if all screws are
fastened.Congratulation! A brand new motorized treadmill has been successful
assembled!

8
GENERAL SAFETY TIPS
A. Practice mounting and dismountingyour treadmill before beginning your workout.
B. Attach the Safety Key to the Computer (the treadmill will not operate without the Safety Key). Clip the other end of
the Safety Key to your clothing before exercising to ensure the treadmill will stop if the user accidentally walks off the
Treadmill.
C. If the user falls off the Treadmill, the Safety Key will come off the Computer and the treadmill will stop at once to
avoid further injury.
D. Do not stand on the Walking Belt while starting the Treadmill. Straddle the Belt and stand on the plastic Foot Rails.
E. The Treadmill will start at 1.0KM/H after countdown. If you are a new user, stay at a slow speed and hold onto the
Hand Grips until you become comfortable.
QUICK REFERENCE GUIDE

9
A
TIME WINDOW
E
QUICK INCLINE BUTTON
I
INCLINE+/- BUTTON
B
DISTANCE WINDOW
F
QUICK SPEED BUTTON
J
SPEED+/- BUTTON
C
INCLINE WINDOW
G
MODE BUTTON
K
START BUTTON
D
SPEED WINDOW
H
PROGRAM BUTTON
L
STOP BUTTON
DISPLAY FUNCTION
TIME: Accumulates total workout time from 0:00 to 99:00 minutes.
PULSE: When pulse signal is detected by grasping both stainless steel pick-ups on front handrails,
it will display yourcurrent heart rate in beats per minute from 50 to 200..
INCLINE: Displays the current deck incline from starting at level 1 to 15.
SPEED: Displays the current belt speed from starting at 1.0Km/h to 18.0Km/h.
CALORIE: Accumulates calorie consumption during exercise. Max. Value is 990 KCAL.
DISTANCE: Accumulates total workout distance from 1.00 to 99.0 kilometers by count-up.
Accumulates total workout distance from 99.0 to 1.00 kilometers by count-down.

10
GETTING STARTED
NOTES:
1. Check to make sure nothing is on or will hinder the movement of the treadmill.
2. Plug in the power cord and turn the treadmill ON.
3. Stand on the foot rails of the treadmill.
4. Attach the safety key clip to part of your clothing.
5. Put the safety key into the safety key hole in the console, and then the treadmill will be on start/ready status.
6. You have two options to start your workout:
A.QUICK START
Simply press the START button to begin working out.
B.SELECT A PROGRAM
Select manual program by pressing MODE button or pressing PROGRAM buttons to enter manual program,
8 training goals or 3 user programs.
QUICK-START OPERATION
STEP 1: Attach the Safety key to wake display up; the treadmill then will be on start/ready status.
STEP 2: Press the START button to begin belt movement after count-down. Use the SPEED +/- or QUICK SPEED
buttons to adjust the desired speed at any time during training; use the INCLINE ∧/∨or QUICK INCLINE buttons to
adjust the incline at any time during training.
STEP 3: To get a pulse reading, simply grasp stainless steel pick-ups on handrails. It may take a few seconds for the
display to reach the actual number. The pulse rate will be displayed on PULSE window.
STEP 4: During quick-start operation, TIME, CALORIE and DISTANCE will count up.
NOTES: Under this program, one of DISTANCE, CALORIE and TIME can be set count-down for your workout,
the others will count up during your workout, after one count-down reach zero, program will be ended and
stop the belt movement, if you need to continue, press the START button to begin belt movement after count-
down.
STEP 1: Attach the Safety key to wake display up; the treadmill then will be on start/ready status.
MANUAL PROGRAMS OPERATION

11
STEP 2: Press MODE button, the TIME window will display 30:00, press SPEED +/- button to set count-down TIME
from 5:00 minutes to 99:00 minutes. If you do not like to set TIME for count-down and pass to others, press MODE
again, the DIST window will display 1.0, you can set count-down DISTANCE from 1.0KM - 99.0KM. If you do not like
to set DISTANCE for count-down and pass to others, press MODE again, the CAL. window will display 50, you can set
count-down CALORIE from 20 KCAL to 990 KCAL.
STEP 3: After finishing setting count-down for your workout, press START to begin belt movement after count-down.
STEP 4: During the program you can adjust the speed and incline by pressing SPEED +/- and INCLINE∧/∨buttons, or
QUICK SPEED and QUICK INCLINE buttons to jump
directly to a setting.
STEP 5: Press STOP button to stop your workout or pull safety key away from its position to shut down the computer.
PRESET PROGRAMS OPERATION
NOTES:
All the preset programs are made up with 18 time-based segments; the speed and incline are preset on each
segment. The elapse time of 18 segments on each program will be automatically arranged according to the time
you set for your workout time. There are 64 preset programs for 8 different training goals, and 8 different intensity
levels on each training goals.
STEP 1: Attach the Safety key to wake display up; the treadmill then will be on start/ready status.
STEP 2: Press PROGRAM button to scroll through the 8 training goals, and BODY FAT function.Atraining goal will be
selected once you press PROGRAM button.After selecting a training goal, press MODE button to select a intensity from L1
to L8. After selecting a intensity, then press SPEED +/- buttons to modify the elapsing time. The pre-set elapsing time of
each program is 30:00 minutes, and it can be set from 5:00 to 99:00 minutes.
STEP 3: After modifying the elapsing time, press START button to accept and begin your workout.
STEP 4:During procession of program you can adjust the SPEED & INCLINE by pressing SPEED +/- and INCLINE∧/∨
buttons, or use QUICK SPEED and QUICK INCLINE buttons to jump directly to a setting. However, the SPEED and
INCLINE you adjust will only be effective on the ongoing segment, after the segment finished, the SPEED and INCLINE will
process with preset values.
STEP 5:Press STOP button to stop your workout or pull safety key away from its position to shut down the computer.

12
USING THE PULSE FUNCTION
The PULSE Window on your Computer works in conjunction with the Pulse Sensors on both handrails. When you are
ready to read your pulse:
1. Place both hands firmly on the Pulse Sensors. For the most accurate reading, it is important to use both hands.
2. Your estimated heart rate will display in the PULSE window approximately 5 seconds after you hold the Pulse Sensors.
3. This estimate is not exact and persons with medical conditions and/or a specific need for accurate heart rate
monitoring should not rely on the estimations provided.
USER PROGRAM
his program is for user to edit a personal program; the speed and incline of each segment can be edited according
Once the program is set, it will be stored on the computer, the computer will proceed the program by pressing
START/STOP button. There are totally 3 user program can be edited.
If you want to re-edit the program, just follow the steps described as bellow.
STEP 1: Attach the Safety key to wake display up; the treadmill then will be on start/ready status, keep pressing PROG
button until the distance window display U-1, then the TIME window display 30:00, press SPEED+/- to set the program time.
STEP 2: Press MODE button to set segment 01, press INCLINE∧/∨to set incline and press SPEED+/- to set speed on this
segment.After finish setting segment 01, press MODE button to set all other 2-18 segments.
STEP 3: After finish setting all 18 segments, the program will be stored, and then press START button to load this program.
HEART RATE CONTROL PROGRAM
NOTE: THOSE PROGRAMS WORKS ONLY WHEN YOUR TREADMILL IS COME WITH HRC PROGRAM, AND THIS
PROGRAM SHALL BE USED WITH HEART RATE CHEST STRAP.
automatically adjusting the incline and speed. For example, you have programmed in a desired heart rate of 125
BPM and your heart rate is only at 110 BPM. If you are wearing the Heart Rate Transmitter correctly, the incline or
speed will automatically increase to intensify the work load, causing your heart rate to slowly climb to 125 BPM.
The treadmill will attempt to maintain your target heart rate through adjustments to the incline or speed for the
remainder of your workout.

13
automatically decrease to lower your heart rate. You may at any time during the Heart Rate Program
adjust/override the speed and/or the incline by simply pressing the correct button.
There are 3 HRC programs as follow:
H-1.
adjusting the speed only.
H-2.
adjusting the incline only.
H-3.
adjusting the speed and incline.
STEP 1: Attach the Safety key to wake display up; the treadmill then will be on start/ready status. Press MODE button, the
INCLINE window will display H-1. Press MODE button to select H-1 to H-3.
STEP 2: After selecting the program, Press MODE button, the TIME window will bling, press SPEED+/- or INCLINE∧/∨to
set time. Press MODE button again, the DIS. window will bling, press SPEED+/- or INCLINE∧/∨to set your age. Press
MODE button again, the CAL. window will bling, press SPEED+/- or INCLINE∧/∨to set TARGET HEART RATE.
STEP 3: After finish setting the lasting time of the program, press START/STOP button to start the program.
BODY FAT SCALE
This function is to estimate your body fat according to the basic information of you body condition.
This estimate is not exact and persons with medical conditions and/or a specific need for accurate body fat value
should not rely on the estimations provided.
STEP 1:
FAT. Press MODE button to set the relative parameters: GENDER,AGE, HEIGHT and WEIGHT.
STEP 2: After entering BODY FAT function by pressing MODE button, the INCLINE window will display F1, the DIST
window will display 1, it represents GENDER, press SPEED +/- button to set gender from 1 - 2, 1 represents MALE,
2 represents FEMALE. Then press MODE button to go to next step.

14
STEP 3: After pressing MODE button, the INCLINE window will display F2, the DIST window will display 25,
it representsAGE, press SPEED +/- button to set age from 10-99. Then press MODE button to go to next step.
STEP 4: After pressing MODE button, the INCLINE window will display F3, the DIST window will display 170,
it represents HEIGHT, press SPEED +/- button to set height from 100CM-200CM. Then press MODE button to
go to next step.
STEP 5: After pressing MODE button, the INCLINE window will display F4, the DIST window will display 70,
it represents WEIGHT, press SPEED +/- button to set weight from 20KG-120KG. Then press MODE button to
go to next step.
STEP 6: After finished setting all the necessary information of your body condition, press MODE button again, the
INCLINE window will then display ----
calculating, then hold the pulse sensor on handrail with both of your hands, around 8 seconds after, the body fat
result will be displayed on INCLINE window.
BODY FAT CHART
The result that given by body fat scale can be a reference of body condition, check your body condition according to the
left chart with the result you get from the treadmill.
Body condition
Result
Fat
BMI > 30
Overweight
26 < BMI < 30
Fit
19 < BMI < 25
Thin
BMI < 19

15
PRESET PROGRAM CHART
P1. WEIGHT LOST
SPEED CHANGES
1
2
3
4
5
6
7
8
9
10
11
12
13
14
15
16
17
18
Level 1
SPEED(KM/H)
1
2
2
3
3
3
4
5
6
6
7
6
5
4
4
3
2
2
Level 2
SPEED(KM/H)
1
2
2
3
4
4
5
6
8
8
10
8
8
5
5
3
2
2
Level 3
SPEED(KM/H)
1
2
3
4
5
5
6
8
9
10
12
10
8
7
6
4
3
2
Level 4
SPEED(KM/H)
1
2
3
4
6
7
8
10
11
12
13
11
10
8
7
5
4
2
Level 5
SPEED(KM/H)
2
3
4
5
7
7
8
10
12
14
14
13
12
10
9
6
4
2
Level 6
SPEED(KM/H)
2
3
4
5
7
9
10
12
13
14
14
13
12
10
9
6
5
3
Level 7
SPEED(KM/H)
2
3
5
6
8
9
10
12
13
14
15
13
12
10
9
6
6
3
Level 8
SPEED(KM/H)
2
3
5
6
8
10
12
14
14
15
15
14
13
11
9
7
6
3
P2. CARDIO TRAIN
SPEED & INCLINE CHANGES
1
2
3
4
5
6
7
8
9
10
11
12
13
14
15
16
17
18
Level 1
ELEVATION
1
1
2
3
4
5
6
7
7
8
8
7
7
5
4
2
1
1
SPEED(KM/H)
1
1
2
2
3
4
5
6
6
7
7
6
6
4
3
2
1
1
Level 2
ELEVATION
1
2
3
4
5
6
7
8
8
9
9
8
8
6
5
3
2
1
SPEED(KM/H)
1
2
2
3
4
5
6
7
7
8
8
7
7
5
4
2
2
1
Level 3
ELEVATION
1
2
4
5
6
7
8
9
9
10
10
9
9
7
6
4
2
1
SPEED(KM/H)
1
2
3
4
5
6
7
8
8
9
9
8
8
6
5
3
2
1
Level 4
ELEVATION
2
3
5
6
7
8
9
10
10
11
11
10
10
8
7
5
3
2
SPEED(KM/H)
2
2
4
5
6
7
8
9
9
10
10
9
9
7
6
4
2
2
Level 5
ELEVATION
2
4
6
7
8
9
10
11
11
12
12
11
11
9
8
6
4
2
SPEED(KM/H)
2
3
5
6
7
8
9
10
10
11
11
10
10
8
7
5
3
2
Level 6
ELEVATION
3
5
7
8
9
10
11
12
12
13
13
12
12
10
9
7
5
3
SPEED(KM/H)
2
4
6
7
8
9
10
11
11
12
12
11
11
9
8
6
4
2
Level 7
ELEVATION
4
6
8
9
10
11
12
13
13
14
14
13
13
11
10
8
6
4
SPEED(KM/H)
3
5
7
8
9
10
11
12
12
13
13
12
12
10
9
7
5
3
Level 8
ELEVATION
5
7
9
10
11
12
13
14
14
15
15
14
14
12
11
9
7
5
SPEED(KM/H)
4
6
8
9
10
11
12
13
13
14
14
13
13
11
10
8
6
4

16
P4. POWER WALK
P3. FAT BURN
SPEED CHANGES
1
2
3
4
5
6
7
8
9
10
11
12
13
14
15
16
17
18
Level 1
SPEED(KM/H)
1
1
2
2
3
3
4
4
4
4
4
4
3
2
2
2
1
1
Level 2
SPEED(KM/H)
1
2
2
2
3
3
4
4
5
4
4
4
3
3
2
2
1
1
Level 3
SPEED(KM/H)
1
2
2
3
3
4
4
5
5
5
4
4
4
3
3
2
1
1
Level 4
SPEED(KM/H)
1
2
3
3
3
4
4
5
6
6
5
4
4
4
3
2
2
1
Level 5
SPEED(KM/H)
1
2
3
4
4
5
5
5
6
6
6
5
4
4
4
3
2
1
Level 6
SPEED(KM/H)
1
2
3
4
5
5
6
6
6
6
6
5
5
4
4
3
2
1
Level 7
SPEED(KM/H)
1
2
3
4
5
6
6
7
7
6
6
6
5
5
4
3
2
1
Level 8
SPEED(KM/H)
1
2
3
4
5
6
7
7
7
7
6
6
6
5
5
4
2
1
SPEED & INCLINE CHANGES
1
2
3
4
5
6
7
8
9
10
11
12
13
14
15
16
17
18
Level 1
ELEVATION
1
1
2
2
3
3
4
5
5
5
5
4
4
3
2
2
1
1
SPEED(KM/H)
1
2
3
3
5
6
7
8
8
8
8
7
7
5
4
3
2
1
Level 2
ELEVATION
1
1
2
2
3
4
5
6
6
6
6
5
5
4
3
2
1
1
SPEED(KM/H)
1
2
3
4
6
7
8
9
9
9
9
8
8
6
5
3
2
1
Level 3
ELEVATION
1
1
2
3
4
5
6
7
7
7
7
6
6
4
3
2
1
1
SPEED(KM/H)
1
2
4
5
7
8
9
10
10
10
10
9
9
7
6
4
2
1
Level 4
ELEVATION
1
2
3
4
5
6
7
8
8
8
8
7
7
5
4
3
2
1
SPEED(KM/H)
2
3
5
6
8
9
10
11
11
11
11
10
10
8
7
5
3
2
Level 5
ELEVATION
1
2
3
4
6
7
8
9
9
9
9
8
8
6
5
3
2
1
SPEED(KM/H)
2
4
6
7
9
10
11
12
12
12
12
11
11
9
8
6
4
2
Level 6
ELEVATION
2
3
4
5
7
8
9
10
10
10
10
9
9
7
6
4
3
2
SPEED(KM/H)
3
5
7
8
10
11
12
13
13
13
13
12
12
10
9
7
5
3
Level 7
ELEVATION
2
3
5
6
8
9
10
11
11
11
11
10
10
8
7
5
3
2
SPEED(KM/H)
4
6
8
9
11
12
13
14
14
14
14
13
13
11
10
8
6
4
Level 8
ELEVATION
2
4
6
7
9
10
11
12
12
12
12
11
11
9
8
6
4
2
SPEED(KM/H)
4
7
9
10
12
13
14
15
15
15
15
14
14
12
11
9
7
4

17
P5. INTERVAL
SPEED CHANGES
1
2
3
4
5
6
7
8
9
10
11
12
13
14
15
16
17
18
Level 1
SPEED(KM/H)
1
2
4
2
4
2
4
2
4
2
4
2
4
2
4
2
4
2
Level 2
SPEED(KM/H)
1
2
5
2
5
2
5
2
5
2
5
2
5
2
5
2
5
2
Level 3
SPEED(KM/H)
1
2
6
2
6
2
6
2
6
2
6
2
6
2
6
2
6
2
Level 4
SPEED(KM/H)
1
3
6
3
6
3
6
3
6
3
6
3
6
3
6
3
6
3
Level 5
SPEED(KM/H)
1
3
7
3
7
3
7
3
7
3
7
3
7
3
7
3
7
3
Level 6
SPEED(KM/H)
2
4
7
4
7
4
7
4
7
4
7
4
7
4
7
4
7
4
Level 7
SPEED(KM/H)
2
4
8
4
8
4
8
4
8
4
8
4
8
4
8
4
8
4
Level 8
SPEED(KM/H)
2
5
8
5
8
5
8
5
8
5
8
5
8
5
8
5
8
5
P6. ROLLING
SPEED CHANGES
1
2
3
4
5
6
7
8
9
10
11
12
13
14
15
16
17
18
Level 1
SPEED(KM/H)
1
2
3
2
1
2
3
2
1
2
3
2
1
2
3
2
1
1
Level 2
SPEED(KM/H)
2
3
4
3
2
3
4
3
2
3
4
3
2
3
4
3
2
2
Level 3
SPEED(KM/H)
2
3
4
5
4
3
4
5
4
3
4
5
4
3
4
5
4
3
Level 4
SPEED(KM/H)
2
4
5
6
5
4
5
6
5
4
5
6
5
4
5
6
5
3
Level 5
SPEED(KM/H)
2
5
6
7
6
5
6
7
6
5
6
7
5
6
7
6
5
3
Level 6
SPEED(KM/H)
3
6
7
8
7
6
7
8
7
6
7
8
7
6
7
8
7
4
Level 7
SPEED(KM/H)
3
7
8
9
8
7
8
9
8
7
8
9
8
7
8
9
8
4
Level 8
SPEED(KM/H)
3
8
9
10
9
8
9
10
9
8
9
10
9
8
9
10
8
4

18
P7. MOUNTAIN CLIMB
SPEED & INCLINE CHANGES
1
2
3
4
5
6
7
8
9
10
11
12
13
14
15
16
17
18
Level 1
ELEVATION
0
1
1
2
2
3
3
4
4
5
6
7
8
7
6
4
2
0
SPEED(KM/H)
1
1
2
2
3
3
3
4
4
4
3
3
3
2
2
2
1
1
Level 2
ELEVATION
0
1
2
2
3
3
4
4
5
6
7
8
9
8
6
4
2
0
SPEED(KM/H)
1
1
2
2
3
3
3
4
4
4
3
3
3
2
2
2
1
1
Level 3
ELEVATION
1
1
2
3
3
4
4
5
6
7
8
9
10
9
8
6
4
2
SPEED(KM/H)
1
1
2
2
3
3
3
4
4
4
3
3
3
2
2
2
1
1
Level 4
ELEVATION
1
2
2
3
3
4
5
6
7
8
9
10
11
10
8
7
5
3
SPEED(KM/H)
2
2
3
3
4
4
4
5
5
4
4
4
3
3
3
2
2
2
Level 5
ELEVATION
1
2
3
4
5
6
7
8
9
9
10
11
12
11
10
8
6
4
SPEED(KM/H)
2
2
3
3
4
4
4
5
5
4
4
4
3
3
3
2
2
2
Level 6
ELEVATION
2
2
3
4
5
6
7
8
9
10
11
12
13
12
10
8
6
4
SPEED(KM/H)
2
2
3
3
4
4
4
5
5
4
4
4
3
3
3
2
2
2
Level 7
ELEVATION
2
3
4
5
6
7
8
9
10
11
12
13
14
13
10
8
6
4
SPEED(KM/H)
2
2
4
4
5
5
5
6
6
6
5
5
4
4
4
2
2
2
Level 8
ELEVATION
3
4
5
6
7
8
9
10
11
12
13
14
15
13
10
8
6
4
SPEED(KM/H)
2
2
4
4
5
5
5
6
6
6
5
5
4
4
4
2
2
2

19
P8. HILL RUN
SPEED & INCLINE CHANGES
1
2
3
4
5
6
7
8
9
10
11
12
13
14
15
16
17
18
Level 1
ELEVATION
0
0
1
1
2
2
2
3
3
3
4
4
5
5
4
3
2
1
SPEED(KM/H)
2
2
2
3
3
3
5
5
7
7
9
9
10
8
8
6
4
2
Level 2
ELEVATION
0
0
1
1
2
2
2
3
3
3
4
4
5
6
5
3
2
1
SPEED(KM/H)
2
2
2
4
4
4
6
6
6
8
8
10
10
8
8
6
4
2
Level 3
ELEVATION
0
0
1
1
2
2
3
3
3
4
4
5
5
6
5
3
2
1
SPEED(KM/H)
2
2
4
4
4
6
6
6
8
8
10
10
12
10
8
6
4
2
Level 4
ELEVATION
0
1
1
2
2
3
3
4
4
4
5
5
6
7
6
5
3
2
SPEED(KM/H)
2
2
4
4
6
6
8
8
8
10
10
10
12
12
10
7
5
3
Level 5
ELEVATION
1
1
2
2
3
3
4
4
5
5
6
6
7
8
7
6
3
2
SPEED(KM/H)
2
4
6
6
6
6
8
8
8
10
10
12
13
12
10
7
5
3
Level 6
ELEVATION
1
2
3
4
4
4
5
5
6
6
7
8
8
8
7
6
3
2
SPEED(KM/H)
2
4
6
6
6
6
8
8
10
10
12
13
13
12
10
7
5
3
Level 7
ELEVATION
1
2
3
4
5
6
6
7
7
8
8
9
10
10
9
6
3
2
SPEED(KM/H)
2
4
6
6
8
8
10
10
12
13
13
14
13
12
10
7
5
3
Level 8
ELEVATION
1
2
3
4
6
6
7
7
8
8
9
9
10
12
9
6
3
2
SPEED(KM/H)
2
4
6
8
10
10
12
12
13
13
14
14
13
12
10
7
5
3

20
HOW TO FOLD THE TREADMILL
Before folding the treadmill, unplug the power cord.
CAUTION: You must be able to safely lift 45
pounds (20kg) in order to raise, lower, or move
the treadmill.
1.Hold the treadmill with your hands in the locations
shownat the right. CAUTION: To decrease the
possibility ofinjury, bend your legs and keep your
back straight. Asyou raise the treadmill, make sure
to lift with your legsrather than your back. Raise
the treadmilluntil the running deck is firmly held by the
folding pole as the right figure shows.
2. If you want to put the treadmill to the work position,
Firstly pull the folding knob outward as figure shows,
And then lay down the running deck light onto floor
HOW TO MOVE THE TREADMILL
Hold the handrails as shown and place one foot against awheel.
Tilt the treadmill back until it rolls freely on the
wheels. Carefully move the treadmill to the desired
location.
Never move the treadmill without tipping it back.
Toreduce the risk of injury, use extreme caution
While moving the treadmill. Do not attempt to
move thet readmill over an uneven surface.
Place one foot on a wheel, and carefully lower the
Treadmill until it is resting in the storage position.
Table of contents
Languages:
Other INTERSPORT Treadmill manuals

INTERSPORT
INTERSPORT ENERGETICS POWER RUN 20.1 User manual

INTERSPORT
INTERSPORT ENERGETICS PR 8.9 User manual

INTERSPORT
INTERSPORT POWER RUN 1.1 User manual

INTERSPORT
INTERSPORT ENERGETICS PR 11.0 User manual

INTERSPORT
INTERSPORT ENERGETICS PR 1.9 User manual

INTERSPORT
INTERSPORT ENERGETICS PR 4.9 User manual