Cubic casja80l User manual


THE FOLLOWING INSTRUCTIONS SHOULD BE READ IN FULL AND
FOLLOWED PRIOR TO THE INSTALLATION, RUNNING, OR ADDI-
TION OF ANY LIVE ANIMALS INTO YOUR AQUARIUM.
YOUR CUBIC JELLYFISH AQUARIUM HAS BEEN CAREFULLY
DESIGNED TO OFFER MANY YEARS OF RELIABLE SERVICE WHEN
SET-UP AND MAINTAINED IN ACCORDANCE WITH THESE INSTRUC-
TIONS.
FOR BEST RESULTS WE RECOMMEND THE USE OF THIS MANUAL
COMBINED WITH THE INCLUDED JELLYFISH HUSBANDRY GUIDE
CONGRATULATIONS ON YOUR
PURCHASE OF THIS CUBIC AQUARIUM
SYSTEMS JELLYFISH AQUARIUM

TABLE OF CONTENTS
MAINTAINING AND CLEANING
THE AQUARIUM
External Surfaces
To clean all external surfaces, use a soft lint-free cloth made damp with clean water or RO water. Any smears or minor
marks may be polished away afterwards by wiping down with a second soft lint-free dry cloth. IMPORTANT: Under no
circumstances should detergents, spray cleaners or any other chemical agent be used on or near the aquarium. Using
such materials can harm the inhabitants and/or damage the acrylic finish and/or weaken the bonding agents used in
construction. Any such use will invalidate any applicable warranties.
Internal Surfaces
Over time the internal surfaces of the aquarium including the viewing panes may show a build-up or fine film, commonly
known as a ‘biofilm’ consisting of bacteria and minor algal populations. These may be removed by regular gentle wiping
with a suitable soft sponge or dedicated acrylic cleaning pad available from your aquatic retailor. IMPORTANT: Under
no circumstances should any excessive pressure be used when cleaning, nor any form of harsh abrasive material be
used. The use of such materials may damage the vulnerable acrylic surface impairing its clarity and tendency to resist
further biofilm accumulation.
Filter Sponge Maintenance
The internal carbon impregnated filter sponges will need regular routine maintenance to maintain even flow, and to
reduce the chances of any animals becoming stuck against the rear diffuser plate due to differences in ambient flow
rate. The regularity of maintenance required will depend on the number of animals kept and the amount/types of food
used. As a general recommendation it is suggested that the sponges be removed by sliding them out of their respective
guides (Fig 4) and rinsed under hot running water before being given a final rinse in RO water at least once every two
weeks. Slapping the sponges against a hard flat surface between rinses will help dislodge heavy accumulations of
detritus or uneaten food.With regular maintenance the sponges should last for a period of up to 3 months at which point
they will need replacing. Replacement sponges are available from your dealer.
IMPORTANT: only genuine Cubic Jellyfish Aquarium sponges should be used.

THE AQUARIUM AND ALL OF ITS COMPONENTS SHOULD HAVE
ALL PACKAGING REMOVED AND BE INSPECTED TO ENSURE
THERE HAS BEEN NO DAMAGE WHILST IN TRANSIT. IF ANY
DAMAGE IS EVIDENT, YOU SHOULD CONTACT YOUR DEALER
AS SOON AS POSSIBLE BEFORE SETTING UP THE AQUARIUM.
YOUR AQUARIUM PACKAGE WILL INCLUDE THE FOLLOWING
1 x Cubic Jellyfish aquarium
1 x Top cover panel
1 x Top cover rear panel
1 x Rear cover panel
1 x Media tower assembly with
lid and pump connection
1 x Remote control for the LED lighting
system. (Requires 2 x AAA batteries - not included)
1 x Adjustable circulation pump
2 x Filter sponge inserts
1 x Removable LED light strip
1 x Sealed power distribution box
2 x Power distribution box retaining screws
1 x set of male/female connector hose tail’s
for chiller connection
1 x Multi-language instruction manual and
jellyfish keeping guide
3x O-rings (CASOR20, CASOR90 & CASOR100)
BEFORE ASSEMBLING
page
1

COMPONENT INSTALLATION
IMPORTANT:
When filled with water, the aquarium will weigh approximately 120kg. The aquarium should therefore be placed
on a flat level surface capable of supporting a minimum recommended 150kg. Any support should also be of
sturdy construction to eliminate the chances of the aquarium toppling or falling should it be accidentally pushed
or knocked.
IMPORTANT:
The aquarium should be sited out of the reach of young children and away from direct sunlight where possible
as this may induce excessive algal growth and overheating of the water which can result in stress and damage
to any livestock present.
IMPORTANT:
Under no circumstances should power be supplied to the aquarium prior to it being filled and the circulation
pump submerged. Failure to do so may result in severe damage to the pump internals and loss of applicable
warranties.
IMPORTANT:
After siting the aquarium and ensuring that it is level, remove the rear top inspection panel to gain access to
the filtration chamber. Also remove the rear panel by sliding upwards on its guides to gain access to the
electrical control box mounting point. IMPORTANT: Under no circumstances should the electrical control box
be opened. Opening this box without authorization will result in loss of applicable warranties.
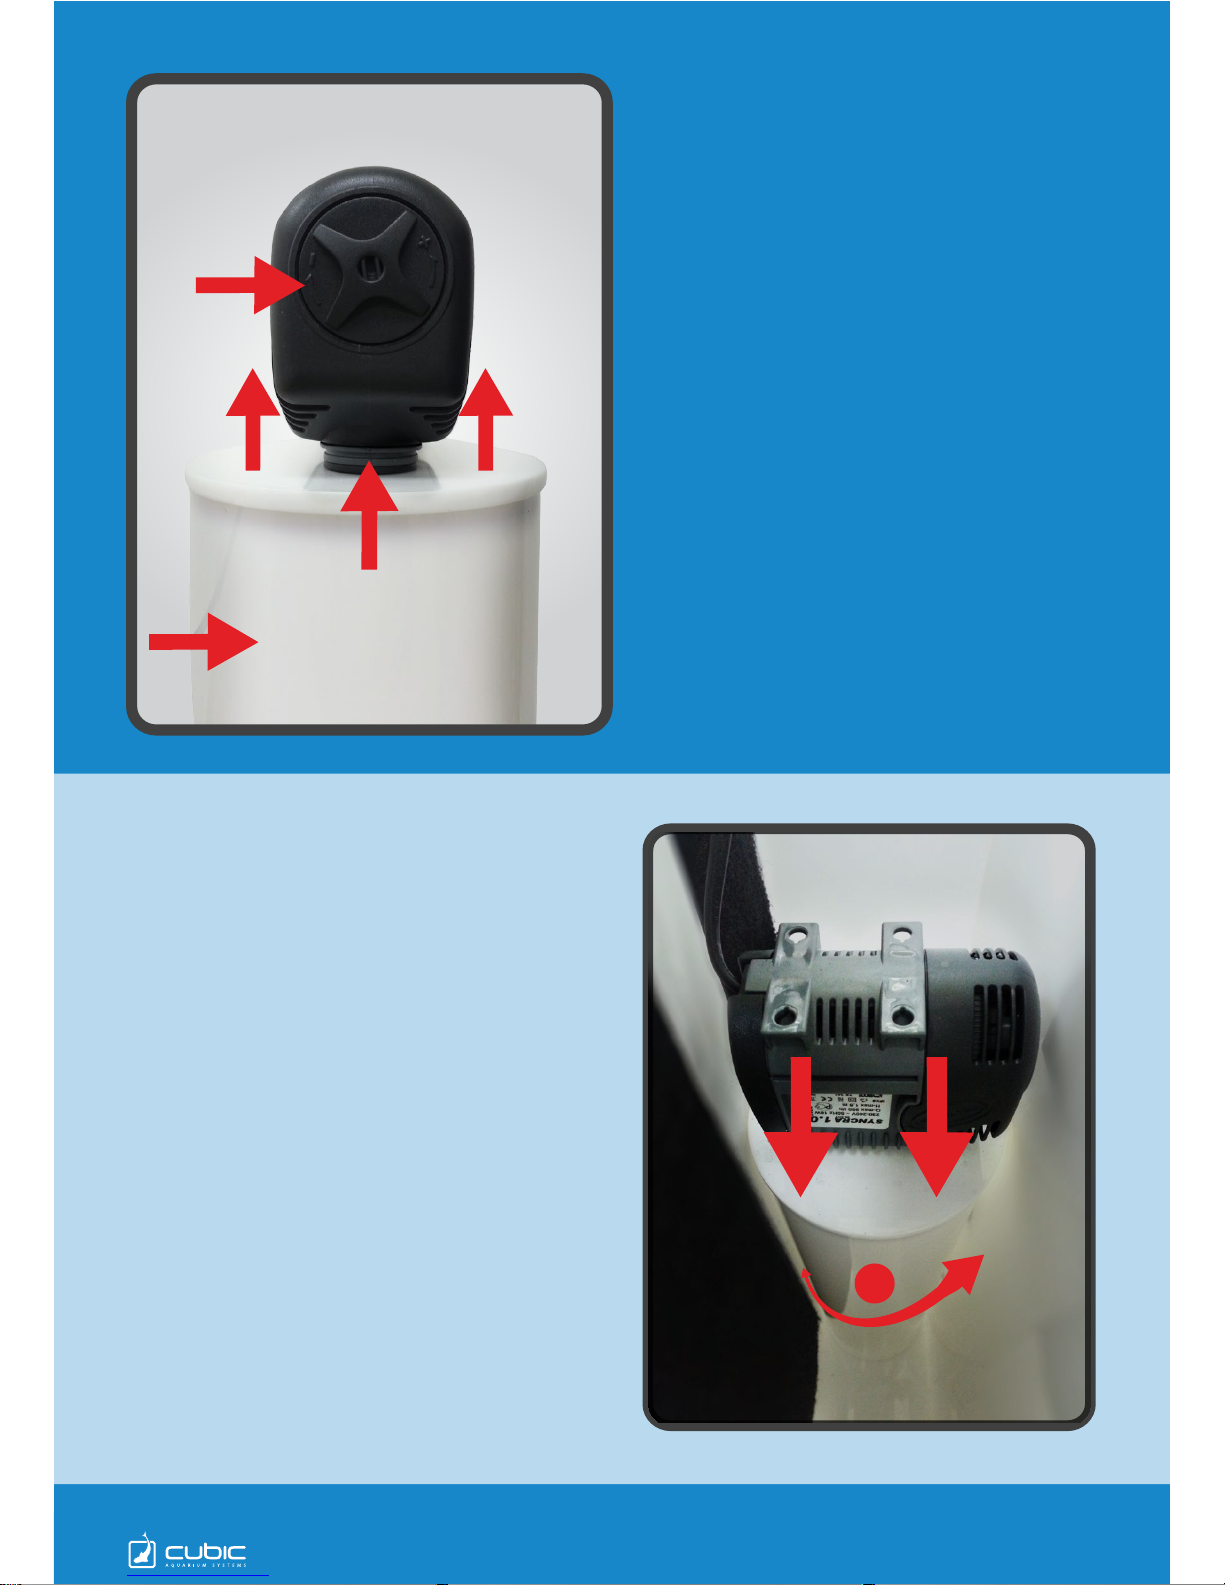
ELECTRICAL BOX
FIG. A
Secure the electrical box In place by
sliding it into the 4 securing points on
the rear inner panel. Then tighten the
2 securing screws
THE CUBIC JELLYFISH AQUARIUM HAS BEEN THROUGH
EXTENSIVE DEVELOPMENT AND TESTING TO ENSURE THAT IT
OFFERS THE BEST CONDITIONS AND CATERS FOR THE VERY
SPECIFIC NEEDS OF JELLYFISH. IMPORTANT: UNDER NO CIR-
CUMSTANCES SHOULD ANY FORM OF MEDIA, SUBSTRATE OR
DECORATION BE ADDED TO THE MAIN DISPLAY AREA.
A
B
B
AA
FIG. B
IMPORTANT: The electrical control
box should always be located in such
a way that all incoming and outgoing
power cables do so from the
underside to prevent water entering
any seals.
page
2

Take the cylindrical media tower
(Fig2: B) and remove the lid by pulling it gently upwards
(Fig2: A) The lid seals with an O-ring that sits in a grove
around the edge of the lid flange.
Once filled and flushed, the media tower should be
inserted into the rear compartment (Fig3: B) and located
into its seat at the bottom of the chamber. This is a simple
locking system requiring alignment of the 3 tabs on each
face to interlock, afterwards apply a gentle twist with
downward pressure to lock the media tower into place
against its O-ring seal (Fig3: A). IMPORTANT: Under no
circumstances should the fitting be forced or over-tight-
ened. Apply only a gentle twisting action with slight
downward pressure until the unit feels secure in its seat.
A
A
Fill the media tower with a suitable ‘marine’ applicable
media such as very course (>8mm) coral gravel,
artificial bio media such as porous ceramics, or for
best results, use lightly crushed course live-rock rubble
which will act as a good biological filter with the
additional benefit of host micro-fauna. If a non-bacteri-
ally live media is used, it is recommended that it is
‘seeded’ biologically by mixing in a small amount of live
rock rubble from your marine aquatic retailor or by the
use of a proprietary maturation fluid. After filling the
Media tower, flush several times with salt water to
wash out any fine sediment or particulates that may
otherwise be passed into the aquarium on start-up.
IMPORTANT:
We do not recommend using a bio media with particles
that are smaller than 8mm. These can block the holes
in the bottom of the media tube causing pressure to
build up which can force the lid to come off.
D
AA
C
B
Fig.2
A
CC
B
Fig.3
MEDIA TOWER LID
Once the media tower is in place, Attach the outlet of the
circulation pump onto the fitting supplied on the lid of the
media tower, (Fig2: D) the lid should then be inserted into
the top of the media tower, ensuring it is firmly seated
against its O-ring seal (Fig3: C). On the front face of the
circulation pump is an adjustable grill that controls the
amount of flow produced. Set this to ‘minimum’ initially.
(Fig2: C)
CIRCULATION PUMP
MEDIA TUBE
FILTER MEDIA
page
3

A
Fig.6
Trace the cable from the LED light strip (Fig5: B) which
exits from the removable cover at the centre of the rear
diffuser plate. Connect the end of this cable to its respec-
tive partner which can be found exiting the electrical
distribution box. Ensure that the threaded coupling is
firmly connected and tightened to ensure a water tight
seal. Should the LED light strip require replacement at
any time, this can easily be done by removing the
protective top cover on the light strip channel (Fig5: A)
and sliding the old strip out prior to replacement with a
new unit.
LED LIGHT STRIP
If using a chiller or remote power filter, unscrew the two blanking plug flanges
from the inlet and outlet pipework on the outside of the rear panel (Fig6:a) and
connect using the supplied male and female hose tails. If hard-plumbing the
aquarium, the blanking plugs may be cut, leaving enough pipe left over to allow
bonding to other fittings. IMPORTANT: Always use inline taps between the
aquarium and any external equipment so that water lines may be closed in the
event of a leak. If not using any kind of external device, ensure both blanking
plugs are tightened gently by hand prior to filling the aquarium.
Fig.5
A
B
AA
Fig.4BFig.4A
ADDING AN EXTERNAL
FILTER OR CHILLER
FILTER SPONGE
The aquarium comes with 2 x carbon impregnated filter sponges (Fig 4A). Ensure that both sponges are seated
correctly into their respective guides on either side of the rear perforated diffuser plate (Fig 4B). The sponges will help
trap any waste or uneaten food, and will help disperse the suction of water through the rear diffuser plate over a wide
area to ensure no livestock becomes trapped against the diffuser plate.
page
4

Using Reverse Osmosis water and a reputable brand of marine aquarium salt that closely matches natural sea
water composition, make approximately 80-90 lts of salt water with a salinity of 34-35ppt (this should be tested
using a reliable refractometer or hydrometer available from your aquatic retailor). This water must be mixed
and allowed to aerate for a minimum 24 hours before coming into contact with jellyfish. Alternately, use
pre-mixed salt water from your aquatic retailor if available.
Add water to the aquarium to within 1” of full. The rear filter compartment and media tower will fill automatically
as water passes through the rear diffuser plate and filter sponges into this compartment.
Inspect for leaks and check all fixtures and fittings to ensure they are securely fastened.
Route all cables accordingly via the handy cut outs to allow outer panels to sit level, and then replace all
inspection covers including the main rear panel by sliding it down its respective guides leaving the main power
cord exiting the aquarium via the cut-out at the base of the rear panel.
Connect the aquarium to a suitable power supply ensuring that there is enough slack in the power cable to
allow a drip loop before the plug. This will ensure that no water can enter the mains plug should there be a leak
resulting in water running down the power cord.
On start-up, the aquarium light will temporarily start up before going into standby. Inspect the circulation pump
to ensure it is functioning correctly. A small amount of air bubbles will commonly be encountered as the pump
and media tower expel any trapped air. IMPORTANT: Under no circumstances should Jellyfish be added whilst
the aquarium water is populated with air bubbles.
Inspection
Connecting the power supply
Routing cables
Checking for leaks
Mixing salt water
Filling the aquarium
IMPORTANT:
We highly recommend the use of pure Reverse Osmosis or De Ionised water mixed with a good quality aquarium salt
when keeping jellyfish. Pure Reverse Osmosis or De Ionised water should also be used when replacing water that has
evaporated from the tank. The use of tap water is not recommended as it may contain excess pollutants or high concen-
trations of Chlorine and other contaminants which may be extremely harmful to the aquariums inhabitants.
FILLING THE AQUARIUM
page
5

To turn on the light Press Key A
To turn off the light Press Key B
To set a particular colour, gently slide your finger around the colour wheel stopping at the
required colour or simply press at a chosen point on C
To turn on the auto-colour-change mode, Press Key F
To adjust the brightness up or down use keys D
To adjust the speed of colour change (only applicable in auto-colour-change mode) adjust
faster or slower using keys E
The aquarium comes with its own remote control system for adjust-
ment of the LED lights. The remote can change various settings
which include: Light intensity / Fixed or Auto Colour Change / Auto
Colour Change Speed. The remote control will function up to a range
of approximately 40ft
NOTE:
If the remote control stops working it may have lost its radio sync with the aquarium, you can
re-sync it with the following procedure;Disconnect the power to the electrical control box
Leave the power off for at least 10 seconds Re-connect the power to the electrical control box
press the S+ key within a few seconds
Power ON A
Brightness Adjust D
Power OFF
B
Speed-Colour-Change
E
Auto-Colour-Change
F
Color Wheel
C
USING REMOTE CONTROL
page
6

MATURING THE AQUARIUM
AND ADJUSTING FLOW
RATES
6.b
If using fresh mixed salt water and/or artificial media that require maturation, then the aquarium should be left
to run for two weeks prior to the addition of any livestock.
IMPORTANT:
Jellyfish are highly sensitive to freshly mixed salt water. The settling period allows the water to ‘age’ and
stabilise chemically, and for the bacterial colonies to establish on and within the media.If using fresh mixed
water with a pre-matured biologically active filter (live rock rubble) then the settling period may be reduced to 1
week.
Once livestock is added, the flow rate should be adjusted, This can be done by turning the flow adjustment grill
on the intake of the circulation pump (Fig2: C). For best results with Jellyfish, the flow rate should be such that
the animals are very gently circulated around the aquarium at a rate no more than that required to prevent the
Jellyfish from settling out on the bottom. This rate of flow will also help keep food suspended in the water
column where the Jellyfish can feed effectively.
For information specifically relating to Jellyfish husbandry and water quality
testing, we strongly recommend reading the included ‘Jellyfish Husbandry
Guide’
Adjusting the flow
Maturing the aquarium filter
page
7

MAINTAINING AND CLEANING
THE AQUARIUM
External Surfaces
To clean all external surfaces, use a soft lint-free cloth made damp with clean water or RO water. Any smears or minor
marks may be polished away afterwards by wiping down with a second soft lint-free dry cloth. IMPORTANT: Under no
circumstances should detergents, spray cleaners or any other chemical agent be used on or near the aquarium. Using
such materials can harm the inhabitants and/or damage the acrylic finish and/or weaken the bonding agents used in
construction. Any such use will invalidate any applicable warranties.
Internal Surfaces
Over time the internal surfaces of the aquarium including the viewing panes may show a build-up or fine film, commonly
known as a ‘biofilm’ consisting of bacteria and minor algal populations. These may be removed by regular gentle wiping
with a suitable soft sponge or dedicated acrylic cleaning pad available from your aquatic retailor. IMPORTANT: Under
no circumstances should any excessive pressure be used when cleaning, nor any form of harsh abrasive material be
used. The use of such materials may damage the vulnerable acrylic surface impairing its clarity and tendency to resist
further biofilm accumulation.
Filter Sponge Maintenance
The internal carbon impregnated filter sponges will need regular routine maintenance to maintain even flow, and to
reduce the chances of any animals becoming stuck against the rear diffuser plate due to differences in ambient flow
rate. The regularity of maintenance required will depend on the number of animals kept and the amount/types of food
used. As a general recommendation it is suggested that the sponges be removed by sliding them out of their respective
guides (Fig 4) and rinsed under hot running water before being given a final rinse in RO water at least once every two
weeks. Slapping the sponges against a hard flat surface between rinses will help dislodge heavy accumulations of
detritus or uneaten food.With regular maintenance the sponges should last for a period of up to 3 months at which point
they will need replacing. Replacement sponges are available from your dealer.
IMPORTANT: only genuine Cubic Jellyfish Aquarium sponges should be used.
page
8

Additional filtration
If stocked and fed sensibly, the built in filtration system will be perfectly adequate in most cases. Although typical
Jellyfish species such as the moon jellyfish are remarkably adaptable to varying water conditions, there may be the
need to use additional filtration Medias in cases of heavy stocking or heavy feeding. If the addition of extra filtration
media is required to maintain better water conditions between water changes, this may be achieved by connecting a
suitable remote power filter via the rear external water inlet/outlets (Fig6). Or by way of a simple media bag placed
inside the rear filter chamber containing a mix of marine applicable carbon and/or phosphate removing media.
Water Changes
Regular water changes are an essential and accepted part of maintaining a healthy aquatic environment. Whilst the
built in filtration system will help break down a large percentage of any waste and uneaten food generated, the accumu-
lation of organic material and lowering of water quality over time mean that a regular routine of water changes are
essential to both dilute unwanted accumulations, and to replenish vital trace elements that are provided in the salt
water. It is therefore recommended that on a monthly basis, at least 20% of the aquariums water be exchanged for new.
Ideally water changes should be split across two changes performed once every two weeks at the same time the filter
sponges are cleaned. The addition of small amount of new salt water will have no adverse effect on any animals
present as long as it is well mixed and aerated prior to addition.
IMPORTANT: Always remember to turn off the circulation pump when conducting water changes to prevent the pump
scavenging air. Never add new water to the main display area as this may add bubbles to the display that can damage
the Jellyfish if they become trapped under the body. New water including fresh top-up water should always be added to
the filter compartment only. The circulation pump may be turned on again only after it has been fully submerged.
TIP: Some minor accumulation of fine particulates or uneaten food may be encountered on the base of the aquarium
over time. This detritus should be syphoned out during water changes. Care should be taken to avoid making contact
with any livestock during this process as they may be harmed by the suction created by such devices as syphon hoses
etc.
TIP: The media tower will need occasional routine rinsing to wash out any heavy accumulations of detritus or organic
matter. This can be done during water changes by removing the media tower and plunging it in and out of the water
removed during the water change.
IMPORTANT:
The media tower should only be rinsed in SALT water. Rinsing in fresh water will destroy the beneficial bacterial popula-
tions that have grown and are essential for on-going biological filtration.
TIP: After any form of maintenance that has involved turning the circulation pump on or off, or it becoming exposed to
air, observe to see if any air is evacuated into the main display once the circulation pump is turned back on. Any air
bubbles that do get stuck under the Jellyfish can be released by gently flipping the Jellyfish over using an applicable
tool such as a piece of acrylic rod etc. with a blunt end.
Circulation pump maintenance
Circulation pump maintenance: The integrated circulation pump should be removed and cleaned every 3 months as
part of a regular routine maintenance schedule. The pump impellor can be extracted by firstly removing the front intake
grill of the pump. Once removed, the impellor can be pulled from the main pump body allowing cleaning and inspection.
Take special note of the condition of the impellor and its associated shaft and bearings which are wearable items that
may need replacement from time to time. Replacement components may be obtained via your local dealer.
page
9

FOR FURTHER INFORMATION VISIT
http://cubicaquarium.com
For additional support and advice visit the Cubic Forum and join the
Jellyfish community http://www.cubicaquarium.com/forum.php
FOLLOW US:
www.facebook.com/cubic.aquarium.systems
www.youtube.com/CubicAquarium
www.twitter.com/cubic_aquarium
For all warranty claims and spare parts please contact your local Cubic dealer.

www.cubicaquarium.com
Information correct at time of publication.
Designs, Technical specifications and instructions are subject to change without prior notice
No claim nor warranty may be accepted nor entered into in relation to any injury or damage incurred during the handling or use of this product unless occurring under
the terms of use according to its design and manufacture. Failure to observe all relevant safety and application guidelines will invalidate any such claim.
Copyright Cubic Aquarium Systems LTD. and Reef-Eden-International 2012. All rights reserved.
Table of contents
Other Cubic Pet Care Product manuals