cuisinecraft CV300 User manual

User Manual
Chamber Vacuum Sealer
Model: CV300

-1-
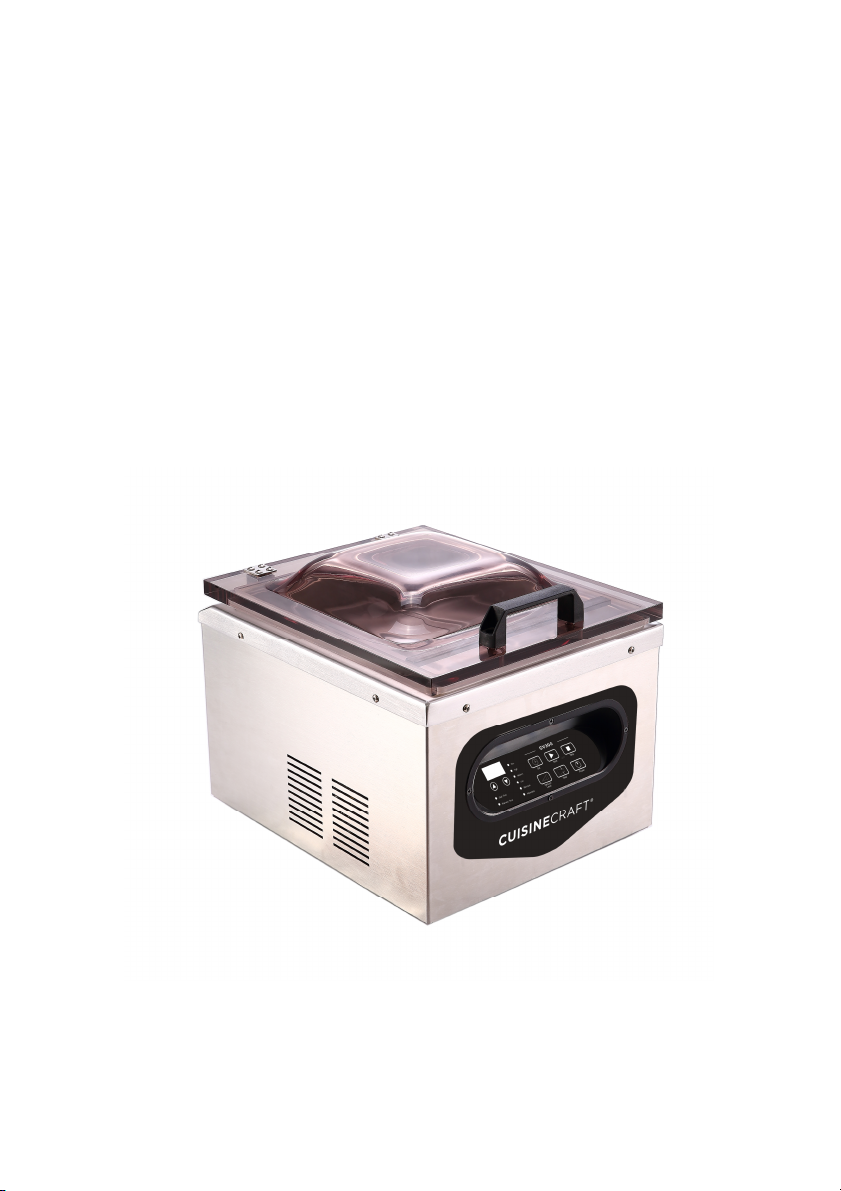
Thank you for purchasing the CV300 Vacuum Packaging Unit. With the help of the
CV300, you will now be able to keep food fresher longer in the refrigerator, freezer
and pantry. The CV300 effectively removes air and extends freshness up to five
times longer than normal preservation methods. Also, the CV300 can be used to
preserve and organize household items like keepsakes, small toys and easy-to-lose
items. You will soon find your CV300 to be so versatile and convenient, it will never
leave your countertop.
The CV300 is a chamber vacuum system, which offers two distinct advantages over
non-chamber, external bag type units. First, a much higher level of vacuum can be
achieved, which means a longer shelf life for foods that you package. Secondly,
liquids and liquid-rich foods can be effectively vacuum packaged. Foods like fresh
meats, fish, soups, stews, etc. are no longer a problem to vacuum package.
Marinated vegetables and meats are packaged quickly with ease, and no mess.
The CV300 Chamber Machine uses commercial technology. Simply place the pouch
to be sealed inside the chamber and close the lid. Push start and the sealing process
begins! First, the air is removed from the entire chamber and the vacuum pouch.
Once the preset vacuum level is achieved, the pouch is sealed. Upon completion of
the sealing cycle, air flows back into the chamber. Wait for the beep, and the process
is complete.
With the CV300, you can easily package a wide variety of sizes and shapes. Prep
and store smaller, individual serving portions as well as bulk items. The maximum
vacuum bag width is 290mm.

-2-
Table of Contents
Vacuum Packaging and Food Safety . . . . . . . . . . . . . . . . . . . . . . . . . . . . . . . . . . . . . . 3 - 4
The Vacuum Sealer Features . . . . . . . . . . . . . . . . . . . . . . . . . . . . . . . . . . . . . . . . . . . . . 5 - 7
Safety & Maintenance . . . . . . . . . . . . . . . . . . . . . . . . . . . . . . . . . . . . . . . . . . . . . . . . . . . . . 7 - 8
Getting Started with Vacuum Packaging……………………………………………..8-9
Packaging with Vacuum Pouches……………………………………………………..…9
Operating Instructions . . . . . . . . . . . . . . . . . . . . . . . . . . . . . . . . . . . . . . . . . . . . . . . . . . 1 0 - 1 3
Food Storage & Safety Information . . . . . . . . . . . . . . . . . . . . . . . . . . . . . . . . . . . . . . 1 3 - 1 4
Troubleshooting . . . . . . . . . . . . . . . . . . . . . . . . . . . . . . . . . . . . . . . . . . . . . . . . . . . . 1 4 - 1 6

-3-
Vacuum Packaging and Food Safety
Vacuum packaging extends the life of foods by removing most of the air from sealed
containers and prevents fresh air escaping into the sealed containers, thereby
reducing oxidation. Vacuum packaging helps preserve flavor and overall quality. It
also helps inhibit the growth of aerobic microorganisms, which can lead to the
problems noted below under certain conditions:
Mold – Mold cannot grow in a low oxygen environment; therefore vacuum packaging
can virtually eliminate it.
Yeast – Results in fermentation, which can be identified by smell and taste. Yeast
needs water, sugar and a moderate temperature to grow. It can also survive with or
without air. Slowing the growth of yeast requires refrigeration, while freezing stops it
completely.
Bacteria – Results in an unpleasant odor, discoloration and/or soft or slimy texture.
Under the right conditions, clostridium botulinum (the organism that causes Botulism)
can grow without air and cannot be detected by smell or taste. Although it is
extremely rare, it can be very dangerous.
As with any other storage container, it is important to inspect food for spoilage prior
to consuming.
To preserve foods safely, it is important to maintain low temperatures. You can
significantly reduce the growth of microorganisms at temperatures of 4ºC or below.
Freezing at -17ºC does not kill microorganisms, but stops them from growing. For
long-term storage, always freeze perishable foods that have been vacuum
packaged.
It is important to note that vacuum packaging cannot reverse the deterioration of
foods. It can only slow down changes in quality. It is difficult to predict how long foods
will retain their top-quality flavor, appearance or texture because it depends on the

-4-
age and the condition of the food on the day it was vacuumed packaged.
Note: vacuum packaging is not a substitute for refrigeration or freezing. Any
perishable foods that require refrigeration must still be refrigerated or frozen
after vacuum packaging.
Preparation Guidelines
Vegetables need to be blanched before vacuum packaging. This process stops the
enzyme action, which leads to loss of flavor, color and texture. To blanch vegetables,
place them in boiling water or in the microwave until they are cooked, but still crisp.
Then, immerse the vegetables in cold water to stop the cooking process. Finally, dry
the vegetables on a towel before vacuum packaging. Cruciferous vegetables
(broccoli, sprouts, cabbage, cauliflower, kale, turnips) naturally emit gases during
storage. Therefore, after blanching, they must be stored in the freezer only.

-5-
The Vacuum Sealer Features
Vacuum lid
Control panel
G I2 E B D
I1 H F C A

-6-
A. Power Button (Power)
When the machine is connected to power, LED (G) will show OFF, press
ON/OFF button, LED (G) will show the preset sealing time (or marinate time)
and then the preset vacuum degree. The machine is now ready to work. Press
ON/OFF button, the machine will be back to standby mode. LED (G) will show
OFF.
B. Start Button (Start)
When the machine is ready to work, press the Start button, the machine will
enter into vacuum-sealing mode or vacuum-marinate mode (according to the
setting mode).
C.Seal Button (Seal)
During the vacuum mode, press the Seal button, stop the vacuum process and
enter into sealing mode.
D. Stop Button (Stop)
Press the Stop button, the machine will stop any process which is underway.
E. Set Button (Set)
Press the Set button, choose vacuum-seal mode or vacuum-marinate mode
(indicator light will be on accordingly). Press the “ ” “ ” button to adjust the
seal time or marinate time (the time will show on the LED).
F. Vacuum Level Button (Vacuum Level)
Press the Vacuum Level button, choose the vacuum Degree needed (indicator
light will be on accordingly, with a unit of inHg). When choosing ADJUSTABLE,
press “ ” “ ” button to set any vacuum degree needed (the vacuum degree will
show on the LED).
G. LED Display
1. Show the vacuum degree in real time.
2. Show the seal time or marinate time.
H. Adjust button (“ ” “ ”)
1. Adjust seal time
2. Adjust marinate time
3. Adjust vacuum degree

-7-
I. Indicator lights
I1. Indicate working process
I2. Indicate vacuum degree
Technical Data
Voltage:220-240V~50HZ Power:630W
Pressure: -29.7”Hg / -1006mbar(±5‰) directly in pump
-29.5”Hg/-999mbar (±5‰ ) in vacuum chamber
Max bag Seal width:300mm Seal wire width:2.5 x2 mm
Weight:24.4KG Size:429x359x345mm
Safety
For your safety, follow these precautions when using your CV300:
▪ Read User’s Manual guide carefully before using the machine for the first time.
▪ Do not use the CV300 on wet or hot surfaces, or near a heat source.
▪ Do not immerse machine or power cord in water or any other liquid.
▪ Plug CV300 into grounded power sources only, do not use extension
cord.
▪ To disconnect, unplug directly from power source. Do not disconnect
by pulling on cord.
▪ Do not operate appliance with damaged power cord.
▪ Only use the CV300 for its intended use.
▪ During the machine working, do not touch the vacuum lid, vacuum chamber and
seal bar to avoid getting bruised, burns or damaging the machine.
▪ This appliance is not intended for use by persons (including children) with reduced
physical, sensory or mental capabilities, or lack of experience and knowledge,

-8-
unless they have been given supervision or instruction concerning use of the
appliance by a person responsible for their safety.
▪ Children should be supervised to ensure that they do not play with the appliance.
▪ If the supply cord is damaged, it must be replaced by the manufacturer, its
service agent or similarly qualified persons in order to avoid a hazard.
Maintenance
▪ Unplug before cleaning.
▪ Regularly clean appliance with damp cloth and mild soap to remove crumbs, dust,
debris.
Getting Started with Vacuum Packaging
If you are part of the food processing or food service industry, there is a good chance
that you already know the advantages of vacuum packaging. It has been used with
success for many years as a safe and cost effective method for extending shelf life
and maintaining the quality of food products. If vacuum packaging is new to your
home or business, you will soon wonder how you lived without it!
Whether you are a beginner or expert, there are certain basic guidelines that should
always be followed in order to package foods safe to eat. Neglecting these basic
guidelines can result in food spoilage, and in some cases, illness or death.
Once you familiarize yourself with the CV300 procedures, you will feel at ease using
the Chamber Machine and enjoy a higher quality of stored foods.
▪ Package only fresh foods. Do not package old or rancid foods. An already bad
product does not improve with vacuum packaging.
▪ Fresh foods (Meats, vegetables, cheeses, etc.) should be refrigerated at 34˚F or
below or frozen after vacuum packaging.

-9-
▪ Vacuum packaging removes a high percentage of air. This slows the growth of
most living microorganisms, which degrade food, such as aerobic bacteria and
molds. However, some forms of bacteria such as clostridium botulinum
(responsible for botulism) are anaerobic and grow in the absence of oxygen.
▪ The foods susceptible to botulinum should be refrigerated for a short term and
frozen for long-term storage. Consume immediately after heating.
▪ Vegetables such as cauliflower, broccoli and cabbage will emit gasses when
vacuum sealed. To prepare these foods for vacuum packaging, you must blanch
them first.
▪ All perishable foods must be refrigerated or frozen to prevent spoilage.
▪ Vacuum packaging is not a substitute for canning.
Packaging with Vacuum Pouches
With the CV300, you can easily package a wide variety of sizes and shapes. You
can also prep and store smaller individual serving portions as well as bulk items.
▪ Keeps food fresh 3-5 times longer than conventional storage bags.
▪ Several sizes available to meet your packaging needs.
▪ Terrific for hundreds of applications in and out of the kitchen.
▪ Safe for freezer, refrigerator and microwave use. Pouches can also be boiled.
▪ Pouch thickness available in standard 3mil or heavy duty 4mil.
▪ Pouches are economically priced, giving you a better value.
▪ Vegetables must be blanched before being packaged. Place in boiling water or
microwave until heated through but still crunchy. Vacuum package as normal.

-10-
Operating Instructions
Preparations
▪ Read the user manual carefully before use.
▪ Plug in grounded power socket.
▪ Open the lid, press Power button, the machine is ready to work, LED will show
the working mode last time. Now use the machine for vacuum packing.
How To Vacuum And Seal With Bags
1. Select vacuum bag
Select the proper size vacuum pouch. Allow a minimum of 1” to 2” of extra
headspace at the top of the pouch to ensure quality, air-tight seal.
2. Select Seal mode and set seal time
Press Set button, when the indicator light of Seal Time in on, the seal mode is
selected. Press “ ” “ ” button to increase or decrease seal time, time range
is 0~6 seconds.
3 Select Vacuum Degree
Press Vacuum Level, select the vacuum degree needed. There are 6 options:
Max (29.3inHg), High (29.0inHg), Medium (27.5inHg), Low (26.0inHg), Minimum
(23.5inHg) and Adjustable. Indicator light will be on according to the selected
vacuum degree. When select the Adjustable option, press “ ” “ ” button to
set any degree between 23.5~29.3inHg
4. Put the vacuum bag with items into the vacuum chamber.
a. Ensure the height of packing bag with liquid or moist food should be less than
the height of the sealing bar.
b. Lay down the packing bag, ensure the bag mouth should be across the

-11-
sealing bar.
c. Open the clip in the front of the chamber, clip the underside of the bag mouth
and press down the clip to lock the bag.
Note: the whole bag including the bag mouth should be within the vacuum
chamber.
5 Working Process (Vacuum-Seal)
a. Close the lid, press Start button, ready for Vacuum-Seal.
b. Pump starts to work. The indicator light of the preset vacuum degree starts to
blink (when the vacuum degree reaches at the preset degree, the indicator
light will be constant on). The number on the LED will count up from 0 to
preset vacuum degree (when it is up to 5 and 19, the machine will beep).
c. When the vacuum is finished, the machine will enter into Seal mode
automatically. LED shows the preset seal time, and starts to count down to 0.
When Sealing is finished, the machine starts to release air.
d. When the machine beeps three times, the whole process is finished. The
machine will be back to ready-to-work mode. The LED and indicator lights
will show accordingly.
Note: during the above b process, press Seal button, it will enter into Seal mode
in advance.
How to vacuum marinate with bag or canister
1. Select the packing bag or container
Packing bag: choose packing bag with suitable size. Allow a minimum of 1” to 2”
of extra headspace at the top of the pouch to ensure quality, air-tight seal.
Container: choose the container with correct size which can be put into the
vacuum chamber.
2. Select Marinate mode and set the marinate time
Press Set button, when Marinate time indicator light is on, the Marinate mode

-12-
is selected. Press “ ” “ ” button to increase or decrease the marinate time.
The time range is 9~99 minutes.
3 set vacuum Degree
Press Vacuum Level, select the vacuum degree needed. There are 6 options:
Max (29.3inHg), High (29.0inHg), Medium (27.5inHg), Low (26.0inHg), Minimum
(23.5inHg) and Adjustable. Indicator light will be on according to the selected
vacuum degree. When select the Adjustable option, press “ ” “ ” button to
set any degree between 23.5~29.3inHg
4. put the packing bag or container into the vacuum chamber
Packing Bag
:
a. Ensure the height of packing bag with liquid or moist food should be less than
the height of the sealing bar.
b. Lay down the packing bag, ensure the bag mouth should be across the
sealing bar.
c. Open the clip in the front of the chamber, clip the underside of the bag mouth
and press down the clip to lock the bag.
Note: the whole bag including the bag mouth should be within the vacuum
chamber.
Container: put the container with items inside into the vacuum chamber. If the
container is with a lid, take away the lid to ensure the container is connected with the
vacuum chamber.
5 Working Process (Vacuum-Marinate)
a、Close the vacuum lid, machine starts to run and enter into the
Vacuum-Marinate mode. One cycle is for 9 minutes; maximum is 11 cycles
(99 minutes). The process is: vacuum—keep vacuum—release. Vacuum
and release time is about 1 minute. Keep-vacuum time is about 8 minutes.
b、Pump starts to work. The indicator light of the preset vacuum degree starts to
blink (when the preset vacuum degree is reached, the indicator light will be
constant on). The number on LED will count up from 0 to the preset vacuum
degree (the machine will beep when the degree is up to 5 and 19).

-13-
c、When vacuum process is finished, machine enters into Marinate mode (keep
vacuum). The marinate time showing in the LED display will count down by 1
minute each. When the number is counted down to a multiple of 9, the
vacuum chamber starts to release air. After the release finished, repeat the
Vacuum-Marinate mode, till the number counts down to 0. The whole
process is finished.
d、When machine beeps three times, the whole working process is finished.
Machine will be back to ready-to-work mode. Display and indicator lights will
show accordingly.
Note: during the above b or c process, press Seal button, machine enters into
seal mode.
Food Storage and Safety Information
The CV300 will revolutionize the way you buy and store food. Because vacuum
packaging works to eliminate freezer burn and slow food spoilage, you are now able
to take advantage of buying food in bulk without the threat of food waste.
Vacuum packaging with the CV300 removes up to 90% of the air from the package.
This will help keep food fresher up to 5 times longer than under normal
circumstances. Dry foods like pasta, cereals and flour will stay fresh from start to
finish. Plus vacuum packaging prevents weevils and other insects from infesting dry
goods. Package only the freshest foods possible.
However, please keep in mind that not all foods benefit from vacuum packaging.
Never vacuum package garlic or fungi like mushrooms. A dangerous chemical
reaction takes place when air is removed, causing these foods to be dangerous if
ingested. Vegetables should be blanched before packaging to kill any enzymes that
may cause deterioration of out-gassing when vacuumed.

-14-
Foods
Vacuum Freezer
Storage
Vacuum Fridge
Storage Typical Storage
Fresh Beef & Veal
1-3 years 1 month 1-2 weeks
Ground Meat 1 year 1 month 1-2 weeks
Fresh Pork 2-3 years 2-4 weeks 1 week
Fresh Fish 2 years 2 weeks 3-4 days
Fresh Poultry
2-3 years 2-4 weeks 1 week
Smoked Meats 3 years 6-12 weeks 2-4 weeks
Fresh Produce,
Blan
ched
2-3 years 2-4 weeks 1-2 weeks
Fresh Fruits 2-3 years 2 weeks 3-4 days
Hard Cheeses 6 months 6-12 weeks 2-4 days
Sliced Deli Meats
not recommended
6-12 weeks 1-2 weeks
Fresh Pasta
6 months 2-3 weeks 1 week
Troubleshooting
Under the proper circumstances, your CV300 will give you top-notch vacuum
performance. In some instances, problems may arise. Please consult the
troubleshooting menu before calling customer support.
CV300 will not turn on
▪ Ensure that the machine is properly plugged into a grounded outlet.
▪ Check the power cord for tears and frays. Do not use machine if power cord is
damaged.
▪ Make sure the Power button was properly pressed. LED screen will be
illuminated when on.
CV300 does not pull a complete vacuum with pouch
▪ Vacuum/seal time may not be set high enough. Set vacuum and seal times
higher and vacuum again.
▪ To vacuum and seal properly, the opening of pouch must be within the vacuum
chamber.
▪ If packaging from a roll pouch, make sure first seal is complete and there are no

-15-
gaps in either seal.
▪ CV300 and vacuum pouch need to be clean, dry and free of debris for the
vacuum process to be successful. Wipe surface of seal bar and inside of pouch
and try again.
Vacuum pouch loses vacuum after being sealed
▪ Sharp items can puncture small holes in pouches. To prevent this, cover sharp
edges with paper towel and vacuum in a new pouch.
▪ Some fruits and vegetables can release gases (out-gassing) if not properly
blanched or frozen before packaging. Open pouch. If you think food spoilage has
begun, discard food. If food spoilage has not yet begun, consume immediately. If
in doubt, discard food.
CV300 is not sealing pouch properly
▪ Seal time may not be long enough. Increase seal time and try again.
▪ Pouches will not seal if any moisture, food particles or debris are present in the
seal area. Wipe the inside of the pouch clean and try again.
▪ Pouch must be properly placed along the seal bar. Make sure the entire pouch is
over the seal bar and there are no wrinkles in pouch material.

-16-
CV300 Error Code and Repairing
CV300 Error Code
Error code Alert reason
Repairing
E01
When the machine
vacuum for some time,
the two pressure
switches do not close.
1.Check if the vacuum lid is close;
2.Check if the sealing gaskets are
assembled correctly;
3.Check if the pump still works;
4.Check if the pressure switches
are still good (check the
connecting pipe, pressure
switches, 10P data cable, etc.)
E02
When the machine enters
into Seal mode, the
micro-switch does not
close.
1.Check if the vacuum lid is close;
2.Check if the micro-switch is
correct (GAS1 connecting wire,
micro-switch, 10P data cable,
etc.)
Thank you for purchasing the Chamber Vacuum Sealer CV300.
Happy Vacuuming!
Table of contents
Popular Food Saver manuals by other brands

Texas Automation Products
Texas Automation Products PM-30 quick start guide

Hatco
Hatco FLAV-R-FRESH FDWD Series Installation and operating manual

Grainger
Grainger 7J823 Operating instructions and parts manual

Imetec
Imetec B6201 Instructions for use

FoodSaver
FoodSaver V1080 quick start

Agilent Technologies
Agilent Technologies G5585B Installation checklist