Curtis DF7003-UL User manual

MODEL: DF7003-UL
ITEM:EAF300-BLACK

1
IMPORTANT SAFEGUARDS
When using electrical appliances, basic safety precautions should always be followed,
including the following:
1. READ ALL INSTRUCTIONS.
2. Do not touch hot surfaces. Use handles or knobs.
3. To protect against electric shock do not immerse cord, plugs, or appliance in water
or other liquid.
4. This appliance is not intended for use by persons (including children) with reduced
physical, sensory or mental capabilities, or lack of experience and knowledge, unless
they have been given supervision or instruction concerning use of the appliance by a
person responsible for their safety.
5. Children should be supervised to ensure that they do not play with the appliance.
6. Unplug from outlet when not in use and before cleaning. Allow to cool before
putting on or taking off parts, and before cleaning the appliance.
7. Do not operate any appliance with a damaged cord or plug or after the appliance
malfunctions, or has been damaged in any manner. Bring it to a qualified technician for
examination, repair or electrical or mechanical adjustment.
8. The use of accessory attachments not recommended by the appliance
manufacturer
may cause injuries.
9. Do not use outdoors.
10.Do not let cord hang over edge of table or counter, or touch hot surfaces.
11. Do not place on or near a hot gas or electric burner, or in a heated oven.

2
12. Extreme caution must be used when moving an appliance containing hot oil or
other
hot liquids.
13. To disconnect, turn both the timer dial and temperature dial to OFF. Then remove
plug from wall outlet.
14. Do not use appliance for other than intended use.
15. Make sure the frying basket is locked into the front of the drawer –both frying
basket handle tabs must be fully inserted into the trenches on the top of the basket
drawer.
16. Always make sure frying basket drawer is fully closed, with frying basket handle
locked securely in the drawer, while Air Fryer is in operation.
WARNING: Air Fryer will not operate unless frying basket drawer is fully closed.
CAUTION: After hot air frying, the frying basket and frying basket drawer and the
cooked foods are hot. Extreme caution must be used when handling the hot Air Fryer
basket/drawer.
17. Oversize foods or metal utensils must not be inserted in a air fryer as they may
create a fire or risk of electric shock."
18. A fire may occur if the air fryer is covered or touching flammable material,
including curtains, draperies, walls, and the like, when in operation. Do not store any
item on top of the appliance when in operation."
19. Do not clean with metal scouring pads. Pieces can break off the pad and touch
electrical parts involving a risk of electric shock.
20. Do not store any materials, other than manufacturers recommended accessories, in
this oven when not in use.

3
21. Do not place any of the following materials in the oven: paper cardboard, plastic,
and the like.
FOR HOUSEHOLD USE ONLY
ADDITIONAL IMPORTANT SAFEGUARDS
CAUTION HOT SURFACES: This appliance generates heat and escaping steam during
use. Proper precautions must be taken to prevent the risk of burns, fires, or other
injury to persons or damage to property.
CAUTION: This appliance is hot during operation and retains heat for some time after
turning OFF. Always use oven mitts when handling hot materials and allow metal parts
to cool before cleaning. Do not place anything on top of the appliance while it is
operating or while it is hot.
1. All users of this appliance must read and understand this instruction manual before
operating or cleaning this appliance.
2. The cord to this appliance should be plugged into a 120V AC electrical outlet only.
3. If this appliance begins to malfunction during use, immediately unplug the cord. Do
not use or attempt to repair the malfunctioning appliance.
4. Do not leave this appliance unattended during use.
5. Do not immerse power cord in any liquid. If the power cord to this appliance is
damaged, it must be replaced by contacting Consumer Service.
6. Keep the cord out of reach from children and infants to avoid the risk of electric
shock and choking.
7. Place the Air Fryer on a flat, heat-resistant work area.
8. Do not obstruct the air outlet on the back side and the air inlet on the top of the Air

4
Fryer with any objects.
9. Keep appliance at least 4 inches away from walls or other objects during operation.
10. Always use the frying basket handle to open frying basket drawer.
11. Do not replace the empty frying basket drawer (without the frying basket) into the
Air Fryer body. Check to make sure the frying basket is locked in position in the drawer.
WARNING: After air frying, make sure to place the frying basket drawer on a flat,
heat-resistant surface before pressing the basket release button.
WARNING: Under- or over-filling the frying basket may damage the Air Fryer and could
result in serious personal injury.
12. Never move a hot Air Fryer or an Air Fryer containing hot food. Allow to cool
before moving.
SAVE THESE INSTRUCTIONS
NOTES ON THE CORD
The provided short power-supply cord should be used to reduce the risk resulting
from becoming entangled in or tripping over a longer cord. An extension cord is not
recommended for use with this product. Always plug directly into a wall
outlet/receptacle.
CAUTION: Do not use an extension cord
This appliance has a polarized plug (one blade is wider than the other). To reduce
the risk of electric shock, this plug is intended to fit into a polarized outlet only one
way. If the plug does not fit fully into the outlet, reverse the plug. If it still does not fit,
contact a qualified electrician. Do not attempt to modify the plug in any way.
PLASTICIZER WARNING
CAUTION: To prevent Plasticizers from migrating to the finish of the counter top or

5
table top or other furniture, place NON-PLASTIC coasters or place mats between the
appliance and the finish of the counter top or table top. Failure to do so may cause the
finish to darken; permanent blemishes may occur or stains can appear.
ELECTRIC POWER
If the electrical circuit is overloaded with other appliances, your appliance may not
operate properly. It should be operated on a separate electrical circuit from other
appliances.
Fig.1
Red power light
Green heat light
30 minute timer dial
Temperature control
dial(140°C/280°F to
200°C/400°F)
Clear button cover
Basket release button
Cool touch frying basket
handle
Frying basket drawer
Power cord
Air outlet

6
Control Dials
Temperature Control Dial
* Select air frying temperatures from 140℃/2800F to 200℃/4000F. Temperatures can
be adjusted at any time.
* The green HEAT ON light will turn off once the set temperature is reached.
* The green HEAT ON light and heating element cycle on and off to maintain the
selected temperature.
30 Minute Countdown Timer Dial
* Once the timer dial is set, the red POWER light will illuminate to show the Air Fryer is
powered on.
* To assure even cooking/browning, open the frying basket drawer halfway through
the cooking time. Check, turn or vigorously shake foods in the frying basket.
IMPORTANT: When you pull the drawer out from the Air Fryer body, the red POWER
light and the Air Fryer will turn OFF. The timer will continue to count down when the
drawer is opened.
Clear button cover
Basket release button
Removable frying basket
with cool touch handle
Frying basket drawer

7
Fig.3
* Heating will resume when the drawer is replaced.
* One beep will sound when the set time has reached 0. The Air Fryer will turn OFF
automatically. Both the red POWER light and the green HEAT ON light will turn off.
IMPORTANT: When all air frying is finished, turn both the temperature control dial and
the timer dial to MIN and 0 (OFF). Unplug the Air Fryer when not in use.
Before Using for the First Time
1.Your Air Fryer is shipped with the frying basket locked into the drawer, inside the
Air Fryer body. Firmly grasp the frying basket handle to open frying basket drawer;
then remove the drawer from the machine and place on a flat, clean work area.
2. To unlock and remove the frying basket from the drawer:
Open the clear button cover to expose the basket release
button. Press the basket release button with your thumb while
pulling the frying basket straight up and out of the drawer.
Refer to Figure 2.
3. Remove all packing material and labels from the inside and outside of the Air Fryer.
Check that there is no packaging underneath and around the frying basket and drawer.
4. Wash frying basket and drawer in hot, soapy water.
5. DO NOT IMMERSE THE AIR FRYER BODY IN WATER. Wipe Air Fryer body with a damp
cloth. Dry all parts thoroughly.
6. Lock the clean frying basket into the drawer.
There are 2 tabs on each side of the handle.
Slide the 2 handle tabs into the trenches on the top of
the basket drawer. An audible click can be heard as
the frying basket handle locks securely into place.
Fig.2

8
Refer to Figure 3.
IMPORTANT: put down the button cover over the basket release button to prevent
accidental frying basket release.
Operating Instructions
WARNING! This unit should not be used to boil water.
NOTE: During first use, the Air Fryer may emit a slight odor. This is normal.
1. Place the Air Fryer on a flat, heat-resistant work area, close to an electrical outlet.
2. Firmly grasp the frying basket handle to open frying basket drawer; then remove the
drawer from the machine and place on a flat, clean surface.
3. Place food into the frying basket. Do not overfill frying basket with food. To ensure
proper cooking and air circulation, NEVER fill any frying basket more than 2/3 full.
When air frying fresh vegetables, we do not recommend adding more than 3 cups of
food to the frying basket.
4. Insert the assembled frying basket drawer into the front of the Air Fryer. Always
make sure frying basket drawer is fully closed.
5. Plug cord in the wall outlet.
6. Select air frying temperature from 140℃/2800F to 200℃/4000F.
7. Turn timer dial to the desired air frying time plus 5 minutes for preheat if the Air
Fryer is cold. The red POWER light will illuminate; the Air Fryer will begin heating.
IMPORTANT: The Air Fryer will not heat if the timer dial has not been set.
WARNING: Air Fryer will not heat -- the red POWER light will remain off, until frying
basket drawer is fully closed.
8. The green HEAT ON light will turn on when set temperature is reached.
NOTE: During air frying, the green HEAT ON light will cycle on and off as proper air

9
frying temperature is maintained.
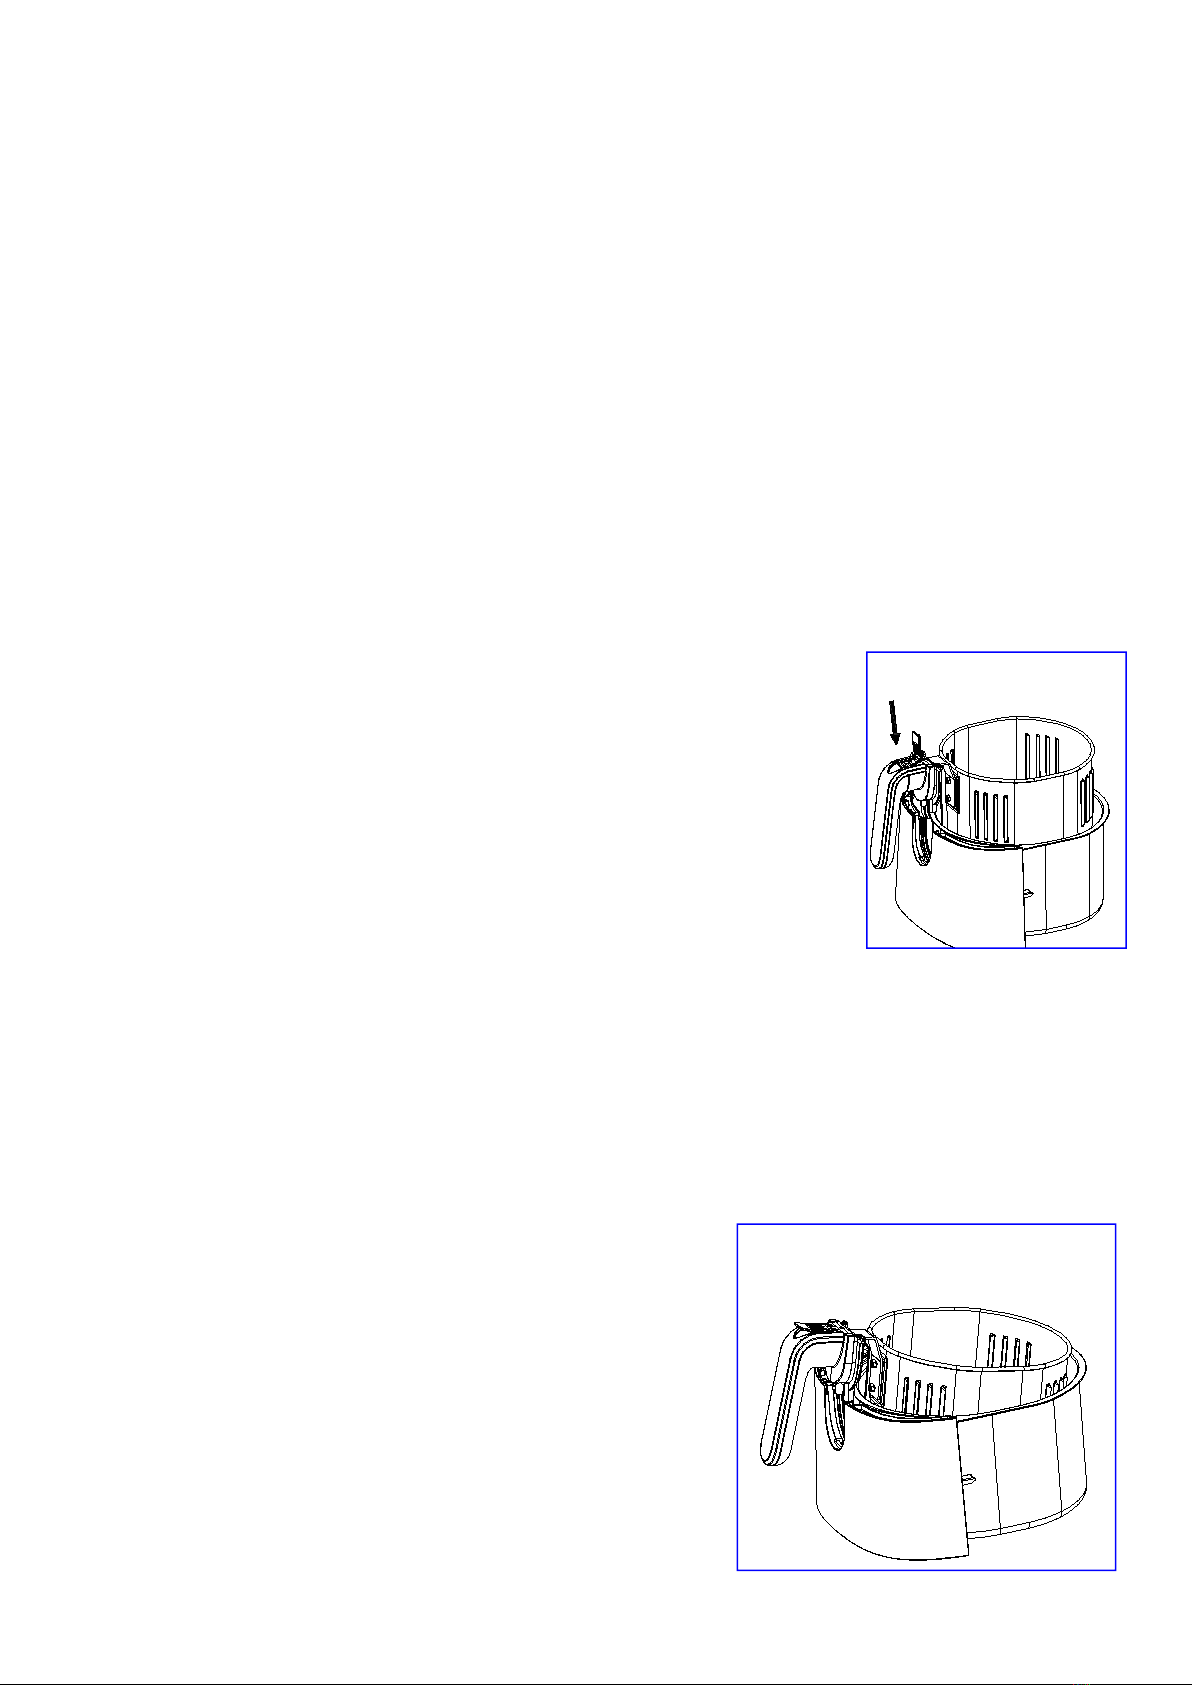
9. To assure even cooking/browning, open the basket drawer halfway through the
cooking time and check. Lift frying basket from frying basket drawer in order to turn or
shake foods in the frying basket. Once complete, return the frying basket into frying
basket drawer. Adjust temperature if needed. The timer will continue to count down
when the drawer is opened, but the Air Fryer will stop heating until the drawer is
replaced.
CAUTION: Make sure the basket is in the locked position when shaking foods for the
Air Fryer. To avoid damage to persons or personal property, do not press the basket
release button while shaking the frying basket.
WARNING: Extreme caution must be used when handling the hot frying basket and
drawer. Avoid escaping steam from the frying basket and the food.
CAUTION: Always use oven mitts when handling the hot air fryer basket.
CAUTION: Hot oil can collect at the base of the drawer. To avoid risk of burns or
personal injury, or to avoid oil from contaminating air fried foods, always unlock and
remove the frying basket from the drawer before emptying.
NEVER turn the drawer upside down with the frying basket attached.
NOTE: The Air Fryer can be turned OFF at any time by turning the timer dial to 0.
10. One beep will sound when the set air frying time has expired. The Air Fryer will
turn OFF automatically. Both the red POWER light and the green HEAT ON light will
turn off.
11. Shake the frying basket/drawer vigorously and check food for browning and
doneness. If additional air frying is needed, adjust temperature if desired, and set
timer for 5 minute increments until fully cooked.

10
12. Allow cooked food to rest for 5 to 10 seconds before removing basket drawer from
Air Fryer or food from frying basket.
13. When air frying is finished, remove the drawer from the machine and place on a
flat, heat resistant surface. Then remove frying basket from the drawer.
14. Shake air fried foods out onto serving area. Promptly return the frying basket to
the drawer and lock into place. Continue with subsequent batches, if any.
NOTE: When the next batch is ready, the Air Fryer’s 1400 watt heating system will
quickly heat and recover.
15. When all air frying is completed, turn both the temperature control dial and the
timer dial to MIN or 0 (OFF). Both the red POWER light and the green HEAT ON light
will turn off.
16. Unplug the Air Fryer when not in use.
Helpful Hints
1. Olive oil spray or vegetable oil works well for air frying.
2. Use your Air Fryer to cook pre-packaged foods with a fraction of the oil, in a fraction
of the time! As a general rule, lower the recipe baking temperature by 10℃/250F and
reduce the cooking time by 30% to 50% depending on the food and amount.
3. Do not overfill frying basket with food. NEVER fill any frying basket more than 2/3
full. When air frying fresh vegetables, we do not recommend adding more than 3 cups
of food to the frying basket.
4. For best results, some foods need to be shaken vigorously or turned over during the
air fry time. Consult the Air Frying Chart following as a general guide.
5. To avoid excess smoke, when cooking naturally high fat foods, such as chicken wings
or sausages, it may be necessary to empty fat from the frying basket drawer between

11
batches.
6. Always pat food dry before cooking to encourage browning and avoid excess smoke.
7. Air fry small batches of freshly breaded foods. Press breading onto food to help it
adhere. Arrange in frying basket so that food is not touching to allow air flow on all
surfaces.
8. The Air Fryer can be used to reheat food. Set the temperature to 140℃/2800F for
up to 10 minutes.
Air Frying Chart
WARNING! ALWAYS USE A MEAT THERMOMETER TO ENSURE THAT MEAT, POULTRY
AND FISH ARE COOKED THOROUGHLY BEFORE EATING. The following chart is intended
as a guide only. The quantity of food air fried at one time, the thickness or density of
the food, and whether the food is fresh, thawed, or frozen may alter the total cooking
time necessary.
1.To assure even cooking/browning, open the frying basket drawer halfway through
the cooking time. Check, turn or vigorously shake foods in the frying basket. This chart
lists average total air frying time, the time at which some action is required, and what
action is to be taken for best results.
2. Remember, frying smaller batches will result in shorter cooking times and higher
food quality. Adjust air frying temperatures and times as necessary to suit your taste.
IMPORTANT NOTE: Unless food is pre-packaged and pre-oiled, for browned and crispy
results, all foods should be lightly oiled before air frying.
* Oil may be sprayed or brushed onto foods.
* Spray oils work well as oil is evenly distributed and smaller quantities of oil are
needed.

12
* To ensure crispy results, make sure foods are dried before adding oil.
* Cut pieces smaller to create more surface area for crispier results.
* Blanching is a term that refers to pre-cooking foods at a lower temperature before
the final air fry.
* Add 5 minutes to the AIR FRY TIME to allow the Air Fryer to preheat.
LEASE NOTE:
The USDA recommends that meats such as beef and lamb, etc. should be cooked to
an internal temperature of 63oC/ 145oF. Pork should be cooked to an internal
FOOD
TEMP
AIR FRY TIME
ACTION
Mixed Vegetables (roasted)
200℃/4000F
15-20 minutes
shake
Broccoli (roasted)
200℃/4000F
15-20 minutes
shake
Onion Rings (frozen)
200℃/4000F
12-18 minutes
shake
Cheese Sticks (frozen)
180℃/3600F
8-12minutes
-
Fried Sweet Potato Chips (fresh,hand cut,1/8 to 1/16-in.thick)
Blanch (Step1)
160℃/3200F
15 minutes
shake
Air Fry (Step2)
180℃/3600F
10-15 minutes
shake
French Fries, (fresh,hand cut,1/4 to 1/3-in.thick)
Blanch (Step1)
160℃/3200F
15 minutes
shake
Air Fry (Step2)
180℃/3600F
10-15 minutes
shake
French Fries,thin (frozen)3 cups
200℃/4000F
12-16 minutes
shake
French Fries,thin (frozen)3 cups
200℃/4000F
17-21 minutes
shake
Meatloaf,1 lb
180℃/3600F
35-40 minutes
-
Hamburgers,1/4 lb.(UP to 4)
180℃/3600F
10-14 minutes
-
Hot Dogs /Sausages
180℃/3600F
10-15 minutes
turn over
Chicken Wings(fresh/thawed)
Blanch (Step 1)
160℃/3200F
15 minutes
shake
Air Fry (Step2)
180℃/3600F
10 minutes
shake
Chicken Tenders/Fingers
Blanch (Step 1)
180℃/3600F
13 minutes
turn over
Air Fry (Step2)
200℃/4000F
5 minutes
shake
Chicken pieces
180℃/3600F
20-30 minutes
turn over
Chicken Nuggets (frozen)
180℃/3600F
10-15 minutes
shake
Catfish Fingers(thawed,battered)
200℃/4000F
10-15 minutes
turn over
Fish Sticks (frozen)
200℃/4000F
10-15 minutes
turn over
Apple Turnovers
200℃/4000F
10 minutes
-
Donuts
180℃/3600F
8 minutes
turn over
Fried Cookies
180℃/3600F
8 minutes
turn over

13
temperature of 71oC/160oF and poultry products should be cooked to an internal
temperature of 77oC/170oF - 82oC/180oF to be sure any harmful bacteria has been
killed. When reheating meat/poultry products, they should also be cooked to an
internal temperature of 74oC/165oF.
User Maintenance Instructions
This appliance requires little maintenance. It contains no user-serviceable parts. Any
servicing requiring disassembly other than cleaning must be performed by a qualified
appliance repair technician.
Care & leaning Instructions
WARNING! Allow the Air Fryer to cool fully before cleaning.
1.Unplug the Air Fryer. Remove frying basket from the drawer. Make sure the frying
basket drawer and frying basket have cooled completely before cleaning.
2.Wash the basket drawer and frying basket in hot soapy water. Do not use metal
kitchen utensils or abrasive cleansers or cleaning products as this may damage the
non-stick coating.
3. The frying basket and frying basket drawer are dishwasher-safe. For best results,
place in the top rack of your dishwasher to clean.
4. Wipe the Air Fryer body with a soft, non-abrasive damp cloth to clean.
Storing Instructions
1.Make sure the Air Fryer is unplugged and all parts are clean and dry before storing.
2. Never store the Air Fryer while it is hot or wet.
3. Store Air Fryer in its box or in a clean, dry place.

MODEL: DF7003-UL
ITEM:EAF300-BLACK
1400W

To make a warranty claim, do not return this product to the store. Please email
support@curtiscs.com or call 1-800-968-9853.
1 Year Warranty
This product is warranted to be free from defects in material and workmanship for a
period of one (1) year from the date of original purchase. During this period, your
exclusive remedy is repair or replacement of this product or component found to be
defective, at our option; however, you are responsible for all costs associated with
returning the product to us. If the product or component is no longer available, we will
replace with a similar one of equal or greater value. Prior to a replacement being sent,
the product must be rendered inoperable or returned to us.
This warranty does not cover glass, filters, wear from normal use, use not in conformity
with the printed directions., or damage to the product resulting from accident, alteration,
abuse, or misuse. This warranty extends only to the original consumer purchaser or gift
recipient. Keep the original sales receipt, as proof of purchase is required to make a
warranty claim. This warranty is void if the product is used for other than single-family
household use or subjected to any voltage and waveform other than as on the specified
rating on the label (e.g., 120V~60Hz).
We exclude all claims for special, incidental, and consequential damages caused by
breach of express or implied warranty. All liability is limited to the amount of the
purchase price. Every implied warranty, including any statutory warranty or
condition of merchantability or fitness for a particular purpose, is disclaimed
except to the extent prohibited by law, in which case such warranty or condition is
limited to the duration of this written warranty. This warranty gives you specific legal
rights. You may have other legal rights that vary depending on where you live. Some
states or provinces do not allow limitations on implied warranties or special, incidental, or
consequential damages, so the foregoing limitations may not apply to you.
For faster service, locate the model, type, and serial numbers on your appliance.
This manual suits for next models
1
Table of contents
Other Curtis Fryer manuals
Popular Fryer manuals by other brands

Crux
Crux 3.0QT instruction manual

Rommelsbacher
Rommelsbacher FRT 2145/E Series instruction manual

DeLonghi
DeLonghi D14427 DZ Instructions for use

GoWISE USA
GoWISE USA GW22921 instruction manual

Vulcan-Hart
Vulcan-Hart 1ER50C Installation and operation manual

Aroma
Aroma ADF-175RN Instruction manual & cooking guide