Cycle Country 18-0010 User manual

1701 38TH AVE W
PO BOX 257
SPENCER, IA 51301
PHONE: 712-262-4191
FAX: 712-262-0248
SERVICE: 800-841-2222
E-MAIL: ccac@cyclecountry.com
www.cyclecountry.com
UTV
HEAVY DUTY
PUSH TUBE KIT
Owner’s Manual
MODEL NUMBER: 18-0010
CUSTOMER MUST RECEIVE A COPY OF THIS
OWNER’S MANUAL AT TIME OF SALE
© 2004 Cycle Country Accessories Corp.
Rev. 6
10/3/07
MAN0018

2
OPERATING INSTRUCTIONS
READ BEFORE OPERATING
WARNING !
TO AVOID SERIOUS INJURY OR DEATH:
1. DO NOT EXCEED 5 MPH WITH BLADE OR MOUNTING BRACKET(S) INSTALLED.
2. DUE TO REDUCED GROUND CLEARANCE, REMOVE THE PLOW MOUNTING BRACKET(S) BEFORE TRAIL RIDING.
3. OPERATE WITH EXTREME CAUTION ON SLOPES, STEEP GRADES, AND ROUGH TERRAIN.
4. KEEP AWAY FROM BLADE AND MOVING PARTS DURING OPERATION.
5. WHEN PLOWING SNOW OR DIRT INTO A PILE, START BACKING UP BEFORE RAISING THE BLADE.
6. DO NOT RAM THE BLADE INTO THE PILE.
7. BE AWARE OF POSSIBLE HIDDEN OBJECTS UNDER SNOW.
CAUTION
TO AVOID PERSONAL INJURY:
1. READ BLADE OWNER’S MANUAL, UTV OPERATOR’S MANUAL, AND SAFETY DECALS BEFORE OPERATING.
2. WEAR HEAD PROTECTION, SAFETY GLASSES, AND SHOES AS RECOMMENDED IN UTV OPERATOR’S MANUAL.
3. DO NOT ALLOW RIDERS ON BLADE OR UTV WHILE MOVING OR STATIONARY.
4. KEEP BYSTANDERS AWAY FROM BLADE OR UTV WHILE MOVING OR STATIONARY.
5. BEFORE ADJUSTING BLADE ANGLE, STOP UTV ENGINE, SET AND LOCK BRAKES, RAISE BLADE IN UP POSITION.
6. WHEN BLADE IS NOT IN USE, STOP UTV ENGINE, SET AND LOCK BRAKES, AND LOWER BLADE TO DOWN POSITION.
7. ONLY MATURE ADULTS OVER THE AGE OF 16 SHOULD OPERATE THE MACHINERY.
8. DO NOT USE THIS EQUIPMENT AT NIGHT OR WHEN VISIBILITY IS POOR UNLESS YOUR UTV HAS ADEQUATE
LIGHTING.
9. DUE TO THE EXTRA LENGTH OF THE 72” (1.83 m) BLADE, LOSS OF DIRECTIONAL CONTROL MAY RESULT WHEN
PUSHING HEAVY MATERIAL. USE CAUTION!
OPERATION TIPS
¾For best results set the suspension to the stiffest setting if possible.
MAINTENANCE
¾Periodically check for wear and tightness of all fasteners. Replace or tighten as necessary. Grease all pivot points
and hinges as needed.
NOTICE
¾The use of winch mounting kits not manufactured by Cycle Country Accessories with Work Power Blades will void
all warranties.
¾The Cycle Country Winch Kits are specifically designed to help prevent damage to the Plows, Winch Kits and
ATV's.
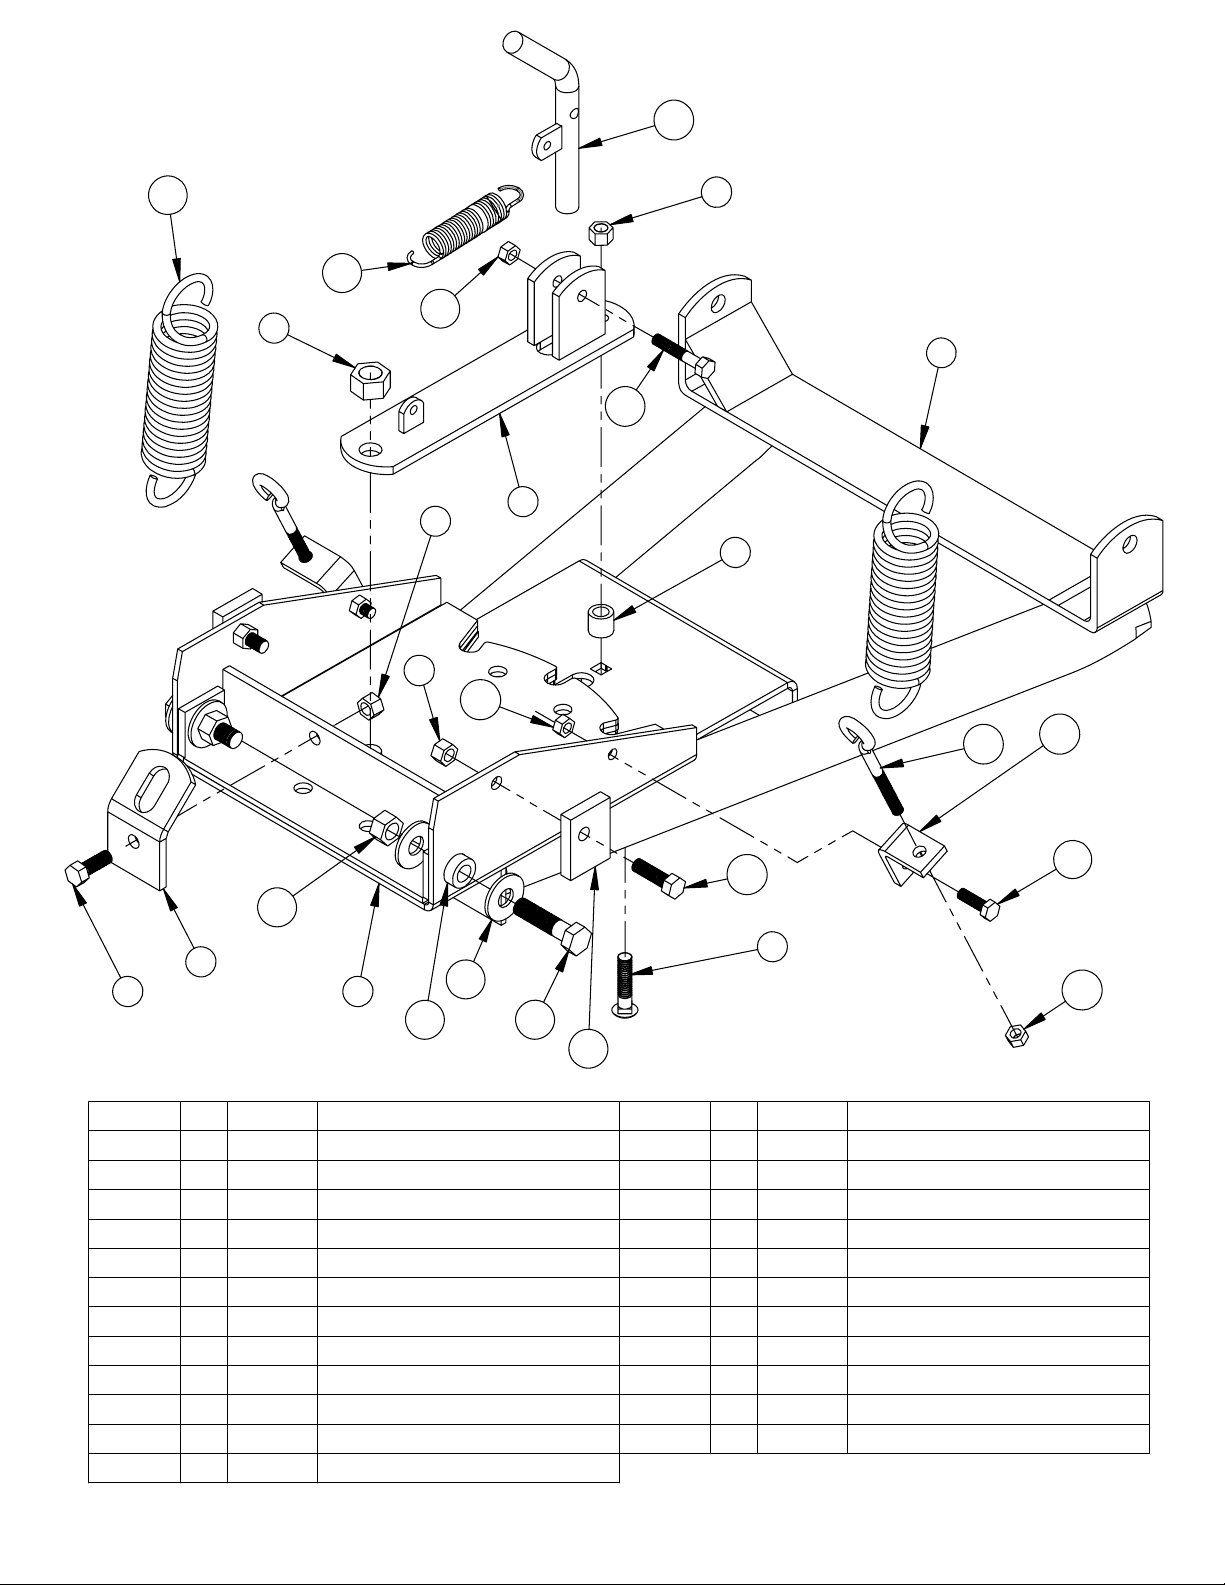
All references to right and left are relative to an operator sitting on the machine.
OPERATION
Your blade and hardware were designed with your safety in mind. In order to protect you and your UTV, certain parts of the
blade and/or hardware are designed to fail when the equipment is over stressed. For this reason the push tubes, blade hinges,
foot peg brackets, push plate attaching pins and clevis pins are not covered by warranty.
1. The blade angle is adjustable. To rotate the blade left, right or straight, lock blade in the up position, pull the blade
position lever ahead and turn the blade to the desired position. The lever will spring back when the blade is at the correct
angle.
2. The blade skids are adjustable to set the desired clearance between the plow and the ground.
3. The blade is designed to trip when it strikes an object or digs in too far. When pressure is released the blade springs back
into position. Blade spring tension may be set stiffer by tightening the locknuts on the bottom of the eyebolts. For less
spring tension, loosen the locknuts.

3
THANK YOU FOR YOUR PURCHASE OF OUR
UTV
HEAVY DUTY PUSH TUBE
MODEL NUMBER 18-0010
TO HAVE A COMPLETE PLOW ASSEMBLY, YOU MUST HAVE AT LEAST FOUR BOXES:
1. MODEL SPECIFIC ATTACHING HARDWARE KIT TO ATTACH
HEAVY DUTY PUSH TUBE TO UTV.
2. UNIVERSAL PUSH TUBE MODEL NUMBER 18-0010
3. BLADE OF YOUR CHOICE (COLOR, STYLE, & SIZE)
4. WINCH TO RAISE AND LOWER YOUR BLADE

22
4
1
23
20
11
8
7
17
2
4
5
3
18
15
16
13
6
9
19 5
21 12
512 10
14
18-0010
Parts List
12
ITEM NO. QTY. PART NO. DESCRIPTION
1 1 CYC4963 Universal Push Tube Weldement
2 1 CYC3810 Lift Bracket
3 1 CYC3799 Blade Hinge
4 1 PUR1140 3/8" x 1" Bolt
5 4 PUR1272 Nut 3/8" Nylock
6 1 CYC3798 Blade Position Lever Bracket
7 1 PUR1188 Carriage Bolt 3/8" x 1 3/4"
8 1 CYC3835 Spacer
9 1 PUR1283 Nut 5/8" Nylock
10 2 CYC0812 Blade Spring Bracket
11 2 PUR1155 5/16" x 1" Bolt Gr 5
12 5 PUR1275 Nut 5/16" Nylock
ITEM NO. QTY. PART NO. DESCRIPTION
13 2 CYC0813 Blade Stop
14 2 PUR1142 3/8" x 1-1/4" Bolt
15 2 PUR1111 1/2" x 2" Bolt
16 4 PUR1233 1/2" Flatwasher
17 2 CYC0497 1/2" x 7/8" x 3/4" Spacer
18 2 PUR1260 Lock Nut 1/2" Yellow
19 2 PUR1409 Blade Spring
20 2 PUR1216 5/16" x 4-1/4" Eye Bolt
21 1 PUR1437 Belt Tension Spring
22 1 CYC2259 Blade Position Lever
23 1 PUR1159 5/16" x 1-3/4" Bolt

5
UTV HEAVY DUTY PUSH TUBE
Model Number 18-0010
Push Tube Assembly
Secure the Heavy Duty UTV Push Tube (Item 1) to the attaching bracket(s) on your
UTV using the 1/2” clevis pins provided in the attaching bracket kit.
Secure the lift bracket (Item 2) to the blade hinge (Item 3) using the 3/8” x 1” bolt
(Item 4) and locknut as shown in the parts list.
Secure the blade position lever bracket (Item 6) and the blade hinge (Item 3) to the
push tube (Item 1) using supplied bolt (Item 7), spacer (Item 8) and locking nuts
(Item 5, 9) as shown in the parts list.
Blade Connection
Fasten the blade spring brackets (Item 10) to the blade hinge, using the 5/16” x 1”
bolts (Item 11) and locknuts (Item 12) as shown in the parts list. Do not tighten
fully at this time.
Install the blade stops (Item 13) as shown on page 4 using the 3/8” x 1-1/4” bolts
(Item 14) and locknuts (Item 5). The forward angle of the blade can be set to one of
four positions by turning the blade stops to the desired position. It is recommended
that the top edge of the blade be directly above the bottom edge.

To secure the blade to the blade hinge (Item 3), place the 7/8” spacer (Item 17) into
the holes in the blade hinge. Secure the blade hinge to the blade with the 1/2" x 2"
bolts (Item 15), flatwashers (Item 16) and locknuts (Item 18). Tighten the nuts to 60
foot pounds of torque.
Hang the two blade springs (Item 19) from the top holes in the blades ribs. See
picture below for proper spring orientation. Place the eyebolts (Item 20) onto the
springs and fasten the eyebolts to the blade spring attaching brackets using the two
locknuts (Item 12). Tighten nuts holding blade spring brackets to the blade hinge at
this time.
Blade
Spring
Brackets
The spring tension may be increased or decreased by tightening or loosening the
locknuts on the eyebolts. The spring tension determines the force required to tilt the
plow forward when the bottom edge strikes an object.
Install the blade position lever (Item 21) and blade position spring (Item 22) using
the 5/16” x 1-3/4” bolt (Item 23), and the 5/16” locknut (Item 12) as shown below.
Tighten the bolt fully and then loosen just enough to allow the blade position lever
to move freely.
6

Blade Angle Operation
The blade can be angled straight or to the left or right. To change the plow angle,
push the blade position lever (Item 6) forward and turn the blade to the desired
position. The lever will automatically spring into the slot when the blade reaches the
proper angle.
ONE YEAR LIMITED WARRANTY
For the period of one year from the purchase date Cycle Country Accessories
Corporation will replace for the original purchaser, free of charge, any part or parts, when
found, upon examination by Cycle Country Accessories Corporation, to be defective in
material, workmanship, or both.
All transportation cost incurred by the purchaser in submitting the material to
Cycle Country Accessories Corporation for replacement under this warranty must be
borne by the purchaser. If Cycle Country Accessories Corporation determines that the
p
roduct must be returned to the factory for credit please call 1-800-841-2222 for an RMA
number and shipping instructions.
The warranty does not apply to parts that have been damaged by accident,
alteration, abuse, improper lubrication, normal wear, or other causes beyond Cycle
Country Accessories Corporation’s control. Products such as engines, electric motors,
and actuators may carry an original manufacturer’s warranty. Please call Cycle Country
Accessories Corporation for information.
1701 38TH AVE W
PO BOX 257
SPENCER, IA 51301
PHONE: 712-262-4191
FAX: 712-262-0248
SERVICE: 800-841-2222
E-MAIL: ccac@cyclecountry.com
www.cyclecountry.com
7

Cycle Country Accessories Corporation has been a world-renowned manufacturer of quality
ATV products since 1981 and we hope you will enjoy your new Cycle Country accessory.
We’re the Industry Snow Blade leader:
42”, 48”, 54”, 60” & 72” Bear Force Straight Blades
52” & 60” State Plows
48” & 60” ‘V’ Force Plow System
If a winch is what you must have, then you’ve come to the right place:
1500lb and 2500lb Winches
We also have an extensive line of winch mounts for both Cycle Country and Warn winches
If you need to haul more gear on your quad, check out our baskets:
Front Basket
Rear Basket
Rear Drop Basket
If you need to mow the trail before you go riding one of these will help:
Our 54” finish cut Quick Silver54 can be mounted in front or towed behind your ATV
The 48” Rough Cut will handle your toughest mowing jobs
The Rough Cut 44 provides an economical way to handle all your mowing needs
If you are into deer hunting and want to make a food plot, you will love our 3 Point
Hitch & Implements:
Rear Blade Moldboard Plow Spreader
Furrower Rake
Cultivator Disk Harrow
And many more accessories to help you Work Hard and Play Hard:
For more information call us at 1-800-841-2222, or on the web at www.cyclecountry.com
8
Table of contents
Other Cycle Country Automobile Accessories manuals

Cycle Country
Cycle Country BEAR FORCE XT BLADE Installation and operating instructions

Cycle Country
Cycle Country ATV PLOW MOUNT Installation and operating instructions

Cycle Country
Cycle Country BEARFORCE 10-0490 Installation and operating instructions

Cycle Country
Cycle Country QuickLift For A.R.M. Plow User manual

Cycle Country
Cycle Country SNOW FORCE 18-0050 User manual

Cycle Country
Cycle Country Work Power 2000 User manual