ENGLISH
TABLE
OF
CONTENTS
Technical
data
Attention!
General
remarks
Machine
description
Preparation
Mounting
and
filling
the
bottle
Control
of
moistening
and
water
level
Loading
of the
tape roll
Operating
instructions
Maintenance
and
care
TECHNICAL
DATA
MAINFEATURES
Dimensions
of
machine:
45x29x25
cm.
approx.
Weight
of
machine:
13
Kgs.approx.
Voltage
and
frequency:
see
machinelabel
Control
circuit
inDC24
Volts
Electricalpower:
100W
Dispensing
velocity:55m./min.
Length:
min.
100
mm./
max.1150
mm.
Sound
levelmeasured
in
room:lessthan
70
dB(A)
TYPES
OF
GUMMED
TAPE
All
PAPER
FEATURES
Width:
min.
20
mm./
max.
100mm.
Maximum
rolldiameter:
200
mm.;
withdevice
for
biggerrolls
(supplied
on
request)
300mm.
ATTENTION!!
-
Before
usingthismachinecarefully
read
the
operatinginstructions.They
contain
importantindications
on
instal-
lation
safety,
useand
maintenance.
-
Keepthisbookletwithcare
forany
further
reference.
It's
customer
responsibility
to
make
surethat
the
personnel
who
will
use
the
machinesreads
and
understandsthis
booklet.
-
The
buildercannot
be
maderesponsible
for
eventualdamage
to
people,animals
or
thingsderivingfrom
non
observation
ofthe
safety
norms
andthe
warningshere
contained.
GENERALREMARKS
-
Follow
the
safety
and
preventionrules
for
accidents
and
fires
issued
bythe
competentauthorities,such
asthe
eventualrecommendations
of
industrial
associations
and
trade unions
in
terms
of
personnelsafety.
-
Thistapedispenser
is
designed
and
manufactured
only
to
dispensegummed
tape.
A
different
use
from
that
advised
is
not
consideredspecific.CYKLOPwill
not
assume
any
responsibilityfollowing
an
improper
useofthe
machine.
-
After
unpackingcheck
the
integrity
ofthe
machine.
In
case
of
doubt
donotusethe
machine
and
enquire
directly
tothe
reseller.
-
Verify
that
the
voltage
ofthe
machine
is
the
same
astheoneyouare
about
to
use.
Otherwise
donotusethe
machine
and
enquiredirectly
tothe
reseller.
-
The
electricalsafety
of
thismachine
is
guar-
anteedonlywhen
itis
correctlyconnected
to
a
groundedelectricalsystem
as
prescribed
by
the
presentelectricalsafetyrules.
-
When
you
disconnect
the
machinefrom
the
electricalplug,alwayspull
by
seizing
the
plug
notthe
cable.
-
Nevertouch
or
operate
the
machinewith
wet
hands
or
barefoot.
-
Donot
leave
the
machine
onfor
long
periods
of
time.Turn
offthe
mainswitch
of
the
machinewhen
itisnot
being
used.
-
Keep
the
machineawayfromchildren
and
from
personnel
whoarenot
authorised
or
adequately
instructed
intheuseofit.
-
Theuseofthe
machine,
as
prescribed
by
the
builder,alsoincludes
the
respect
ofthe
rules
of
inspection,
maintenance
and
repair.
-
Someparts
ofthe
machinereach
dangeroustemperatures
and
thereforethey
shouldNEVER
be
touchedwith
the
hands.
Thetop
heater,
if
functioning,
can
reach
a
hightemperature(100°C).
-
Keep
the
machinealways
in
good
status,
clean
and
dry.
-
The
machineperformsbetter
ina
rather
dry
environment,therefore
we
discourage
usage
in
dampplaces.Workingwith
gummedpaper
in
humidplaces
can
create
problems;
it
performs
better
indry
places.
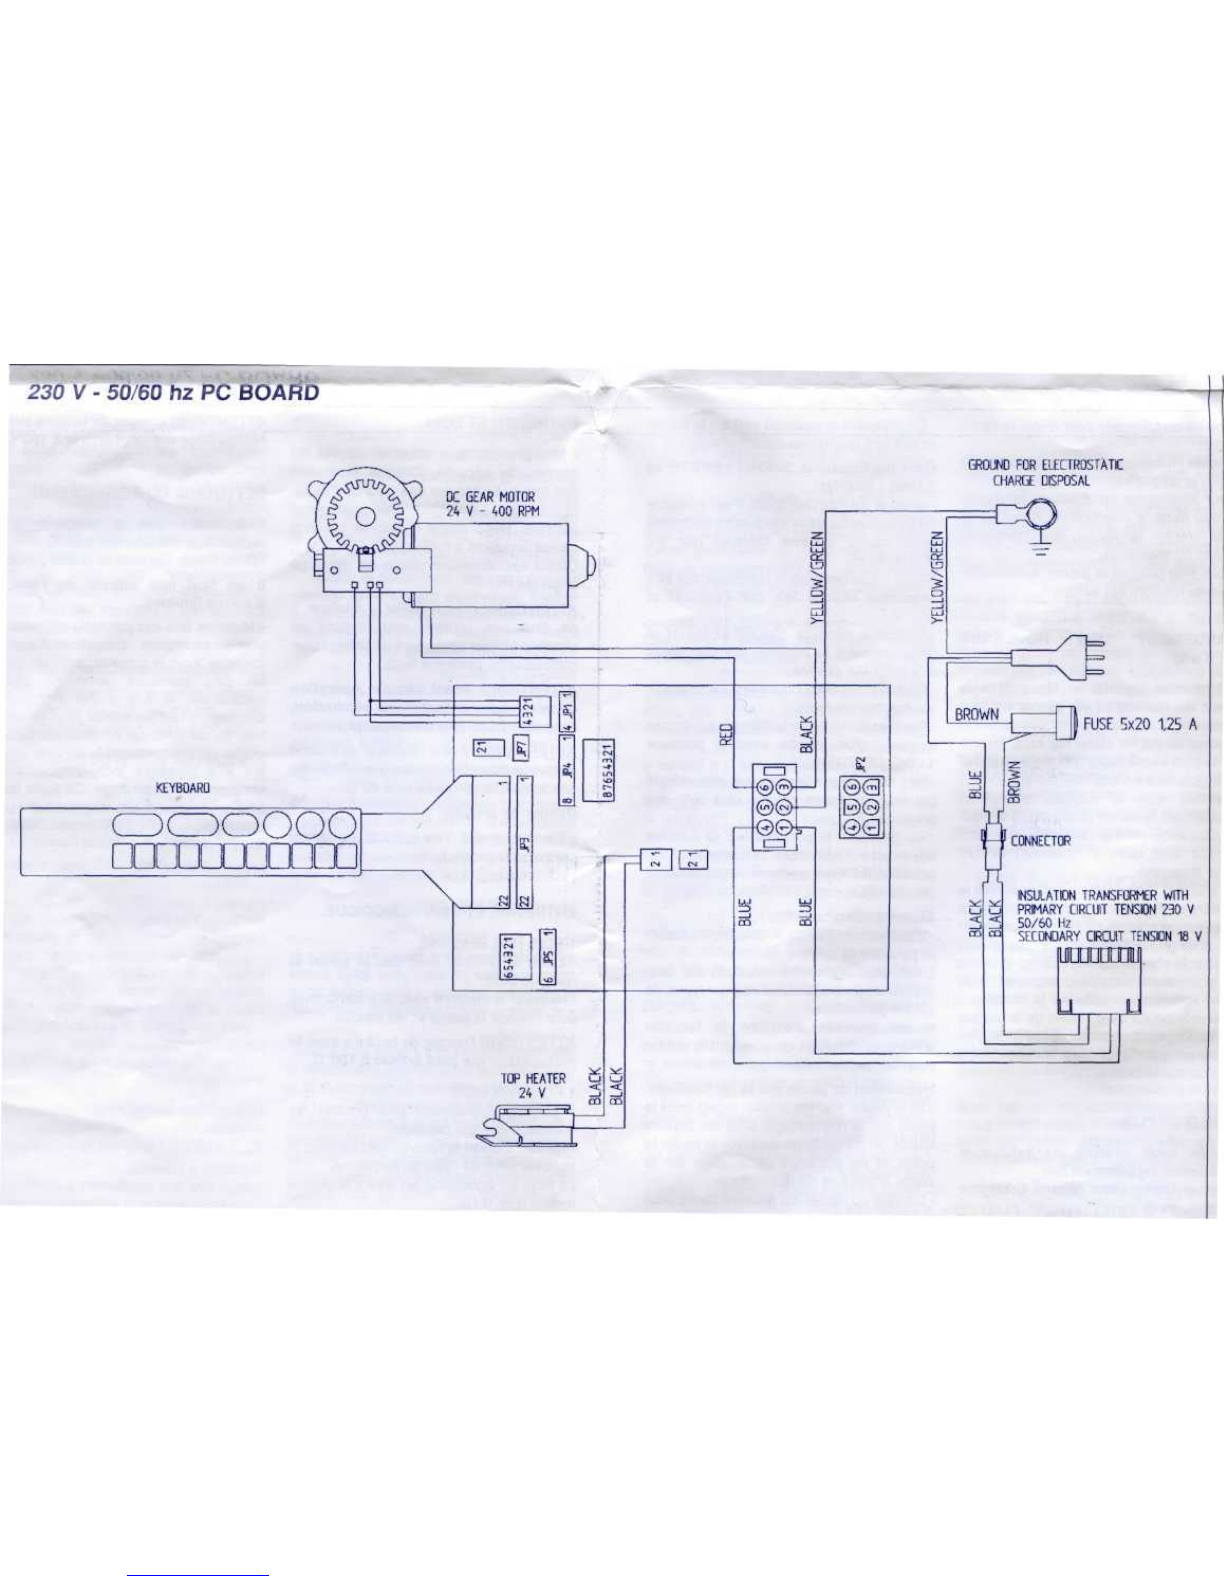
MACHINEDESCRIPTION
ASSEMBLY
(Fig.
1)
A
Main
cable
and
plug
B
Sidecover
C
Mainlightswitch
D
Switch-board
LTop
Heater
M
Watertank
ITop
heaterswitch
N
Waterbottle
•
OPERATINGELEMENTS
E
Green
pushbutton
'free
length'
- it
dispensestapecontinuouslyuntil
released.
F
Pushbuttons
for
dispensing
11
pre-set
lengths
of
tape
G+5
pushbutton:
it
increasespre-set
lengths
by5 cm.
H
'SHORT
LENGTH'
sets
one
shortlength
of
tape
-
'LONG
LENGTH'
sets
one
length
of
tapelongerthan
the
first
one
Q
Coloredindicators.
PREPARATION
Brush.
-
Beforeusing
a new
dispenser,wash
the
moisteningbrushwithwater
and
soap.
Rinse
it
withwater.
-
After
inserting
the
brush
inthe
watertank,
proceed
to
mounting
the
watertankitself
following
the
operations
below.
Switching
the
machine
on.
-
Insertmainplugintoproperoutlet
and
switch
the
machine
on.
Loading
of
watertank(Fig.
2).
-
With
the
righthandkeep
the
greenbutton
pressed.
-
Take
the
water
tank
with
the
lefthand
and
insert
the
pivot
inthe
properseats
as
indicated
bythe
arrow.
-
Turn
the
water
tank
following
the
arrow
direction
on
picture
2
till
it
touches
the
back
part
ofthe
machine.
-
Lower
the
watertank
till
it
locksinto
position.Releasegreenbutton.
-
To
remove
the
watertankkeep
the
green
buttonpressedwith
the
righthand
and
lift
it
with
the
left
one
and,
by
rotating
it
remove
it
from
its
seat.
Mounting
oftop
heater.
-
Place
thetop
heater
(L)inthe
watertank,
above
the
moistening
brush,
inits
proper
housing.
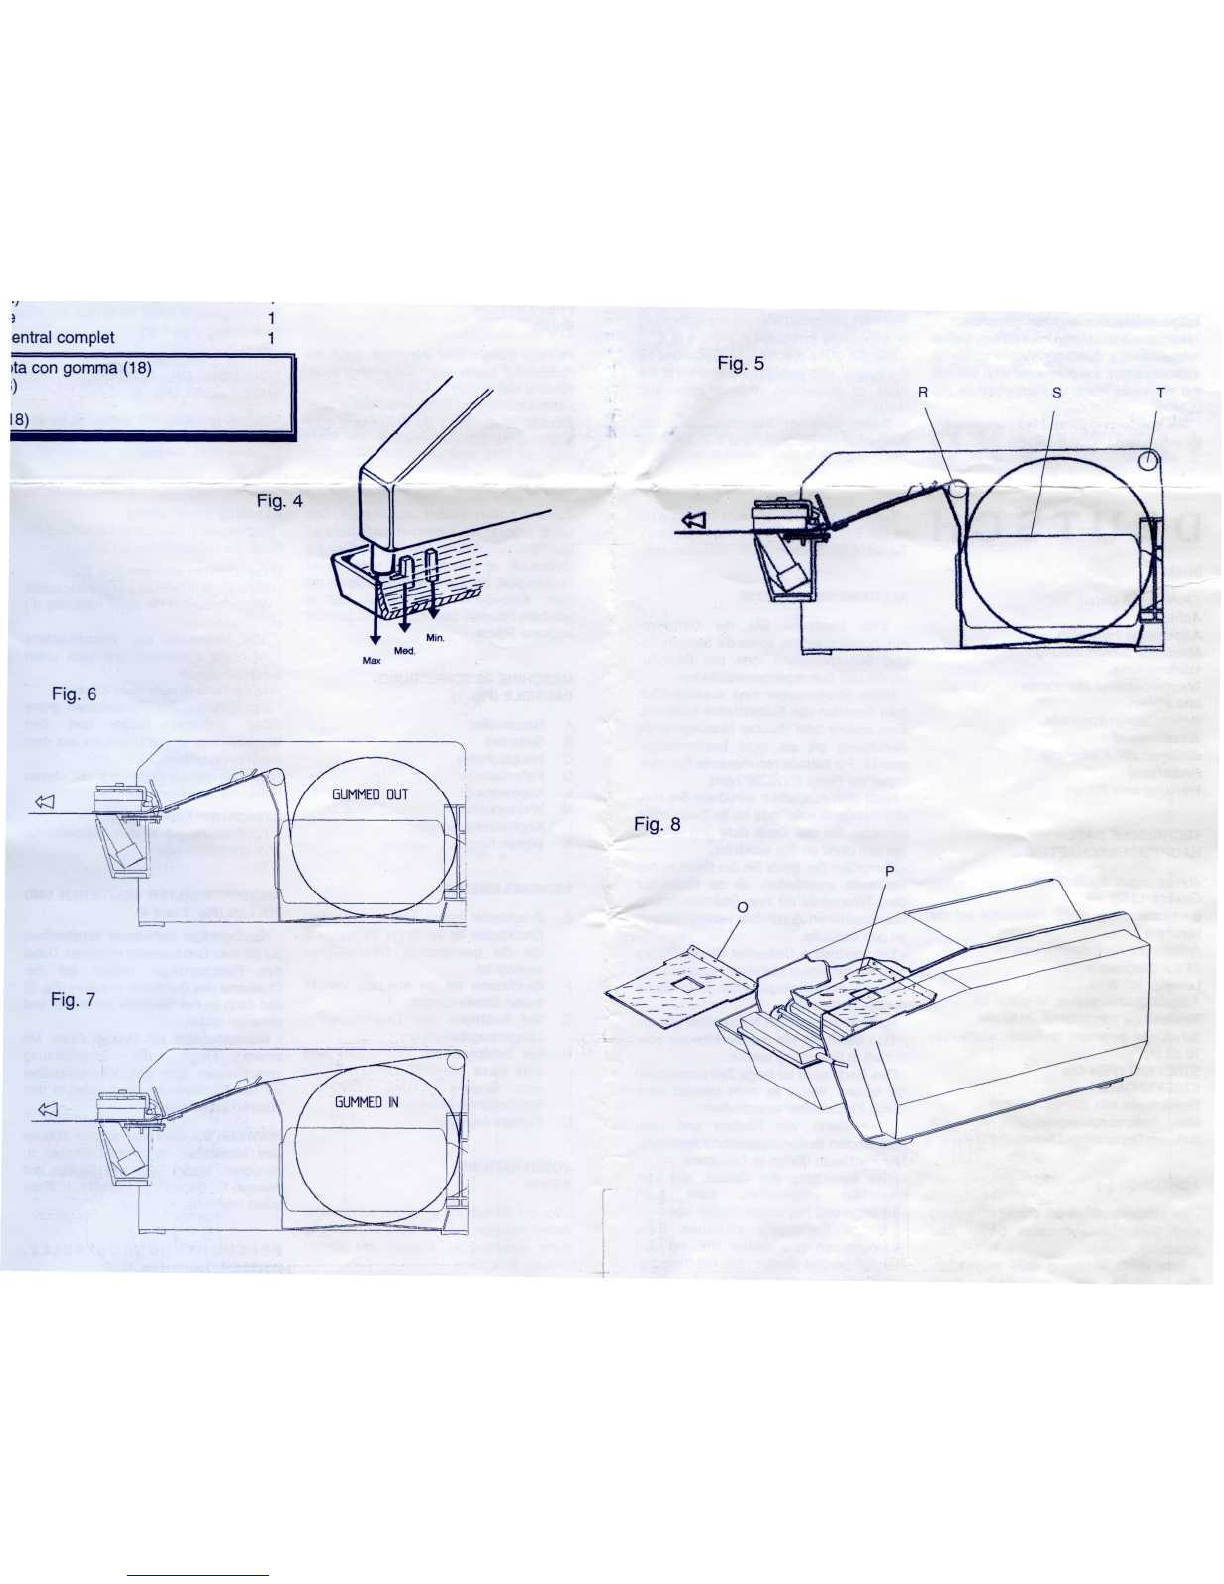
MOUNTING
AND
FILLING
THE
BOTTLE
(Fig.
3 and4)
-
Mount
the
bottleholders(blackplastic
U-shapedparts)
onthe
leftside
ofthe
machine,inserting
at
first
the
uppertooth
in
its
housing
and
then
the
lower
one
until
it
locksintoposition
as
shown
in
fig.
3.
-
Fill
the
bottlethrough
the
holewithclean
water.
Puta
finger
onthe
hole
and
place
the
bottle
inits
housingwithhole
onthe
tank.
SUGGESTION:
the
machineworkswith
drinkablewater.
Donotuse
waterwith
carbonates;
for
safeguardingsomeparts
we
suggestdemineralisedwater.
In
casedrops
of
waterfall
onthe
machine
immediatelywipe
it
dry.
CONTROL
OF
MOISTENING
AND
WATER
LEVEL(Fig.
4)
-
Beforeremoving
the
bottle,makesure
that
it
does
not
contain
water,otherwise