CYP DS-MP1000 User manual

DS-MP1000
CYP TV - Digital Signage Media Player
OPERATION MANUAL


DISCLAIMERS
The information in this manual has been carefully checked and is
believed to be accurate. CYP (UK) Ltd assumes no responsibility for any
infringements of patents or other rights of third parties which may result
from its use.
CYP (UK) Ltd assumes no responsibility for any inaccuracies that may be
contained in this document. CYP (UK) Ltd also makes no commitment to
update or to keep current the information contained in this document.
CYP (UK) Ltd reserves the right to make improvements to this document
and/or product at any time and without notice.
COPYRIGHT NOTICE
No part of this document may be reproduced, transmitted, transcribed,
stored in a retrieval system, or any of its part translated into any language
or computer le, in any form or by any means—electronic, mechanical,
magnetic, optical, chemical, manual, or otherwise—without express
written permission and consent from CYP (UK) Ltd.
© Copyright 2011 by CYP (UK) Ltd.
All Rights Reserved.
Version 1.1 August 2011
TRADEMARK ACKNOWLEDGMENTS
All products or service names mentioned in this document may be
trademarks of the companies with which they are associated.

SAFETY PRECAUTIONS
Please read all instructions before attempting to unpack, install or operate
this equipment and before connecting the power supply.
Please keep the following in mind as you unpack and install this
equipment:
• Always follow basic safety precautions to reduce the risk of re,
electrical shock and injury to persons.
• To prevent re or shock hazard, do not expose the unit to rain,
moisture or install this product near water.
• Never spill liquid of any kind on or into this product.
• Never push an object of any kind into this product through any
openings or empty slots in the unit, as you may damage parts inside
the unit.
• Do not attach the power supply cabling to building surfaces.
• Use only the supplied power supply unit (PSU). Do not use the PSU if
it is damaged.
• Do not allow anything to rest on the power cabling or allow any
weight to be placed upon it or any person walk on it.
• To protect the unit from overheating, do not block any vents or
openings in the unit housing that provide ventilation and allow for
sucient space for air to circulate around the unit.
REVISION HISTORY
VERSION NO. DATE SUMMARY OF CHANGE
v1.00 17/10/2012 First release
v1.01 08/08/2013 Corrections

CONTENTS
1. Introduction.................................................. 6
2. Package Contents ......................................... 6
3. System Requirements .................................. 6
4. Features......................................................... 7
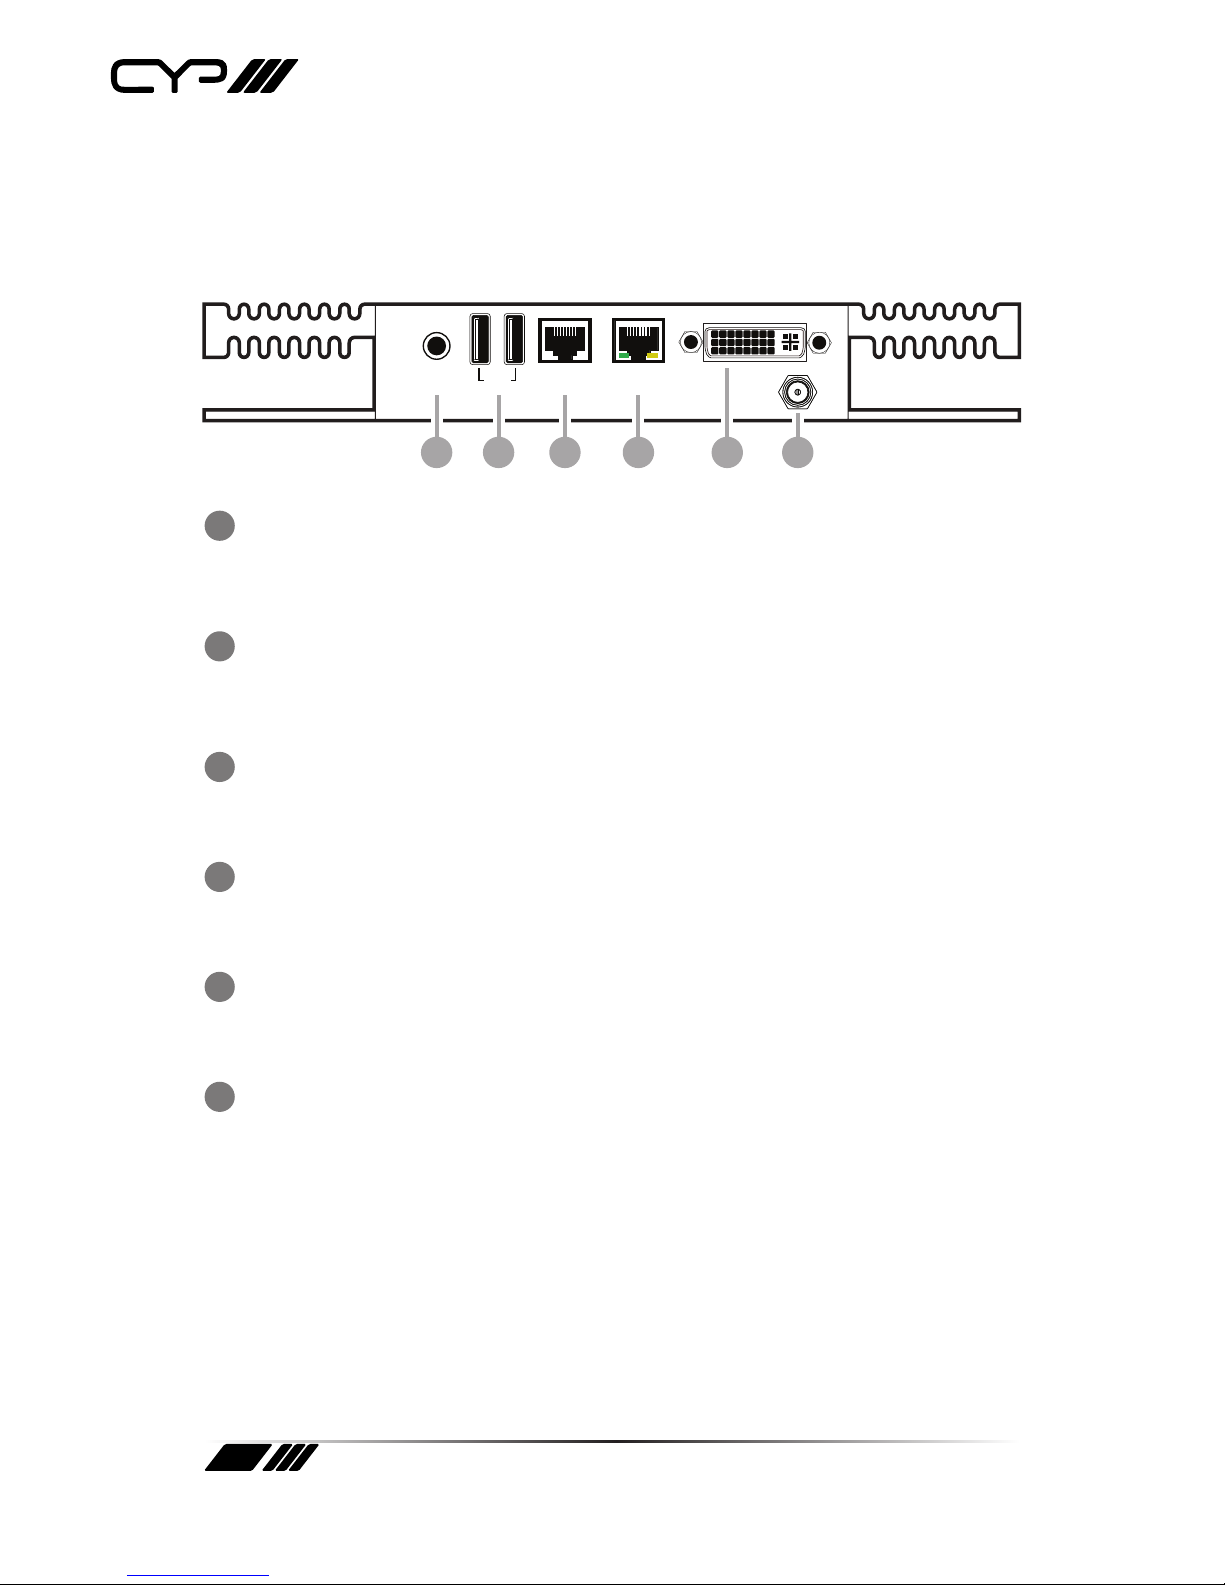
5. Operation Controls And Functions.............. 8
5.1 Front Panel ............................................................ 8
6. Using the Web Interface .............................. 9
6.1 Register: ................................................................. 9
6.2 Add your channel (s)........................................10
6.3 Adding user accounts .....................................11
6.4 Templates.............................................................13
6.5 Building a template .........................................14
6.6 Template Scheduling.......................................16
6.7 Uploading content ..........................................18
6.8 Uploading images and video .......................18
6.9 Schedule a Webpage.......................................23
6.10 Schdule a RSS Feed........................................25
6.11 Schedule a Notice...........................................26
6.12 Schedule Ticker Text......................................27
6.13 Content Manager ...........................................29
7. TroubleShooting......................................... 30
7.1 Content always 'set to sync' ..........................30
7.2 Network................................................................30
7.3 Serial / MAC Address Issues...........................30
7.4 Supported Media Types..................................31
7.5 Templates not showing in template
scheduler ....................................................................31
7.6 Uploading Webpages......................................31

6
1. INTRODUCTION
The DS-MP1000 media player is a comprehensive content management
system that provides the platform for any integrated digital signage
system. Using a compact, low voltage static state PC as the hardware
backbone and an intuitive browser based content management system
for control and scheduling, the DS-MP1000 provides both advanced
features and new levels of exibility for the user.
The cloud based content management system can be set up in minutes
and managed remotely by multiple users anywhere in the world. The
integrated digital content can include video, images, web pages, RSS
Feeds, rolling ticker feeds and live TV, all of which can be scheduled
and altered quickly to eciently optimise the impact of any targeted
marketing communication.
2. PACKAGE CONTENTS
DS-MP1000 Digital Signage Media Player
12V/5A Power Adaptor
Registration Documents
3. SYSTEM REQUIREMENTS
Please note your player has a DVI-I output and will require either a DVI-I
cable or a adapter to VGA or HDMI. You will also require an Ethernet cable
to connect it to your network.

7
4. FEATURES
Low voltage static state PC hardware (Wall mountable)
Cloud based browser controlled content management system
Customisable design layouts to integrate and display video, images,
internet content, presentations, text and live feeds
Remote browser access enables content upload and scheduling from
any external location
Intuitive schedule planner enables complete control of template and
content timings
Unlimited number of media players can be allocated to a single user
account, enabling nationwide estate management from a single
interface
Assign unlimited content administrators with comprehensive access
rights control function for enhanced integration and management
Up to 1080p HD resolutions and audio supported
No ongoing management or support costs
3 Year Manufacturer Warranty

8
5. OPERATION CONTROLS AND FUNCTIONS
5.1 Front Panel
USBAUDIO COM LAN DC-IN
DVI
1 2 3 4 5 6
1AUDIO
3.5mm Stereo mini-jack analogue audio output.
2USB
2xUSB 2.0 ports.
3COM
Reserved for future use.
4LAN
RJ45 Network connection.
5DVI
Video output, supports HDMI and VGA with optional adaptor.
6DC-IN
Locking Power Supply connecter for the power adaptor.

9
6. USING THE WEB INTERFACE
6.1 Register:
The rst step is to register at cms.cypeurope.com/register
You will receive a 'Welcome' email to the email address supplied
conrming the successful setup of the account

10
6.2 Add your channel (s)
You then need to add your CYPtv Player Channel to your account. You do
this by selecting the Add Channel link in the Admin Section.
Open the white envelope and enter the Serial Number, MAC Address, and
Licence Key. Choose a display name that describes the location of the
screens that the CYPtv Media Player is attached to.
Repeat this for all of the Media Players that you want to manage on this
administrator account.

11
6.3 Adding user accounts
You can add user accounts in the Admin section by following the Add
User link
Fill in the new user's details and create a user name for them. Then assign
the users access levels by checking the appropriate box. Click the channel
access link to assign which channels the user can access.

12
Complete the new user registration by clicking create. The new user will
receive a welcome email along with their password.

13
6.4 Templates
Templates can be built using the web interface and can contain one of
each of the following zones:
• Media Window: Displays video, images, and websites. This is also the
zone live TV will be displayed if it has been specied with your system
• Notices: This zone displays plain text that has been inputted using the
CMS website
• Ticker: This zone displays a ticker message that has been inputted via
the CMS website
• RSS: This zone displays an RSS feed in text format.
• Clock: Displays the time in a digital clock format along with the date
• Logo: This zone enables you to upload a company logo
The CYPtv Media Player has a default template and default content
to assist in installation if the player is installed before any content is
uploaded. This content and template will disappear as soon as a template
and content is uploaded.

6.5 Building a template
Select the template builder link from the home page. Name your template
and decide if it is going to be used as your default template.
It is strongly advised to design the template in a dedicated design
application such as Adobe illustrator or Photoshop. Best results are
achieved by designing a background image with placeholders for the
various content elements. It is then a simple matter of dragging the
elements and resizing them in the template builder.
Save the background as a jpeg or gif and upload it by clicking on select.

Simply drag and drop the zones that you require onto your background
image and resize them using your mouse. A company logo can either be
built into the background image or by selecting it from an existing le
from your computer using the select button next to the Logo Image eld.
Each zone contains information on its 'x' and 'y' position and its size. This
enables each zone to be accurately aligned. Please note that the media
window will resize images automatically to t the zone that you have
created, hence it is advisable to keep it to the same ratio as the screen
that will be connected to the player, for most new screens it will need to
be 16:9.
Repeat the above for additional templates at any time.

16
6.6 Template Scheduling
New Schedule
Once you have created a Template in template builder, you will need to
schedule it by navigating to Template Manager.
Remember to select a Channel rst. Give the schedule a meaningful name
and then select the template you wish to use from the dropdown menu.
Note that default templates cannot be scheduled so they will not appear
in the list.
The Start Date and End Date are 'inclusive' meaning the schedule will play
ON the StartDate and ON the EndDate. The Live Hours are in 24hr format.
The schedule WILL play in the Start hour but WILL NOT play in the End
hour. Thus setting a template to play Start Hour 9 and End hour 11 will

17
play for the whole hours 9 and 10 but not 11.
Exclusive templates are templates which do not allow media to display
unless they have been assigned to the scheduled template. If this is
Unchecked, media which has the attribute 'Forced Template' will play
during the scheduled period and 'Force' the template they are associated
with.
Existing Schedules
Existing schedules can be deleted or edited in the 'Manage Existing
Schedules' tab in the Template Manager.
Assign Media to Templates
Assigning media to templates ensures you have full exibility on how
your content displays. Selecting 'Force Template' means that when the
media plays the template surrounding the content will change to the
selected template.
"Exclusive" templates override this option.

18
6.7 Uploading content
Content is uploaded via the Quick Upload link on the home page.
You can upload all the content that is for an individual zone and that has
the same playback schedule e.g. multiple images that are to be shown
during the same time period can be uploaded to the media zone at the
same time. Images with a dierent schedule and content for other zones
must be uploaded separately.
6.8 Uploading images and video
Click 'Quick Upload' from the home screen as shown above. Then select
Upload Video and Images by clicking Start as shown below.

19
Select which channels you wish to uploaded the videos or images to.
Browse for the les you want to upload from your computer.

20
Select the relevant les, then click open
Table of contents
Other CYP Media Player manuals