Cypress CX-5100AH User manual

CX-5100AH
HDMI with Audio Amplier
Operation Manual
CX-5100AH

TABLE OF CONTENTS
1. Introduction ........................................................................................
2. Features ...............................................................................................
3. Remote Control ...................................................................................
4. Hardware Descriptionl .......................................................................
4.1 Front View.......................................................................................
4.2 RearView .......................................................................................
5. LCM Operation ......................................................................................
5.1 LCM Menu...................................................................................
5.2 LCM Menu 1................................................................................
5.3 LCM Operation table.................................................................
6. Audio output format table.................................................................
7. Connection and Installation..............................................................
8. Specications......................................................................................
3
3
3
4
4
5
6
6
7
8
8
10
10

1. Introduction
This is themost advanced solution forHDMI with Audio Amplier. That supports
three HMDI input and two HDMI output, also supports Analog/Digital audio
input/output. Simply select from theLCM menu orremotecontrol to select
desire combination.
2. Features
Compliant with HDMI 1.2, HDCP 1.1 and DVI 1.0 specications.
Full HD 1080p supported.
Supports a wide range of PC and HDTV resolutions from VGA to UXGA
and 480p to 1080p. Maximum resolution bandwidth is 165MHz.
Built-in EDID simulator and HDCP keyset allows each output to work
independently in connecting to a HDMI display.
Lip Sync delay (up to 480ms can be split up to 4 channels).
Supports Concert Hall, Jazz Club, Rock Concert, Cathedral, Karaoke,
Stadium, Echo, Studio and 3D panorama audio effects.
Easy to install and simple to operate.
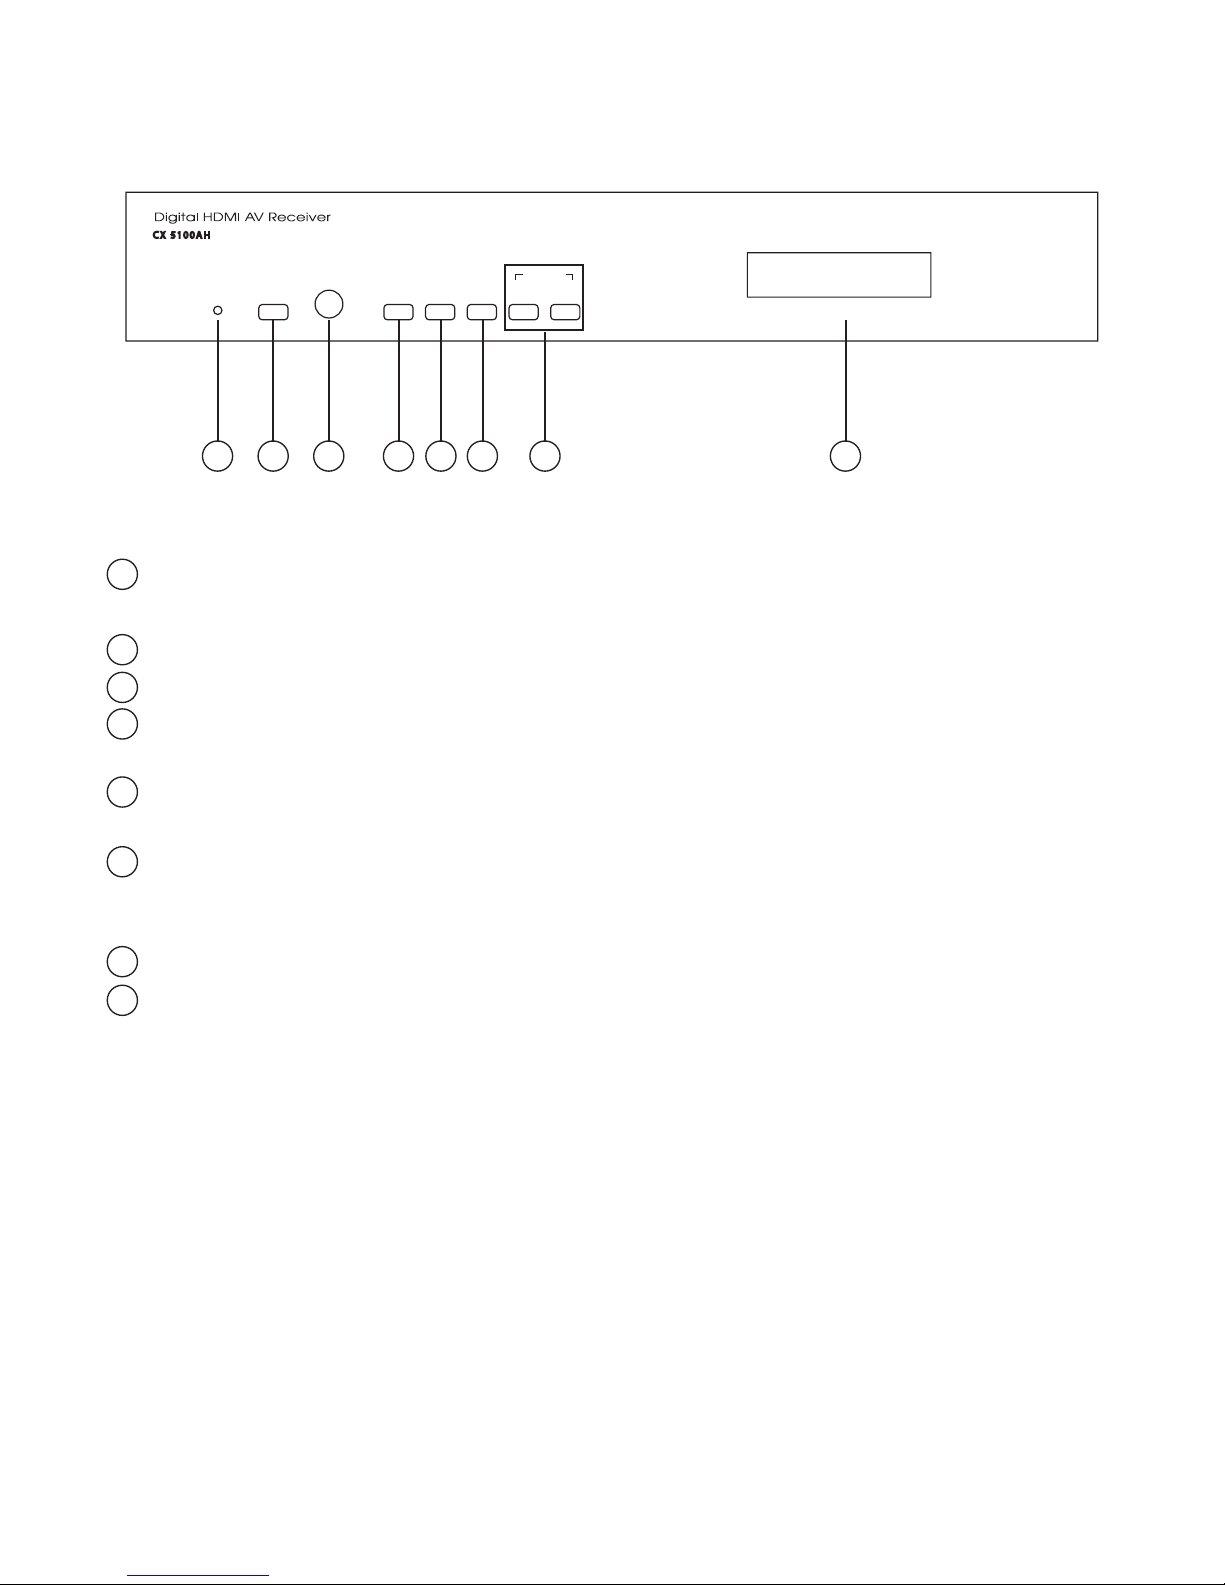
3. Remote Control
1. Power: Press to turn ON/OFF the system.
When power on theLED will indicatein Green
color, when power off theLED will indicatein
Red color.
2. Mute: Press to mute the audio, press
again to turn ONtheaudio.
3. HDMI in: Select the desire HDMI input source.
4. Audio in:Select thedesire audio input source.
5. Analog audio in:Select thedesire stereo
analog input source.
6. HDMI LPCM:Select theaudio LPCM output
from HDMI ports for2 Channels orMulti-
Channels.
7. +/-:Press to adjust thevolume,
Press [
-
]:to deouacethevolume, the
minimum lovels
Press [ + ]:to increasethevolume, the
maximum levels up to+64.
8. Menu/
◄
/
►
/◄/►: Press [MENU] enter
LCM menu and sub-menu, From Sub-menu.
Press[/
◄
/
►
/◄/►]to adjust Bass/Treble/
Loundness/Lipsync LR,c and defanlt Setting.
1
2
4
5
7
3
MUTEMUTE
CR-36
112233
OPT1OPT1 OPT2OPT2 COAX1COAX1 COAX2COAX2
1122
HDMI LPCMHDMI LPCM
2CH2CHMULT I CHMULT I CH
VOLUMEVOLUME
3344
ANALOG AUDIO INANALOG AUDIO IN
DIGITAL AUDIO INDIGITAL AUDIO IN
HDMI INHDMI IN
MENU
POWERPOWER
6
8
3

4. Hardware Description
4.1 Front View
1 Power indicator: When power on theLED will indicatein Green color,
when power off theLED will indicatein Red color.
2 Power switch:Turn thesystem ON/OFF.
3 IR sensor.
4 Homemenu:Press thebutton to enter theLCM menu selection. Forthe
LCM menu selection pleaserefer to “section 5. LCM Operation”.
5 Video in:Press [Video in ▲] switch between different input video sources
(HDMI 1, HDMI 2, HDMI 3).
6 Audio in:Press [Audio in ▼] switch between different input audio sources
(Optical 1, Optical 2, Coaxial 1, Coaxial 2, L/R 1, L/R 2, L/R 3, L/R 4 orHDMI).
Pleaserefer to “section 5. LCM Operation”.
7 Volume-/+:Press [-] / [+] to adjust thevolumeup/down.
8 LCM display.
PowerHome
Menu
Video In
Audio In
-
+
VOLUME
1 2 3 4 5 6 7 8
4

4.2 Rear View
1 2 1 2 L
R
SUBREARFRONT4321
DC 12V
OPTICAL COAXIAL OPTICALCOAXIAL
12123
HDMI INPUT HDMI OUT
DIGITAL
IN
DIGITAL
OUT
FRONT
L/Lt R/Rt L R
CENTER
5.1CH AMP
OUTPUT
REAR
ANALOG INPUT 5.1CH OUTPUT
SUBWOOFER
CENTER(TOTAL)
1 5.1CH AMP out:Connect theFront/Rear/Center/Subwoofer to theSpeakers.
2 Optical 1/2 in:Connect theOptical input ports to theOptical output port of
yoursourceequipments. Only support LPCM 2ch input when input source
is Dolby 2ch or5.1ch thesystem will sound less and theLCM will show
"NonPCM".
3 Coaxial in:Connect theCoaxial input ports to theCoaxial output port of
yoursourceequipments. Only support LPCM 2ch input when input source
is Dolby 2ch or5.1ch thesystem will sound less and theLCM will show
"NonPCM".
4 Optical out:Connect theOptical output port to theinput port of your
audio equipment. Only support LPCM 2ch.
5 Coaxial out:Connect theCoaxial output port to theinput port of your
audio equipment. Only support LPCM 2ch.
6 HDMI in:Connect theHDMI 1 ~ 3 input ports to theHDMI output port of your
sourceequipments. TheHDMI audio output are follow HDMI input Sources.
7 HDMI out:Connect theHDMI 1 ~ 2 output ports to theHDMI input port of
yourdisplay orAmplier.
8 Analog audio input:There are fourL/R input connectors; it can connect to
fourdifferent stereo audio sources.
9 5.1 CH out:Connect theFront/Rear/Center/Subwoofer to theAmplier.
10
Power: Plug the12VDC power supply into theunit and connect the
adaptorto AC wall outlet.
1 2 3 4 5
6
7
10
9
8
5

5. LCM Operation
Start Menu Display V:HDMI_1
A:Opt_1 L:16
↓
1. Video input selection
HDMI 1 input HDMI 2 input HDMI 3 input
↓
↓
V:HDMI_1
A:Opt_1 L:+16
↓
↓
V:HDMI_2
A:Opt_1 L:+16
V:HDMI_3
A:Opt_1 L:+16
2. Audio input selection
Optical 1 input
↓
↓
Optical 2 input
↓
↓
V:HDMI_1
A:Opt_2 L:+16
Coaxial 1 input
↓
↓
V:HDMI_1
A:Opt_1 L:+16
V:HDMI_1
A:Coax_1 L:+16
Coaxial 2 input
↓
↓
V:HDMI_1
A:Coax_2 L:+16
L/R 1 input
↓
↓
V:HDMI_1
A:LR_1 L:+16
L/R 2 input
↓
↓
V:HDMI_1
A:LR_2 L:+16
L/R 3 input
↓
↓
V:HDMI_1
A:LR_3 L:+16
L/R 4 input
↓
↓
V:HDMI_1
A:Opt_1 L:+16
HDMI input
V:HDMI_1
A:HDMI L:+16
3. Volume Adjustment
↓
V:HDMI_1
A:Opt_1 L:+00
V:HDMI_1
A:Opt_1 L:+64
↓
Default +16
4. Bass Adjustment
↓
Bass -12
>Press MENU Exit
Bass +12
>Press MENU Exit
↓
Default +00
5. Treble Adjustment
↓
Treble -12
>Press MENU Exit
Treble +12
>Press MENU Exit
↓
Default +00
6. Loudness Adjustment
↓
Loudness +00
>Press MENU Exit
Loudness +16
>Press MENU Exit
↓
Default +00
7. LipSync LR
↓
LipSync LR +00
>Press MENU Exit
LipSync LR +16
>Press MENU Exit
↓
Default +00
8. LipSync Center
↓
LipSync C +00
>Press MENU Exit
LipSync C +16
>Press MENU Exit
↓
Default +00
Main menu
( Manual )
Wait...
↓
↓
( Manual )
↓
Load Default
Wait…
9. Factory setting
Factory Setting - OFF Factory Setting - ON
↓
Default Off
>Press MENU Exit
Default On
>Press MENU Exit
↓
Default +00
Operation instruction:
↓↑ :Press ↓↑to move the cursor.
←→ :Press ←→to move the cursor or adjust the value.
MENU:Switch between Main Manual or Sub-Manual or Confirm the selection.
5.1 LCM Menu
0 1 2 3 4 5 6 7 8 9 A B C D E F
Main MenuVideo In V : H D M I έ1
A : O p t _ 1 L : Ѐ1 6
Audio In V : H D M I έ1
A : O p t έ1 L : Ѐ1 6
Volume V : H D M I έ1
A : O p t έ1 L : Ѐ1 6
0 1 2 3 4 5 6 7 8 9 A B C D E F 0 1 2 3 4 5 6 7 8 9 A B C D E F
Sub Menu Bass B a s s Ё1 2 B a s s Ѐ1 2
υP r e s s M E N U E x i t υPr e s s M E N U E x i t
Treble T r e b l e Ё1 2 T r e b l e Ѐ1 2
υP r e s s M E N U E x i t υP r e s s M E N U E x i t
Loudness L o u d n e s s Ѐ0 0 L o u d n e s s Ѐ1 6
υP r e s s M E N U E x i t υP r e s s M E N U E x i t
LipSync LR L i p S y n c L R Ѐ0 0 L i p S y n c L R Ѐ1 6
υP r e s s M E N U E x i t υP r e s s M E N U E x i t
LipSync C L i p S y n c C Ѐ0 0 L i p S y n c C Ѐ1 6
υP r e s s M E N U E x i t υP r e s s M E N U E x i t
Default D e f a u l t O f f D e f a u l t O n
υP r e s s M E N U E x i t υP r e s s M E N U E x i t
Wait L o a d D e f a u l t
W a i t . . .
5.2 LCM Menu 1
6

0 1 2 3 4 5 6 7 8 9 A B C D E F
Main MenuVideo In V : H D M I έ1
A : O p t _ 1 L : Ѐ1 6
Audio In V : H D M I έ1
A : O p t έ1 L : Ѐ1 6
Volume V : H D M I έ1
A : O p t έ1 L : Ѐ1 6
0 1 2 3 4 5 6 7 8 9 A B C D E F 0 1 2 3 4 5 6 7 8 9 A B C D E F
Sub Menu Bass B a s s Ё1 2 B a s s Ѐ1 2
υP r e s s M E N U E x i t υPr e s s M E N U E x i t
Treble T r e b l e Ё1 2 T r e b l e Ѐ1 2
υP r e s s M E N U E x i t υP r e s s M E N U E x i t
Loudness L o u d n e s s Ѐ0 0 L o u d n e s s Ѐ1 6
υP r e s s M E N U E x i t υP r e s s M E N U E x i t
LipSync LR L i p S y n c L R Ѐ0 0 L i p S y n c L R Ѐ1 6
υP r e s s M E N U E x i t υP r e s s M E N U E x i t
LipSync C L i p S y n c C Ѐ0 0 L i p S y n c C Ѐ1 6
υP r e s s M E N U E x i t υP r e s s M E N U E x i t
Default D e f a u l t O f f D e f a u l t O n
υP r e s s M E N U E x i t υP r e s s M E N U E x i t
Wait L o a d D e f a u l t
W a i t . . .
5.2 LCM Menu 1
7

5.3 LCM Operation table
Function Level Suggestion level
Bass -6 ~ +6 0
Treble-6 ~ +6 0
Loudness -6 ~ +6 0
LipSync LR 0 ~ 16 0
LipSync C 0 ~ 16 0
Default Off/On off
LipSync can delay120ms +/- 5% foreach mono channel.
6. Audio output format table
Output Jacker & Format
HDMI_1
Out
HDMI_2
Out OPT Out COAXOut 6 RCA
LineOut
Input Jacker & Format
PCM
5.1 CH
HDMI_1
In
PCM 5.1
CH / Mute
PCM 5.1
CH / Mute
PCM 2 CH
(Downmix)
/ Mute
PCM 2 CH
(Downmix)
/ Mute
Real 5.1
CH / Mute
HDMI_2
In
PCM 5.1
CH / Mute
PCM 5.1
CH / Mute
PCM 2 CH
(Downmix)
/ Mute
PCM 2 CH
(Downmix)
/ Mute
Real 5.1
CH / Mute
HDMI_3
In
PCM 5.1
CH / Mute
PCM 5.1
CH / Mute
PCM 2 CH
(Downmix)
/ Mute
PCM 2 CH
(Downmix)
/ Mute
Real 5.1
CH / Mute
PCM 2
CH
HDMI_1
In
PCM 2 CH
/ Mute
PCM 2 CH
/ Mute
PCM 2 CH
/ Mute
PCM 2 CH
/ Mute
Virtual 5.1
CH / Mute
HDMI_2
In
PCM 2 CH
/ Mute
PCM 2 CH
/ Mute
PCM 2 CH
/ Mute
PCM 2 CH
/ Mute
Virtual 5.1
CH / Mute
HDMI_3
In
PCM 2 CH
/ Mute
PCM 2 CH
/ Mute
PCM 2 CH
/ Mute
PCM 2 CH
/ Mute
Virtual 5.1
CH / Mute
8

Input Jacker & Format
PCM
2 CH
OPT_1 In
PCM 2 CH
/ 5.1 CH /
Mute
PCM 2 CH
/ 5.1 CH /
Mute
PCM 2 CH
/ Mute
PCM 2 CH
/ Mute
Virtual
5.1 CH /
Mute
OPT_2 In
PCM 2 CH
/ 5.1 CH /
Mute
PCM 2 CH
/ 5.1 CH /
Mute
PCM 2 CH
/ Mute
PCM 2 CH
/ Mute
Virtual
5.1 CH /
Mute
COAX_1
In
PCM 2 CH
/ 5.1 CH /
Mute
PCM 2 CH
/ 5.1 CH /
Mute
PCM 2 CH
/ Mute
PCM 2 CH
/ Mute
Virtual
5.1 CH /
Mute
COAX_2
PCM 2 CH
/ 5.1 CH /
Mute
PCM 2 CH
/ 5.1 CH /
Mute
PCM 2 CH
/ Mute
PCM 2 CH
/ Mute
Virtual
5.1 CH /
Mute
Line
2 CH
RCA
Line_1 In
PCM 2 CH
/ 5.1 CH /
Mute
PCM 2 CH
/ 5.1 CH /
Mute
PCM 2 CH
/ Mute
PCM 2 CH
/ Mute
Virtual
5.1 CH /
Mute
RCA
Line_2 In
PCM 2 CH
/ 5.1 CH /
Mute
PCM 2 CH
/ 5.1 CH /
Mute
PCM 2 CH
/ Mute
PCM 2 CH
/ Mute
Virtual
5.1 CH /
Mute
RCA
Line_3 In
PCM 2 CH
/ 5.1 CH /
Mute
PCM 2 CH
/ 5.1 CH /
Mute
PCM 2 CH
/ Mute
PCM 2 CH
/ Mute
Virtual
5.1 CH /
Mute
RCA
Line_4 In
PCM 2 CH
/ 5.1 CH /
Mute
PCM 2 CH
/ 5.1 CH /
Mute
PCM 2 CH
/ Mute
PCM 2 CH
/ Mute
Virtual
5.1 CH /
Mute
Note: 1. 6 ports of RCA output only support 5.1 Channels.
2. This system can’t support compress audio input (AC3 orDTS), if the
audio sources are contain compress audio theoutput from Optical,
Coaxial and 6 RCA are soundless and this is normal phenomena.
9

8. Specications
Video input ports
Digital audio input ports
Analog audio input ports
3 x HDMI
2 x Coaxial, 2 x Optical
4 x Audio R/L
Video output ports
Digital audio output ports
Analog audio output ports
2 x HDMI
1 x Coaxial, 1 x Optical
5.1 channels output clips
(6ohm speakers at 1 Vrms 1KHz, theoutput power is
around 12wx6.)
(8ohm trumpets, theoutput power is around 9wx6.)
Power Supply 12V/6A DC (US/EUstandards, CE/FCC/UL certied)
Dimensions (mm)171(W)x 356(D)x 70(H)
Weight(g)1764
Chassis Material Aluminum
SilkSkin ColorSilver
Operating Temperature Operating from 0°C ~ 40°C
7. Connection and Installation
10
Other manuals for CX-5100AH
1
Table of contents
Other Cypress Amplifier manuals

Cypress
Cypress CCMX-44DA User manual

Cypress
Cypress QU-14WE User manual

Cypress
Cypress CHDMI-4 User manual

Cypress
Cypress CX-5100AH User manual

Cypress
Cypress SC-AMP3 User manual

Cypress
Cypress EHD-8 User manual

Cypress
Cypress OR-YUV44S User manual

Cypress
Cypress CHDMI2 User manual

Cypress
Cypress CDVI-8 User manual