d & b audiotechnik R70 User manual

R70
Ethernet to CAN interface
Manual (1.4 EN)

General information
R70 Ethernet to CAN interface
Manual
Version 1.4 EN, 04/2009, D2402.EN .01
Copyright © 2009 by d&b audiotechnik GmbH; all rights reserved.
d&b audiotechnik GmbH
Eugen-Adolff-Strasse 134, D-71522 Backnang, Germany
Telephone: +49-7191-9669-0, Fax: +49-7191-95 00 00

Contents
1. R70 Ethernet to CAN interface........................................4
1.1. General safety instructions......................................................................4
1.2. Intended use................................................................................................4
1.3. Scope of supply..........................................................................................5
1.4. Technical specification..............................................................................6
2. R70 Hardware..................................................................7
2.1. Connectors...................................................................................................7
2.1.1. Power supply [DC IN]...................................................................7
2.1.2. LAN connector [1].........................................................................7
2.1.3. CAN-Bus connectors [2]..............................................................8
2.2. Controls and indicators............................................................................9
2.2.1. Termination switch [3a] and indicator [3b].............................9
2.2.2. Indicators (Status LEDs).............................................................11
2.2.3. RESET [R]........................................................................................11
3. R70 operation and configuration................................12
3.1. Physical setup............................................................................................12
3.2. IP address..................................................................................................12
3.3. Direct connection.....................................................................................12
3.4. LAN network with DHCP server..........................................................13
3.5. LAN network without DHCP server...................................................14
3.6. R70 Web interface.................................................................................15
3.6.1. Device Info....................................................................................15
3.6.2. LAN and CAN Parameters......................................................15
4. R70 accessories and anti-theft protection (LOCK).......17
4.1. Mounting clamp.......................................................................................17
4.1.1. Attaching the mounting clamp................................................17
4.2. Anti-theft protection – LOCK...............................................................17
4.3. Dimension drawings...............................................................................18
5. Manufacturer's declarations.........................................19
5.1. EU declaration of conformity (CE symbol).......................................19
5.2. Disposal (WEEE symbol)........................................................................19
R70 Ethernet to CAN interface, Manual (1.4 EN) Contents - 1

R70 Ethernet to CAN interface d&b audiotechnik GmbH
1. R70 Ethernet to CAN interface
This manual describes the facilities and functions of the hardware and
the basic operation of the R70 Ethernet to CAN interface.
Basic knowledge of Ethernet network technology is assumed.
A detailed description of the advanced functionality of the R70 is given
in the 'Software reference manual' which is available on the attached
CD-ROM in English language.
1.1. General safety instructions
Installation and start up must only be carried out by qualified
technicians.
In case of a malfunction or doubts concerning the proper functioning of
the device, please contact d&b audiotechnik for further information or
advice.
As the device does not contain any components to be maintained or
repaired by the user, the enclosure must not be opened. The device can
only be repaired by d&b audiotechnik.
1.2. Intended use
The R70 Ethernet to CAN interface provides two RJ 45 CAN connectors
with a built-in switchable terminator as well as a LAN connector. The
R70 contains a web interface for configuration using a standard web
browser. Up to five R70 interfaces in TCP/IP mode may be connected to
a PC and simultaneously operated by the R1 software.
The R70 is designed to connect the d&b Remote network (CAN-Bus) to
a PC via Ethernet (TCP/IP or UDP/IP).
The R70 must only be used within a d&b sound reinforcement system.
The device can be used within applications according to the standard
EN 60849 (IEC 60849) 'Sound Systems for Emergency Purposes' (voice
evacuation systems).
The device is not intended for direct connection to telecommunication
networks.
A detailed description of the d&b Remote network (CAN-Bus) is given in
the technical information TI 312 which is provided with the CD-ROM or
can be downloaded from our website at www.dbaudio.com. We
recommend to regularly check the d&b website for the latest version of
the documentation (R70 manual and TI 312).
Page 4 of 20 R70 Ethernet to CAN interface, Manual
d&b audiotechnik GmbH R70 Ethernet to CAN interface
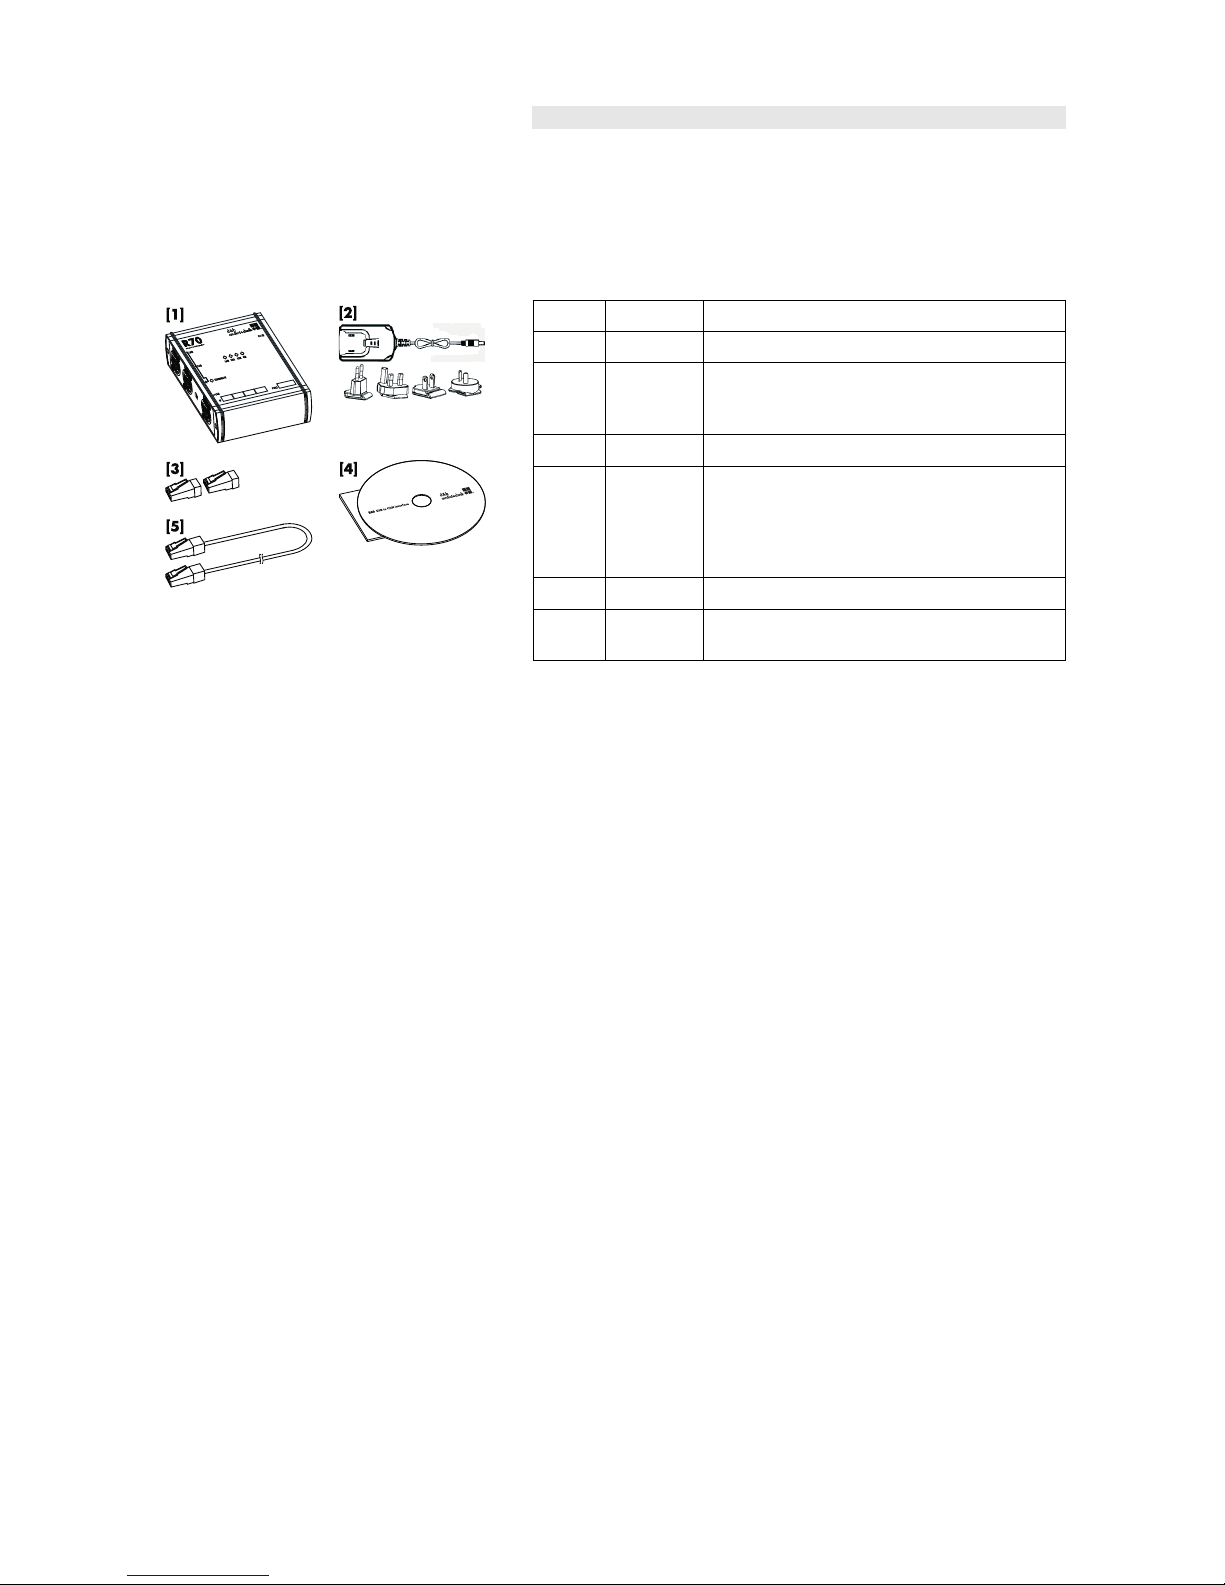
1.3. Scope of supply
Before installation and start up please verify the shipment for
completeness and carry out a visual inspection of the packaging and
the individual items listed below for obvious damage during shipment.
NOTICE: If there are any signs of obvious damage to the items, do not
connect and operate the device.
Qty. d&b Code Description
1 Z6124 R70 Ethernet to CAN interface [1]
1Power supply [2] including 4 x AC input plugs
specific to the following territorial regions:
Europe, UK, USA, and Australia
2 Z6116 RJ 45 M Terminator [3]
1CD-ROM [4] containing the R70 manuals and
additional documentation (TI 312).
Additionally, the AcrobatReader® in its current
version is provided to allow the documents to be
displayed and printed.
1Ethernet cable 2 m/6.5 ft (CAT6, 4 Pair STP) [5]
1 Additional cable clip to be used as cord grip for the
power supply.
(1.4 EN) Page 5 of 20

R70 Ethernet to CAN interface d&b audiotechnik GmbH
1.4. Technical specification
Power supply
Supply voltage.............10 V to 30 V DC / 330 mA, or PoE (Power over Ethernet)
DC IN (barrel connector)..........................to accept coaxial plug 2.1 x5.5 x 9.5 mm
......................................................................................................Center Positive Standard
Operating conditions
Temperature range.....................................– 40° C to + 50° C (– 40° F - + 122° F)
Controls and indicators
Termination.........................................................................built-in switchable terminator
..................Termination of CAN-Bus with internal resistor 120 Ω / 1/4 W /± 5%
.............................................................................................with corresponding status LED
Indicators (Status LEDs)....................................ON, CAN, ERROR, LAN, TERMINATE
Connectors
LAN (Ethernet)....................................................................................1 x RJ 45 connector
CAN....................................................................2 x RJ 45 connectors, wired in parallel
Hardware
Controller.......................................................................................................................16 Bit
Program Flash.............................................................................................................256 kB
Data Flash.......................................................................................................................8 MB
SRAM Size...................................................................................................................256 kB
EEPROM Size...................................................................................................................8 kB
Additional features.................................................................CAN galvanically isolated
CAN Specification
......................................................................................................................................2.0 A/B
CAN-Bus coupling............................................High Speed, according to ISO 11898
...............................................................................................................galvanically isolated
Max. CAN Baud Rate............................................................................................1 Mbit/s
Ethernet Specification
Ethernet..........................................................................10/100 M Base-F, IEEE 802.3u
Power over Ethernet (PoE)............................................................................IEEE 802.3af
Housing/Dimensions/Weight
Housing.................................................................................................Extruded aluminium
Dimensions (height x width x depth).............115x110x35 mm [4.5" x 4.3" x 1.4"]
Weight.............................................................................................................230 g (0.5 lb)
114 [4.5"] 35 [1.4"]
109 [4.3"]
Fig. 1: Dimensions in mm [inch]
Additional accessories
Z6123 Bopla mounting clamp upright.....................................................wall mounting
...............................................................................................top hat rail mounting (TS 35)
Page 6 of 20 R70 Ethernet to CAN interface, Manual
d&b audiotechnik GmbH R70 Hardware
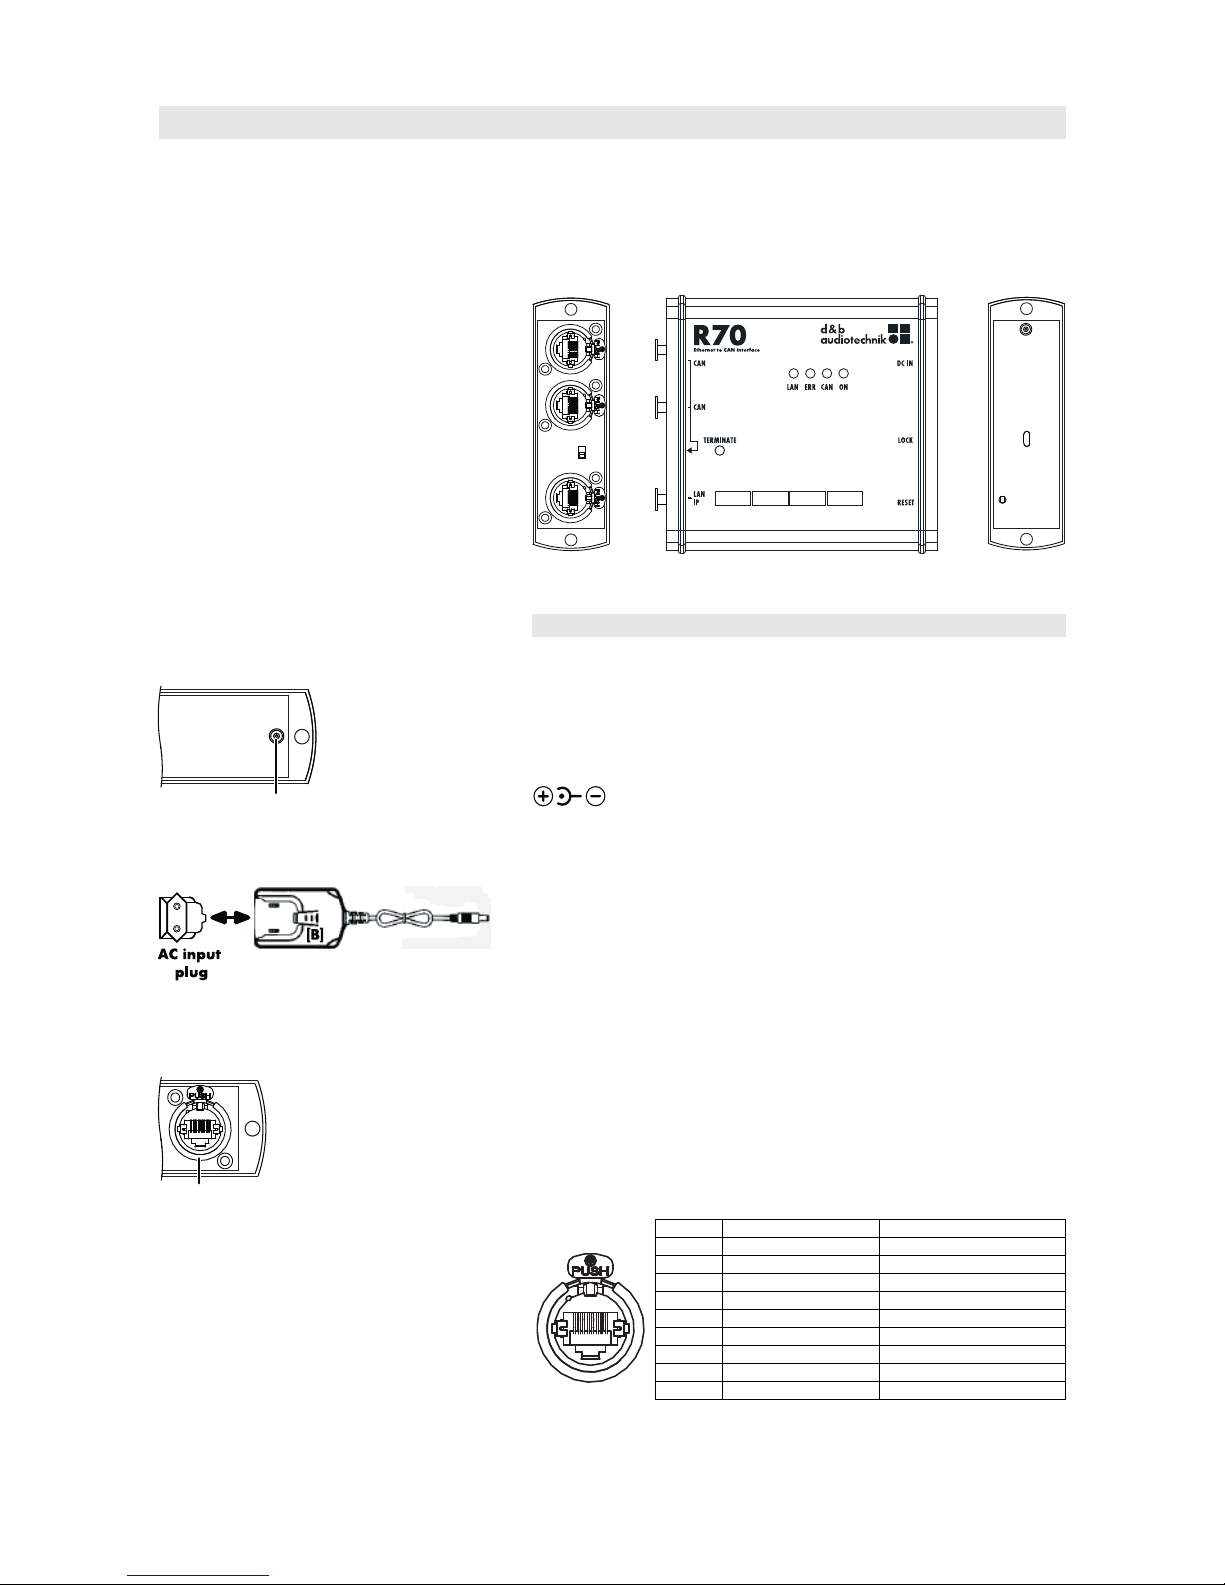
2. R70 Hardware
The hardware of the R70 Ethernet to CAN interface is housed in a
rugged aluminium enclosure including connectors, controls, and
indicators.
Left
panel
Right
panel
Top
panel
2.1. Connectors
2.1.1. Power supply [DC IN]
[DC IN]
The device can be powered by Ethernet (PoE, IEEE 802.3af) or by an
external power supply according to the specifications.
The connector for the external power supply is located on the right
hand side panel of the device (DC IN/Center Positive Standard
).
The power supply is equipped with changeable AC input plugs to allow
for connection to the following mains sockets: Europe, UK, USA, and
Australia.
Fitting/Exchanging the AC input plug
To fit or exchange the AC input plug, proceed as follows:
1. Slide in the respective AC input plug until it snaps into place.
2. To exchange the plug, press the button [B] and slide out the
plug.
2.1.2. LAN connector [1]
[1]
The RJ 45 connector type B (white colored coding ring) is located on the
left hand side panel of the device.
Note: Crossover Detection and Auto Correction are supported.
LAN [1] Pin Signal PoE
1..45..8
1 TxD + Mode A+
2 TxD - Mode A+
3 RxD + Mode A-
4 connected to Pin 5 Mode B +
5 connected to Pin 4 Mode B +
6 RxD - Mode A -
7 connected to Pin 8 Mode B -
8 connected to Pin 7 Mode B -
Shell Enclosure Shield
Tab. 1: LAN port pin assignment
(1.4 EN) Page 7 of 20

R70 Hardware d&b audiotechnik GmbH
2.1.3. CAN-Bus connectors [2]
[2]
Two RJ 45 connectors are located on the left hand side panel of the
device. Both connectors are wired in parallel to allow different wiring
setups of the CAN-Bus
NOTICE: Shielded cables and shielded RJ 45 connectors must be used
to connect the devices of the d&b Remote network (CAN-Bus). The
cable shielding must be connected to both sides of the RJ 45 connector
as the "CAN Ground" is routed via the cable shielding.
RJ 45 [2] Pin Signal Remark
1..45..8
1 -
2 -
3 -
4 CAN_H CAN high bus line (active high)
5 CAN_L CAN low bus line (active low)
6
7
8
Shell GND CAN ground
Table 2: RJ 45 (CAN-Bus) pin assignment
Page 8 of 20 R70 Ethernet to CAN interface, Manual

d&b audiotechnik GmbH R70 Hardware
2.2. Controls and indicators
[4][5][6][7]
[3b]
[3a]
Fig. 2: Controls and indicators
2.2.1. Termination switch [3a] and indicator [3b]
Fig. 3: Termination switch
and corresponding indicator LED
Fig. 4: Z6118 RJ 45 M Terminator
In general, the CAN-Bus has to be terminated on both ends of a CAN-
Bus segment. Please refer to the technical information TI 312
d&b Remote network for more detailed information.
The R70 interface has a built-in switchable terminator which can be
activated when only one of its CAN connectors is used (refer to the
wiring examples given in the following section).
To terminate the interface:
•Set the termination switch [3a] to TERMINATE. The corresponding
status LED [3b] lights up.
In this case both RJ 45 connectors are terminated as shown in the
graphic opposite.
Note: The two RJ 45 M terminators supplied with the R70 interface
must not be used to terminate the interface if the termination switch is
set to TERMINATE. They are used to terminate the last device of a
CAN-Bus segment (refer to the following section).
(1.4 EN) Page 9 of 20

R70 Hardware d&b audiotechnik GmbH
CAN-Bus termination
Daisy chain
RJ 45 M
Terminating
connector
CAN-Bus
Termination
switch set to
TERMINATE
D12
LEVEL
PUSHMENU
MUTE
POWER
AB
ON
OFF
OVLGRISPOVLGRISP
D12
LEVEL
PUSHMENU
MUTE
POWER
AB
ON
OFF
OVLGRISPOVLGRISP PC running
R1
Ethernet (LAN)
connection
d&b R70
Ethernet to CAN
interface
Fig. 5: d&b Remote network (CAN-Bus), wiring example 1 with terminated R70 interface at the "beginning" of the CAN-
Bus segment.
Daisy chain
RJ 45 M
Terminating
connector
CAN-Bus
D12
LEVEL
PUSHMENU
MUTE
POWER
AB
ON
OFF
OVLGRISPOVLGRISP
D12
LEVEL
PUSHMENU
MUTE
POWER
AB
ON
OFF
OVLGRISPOVLGRISP
Termination
switch set to
'off'
Daisy chain
RJ 45 M
Terminating
connector
CAN-Bus
D12
LEVEL
PUSHMENU
MUTE
POWER
AB
ON
OFF
OVLGRISPOVLGRISP
D12
LEVEL
PUSHMENU
MUTE
POWER
AB
ON
OFF
OVLGRISPOVLGRISP
PC running
R1
Ethernet (LAN)
connection
d&b R70
Ethernet to CAN
interface
Fig. 6: d&b Remote network (CAN-Bus), wiring example 2 with non-terminated R70 interface within the CAN-Bus
segment.
Page 10 of 20 R70 Ethernet to CAN interface, Manual

d&b audiotechnik GmbH R70 Hardware
2.2.2. Indicators (Status LEDs)
The R70 interface is equipped with four LEDs for visual status control of
the device. The function of each LED is described in the table below:
[4] [5] [6] [7]
LED (Col. [Pos.]) Status: Description
LAN (Green [4]) Off: No active Ethernet connection
Rapid flashing: Active Ethernet connection
ERR (Red [5]) Off: No error
On: Device is in Bus off mode
Flashing: CAN error
CAN (Green [6]) Off: No CAN data transfer
On: Operational state
Slow flashing: Stopped state
Flashing: CAN message received
(through an active Ethernet
connection)
ON (Green [7]) Off: Device is shut off
On: Status OK
Flashing: Initializing
2.2.3. RESET [R]
[R]
The RESET switch (push button) is located on the right hand side panel
of the device and allows for a reset of the device to factory default. To
reset the device, proceed as follows:
1. Disconnect the power from the device.
2. Press and hold the reset switch while reconnecting the power
and continue pressing down the reset switch for approx 3 s.
During this time the reset is executed while the ERR-LED is
flashing and the CAN-LED lights up. After successful reset all
status LEDs light up.
3. Release the reset switch.
(1.4 EN) Page 11 of 20
R70 operation and configuration d&b audiotechnik GmbH
3. R70 operation and configuration
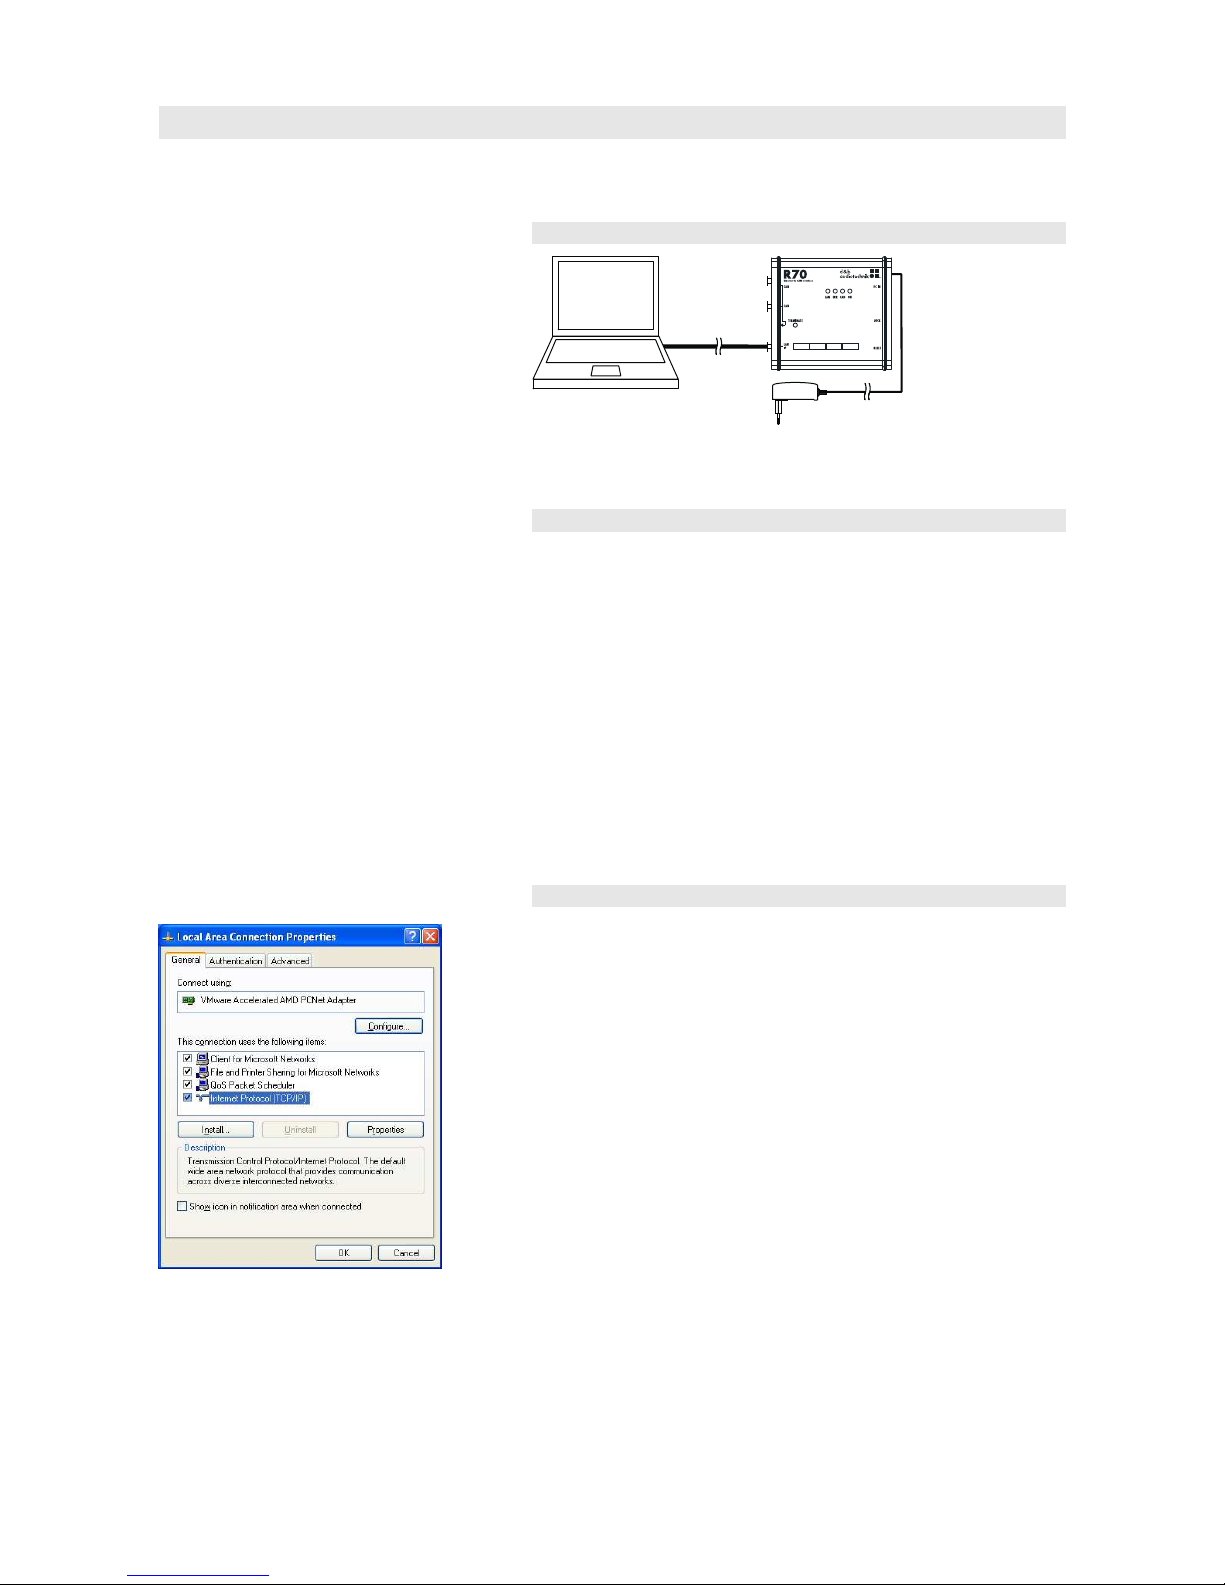
3.1. Physical setup
Ethernet
(LAN)
connection
Power
supply
Note: When Power over Ethernet (PoE) is available, the external
power supply is not required.
3.2. IP address
In order to access the d&b Remote network, the R70 interface must
have the same IP network settings as your network. Depending on the
network topology, the IP address can either be assigned manually or
automatically (DHCP).
When the R70 is connected to a network with a DHCP server present, a
matching IP address is assigned to the interface automatically.
In all other cases the R70 must be adapted manually.
The R70 IP address is set to 192.168.1.70 by factory default
(see also the label sticker on the rear panel of the R70).
3.3. Direct connection
To access the R70, manually assign an IP address to the PC on your
network with the same subnet as the R70. Proceed as follows:
1. From the "Start-Settings" menu select the "Network
Connection" associated with your network adapter.
2. Select "Internet Protocol (TCP/IP)" and click on "Properties".
3. Enter a static IP address in the same subnet as the R70 by
selecting "Use the following IP address":
IP address: 192.168.1.71
Subnet mask: 255.255.255.0
4. Apply the changes by clicking OK and close the network
properties dialog.
To display the web interface of the R70, enter the IP address of the R70
in the address bar of your web browser.
Page 12 of 20 R70 Ethernet to CAN interface, Manual

d&b audiotechnik GmbH R70 operation and configuration
3.4. LAN network with DHCP server
Note: If a firewall is active, allow access to the UDP Port 33333 (fix)
and the TCP Port 30000 (adjustable).
The "Obtain an IP address automatically" function is enabled by default.
1. Connect the R70 to your network and an IP address is
assigned by the DHCP server.
2. Start the respective d&b software (e.g. R1 - Edit mode) and
select "CAN" from the "Extras-Options" menu.
The program scans for connected interfaces and all devices
found are listed. This may take several seconds.
3. Right click on an R70 entry in the list and select
"Configure Interface" to access the R70 web interface.
(1.4 EN) Page 13 of 20

R70 operation and configuration d&b audiotechnik GmbH
3.5. LAN network without DHCP server
When the R70 is connected to a network without DHCP server, the R70
must be adapted to the local network.
To do so, first proceed as described in the previous section (Direct
connection) to gain access to the R70.
1. Select the "LAN Parameters" tab from the R70 web interface and
disable "Obtain an IP address automatically".
2. Enter the desired Host name, the respective IP address and Subnet
mask.
3. Click Save to confirm and execute a Device Restart.
Page 14 of 20 R70 Ethernet to CAN interface, Manual

d&b audiotechnik GmbH R70 operation and configuration
3.6. R70 Web interface
The R70 does not require its own drivers for use with a computer. All
configurations can be set using a standard web browser with JavaScript
enabled.
Recommended web browsers:
Windows Microsoft Internet Explorer 6.0 or higher
Mozilla Firefox 2.0 or higher
Mac OS Safari 1 or higher
3.6.1. Device Info
Clear Errors
The respective error message is reset after the related fault is solved.
Device Restart
The device is rebooted and the current session is disconnected.
Factory Default
The device is set to the default IP address and DHCP is enabled. The
R70 IP address is set to 192.168.1.70 by factory default - see also the
label sticker on the rear panel of the R70.
3.6.2. LAN and CAN Parameters
NOTICE: The "Advanced" pages for the LAN and CAN parameters
are only intended for users with advanced experience and knowledge.
Wrong adjustments or settings can lead to malfunction.
(1.4 EN) Page 15 of 20

R70 operation and configuration d&b audiotechnik GmbH
LAN Parameters
In the "LAN Parameters" tab, the settings of the R70 can be modified to
the on site conditions of the local area network.
When more than one R70 is used, each one must have a unique IP
address and host name.
The settings below can be assigned automatically if the on site network
supports this capability. Otherwise please consult the responsible
network administrator for the appropriate IP settings.
Host Name Name to identify the R70 within a
network. This name must be unique.
IP Address Unique IP address according to "IP v4
Standard".
Subnet Mask Corresponding subnet mask
Obtain an IP address
automatically
Enable / Disable
CAN Parameters
Page 16 of 20 R70 Ethernet to CAN interface, Manual

d&b audiotechnik GmbH R70 accessories and anti-theft protection (LOCK)
4. R70 accessories and anti-theft protection (LOCK)
4.1. Mounting clamp
The additional Z6123 Bopla mounting clamp allows the R70 interface to
be mounted to:
•Walls or inside touring racks.
•Top hat rails (TS 35 – 35 mm/1.4") inside an equipment cabinet.
4.1.1. Attaching the mounting clamp
The two clamp halves have different lengths. For this reason, we
recommend you to align the clamp or the R70 in such a way that the
short clamp half is located on the top panel of the device (see graphic
opposite).
4.2. Anti-theft protection – LOCK
A slot (LOCK) is located on the right hand side panel of the device and
allows for the attachment of a Kensington lock device.
(1.4 EN) Page 17 of 20

R70 accessories and anti-theft protection (LOCK) d&b audiotechnik GmbH
4.3. Dimension drawings
54 [2.1"]
0
/4.4 [0.2"]
36 [1.4"]
Fig. 7: Z6123 Bopla mounting clamp upright, dimensions in mm [inch]
Fig. 8: Wall mounting with dimensions in mm [inch]
Fig. 9: Top hat rail mounting with dimensions in mm [inch]
Page 18 of 20 R70 Ethernet to CAN interface, Manual
d&b audiotechnik GmbH Manufacturer's declarations
5. Manufacturer's declarations
5.1. EU declaration of conformity (CE symbol)
This declaration applies to the:
R70 Ethernet to CAN interface, Z6124.000
manufactured by d&b audiotechnik GmbH.
All products of this type starting from variant Z6124.000 are included,
provided they correspond to the original technical version and have not
been subject to any later design or electromechanical modifications.
We herewith declare that said product is in conformity with the
provisions of the following EC directives including all applicable
amendments:
2004/108/EC Electromagnetic Compatibility
2006/95/EC Low Voltage
IEC 60950 (DIN EN 60950): 2001
A detailed declaration is available on request and can be ordered from
d&b or downloaded from the d&b website at www.dbaudio.com.
5.2. Disposal (WEEE symbol)
This symbol indicates that electrical and electronic equipment must be
disposed of separately from normal waste at the end of its operational
lifetime.
When out of use the device must be disposed of in accordance with the
national environmental regulations.
(1.4 EN) Page 19 of 20

D2402.EN .01, 04/2009 © d&b audiotechnik GmbH
d&b audiotechnik GmbH, Eugen-Adolff-Str. 134, D-71522 Backnang, Germany, Phone +49-7191-9669-0, Fax +49-7191-95 00 00
Other manuals for R70
1
Table of contents
Other d & b audiotechnik Recording Equipment manuals

Popular Recording Equipment manuals by other brands


Northern Airborne Technology
Northern Airborne Technology AA224 series Installation and operation manual

Crux
Crux Sightline RVCAD-81H quick start guide

Teledyne
Teledyne Avalanche Locking Kit installation guide

Zoom
Zoom H2next Operation manual

Fostex
Fostex DV-824 Owner's manual supplement

Panasonic
Panasonic SLPR300 - CD RECORDER Service manual


