cymatic audio LR-16 User manual

Page 1
c
ymatic audio
Live Recorder LR-
16
www.cymaticaudio.com
www.cymaticaudio.comwww.cymaticaudio.com
www.cymaticaudio.com
Live Recorder LR
Live Recorder LRLive Recorder LR
Live Recorder LR-
--
-
16
User Manual
connect
record
done
cymatic audio
www.cymaticaudio.com

Page 2
c
ymatic audio
Live Recorder LR-
16
www.cymaticaudio.com
www.cymaticaudio.comwww.cymaticaudio.com
www.cymaticaudio.com
SAFETY PRECAUTIONS
AC adapter
Be sure to use only the supplied 12 V DC, 1000 mA AC adapter which is equipped with a "center plus" plug. he use of
an adapter other than the specified type may damage the unit and pose a safety hazard. Connect the AC adapter only
to an AC outlet that supplies the rated voltage required by the adapter. When disconnecting the AC adapter from the
AC outlet, always grasp the adapter itself and do not pull at the cable. During lightning or when not using the unit for an
extended period, disconnect the AC adapter from the AC outlet.
Environment
o prevent the risk of fire, electric shock or malfunction, avoid using your Live Recorder LR-16 in environments where it
will be exposed to:
• Extreme temperatures
• Heat sources such as radiators or stoves
• High humidity or moisture
• Excessive dust or sand
• Excessive vibration or shock
Handling
Never place objects filled with liquids, such as vases, on the Live Recorder LR-16 since this can cause electric shock. Do
not place naked flame sources, such as lighted candles, on the Live Recorder LR-16 since this can cause fire. he Live
Recorder LR-16 is a precision instrument. Do not exert undue pressure on the keys and other controls. Also take care
not to drop the unit, and do not subject it to shock or excessive pressure. ake care that no foreign objects (coins or
pins etc.) or liquids can enter the unit.
Connecting cables and input and output jacks
You should always turn off the power to the Live Recorder LR-16 and all other equipment before connecting or
disconnecting the power source. Also make sure to disconnect all connection cables and the power cord before moving
the Live Recorder LR-16.
Alterations
Do not open the case of the Live Recorder LR-16 or attempt to modify the product in any way as this would void the
warranty. here are no serviceable parts inside the unit.
Volume
Do not use the Live Recorder LR-16 at a loud volume for a long time since this can cause hearing impairment.

Page 3
c
ymatic audio
Live Recorder LR-
16
www.cymaticaudio.com
www.cymaticaudio.comwww.cymaticaudio.com
www.cymaticaudio.com
Usage Precautions
Electrical interference
For safety considerations, the Live Recorder LR-16 has been designed to provide maximum protection against the
emission of electromagnetic radiation from inside the device, and protection from external interference. However,
equipment that is very susceptible to interference or that emits powerful electromagnetic waves should not be placed
near the Live Recorder LR-16, as the possibility of interference cannot be ruled out entirely. With any type of digital
control device, the Live Recorder LR-16 included, electromagnetic interference can cause malfunctioning and can
corrupt or destroy data. Care should be taken to minimize the risk of damage.
Cleaning
Use a soft, dry cloth to clean the Live Recorder LR-16. If necessary, slightly moisten the cloth. Do not use abrasive
cleanser, wax, or solvents (such as paint thinner or cleaning alcohol), since these may dull the finish or damage the
surface. Please keep this manual in a convenient place for future reference.
Certifications
CE This product complies with the European Union Council Directives and Standards relating to Directive 2004/108/EC or Electromagnetic
compatibility (EMC) and Low Voltage Directive 2006/95/EC.
RoHS This product is compliant with the EU Directive 2011/65/EU or the Restriction o the use o Certain Hazardous Substances in
Electrical and Electronic Equipment. No lead (Pb), cadmium (Cd), mercury (Hg), hexavalent chromium (Cr+6), PBB or PBDE is intentionally
added to this device. Any traces o impurities o these substances contained in the parts are below the RoHS speci ied threshold levels.
FCC This equipment has been tested and ound to comply with the requirements o 47 CFR o PART 15 limit or radiation and conduction
emission relating to FCC rules Part 15B : 2010.

Page 4
c
ymatic audio
Live Recorder LR-
16
www.cymaticaudio.com
www.cymaticaudio.comwww.cymaticaudio.com
www.cymaticaudio.com
Table of Contents
1.
INTRODUCTION ........................................................................................................................................................................... 5
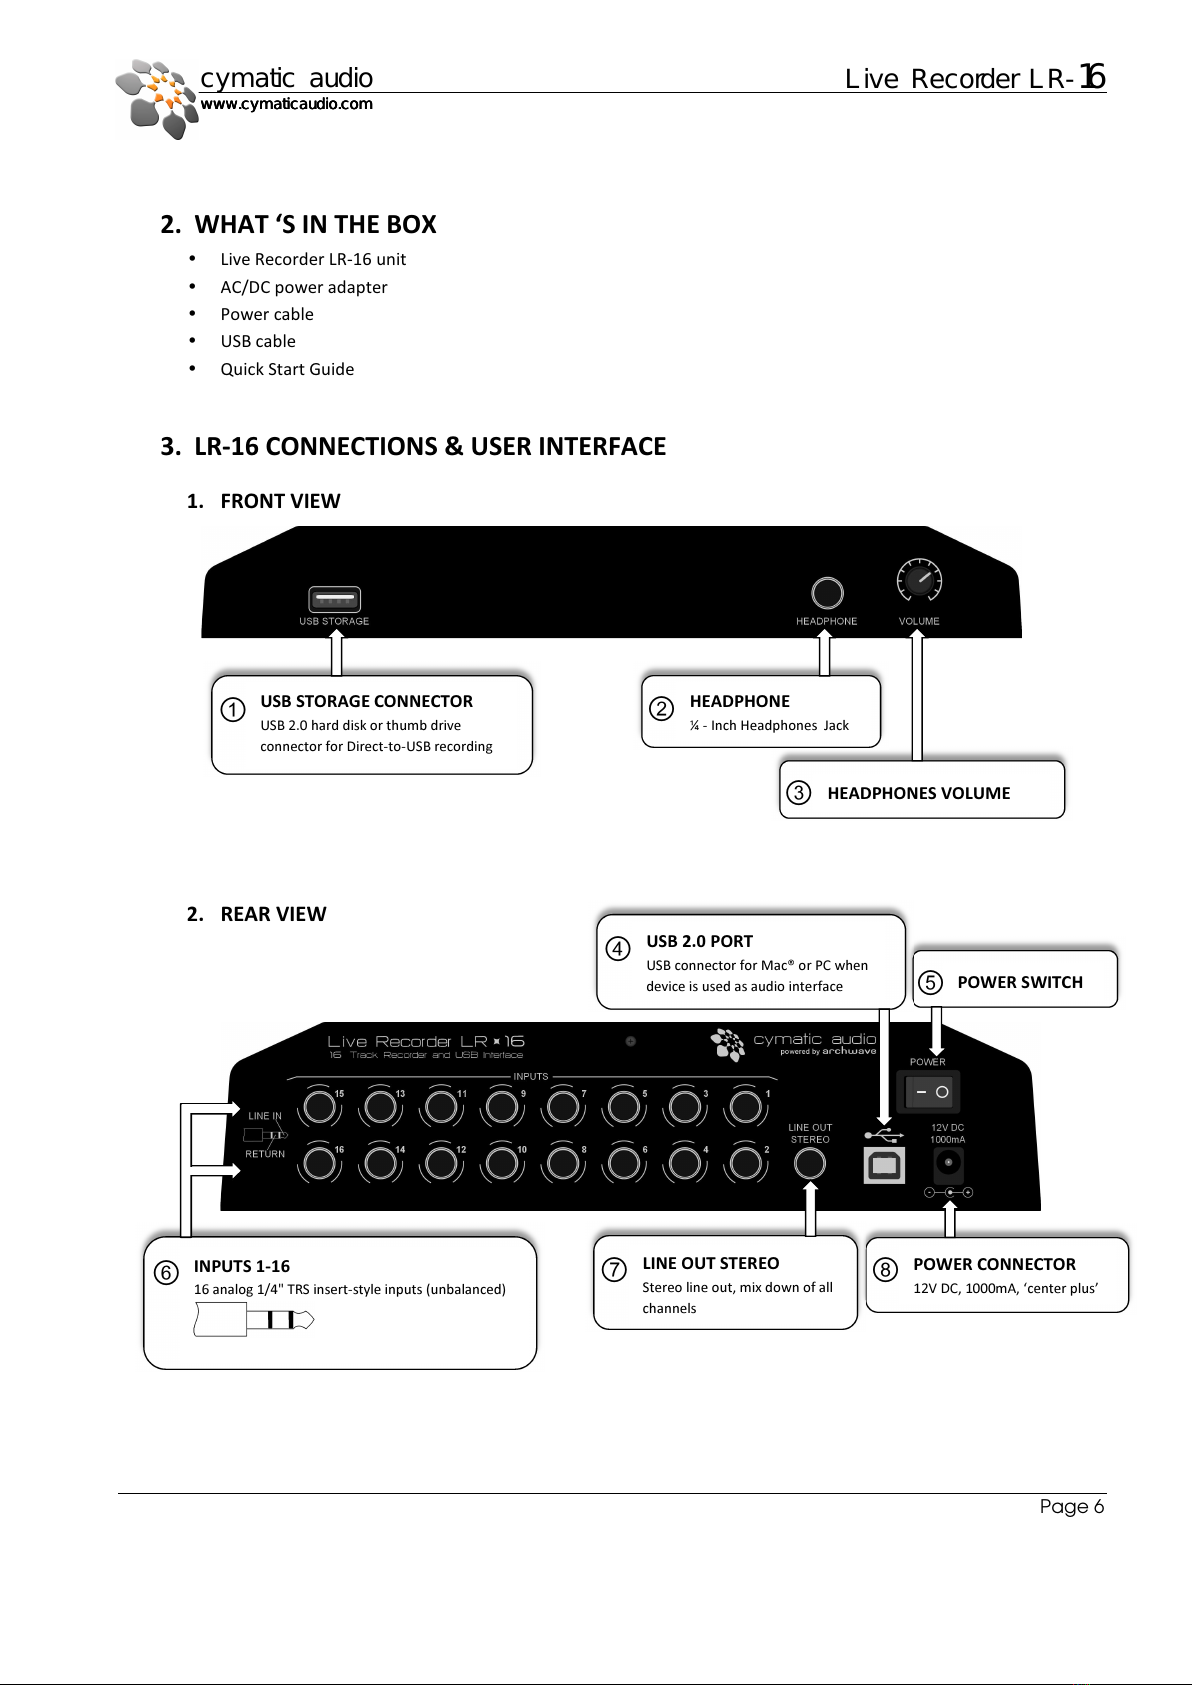
2.
WHAT ‘S IN THE BOX ................................................................................................................................................................... 6
3.
LR-16 CONNECTIONS & USER INTERFACE ................................................................................................................................... 6
FRONT VIEW ...................................................................................................................................................................... 6
1.
REAR VIEW ......................................................................................................................................................................... 6
2.
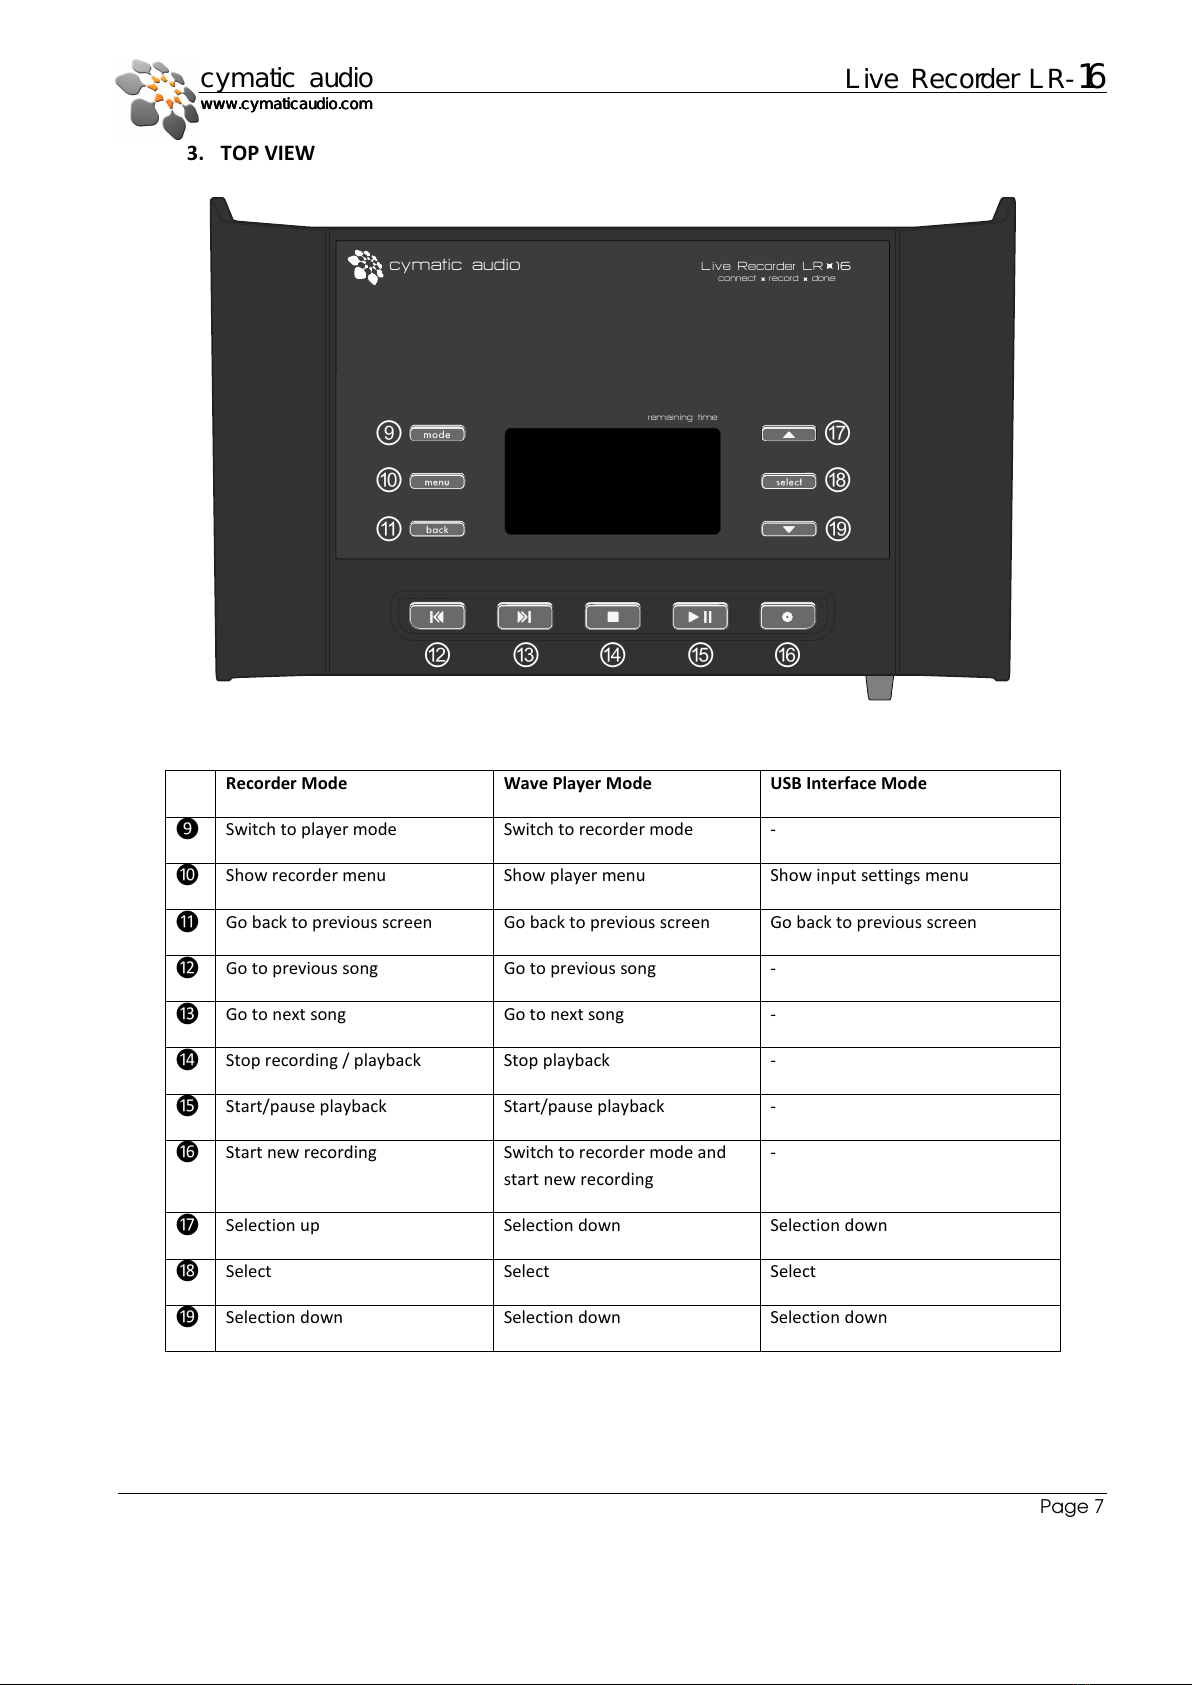
TOP VIEW........................................................................................................................................................................... 7
3.
4.
DIRECT TO USB RECORDIN ....................................................................................................................................................... 8
Turn on the device ............................................................................................................................................................. 8
1.
Connect USB storage device .............................................................................................................................................. 8
2.
Storage device test result .................................................................................................................................................. 8
3.
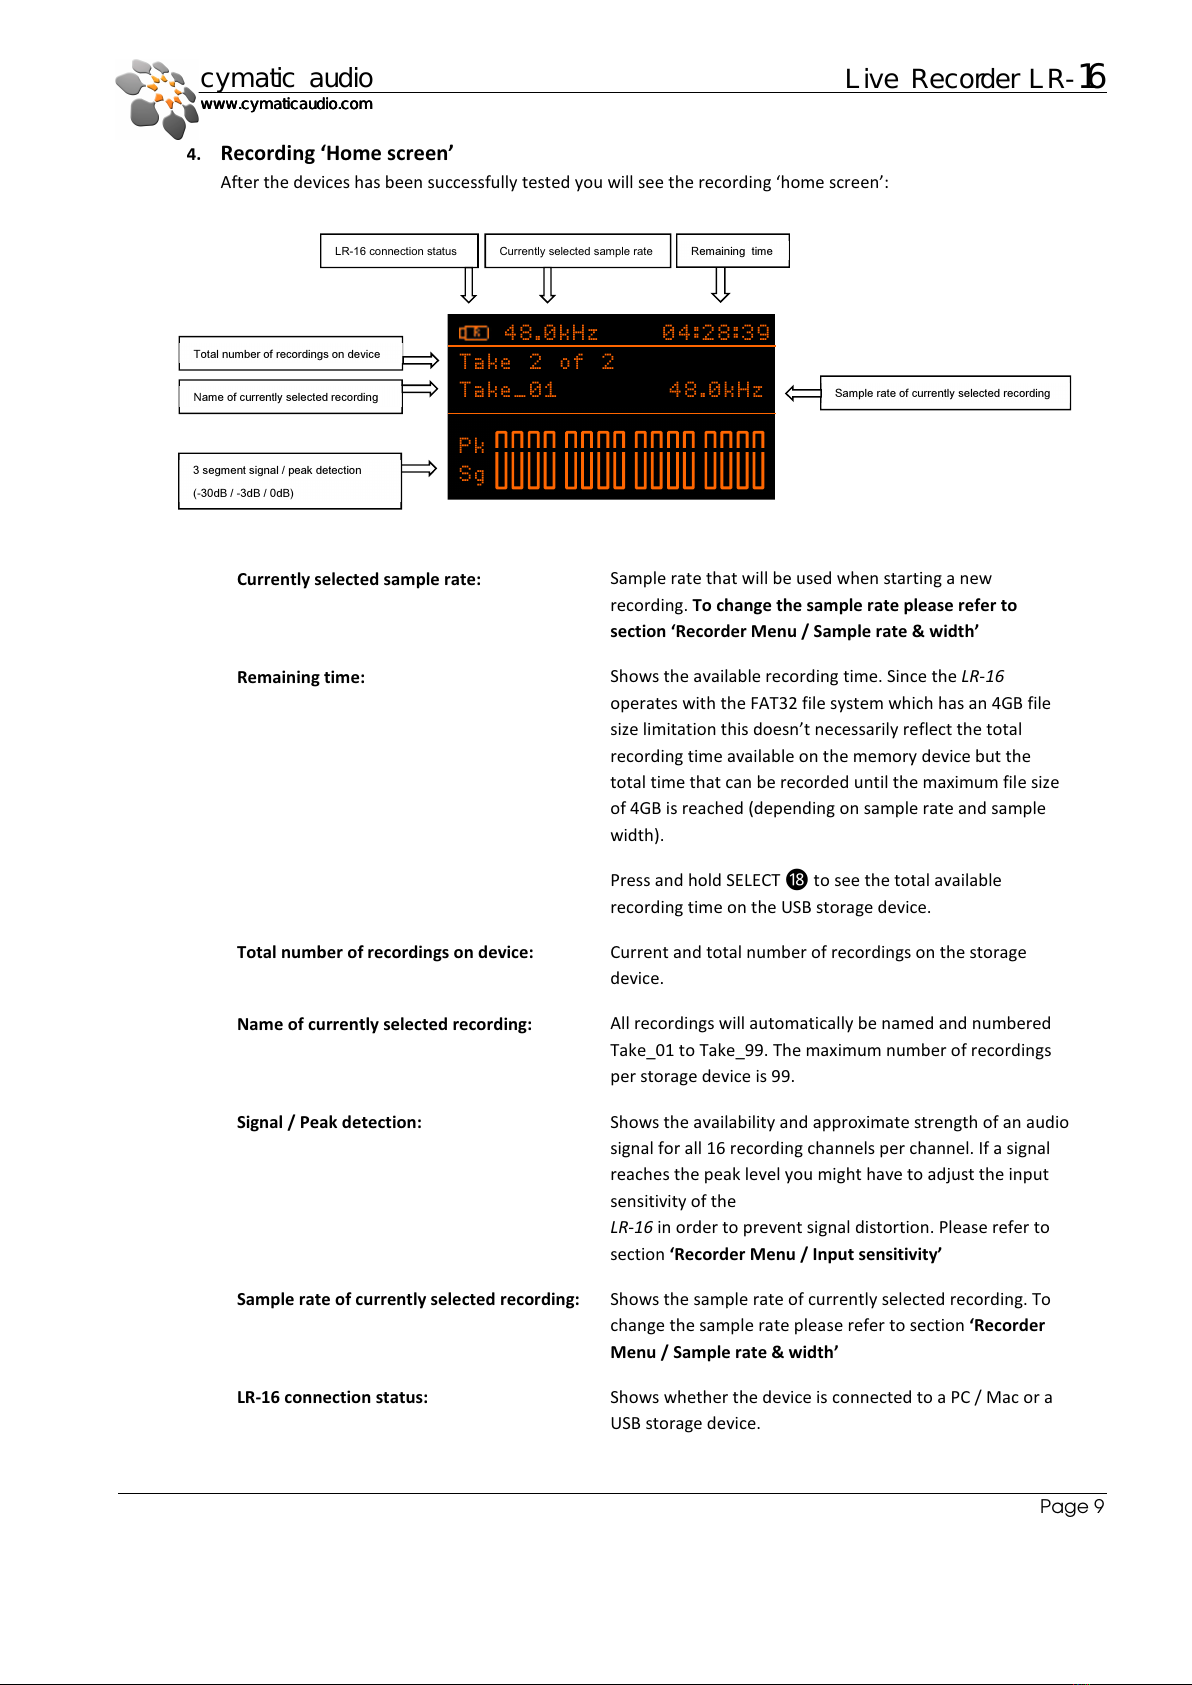
Recording ‘Home screen’ .................................................................................................................................................. 9
4.
Start recording ................................................................................................................................................................. 10
5.
Creating a new track ‘on the fly’ ..................................................................................................................................... 10
6.
Stop the recording ........................................................................................................................................................... 10
7.
Playing back the recorded tracks .................................................................................................................................... 10
8.
Recording priority ............................................................................................................................................................ 10
9.
Recorder Menu ................................................................................................................................................................ 11
10.
5.
Player Mode .............................................................................................................................................................................. 12
Start playback .................................................................................................................................................................. 12
1.
Player Menu .................................................................................................................................................................... 12
2.
6.
Supported USB storage devices ................................................................................................................................................ 13
USB2.0 Thumb Drives ...................................................................................................................................................... 13
1.
USB2.0 Hard Disks ........................................................................................................................................................... 13
2.
7.
Connecting recording sources .................................................................................................................................................. 14
8.
16x2 Channel USB Interface Mode ........................................................................................................................................... 16
PC / Windows .................................................................................................................................................................. 16
1.
Apple® Mac®.................................................................................................................................................................... 20
2.
Apple® iPad®.................................................................................................................................................................... 21
3.
9.
Firmware update....................................................................................................................................................................... 21
10.
Troubleshooting ................................................................................................................................................................... 22
11.
Specifications ....................................................................................................................................................................... 23
12.
Cymatic Audio Limited Warranty ......................................................................................................................................... 24

Page 5
c
ymatic audio
Live Recorder LR-
16
www.cymaticaudio.com
www.cymaticaudio.comwww.cymaticaudio.com
www.cymaticaudio.com
1. INTRODUCTION
hank you for purchasing the Cymatic Audio Live Recorder LR-16.
he Live Recorder LR-16 is the world’s easiest to use Direct to USB 16-track recorder and 16 in / 2 out USB audio
interface for PC and Mac® and iPad®.
he Live Recorder LR-16 was designed using high-grade components to ensure optimum performance as a recorder for
live performances while sparing users the hassle of ‘traditional’ multi-track recording. he LR-16 doesn’t need any
additional hardware except for a USB thumb or hard drive and some cables in order to record 16 audio tracks as
standard wave files directly from a mixer’s FOH inserts to the USB recording medium. he LR-16 is the cost effective and
easy live recording solution you have been waiting for. Great for beginner recordists who don’t want to deal with
difficult and time consuming learning curves, as well as the most seasoned professionals who don’t want to be
bothered with messy setups
Used in connection with an iPad®, Mac® or PC the LR-16 serves as an 16 in / 2 out USB audio interface. When you’ve
finished your live recording in the field, simply connect the LR-16 to your computer or tablet and you have a high quality
USB interface. Plug your USB drive and drag and drop your files into your favorite DAW to edit your audio or do
additional overdubs. Convenient features such as native Mac and iPad® driver support make installation a breeze. Zero
latency hardware monitoring and a built in mixer allow for error free recording, flexibility and hassle free setup.
Free your mind...and make more music.
he LR-16 User Manual contains in-depth details of your Live Recorder’s features and functionality:
•USB2.0 compatible Direct to USB recording (16 tracks, 16/24-bit 44.1 - 48 kHz)
•24 bit/44.1 - 96 kHz USB Class Compliant Audio Interface
•Mac® OS-X® compatible - Core Audio plug and play drivers
•Pad® compatible - plug and play (USB adapter required e.g. Apple® Camera Kit).
•No powered USB hub required for iPad® connectivity.
•Windows® PC compatible (Win XP, Vista, 7&8 32/64) WDM and ASIO® drivers.
•16 analog 1/4" RS insert-style inputs with stereo output and headphone output.
•Independent and Global 12dB input padding.
•Zero latency hardware input monitoring.
•Built in mixer with pan, solo, mute and volume control.
•Stereo wave player.

Page 6
c
ymatic audio
Live Recorder LR-
16
www.cymaticaudio.com
www.cymaticaudio.comwww.cymaticaudio.com
www.cymaticaudio.com
2. WHAT ‘S IN THE BOX
•Live Recorder LR-16 unit
•AC/DC power adapter
•Power cable
•USB cable
•Quick Start uide
3. LR-16 CONNECTIONS USER INTERFACE
FRONT VIEW
1.
REAR VIEW
2.
③
HEADPHONES VOLUME
①
USB STORAGE CONNECTOR
USB 2.0 hard disk or thumb drive
connector for Direct-to-USB recording
②
HEADPHONE
¼
-
Inch Headphones
ack
⑤ POWER SWITCH
⑧ POWER CONNECTOR
12V DC, 1000mA, ‘center plus’
④ USB 2.0 PORT
USB connector for Mac® or PC when
device is used as audio interface
⑦ LINE OUT STEREO
Stereo line out, mix down of all
channels
⑥ INPUTS 1-16
16 analog 1/4" TRS insert-style inputs (unbalanced)

Page 7
c
ymatic audio
Live Recorder LR-
16
www.cymaticaudio.com
www.cymaticaudio.comwww.cymaticaudio.com
www.cymaticaudio.com
TOP VIEW
3.
Recorder Mode Wave Player Mode USB Interface Mode
❾ Switch to player mode Switch to recorder mode -
❿ Show recorder menu Show player menu Show input settings menu
⓫ o back to previous screen o back to previous screen o back to previous screen
⓬ o to previous song o to previous song -
⓭ o to next song o to next song -
⓮ Stop recording / playback Stop playback -
⓯ Start/pause playback Start/pause playback -
⓰ Start new recording Switch to recorder mode and
start new recording
-
⓱ Selection up Selection down Selection down
⓲ Select Select Select
⓳ Selection down Selection down Selection down
connect record done
remaining time
cymatic audio Live Recorder LR 16
⑨
⑩
⑪
⑯
⑮
⑭
⑬
⑫
⑲
⑱
⑰

Page 8
c
ymatic audio
Live Recorder LR-
16
www.cymaticaudio.com
www.cymaticaudio.comwww.cymaticaudio.com
www.cymaticaudio.com
4. DIRECT TO USB RECORDING
Turn on the device
1.
Connect the LR-16 to the power supply and turn it on ❺. After the
start-up screen you will see the following:
Connect USB storage device
2.
After plugging in a USB thumb drive or USB hard disk into the USB
storage connector ❶ the LR-16 will start testing the drive’s
performance. This can take up to 2 minutes for slow storage
devices. Please do not remove the storage device while this test is
conducted.
Storage device test result
3.
1. Test passed
If the LR-16 determines that the storage device is suitable
for recording the following screen will appear for a few
seconds after which the device goes to the recording
‘home screen’. The device is now ready to start recording.
2. Test failed: USB Flash drive too slo
If the Flash drive’s performance is too slow for Direct-to-
USB recording you are given the option to format the
drive. This can in some cases improve the device’s
performance (e.g. if the memory is too fragmented or the
existing format uses the wrong cluster size).
Please see ‘Format USB device’
3. Test failed: rong file system
The inserted flash drive needs to be formatted FAT32 in
order to be suitable for Direct-to-USB recording. If this is
not the case you are given the option to format the drive.
Please see ‘Format USB device’
4. Test failed: disk error
If the USB storage device is defective or otherwise
unsupported please remove the device and refer to section
‘Supported USB storage devices’
48.0kHz
Please connec t PC or
USB storage d evice
Pk
Sg
USB device test
USB Flash Drive
Please wait
testing
Test assed
USB Flash Drive
free s ace: 23.628GB
remain time: 04:28:50
sam le rate: 48.0kHz
sam le width: 16 bit
USB device test
USB Flash Drive
too slow
Format USB device?
( ress MODE)
USB device test
wrong file sy stem
lea se reformat
Format USB device?
( ress MODE)
USB device test
Disk Error!
This memory d evice
is not su or ted,
lea se remove it .

Page 9
c
ymatic audio
Live Recorder LR-
16
www.cymaticaudio.com
www.cymaticaudio.comwww.cymaticaudio.com
www.cymaticaudio.com
Recording Home screen’
4.
After the devices has been successfully tested you will see the recording ‘home screen’:
Currently selected sample rate: Sample rate that will be used when starting a new
recording. To change the sample rate please refer to
section ‘Recorder Menu / Sample rate & idth’
Remaining time:
Shows the available recording time. Since the LR-16
operates with the FAT32 file system which has an 4 B file
size limitation this doesn’t necessarily reflect the total
recording time available on the memory device but the
total time that can be recorded until the maximum file size
of 4 B is reached (depending on sample rate and sample
width).
Press and hold SELECT ⓲ to see the total available
recording time on the USB storage device.
Total number of recordings on device: Current and total number of recordings on the storage
device.
Name of currently selected recording: All recordings will automatically be named and numbered
Take_01 to Take_99. The maximum number of recordings
per storage device is 99.
Signal / Peak detection: Shows the availability and approximate strength of an audio
signal for all 16 recording channels per channel. If a signal
reaches the peak level you might have to adjust the input
sensitivity of the
LR-16 in order to prevent signal distortion. Please refer to
section ‘Recorder Menu / Input sensitivity’
Sample rate of currently selected recording:
Shows the sample rate of currently selected recording. To
change the sample rate please refer to section ‘Recorder
Menu / Sample rate & idth’
LR-16 connection status: Shows whether the device is connected to a PC / Mac or a
USB storage device.
48.0kHz 04:28:39
Take 2 of 2
Take_01 48.0kHz
Pk
Sg
Total number of recordings on device
Name of currently selected recording
3 segment signal / peak detection
(-30dB / -3dB / 0dB)
Sample rate of currently selected recording
Currently selected sample rate
emaining time
LR-16 connection status

Page 10
c
ymatic audio
Live Recorder LR-
16
www.cymaticaudio.com
www.cymaticaudio.comwww.cymaticaudio.com
www.cymaticaudio.com
Start recording
5.
Connect your recording source to the inputs on the rear panel ❻
of
the LR-16 (please refer to section ‘Connecting recording sources’)
and
check whether you have an input signal by observing the Signal / Peak
detection meters. If necessary adjust the output levels of your
recording source or the input levels of the LR-16 (please refer to
section ‘Recorder Menu / Input sensitivity’)
Press the Record ⓰ button to start the recording. The LR-16 will
create a new Take, the record button light will turn red and the
‘walking dots’ in the display indicate that the recording is running. At
the same time the ‘Remaining time’ indicator in the top right corner
will count down the maximum remaining time for this recording. The
recording will be stored as 16 separate wave files into the
‘Recording/Take_xx’ folder on the USB storage device.
Creating a new track on the fly’
6.
When the Record ⓰ button is pressed while the LR-16 is already recording the device will close the current and
create a new track on the USB storage device.
Stop the recording
7.
To stop the recording press the Stop button ⓮. The Play and Record
buttons will flash for a few moments and the display will read ‘Please
wait’ until the LR-16 has finished writing all data to the storage device.
Playing back the recorded tracks
8.
Use the Next ⓬/ Previous ⓭ or Up ⓱/ Down ⓳ buttons to step
through the recorded tracks on the USB storage device. Hit the Play
button to start playing back a track. The recording will be played out
to the Headphone ❷ and Line ❼ outputs. To change the levels
panning of each individual channel please refer to section ‘Monitoring
settings’.
Recording priority
9.
No matter what mode the device currently is in - hitting the Record ⓰ button will always cause it to instantly go
into recording mode and start a new recording. While recording all buttons except for the Record ⓰ and Stop ⓮
buttons are blocked.
48.0kHz 04:28:39
Take 2 of 2
Take_02 48.0kHz
Pk
Sg
48.0kHz 04:27:15
Recording
Take_03 48.0kHz
Pk
Sg
48.0kHz 03:55:35
Please wait
Take_03 48.0kHz
Pk
Sg
!
Do no remove he s orage device while he
Record and Play bu ons are s ill flashing – your
recording migh become unusable.
48.0kHz 00:17:28
Playing
Take_02 48.0kHz
Pk
Sg

Page 11
c
ymatic audio
Live Recorder LR-
16
www.cymaticaudio.com
www.cymaticaudio.comwww.cymaticaudio.com
www.cymaticaudio.com
Recorder Menu
10.
Pressing the Menu ❿ Buon while in recording mode will take you to
the Recorder Menu. Use the Up ⓱/ Down ⓳ and Select ⓲ buttons
to select a menu option.
Sample rate & idth
Manually override the default sample rate and sample width settings
of the LR-16. The default recording settings are:
USB Thumb Drive: 48kHz / 16 bit
USB Hard Drive: 48kHz / 24 bit
Use the Up ⓱/ Down ⓳ and Select ⓲ buttons to make a selection.
Please refer to section ‘Supported USB storage devices’
Pad settings
The input sensitivity can be set to high or low (-10dB) for all or for each
individual channel by turning the pad on or off.
Use the Up ⓱/ Down ⓳ buttons to select a channel and the Select
⓲ button to toggle pad on/off. On entering the menu option all
channels can be toggled between pad on/off together.
Monitor settings
With the monitoring menu option output levels, left/right panning and
mute/solo can be set for each channel individually. The solo setting will
only be active while the monitoring menu is active. The mute setting
will only be active until the LR-16 is restarted. The volume and panning
settings are saved to the Live Recorder’s internal memory. Use the Up
⓱/ Down ⓳ buttons to select a channel and the Select ⓲ button to
toggle between volume, mute/solo and panning. Set the values with
the Up/Down buttons.
Delete recording
Individual tracks can be deleted from the USB storage device
connected to the LR-16. Use the Up ⓱/ Down ⓳ buttons to select a
track and the Select ⓲ button delete selected track.
Format USB device
The format function can be used to format thumb or hard drives
connected to the Live Recorder.
disk
sam le rate & width
in ut s ensitivity( ad)
monitoring
delete record ing
format USB de vice
sam le rate & width
PAD setting s
Pk
Sg
ch: 4 ad: on
on
off
Monitor set tings
ch: 4 volume : -15dB
mute/solo: on
annin g : 127R
M
M
disk 05:10:23
Take_04
Take_06
Take_07
SELECT=delete selected
Take_05
Format USB device?
ARE YOU SURE?
(all data wil l be lost!)
res s PLAY to co ntinue
disk
05:1 0:23
44 .1kHz
16 bit
48 kHz
24 bit
!
All da a as well as all par i ions on he humb or
hard drive will be dele ed when he forma
func ion is used!

Page 12
c
ymatic audio
Live Recorder LR-
16
www.cymaticaudio.com
www.cymaticaudio.comwww.cymaticaudio.com
www.cymaticaudio.com
Display settings
Display contrast and brightness can be set to ensure optimal
readability at different viewing angles.
Use the Up ⓱/ Down ⓳ buttons to choose a setting and the
Select ⓲ and Up/Down buttons to adjust the values.
5. Player Mode
When in Player mode the LR-16 servers as a stereo wave player, playing back 44.1 and 48kHz stereo wave files that are
stored in the ‘Music’ folder on the USB storage device.
Start playback
1.
Switch the LR-16 into the player mode by pressing the Mode ❾
button. All the wave files stored in the ‘Music’ folder on the USB
storage device will be displayed in a list. Use the Up ⓱/ Down ⓳ or
Previous ⓬/ Next ⓭ buttons to choose a song and the Select ⓲ or
Play/Pause ⓯ buttons to start playback. The currently played song
will be displayed in the bottom line of the display.
Player Menu
2.
When pushing the Menu ❾ button while in player mode the Player
Menu will be displayed where 1 of 4 different playback modes can be
set.
normal: the current song will be played once
continuous: all the songs in the ‘Music’ folder will be played
repeat: the current song will be repeated endlessly
shuffle: the device continuously chooses song to play at random.
Dis la y settings
contrast : 1 (0-1)
brightness : 5 (0-25)
disk 00:04:15
There will ne ver be a...
Let the sunsh ine in
Everybody’s g ot some...
Sl edge hammer
Hel !
00:04:15
normal
continuous lay
re ea t
shuffle
no rmal

Page 13
c
ymatic audio
Live Recorder LR-
16
www.cymaticaudio.com
www.cymaticaudio.comwww.cymaticaudio.com
www.cymaticaudio.com
6. Supported USB storage devices
USB2.0 Thumb Drives
1.
Thumb drives used for Direct-to-USB recording have to be USB2.0 compatible and guarantee a sustained data
transfer rate of at least 25 Mbit/s when writing in order to ensure drop-out free 16 track recording.
In order to prepare and optimize the file system on a USB thumb drive, it is strongly advised to format the drive
with the Live Recorder’s format function regardless of the outcome of the USB device performance test in order to
minimize the risk of drop-outs during recording. (Menu ❿ -> Format USB device).
The default sample width setting applied by the Live Recorder LR-16 when recording to a thumb drive is 16 bit.
Even though the sample width can be set to 24 bit by the user, this should only be done if it is well established that
the thumb drives performance is sufficient to support 24 bit recording. Using 24 bit recording with USB thumb
drives that do not deliver the necessary performance will lead to recording drop outs.
USB2.0 Hard Disks
2.
USB Hard drives used for recording have to be fully compatible with the USB2.0 specification without requiring
custom software.
If the hard disk has more than one partition the primary partition will be used for recording. The Live Recorder's
USB Storage connector supplies power to run external USB hard disks, but depending on the hard disk's power
consumption an additional power supply for the hard disk might be needed.
The default sample width for recording to a USB hard disk is automatically set to 24 bit
!
All da a as well as all par i ions on he humb or hard drive will be
dele ed when he forma func ion is used!
!
Some USB humb drives show, even when he Live Recorder performance es was
passed successfully, an uns able performance when used for longer recordings.
For 'mission cri ical' recordings please use a USB2.0 hard disk or make sure o
horoughly es he humb drive you are in ending o use by recording o i for a
longer period of ime and checking whe her he device indica es ha drop-ou s
have occurred while recording (number of drop
-
ou s will be shown a op of screen)

Page 14
c
ymatic audio
Live Recorder LR-
16
www.cymaticaudio.com
www.cymaticaudio.comwww.cymaticaudio.com
www.cymaticaudio.com
7. Connecting recording sources
Connecting to Insert Plugs
The Live Recorder LR- 16 offers 16 analog input jacks with standard TRS insert configuration ❻, so it is best connected
to recording sources that provide per-channel inserts. The Return output is taken from the Line input over 110 Ohm
resistor (passive feed through).
Connecting to Mono Signals (Direct Outs)
Use a TS-to-TRS adapter at the LR16 inputs:
Tip = Output, Sleeve = ND
Standard TRS configuration
Tip = Send, Ring = Return, Sleeve = ND
Use a standard TRS cable:
T
S
-
to
-
TRS Adapter
(ring not connected)

Page 15
c
ymatic audio
Live Recorder LR-
16
www.cymaticaudio.com
www.cymaticaudio.comwww.cymaticaudio.com
www.cymaticaudio.com
Connecting to Balanced Audio
If the source provides a symmetric output, it should handle a short from Ring to ND properly. The same setup as for a
mono source can be used.
In rare cases where the source cannot tolerate a shorted Ring to ND, a special cable (e.g. Hosa PXF105, a XLR-to-TS cable
that leaves XLR pin 3 open) and again a TS-to-TRS adapter at the LR16 inputs resolves the issue:
Tip = hot, Ring = cold, Sleeve = ND
2 = hot, 3 = cold, 1 = ND
T
S
-
to
-
TRS Adapter
(ring not connected)

Page 16
c
ymatic audio
Live Recorder LR-
16
www.cymaticaudio.com
www.cymaticaudio.comwww.cymaticaudio.com
www.cymaticaudio.com
8. 16x2 Channel USB Interface Mode
When connected to your Mac®, iPad® or PC the Live Recorder LR-16 becomes a 16 in / 2 out, 24 bit/96 kHz USB class
compliant audio interface.
PC / Windows
1.
1. Minimum System Requirements
Operating Systems (32- or 64bit):
•Windows® XP(SP2), Windows Vista, Windows 7, Windows 8
•Microsoft .NET Framework 4.0 (usually installed
automatically by Windows update.)
→ for Windows versions where the .NET Framework 4.0 is
not already installed, the installation wizard will
automatically start when the mixer / control panel is started
for the first time. )
The LR-16 device drivers do not require the .NET Framework.
Hardware:
•Pentium® IV 1.2 Hz or better
•512 MB Ram ( 1 B or more recommended)
•1 free USB2.0 compatible port on PC
NOTE: The speed of your processor, amount of RAM, and capacity, size, and speed of your hard drives will
greatly affect the overall performance of your recording system. A faster processor and more RAM can
reduce signal latency (delay) and improve overall performance.
2. WDM and ASIO driver installation
Before connecting the Live Recorder LR-16 to your PC please download the driver package from the
download section at the Cymatic Audio website:
http://www.cymaticaudio.com
After the download has finished unzip the downloaded archive to a folder on your PC. Double click the
setup.exe and follow the on-screen instructions. It is strongly recommended that you exit all other
programs before running the LR-16 driver installation program.
Once the driver installation has finished please connect the LR-16 to your PC by connecting the supplied
USB cable to the LR-16 USB2.0 connector ❹ on the rear panel and a free USB2.0 port on your PC.
!
Make sure ha here is no USB s orage device connec ed o he USB s orage
connec or ❶ when using he LR-16 as a USB audio in erface.

Page 17
c
ymatic audio
Live Recorder LR-
16
www.cymaticaudio.com
www.cymaticaudio.comwww.cymaticaudio.com
www.cymaticaudio.com
3. LR-16 Mixer and Control Panel for PC
he LR-16 driver installation program will automatically install the LR-16 Mixer and control panel on your
PC. You can start it by clicking on the LR-16 icon in the Windows task bar or by
locating it in the Windows start menu.
Mixer View
In order to change to the Settings View click on the ‘Settings’ button.
Settings View: Synchronization
he Name the device will appear under in your DAW’s channel configuration can be changed.
Supported synchronization modes: Device Internal Clock, USB-Bus (SOF)
Supported Sample Rates: 44.1kHz, 48kHz, 88.2kHz, 96kHz
input level meters
and faders
cross fader
monitor panning
main out level meters
USB connection indicator
display device
settings
mute, solo & channel link

Page 18
c
ymatic audio
Live Recorder LR-
16
www.cymaticaudio.com
www.cymaticaudio.comwww.cymaticaudio.com
www.cymaticaudio.com
Settings View: Input Channels
he input channel names as they will appear in your DAW can be changed (mid column). If you check
‘Include device name in ASIO display name’ the channel names will be prepended with the device name.
Settings View: Output Channels
he output channel names as they will appear in your DAW can be changed (mid column). If you check
‘Include device name in ASIO display name’ the channel names will be prepended with the device name.
Settings View: Buffer Settings
Isochronous Streaming Buffer: Use this slider to adjust the buffer size of the LR-16 drivers.
ASIO Buffers: Use this slider to adjust the buffer size of the LR-16 ASIO drivers.
WDM Buffers: Use this slider to adjust the buffer size of the LR-16 WDM drivers.

Page 19
c
ymatic audio
Live Recorder LR-
16
www.cymaticaudio.com
www.cymaticaudio.comwww.cymaticaudio.com
www.cymaticaudio.com
Lower slider settings offer less latency but utilize more CPU power from your computer. Higher values
offer less CPU usage and can resolve audio drop-out issues.
Settings View: About
Displays device status, device serial number, driver version and device firmware version.
Minimizing the Mixer anel
he LR-16 Mixer Panel also be run in minimized mode which allows you to
keep an eye on the level meters while the panel itself uses a lot less space on
your desktop.

Page 20
c
ymatic audio
Live Recorder LR-
16
www.cymaticaudio.com
www.cymaticaudio.comwww.cymaticaudio.com
www.cymaticaudio.com
Apple® Mac®
2.
1. Minimum System Requirements
Operating Systems: Mac OS-X® 10.5 or better
Hardware: 5 800 MHz or better
512 MB Ram ( 1 B or more recommended)
1 free USB2.0 compatible port on PC
NOTE: The speed of your processor, amount of RAM, and capacity, size, and speed of your hard drives will
greatly affect the overall performance of your recording system. A faster processor and more RAM can
reduce signal latency (delay) and improve overall performance.
2. Driver Installation
There is no driver installation for Mac Computers necessary. Just connect the LR-16 to your Mac® by
connecting the supplied USB cable to the LR-16 USB2.0 connector ❹ on the rear panel and a free USB2.0
port on your Mac.
The device will now be selecteable in the Audio MIDI Setup.
Other manuals for LR-16
5
Table of contents
Other cymatic audio Recording Equipment manuals

cymatic audio
cymatic audio LR-16 User manual

cymatic audio
cymatic audio LR-16 User manual

cymatic audio
cymatic audio uTrack24 audiolan User manual

cymatic audio
cymatic audio LR-16 User manual

cymatic audio
cymatic audio uTrack24 audiolan User manual

cymatic audio
cymatic audio LR-16 User manual

cymatic audio
cymatic audio uTrack 24 User manual

cymatic audio
cymatic audio LR-16 User manual

cymatic audio
cymatic audio uTrack 24 User manual

cymatic audio
cymatic audio uTrack 24 User manual