D.C. Athletics CANNIBAL I User manual
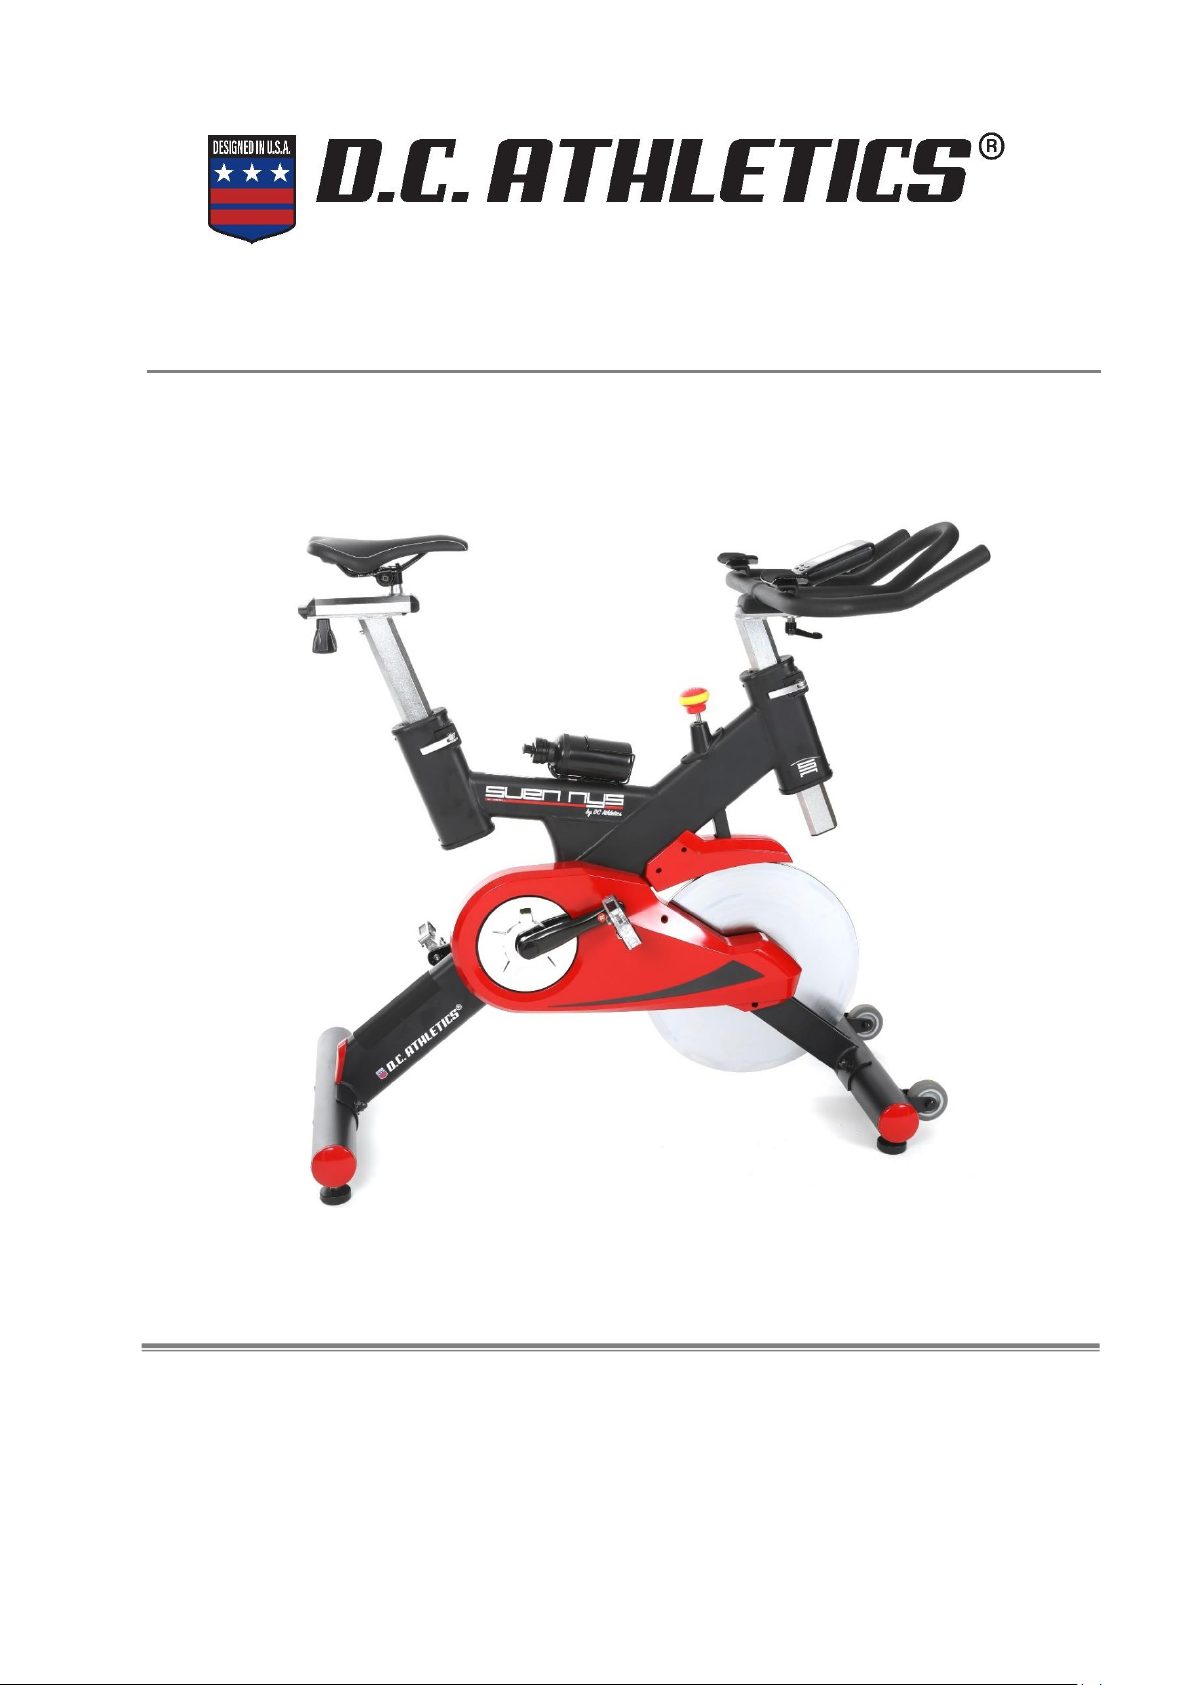
CANNIBAL I SPEED BIKE
MANUAL CONSOLE
IMPORTANT!
Please read all instructions carefully before using this product.
Retain this manual for future reference.
The specifications of this product may vary slightly from the illustrations and are subject to
change without notice.

Before You Start
Thank you for purchasing the DC Athletics Cannibal I Speed Bike! For your safety and benefit, read this
manual carefully before using the machine.
Prior to assembly, remove components from the box and verify that all the listed parts were supplied.
Assembly instructions are described in the following steps and illustrations.
IMPORTANT SAFETY NOTICE
Note the following precautions before assembling or operating the machine.
01. Assemble the machine exactly as the descriptions in the instruction manual.
02. Check all the screws, nuts and other connections before using the machine,
only do exercising on the machine when it is in correct working way. Ensure
that all users are adequately informed of all precautions.
03. Set up the machine in a dry level place and leave it away from moisture and
water; before beginning exercising, remove all objects within a radius of 2
meters from the machine.
04. Place a suitable base (e.g. rubber mat, wooden board etc.) beneath the
machine in the area of assembly or exercise to avoid scratch, dirt and etc.
05. Do not use aggressive cleaning articles to clean the machine, remove drops
of sweat from the machine immediately after finishing exercising.
06. Only use the supplied tools or suitable tools of your own to assemble the
machine or repair any parts of machine, use only original spare parts for
any necessary repairs.
07. Your health can be affected by incorrect or excessive exercising. Before
beginning this or any exercise program, consult your doctor. This is
especially important for people over the age of 35 or those with pre-
existing health problems.
08. This machine is intended for home use only, not suitable for therapeutic
purpose.
09. Wear appropriate clothes and athletic shoes when exercising.
10. If you have a feeling of dizziness, sickness or other abnormal symptoms,
please stop immediately and consult your doctor.
11. The power of the machine increases with increasing the speed, and the
reverse. The machine is equipped with adjustable knob that can adjust the
resistance.
12. The maximum user’s weight is 150 KGS.
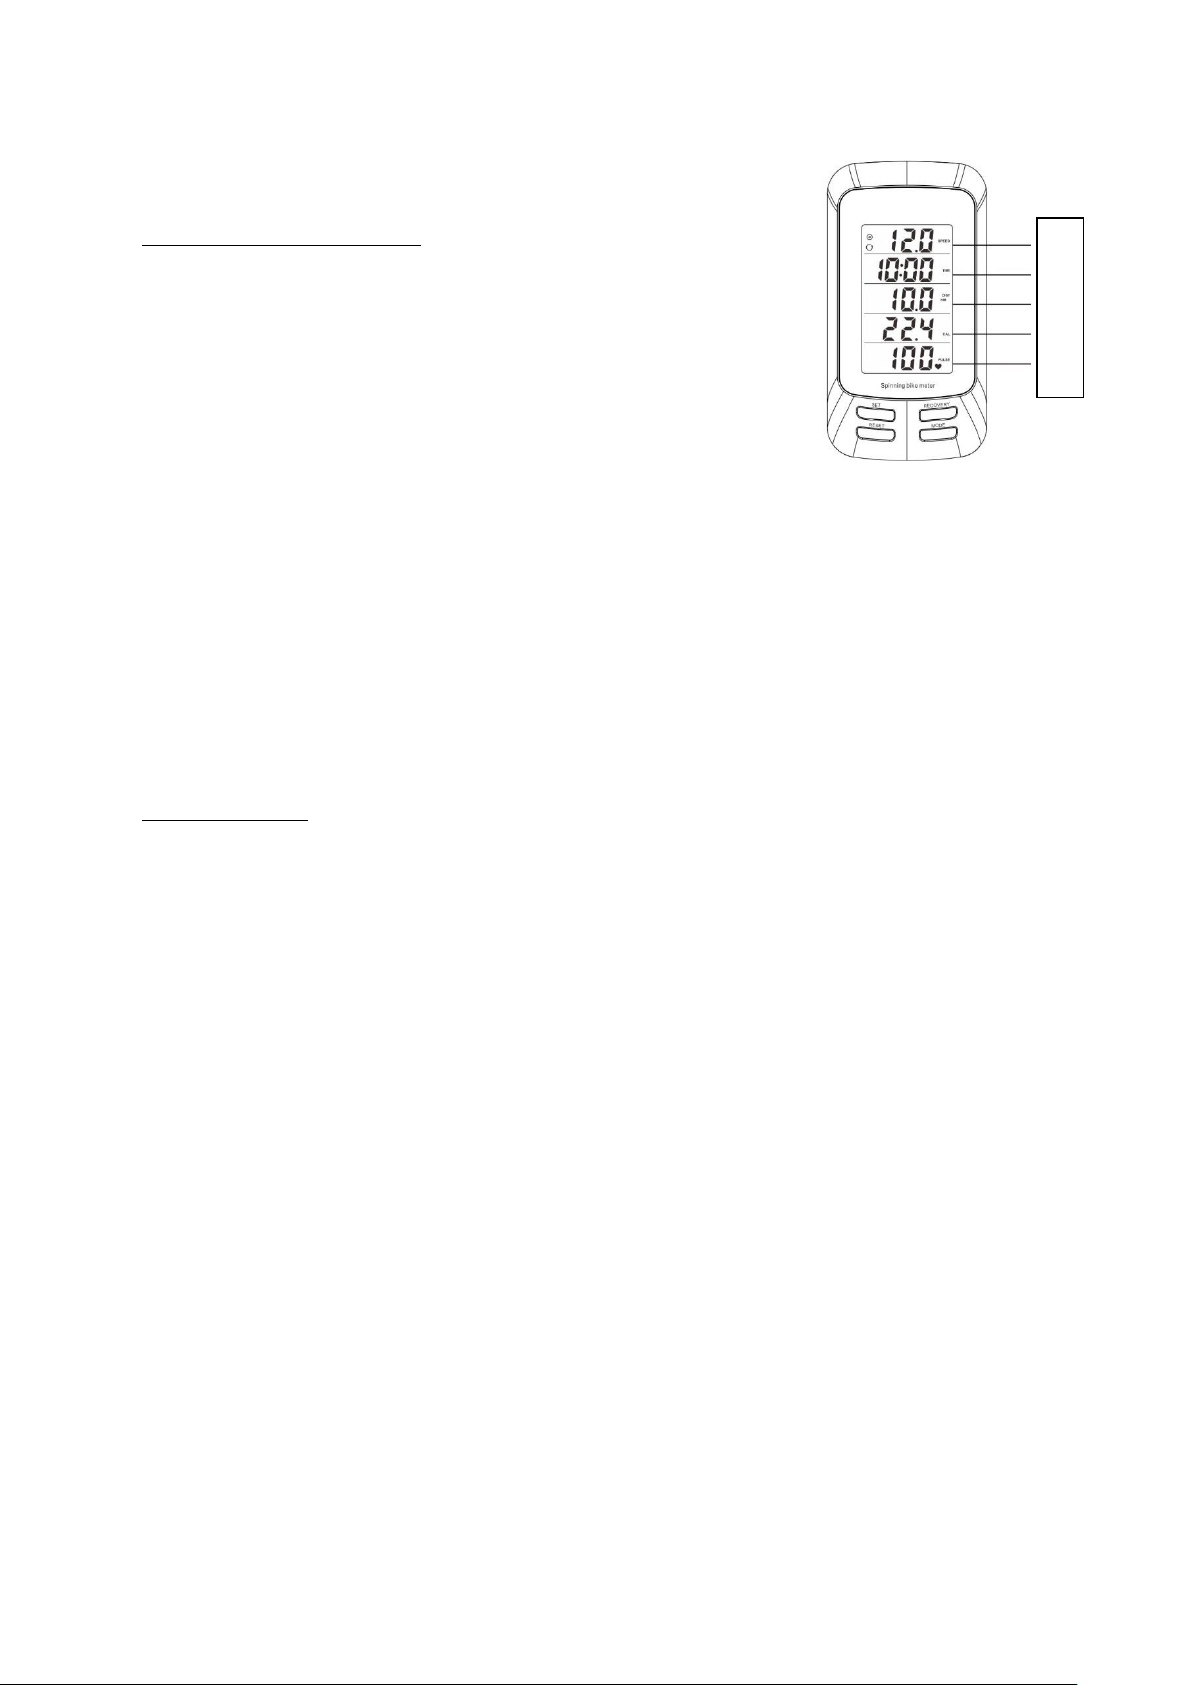
JS-I0371 EXERCISE COMPUTER INSTRUCTION MANUAL
•FUNCTIONAL BUTTONS
1.
MODE
A.
Select the window to be set
B.
When exercise (icon
0
display)
,
scan (with icon 0)or display :
SPEED / AVG
SPEED / MAX SPEED
,
CALORIES/RPM
,
PULSE/AVG.
PULSE/ MAX PULSE
C.
Reset: hold for 2 seconds to reset all data
2.
SET
A. Set the values of the relevant display window
,
hold for quick
increase
B. In other modes, scan (with icon O) or display: SPEED / AVG. SPEED / MAX SPEED,
CALORIES/RPM,PULSE /AVG. PULSE/ MAX PULSE.
3.
RESET
During SET, reset the value of the relevant display window
4.
RECOVERY
Press it to enter/exit pulse recovery function when heart rate display
•FUNCTION
1. SPEED / AVG. SPEED / MAX SPEED: Window A displays
The current exercise speed, and the avg. speed & max speed during exercise
2. TIME: Window B displays
A. Count the cumulative time from the exercise start to the end, and it will automatically stop
timing if without exercise signal over 6 seconds
B. Exercise time can be set,MAX 99 minutes ,each press to add 1 minute ,countdown to
zero,the TlME will flash and beep for 5 seconds
3. DISTANCE: Window C displays
A. Count the cumulative distance from the exercise start to the end,KM means metric, Ml means
imperial
B. Exercise distance can be set MAX 99 KM/MI,each press add 0.1 ,countdown to zero ,the
DIST will flash and beep for 5 seconds
4. CALORIES /RPM: Window 0 displays
A. Count the cumulative calories consumed from exercise start to the end ,and also the current
RPM (or cadence)
B. The calorie value can be set,MAX 999,each press add 1,countdown to zero ,the CAL will
flash and beep for 5 seconds
5. PULSE/AVG. PULSE/ MAX PULSE: Window E displays
A B C D E

Show your current heart rate ,average ,and max heart rate during exercise, pulse range: 40 –220
BPM
6. AUTO OFF
Without any exercise signal or operation over 4 minutes, the computer will turn off automatically and
memorize the current data.
•INSTALLATION
1. Fix the computer on the front place of exercise bike by screw
2 . Install the magnet and wireless sensor on the related place of the bike. Make sure the magnet is
align with the sensor's triangle icon" Þ-"
Step 1: drill the hole at the installation place (screw hole notice: the hole is tapping if the shell is metal,
the hole is screw directly if the shell is plastic).
Step 2: install the sensor bracket (you can install at different places, as there is no special requirement
for places).
Step 3: tighten the sensor on the base
Step 4: keep the distance between magnet and sensor less than 10 mm.
The installation steps of flying wheel’s magnet and wireless sensor:
The belt pulley or crank’s magnet and wireless sensor installation (the installation of wireless sensor is
the same as flying wheel).
The distance between sensor and computer is no more than 2 meter.
•OPERATION
1. CODE MATCHING
The computer 's transmitting and receiving are all using the coded 433M frequency. lt needs to finish
the code matching for first time usage, or either party change the batteries. Or else, the signal cannot
be transmitted and display the right data

Put 2 pieces new battery of 1.5V AAA inside the computer correctly, and ride the bike several circles
within 2 minutes (for the sensor already installed battery). Make the wireless sensor receive the signal
from the magnet moving. Or replace the battery of the sensor within 2 minutes, and then the
computer will finish the code matching with the sensor automatically. Once finished the code
matching, the computer will display the measured data automatically
Remarks:
①Make sure the sensor will receive the signal from the magnet
②After the battery replacement of the computer, if not receiving the sensor 's signal or the sensor
did not replace battery within 2 minutes, the computer will save the coded data of last time
automatically
③Only one set of products can operate the code matching at the same time
④The distance between the computer and the sensor should be no more than 2M
⑤After the code match operation ,if the computer still can not display the measured data, please
check the sensor 's battery is installed properly or not ,or the whether the battery voltage is over
2.6V, or the place between magnet and sensor is correctly or not ,or whether there's several sets
of product s are operating the code matching. After the above confirmation, operate the code
matching again
2.RESET
In any displays, hold MODE button for 2 second s to reset all the data
3. SET THE TARGET PARAMETERS
When stop exercise (icon 0 not display) ,press MODE to choose the window to be set or reset,the
corresponding window displays SET,meanwhile ,the window's digit flash ,press RESET to clear the
value,and press SET to set the flashing window's value. Hold the button to quick increase
Set the value as: TIME→DIST→CAL.
4. CHECK THE EXERCISE DATA
①In non- set mode,press SET or during exercise ,icon 0 displays ,press MODE to separately
check the SPEED / AVG. SPEED /MAX SPEED,CALORlES/ RPM ,PULSE/AVG. PULSE/ MAX PULSE .
②When icon 0 displays,it means the computer is scanning the display. lt will scan the display the
value in corresponding window every 6 seconds
5. PULSE RECOVERY
Wear the transmitter belt properly, or hold the hand pulse place ,the computer will display your
current heart rate
When the pulse window has the display, stop exercise ,press RECOVERY to enter the function of
pulse recovery. The display will show 1 minute countdown as well as your pulse rate, test your pulse
until it counts down to zero. Then it will pop up your pulse recovery level from F1 to F6,that is, from
the fastest recovery to the slowest. The fastest recovery F 1 shows the best, F6 mean s the slowest.
Press RECOVERY again to exit the pulse recovery function.

•REPLACE BATTERY
1. When the display color fades, or with flash when operate buttons,means the battery has no
enough power. Take off the battery cover, and use 2pcs new 1.5V AAA UM-4 battery to replace the
old battery
2. When the computer cannot receive the sensor's signal, it mean s the sensor is low battery ,
and you need to replace the battery as soon as possible. Loosen the sensor's screw, take out the
sensor, use the coin to twist the battery cover, and put 1 piece CR2032 battery inside properly,
then twist the cover back. Install the sensor back to the related place,make sure the sensor's
triangle"∆" is aligning with the magnet and the distance between the two is less than 10mm.
Remark: Either party's battery changed ,you need to operate the code matching again for the
computer and sensor, or the computer can't correctly receive the sensor's data. The code matching
operation ,please refer to CODE MATCHING.
•Q&A
If there's no data display or speed change when you riding the bike:
I. Check the installation of the magnet and sensor. Make sure the magnet is align with the sensor
's triangle icon "∆",and keep the distance between the two less than 1Omm. Or else, please adjust
the sensor's place
2. Check the sensor's voltage is over 2.6V or not ,if yes: change the sensor 's battery;
3. Check the display is dark or not ,or the display is flashing or not when press button s, if yes,
change the computer's battery 4.lf the above three item s are OK, please operate the code matching
according to CODE MATCHING.
Table of contents
Other D.C. Athletics Exercise Bike manuals


