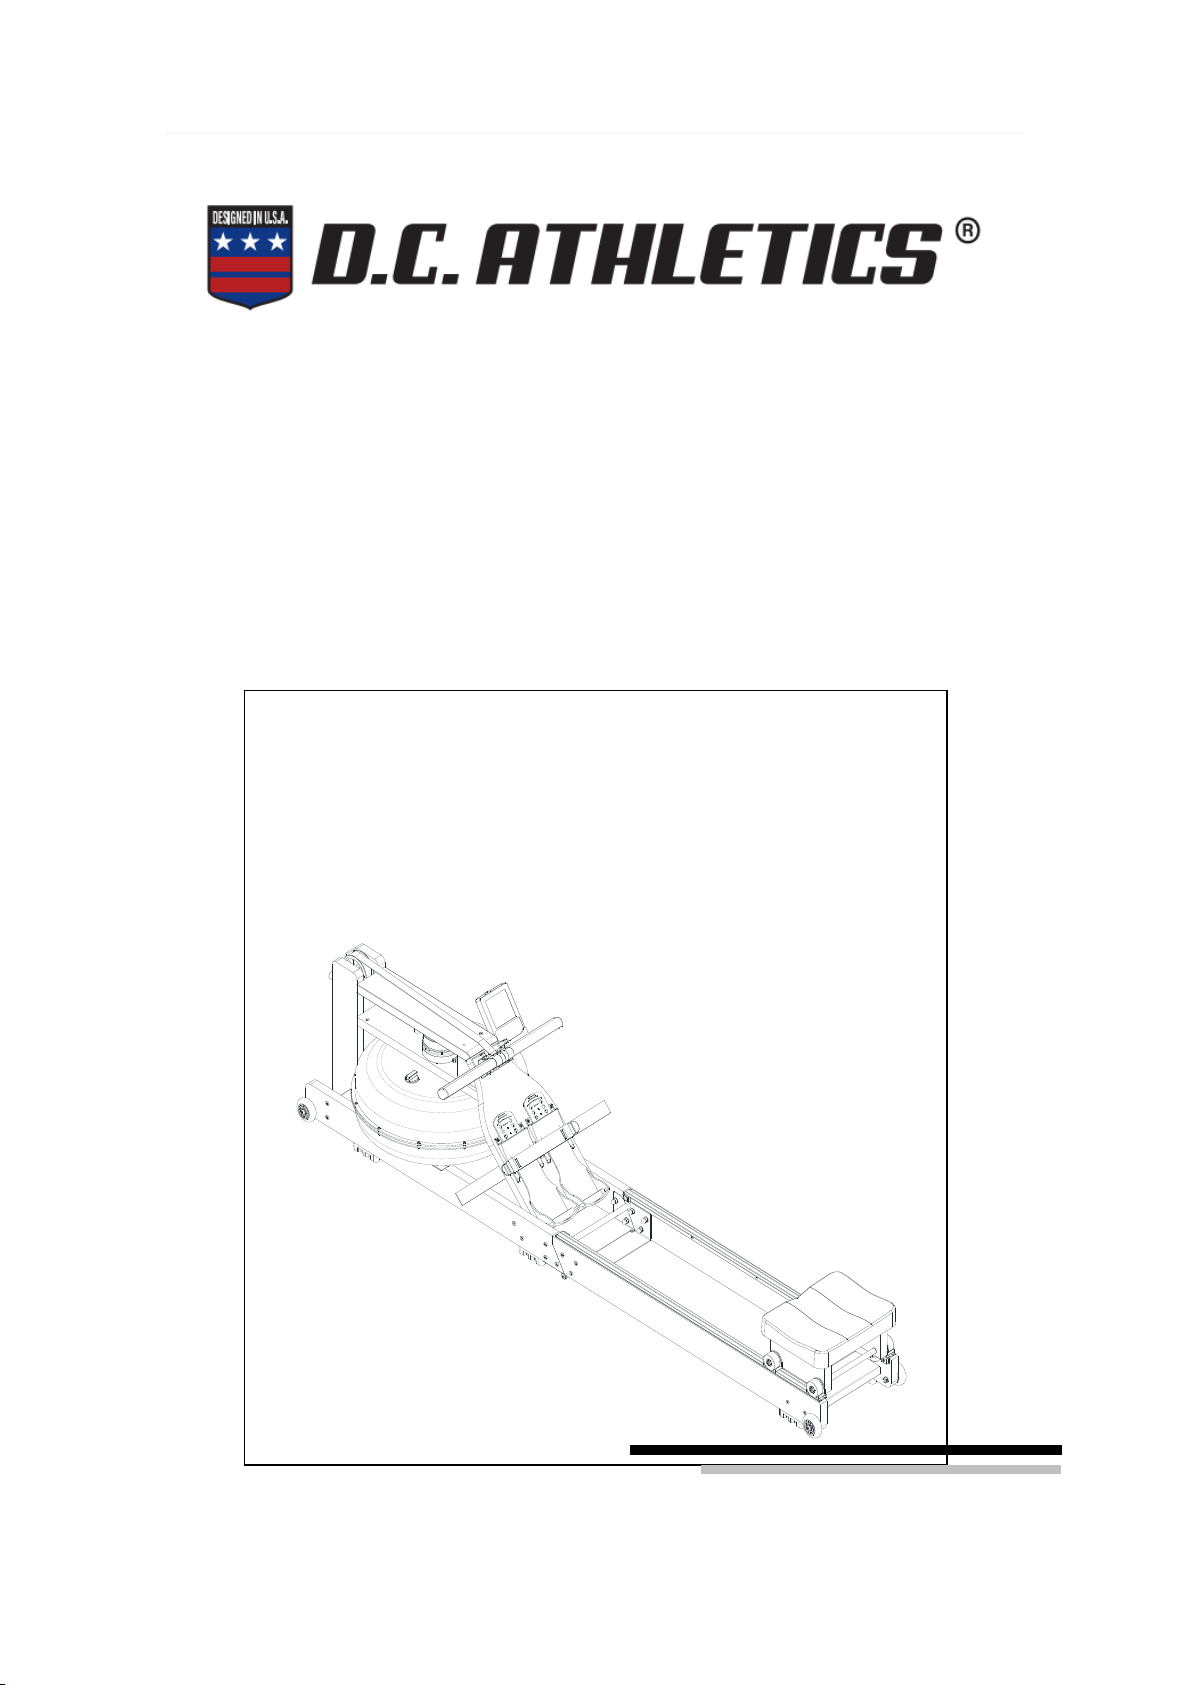
D.C. Athletics Potomac Regatta User manual
0
Potomac Regatta
MANUAL

1
Stay Healthy﹐Stay Fit
Read all precautions and instructions in this manual before using rower.
Important precautions
Please keep this manual for future reference.
1、It is important to read all the contents of instruction manual carefully before assembling and using the
rower. Only the correct installation、maintenance and using the rower can achieve a safe and effective
training effect. It is the responsibility of the owner to ensure that all users of the rower are adequately
informed of all warnings and precautions.
2、Before using the rower, users should consult a doctor according to their physical condition to prevent
health or safety incidents during training, so that normal training cannot be carried out. If the users is
taking medication and treatment that affects heart rate, blood pressure and cholesterol, make sure to
follow the doctor’s advice before training.
3、The rower is not intended for use by persons with reduced physical , sensory, or mental capabilities or
lack of experience and knowledge, unless they are given supervision or instruction about use of the rower
by someone responsible for their safety.
4、Keep your children and pets away from the rower which is only for adults.
5、Place the rower on a level surface, with a mat beneath it to protect the floor or carpet. Make sure that
there is at least 0.5m of clearance around the rower.
7、Only repair and maintenance of the parts frequently which are easy to be damaged, easy to be wearable
and easy to be broken can ensure the safe of using rower.
8、Inspect and properly tighten all parts each time the rower is used. Replace any worn parts immediately.
9、Wear appropriate clothes while exercising, do not wear loose clothes that could become caught on the
rower. Always wear athletic shoes for foot protection.
10、The rower has been certified by EN957 Class HC and is suitable for home use only. The weight of

2
trainer is less than 135kg.
11、The rower is not suitable for use as medical equipment.
12、During lifting or moving the rower, be careful do not hurt your back. Use correct movement method, or
with the assistance of others.

3

4

5
PARTS LIST
NO.
Description
Spec.
Qty.
NO.
Description
Spec.
Qty.
1
Front rail
2
46
Water tank plug
1
2
Rear left rail
1
47
Left ribbon fixed seat
1
3
Rear right rail
1
48
Right ribbon fixed seat
1
4
Rail connection plate
1
49
Handlebar fixed seat
1
5
Seat fixed plate
2
50
Block for seat
4
6
Right column
1
51
Small roller
4
7
Left column
1
52
Wheel fixed seat
4
8
Top connection plate
1
53
Seat roller
4
9
Water tank fixed plate
1
54
Foot pad
6
10
Foot pedal
1
55
Plastic gasket
1
11
Connection U plate
2
56
Handlebar
1
12
Front left connection plate assembly
1
57
Edgings
2
13
Front right connection plate assembly
1
58
PVC grip
2
14
Rear connection plate assembly
1
59
Seat
1
15
Left fixed connection plate assembly
1
60
Foot webbing
1
16
Right fixed connection plate assembly
1
61
EVA pad
2
17
Tablet plate assembly
1
62
Retractor assembly
1
18
U belt
1
63
Upper sleeve
1
19
Pulley shaft
Q235/φ10*89
1
64
Water pump
1
20
Belt wheel shaft
Q235/φ10*106
1
65
IPAD holder
1
21
M6 cylindrical nut
Q235/φ10*20
8
66
Allen screw
M6*110
4
22
Long shaft
Q235/φ10*305
1
67
Allen screw
M6*55
1
23
Seat roller shaft
Q235/φ8*320
2
68
Hexagon flat screw
M6*30×S4
2
24
Fixed pin
1
69
Allen screw
M6*16
4
25
Tablet
1
70
Hexagon socket pan head screw
M8×110×30×S6
1
26
Lower water tank
1
71
Hexagon socket pan head screw
M8×65×20×S5
4
27
Upper water tank
1
72
Hexagon flat screw
M8×40×15×S5
20
28
Paddle
1
73
Hexagon flat screw
M6×70×S4
4
29
Water tank seal
1
74
Hexagon flat screw
M6×15×S4
6
30
Rubber gasket
1
75
Hexagon bolts
M8×140x20×S14
4
31
Rubber gasket
1
76
Hexagon wooden bolt
M6×25×S10
7
32
Plastic bearing
1
77
Hexagon socket pan head screw
M8×25×S5
4

6
33
Plastic pulley 2
1
78
Hexagon socket pan head screw
M6*32×S4
8
34
Plastic sleeve
6
79
Hexagon socket pan head screw
M8×20×S5
1
34
Plastic sleeve 2
2
80
Pan head screws with cross
recessed
M3x20xΦ6
12
35
Small pulley
1
81
Pan head tapping screws with
cross recessed
ST4.2x16xФ7
30
36
Footplate
2
82
Nylon nut
M6xH6xS10
1
37
Adjust the pedal
2
83
Nylon nut
M8xH7.5xS13
16
38
Column footpad
2
84
Nylon nut
M3xH3.8xS6
12
39
PU roller
4
85
Cap nut
M8×H16×S13
12
40
PVC casing
2
86
Hex nuts
M8×H6.8×S14
2
41
PVC casing 2
2
87
Flat washers
d8×Φ16×1.5
49
42
PVC casing 3
4
88
Flat washers
d3×Φ7×0.5
24
43
PVC casing 4
1
89
Shaft ring
D8×0.8
4
44
PVC casing 5
1
90
Shaft ring
D20×1.0
1
45
TC frame oil seal
1
91
Countersunk flat head tapping
screws with cross recessed
ST4.2x16xФ7
6

7
Open the packing box and you can take out the following parts in the box
List of installation parts
No
description
quantity
No
description
quantity
A
Whole rower machine
1PC
B
Seat set
1PC
C
Water pump
1PC
D
Block for seat cushion
2PCS
E
Allen screw
2PCS
F
Allen spanner
1PC
A B
C D
E F

8
ASSEMBLY INSTRUCTION
STEP 1
1.Take out the product from the carton and stand up the product, then place the
product flat on the floor. Note that one hand is on the round tube of the frame(N) and
the other hand pushed out on the guide rail(M) slightly to prevent the pinch.
2.First slide the seat set(B) into the guide rail, then use the Allen screw(E) to fix
the block for seat cushion(D) on the guide rail, thus the assembly is completed.
A
N
M
B
DE

9
STEP 2
1. Remove the tank plug(G) from the upper tank .
2. Water injection as shown in figure1. Insert the water pump(C) into the tank, and
then use water pump(C) and bucket to fill the water tank. Refer to the digital
mark on the side of the tank to measure the amount of water in the tank.
3. Pump water as shown in figure2. Place a bucket next to the rowing machine, and
use water pump(C) pumps water from the bucket into the tank. Then stuff the
water tank plug(G) into the upper tank . Lastly, use a dry cloth to dry the water
around the rower.
Fig1
C
G

10
G
C
Fig2

11
Product folding
First move the seat set(B) to the end when the rower is to be folded, then hold the
round tube of frame(N) with your hand, pull up slightly to prevent the seat set from
falling down when rower is folded, and damage the rowing machine.
B
N
12
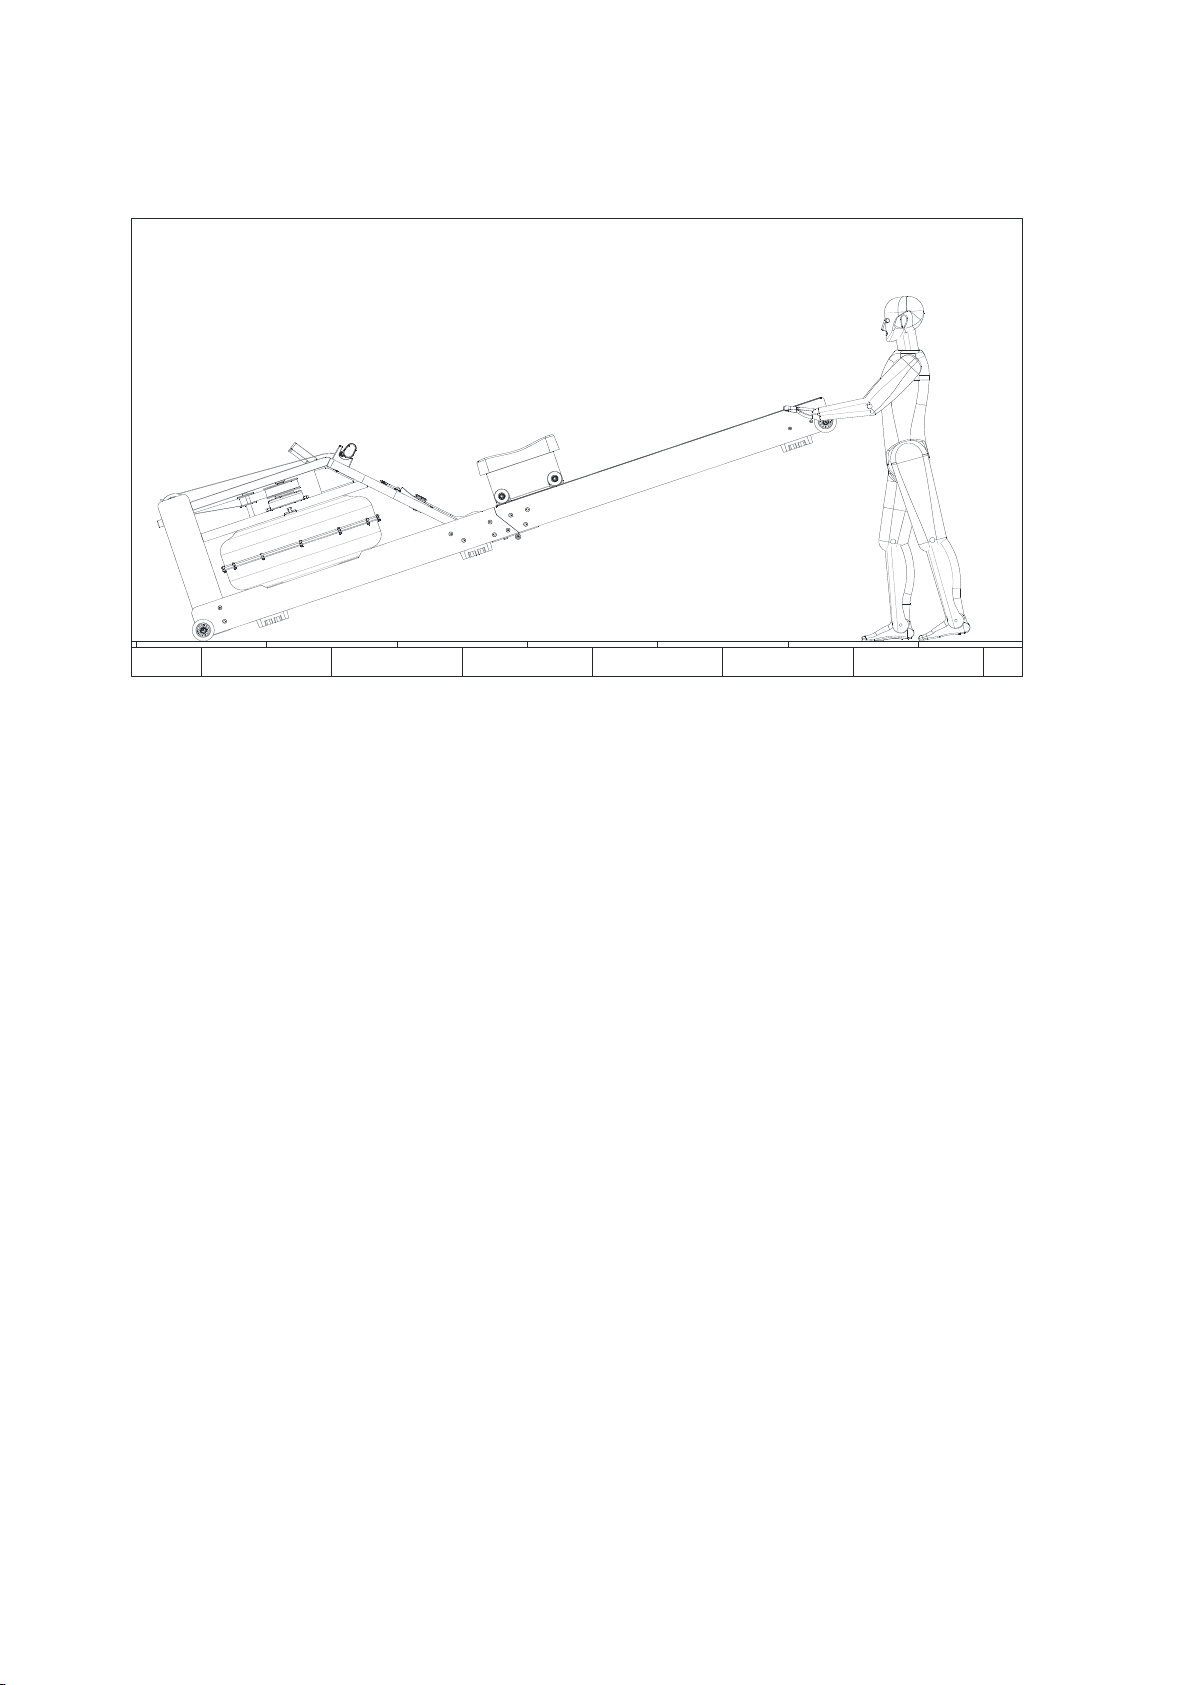
Product movement
Lift the end of the guide rail and then move the rower to the desired position.
13
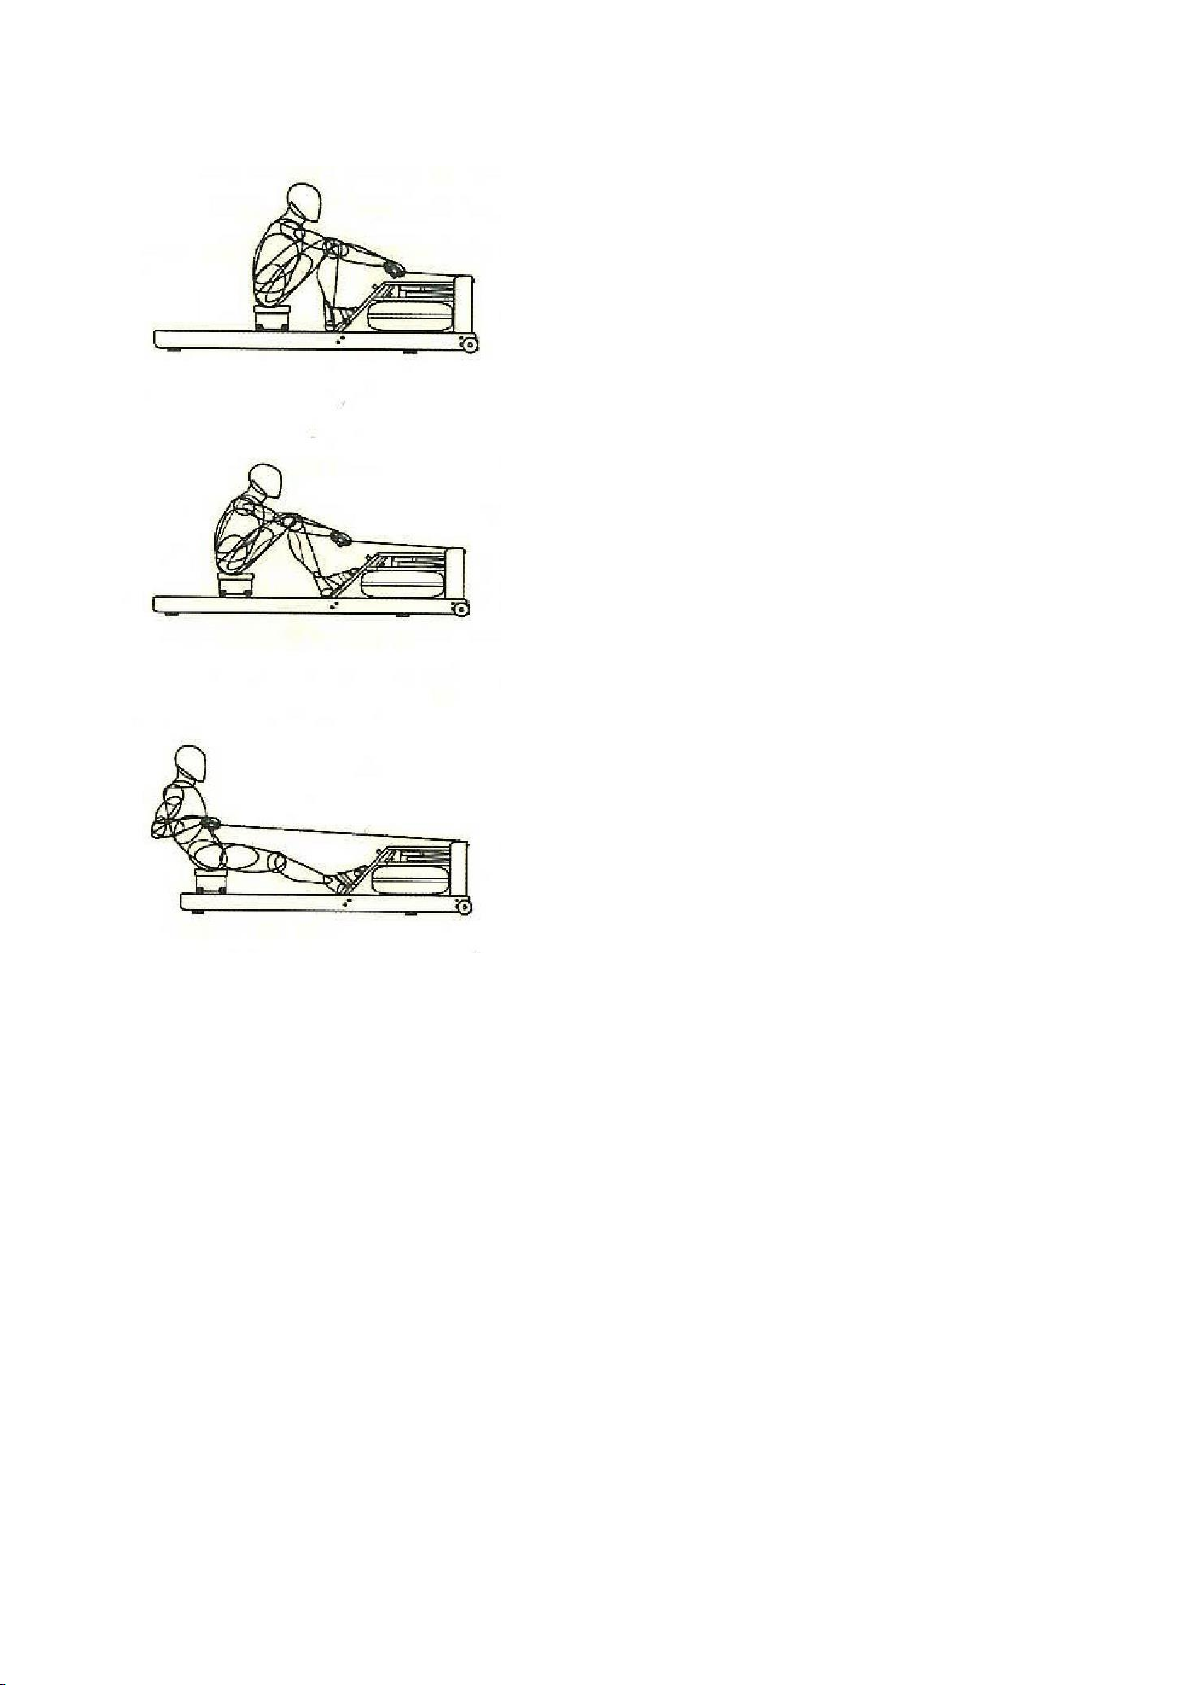
Training guide diagram
Start position
Keep your arms straight in front of you,
shoulders relaxed, head up, eyes look forward,
feet and calves compressed vertically.
Sliding process
Grab the arm with your hands, keep the
body in correct posture and angle. Open
the legs slowly and move them forward .
Return position
Straighten your legs forward, pull the handle
to the chest, relaxed your shoulders and look
forward.
After you have mastered the correct posture and rhythm of your rowing movement, the technique will be easier
than regular rowing, then you will experience the benefits of rowing machine training soon.
14
Training introduction
Use the product can not only enhance physical fitness and exercise muscle, but also play a role in weight
loss through a reasonable diet.
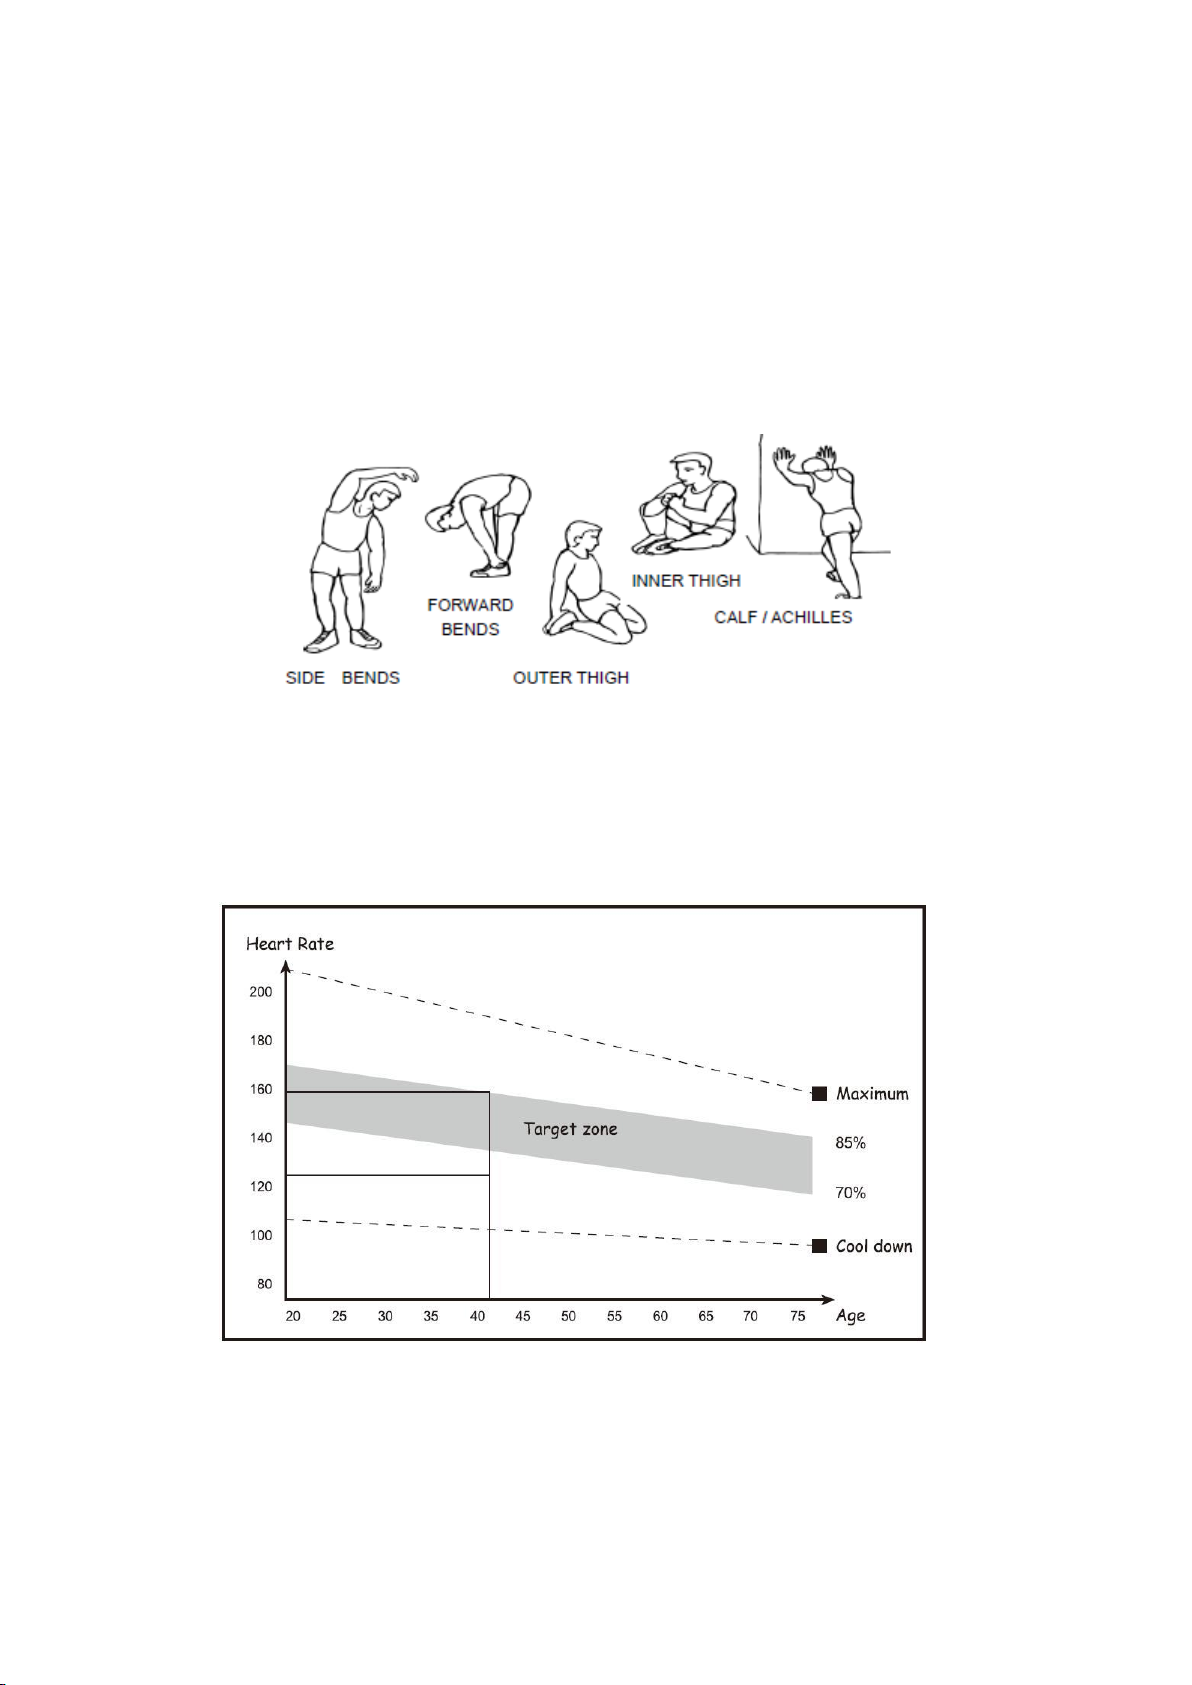
Warm-up exercise before training
This stage of warm up exercise can enhance the trainer’s body blood circulation and make the muscles in a good
condition, at the same time reduce the risk of cramping or muscle pulling during training. Before each training , please
do the warm up exercise according to the following recommended training methods, each type of stretching exercise
must be maintained for about 30s,when doing exercise , be careful not to do strenuous stretching exercise to prevent
muscle damage, once the muscle is damaged, please stop practicing.
Training phase
This stage is formal training stage. You can improve the flexibility of your legs muscle after a long-term regular
practice. During the training, it is important to do the stable training intensity according to their own training situation
and choose the reasonable training intensity, so keep the heart rate within the target values listed in the following
table.
At least 12mins of training to keep the heart rate within the corresponding target range.At the beginning of
training , most of people continue to train for 15-20mins.
Recovery phase after training.
During the recovery phase, repeat the activities in the preparation. During the process, you can reduce the
amplitude and speed of the exercise appropriately. Time around 5mins . Through exercise to adjust body heat and
relax muscles. It is important to note that you cannot do strenuous stretching during exercise to avoid damaging

15
your muscles.
When you have already adapted training, you can gradually increase the training time and training intensity, at least
3times per week. If possible record the average level of weekly practice.
Strengthen muscles
If you would like to use product to strengthen the muscle, you need to adjust the resistance to the highest. So that
you can achieve the effect of strengthening the muscle by increasing the strength of exercise in a short time. If you
want to achieve the purpose of fitness while strengthen the muscle, you need to use another method. First do the
warm up exercise then do the regular practice, increase the strength of training near the end of training phase,
increase the resistance of legs, but pay attention to slow down training speed while increasing the strength to keep
the heartbeat within the target value and do some finish exercise after training .
Weight loss
To achieve the effect of weight loss, the key points that is time and intensity of training , the more intensity of
training , the longer time will burn more calories, thus achieving the effect of weight loss. Also the effect of fitness
can be achieved through practice, enhance physical. During the training you can do some proper practice according
to different needs.

16
Operation manuals for multi-functional monitor
Ⅰ.Function table
No.
Items
Indication range
Setting
mem
ory
zero
Summary statement
1
TIME
0:00~99:59
(min:sec)
±1min
Yes
yes
1.count up when no setting.
2.count down after setting. Ring at 0
(BIBI 4 sounds)
3.no signal input after 4 mins, enter the standby screen
2
DIST
0~9999
0~9990
±10K
±10M
yes
yes
1. count up when no setting
2. count down after setting. Ring at 0
(BIBI 4 sounds)
3.o signal input after 4 mins, enter the standby screen
3
CAL
0~9999cal
0~9990
(±10)
yes
yes
1. count up when no setting
2. count down after setting. Ring at 0
(BIBI 4 sounds)
3. no signal input after 4 mins, enter the standby
screen
4
SPM
0~999
no
no
yes
After start the workout
a. Display SPM in 3s after get the signal input
b. Clear SPM in 4.6s while no signal input
c. The window is also for WATT. Every 5s WATT
and SPM display interactively
5
STROKES
0~9999
0~9990
(±10)
yes
yes
Rowing strokes share the display window with TOTAL
STROKES and every 5s display interactively
6
TOTAL
STROKES
0~9999
no
yes
no
Total strokes
7
PULSE
P-30~230 BPM
0-30~230
(±1)BPM
yes
yes
a. When a pulse signal entered, the initial display
time is 7.5s. (counted by the first pulse)
b. Clear the pulse in 6s while no pulse signal
c. Refer to appendix1 foe calculation method
d. While the pulse is higher than the target, pulse
window flashes per second to indicate or pulse
over alarm BIBI per second.
8
Manual Program、
Do quick start when RPM signal is detected when not
in any mode.
9
INTERVAL 20-10
1. Intermittent motion mode
2. Exercise for 20s and rest for 10s
10
INTERVAL 10-20
1. Intermittent motion mode
2. Exercise for 20s and rest for 10s
11
INTERVAL
CUSTOM
1. Intermittent motion mode
2. User sets the time for exercise and rest

17
Ⅱ.button description:
BLUETOOTH
App function on / off
MODE
Select confirm
INTERVAL
CUSTOM
Intermittent training setting (setting exercise and rest time)
RECOVERY
Heart rate recovery mode
UP
Upward setting
START/STOP
Start/ stop
RESET
Reset/ clear
Ⅲ.turn on/ off
1.Turn on:
Power on the LCD will fully display for 2s (picture 1), at the same time there will be a long beep for 2s,
then into standby mode.
1
2、turn off:
2.1. No signal input within 4 mins, monitor will enter sleep mode
2.2. Monitor wake up when there is a signal or button input.
12
TARGET TIME
User sets the target time
13
TARGET
DISTANCE
User sets the target distance
14
TARGET
CALORIES、
User sets the target calories
15
TARGET
STROKES
User sets the target strokes
16
TARGET PULSE
User sets the target pulse rate
17
BLUETOOTH
User turns on /off the Bluetooth. while monitor is on
that only shows Bluetooth icon. while off, app cannot
use.
18
Ⅳ.operation description
1. turn on :
After the monitor is energized (or press mode /reset for 3s), buzzer beeps for 2s, LCD fully displayed for 2s
then enter standby mode.
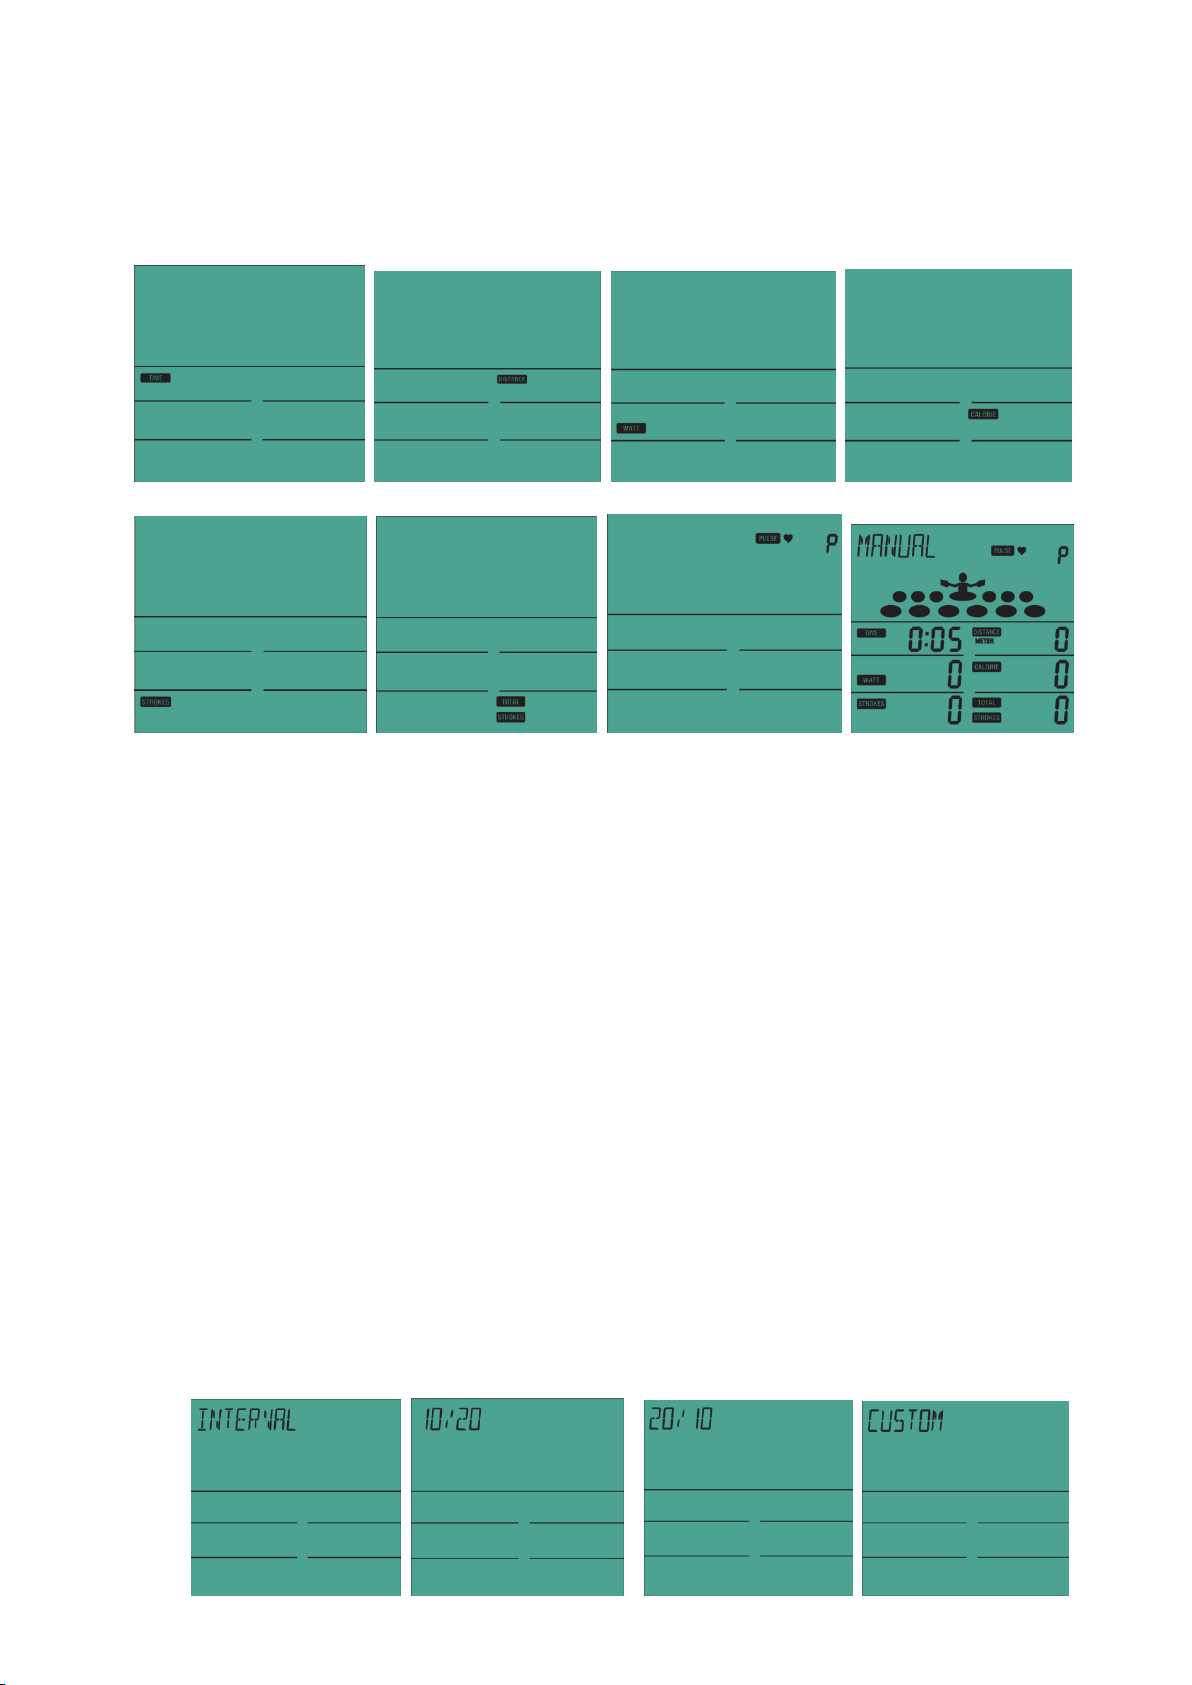
2. Standby mode:
A. Monitor enters standby mode after turn on. Scan mode to display for 1s. See picture 2-8 below.
2 3 4 5
6 7 8 9
B. In standby mode, monitor enters sleep in 4mins while no any button pressed, no RPM signal and no heartbeat
signal.
3. Manual mode :
A. Please start quick start quickly once there is RPM signal input during standby, then buzzer rings for 1s.
B. Or in standby mode , press mode button, monitor displays MANUAL and press mode button again,
buzzer rings 1s, MANUAL function start(as shown in picture 9). Time, distance ,calories, pulse, spm, watt,
total strokes and strokes start counting as per workout.
C. No any button press, no RPM signal, heartbeat input in 4mins during processing, buzzer beeps 0.5s then
into standby mode.
D. Press start or stop to pause/ restart the exercise.
E. Press stop button to pause workout, then press reset button or any button in 4mins. Monitor enters
standby mode.
4. other function options
INTERVAL:
In standby mode, press mode button then press up button to select interval function. Monitor display like
(Picture 10-13).
19
10 11 12 13
(1) INTERVAL 10/20
A. During monitor flashing displays INTERVAL, press mode button, monitor shows 10/20 flashing, then
press start/stop 10/20 function.
(2) INTERVAL 20/10
A. During monitor flashing displays INTERVAL, press mode button, then press up/ down button to
switch to select 20/10, press start/ stop start 20/ 10 function.
(3) INTERVAL CUSTOM
A. During monitor flashing displays INTERVAL, press mode button then press up to switch to select
CUSTOM function, lastly press mode button to enter CUSTOM setting.
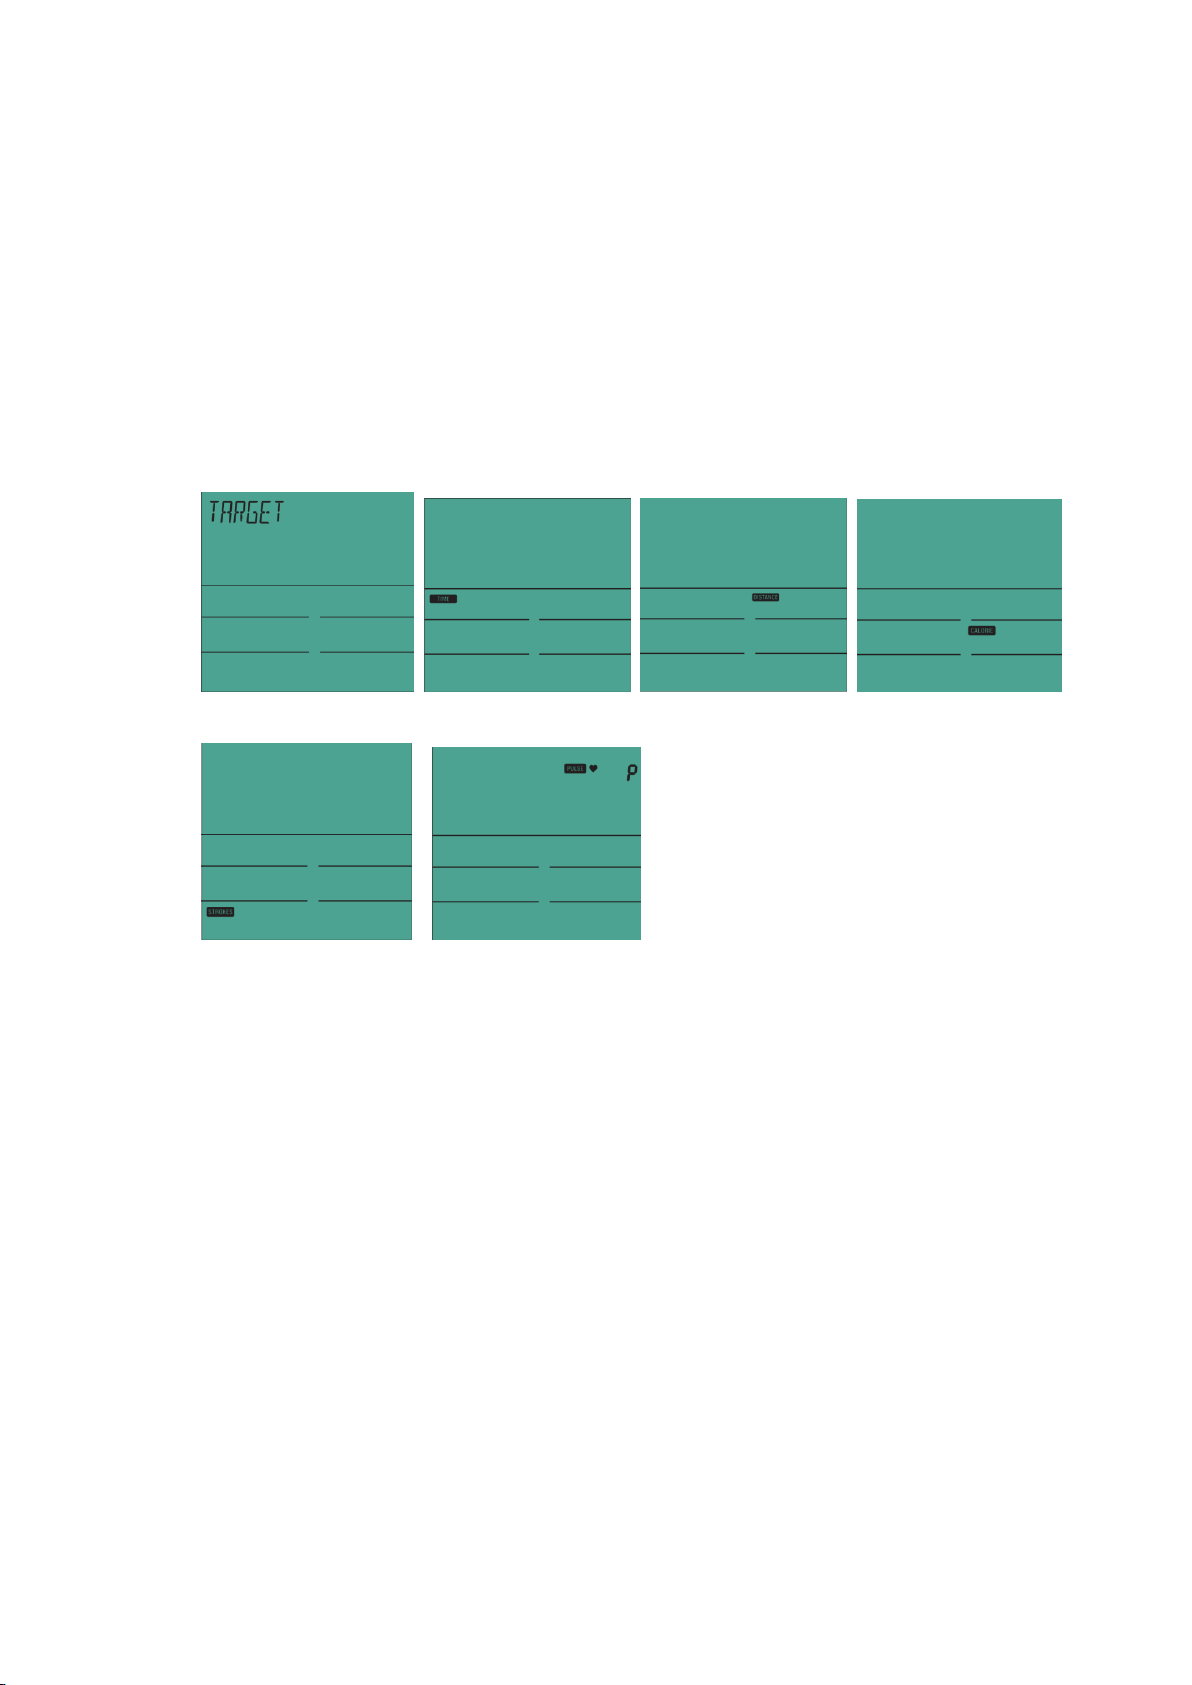
Ⅴ.TARGET:
In standby mode, press mode button then press up to switch to select TARGET function.(Picture 14-19)
14 15 16 17
18 19
(1) TARGET TIME:( Picture 15)
A. During monitor flashing displays target, press mode button, then press up to switch to select target
time function, time window flashed and then press mode button to start time setting function.
(2) TARGET DISTANCE:( Picture 16)
A. During monitor flashing displays target, press mode button, then press up to switch to select target
distance function, distance window flashed and then press mode button to start distance setting
function.
(3) TARGET CALORIES:( Picture 17)
A. During monitor flashing displays target, press mode button, then press up to switch to select target
calories function, calories window flashed and then press mode button to start calories setting
function
(4) TARGET STROKES:( Picture 18)
A. During monitor flashing displays target, press mode button, then press up to switch to select target
strokes function, strokes window flashed and then press mode button to start strokes setting function
(5) TARGET PULSE:( Picture 19)
A. During monitor flashing displays target, press mode button, then press up to switch to select target
Table of contents
Other D.C. Athletics Exercise Bike manuals


