D-D The Aquarium Solution D-Deltec AP Series User manual

D-D aquarium solutions ltd.
D-Deltec AP Series Skimmer Range and Self-Cleaning Head Instructions.
Congratulations on your decision to purchase a Deltec AP Series Skimmer.
Deltec skimmers with their Patented Pin Wheel Impellor are renowned throughout the world and are unsurpassed in their ability to mix
air and water to produce the fine-bubbled foam that is required for efficient foam fractionation.
The AP Series skimmers are the ultimate tool for protein waste removal from aquariums and when combined with an automatic
cleaning head on larger models can clean both inside and outside of the cup and can increase the efficiency by a further minimum 20%.
Choice of Skimmer: The initial choice of skimmer should be determined by the size of the aquarium system and the stocking level.
Model High Stocking Capacity Normal Stocking Capacity Required Water Throughput Self Cleaning Head
AP 525 450 lts (100 gals) 700 lts (155 gals) 600lts/hr (133 gals/hr) Not Available
AP 600 500 lts (111 gals) 750 lts (167 gals) 600lts/hr (133 gals/hr) Not Available
APF600 750 lts (167 gals) 1000 lts (222 gals) 800lts/hr (178 gals/hr) Not Available
AP 850 1000 lts (222 gals) 1500 lts (333 gals) 1000lts/hr (222 gals/hr) Not Available
AP 702 1500 lts (333 gals) 2000 lts (444 gals) 2300lts/hr (511 gals/hr) Not Available
AP 703 2000 lts (444 gals) 3000 lts (667 gals) 2800lts/hr (622 gals/hr) Available
AP 902 1800 lts (400 gals) 3600 lts (800 gals) 3000lts/hr (667 gals/hr) Not Available
AP 1003 3500 lts (778 gals) 5000 lts (1111 gals) 3000lts/hr (667 gals/hr) Available
AP 1004 4500 lts (1000 gals) 6000 lts (1333 gals) 3000lts/hr (667 gals/hr) Available
AP 1006 8000 lts (1778 gals) 12000 lts (2667 gals) 3500lts/hr (778 gals/hr) Available
Assembly: When the skimmer arrives it is likely that it has been packed in a disassembled state to prevent damage in transit. Study
the diagrams attached to reassemble. Always check when screwing the pumps and couplings together that you have fitted the o-rings
that are supplied with the unit, as without these a watertight joint cannot be achieved.
Take the opportunity to remove the inlet pipework from the pump and have a look at the Patented Pinwheel Impellor with its ceramic
shaft. Note the venturi pipe where the air passes into the pump. These are all parts that will require regular cleaning and inspection. Do
not switch on the recirculation pumps unless the pumps are immersed or flooded with water.
Positioning: The whole range of Deltec skimmers are designed so that they can stand either beside the aquarium, in or beside a sump
or remotely with a return drain back to the system. In all types of installation the water should be able to drain freely from the unit, under
gravity, into a section of the aquarium system, which is lower than the underside of the return pipe.
Suitable installations are:Pumping from the aquarium and returning water back into the aquarium. Pumping from the sump and
returning water back into the sump. Pumping from the sump and returning water back into the aquarium. Ensure for this option that the
over flow system in the tank is large enough to cope with the increased flow.
Note Never install a system that pumps water from the aquarium through the skimmer and then returns it to a low level sump below. If
the pump returning water from the sump to the tank should lose duty or fail then the sump will become flooded and the tank will empty
down to feed pump level. In the case of a power cut the system will also siphon to the same level.
Feed Supply and Return Pipework: The skimmer should be provided with water from the aquarium system either under pressure
from a separate feed pump or by gravity supply.
For a pumped system use our installation kits or choose a suitable pump and pipe diameter using the table above and connect it to the
inlet of the unit. Rigid or flexible pipework can be used for this task. Connect up the outlet pipe to allow water to return to the system.
It is recommended on smaller skimmers that a ball valve is fitted on the outlet pipe to achieve better adjustment of the water level.
Larger models may come supplied with a coupling at one side of the ball valve to allow the riser tube to rotate for easier installation.
If gravity feeding the skimmer it is necessary to fit a tee piece to the existing overflow drain to the sump and use the branch to supply
the skimmer. In order to regulate the supply, a valve should be fitted below the tee. Ensure that the pipe feeding the skimmer is of large
enough diameter and that there is enough head to provide the proper flow rate. It is unusual to be able to provide sufficient water in this
manner to supply the larger of the skimmer models.
Operation and Setting: Open the valve on the outlet pipe and allow the skimmer to fill with water then overflow naturally back into the
system. Check for leaks on the fittings. Close the tap(s) on the air intake pipe(s), plug the pump(s) into a suitable supply and switch on.
Check that all of the pumps are operating by opening and closing the tap on each air intake in turn. This should produce a stream of
bubbles into the skimmer body if operating correctly. Note: Do not run for prolonged periods of time with the air taps closed.
As with all water pumps it is possible to trap air within the body, which will affect the operation and noise produced by the unit. To
remove this air, switch the pump off and on at the mains a few times until no further air is released.
Often the pump will be found to run hot at one end. This is often due to trapped air affecting the water-cooling of the ceramic bearing
and can be reduced by following the above procedures.
Observe the water level within the skimmer with the air intake valves closed. For all Deltec skimmers the ideal operating level for the
water is just above the bottom of the black bayonet fitting for the removable cup (A). Adjust the level by opening or closing the valve the
outlet pipe or by altering the flow through the inlet. If it is not possible to reduce the level below the bayonet then the supply volume is
too great and should be regulated accordingly.
Open the air intake tap(s) and set to the 2 o’clock position. The body of the skimmer should now be white with fine dense foam. Leave
the skimmer to settle down for a day or so before further adjustment to allow the surface of the plastic to wet out fully as until this
happens the true capacity of the unit will not be achieved. With fresh salt solutions or large water changes it is often common to remove
significant quantities of clear or pale liquid. This is a conditioning compound found in some salts and will not last for long.
The level of the initial foam in the skimmer should rise to half way up the skimmer tube. Adjust the taps to achieve fine bubbles within
the neck of the skimmer. Opening the air intake taps will result in an increased quantity of wetter foam and visa versa.
During normal operation it is recommended that the skimmer cup is emptied every 2-4 days and that during this operation the riser tube
into the cup is wiped clean of any fatty deposits as build up of this waste product will greatly reduce the ability for the foam to climb the
neck. Ensure before removing the cup that the pumps are switched off and that the water level is below the bayonet fitting. Whilst
cleaning leave the pump switched off, with the taps open, for 10 minutes to allow any salt deposits in the venturi tube to dissolve.

Use with Ozone:
Deltec skimmers are suitable for use with ozone and will automatically suck the gas through the venturi hose. A
maximum volume of 50 mg/h per pump should be used with special manifolds available for multi pump units. Do not use excessive
ozone, as it is dangerous and can cause severe headaches. Should the skimmer performance deteriorate check the ozoniser for
blockage. Ensure that it is not possible for water to siphon through the ozoniser by installing the unit above the skimmer water level.
Maintenance: The Deltec skimmer range should need very little adjustment and maintenance once set correctly, however due to the
high levels of calcium in marine aquariums and large volumes of air drawn in, it is common for deposits to accumulate requiring
periodical cleaning. Regular introduction of a small amount of RO water into the inlet tap may help to prevent any build up.
The AP Series Skimmers are fitted with two different types of pump depending on the model.
Smaller skimmers are fitted with Aquabee pumps, which have permanent magnet motors.
The drawback of a permanent magnet motor is that the impellor, on start up, can randomly rotate in either a clockwise or anti
clockwise direction. In one direction the full pumping capacity is achieved and in the other a much reduced flow is observed.
In order to counteract this effect the Aquabee pumps are fitted with a little flap inside the outlet of the pump, which flips from one side
to the other depending on the direction of rotation thus ensuring that the pump always operates at full duty.
Larger skimmers are fitted with Eheim Pumps, which are also have permanent magnet motors but have no such flap device, relying
on a symmetrical outlet port design and accepting a lower working efficiency.
It is recommended every 3 months that the pumps are removed from the skimmer having first drained the body of water. Strip down
the pump to check and clean the impellor of debris. On Aquabee pumps ensure that the direction flap moves easily and if necessary
soak the neck of the pump housing in white vinegar or kettle scale remover to dissolve any calcium carbonate deposits.
On older skimmers check for wear on the impeller by holding the two ends of the ceramic shaft between the thumb and first finger
and look for excessive movement (slop). If this is found it should be replaced, as the loss of balance will cause unnecessary noise.
A build up of calcium, dust and salt can restrict or block the venturi inlet on the connecting pipework and also the inlet tap, reducing
the skimming efficiency. This should be checked and carefully cleaned with a toothpick or fine drill rotated between the fingertips.
Check for damage or wear of the sealing ring on the base of the cup and if necessary replace it.
Important Note: Ensure that the air intake pipes are always positioned well above the water level in the skimmer to prevent back
siphoning of water when the pumps are switched off.
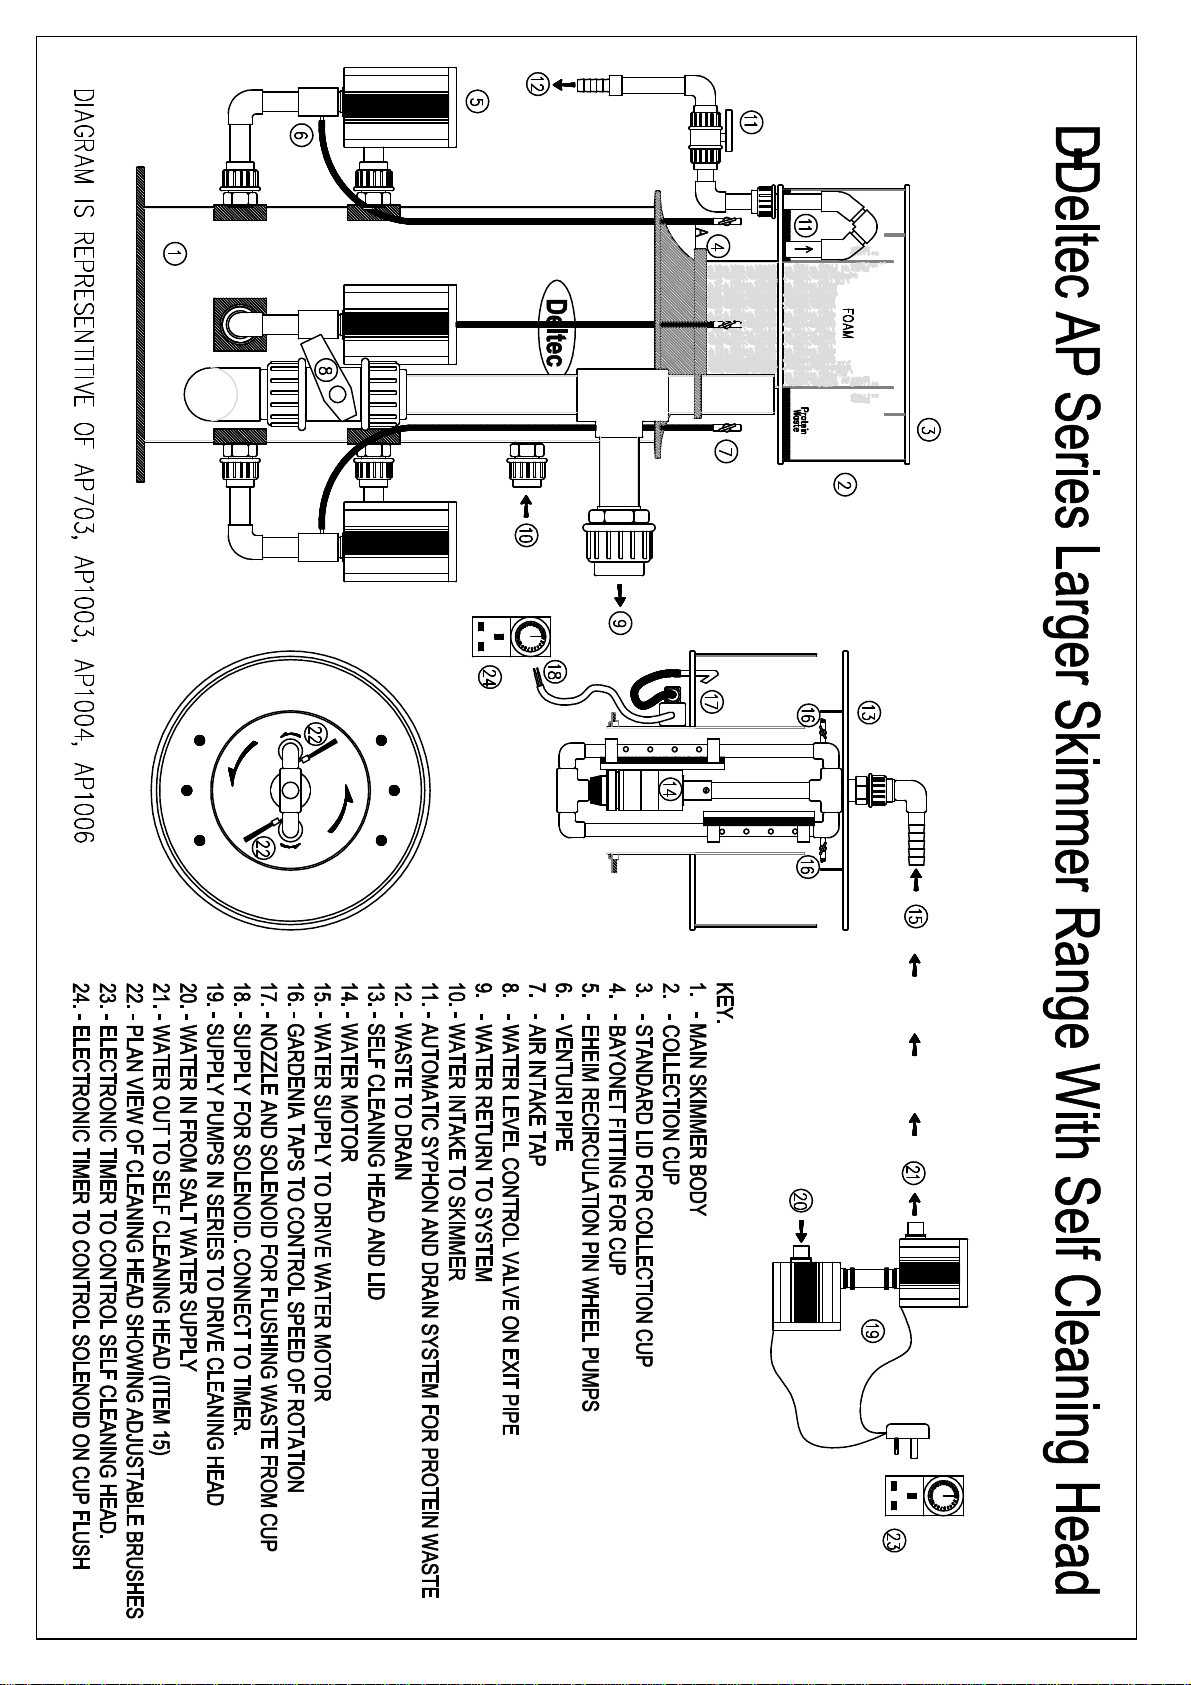
D-Deltec Self Cleaning Head and Auto Flush Systems
It is possible to fit a Self Cleaning Head to some of the larger Deltec Skimmers as indicated above to clean the inside and the outside
of the collection cup. This can be ordered with the skimmer or can be simply retrofitted at a later stage.
Fitting of such a system can increase the efficiency of the skimmer by at least 20% due to the constant removal of fatty deposits on
the riser tube that will otherwise reduce foam production.
Operation: The cleaning head consists of a supply system, modified lid, two sets of brushes on a rotating pipework body and a water
motor to drive it. The details of this can be clearly seen on the attached diagram. In addition there is a flushing system to periodically
wash out the cup and an auto siphon device to remove the waste to drain.
The head operates by forcing water at a relatively high pressure through the pipework and water motor causing it to rotate. Taps on
the end of the brush bars regulate the water throughput and hence the speed of rotation.
Setting up the Cleaning Head:To operate the unit it is necessary to provide a high-pressure supply of salt water to the head.
For this purpose the optional Deltec pump set consists of two Aquabee pumps, which are connected together in series to increase
the achievable pressure to the cleaning head. These are normally piped in flexible hose from a suitable water supply point, through
the pump and then to the hose tail on the skimmer lid. On all new models a drain port is fitted near the base of the body, which can
be fitted with a hose tail allowing it used as a suitable source of supply.
Important Note: Ensure, as with all flexible joints, that the connections onto the hose tail and on the flexi between the two pumps are
suitably clamped as failure of one of these connections could drain down the whole system.
With the supply system fitted as described, switch on the pumps and check that they both operate correctly in supplying water to the
head. Open the taps until the cleaning head is seen to rotate. Rotation is designed to be slow and further adjustment of the taps will
not produce rapid spinning. If the head does not spin it is possible that only one of the two pumps is operating correctly in which case
the directional flap in the pumps should be checked as described under skimmer maintenance.
The angle of the brushes should be adjusted so that they lightly clean the surface of the tube. Excessive contact may cause the
motor to stall. The position of the brushes may need adjusting over time as they gradually wear.
Having commissioned the cleaning head, it will be necessary to control the operation of the supply system with a suitable timer.
Deltec recommend that the timer is set to allow the cleaning head to rotate for 5 -15 minutes every 4 hours.
Setting up the Cup Flushing System: The skimmer cup is fitted with a flushing system, which consists of a directional nozzle; small
bore pipework and a solenoid valve. The drainage side is fitted with an auto siphon device and pipework to drain with a tap.
This is installed to allow a periodic flow of fresh water to flush out the detritus and waste protein from the skimmer cup which
otherwise over a period of time may cause a nuisance smell.
To set up the unit it is necessary to connect the solenoid to a suitable fresh water supply and for the waste to be piped to a drain.
Pipework and connections suitable for R O installations should be used and it is important to fit a non-return valve or preferably a
separate reservoir or other air break device. This will to prevent back siphoning of waste into the water stream should the mains
supply fail. Flushing of the cup with salt water is therefore not recommended as it may result in a gradual reduction in salinity
The auto siphon device that comes fitted with the collection cup will allow the waste water to rise to the top of the 90-degree bend
and then will automatically drain away until empty at which point the siphon will again break.
The solenoid should be connected to a separate timer, which allows the cup to be flushed every 4 hours to prevent waste products
drying on the side of the cup. All waste should be directed to a permanent drain.
Maintenance: This should consist simply of cleaning every 4-6 weeks, maintaining the supply pumps and occasional adjustment of
the brushes so that they keep light contact with the riser tube.
For further information on this or any other D-D product please contact us or visit our website on:
www.d-daquariumsolutions.com Telephone. 020 8501 2492 Fax. 020 8500 9102


This manual suits for next models
10
Table of contents
Popular Swimming Pool Filter manuals by other brands

Pentair
Pentair TRITON Installation and user guide

Oase
Oase Skimmer 250 operating instructions

Pentair Pool Products
Pentair Pool Products Warrior owner's manual

BSV
BSV PRO200 IP65 user manual

Aquadistri
Aquadistri BlueMarine Internal Skimmer 120 instruction manual

LASWIM
LASWIM EC Series Installation and user manual

Intex
Intex ECO7111 owner's manual

Jandy
Jandy CS100 Installation and operation manual

BIO-LAB CANADA
BIO-LAB CANADA Mineral Springs Pool Pilot Soft Touch 48 Installation and operation manual

ChlorKing
ChlorKing NEXGEN80 Installation, operation and maintenance manual

Zodiac
Zodiac PH Expert Instructions for installation and use

Intex
Intex SF70220RC-1 owner's manual