D.E. Systems Border Patrol TC1 User manual
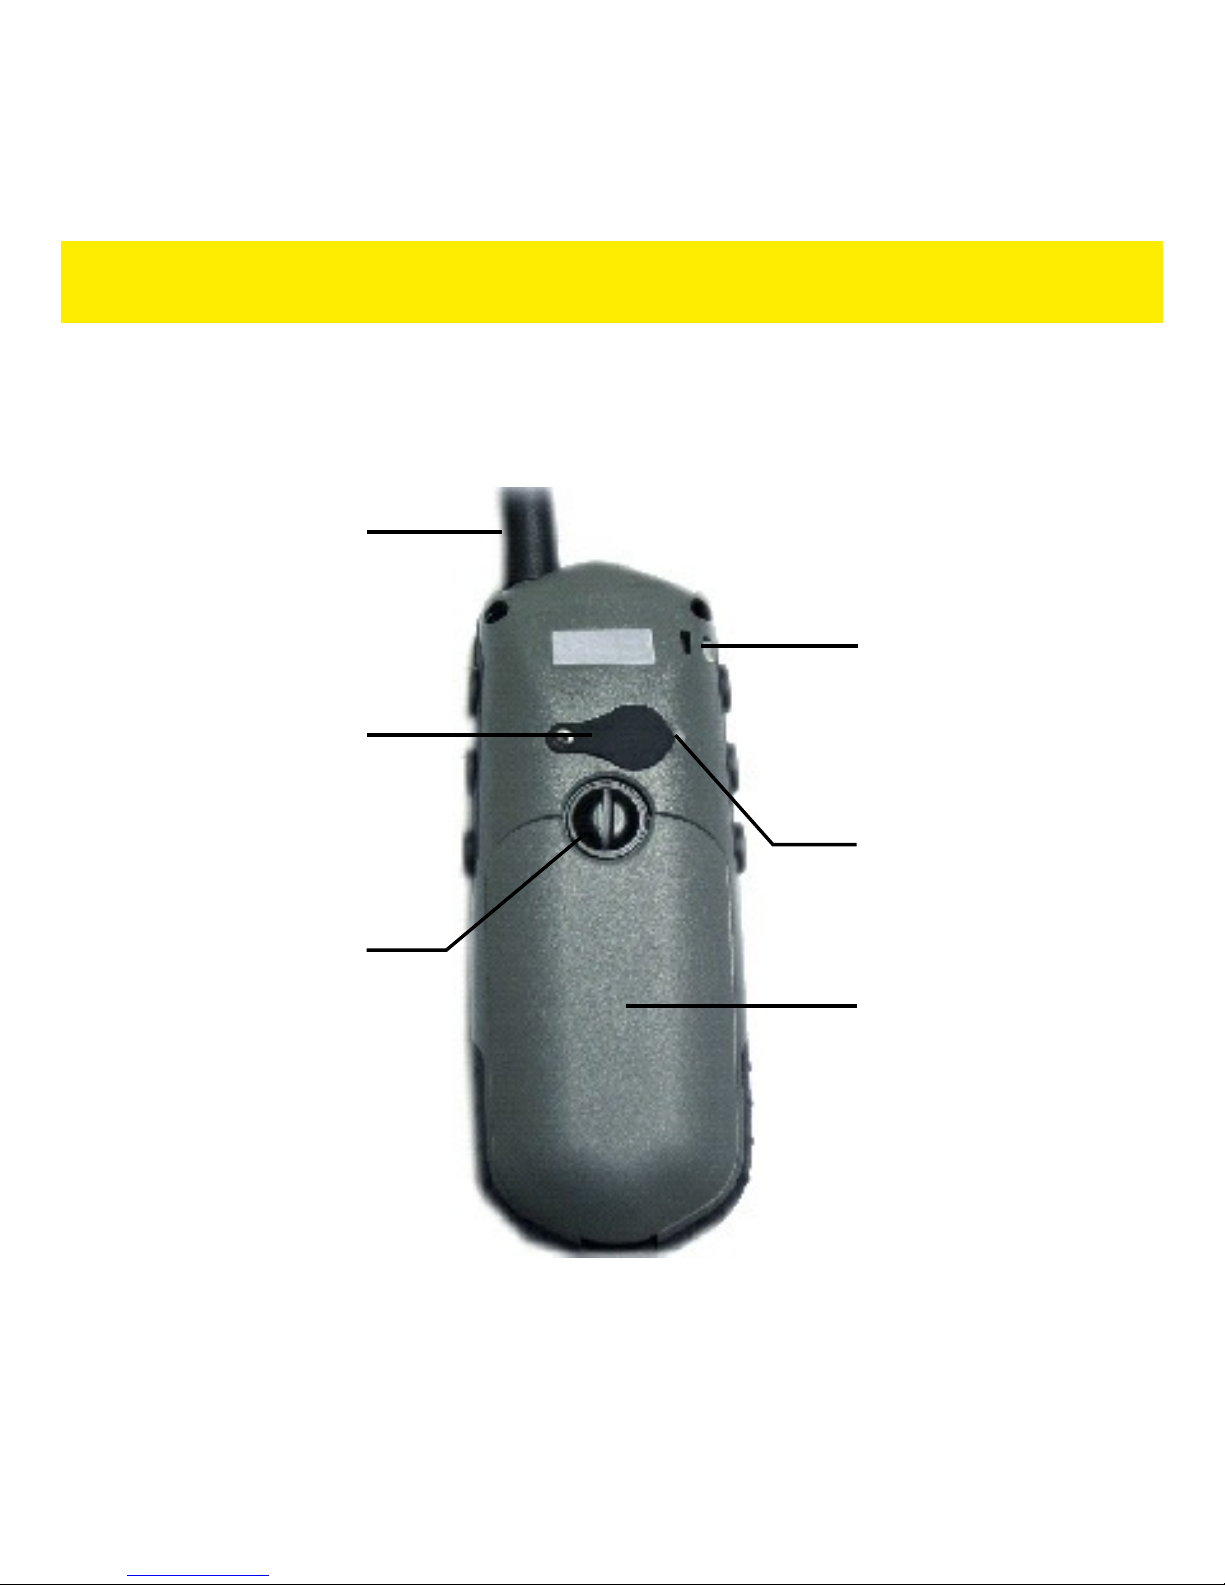
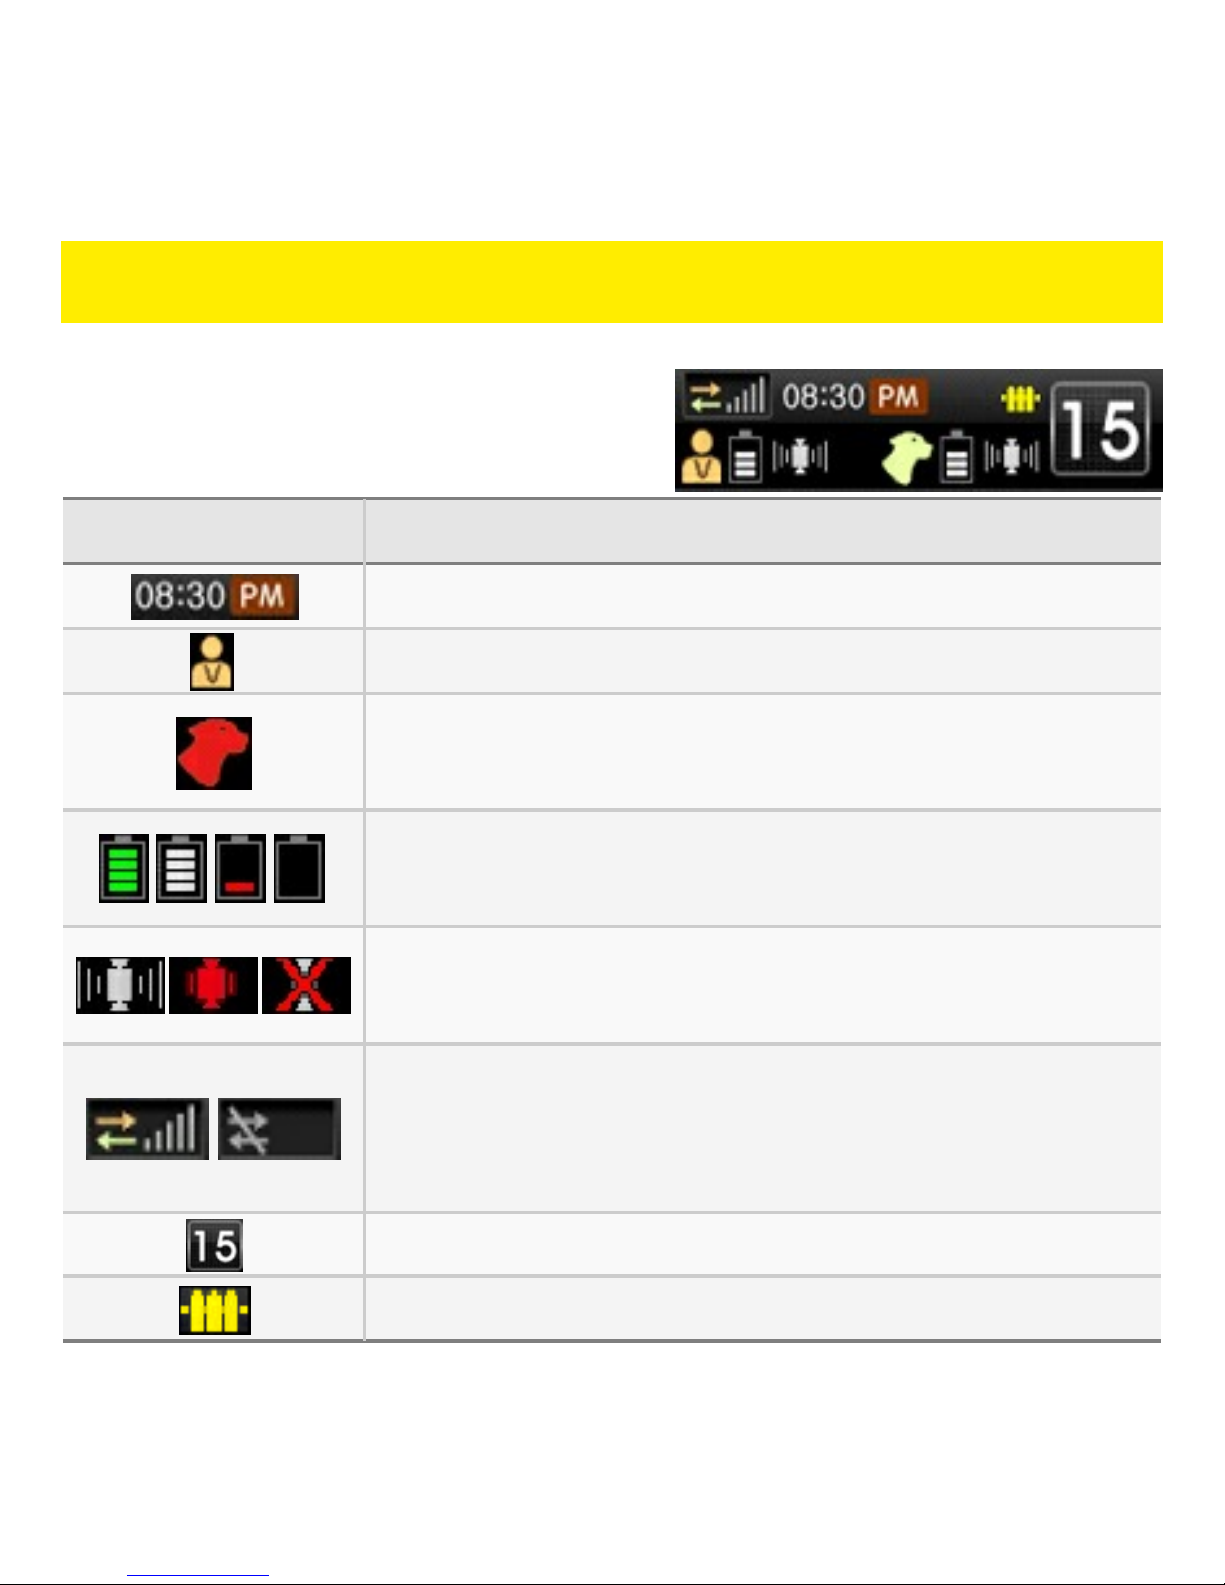
1
Please read this manual in its
entirety before using this unit.
Manual
- GPS Containment System
- Remote Trainer
- Short-Range Tracking Unit
Owner’s

2
INTRODUCTION
Thank you for choosing the D.E. Systems Border PatrolTM TC1 for your
dog training needs. This unit features a revolutionary GPS-Guided Fence
system, remote training functions, and waypoint marking capabilities. Up
to 5 collar units can be controlled by the handheld unit.
Utilizing GPS-guided technology, the D.E. Systems Border Patrol TC1
features a portable, wireless, and easy to use electronic fence system.*
It creates a circular fence of up to an 800 yard radius that has a Safe
Zone, Warning Zone, and Stim Zone. It also has our patented Welcome
HomeTM feature allowing a dog to re-enter the Fence area without a
correction.
The D.E. Systems Border Patrol TC1 also includes remote training
features with up to a 2 mile range.** 50 levels of Nick and Continuous
stimulations are available at your fingertips, as well as Jump and Rise
stimulations. The Vibration feature will Vibrate the collar unit. This unit
also has the ability to mark up to 4 different waypoints. If a Fence is
active, the Fence center is also automatically saved as a Waypoint.
The D.E. Systems Border Patrol TC1 remote trainer is a safe and
effective training tool when used properly. Be sure to read through this
instruction manual and the training manuals to get the most out of your
unit. We hope you enjoy using your new D.E. Systems Border Patrol
TC1 unit.
*GPS signal required.
**Maximum line of sight range.

3
TABLE OF CONTENTS
Introduction.............................................................................................2
1. Before you Begin...............................................................................7
- Warnings............................................................................................8
- Caution.............................................................................................10
2. Getting to Know Your System........................................................11
- Package Contents............................................................................12
- Features...........................................................................................13
- Handheld Unit..................................................................................14
- Collar Unit........................................................................................18
- LCD Screen Icon Definitions............................................................20
- Collar LED Light Status....................................................................22
3. Getting Started.................................................................................25
- Charging the System.......................................................................26
- Turning the System ON/OFF...........................................................28
- Acquiring GPS Signal......................................................................29
- Compass Calibration........................................................................30
- Fitting the Collar...............................................................................32
- Finding the Proper Intensity Level...................................................33

4
TABLE OF CONTENTS
4. Fence.................................................................................................35
- Fence Overview...............................................................................36
- Fence Area Terms...........................................................................38
- Setting Up Fence Boundaries..........................................................39
- Activating/Deactivating Fence..........................................................42
- Creating Visible Fence.....................................................................42
- Fence View Screen..........................................................................43
- Reading Fence View Screen...........................................................44
- Collar Status....................................................................................45
- Switching Between Collars..............................................................46
- “Welcome Home” Fence Feature.....................................................47
- Testing Fence..................................................................................47
5. Training.............................................................................................49
- Training Home Screen.....................................................................50
- Training Functions...........................................................................51
- General Training Mode Information.................................................52
- Jump and Rise Stimulations............................................................53
- Testing Training Functions...............................................................54

5
6. Marking Waypoints..........................................................................55
- Mark Overview.................................................................................56
- Mark Current Location.....................................................................57
- Find Previously Marked Waypoints..................................................58
- Edit/Delete Marked Waypoints.........................................................59
7. Setup.................................................................................................61
- Setup Overview................................................................................62
- System.............................................................................................62
- Adding a Collar Unit.........................................................................63
- Edit Name & Color / Delete Collar...................................................64
- GPS/RF............................................................................................65
- Alerts................................................................................................68
- Display.............................................................................................69
8. Troubleshooting, FAQ, Maintenance, Warranty & Repair............71
- Troubleshooting...............................................................................72
- FAQ..................................................................................................74
- Maintenance....................................................................................76
- Warranty & Repair...........................................................................77
Terms of Use & Liability Limitations...................................................78
FCC & IC Compliance...........................................................................79
TABLE OF CONTENTS

6

7
1
Before You Begin
Please read this manual in its entirety before use.

8
The Dog Expedition Systems Border Patrol TC1 GPS Fence and
Training system is a safe and effective training tool when used properly.
This manual provides essential user information for the proper operation
of this unit. Please read the instruction manual and training manuals
completely before using this product.
General Warnings
ŸKeep away from Children.
ŸDo not operate unit outside these temperatures: -2º F to 130º F.
ŸDo not recharge the unit outside these temperatures: 33º F to 105º F.
ŸDo not leave unit in or around a high temperature heat source. In
particular, do not leave unit unattended in a vehicle on a hot day or
exposed directly to sunlight for extended periods (see battery
warnings).
ŸDo not operate in areas of high humidity for extended periods.
ŸDo not leave unit unattended.
ŸDo not leave unit in an area where a dog can reach and chew on it
(see battery warnings).
ŸDo not use unit while operating a vehicle, gun, or dangerous tool.
ŸKeep unit watertight. Check that all covers and plugs are in good
condition and properly seal the unit as water may seep in if not sealed.
ŸCheck unit for proper tightness of screws, gaskets, and plugs before
each use.
ŸDo not take apart or open the Border Patrol Unit, as this may void
your warranty.
WARNINGS

9
Battery Warnings - This unit uses volatile Lithium-Ion batteries and
requires special care. Failure to follow the battery guidelines may result
in fire, explosion, chemical burn, electrolyte leak, injury, and/or shortened
battery life span.
ŸMake sure to observe the correct polarity when inserting batteries.
Match the + and - labeled on the battery and in the battery
compartment. Inserting batteries incorrectly may result in permanent
damage to the unit.
ŸKeep batteries away from fire and do not leave batteries/units
unattended in high temperature locations, under direct sunlight or in a
hot vehicle.
ŸKeep batteries away from Children.
ŸDo not pierce, drop, or cause high impact to the battery as this may
cause the battery to overheat, explode, or cause a fire.
ŸUse only an authorized D.E. Systems charger and wall adapter.
ŸDo not leave batteries unattended. In particular, do not leave in an
area where an animal or dog may chew on the batteries.
ŸAlthough your unit will go into a trickle charge, it is recommended that
the units are disconnected from the charger when charging is
complete.
ŸFully charge and test your unit about once a month when storing your
unit for an extended period of time.
ŸDo not store your unit in extremely hot or cold conditions.
ŸStore your unit in a dry environment.
ŸDispose of batteries properly by calling your local waste service.
WARNINGS

10
CAUTION
ŸBefore training, your dog should be examined by a veterinarian to
assure that your dog is in good health.
ŸDo not use with aggressive-tempered dogs.
ŸNever leave your dog unattended with the unit on. Since no
electronic device is perfect, there is a possibility that your dog may
receive an unintentional electric stimulation.
ŸYour Border Patrol training collar is a very valuable tool if used
correctly. It is extremely important that you completely understand all
the functions of the collar and how to properly train with it before
placing it on your dog.
ŸTo prevent neck irritations, the collar should never be worn for
more than 12 hours a day. Changing the collar location on the dog’s
neck daily will also help prevent irritations. It is recommended to
reposition the collar every 1-2 hours of use (see fitting collar unit pg.
32).
ŸIt is important to keep the collar clean. Clean the electrodes regularly
with a mild anti-bacterial soap.
ŸIf an irritation is found, carefully wash the dog’s neck with soap and
water and then wipe the area with Hydrogen peroxide. Dry thoroughly
and apply an antibiotic ointment. If condition persists beyond 48 hours,
please see a veterinarian.
CAUTION - Be sure to test your unit before placing the collar unit on
your dog(s). Always checking your collar system before use will
help prevent possible interruptions and inconsistencies during
training and field time.

11
2
Getting to Know
Your System

12
PACKAGE CONTENTS
ŸWater-resistant Handheld Unit with antenna
ŸWaterproof Collar Unit with belt assembly
ŸCharger
ŸTest light
ŸBoundary flags
ŸScreen Cover
ŸLanyard
ŸCarrying Case
ŸUser manual
ŸTraining manuals
ŸWarranty card

13
ŸGPS Guided e-Fence, e-Collar Training Unit, and Short-Range
Tracking Unit operating on 900 MHz radio frequency
ŸRechargeable Li-Ion Batteries in both Handheld and Collar Units
ŸWater-resistant Handheld Unit and waterproof Collar Unit
ŸHigh resolution 2.4’’ TFT Color LCD
ŸExpandable up to 5 dogs with TC1 Add-On units (sold separately)
ŸGPS e-Fence Mode
ŸContainment area: 15 yard to 800 yard radius from Center Point
ŸWarning Zone Notifications: Vibration or Audible Beep
ŸV+S or B+S: Vibration or Audible Beep with delayed stimulation
Ÿ50 levels of stimulation in Stimulation Zone
ŸTraining Mode
Ÿ50 adjustable intensity levels of Momentary (“Nick”) Stimulation and
Continuous Stimulation
ŸPositive Vibration, Jump Stimulation, Rise Stimulation
ŸTraining Range of up to 2 miles (line of sight)*
ŸShort-Range Tracking and Status Updates when e-Fence is Active
ŸTrack Location up to 2 miles (line of sight)*
ŸRead status of collar: battery life, out of fence area, etc.
ŸMark up to 4 Waypoints (plus automatically saved Fence Center)
*NOTE - Radio Communication between the handheld unit and the collar
unit varies greatly according to factors such as: terrain, obstructions,
weather, electromagnetic interferences, etc. Having an unobstructed
line-of-sight between the handheld unit and the collar unit will produce
the best communication signal between the units and the greatest range.
FEATURES

14
HANDHELD UNIT
RF Antenna
Vibration Button
Rise Button
Dog Selection
Button
Mark Key
Up Key
Right (PING) Key
Down Key
Nick Button
Continuous Button
Jump Button
Menu/Power Key
Left (Toggle
Screen) Key
Enter Key
Color LCD Screen
Front View

15
HANDHELD UNIT
Color LCD Screen - Displays Training, Fence, and Mark information.
RF Antenna - Aids in communication between handheld unit /collar unit.
Nick Button - Quick, split-second stimulation.
Continuous Button - Continued Stimulation while button is pressed (8
second safety shutoff).
Jump Button - User-programmed Jump stimulation level without
changing default stimulation level (see pg. 53).
Vibration Button - Applies Vibration only.
Rise Button - Stimulation that gradually increases intensity level while
button is pressed. (see pg. 53).
Dog Selection Button - Selects desired collar when multiple collars are
programmed to the handheld unit (see pg. 46).
Menu/Power Key - Powers the handheld unit ON/OFF and accesses
Menu. Also acts as BACK button in certain menus.
Mark Key - Accesses Mark menu to mark and find waypoints. Also acts
as NEXT or END buttons in certain menus.
Directional Keys - Up/Down/Left/Right Keys navigate through menus.
Up/Down Key - Increases/decreases intensity level.
Toggle Screen - Toggles between Training and Fence or Mark screens.
Ping Key - Sends signal to collar unit for location and status updates.
Enter Key - Selects menu item.

16
HANDHELD UNIT
Back View
Lanyard
Attachment Slot
RF Antenna
USB Connector
Port (under cover)
Battery Cover
USB Port Cover
Battery Cover
Locking Screw

17
HANDHELD UNIT
RF Antenna - Antenna for communication between handheld unit and
collar unit.
Lanyard Attachment Slot - Attachment point for optional lanyard.
USB Connector Port - Connection point to charge handheld unit.
USB Port Cover - Cover protecting USB Port from dirt and debris.
Battery Cover - Cover enclosing the handheld unit's rechargeable
batteries.
Battery Cover Locking Screw - Screw that locks down the Battery
Cover keeping it weather tight. It can be loosened/tightened with a coin
or large flathead screwdriver.
NOTE - Your Handheld Unit will come without the battery installed. To
install the battery:
1. Unscrew the Locking Screw and remove the Battery Cover.
2. Insert the battery with the terminals pointing towards the top of the
Handheld Unit and the positive terminal on the left.
3. Replace the Battery Cover and secure with the Locking Screw.

18
COLLAR UNIT
RF Antenna
LED Light
Belt
GPS Antenna
Electrodes
Front View
Back View
Battery
Charging Port
Power Button
Charging Port
Cover

19
COLLAR UNIT
FRONT VIEW
GPS Antenna - Antenna used to obtain GPS signal.
RF Antenna - Antenna for communication between handheld unit and
collar unit.
Belt - Flexible nylon collar belt.
Electrodes - Makes contact with dog's skin for stimulation.
LED Light - Indicates status and errors of collar unit.
BACK VIEW
Power Button - Turns collar unit ON/OFF.
Battery Charging Port - Connection point to charge collar unit.
Battery Charging Port Cover - Cover protecting Charging Port from dirt
and debris.

20
LCD SCREEN ICON DEFINITIONS
System Information BarThe System Information Bar is located
at the top of the LCD screen and
provides information and status of the
handheld unit and collar unit.
ICON DEFINITION
Current time (must establish GPS signal).
Indicates that the handheld unit is active.
Indicates that the collar unit is active. Color of
collar unit currently being controlled is shown.
Battery status of handheld unit and collar unit. (see
pg. 26 for more information on Battery status).
GPS signal status of handheld unit and collar unit
(see pg. 29 for more information on GPS signals).
RF signal strength between handheld unit and
collar unit. Zero bars and gray icon indicates lost
RF signal.
Intensity level of selected collar unit.
Fence status. Yellow icon indicates active Fence.
Table of contents
Other D.E. Systems Pet Care Product manuals