D.E. Systems BL 500 User manual

BL NATURAL FLUSH
BL NATURAL FLUSHTM
TM
BIRD LAUNCHER
BIRD LAUNCHER
BL Series Owner’s Manual
BL 500 • BL 505 • BL 509
BL 700 • BL 705 • BL 709
2
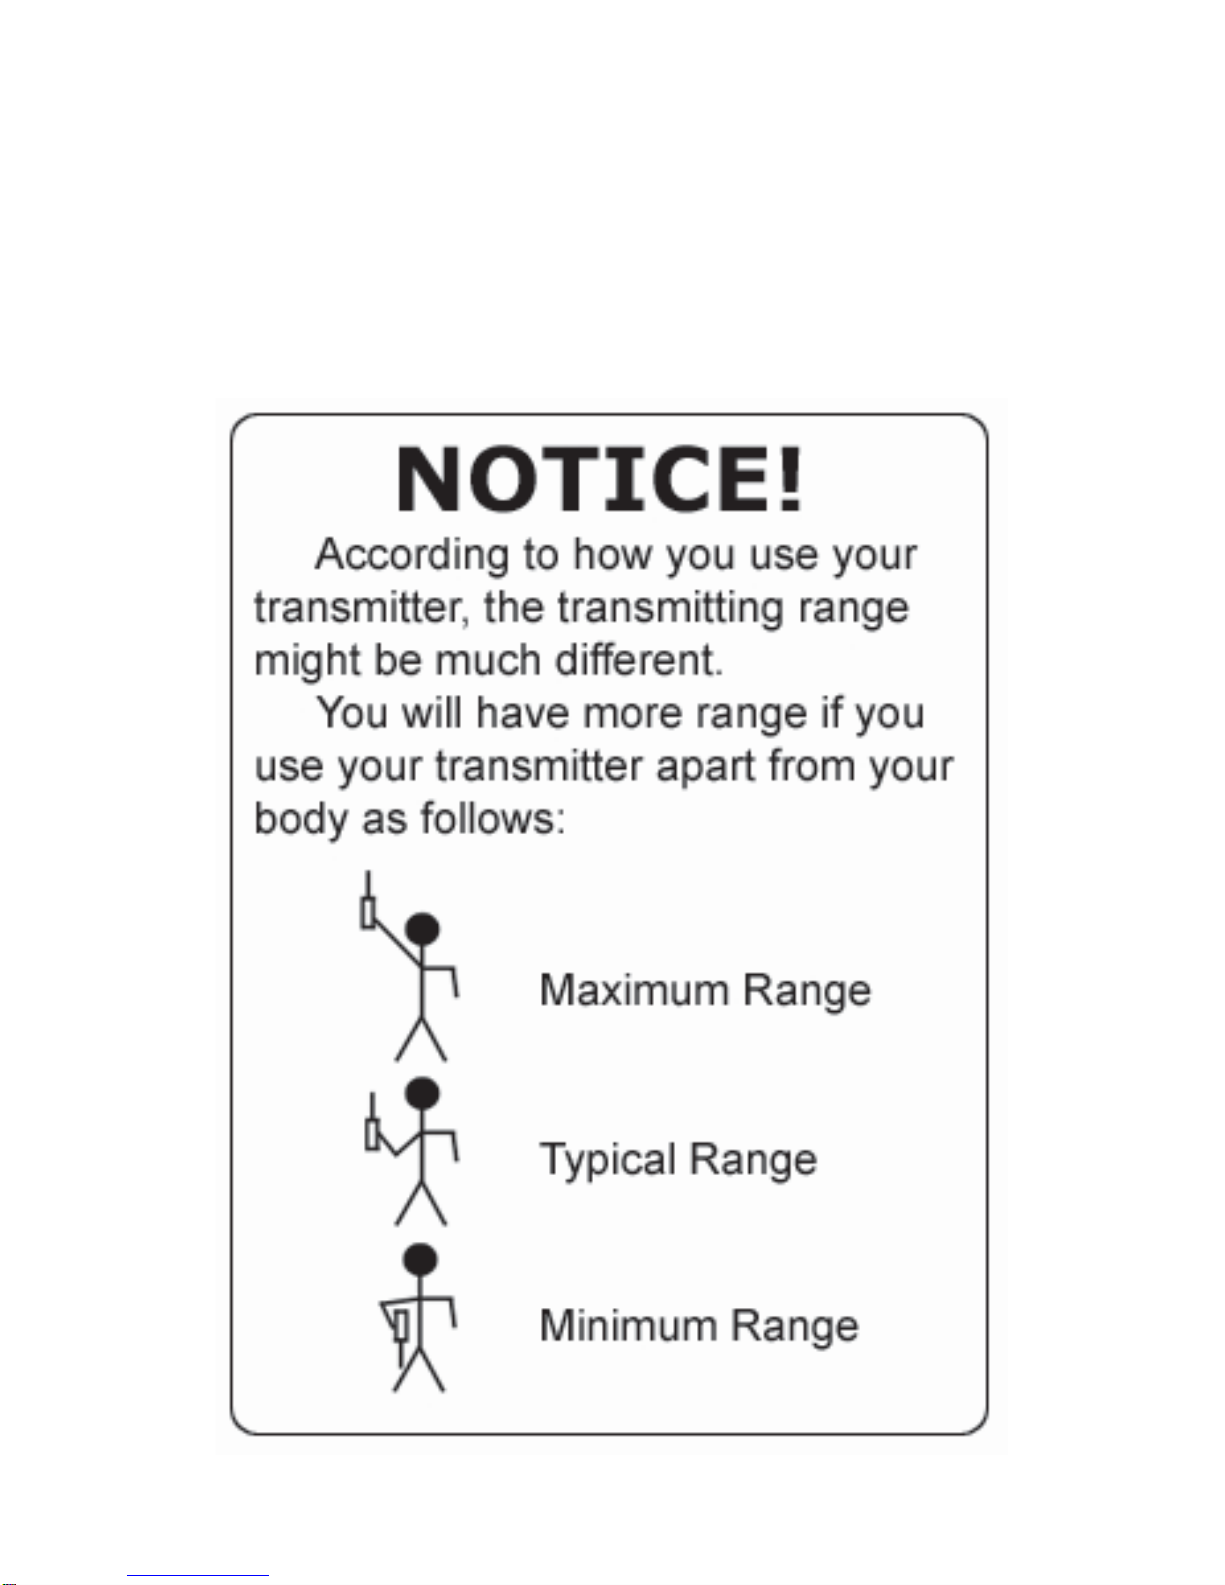
IMPORTANT NOTE
Please read this owners manual entirely before
operating this unit. Should you have any questions
about our Launchers or their operation please contact
our Customer Service department.

3
TABLE OF CONTENTS
xTable of Contents ....................................... 3
xIntroduction ................................................ 4
xPackage Contents ...................................... 5
xFeatures ..................................................... 5
xParts & Functions ....................................... 6
xTurning Remote Receiver On/Off ............... 12
xProgramming Remote Launcher................. 13
xSetting Launcher ........................................ 14
xTesting Launcher........................................ 15
xOperating Launcher.................................... 16
xInstalling Remote Receiver......................... 18
xMaintenance............................................... 20
xTroubleshooting.......................................... 21
xImportant Safety Notes............................... 21

4
Thank you for choosing the D.T. Systems BL
series Natural Flush™ Bird Launcher training
product. Your bird dog can reach his or her
best with our Natural Flush™ Bird Launcher,
hailed by professional trainers everywhere as
the best launcher ever developed. Our BL
series bird launchers are available in either a
manual or remote release and have a patent
pending Easy-Load™ trap door that lets you
load and unload single or multiple birds safely
and easily. A Quiet-Release™ system helps
prevent “spooking” your dog. Large scent
holes create a natural flow of bird scent in the
air. Remote launchers have a 700 yard range
and a transmitter that can control 16 different
launchers. A remote-activated beeper helps
you locate each launcher after training ses-
sions. Launchers are available in a small size
for quail/pigeon size birds or a large size for
pheasant/duck size birds. Start training with
our gear and start bringing out the best in your
best friend.
INTRODUCTION

5
PACKAGE CONTENTS
BL 500/BL 700:
xBird Launcher
xInstruction manual
BL 505/BL 705*:
xAll contents of BL 500/BL 700
xRemote Receiver attachment for Launcher
BL 509/BL 709*:
xAll contents of BL 505/BL 705
xRemote handheld Transmitter
* Batteries not included.
FEATURES
All BL series Bird Launchers have:
xEasy-Load™ trap door for easy loading/unloading.
xQuiet Release™ System prevents “spooking” dog
xHigh Quality Nets and Springs for effective launching
xLarge Scent Holes for natural scent flow
Additional Features for Remote Launchers:
xDigital technology
x1 Transmitter controls up to 16 Remote Launchers
x700 yard range
xWeather resistant Transmitter and Receiver unit
xTransmitter and Receiver use regular 9-volt batteries
(not included)
xPower-Save Mode on Remote Receiver (see p.17)
xBeeper Locator on Launcher makes it easy to find
6
PARTS & FUNCTIONS
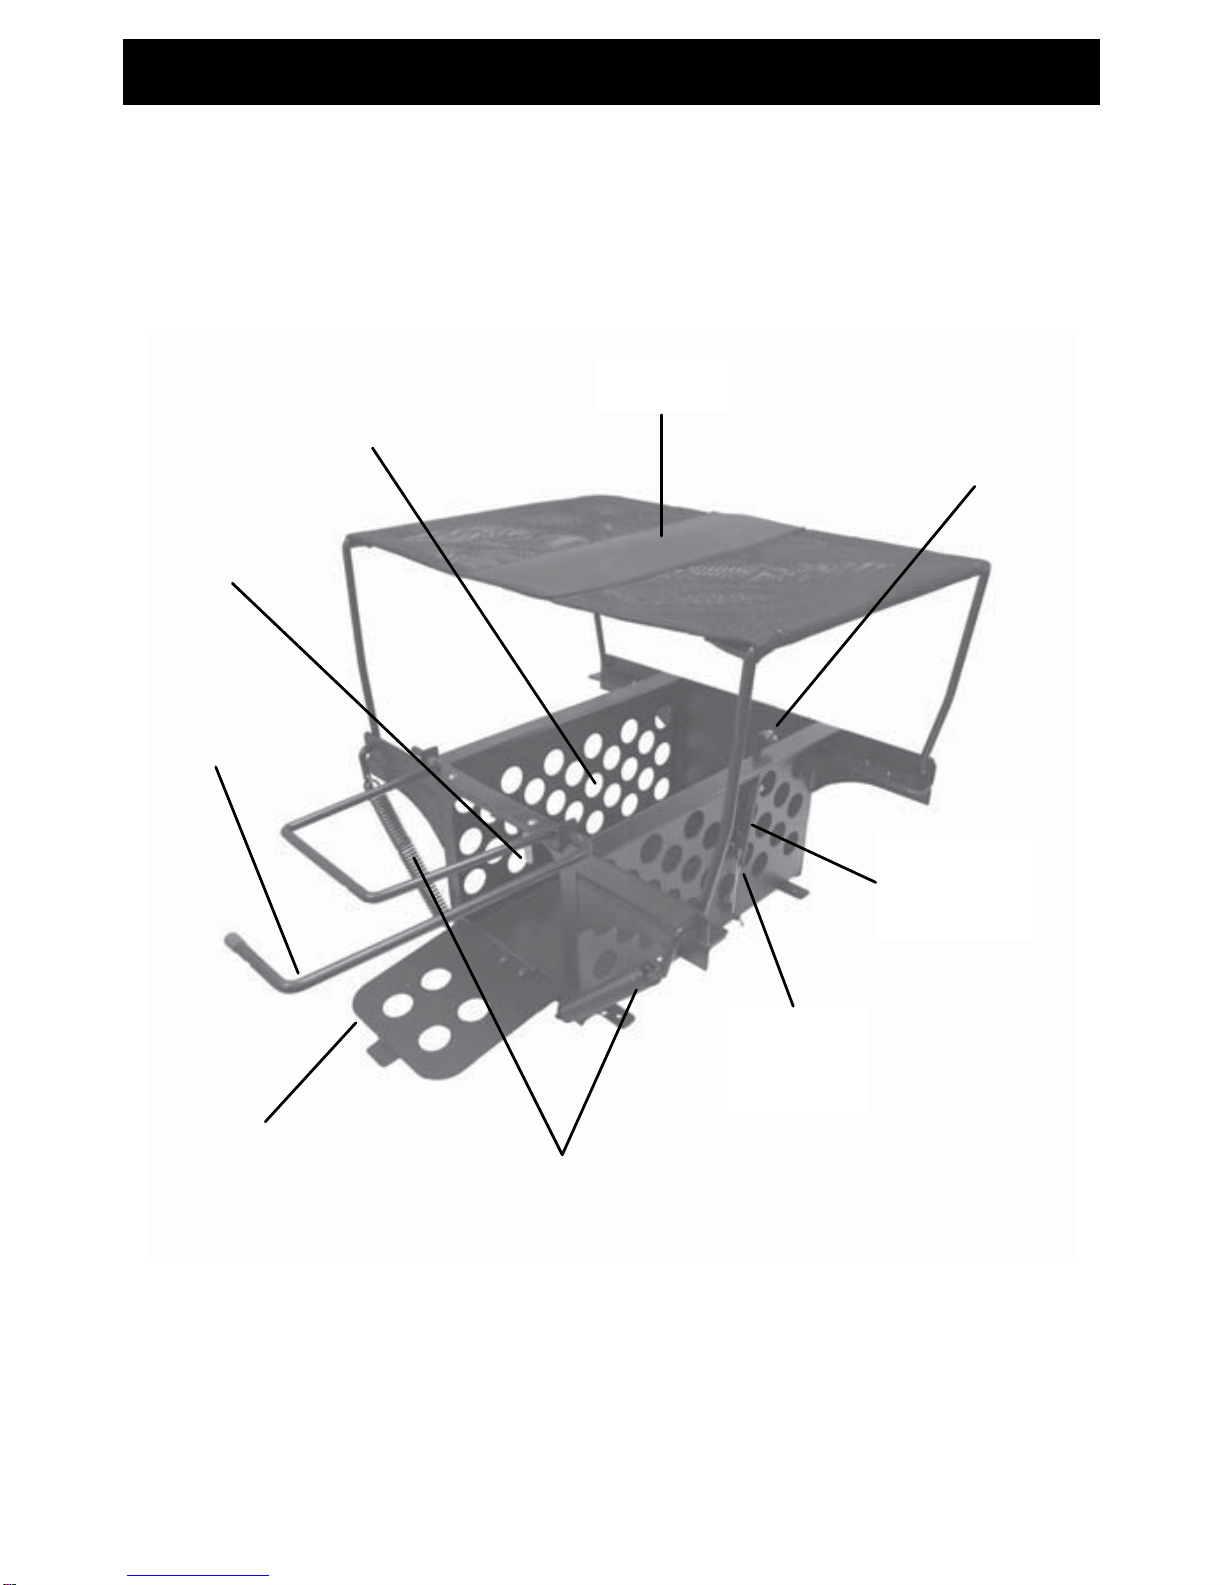
Launcher
(BL 700 shown in ‘open’ position)
Netting
Safety
Pin
Release
Arm
Release
Wheel
Scent
Holes
Springs
Locking
Lever
Easy-Load™
Trap Door
Door
Latch
7
PARTS & FUNCTIONS
Large Scent Holes
Provides natural flow of bird scent into the air.
Heavy Duty Springs
Creates strong, consistent launches that send
birds several feet in the air (depending on size
and weight). Quiet release during launch.
Durable Netting
Holds bird(s) comfortably in Launcher. Quiet
release during launch.
Easy-Load™ Trap Door
Allows safe, easy loading/unloading of bird(s)
while Launcher is already in ‘closed’ position.
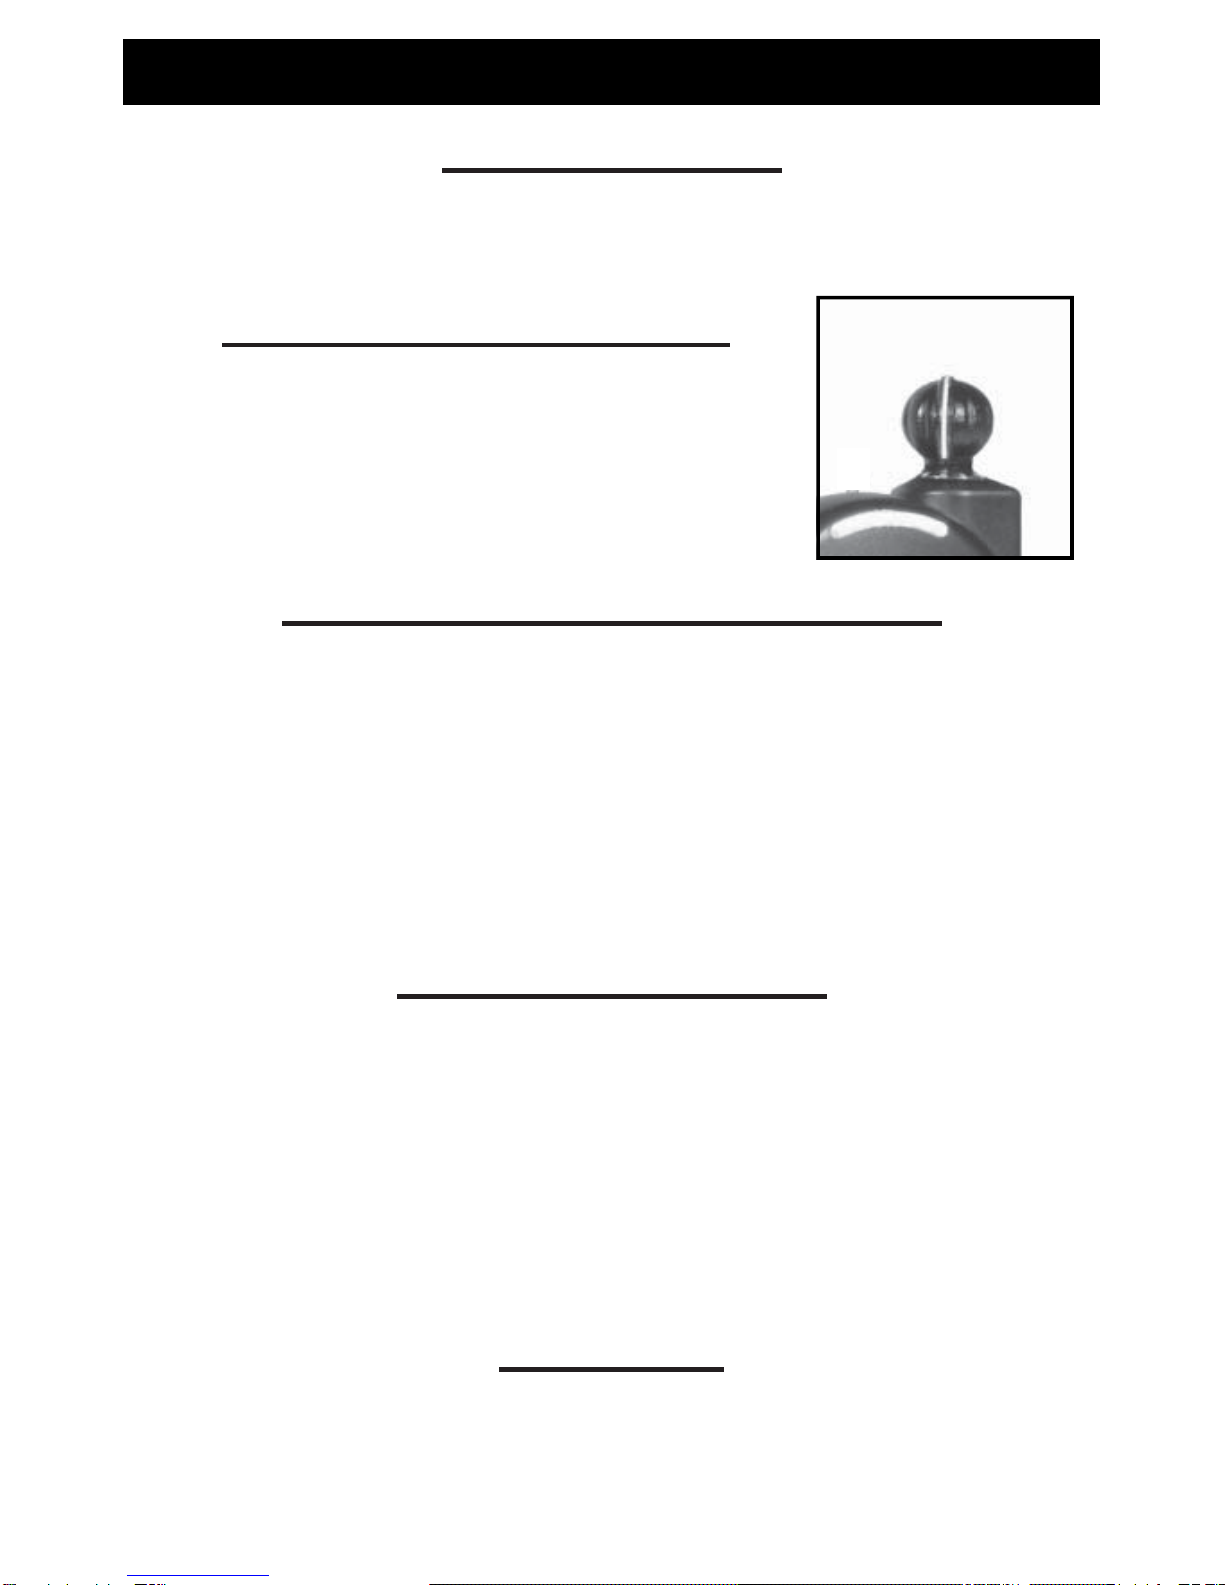
Release Arm with Release Wheel
Release Wheel on top rolls over Locking Lever
to keep it in place until launch. Lower part of
Release Arm can be attached to pull cord for
manual release or to Remote Receiver.
Locking Lever
Holds Launcher in ‘closed’ position. Launches
bird(s) when released by Release Arm.
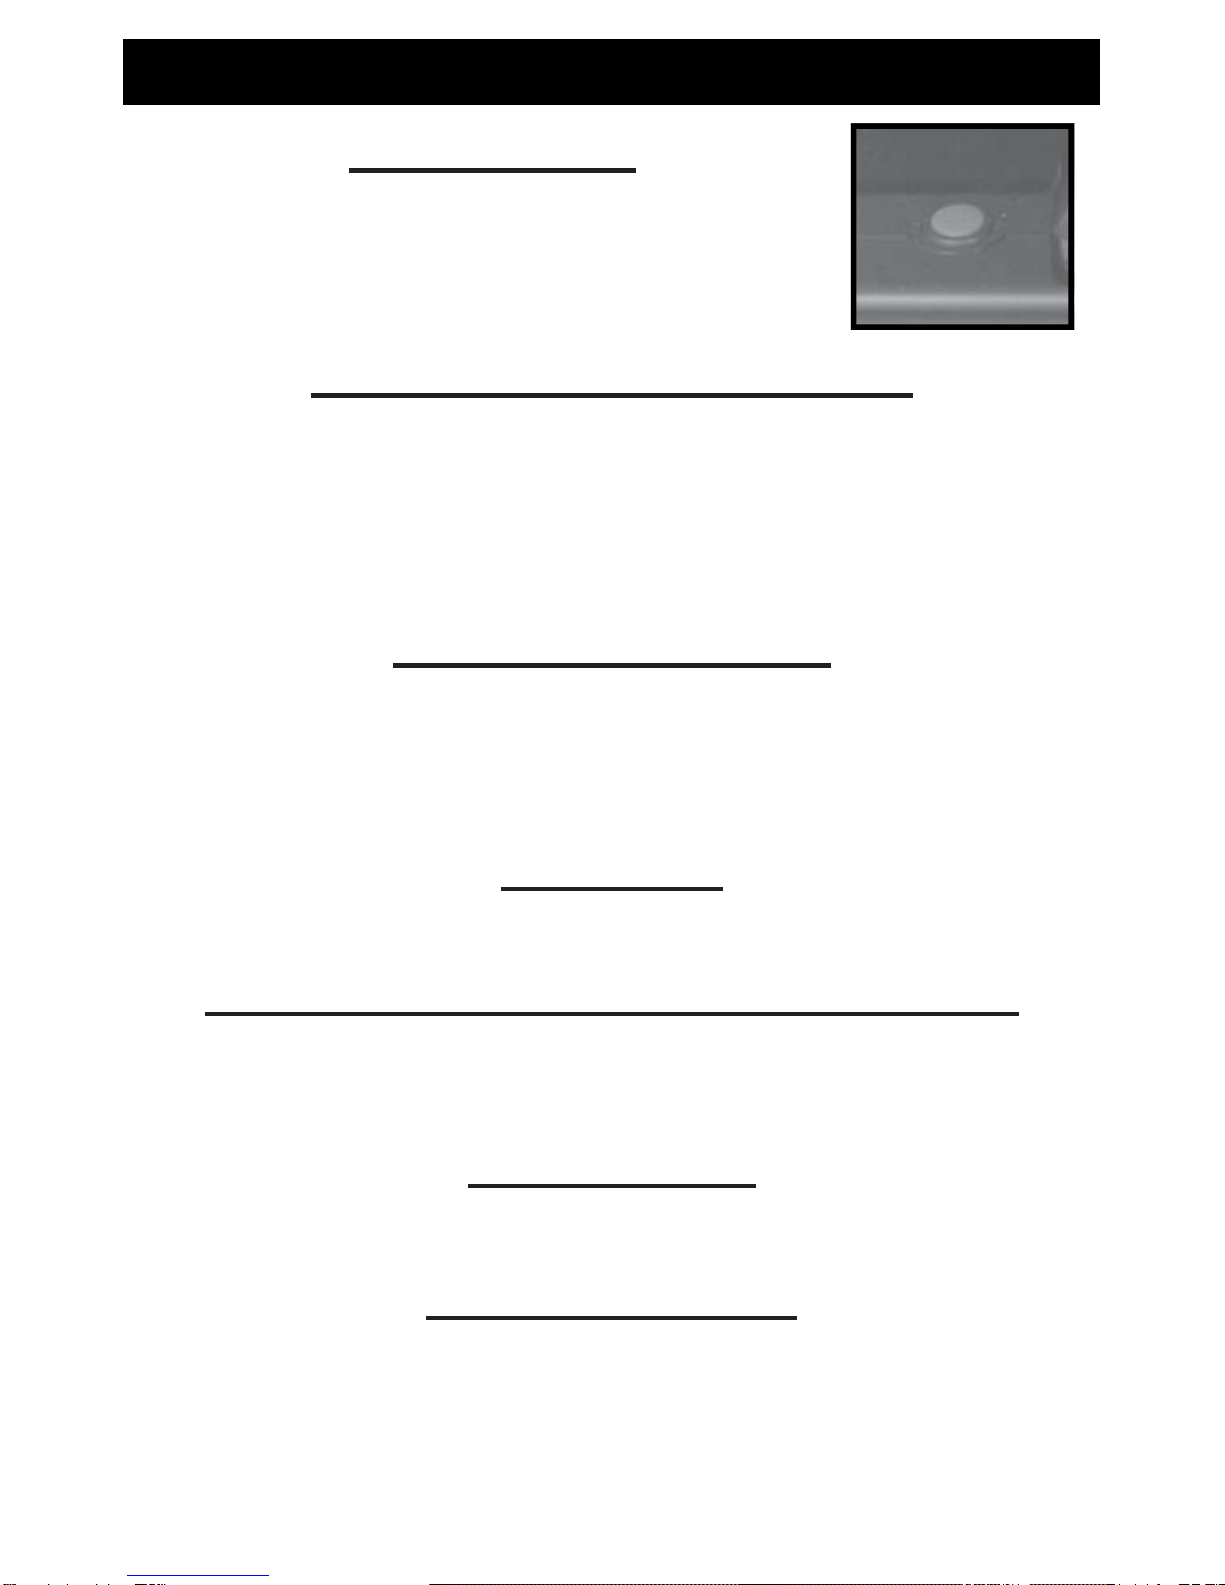
Safety Pin
Locks Release Arm in closed position
to prevent accidental launch.
Door Latch
Locks Easy-Load™ Trap Door closed.
8
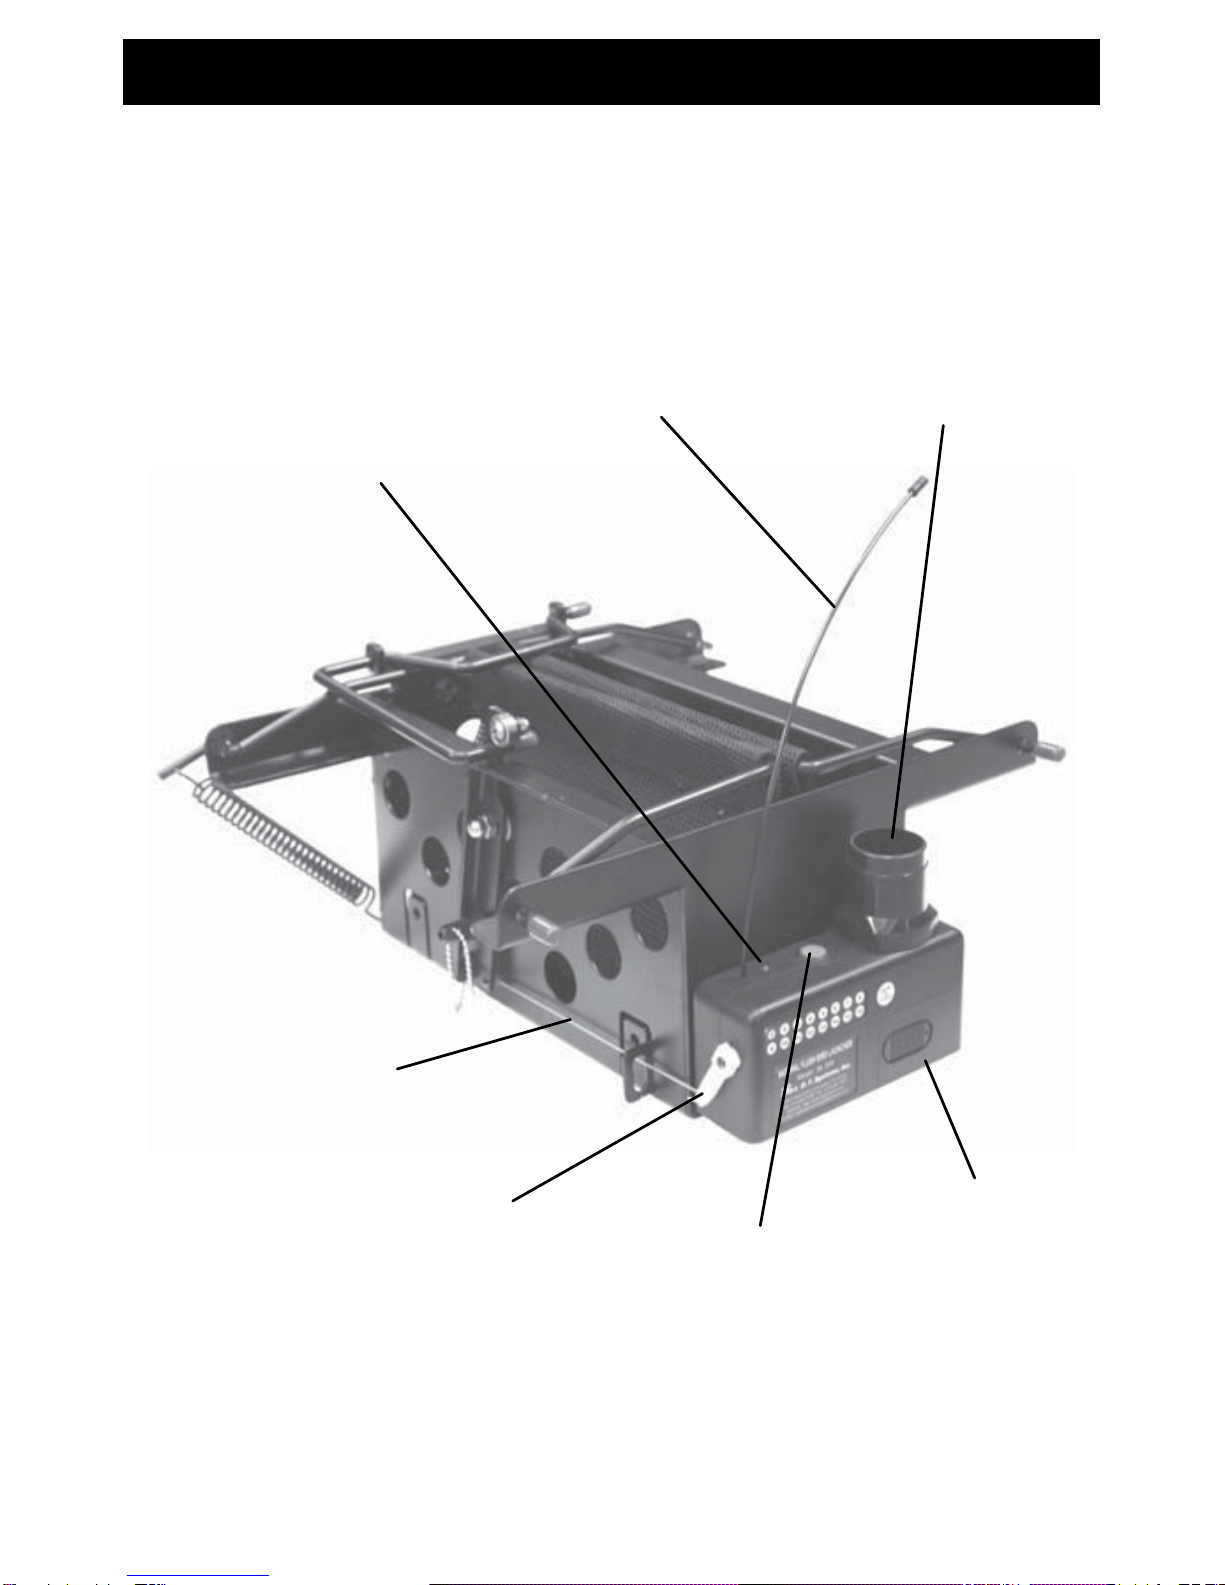
PARTS & FUNCTIONS
(BL 505 shown in ‘closed’ position)
Antenna
Motor
Arm Power
Button
Connecting
Wire
Beeper/Locator
Horn
Battery
Cover
LED Indicator
Light
Remote Receiver
(BL 505, BL 509, BL 705, BL 709)
9
PARTS & FUNCTIONS
Beeper/Locator Horn
Emits loud beeps to help locate Launcher in
the field. Remote-activated and audible from
up to 450 yards.
Receiver-to-Launcher Connecting Wire
Connects Motor Arm on Remote Receiver to
Release Arm on Launcher.
Motor Arm
Swivels to pull Release Arm for launch.
Power Button
Turns Remote Receiver ON/OFF,
resets unit after each launch, and
is used in programming procedure.
Receiver Antenna
Receives signal from Transmitter from up to
700 yards away.
Receiver LED Indicator Light
Blinks to indicate the Remote Receiver is ON.
Lights when signal for launch or beeper is re-
ceived from Transmitter. Blinks rapidly when
the battery is low and needs replacing.
Battery Cover
Slides open for access to battery compartment.

10
Transmitter
(BL 509 and BL 709 only)
PARTS & FUNCTIONS
Launcher
Selector
Knob
Bird
Button
Beeper
Button
Antenna
LED
Indicator
Light
“T” Switch*
Model
Number
Battery Cover
(back side)
(BL 509 shown)
*Most Transmitters
have a “T” Switch
that is permanently
in the ‘up’ position.
11
PARTS & FUNCTIONS
Launcher Selector Knob
The Launcher Selector Knob
chooses which Launcher is being
controlled. The BL Transmitter
can control up to 16 launchers.
Transmitter Antenna
Be sure to check that the Antenna is securely
fastened to the Transmitter before each use.
Hand-tightened only. Be careful when screw-
ing the Antenna into the Transmitter. Over-
tightening the Antenna can cause damage to
the Antenna or the Antenna mount.
Transmitter LED Indicator Light
The red LED light will turn on any time a Trans-
mitter button is pushed to indicate that the
Transmitter is being operated. If the red LED
light blinks rapidly after pushing any Transmit-
ter button, the 9-volt battery will need to be re-
placed soon.
Remote Buttons
The “BIRD” button launches bird(s). The
“BEEPER” button activates the Beeper horn.
“T” Switch
The “T” Switch should always be in the up po-
sition when operating the Launcher.

12
TURNING REMOTE RECEIVER ON/OFF
Turning Remote Receiver OFF
1. Push and hold the Power Button on the Remote
Receiver. The Red LED Light will light solidly for
about 2 seconds followed by one short flash while
holding button.
2. Release the Power Button after the one short flash.
The unit is now OFF.
NOTE - The Remote Receiver will automatically go into
Power-Save Mode after 1 hour of inactivity (see p.17).
Turning Remote Receiver ON
1. Push and hold the Power Button on the
Remote Receiver. The Red LED Light
will light solidly for about 2 seconds
while holding button.
2. Release the Power Button when the Red LED light
goes off. The unit is now ON and the Red LED light
will now flash approximately every two seconds.
NOTE - The Transmitter is in a permanent “sleep” state
and is only active when a button is pressed.
These directions are for the BL 505, BL 509, BL 705,
and BL 709. For safety, keep Launcher in the ‘open’
position when turning Remote Receiver ON/OFF.
Before using the Remote Launcher, install 9V battery
in Transmitter and Remote Receiver by removing Bat-
tery Cover to access battery compartment. Use only
Alkaline batteries from major brand name manufactur-
ers. Generic brands may not work with these units.

13
These directions are for initial Programming of a new
Launcher, Programming after battery replacement, and
Programming additional Launchers to the Transmitter.
PROGRAMMING RECEIVER/TRANSMITTER
Programming
1. Verify that the Bird Launcher is off.
2. Choose a number (1-16) on the Launcher Selector
Knob of the Transmitter (optional: label the Launcher
with the number for easy recognition).
3. Push and hold the red Power Button on the Remote
Receiver of the Bird Launcher. Do not release the
Power Button.
4. After approximately 6 seconds of holding the Power
Button down, the Red LED light will flash 4 times.
5. While continuing to hold the red Power Button
down, push either the “BIRD/NICK” button or the
“BEEP/CONT” button on the Transmitter for approxi-
mately one second.
6. To indicate the unit has been programmed, the LED
light on the Remote Receiver will flash 5 times and
the Beeper/Locator horn will beep 5 times.
7. After programming confirmation, release the Power
Button on the Remote Receiver.
NOTE - Do not release the red Power Button until in-
structed to do so or the entire process will have to be
repeated. Repeat the process from the beginning if the
light does not blink 5 times and beep 5 times at the end
of the programming.
CAUTION:
For safety, program the unit while the Launcher is
unloaded and in the ‘open’ position.

14
CAUTION:
The BL series Launcher is designed to launch a bird
several feet in the air and thus releases with great
force. Keep body parts and face clear of the unit at all
times. Make sure all persons are a minimum of 15 feet
away from the path of the unit when it is released. Do
not launch indoors with Launcher loaded. Keep out of
reach of children at all times.
SETTING LAUNCHER
Setting the Launcher
1. On Manual-Release Launchers, tie a pull cord
to the large hole at the bottom of the Release
Arm. On Remote Launchers, turn the Remote
Receiver ON. If it is already ON, the Power
Button may have to be pushed quickly to reset.
2. With the net in the open position, pull the arms
of the Launcher inward towards the center and
down into the ‘closed’ position. Hold the arms
down in the ‘closed’ position with one hand.
3. Pull the Locking Lever over the net with your
free hand and hold it down over the Launcher
arms with one hand in the ‘closed’ position.
4. With your free hand, lock the
Locking Lever down by rolling the
Release Wheel over the Locking
Lever so that it locks the
Launcher in the ’closed’ position.
NOTE - If the Launcher will not be immediately
launched, insert the Safety Pin in the Release Arm to
prevent accidental release.

15
TESTING LAUNCHER
Testing the Launcher
1. Set Launcher (see p.14). Make sure Safety Pin
is out before launch.
2. Keep area immediately around Launcher clear
of people and objects.
3. On Manual-Release Launchers, give a short
quick pull on the pull cord. On Remote Launch-
ers, be sure the correct Launcher is selected on
the Selector Knob and push the ‘BIRD’ button
on the transmitter.
Testing the Beeper/Locator
1. Turn Remote Receiver ON.
2. Be sure the correct Launcher is selected on the
Selector Knob and push the ‘BEEPER’ button
on Transmitter.
3. The Beeper Horn should beep any time the but-
ton is pushed.
NOTE - The Beeper Horn is very loud and should be
covered if tested in close proximity.
Testing the Remote Receiver Only
1. Leave Launcher in the ‘open’ position.
2. Turn Remote Receiver ON. If it is already ON,
the Power Button may have to be pushed
quickly to reset the Remote Receiver.
3. Be sure the correct Launcher is selected on the
Selector Knob and push the ‘BIRD’ button on
Transmitter. The Motor Arm should rotate away
from the Launcher.
16
OPERATING THE BIRD LAUNCHER
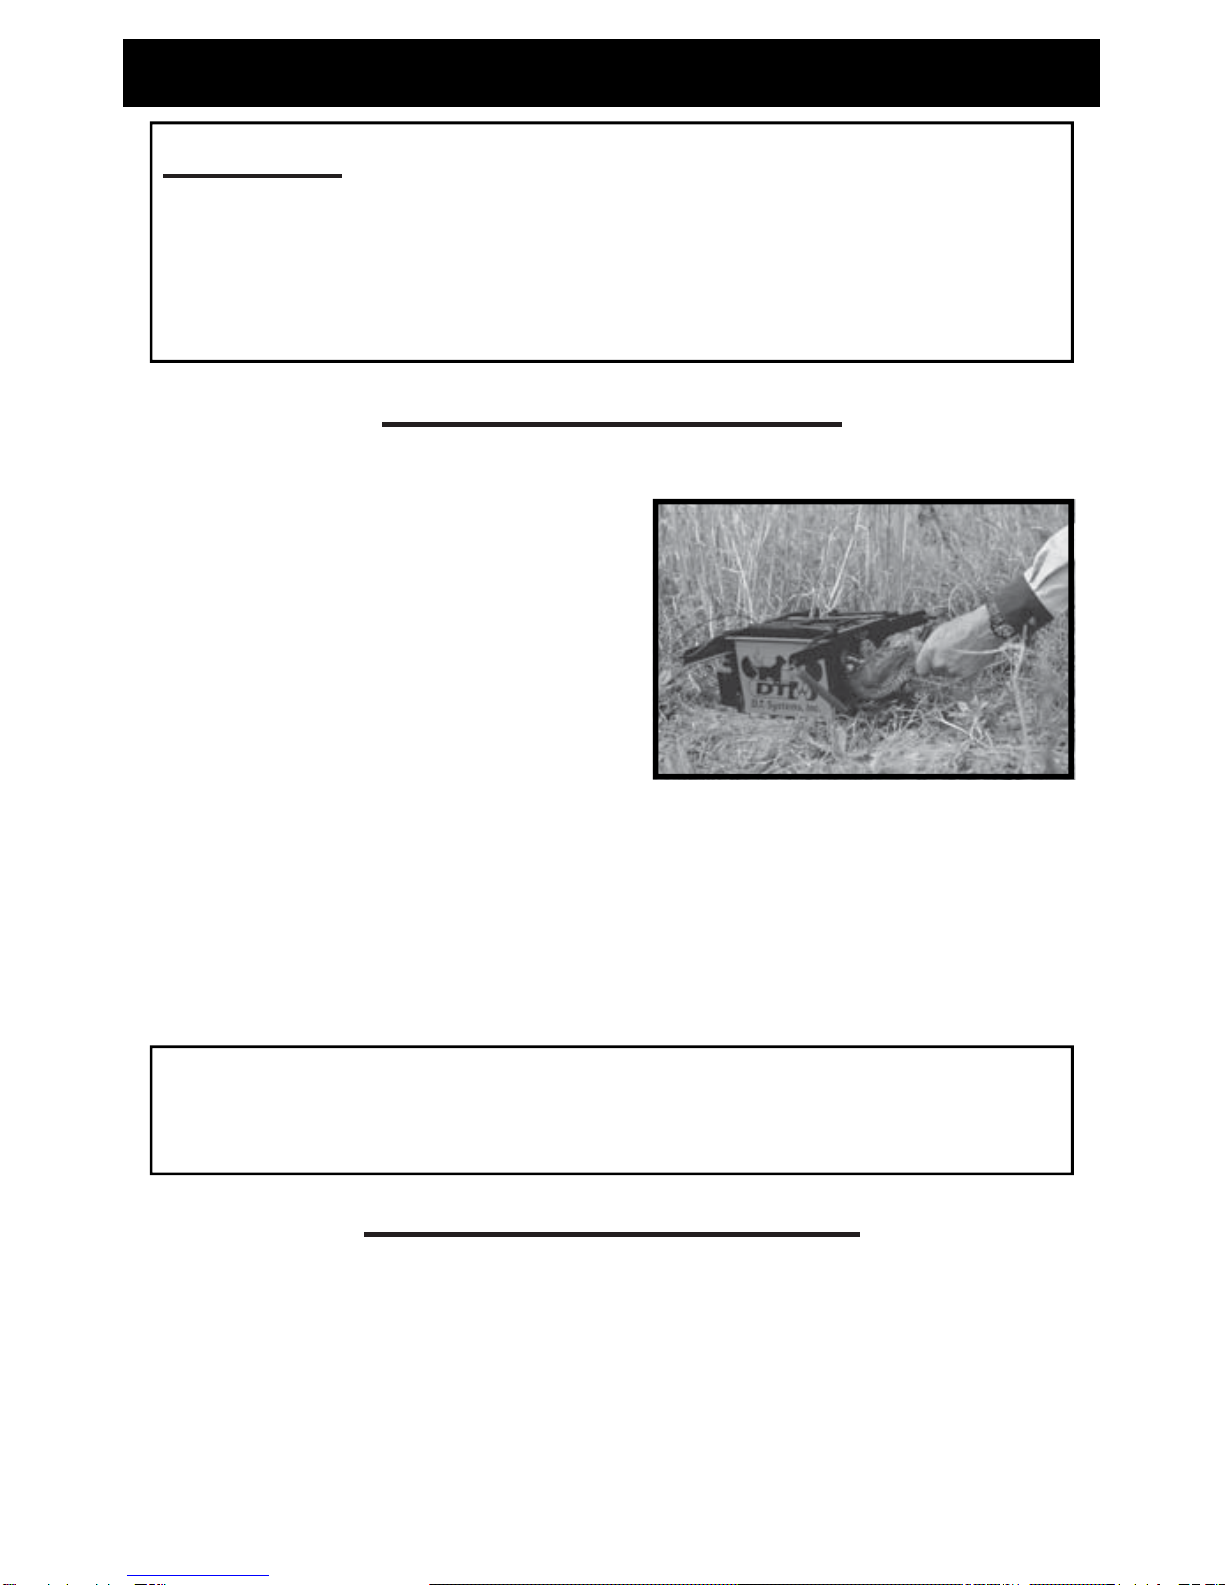
Loading the Launcher
x Set Launcher (see p.14) and insert Safety Pin.
x Open Easy-Load™ door
and place bird(s) into the
net. You can load more
than one bird at a time
depending on the size of
the birds.
x Close Easy-Load™ door and secure with Latch.
If you do not secure door with Latch, the bird(s)
may be able to push the door open and escape.
x Place Launcher in desired location and position.
x Remove Safety Pin.
CAUTION: Keep body parts and face clear of the unit
at all times. Make sure all persons are a minimum of
15 feet away from the path of the unit when it is re-
leased. Do not launch indoors with Launcher loaded.
Keep out of reach of children at all times.
Releasing the Launcher
x For Manual-Release Launchers, give short quick
pull on cord away from door-side of Launcher.
x For Remote Launchers, select the appropriate
Launcher on the Selector Knob and push the
‘BIRD’ button on the Transmitter.
NOTE - Do not load small birds into large Launcher. Smaller birds
may slip through the larger gaps in the Netting of the larger Launch-
ers. This may result in an injured or dead bird during launch.

17
OPERATING THE BIRD LAUNCHER
Resetting Remote Launcher for Re-Release
xSet (see p.14) and load Launcher (see p.16) and
keep Safety Pin inserted.
xQuickly push the Power Button on the Remote
Receiver to reset for re-release. Remote Re-
ceiver will not release after a launch unless reset.
xRemove Safety Pin.
Unloading Unused Birds from Launcher
xInsert Safety Pin.
xOpen Easy-Load™ door.
xRemove unused bird(s) from Launcher.
NOTE - Remote Launchers can be turned OFF if no
longer being used (see p.12).
Locating Remote Launcher
xSelect appropriate Launcher on Selector Knob.
xPush the ‘BEEPER’ button on the Transmitter
any time the Remote Receiver is ON to activate
the Beeper/Locator.
Power-Save Mode on Remote Receiver
xAfter 1 hour of inactivity, the Remote Receiver
will go into Power-Save Mode. This mode re-
duces battery use by making responses to the
Transmitter less immediate.
xTo cancel, press and hold the Beeper button for
6 seconds or turn the unit OFF and back ON.

18
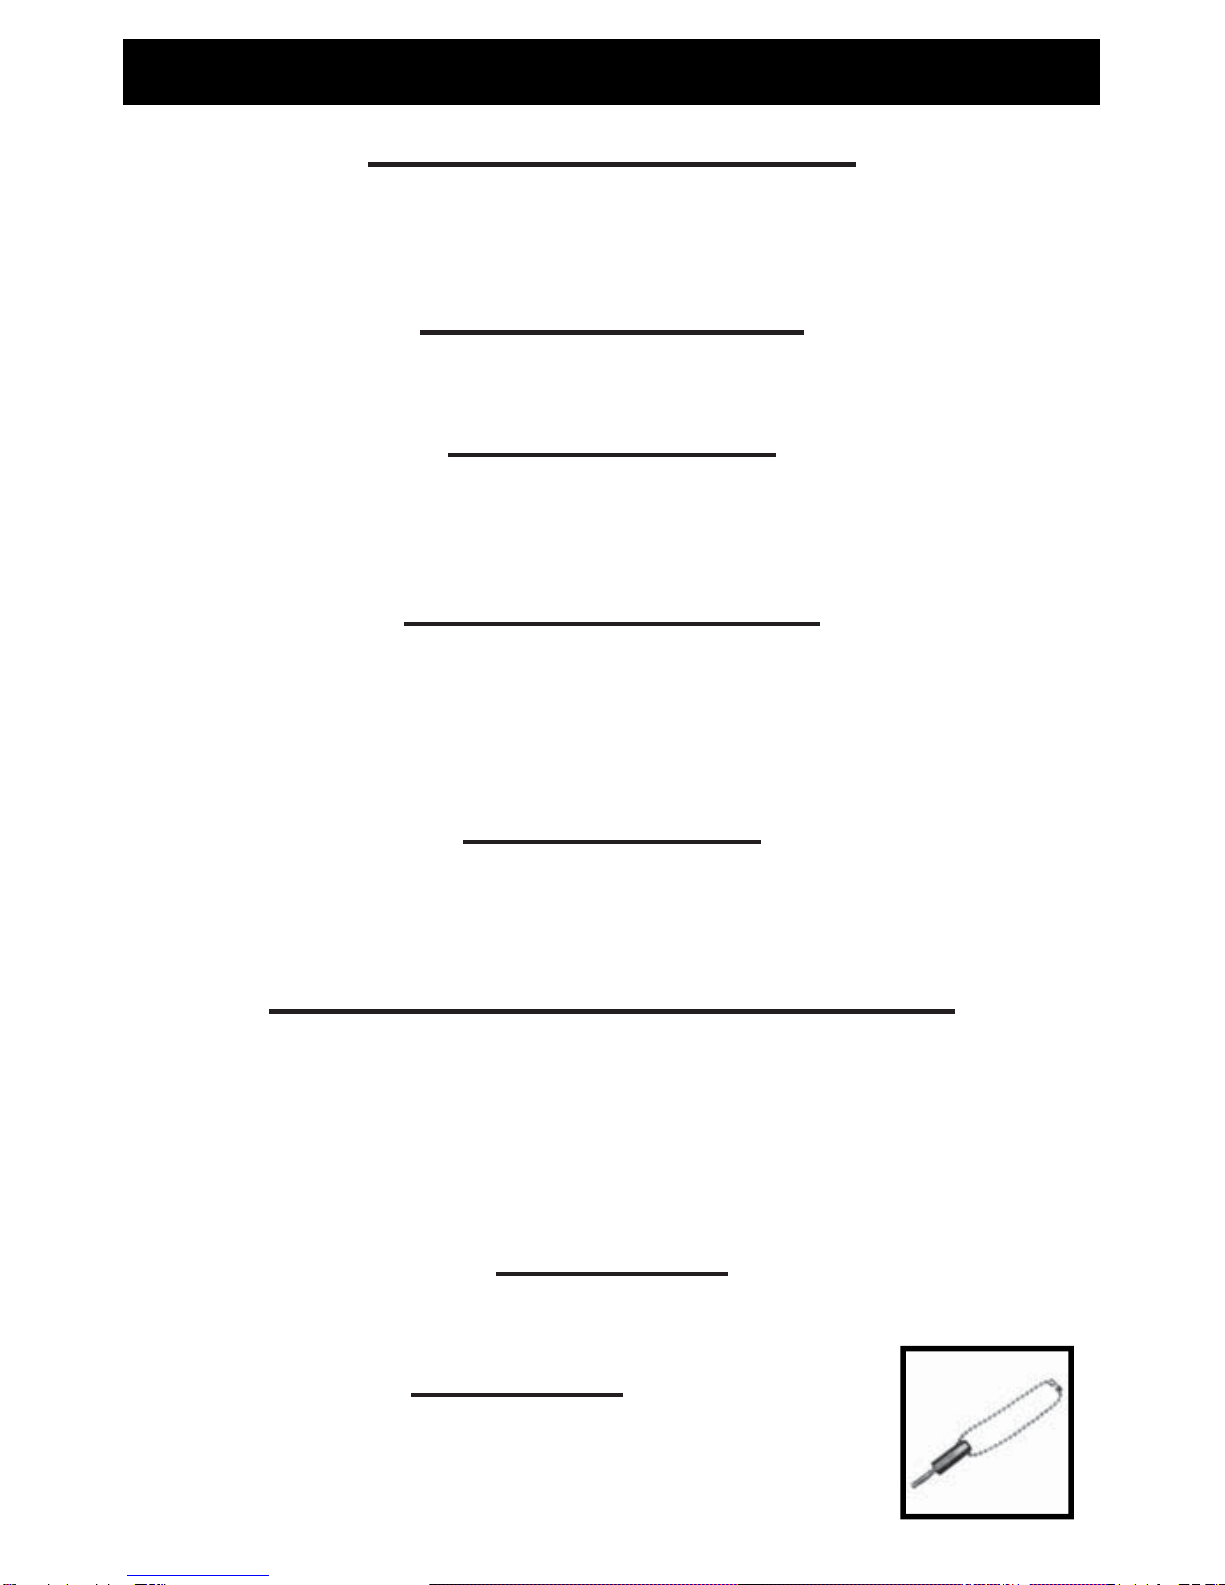
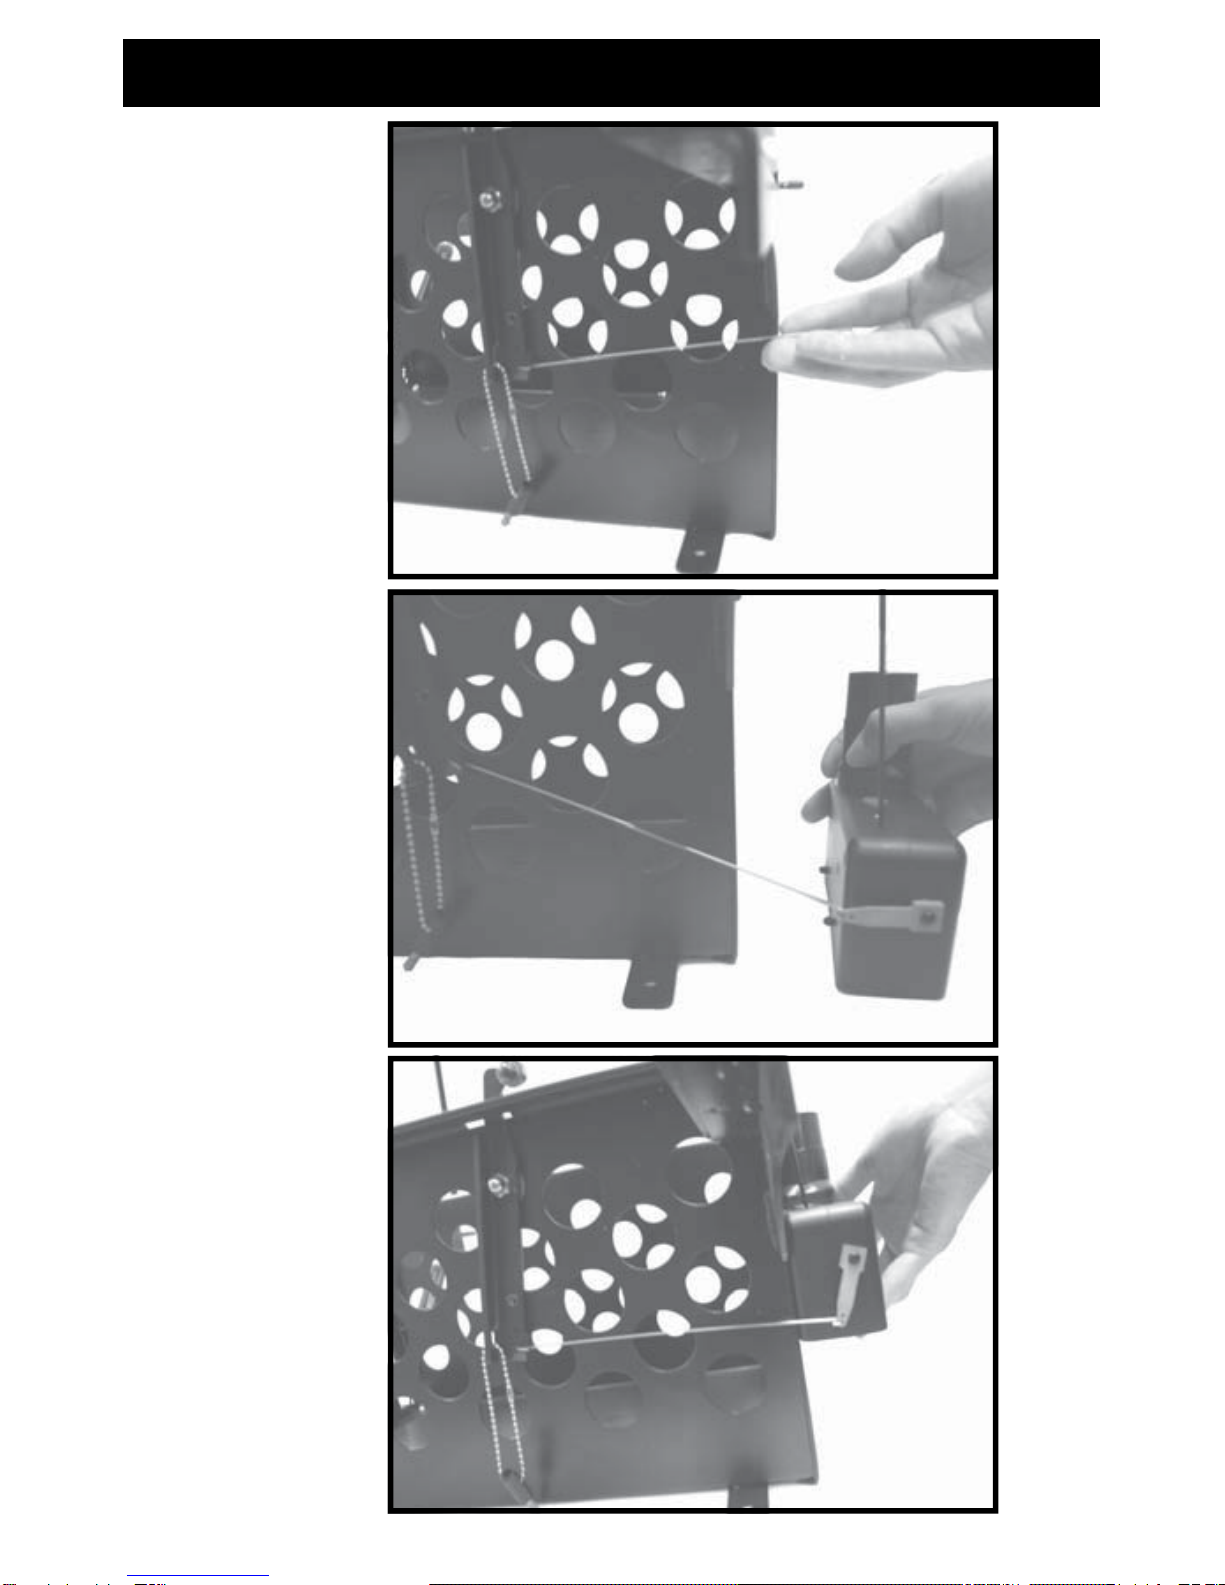
INSTALLING REMOTE RECEIVER
1. Leave the Launcher in the open position to
prevent it from popping open during the instal-
lation, and position the Launcher so that the
Easy-Load™ trap door is to your left.
2. Hook the Connecting Wire to the bottom hole
of the Release Arm on the Launcher so that
the Connecting Wire is lying against the
Launcher itself. (see Figure 1)
3. Move the Motor Arm on the Remote Receiver
so that it is pointing toward the side of the Re-
mote Receiver that has the screw holes.
4. Hook the other end of the Connecting Wire to
the last hole on the Motor Arm (see Figure 2)
and point the Motor Arm down.
5. Line up the Remote Receiver to the holes on
the Launcher (the black prongs on the back of
the Remote Receiver should fit into the bottom
two holes of the Launcher). (see Figure 3)
6. Holding the Remote Receiver against the
Launcher, insert the screws that were included
with the Remote Receiver and tighten so that
the Remote Receiver fits snugly against the
Launcher.
7. Program the Remote Receiver to the Trans-
mitter (see p.13) and test to verify successful
programming (see p.15).
These directions are for adding a Remote Receiver unit
to a Manual-Release Launcher or replacing a Remote
Receiver unit on a Remote Launcher.
19
INSTALLING REMOTE RECEIVER
Figure 1
Figure 2
Figure 3
BL 700 shown

20
MAINTENANCE
Regular Maintenance*
xWipe and clean Bird Launcher and Transmitter
with a clean, soft cloth and warm, soapy water
after each use.
xDry off any moisture to prevent rusting as this
may cause malfunction of the unit.
xRegularly clean and oil the Springs to keep
from rusting.
During Use
xAvoid placing the Launcher in extremely wet or
marshy conditions.
xThe Remote Receiver and Transmitter are wa-
ter-resistant, but not waterproof. Never im-
merse these in water or keep them in rain for
extended periods of time.
Storing Your Launcher
xLeave Launcher in the ‘open’ position to keep
the Springs from stretching.
xRemove batteries from Remote Receiver and
Transmitter.
xDo not store in extreme temperatures or hu-
midity.
*Keep Launcher in ‘open’ position during Regular
Maintenance to prevent accidental release.
This manual suits for next models
5
Table of contents
Other D.E. Systems Pet Care Product manuals

Popular Pet Care Product manuals by other brands


Garmin
Garmin Delta Smart owner's manual

juwel
juwel Rio 300 instruction manual

R&J LASER
R&J LASER Physiolaser olympic 500 instructions

Richell
Richell 94944 instruction manual

D-D The Aquarium Solution
D-D The Aquarium Solution DUAL HEATING & COOLING CONTROLLER instruction manual

Owon
Owon SPF 2200-WB-TY quick start guide