DÖRR B-4WE 2.4G User manual

01
doerr-foto.de
Instruction manual
MOTORIZED ELEVATING SYSTEM
FOR 4 PAPER BACKGROUND ROLLS
GB
Bedienungsanleitung
MOTOR ROLLENAUFHÄNGER
FÜR 4 PAPIERHINTERGRÜNDE
DE
B-4WE 2.4G
MOTOR ROLLENAUFHÄNGER

02
TEILEBESCHREIBUNG
NOMENCLATURE
DE
GB
3
2
1
3a
2a
1a
46
7
4a
4d
4b
4c
5
5b
5c
5a

03
01 | SICHERHEITSHINWEISE
• Schützen Sie das Gerät vor Regen, Feuchtigkeit, direkter Sonnenein-
strahlung und extremen Temperaturen.
• Benutzen und berühren Sie das Gerät nicht mit nassen Händen.
• Schützen Sie das Gerät vor Stößen. Verwenden Sie das Gerät nicht, wenn
es heruntergefallen ist. In diesem Fall lassen Sie es von einem qualifi-
zierten Elektriker überprüfen bevor Sie das Gerät wieder einschalten.
• Falls das Gerät defekt oder beschädigt ist, versuchen Sie nicht, das Gerät
zu zerlegen oder selbst zu reparieren – es besteht Stromschlaggefahr!
Kontaktieren Sie bitte Ihren Fachhändler.
• Menschen mit physischen oder kognitiven Einschränkungen sollten das
Gerät unter Anleitung und Aufsicht bedienen.
• Personen mit einem Herzschrittmacher, einem Defibrillator oderanderen
elektrischen Implantaten sollten einen Mindestabstand von 30 cm ein-
halten, da das Gerät Magnetfelder erzeugt.
• Benutzen Sie das Gerät nicht in der direkten Umgebung von Funktele-
fonen und Geräten, die starke elektromagnetische Felder erzeugen.
• Das Gerät ist kein Spielzeug. Halten Sie das Gerät, Zubehörteile und die
Verpackungsmaterialien von Kindern und Haustieren fern, um Unfällen
und Erstickung vorzubeugen.
• Schützen Sie das Gerät vor Schmutz. Reinigen Sie das Gerät nicht mit
Benzin oder scharfen Reinigungsmitteln. Wir empfehlen ein fusselfreies,
leicht feuchtes Mikrofasertuch um die äußeren Bauteile des Geräts zu rei-
nigen. Vor der Reinigung schalten Sie das Gerät aus und trennen Sie die
Stromverbindung!
• Bewahren Sie das Gerät an einem staubfreien, trockenen, kühlen Platz
auf.
• Bitte entsorgen Sie das Gerätwenn es defekt ist oder keine Nutzung mehr
geplant ist entsprechend der Elektro- und Elektronik-Altgeräte-Richtlinie
WEEE. Für Rückfragen stehen Ihnen die lokalen Behörden, die für die Ent-
sorgung zuständig sind, zur Verfügung.
VIELEN DANK, dass Sie sich für ein Qualitätsprodukt aus dem Hause DÖRR
entschieden haben.
Bitte lesen Sie vor dem ersten Gebrauch die Bedienungsanleitung und
die Sicherheitshinweise aufmerksam durch.
Bewahren Sie die Bedienungsanleitung zusammen mit dem Gerät für den
späteren Gebrauch auf. Sollten andere Personen dieses Gerät nutzen, so
stellen Sie ihnen diese Anleitung zur Verfügung. Wenn Sie das Gerät ver-
kaufen, gehört diese Anleitung zum Gerät und muss mitgeliefert werden.
DÖRR haftet nicht bei Schäden durch unsachgemäßen Gebrauch oder bei
Nichtbeachten der Bedienungsanleitung und der Sicherheitshinweise.
02 | PRODUKTBESCHREIBUNG
• Mit der motorischen Rollenaufhängung lassen sich bis zu
4 Papierhintergründe per Knopfdruck auf- und abrollen
• Passend für alle Papierhintergründe auf Rolle (Rolle ca. 4,5 bis 6 cm
Durchmesser) mit einer Breite bis max. 2,75 m
• Geeignet für die Decken- und Wandmontage
• Motor mit Netzbetrieb
• Funkfernbedienung mit Frequenz 2,4 GHz zur Steuerung aller
Funktionen, Reichweite ca. 15 m
• Steuerung von bis zu 3 Hintergrundsystemen mit jeweils bis zu
4 Hintergründen möglich
03 | TEILEBESCHREIBUNG
1 Motoren A, B, C, D mit Expander (4 Stück)
1a) Führungsnut für Decken/Wand Halterung
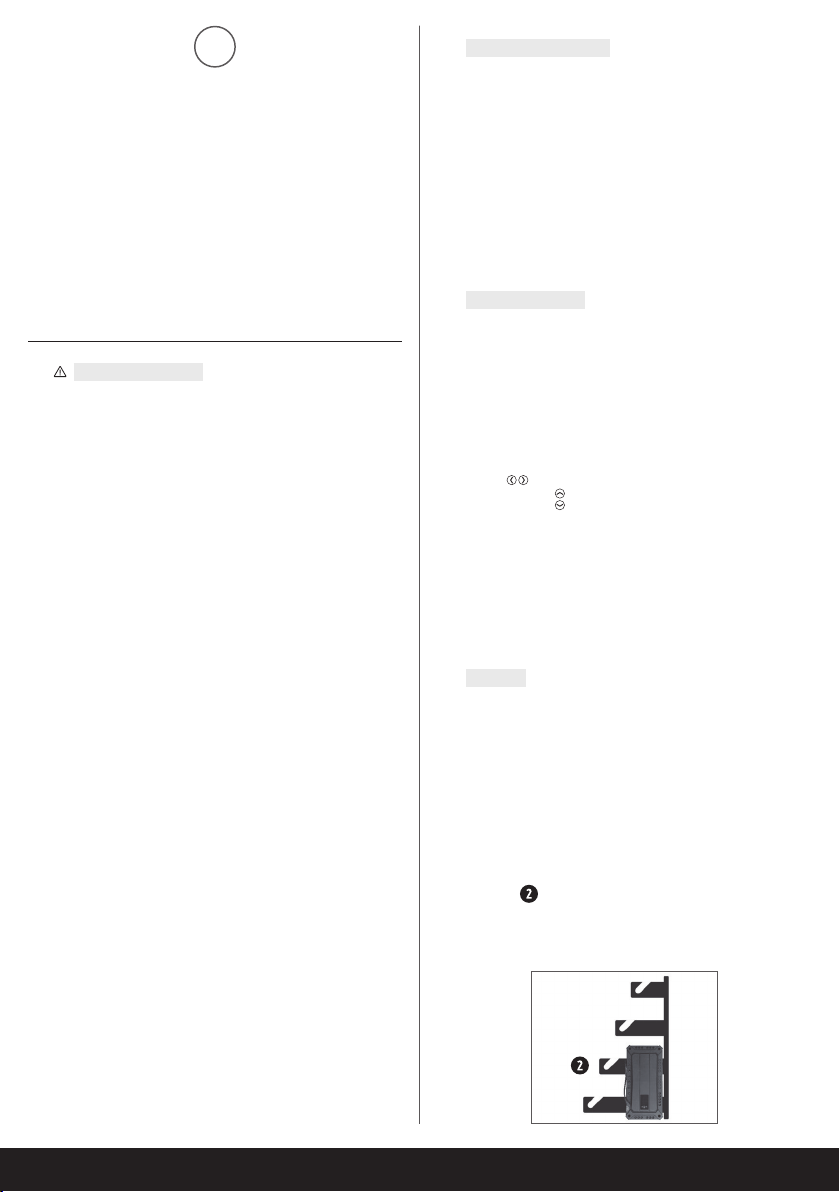
2 Expander (4 Stück)
2a) Führungsnut für Decken/Wand Halterung
3 Decken/Wand Halterungen (2 Stück)
3a) Löcher Fixierschrauben
4 Fernbedienung
4a) Display
4b) Tasten für Kanaleinstellung
4c) Tastenfelder 1-6 hoch/runter
4d) Ein/Ausschalter
5 Steuereinheit mit Netzteil
5a) 4 Anschlussbuchsen für Motoren
5b) Tasten für Kanalauswahl
5c) Fixierschrauben
6 Netzkabel
7 Schwerlastdübel für Beton (4 Stück)
04 | MONTAGE
Schrauben Sie die beiden Decken/Wand Halterungen (3) im entsprechen-
den Abstand an die Wand oder Decke. Der Abstand ergibt sich aus der
Breite der Papierhintergründe. Die beiliegenden 4 Stück Schwerlastdübel
(7) sind ausschließlich für Beton Untergrund geeignet. Für andere Un-
tergründe verwenden Sie bitte andere, geeignete Dübel/Schrauben. Wir
empfehlen min. 4 Schrauben pro Decken/Wand Halterungen.
Schrauben Sie die beiden Fixierschrauben (5c) auf der Unterseite der Steu-
ereinheit (5) ab.
Schieben Sie die Steuereinheit außen (5) aufdie Halterung (3) – hierfürwird
der Metallhaken zwischen Steuereinheit und Netzteil durchgeschoben.
Achten Sie darauf, dass die Löcher fürFixierschrauben (3a) mit den Löchern
an der Steuereinheit übereinanderliegen. Mit den beiden Fixierschrauben
(5c) schrauben Sie die Steuereinheit fest.
DE

04
Hängen Sie die 4 Motoren A, B, C, D (1) an der Führungsnut (1a) in die De-
cken/Wand Halterung (3) und verbinden Sie die Anschlussstecker der Mo-
toren mit den 4 Anschlussbuchsen (5a) an der Steuereinheit.
Schieben Sie die Expander (1+2) in die Papierrollen und hängen die Papier-
rollen in die Haken der Decken/Wand Halterung (3) ein. Beachten Sie dabei,
dass die Führungsnuten (1a und 2a) in den Haken liegen.
Drehen Sie die große Kunststoschraube an den Expandern im Uhrzei-
gersinn auf, damit sich die Expander ausweiten und so die Papierrollen
fixieren.
05 | BETRIEB
Verbinden Sie das Netzkabel (6) mit dem Netzteil an der Steuereinheit (5)
und mit einer Steckdose. Die Steuereinheit ist eingeschaltet und das Dis-
play leuchtet.
Legen Sie 3 Stück AAA Batterien (optional) gemäß korrekter Polung +/- in
das Batteriefach der Fernbedienung (4) ein. Schalten Sie die Fernbedienung
am Ein/Ausschalter (4d) ein.
Wählen Sie an der Steuereinheit mit Tasten (5b) und an der Fernbedienung
mit den Tasten (4b) den selben Kanal aus. Es stehen insgesamt 99
Kanäle zur Auswahl.
Mit den Tastenfeldern 1-6 (4c*) hoch/runter kann der Papierhintergrund
nun auf- bzw. abgerollt werden: Tastenfeld 1 bedient Motor 1, Tastenfeld 2
bedient Motor 2 etc.
(*) Hinweis: Die Fernbedienung ist für die Steuerung von bis zu 6 Hintergründen aus-
gelegt, dieses Komplettsystem ist allerdings nur für 4 Rollen konzipiert.
Nach Gebrauch nehmen Sie den Motor Rollenaufhängervon der Steckdose
und schalten Sie die Fernbedienung aus.
06 | TECHNISCHE DATEN
Max. Breite Papierhintergrund 2,75 m
Durchmesser innere Papierrolle 4,5-6 cm
Max. Belastbarkeit pro Haken 20 kg
Funkfernbedienung 2,4 GHz, Reichweite ca. 15 m
Motor Netzspannung AC 220 V
07 | LIEFERUMFANG
4 Motoren mit Expander
4 Expander
2 Decken/Wand Halterungen
1 Steuereinheit mit Netzteil
1 Netzkabel
1 Fernbedienung
4 Schwerlastdübel für Beton
Deckenmontage Wandmontage

05
08 | ENTSORGUNG, CE KENNZEICHNUNG,
VEREINFACHTE EUKONFORMITÄTSERKLÄRUNG
08.1 WEEE HINWEIS
Die WEEE (Waste Electrical and Electronic Equipment) Richtlinie, die als Eu-
ropäisches Gesetz am 13. Februar 2003 in Kraft trat, führte zu einer umfas-
senden Änderung bei der Entsorgung ausgedienter Elektrogeräte. Der vor-
nehmliche Zweck dieser Richtlinie ist die Vermeidung von Elektroschrott
bei gleichzeitiger Förderung der Wiederverwendung, des Recyclings und
anderer Formen der Wiederaufbereitung, um Müll zu reduzieren. Das ab-
gebildete WEEE Logo (Mülltonne) auf dem Produkt und auf derVerpackung
weist darauf hin, dass das Produkt nicht im normalen Hausmüll entsorgt
werden darf. Sie sind dafür verantwortlich, alle ausgedienten elektrischen
und elektronischen Geräte an entsprechenden Sammelpunkten abzu-
liefern. Eine getrennte Sammlung und sinnvolle Wiederverwertung des
Elektroschrottes hilft dabei, sparsamer mit den natürlichen Ressourcen
umzugehen. Des Weiteren ist die Wiederverwertung des Elektroschrottes
ein Beitrag dazu, unsere Umwelt und damit auch die Gesundheit der Men-
schen zu erhalten. Weitere Informationen über die Entsorgung elektrischer
und elektronischer Geräte, die Wiederaufbereitung und die Sammelpunk-
te erhalten Sie bei den lokalen Behörden, Entsorgungsunternehmen, im
Fachhandel und beim Hersteller des Gerätes.
08.2 ROHS KONFORMITÄT
Dieses Produkt entspricht der europäischen RoHS-Richtlinie zur Beschrän-
kung der Verwendung bestimmter gefährlicher Stoe in Elektro- und Elek-
tronikgeräten sowie deren Abwandlungen.
08.3 CE KENNZEICHEN
Das aufgedruckte CE Kennzeichen entspricht den geltenden EU Normen
und signalisiert, dass das Gerät die Anforderungen aller für dieses Produkt
gültigen EU-Richtlinien erfüllt.
08.4 VEREINFACHTE EUKONFORMITÄTSERKLÄRUNG
Hiermit erklärt die DÖRR GmbH, dass der Funkanlagentyp [373126] der
Richtlinie 2014/53/EU entspricht. Der vollständige Text der EU-Konformi-
tätserklärung ist unter der folgenden Internetadresse verfügbar:
http://www.doerr-foto.de
01 | SAFETY HINTS
• Protect the device from rain, moisture, direct sunlight and extreme tem-
peratures.
• Do not operate or touch the device with wet hands.
• Protect the device against impacts. Do not use the device if it has been
dropped. In this case a qualified electrician should inspect the device
before you use it again.
• Do not attempt to repair the device by yourself. Risk of electric shock!
When service or repair is required, contact qualified service personnel.
• People with physical or cognitive disabilities should use the device with
supervision.
• People with cardiac pacemakers, defibrillators or any other electrical
implants should maintain a minimum distance of 30 cm, as the device
generates magnetic fields.
• Do not use the device nearby mobile phones and devices that generate
strong electromagnetic fields.
• This device is not a toy. To prevent accidents and suffocation keep the
device, the accessories and the packing materials away from children
and pets.
• Protect the device against dirt. Never use aggressive cleansing agents or
benzine to clean the device. We recommend a soft, slightly damp micro-
fiber cloth to clean the outer parts of the device. Before cleaning make
sure to switch off the device and take off from power supply!
• Store the device in a dust-free, dry and cool place.
• If the device is defective orwithout any further use, dispose of the device
according to the Waste Electrical and Electronic Equipment Directive
WEEE. For further information, please contact your local authorities.
THANK YOU for choosing this DÖRR quality product.
Please read the instruction manual and safety hints carefully before
first use.
Keep this instruction manual together with the device for future use. If
other people use this device, make this instruction manual available. This
instruction manual is part of the device and must be supplied with the de-
vice in case of sale.
DÖRR is not liable for damages caused by improper use or the failure to
observe the instruction manual and safety hints.
GB

06
02 | PRODUCT DESCRIPTION
• Comfortable up and down movements of up to 4 paper background
rolls at the simple push of a button
• Suitable for backgrounds of a maximum width of 2,75 m with a
cardboard role of a diameter of approx. 4,5 to 6 cm
• Well suited for both wall and ceiling application
• Motor drive
• Control of functions via 3 channel radio remote control frequency
2.4 GHz, range approx. 15 m
• Up to 3 background systems with background rolls can be controlled
by one remote control with each up to 4 background rolls
03 | NOMENCLATURE
1 Motor drives A, B, C, D with expander (4 pcs)
1a) Guide slot for ceiling/wall mount
2 Expander (4 pcs)
2a) Guide slot for ceiling/wall mount
3 Ceiling/wall mount (2pcs)
3a) Holes fixing screws
4 Remote control
4a) Display
4b) Key buttons for channel selection
4c) Key pads 1-6 up/down
4d) On/O switch
5 Control unit with power supply
5a) 4 Sockets for motor drives
5b) Key buttons for channel selection
5c) Fixing screws
6 Power cord
7 Heavy-duty dowel (4 pcs)
04 | MOUNTING
Screw the two ceiling/wall brackets (3) to the wall or ceiling with the
appropriate distance. The distance results from the width of the paper
backgrounds. The supplied 4pcs heavy-duty dowels (7) are only suitable
for concrete underground. For other surfaces please use other suitable
dowels/screws. We recommend min. 4 screws per ceiling wall bracket.
Unscrew the two fixing screws (5c) located on the bottom of the control
unit (5).
Slide the control unit facing to the outside (5) onto the mount (3) – the
second metal hook must be between the control unit and the power
supply. Make sure that the holes for fixing screws (3a) are conform with
the holes at the control unit. Use the two fixing screws (5c) to tighten the
control unit.
Hang the 4 motor drives A, B, C, D (1) with the guide slots (1a) into the
ceiling/wall mount (3). Connect the cables of the motor drives to the 4
sockets (5a) at the control unit.
Slide the expanders (1 + 2) into the paper rolls and hang the paper rolls into
the hooks of the ceiling/wall mount (3). Make sure that the guide slots (1a
and 2a) rest in the hooks.
Turn the large plastic screwat the expanders clockwise to open the expan-
der and to fix the paper rolls.
05 | OPERATION
Connect the power cable (6) with the power supply at the control unit (5)
and connect with an outlet. The control unit is on and the display lights up.
Insert 3pcs AAA batteries (optional) according correct polarity +/- into the
battery compartment of the remote control (4). Turn on the remote control
with the On/O switch (4d).
Select same channel using the key buttons (5b) at the control unit and the
key buttons (4b) at remote control. In total 99 channels are available.
With the key pads 1-6 (4c*) up/down the paper backgrounds can now
be rolled up or down: keypad 1 operates motor 1, keypad 2 operates motor
2 etc.
(*) Note: The remote control is designed to control up to 6 backgrounds,
but this system is designed for 4 rolls only.
After usage please disconnect from outlet and switch of remote control.
06 | TECHNICAL SPECIFICATIONS
Max. width paper background 2,75 m
Diameter inside paper roll 4,5-6 cm
Max. load capacity per hook 20 kg
Remote control 2.4 GHz, range approx.15 m
Motor drive voltage AC 220 V
Ceiling mounting Wall mounting

07
07 | SCOPE OF DELIVERY
4 motor drives with expander
4 Expander
2 Ceiling/wall mount
1 Control unit with power supply
1 Power cable
1 Remote control
4 Heavy-duty dowels for concrete
08 | DISPOSAL, CE MARKING, SIMPLIFIED EU DECLARATION
OF CONFORMITY
08.1 WEEE INFORMATION
The Waste Electrical and Electronic Equipment Directive (WEEE Directive)
is the European community directive on waste electrical and electronic
equipment, which became European law in February 2003. The main pur-
pose of this directive is to prevent electronic waste. Recycling and other
forms of waste recovery should be encouraged to reduce waste. The
symbol (trash can) on the product and on the packing means that used
electrical and electronic products should not be disposed of with general
household waste. It is yourresponsibility to dispose ofall yourelectronic or
electrical waste at designated collection points. Disposing of this product
correctly will help to save valuable resources and it is a significant contri-
bution to protect ourenvironment as well as human health. For more infor-
mation about the correct disposal of electrical and electronic equipment,
recycling and collection points please contact your local authorities, waste
management companies, your retailer or the manufacturer of this device.
08.2 ROHS CONFORMITY
This product is compliant with the European RoHS directive for the restric-
tion of use of certain hazardous substances in electrical and electronic
equipment and its amendments.
08.3 CE MARKING
The CE marking complies with the European standards and indicates that
the product meets the requirements of the applicable EU directives.
08.4 SIMPLIFIED EU DECLARATION OF CONFORMITY
Hereby, DÖRR GmbH declares that the radio equipment type [373126] is in
compliance with Directive 2014/53/EU. The full text of the EU declaration
of conformity is available at the following internet address:
http://www.doerr-foto.de

08
doerr-foto.de
DÖRR GmbH Messerschmittstr. 1 · D-89231 Neu-Ulm
Fon +49 731.970 37 69 · info@doerrfoto.de · doerr-foto.de
DÖRR Motor Rollenaufhänger B-4WE 2.4G f. 4 Hintergründe
Artikel Nr 373126
Table of contents
Languages:
Popular Lifting System manuals by other brands

AAQ
AAQ AutoLift AL-9500HD Installation manual & operation instructions

Dhollandia
Dhollandia DH-SM installation manual

Aqua Creek Products
Aqua Creek Products F-702RLNA-04 manual

Dhollandia
Dhollandia DH-L Series Maintenance & Repair Manual

Car-O-Liner
Car-O-Liner Speed instruction manual

Still
Still LiftRunner B frames Original instructions