manuals.online logo
Brands
  1. Home
  2. •
  3. Brands
  4. •
  5. Dacor
  6. •
  7. Grill
  8. •
  9. Dacor EOG303 User manual

Dacor EOG303 User manual

The Life of the Kitchen?
Use and Care Manual
Outdoor Grill
For use with models EOG303,
EOG36, EOG52, EOSB162
SAFETY IS EVERYONE'S RESPONSIBILITY.ALL DACOR APPLIANCES ARE DESIGNED IMPORTANT INFORMATION
AND CONSTRUCTED TO GIVE YOU MANY YEARS OF SAFE OPERATION. THE ° Operating Instructions
OPERATION WILL BE FURTHER ENHANCED IF PROPER CARE AND JUDGEMENT ARE ° Care and Cleaning Instructions
EXERCISED IN THE USE AND MAINTENANCE OF THIS APPLIANCE, ° Safety Tips
WARNINGS:
Must be followed carefully to avoid personal injury or damage. _,_t_l|
"} NOTES:
J Contains helpful hints and tips. _,_Si_"_g _(our Outdoor
please Read _Se_ore °-
Place Serial Number Label Here
Part No. 65250 Rev. E
To Our Valued Customer:
Congratulations on your purchase of the very latest in Dacor _products! Our unique combination of features, style and
performance make us The Life of the Kitchen", and a great addition to your home.
In order to familiarize yourself with the controls, functions, and full potential of your new Distinctive Appliance, we
suggest that you thoroughly read this use and care manual, beginning with the Important Safety Instructions
section.
All Dacor appliances are designed and manufactured with quality and pride, while working within the framework of our
company value. Should you ever experience a problem with your product, please first check the Before You Call for
Service section of this manual for guidance. It provides useful suggestions and remedies prior to calling for service.
Valuable customer input helps us to continuously improve our products and services, so please feel free to contact
our Customer Service Team for assistance with any of your product support needs.
Dacor Customer Service Team
1440 Bridge Gate Drive
Diamond Bar, CA 91765
Telephone:
Fax:
Hours of Operation:
Web Site:
(800) 793-0093
(626) 403-3130
Monday through Friday
6:00 A.M. to 5:00 P.M. Pacific Time
www.Dacor.com
Thank you for choosing Dacor for your home. We are a company built by families for families and we are dedicated
to serving yours. We are confident that your new Dacor product will deliver a high level of performance and
enjoyment for many years to come.
Sincerely,
The Dacor Customer Service Team
TABLE OF CONTENTS .................................... 1
Purpose of this Manual ................................ 1
Product Registration ..................................... 1
IMPORTANT INSTRUCTIONS ......................... 1
GRILL OPERATION ....................................... 2-5
Safety ........................................................... 2
Liquid Propane Tanks ................................... 2
Grill/Cart Features ..................................... 2-3
Install Liquid Propane Tank .......................... 3
Lighting Liquid Propane Grills ...................... 3
Lighting Natural Gas Grills ........................ 3-4
Manual Lighting ............................................ 4
Canopy Mounted Temperature Gauge ......... 4
Preheating Instructions ................................ 4
Grill Cooking ................................................. 4
Smoker Cooking ........................................ 4-5
Rotisserie Cooking ....................................... 5
Side Burners ................................................ 5
CARE AND CLEANING ................................. 5-6
Cleaning Tips ............................................... 5
Exterior Surfaces .......................................... 5
Interior Surfaces ........................................... 6
PROBLEM SOLVING ..................................... 7-8
Troubleshooting ........................................... 7
Product Maintenance ................................... 8
If You Need Service ...................................... 8
PRODUCT WARRANTY ................................... 8
What Is Covered .......................................... 8
What Is Not Covered .................................... 8
If you received a damaged product,
immediately contact your dealer or builder.
Do not install or use a damaged appliance.
qk
Purpose of This Manual /I
This use and care manual is designed to enable
you to properly operate and maintain your new
grill. Please keep this manual handy for easy
access and quick reference.
Additional information may be requested by
e-mailing, writing or phoning the DACOR
Customer Service Department. The address
and phone number of this department are listed
on the inside front cover of this manual.
Important Instructions ] 1.
[_WARNINGS:
1. If the information in this manual is not
followed exactly, afire or explosion
may result causing property damage,
personal injury or death.
2. Do not store or use gasoline or other
flammable liquids in the vicinity of the
appliance.
3. If you smell gas:
• Shut off gas to the appliance.
•If odor continues, immediately
phone your gas supplier.
•Extinguish any open flame.
•If you cannot reach your gas
supplier, call the fire department.
•Open Lid.
4. Installation and service must be
performed by a qualified installer,
service agency or the gas supplier.
5. This unit is for outdoor use only in a
well-ventilated area. Not to be used in a
building, garage or any other enclosed
area.
6. Tested in accordance with ANSI Z21.58-
1998, standard for outdoor cooking
gas appliances and CAD/CGA 1.6-M98,
standard for outdoor cooking gas
appliances.
7. Check your local building codes for
proper method of installation. In the
absence of local codes, this unit should
be installed in accordance with National
Fuel Gas Code No. Z223.1 Current Issue
and National Electrical Code ANSI/NFPA
No. 70 Current Issue or the CAN/CGA
- B149.1 Natural Gas Installation Code
or CAN/CGA - B149.2 Propane Gas
Installation Code and C22.1 Canadian
Electrical Code Part 1.
8. CALIFORNIA PROPOSITION 65 B
The burning of cooking fuel generates
some by-products that are on the
list of substances which are known
by the State of California to cause
cancer or reproductive harm. California
law requires businesses to warn
customers of potential exposure to such
substances. To minimize exposure to
these substances, always operate this
unit to the instructions contained in this
manual and provide good ventilation
when cooking with gas.
IMPORTANT:
Keep the area around the appliance
clear and free from combustible
materials, gasoline and other flammable
liquids.
2. This outdoor gas cooking appliance is
not intended to be installed in or on a
recreational vehicle or boat.
3. Do not leave the grill unattended while
cooking.
4. Do not place any items in front of the
unit while in use. This could obstruct
the proper flow of air needed for
combustion and ventilation.
5. Keep the ventilation openings of the
enclosure free and clear of obstructions
and debris.
6. Always inspect the natural gas or LP
gas hose assembly before each use of
the appliance. If you see evidence of
abrasion, wear, or a cut gas connection
hose then immediately replace the hose
prior to operation of the appliance.
7. Keep any electrical supply cords and the
fuel gas supply lines away from heating
surfaces.
PROPOSITION 65 WARNING:
The burning of gas cooking fuel
generates some by-products that are
on the list of substances which are
known by the State of California to
cause cancer or reproductive harm.
California law requires businesses to
warn customers of potential exposure to
such substances. To minimize exposure
to these substances, always operate
this unit according to the use and care
manual, ensuring you provide good
ventilation when cooking with gas.
SAVE THESE
INSTRUCTIONS
Product Registration 1
_ lease enter the information requested in the spaces provided below. This information will be required in the unlikely event that a service call
becomes necessary:
Model No. Serial No.
Date Purchased Date Installed
Purchased From
Address
Phone
iSafety i
_IMPORTANT:
Your Dacor grill is designed to be safe when
installed properly. However, care must be
used as these grills can produce very high
temperatures which increases the potential
for injury or accidents. We recommend you
always follow the safety notes listed below.
1. Carefully read this manual before using
the grill, this will reduce the risk of
injury due to fire or electric shock.
2. Proper installation is extremely
important. Refer to the installation
instructions included within the
literature kit which shipped with your
grill. Your installer should show you the
location of the gas shut off valve and
the electrical connection. You should
also be familiar with the correct and
easiest way to shut off these utilities
in case of an emergency. Minimum
clearances to combustible materials
should always be observed. Reference
the correct clearances in the installation
instructions.
3. Repair and replacement of any parts
within this appliance should be
referred to an authorized Dacor service
technician.
4. Children should never be allowed to sit,
stand, or play around the grill at any
time. Children should never be allowed
to crawl inside the grill cart. Remember,
when in use, the grill will get hot
enough to cause severe burns.
5. Avoid the potential for grease fires by
frequently cleaning the grease tray.
Always allow the unit to completely cool
down before removing the grease tray
for cleaning.
6. Keep hands and fingers away from all
edges of the canopy while in the raised
position.
7. Never move the grill during cooking.
8. Always keep the canopy closed when
moving the grill cart.
9. Spiders and insects can nest in the
burners of this grill. This can obstruct
the proper flow of gas into the burner
and cause improper operation, fire
hazard and potential damage to the unit.
Periodically inspect the burners. If any
of these symptoms occur, immediately
refer to service or the troubleshooting
section of this manual.
10. Your outdoor grill is equipped with a
three-prong grounding plug to protect
animals against shock hazard. This
plug should be plugged directly into
a properly grounded three-prong
receptacle. Never cut or remove the
grounding prong from this plug.
11. The grill canopy should be closed
during the pre-heating period.
12. Gas Smells:
•If you smell gas when the unit is not
in use, immediately shut off the gas
at the main valve, open the canopy
and call your local service agency
to inspect the unit. Finding a leak is
not a do-it-yourself process.
•If you smell gas when the unit is
in use, immediately shut off the
gas at the main valve, open the
canopy, and dissipate for at least
five minutes. Relight the burners
and verify that they are operating
properly. If the burners fail to light
or are not functioning properly, shut
off the main gas supply valve and
call your local service agency for
inspection.
13. Never block the vents located on the
back of the grill or the opening at the
rear of the canopy. Blocking any or
all of these vents during cooking, will
result in damage to the unit and may
cause a fire or injury.
2.
Liquid Propane Tanks i
Dacor LP model grills are set at the
factory for LP tank installations. Use
only the Dacor supplied regulator. DO
NOT ATTEMPT FIELD CONVERSIONS.
Approved field conversions from natural to
LP or LP to natural will only be approved
when completed by an authorized Dacor
servicer.
Dacor grills are approved for a maximum
LP tank capacity of 20 pounds (5 gallons).
The tank must be constructed and marked
in accordance with the specifications for
LP-gas tanks of the U.S. Department
of Transportation (DOT) or the National
Standard of Canada, CAN/CSA-B339, tank,
Spheres and Tubes of the Transportation
of Dangerous Goods. To minimize the
potential for fire or an explosion, the
following precautions should be observed
when using, filing, or storing an LP tank:
Never use a dented or rusty LP tank.
If there is any question as to the
soundness of the tank, have it checked
by your LP supplier.
Never use a tank with a damaged or
defective shut off valve.
Do not over fill the LP tank. Never fill
the tank beyond eighty percent (80%)
of its capacity. Overfilling will cause
the pressure relief valve on the tank to
vent excess gas vapor. This vapor is
combustible and can ignite, causing a
fire.
• When transporting an LP tank, ensure it
is in an upright position and away from
any sources of high heat.
Do not store additional LP tanks inside
the cart of the unit. Tanks must be stored
outdoors in a well-ventilated area out of
the direct sunlight and/or sources of high
heat, and out of the reach of children.
LP tank supply systems must be
arranged for vapor withdrawal.
LP tank used must include a collar to
protect the tank valve.
1,
IMPORTANT:
For your safety, the gas supply must
be turned off at the LP-gas supply tank
when your grill is not in use.
2. The LP-gas supply cylinder must be
disconnected when this barbecuing
appliance is not in use.
3. If the appliance is to be stored indoors,
the LP tank must be disconnected and
removed from the appliance.
4. LP tanks not connected for use shall not
be stored in the vicinity of this or any
other appliance.
5. Detach and leave the tank outdoors if
storing the unit indoors. These grills are
for outdoor use only.
6. Check for leaks after every tank change.
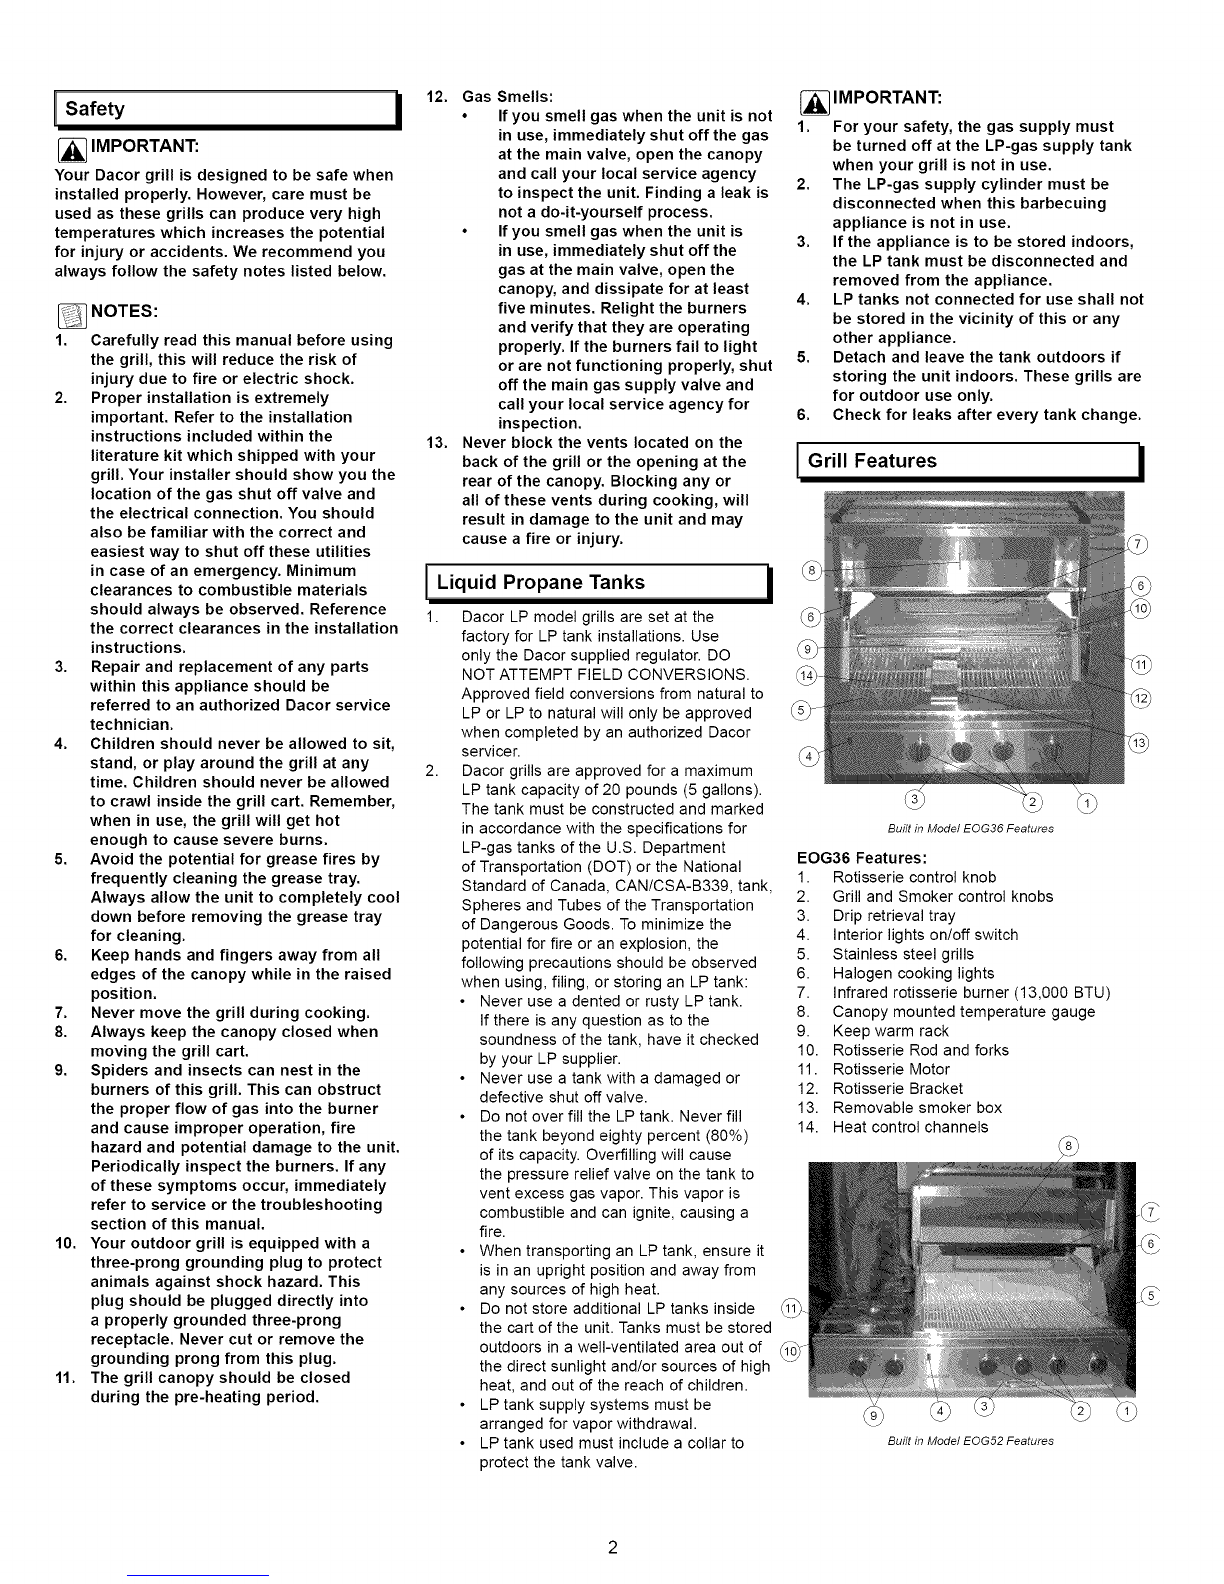
IGrill Features /
Built in Model EOG36 Features
EOG36 Features:
1. Rotisserie control knob
2. Grill and Smoker control knobs
3. Drip retrieval tray
4. Interior lights on/off switch
5. Stainless steel grills
6. Halogen cooking lights
7. Infrared rotisserie burner (13,000 BTU)
8. Canopy mounted temperature gauge
9. Keep warm rack
10. Rotisserie Rod and forks
11. Rotisserie Motor
12. Rotisserie Bracket
13. Removable smoker box
14. Heat control channels
Built in Model EOG52 Features
EOG52 Features:
1. Rotisserie control knob
2. Grill and Smoker control knobs
3. Drip retrieval tray
4. Interior lights on/off switch
5. Stainless steel grills
6. Halogen cooking lights
7. Infrared rotisserie burner (13,000 BTU)
8. Canopy mounted temperature gauge
9. Side burner control knobs
Locking
wheel
Locking
wheei
10. Side burners (2 - 18,000 BTU)
11. Burner grate
Keep warm rack (not shown)
Rotisserie Rod and forks (not shown)
Rotisserie Motor (not shown)
Rotisserie Bracket (not shown)
Removable smoker box (not shown)
Heat control channels (not shown)
Lift up work
Surface
Fixed
wheels
Roll out storage
Drawers (2)
Freestanding Cart Model 0GC36 Features
Lift up work
Surface
Fixed
wheels
Roll out storage
Drawers (2)
Freestanding Cart Model 0GC52 Features
IInstall Liquid Propane (LP) Tank
Gas Connection at
Right Read Corner
Under Outdoor GrlI
Tank Gas _
Regulat_ _\-.
Main Tank Valve
Slideout LP Tank
Storage Self
Flexible Gas Line
LP Tank
(5 Gal Max.)
Installing the LP Tank
ILighting Liquid Propane Grills
[_WARNING:
Open canopy before attempting to light the
appliance. Failure to open the canopy could
allow gas to accumulate which could cause
an explosion.
1.
2.
NOTES:
Reference your installation instructions
for proper LP gas line connections to
the Dacor regulator and the "Main tank
valve".
Once the tank is properly installed:
•Open the canopy to full open
position.
•Turn on the main tank valve.
•Light one grill burner at a time by
pressing in on the control knob
and turning it counter clockwise
until you hear the clicking ignition
sound. Your burner should ignite
within 4 to 10 seconds.
•Repeat the last step with all control
locations.
ILighting Natural Gas Grills
_WARNING:
Open canopy before attempting to light the
appliance. Failure to open the canopy could
allow gas to accumulate which could cause
an explosion.
I
1.
2.
NOTES:
Reference your installation instructions
for proper natural gas line connections
to the Dacor regulator.
Once you have confirmed that the
electrical and gas are properly installed,
begin the following processes:
•Open the canopy to full open
position.
•Light one grill burner at a time by
pressing in on the control knob
and turning it counter clockwise
until you hear the clicking ignition
sound. Your burner should ignite
within 4 to 10 seconds.
•Repeat the last step with all control
locations.
Ifignitiondoesnot immediately
take place, turn the burner valve
handle off, wait 5minutes, and
repeat the lighting procedure.
Manual Lighting I
_WARNINGS:
FOR YOUR SAFETY FOLLOW THESE STEPS
BEFORE ATTEMPTING A MANUAL LIGHTING
PROCESS:
1. Turn all control knobs to OFF position.
2. Raise the canopy to its full open
position.
1. Remove all of the grills to access the
heat control channels.
2. Find the hole in the front of the heat
control channel located directly behind
the front control panel.
3. Use the match holder provided or a long
stem match to light the grill burners
manually.
4. Push in on the control knob and turn
counter-clockwise while inserting the
burning match into the access hole in
the heat control channel. This should
immediately result in ignition. If you do
not experience immediate ignition, turn
the control back to the off position.
5. After waiting for 2 to 3 minutes, begin
the process with step 4.
6. If you cannot achieve ignition after two
attempts, turn off all gas to the product
and immediately call your authorized
Dacor servicer for a service call.
Access Hole for
ManuaE Lighting
/
Access Hole for Manual Lighting
iManual Lighting i
1. Your Dacor grill is equipped with a
canopy mounted thermometer to assist
you in various grill functions.
• Preheating is an important part
of proper grilling - preheat to
approximately 225 degrees.
• Smoking foods - heat to a
temperature range from 225 to 300
degrees.
2.
•Grilling all types of foods - vary
temperatures as needed from 225 to
500 degrees.
We recommend these temperatures as
approximations. For more detail please
refer to your complimentary Dacor
cooking guide. To receive your cooking
guide, send your completed warranty
card to Dacor's marketing department.
Canopy Mounted Temp. Gauge i
1. Your Dacor grill is equipped with a
canopy mounted thermometer to assist
you in various grill functions.
• Preheating is an important part
of proper grilling - preheat to
approximately 225 degrees.
• Smoking foods - heat to a
temperature range from 225 to 300
degrees.
• Grilling all types of foods - vary
temperatures as needed from 225 to
500 degrees.
2. We recommend these temperatures as
approximations. For more detail please
refer to your complimentary Dacor
cooking guide. To receive your cooking
guide, send your completed warranty
card to Dacor's marketing department.
Preheating Instructions i
_NOTE:
When preheating, set burners on high.
Following preheat, adjust burners to desired
temperature setting.
In order for the U- burners and burner box to
remain clean, the gas burners and the flame
spreaders have to be hot enough to vaporize
fats/oils/marinades as they drip upon them.
Without a proper preheat, these materials will
collect on both the flame spreader and the
burner tubes resulting in partial or total loss of
ignition or a decrease in burner performance.
Always light every burner to generate maximum
heat output and to assure even heat distribution.
Using only one or two burners can eventually
result in a buildup of unwanted material and
could affect performance.
_NOTE:
In colder climates the infrared burner may
have to be used in order to achieve the
suggested preheat temperature of 50001=.
Regardless of what you are barbecuing, use
every burner. This assures even heat distribution
and also improves grease/fat management.
Using only one or two burners will eventually
result in an unwanted buildup of material that
might inhibit reliable performance.
After using the barbecue, allow it to continue
heating an additional five minutes. This allows
materials to move to the grease tray and away
from the burner area. This assures clean
burners and a healthy ignition system.
IGrill Cooking
NOTES:
1. Advanced preparation:
•Bring all food items to be grilled to
thawed temperature.
•Check to make sure the drip
retrieval tray is in position.
•Preheat the grill with the canopy
closed to a minimum of 225
degrees or the applicable cooking
temperature for the food you are
preparing.
•Refer to the Dacor cooking
guide for preheat/cooking food
temperatures and style of cooking
recommended.
2. Begin the cooking process:
•Once you have achieved the
appropriate temperature for your
chosen recipe, place the food
product on the grill and begin the
timing process.
•Refer to your Dacor cooking guide
for approximate times for all types
of grilled foods.
3. After completion of cooking:
•Remove the food to serve and close
the canopy for a safer environment.
I Smoker Cooking
_WARNINGS:
1. Smoker cooking is done with the
canopy in the down position. Smoke will
be exhausting through the grill vents.
Do not block vents. Blocking vents will
damage the unit and may cause fire or
injury.
2. Smoker wood chips are soaked with
liquids which create steam and smoke
while barbecuing. Proceed with caution
during cooking. This steam can be very
hot and dangerous.
3. Frequently, the smoker box will need
to be refilled during cooking. It will be
extremely hot. Exercise caution during
this process. Steam and hot metal
surfaces can cause personal injuries
and possible fire.
NOTES:
1. Smoker cooking enhances the flavors
of food during grilling or rotisserie
cooking.
2. Your Dacor smoker box is a removable
accessory that is shipped with your
originally purchased grill product.
3. The smoker should be filled with
your choice of wood chips. For your
convenience, please refer to your Dacor
grill cooking guide for a chart of wood
types, characteristics, and foods to go
with each type of wood chip.
4. Once you have prepared the wood and
smokerbox for use, while the grill is
still cool, select adirect or indirect
cooking location, then place the smoker
box appropriately.
5. To place the smoker box correctly
•Determine desired smoker location.
• Remove one small grill and the
even heat channel. (The grills
and even heat channels may be
moved to create a smoker opening
anywhere across the full width of
the unit.)
• Place smoker in the opening.
6. Turn on the burner to maximum (HI)
temperature. Leave the burner on high
until the chips begin smoking. Then turn
the heat down where the chips don't dry
out or flame up.
7. Recipes with long time duration will
require the addition of wood and liquid
to the smoker box. Remember, every
additional time you open the grill
canopy and smoker box, you will extend
your recipe cooking times.
8. Clean up should occur only after cool
down. Do not leave the smoker box and
its contents inside the grill during HI
heat self cleaning.
9. A cool smoker box and the residue can
be removed safely for cleaning. Dump
the cool wood remnants and wash the
stainless steel smoker box with warm
water and dish soap. Rinse well and dry
the box. Do not dump the remnants until
cool.
Rotisserie Cooking I
_WARNING:
This unit is equipped with a 3-prong
grounding plug for your protection against
shock hazard and should be plugged directly
into a properly grounded receptacle. Do not
cut or remove the grounding prong from this
plug. Do not allow the rotisserie electrical
cord to touch any heated surface of your
grill.
[_ CAUTION:
1. Cooking with the rotisserie burner is not
recommended during high wind.
2. If any flame is blown out during windy
conditions and does not automatically
re-ignite within 5to 7seconds, turn off
the control and attempt a new ignition
until you hear the constant clicking stop
and you see flame ignition.
1. Rotisserie cooking utilizes the intense
searing heat of the infrared burner and
constant rotisserie rod rotation to cook
many different types of meat.
2.
3.
Rotisserie burner operation:
•Rotisserie burner requires no pre- 1.
heating.
• Rotisserie burner can be used in
conjunction with grill burners and
smoker box.
• Push control knob and rotate 1/4
turn to the left (igniters will spark).
Push knob and hold (approximately
30 seconds) until burner stays lit.
If ignition does not immediately
take place, turn burner knob off,
wait 5minutes, and repeat lighting
procedure.
Rotisserie Motor and Rotisserie Rod
Prepare the grill for rotisserie cooking
by following these steps:
• Install the motor mounting bracket
and motor by slipping the edge of
the bracket down into the slot at the
right side edge of the grill frame.
(as shown below)
• Plug the motor power cord into 120
VAC grounded receptacle. Keep the
cord away from all heated surfaces.
• Load your menu items on the
rotisserie rod.
•Mount your loaded rotisserie 1.
rod into the drive location on the
rotisserie motor and into secondary
mounting support on the left side of
the grill.
• Double check all rotisserie forks
and locking screws for tightness to
assure items will not move during
rotation.
• Turn on the motor and observe
several rotations to confirm the
food is stable, then close the 2.
canopy completely and you are
cooking. 3.
Rotisserie Installation
Side Burners (Select Models Only)_
[_ IMPORTANT:
Do not place the burner cover over the
burners while hot. Excessive heat contact
with the cover may cause permanent
discoloration.
NOTES:
Largest recommended pot for these
burners is 14 inches in diameter. Larger
pots may contact the grill canopy during
opening and closing.
2. Automatic re-ignition systems will ignite
an extinguished flame.
3. Do not operate the side burner in windy
conditions.
4. The porcelain burner grate is durable,
however continuous sliding of pots can
remove surface material.
5. A stainless steel side burner cover is
made to cover the burner grate and
burners when not in use.
I Cleaning Tips
_WARNING:
To avoid electric shock or burns, turn off all
controls and ensure the grill is cool before
cleaning. Do not store any type of cleaning
products around the grill.
i
4.
5.
6.
NOTES:
Read and follow the CARE AND
CLEANING INSTRUCTIONS to
ensure that proper grill operation
and appearance will be maintained
throughout the lifetime of the product.
Several materials and finishes are used
in the grill. Each material and finish
must be properly cleaned according to
the following recommendations. Failure
to follow these recommendations may
result in permanent damage to the grill.
To keep the grill looking it's best, clean
it after every use.
Use the mildest cleaners or procedure
available to perform the cleaning
operation. Do not use commercial
cleaners to clean any part of the grill.
Use only a sponge, soft cloth, fibrous
or plastic brush and nylon pad for
cleaning. Avoid the use of abrasive
cleaners such as steel wool.
Always dry components completely
before using the grill.
The use of brand names is intended
only to indicate a type of cleaning
agent or cleaning implement. All
products listed by name must be used
in accordance with the manufacturer's
recommendations. Use of a brand name
does not constitute an endorsement,
nor does omission of a particular brand
imply that a product is inferior.
Exterior Surfaces
_IMPORTANT:
1. Turn the knobs to the "OFF" position
prior to removing them from the valve
stems.
2. The grill should never be operated
without the knobs in place.
3. Do not soak the knobs in water or place
them in the dishwasher.
4. Do not expose the knobs to direct
flame, hot utensils or other sources of
heat.
5. Do not use abrasive or corrosive
cleaners or applicators, as these could
cause permanent damage.
NOTE:
Cleaning stainless steel varies with each
part of the grill. To assist you, please refer
to the list below for the suggested cleaning
procedures:
1. Stainless Steel (canopy, chassis)
• Wipe with the grain
•Non-abrasive cleaners or
•Mild abrasive cleaners
•For stubborn areas, use the Dacor
Cooktop Cream supplied with the
grill
• "Liberally apply the cleaner to a wet
sponge. For best cleaning results
thoroughly rinse off all residue."
2. Porcelain (black upper back wall)
•Non-abrasive cleaners
•Mild abrasive cleaners
3. Brass Burner Caps
•Mild abrasive cleaners
•Do not place burner caps in the
dishwasher for cleaning.
4. Plastic (knobs)
•Non-abrasive cleaners. (warm water
with dish soap)
IInterior Surfaces
_IMPORTANT:
To assist in the removal of the halogen light
lens Dacor has included a pry stick. Gently
slip the pry stick under the edge of the glass
and pry away until the glass lifts. Remove
the remaining distance by hand.
To assist you, please refer to the list below
for the suggested cleaning procedures:
1. Stainless Steel (grills, heat control
channels, burner box)
•Mild abrasive cleaners
•De-greasors (such as 409)
•Abrasive cleaners (limited
applications)
•Dacor Cooktop Creme and wet
sponge
2. Stainless Steel (u-shape burners)
•Mild abrasive cleaners
•Abrasive cleaners (limited
applications)
3. Glass (light lens)
•Non-abrasive cleaners
•Glass cleaners are acceptable
•Warm soapy water
iTroubleshooting i
Unnecessary service calls may be expensive, frustrating and time consuming. Before you call for service, please review the potential problems, possible
causes and remedies shown in the table below.
Problem Possible Cause Remedy
1. Nothing works.* Grill is not connected to electrical power. Have grill connected to the proper electrical
supply by a qualified electrician or appliance
installer.
Power supply is not energized. Check circuit breaker, wiring, fuses, plugs, etc.
2. Ignitors do not spark.* Circuit breaker is tripped. Reset circuit breaker.
House fuse is blown. Replace house fuse.
3. Sparking but no flame. Gas shut-off valve is in "off" position. Turn shut-off valve to "on" position.
Ports on U-burner are clogged or dirty. Brush U-burner with a steel brush and clear
blockage with a toothpick or metal object
(straightened paper clip, needle, or wire).
4. Burners ignite but flame is extremely large,
distorted or yellow. Ports on U-burner are clogged or dirty. Brush U-burner with a steel brush and clear
blockage with a toothpick or metal object
(straightened paper clip, needle, or wire).
Grill is being operated on wrong type of gas. Ensure that the type of grill matches the gas
supply (natural gas or LP).
Regulator is not installed, is faulty, or is set for
the wrong type of gas. Check installation, replace regulator, or set
regulator for proper gas type.
5. Burner flame goes out at low setting. Low gas pressure. Contact gas company, have incoming gas
pressure tested.
Air intake holes under the control panel are
obstructed.
Incorrect installation.
Remove obstruction.
Check installation dimensions against
installation instructions.
6. Ignitors spark continuously after flame
ignition. Ports on U-burner are clogged or dirty at ignition Brush U-burner with a steel brush and clear
location, blockage with a toothpick or metal object
(straightened paper clip, needle, or wire).
Power supply polarity is reversed. Have polarity corrected.
Ignitors are wet or dirty. Dry ignitors or clean ignitors with a metal brush
to remove any residue.
Low burner flame. Contact gas company, have incoming gas
pressure tested.
Troubleshooting Guide
*The grill burners can be manually ignited with a match or the hand spark ignitor supplied with the unit. (Refer to Manual Lighting section
on page 6.)
IProduct Maintenance
No maintenance, other than the CARE AND
CLEANING INSTRUCTIONS identified in this
Use & Care Manual, should be attempted by
the owner/operator. All other maintenance
and service must be performed by a qualified
appliance technician.
i
If You Need Service... |
First, review the recommended checks listed in
the preceding Troubleshooting Guide. Then,
be certain that the appliance has been installed
properly and is being operated correctly.
Familiarize yourself with the warranty terms and
conditions listed in the PRODUCT WARRANTY
section on the inside back cover.
If the above checks have been completed and
the problem has not yet been remedied, call your
local authorized DACOR service representative.
Your dealer can normally provide the name
and telephone number of the nearest service
company.
DACOR works diligently to ensure your
satisfaction when service is necessary. However,
if you are not completely satisfied with the
service provided, contact the company that
performed the service and express why you are
not pleased. Normally, they will be willing and
able to resolve the problem.
If the service agency is not able to respond
effectively, call or write the DACOR Customer
Service Department. The phone number and
address of this department are listed on the
inside front cover of this manual. Please include
your telephone number if you choose to write.
We will then do our utmost to assure your
happiness and satisfaction.
What is Covered
CERTIFICATE OF WARRANTIES
DACOR EPICURE ® GRILLS
I
WITHIN THE FIFTY STATES OF THE U.S.A., THE
DISTRICT OF COLUMBIA AND CANADA*:
ONE-YEAR FULL WARRANTY
If your DACOR product fails to function within
one year of the original date of purchase, due to
a defect in material or workmanship, DACOR
will remedy the defect without charge to you
or subsequent users. The owner must provide
proof of purchase, upon request, and have the
appliance accessible for service.
FIVE YEAR LIMITED WARRANTY
Rotisserie burner
LIFETIME WARRANTY
All stainless steel components, including grill
and grill burners, are warranted against rust
through.
i OUTSIDE THE FIFTY STATES OF THE U.S.A.,
THE DISTRICT OF COLUMBIA AND CANADA:
LIMITED FIRST YEAR WARRANTY
If your DACOR product fails to function within one
year of the original date of purchase, due to a
defect in material or workmanship, DACOR will
furnish a new part, RO.B. factory, to replace the
defective part. All delivery, installation and labor
costs are the responsibility of the purchaser. The
owner must provide proof of purchase, upon
request, and have the appliance accessible for
service.
What is Not Covered I
Failure of the product caused by faulty
installation, improper usage, or neglect of
required maintenance.
Service calls to educate the customer in
the proper use and care of the product.
Failure of the product when used for
commercial, business, rental or any
application other than for residential
consumer use.
Replacement of house fuses or fuse boxes,
or resetting of circuit breakers.
Damage to the product caused by accident,
fire, flood or other acts of God.
Breakage, discoloration or damage to
glass, metal surfaces, plastic components,
trim, paint, or other cosmetic finish, caused
by improper usage or care, abuse, or
neglect.
THE REMEDIES PROVIDED FOR IN THE
ABOVE EXPRESS WARRANTIES ARE
THE SOLE AND EXCLUSIVE REMEDIES.
THEREFORE, NO OTHER EXPRESS
WARRANTIES ARE MADE, AND OUTSIDE
THE FIFTY STATES OF THE UNITED STATES,
THE DISTRICT OF COLUMBIAAND CANADA,
ALL IMPLIED WARRANTIES, INCLUDING BUT
NOT LIMITED TO, ANY IMPLIED WARRANTY
OF MERCHANTABILITY OR FITNESS FOR A
PARTICULAR USE OR PURPOSE, ARE LIMITED
IN DURATION TO ONE YEAR FROM THE DATE
OF ORIGINAL PURCHASE. IN NO EVENT
SHALL DACOR BE LIABLE FOR INCIDENTAL
EXPENSE OR CONSEQUENTIAL DAMAGES.
NO WARRANTIES, EXPRESS OR IMPLIED,
ARE MADE TO ANY BUYER FOR RESALE.
Some states do not allow limitations on how
long an implied warranty lasts, or do not allow
the exclusion or limitation of inconsequential
damages, so the above limitations or exclusions
may not apply to you. This warranty gives you
specific legal rights, and you may also have
other rights that vary from state to state.
fold here
NO POSTAGE
NECESSARY
IF MAILED
IN THE
UNITED STATES
BUSINESS REPLY MAIL
FIRST-CLASSMAIL PERMITNO.4507 DIAMONDBARCA
POSTAGEWILL BEPAIDBYADDRESSEE
DACOR
ATTN: WARRANTY PROCESSING DEPT
PO BOX 6532
DIAMOND BAR CA 91765-9861
I1,1,,,,,111,,,I,I1,,,I,1,1,1,,I,,I,,11,,,,,111,,I,I
Pleasevisit www.Dacor.com to activate your warranty online.
WARRANTYINFORMATION
IMPORTANT:
Yourwarrantywillnotbeactivateduntilyouactivateitonlineor returnthisform toDacor.Ifyou havepurchasedmore
thanoneDacorproduct,pleasereturnallforms inoneenvelopeoractivatethewarrantyfor eachproductonline.
Pleaserestassuredthat undernoconditionswill Dacorsellyournameoranyoftheinformationon thisformfor mailinglistpurposes.We
areverygratefulthatyouhavechosenDacorproductsforyourhomeanddo notconsiderthesaleof suchinformationto beaproperway
ofexpressingourgratitude!
Owner'sName:
Street:
City:
PurchaseDate:
Dealer:
City:
Last (PleasePrintor Type)
Email:
First Middle
State: Zip:
Telephone:
State: Zip:
Yourwillingnesstotakea fewsecondstofillin thesectionbelowwillbesincerelyappreciated.Thankyou.
1.Howwereyoufirst exposedtoDacorproducts?(Pleasecheckoneonly.)
[] A. T.V.CookingShow [] F Builder
[] B. Magazine [] G. Architect/Designer
[] C. ApplianceDealerShowroom [] H. AnotherDacorOwner
[] D, KitchenDealerShowroom [] I. ModelHome
[] E. HomeShow [] J. Other
2.Wheredid youbuyyourDacorappliances?
[] A. ApplianceDealer [] D. Builder
[] B. KitchenDealer [] E. Other
[] C. BuilderSupplier
3.Forwhatpurposewastheproductpurchased?
[] A. Replacementonly [] C. NewHome
[] B, PartofaRemodel [] D, Other
4. Whatisyourhouseholdincome?
[] A. Under$75,000 [] D. $150,000-$200,000
[] B. $75,000-$100,000 [] E. $200,000-$250,000
[] C. $100,000-$150,000 [] F. OverS250,000
5.Whatotherbrandsofappliancesdoyouhavein yourkitchen?
A. Cooktop C. Dishwasher
B.Oven D. Refrigerator
6.Wouldyoubuyor recommendanotherDacorproduct?
[] Yes
Comments: [] No
I
I
I
I
*5
°I
Thankyouverymuchforyourassistance.Theinformationyouhave
providedwillbeextremelyvaluablein helpingusplanforthefuture
andgivingyouthesupportyoudeserve.
PlaceSerialNumberLabelHere
Web site: www.Dacor.com
Corporate phone: (800) 793-0093

Other manuals for EOG303

2

This manual suits for next models

3

Other Dacor Grill manuals

Dacor Epicure OB36 User manual

Dacor

Dacor Epicure OB36 User manual

Dacor AEGR30 User manual

Dacor

Dacor AEGR30 User manual

Dacor Discovery OB36 User manual

Dacor

Dacor Discovery OB36 User manual

Dacor Epicure OB36 User manual

Dacor

Dacor Epicure OB36 User manual

Dacor Epicure OB36 User manual

Dacor

Dacor Epicure OB36 User manual

Dacor Epicure OBS36 User manual

Dacor

Dacor Epicure OBS36 User manual

Dacor Epicure 0B36 User manual

Dacor

Dacor Epicure 0B36 User manual

Dacor Epicure OB36 User manual

Dacor

Dacor Epicure OB36 User manual

Dacor Epicure OB36 Technical manual

Dacor

Dacor Epicure OB36 Technical manual

Dacor Epicure OB36 User manual

Dacor

Dacor Epicure OB36 User manual

Dacor Epicure OB36 Technical manual

Dacor

Dacor Epicure OB36 Technical manual

Dacor Epicure OB36 Technical manual

Dacor

Dacor Epicure OB36 Technical manual

Dacor EG366 User manual

Dacor

Dacor EG366 User manual

Dacor Epicure EOG36 Owner's manual

Dacor

Dacor Epicure EOG36 Owner's manual

Dacor EOG303 User manual

Dacor

Dacor EOG303 User manual

Dacor Epicure OB36 User manual

Dacor

Dacor Epicure OB36 User manual

Dacor EOG303 User manual

Dacor

Dacor EOG303 User manual

Dacor Epicure EOG36 User manual

Dacor

Dacor Epicure EOG36 User manual

Popular Grill manuals by other brands

Grillstream GCO30MK operating manual

Grillstream

Grillstream GCO30MK operating manual

Trisa electronics 7590.42 Instructions for use

Trisa electronics

Trisa electronics 7590.42 Instructions for use

TEFAL OptiGrill XL Instructions for use

TEFAL

TEFAL OptiGrill XL Instructions for use

Masterbuilt MB20040919 manual

Masterbuilt

Masterbuilt MB20040919 manual

EDM Product 07642 instruction manual

EDM Product

EDM Product 07642 instruction manual

Char-Broil 14601711 Product guide

Char-Broil

Char-Broil 14601711 Product guide

Hendi 268506 user manual

Hendi

Hendi 268506 user manual

Weber Spirit SP-210 owner's guide

Weber

Weber Spirit SP-210 owner's guide

Traeger BBQ075 owner's manual

Traeger

Traeger BBQ075 owner's manual

Gasmate BQ1062 instructions

Gasmate

Gasmate BQ1062 instructions

Silvercrest 93460 operating instructions

Silvercrest

Silvercrest 93460 operating instructions

Silvercrest SKGE 2000 C3 operating instructions

Silvercrest

Silvercrest SKGE 2000 C3 operating instructions

Beef Eater BSH158SAEU Assembly and operating instructions manual

Beef Eater

Beef Eater BSH158SAEU Assembly and operating instructions manual

Rankam ST1017-012939 Operator's manual

Rankam

Rankam ST1017-012939 Operator's manual

Bravetti EP865 Use and care instructions

Bravetti

Bravetti EP865 Use and care instructions

FCC BBQ FCC-C-20000 Instructions, manual, maintenance

FCC BBQ

FCC BBQ FCC-C-20000 Instructions, manual, maintenance

Steba RC 68 Instructions for use

Steba

Steba RC 68 Instructions for use

Livoo DOC277 instruction manual

Livoo

Livoo DOC277 instruction manual

manuals.online logo
manuals.online logoBrands
  • About & Mission
  • Contact us
  • Privacy Policy
  • Terms and Conditions

Copyright 2025 Manuals.Online. All Rights Reserved.