Daewoo DVG-8000D User manual

• 1 •
SAFETY INFORMATION
CLASS 1
LASER PRODUCT
NOTE:
This player can be used only where the power supply is
100~240V
,
50/60Hz. It cannot be used elsewhere.
WARNING:
TO REDUCE THE RISK OF FIRE OR ELECTRIC
SHOCK, DO NOT EXPOSE THIS PLAYER TO RAIN
OR MOISTURE.
TO REDUCE THE RISK OF FIRE OR ELECTRIC
SHOCK, AND ANNOYING INTERFERENCE, USE
THE RECOMMENDED ACCESSORIES ONLY.
CAUTION:
DVD/CD PLAYER IS A CLASS 1 LASER PRODUCT.
HOWEVER THIS DVD/CD PLAYER USES A
VISIBLE LASER BEAM WHICH COULD CAUSE
HAZARDOUS RADIATION EXPOSURE IF
DIRECTED. BE SURE TO OPERATE THE DVD/CD
PLAYER CORRECTLY AS INSTRUCTED.
WHEN THIS DVD/CD PLAYER IS PLUGGED TO
THE WALL OUTLET, DO NOT PLACE YOUR EYES
CLOSE TO THE OPENING OF THE DISC TRAY
AND OTHER OPENINGS TO LOOK INTO THE
INSIDE OF THIS PLAYER.
USE OF CONTROLS OR ADJUSTMENTS OR
PERFORMANCE OF PROCEDURES OTHER THAN
THOSE SPECIFIED HEREIN MAY RESULT IN
HAZARDOUS RADIATION EXPOSURE.
DO NOT OPEN COVERS AND DO NOT REPAIR
YOURSELF, REFER SERVICING TO QUALIFIED
PERSONNEL.
(Back of player)
(Inside of player)
CAUTION -LASERRADIATIONWHENOPEN.
DONOTSTARE INTO BEAM.
ATTENTION -RAYONNEMENT LASERENCASD’OUVERTURE.
NEPASREGARDERDANSLEFAISCEAU.
VORSICHT -LASERSTRAHLUNG, WENN ABDECKUNG GEÖFFNET.
NICHTINDENSTRAHLBLICKEN.
ADVARSEL -LASERSTRÅLINGVEDÅBNING.
SEIKKEINDISTRÅLEN.
ADVARSEL -LASERSTRÅLINGNÅRDEKSELÅPNES.
STIRRIKKEINNISTRÅLEN.
VARNING -LASERSTRÅLINGNÄRDENNADELÄRÖPPNAD.
STIRRAEJINISTRÅLEN.
VARO! -AVATTAESSAOLETALTTIINALASERSÄTEILYLLE.
ÄLÄTUIJOTA SÄTEESEEN.

• 2 •
TABLE OF CONTENTS
1. IMPORTANT SAFEGUARDS---------------------1
2. TABLE OF CONTENTS ----------------------------2
3. FEATURES---------------------------------------------3
4. ABOUT MANUAL-----------------------------------4
5. PLAYABLE DISCS-----------------------------------4
6. TERMS FOR DISCS ---------------------------------5
7. BEFORE OPERATION------------------------------7
8. PRECAUTIONS FOR DISC------------------------7
9.PREPARATIONS BEFORE OPERATION -------8
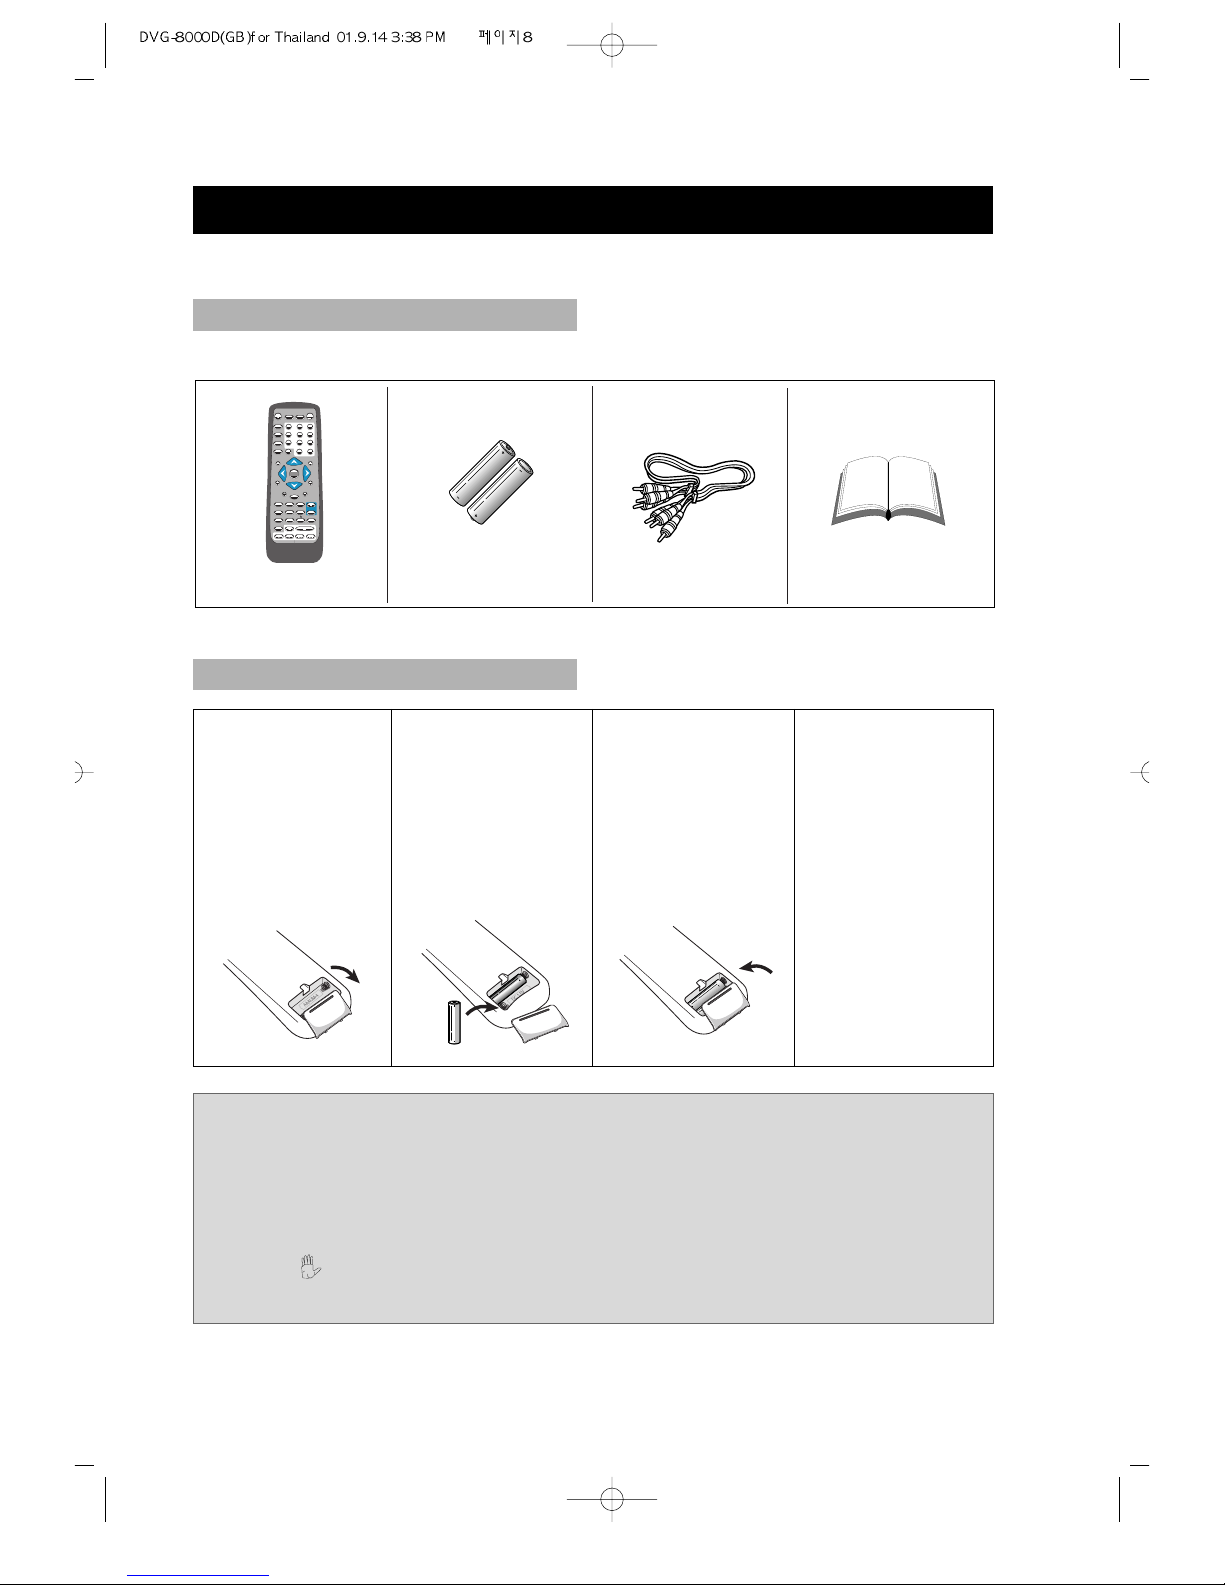
• CHECK ACCESSORIES --------------------------8
• USE REMOTE CONTROL -----------------------8
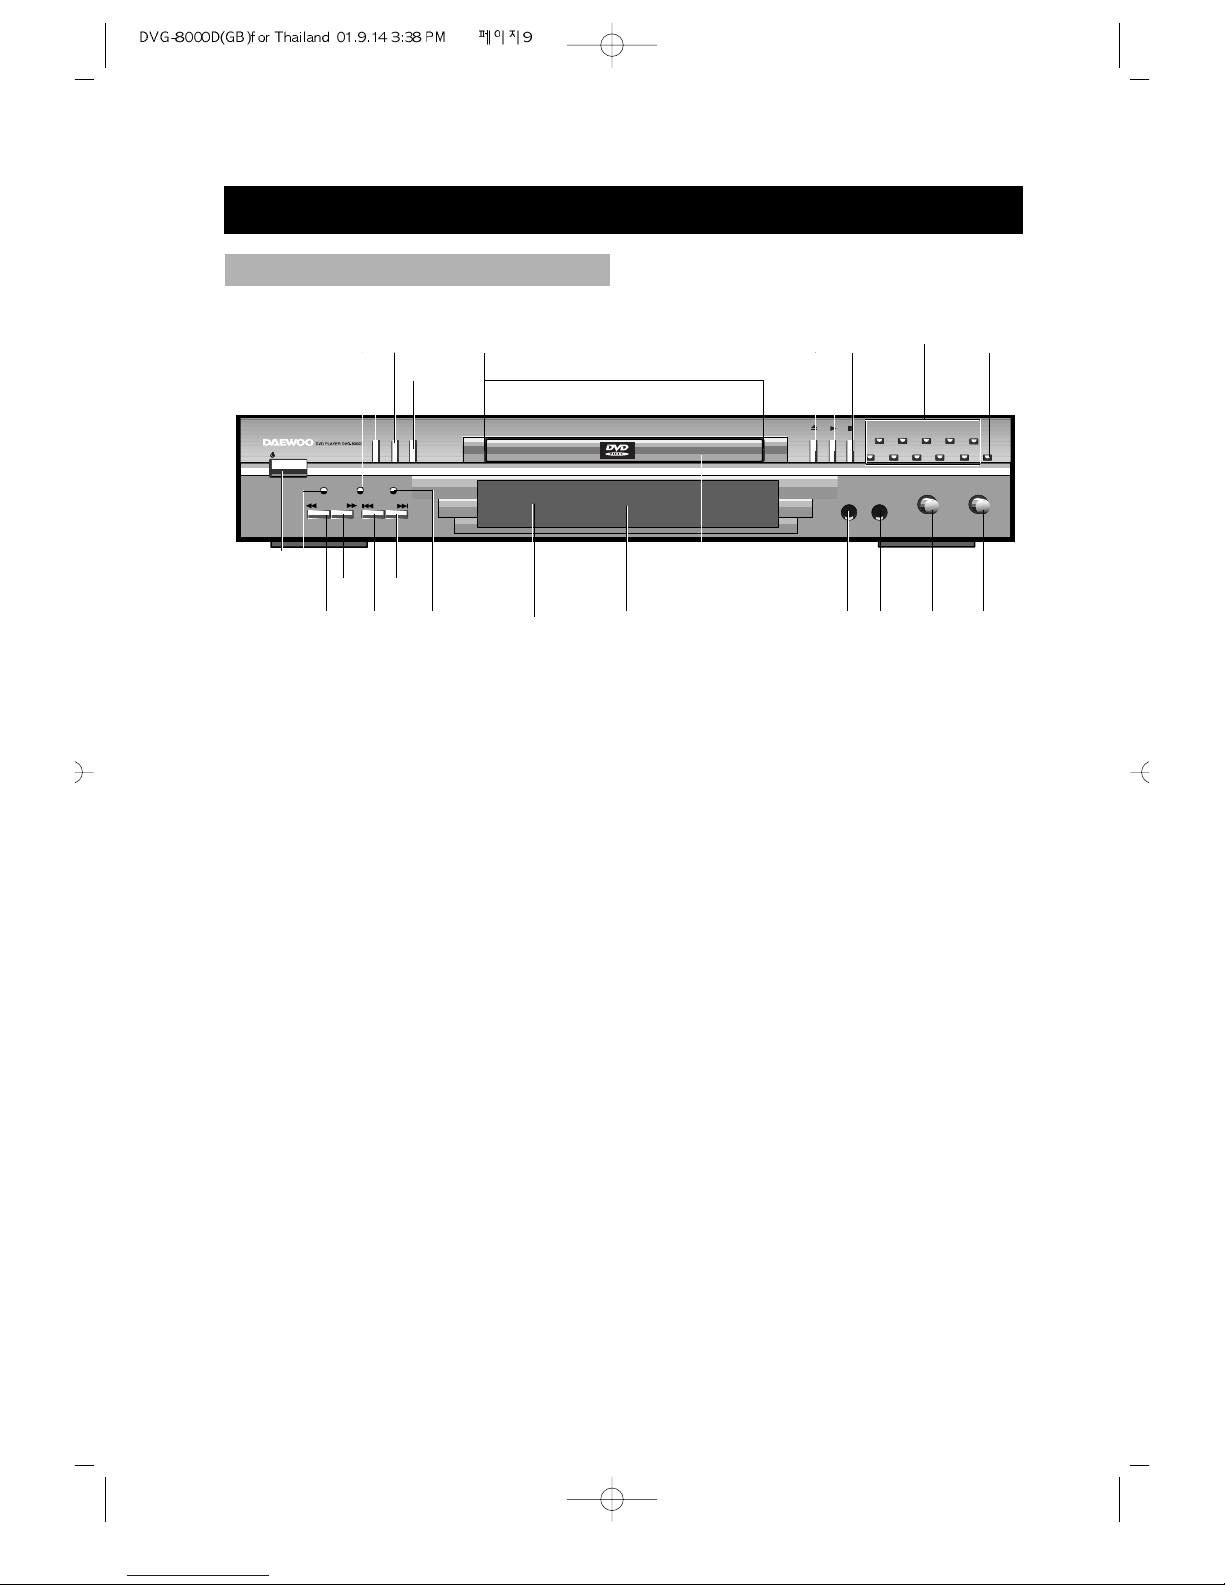
• FRONT PANEL -------------------------------------9
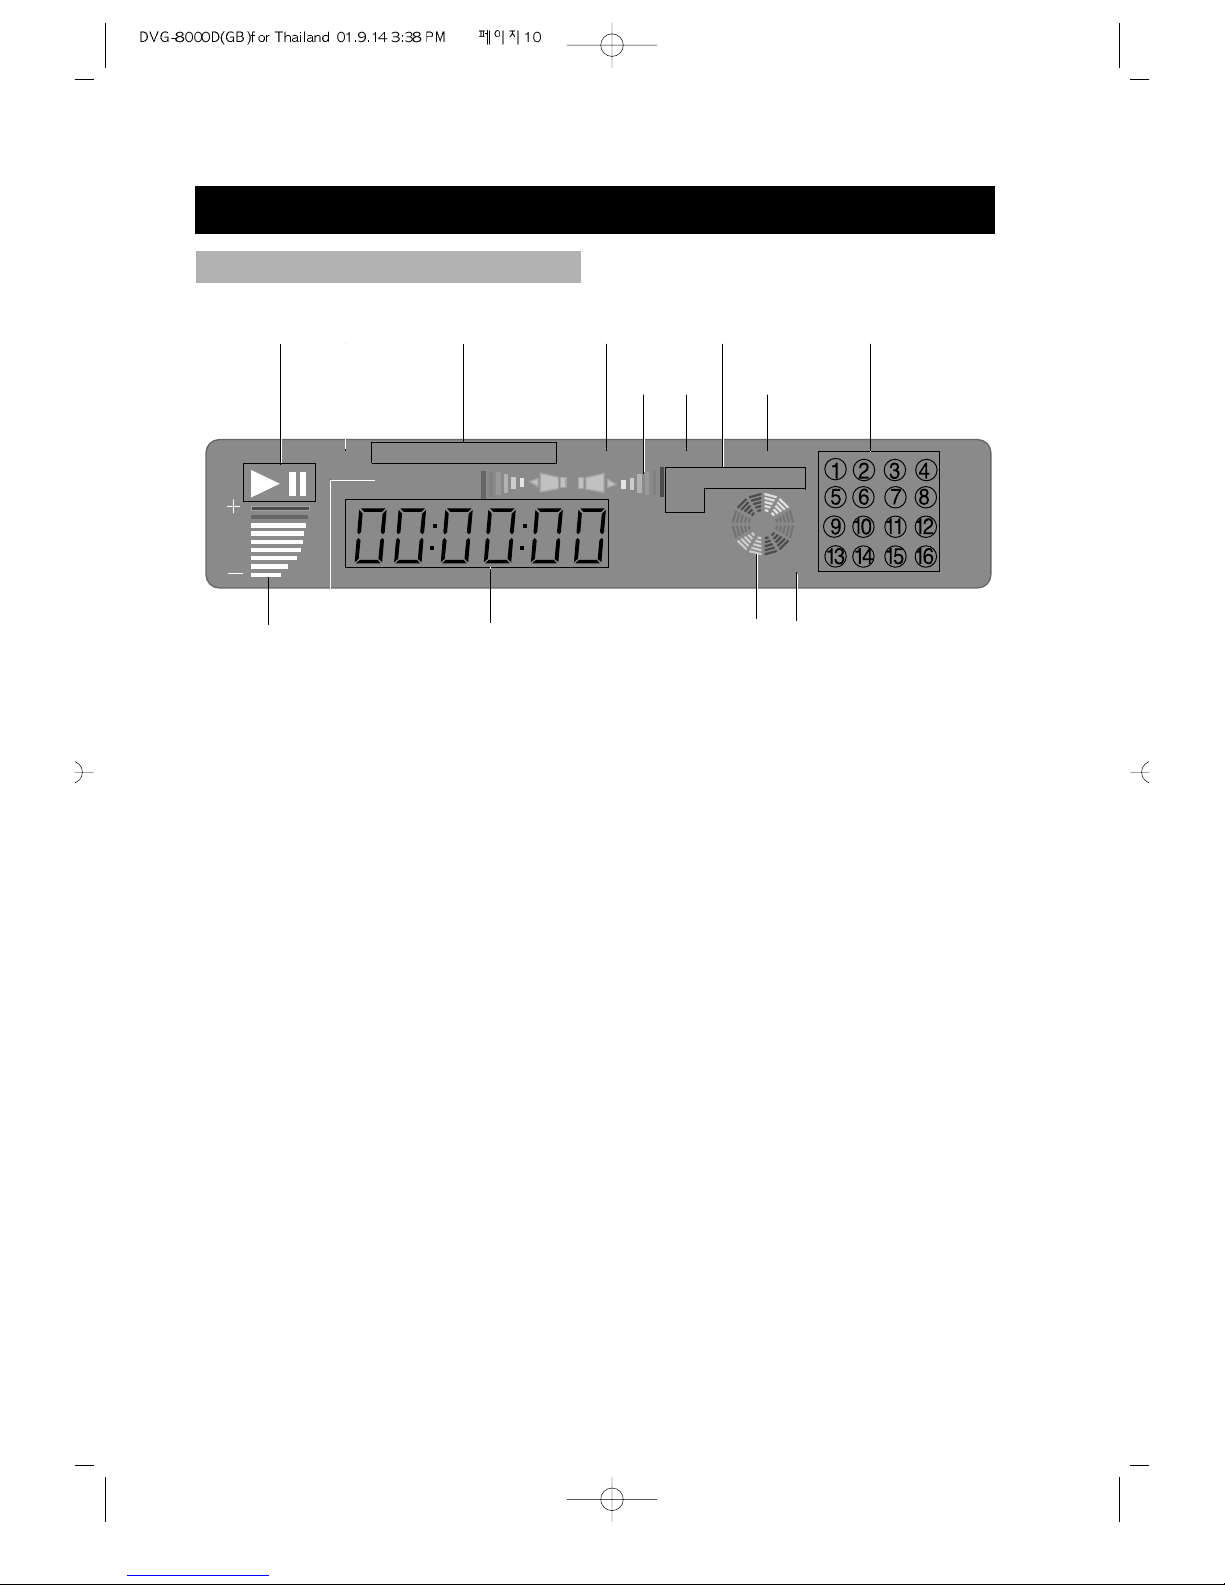
• DISPLAY -------------------------------------------10
•
NAMESAND LAYOUTOF REMOTECONTROLS
--11
• REAR PANEL -------------------------------------12
10. CONNECTIONS-----------------------------------13
11. BASIC OPERATIONS ----------------------------16
• PLAY DISCS ---------------------------------------16
• SYSTEM SETTING-------------------------------17
• STEP, PAUSE---------------------------------------17
• OSD --------------------------------------------------17
• VOLUME CONTROL----------------------------18
• DVD MENU PLAY -------------------------------18
• MP3 PLAY------------------------------------------18
• PBC PLAY ------------------------------------------19
• SELECT WITH NUMBER BUTTONS -------19
12. PLAY DISCS IN VARIOUS WAYS ------------20
• SELECT LANGUAGE ---------------------------20
• SELECT CHANNEL------------------------------20
• MUTE------------------------------------------------20
• FAST PLAY-----------------------------------------21
• SLOW PLAY ---------------------------------------22
• REPEAT PLAY-------------------------------------22
• PLAYING A DISC REPEATEDLY ------------22
• REPEAT SOME PARTS--------------------------23
• SELECT SUBTITLES ----------------------------24
• SELECT ANGLES --------------------------------25
• 3D SURROUND-----------------------------------25
• TIME SEARCH AND REMAINING TIME--26
• RESUME PLAY -----------------------------------28
• ZOOM PLAY---------------------------------------28
• PROGRAM PLAY---------------------------------29
• DIGEST PLAY-------------------------------------29
• PLAY KARAOKE---------------------------------31
13. FUNCTION SETTING---------------------------32
• GENERAL SETUP--------------------------------33
• SPEAKER SETUP---------------------------------35
• DOLBY DIGITAL SETUP-----------------------36
• DOLBY SURROUND SETUP------------------37
• PREFERENCES -----------------------------------37
14. TROUBLESHOOTING---------------------------39
15. TECHNICAL SPECIFICATIONS --------------40
16. REGIONAL RESTRICTION CODE-----------41

• 3 •
FEATURES
❏OUTSTANDING SOUND QUALITY
Dolby Digital system developed by Dolby Laboratories and DTS developed by
DTS Inc., features high quality surround sound, can be played in DVD or CD disc at home,
to reproduce high quality sound effects.
❏HIGH DEFINITION
The unit adopts MPEG2 coding format and brings the horizontal resolution over 500 lines.
❏UNIQUE FUNCTIONS
Multi-angle and multi-language bring unique trick functions.
Parent lock makes it easy to control the content of discs.
❏SCREEN
Ordinary screen and wide screen (16:9) are available.
❏COMPATIBILITY
The unit can play DVDs, and is compatible with CDs.
❏ZOOM
It can enlarge pictures 1.5 times, twice or four times their size.
❏9-PICTURE DIGEST (VCD)
It can look through the content of discs and select to play.
❏MULTI-FUNCTIONS
Fast forward, fast reverse, slow play, frame play, repeat play and program play.
❏TIME SEARCH
It can search a specificpart on a disc, especially good for watching fiction movies.
❏RESUME PLAY
It can memorize the position where the disc is stopped and resume playback.
❏CONTENT DISPLAY
It adopts (a coloured) fluorescent display and English/French/Spanish OSD, making the
disc content clearer.
❏VIDEO OUTPUT
Standard video, S-video signal output mode and component output easy system change.
❏AUDIO OUTPUT
Analog audio output, coaxial and optical digital audio output, can be connected with the
appropriate amplifier to enjoy high quality sound effects.
❏5.1 CHANNEL ANALOGUE AUDIO OUTPUT
Six phono sockets for analogues 5.1 channel audio output in order to connect to an amplifier
with analogue 5.1 channel input terminal. They are FRONT left, FRONT right,
SURROUND left, SURROUND right, SUBWOOFER, CENTER respectively.
❏MIC
Used to make connection with the MIC. Please insert the MIC jack into this socket. The
downmix mode is selected analog audio out whenever the MIC are plugged in.
❏MIC LEVEL
Used to adjust the MIC volume.

• 4 •
ABOUT MANUAL
• This manual mainly introduces how to
use buttons on the remote control.
• You may operate the unit if the buttons
on the unit have the same or similar
names as or to those on the remote
control.
• The marks shown in the chart on the
right are used in the manual.
MARK INDICATION
functions of DVD
functions of super-VCD
TYPE
DVD
CD
MARK CONTENT
audio+video
(motion
pictures)
audio
SIZE
12cm
about 2hrs (single-side disc)
about 8hrs (double-side disc)
about 80mins (single-side disc)
about 160mins(double-side disc)
about 74mins
about 20mins
8cm
12cm
8cm
PLAYING TIME
DVD
SVCD
VCD
CD
PRINCIPLES FOR WRITING
PLAYABLE DISCS
Super-VCD audio+video
(motion pictures)
12cm about 45mins
VCD audio+video
(motion pictures)
12cm
8cm
about 74mins
about 20mins
MP3 audio 12cm about 160mins
about 600mins
about 600mins
functions of VCD
functions of CD
CD-R audio 12cm
CD-RW audio 12cm

• 5 •
REGION MANAGEMENT INFORMATION
This unit is designed and manufactured to respond to the Region Management
information that is recorded on a DVD disc. The region number of this player is
“3”. If the region number described on the DVD discs does not correspond to the
Region number of this player, the player will not play this disc. This player will
play DVD discs made for “ALL” regions. Therefore, this player will play DVD
discs marked with labels containing the region number “3” or “ALL”.
(Region 3) (Region ALL)
3
TERMS FOR DISCS
The images or music of a DVD are
divided into some units, among which
title is the biggest one.
When playing a DVD, the movie is the
title.
When playing a CD, the combined tracks
make up the title.
It is smaller than title among the units of
a DVD. A title is made up of several
chapters , and each chapter has a
number for search. But some discs
may not have numbered chapters.
In a CD, each track has a number to
enable search functions.
DISC
TITLE
CHAPTER
DISC
TRACK
TITLE
CHAPTER
TRACK
STRUCTURE OF DVD
STRUCTURE OF CD

• 6 •
TERMS FOR DISCS (Continued)
The menu pictures, motion and motionless pictures of a Super-VCD, VCD or CD with
PBC function can be divided into some parts, these parts are scenes. Each scene has a
number for search.
SCENE
PBC (PLAYBACK CONTROL) (SUPER-VCD, VCD)
This product incorporates copyright protection technology that is protected by
method claims of certain U.S. patents and other intellectual property rights owned
by Macrovision Corporation and other rights owners. Use of this copyright
protection technology must be authorized by Macrovision Corporation, and is
intended for home and other limited viewing uses only unless otherwise
authorized by Macrovision Corporation. Reverse engineering or disassembly is
prohibited.
It is signals recorded in a super- VCD or VCD2.0 to control playback.
DISC TYPE
VCD1.1
without PBC
FUNCTION
enjoy music and images (motion pictures)
super-VCD and VCD with
PBC
Besides the images of VCD1.1, play interactive
software with the menu pictures shown on the TV
screen (PBC play). If the disc has motionless
pictures, high-resolution playback is also available.

• 7 •
BEFORE OPERATION
• Before operation, check if the voltage of the unit is in line with the local voltage.
• Hold the plug to disconnect it from the mains outlet. Do not pull the power cord.
• When the plug of the unit is connected to the mains outlet , the unit will be still
connected to AC even if the power is turned off.
• Disconnect the plug as soon as liquid or objects enter the unit. The unit can not be used
until being checked by experts.
• Do not open the cabinet as laser rays employed by the unit may damage eyes. Any
servicing should be done by qualified service personnel.
• Put the unit where ventilation is good enough to prevent overheating.
• Never put the unit in direct sunlight or near heat sources.
• Put the unit horizontally, never put any heavy object on the unit.
• To protect the pickup, do not put the unit where there is dust. If there is dust on the
pickup, use a cleaning disc to clean it. Paying particular attention to the operating
instructions of the cleaning disc.
Moisture will appear on the pickup lens in the following cases:
• The unit is suddenly moved from a cold place to a warm place.
• The unit is put in a room with a heater, or in cold air from an air-conditioner.
• Using the unit in a humid place. In these cases, the unit can not work. Unload the disc
and leave the unit on for about one hour to evaporate the moisture.
• Use a soft cloth with a little neutral detergent to wipe the cabinet, panel and controls.
Never use abrasive paper, polishing powder, solvent like alcohol or gasoline.
SECURITY
PRECAUTIONS FOR DISC
HANDLING DISC CLEANING DISC
PLACEMENT
CONDENSATION
CLEANING
• To keep the disc clean, do not touch the
playsides of the disc.
• Do not attach paper or tape to the disc.
• Keep the disc away from direct
sunlight or heat sources.
• Store the disc in a disc case after
playback.
• Before playback,
wipe the disc
outwards from
the centre with
clean cloth.
• Do not use any type of solvent such as
thinner, benzine, commercially
available cleaners or antistatic spray.

• 8 •
PREPARATIONS BEFORE OPERATION
This part introduces the work to be done before operating the unit.
Check if you have all the accessories after the carton is opened.
CHECK ACCESSORIES
USE REMOTE CONTROL
Notes:
1. Batteries can generally last for about 6 months. Change the batteries if the
remote control does not work, or the operating range reduces.
2. If the remote control is not used for a long time, remove the batteries to prevent
battery leakage.
3. When appears on the TV screen by pressing the button. The disc does not
have the pertinent button.
1. Open the battery
compartment. 2. Insert two AAA
batteries, make
sure to
match"+"and "-
"of the batteries
to the marks in
the battery
compartment.
3. Close the battery
compartment. 4. Point the remote
control at the
remote sensor.
It will operate up
to a range of 7
meters and an
angle of 30°
either side of the
remote sensor on
the front of the
player.
OSD
SUBTITLE
ANGLE
SET UP
V-MODE
TITLE.PBC INTRO
REPEAT
P/N
RETURN A-B
MENU
STEP PROGRAM ZOOM
SLOW A-TIME MEMORY
CHANNEL
LANGUAGE
#
MUTE 3D
123
654
78
0/10
9
10+
VOLUME
PLAY
b
•
Remote control
•
AAA batteries
•
Video/Audio cord
•
Owner’s manual

• 9 •
PREPARATIONS BEFORE OPERATION (Continued)
FRONT PANEL
!STANDBY/ON button
To switch the unit On or Off when
connected to AC power outlet
@PAUSE/STEP button
Used to view one frame at a time
during play. When you continue
pressing this button, it will function
continuously. Press PLAY/SELECT
button for normal play.
#FR (Fast Reverse) button
To play the disc fast reverse.
$FF (Fast Forward) button
To play the disc fast forward.
%PREV button
To skip back from the current chapter (for
DVD) or track (for VCD or CD).
^NEXT button
To skip forward to the next chapter (for
DVD) or track (for VCD or CD. If playing a
Video CD with PBC, this button works as the
NEXT button to move to the next play list.
&RETURN
*REMOTE SENSOR
Receives a light signal from the remote controller.
(DISPLAY
Displays operation status
)MIC 1 JACK
1MIC 2 JACK
2MIC LEVEL
3ECHO ADJUSTMENT
410+ NUMBER
5NUMBER (1-0/10)
6STOP
7PLAY(SELECT) button
To play the loaded disc. Press this
button to go to the preferred item when
the menu is displayed on the TV screen.
8OPEN/CLOSE button
To open or close the disc tray.
9DISK TRAY
To load or unload a disc. Put a disc to
be played on here.
0POWER INDICATOR
“LANGUAGE
‘SETUP
+TITLE /PBC
=CHANNEL
II/STEP
CHANNEL RETURN
SEARCH SKIP
PBC
TITLE LANG
LEVEL
MIN MAX MIN MAX
12345
67890/10 10+
SETUP
MIC1 MIC2 MIC ECHO
STANDBY/ON
OPEN/
CLOSE
PLAY STOP
DVD/VCD/SVCD/DVCD/CD/MP3/CD-R/CD-RW
!
@ #
$
% &
8
9
0
+“
‘64
( ) 1 2 3
*
5
=
7
^

• 10 •
PREPARATIONS BEFORE OPERATION (Continued)
DISPLAY
PBC
DVD
SVCD
DTS (1) (2) (3) MUTEAC-3 RESUME
REPEAT 1 ALL
A-B
OVER
D
!PLAY/PAUSE/STEP
Illuminates the current operation mode.
@PBC
Indicates the PBC PLAY under play
SVCD or VCD2.0.
#DVD/SVCD
Illuminates the type of a disc loaded on
disc tray.
$DTS
Indicates the audio type of the disc
under play is DTS.
%AC-3
Indicates the audio type of the disc
under play is DOLBY DIGITAL.
^AUDIO INDICATION
Illuminates the information of the AUDIO.
&MUTE
Illuminates when MUTE mode.
*REPEAT 1, ALL, A-B
Illuminates when the current play mode
is under repeat title, chapter, track
(single), disc (all), A-B respectively.
(RESUME
Illuminates when RESUME mode.
)TRACK CALENDAR
Illuminates the information of the
TRACK.
1OVER
Illuminates the over than 16 track under
play CD or VCD.
2ROTATION
Rotates when the disc is spinning
3TITLE/CHAPTER/TRACK
Illuminates the information of the
TITLE, CHAPTER or TRACK of the
DVD and CD disc under play.
4VOLUME LEVEL
Indicates the volume level of analog
audio output.
! @ # %
$
* )
& (^
1
2
3
4

• 11 •
PREPARATIONS BEFORE OPERATION (Continued)
!STANDBY/ON
@OSD
#SUBTITLE
$ANGLE
%SETUP
^V-MODE
&TITLE.PBC
*LEFT DIRECTION
(SYSTEM(AUTO/NTSC/PAL)
CONVERT
)DOWN DIRECTION
1RETURN
2MENU
3STEP PLAYING
4PROGRAM PLAYING
5SLOW PLAYING
6TIME-SEARCH PLAYING
7CHANNEL CONVERT
8LOWER TONE
9LANGUAGE SWITCH
0FAST BACKWARD /
FAST FORWARD SEARCH
“
ONE CHAPTER/TRACK
PREV/NEXT
‘PAUSE
+STOP
=ATONIC TONE
QRAISE TONE
q
MEMORY (RESUME) PLAYING
WVOLUME (-/+)
wZOOM PLAYING
EA-B
eREPEAT PLAYING
RPLAY (ENTER)
rRIGHT DIRECTION
TINTRO
tUP DIRECTION
YNUMBER (1~ 10+)
yOPEN/CLOSE
U3D PLAYING
uMUTE
NAMES AND LAYOUT OF REMOTE CONTROLS
OSD
SUBTITLE
ANGLE
TITLE.PBC INTRO
REPEAT
P/N
RETURN A-B
MENU
STEP PROGRAM ZOOM
SLOW A-TIME MEMORY
CHANNEL
LANGUAGE
#
123
654
78
0/10
9
10+
VOLUME
PLAY
b
!
@
#
$
%
3
5
7
9
0“
+
W
Q
w
E
e
r
T
Y
y
Uu
R
t
‘
=
q
4
()
2
&
1
*
^
6
8
MUTE 3D
SET UP
V-MODE

• 12 •
PREPARATIONS BEFORE OPERATION (Continued)
!DIGITAL AUDIO COAXIAL/OPTICAL OUT
Connects digital audio under play mode into an AV amplifier or a receiver equipped with
digital audio decoder for you to enjoy the theatre-quality sound in your home.
@VIDEO OUT
Connects composite video signal to input AV or PHONO sockets of TV or monitor to
achieve high fidelity colour reproduction.
#5.1 CHANNEL ANALOGUE OUT
In Dolby Digital and dts, total 6 channels are used. 3 channels for front, 2 channels for
surround and 1 channel for subwoofer. They are front left, front right, center, subwoofer,
rear left and rear right. L stands for front left, R for front right, C for center, LFE for
subwoofer, LS for rear left surround and RS for rear right surround.
$S-VIDEO OUTPUT
Connects to TV or monitor equipped with S-VIDEO input. In order to achieve a sharper and
cleaner picture than that when connected via VIDEO OUT (composite video).
%COMPONENT(Y/Cb/Cr)
Connects to TV or monitor equipped with Component input . In order to achieve a sharper
and cleaner picture than that when connected via VIDEO OUT (composite video).
^EURO AV JACK
If VIDEO OUT phono is not utilized, the SCART socket can be used to connect to a TV set,
monitor or VCR.
&POWER SUPPLY SOCKET WIRE
Creates POWER between wall outlet and the unit.
*POWER SWITCH
Turn on or off the main power.
- ON : Press “ ”. - OFF : Press “ ”.
#
$
%^
!@
&
*
REAR PANEL
Notes:
•
Remove the dust protection cap from the optical digital audio output connector and connect the
cable firmly so that the configurations of both the cable and connector match.
•
Do not connect to the digital audio input of an amplifier that does not have Dolby Digital and dts
decoder when you set the digital out option of setup information to SPDIF/RAW.

• 13 •
CONNECTIONS
1. If the TV has S -VIDEO input, please connect the unit and the TV with S-video cord
(not supplied). You do not have to utilize S-VIDEO but it will give clearer images.
2. Set the unit. You have to set the unit according to the TV connected.
•
If the system of the TV is AUTO (multi-system), press P/N and select AUTO.
•
If the system of the TV is NTSC, press P/N and select NTSC.
•
If the system of the TV is PAL, press P/N and select PAL.
•
Connect the unit to a wide-screen TV.
Set the "TV DISPLAY" to "WIDE " in the function setting column.
•
Connect the unit to an ordinary TV.
Set the "TV DISPLAY" to "NORMAL/ PS" (Pan scan) or "NORMAL/ LB" (Letter box) in the
function setting column.
Turn off all equipment before operation.
The unit has many kinds of output modes like A/V output, S-VIDEO output and
digital signal output (OPTICAL, COAXIAL). You may select as you need.
VIDEO AUDIO INL R
CONNECTED TO A TV

• 14 •
CONNECTIONS (Continued)
•
If the TV has component input, please connect the unit and the TV with component
cord (not supplied). You do not have to utilize component but it will give clearer images.
CONNECTED TO A TV WITH COMPONENT
Notes:
• In case of connecting the component, press the V-MODE on the remote control to
select YUV.
•
When you connect the Composite or S-VIDEO and picture is not displayed, press the
V-MODE on the remote control to check if DVD player position in the video mode.

• 15 •
CONNECTIONS (Continued)
CONNECT TO AN ORDINARY AMPLIFIER
• Optical or coaxial can be selected at your option while connecting
• If you have a DTS decoder of processor, you can enjoy DVD disc or CD sound
decoded by 5.1 channel DTS. ie : 5 surround speakers + 1 woofer
• Refer to page 36 for the setting.
Manufactured under license from Dolby Laboratories. "Dolby", "Pro Logic" and
the double-D symbol are trademarks of Dolby Laboratories. Confidential
Unpublished works.
©1992-1997 Dolby Laboratories, Inc. All rights reserved.
"DTS" and "DTS Digital Out" are trademarks of Digital Theater Systems, Inc.

• 16 •
BASIC OPERATIONS
TV/AUDIO SELECTION
Press on the TV and audio
system.
1. Press "TV/VIDEO" on the TV, select
VIDEO mode (TV).
• Select S-VIDEO mode if using an ‘S’
Video connection.
2. Select the right audio input on the
amplifier.
• Each amplifier is different from
another, please refer to the manual of
the amplifier.
(e.g., connect the audio output of the
DVD player to the DVD audio input of
an amplifier.)
DVD/LD
TV/VIDEO
PLAY DISCS
Notes: This step can be cancelled if
you do not connect it to the amplifier.
1. Press to turn on the unit.
2. Press to open the disc tray and load
a disc with the label side.
3. Press again to close the disc tray.
The unit begins to read the disc.
4. Press to play the disc.
AFTER STEP4 IS FINISHED:
• PLAY DVD
The TV screen shows the DVD
menu and title menu.
• PLAY SUPER-VCD, VCD2.0
The TV screen shows the menu, the
unit enters PBC status.
• PLAY CD, VCD1. 1 , MP3
Press , the unit plays the disc
according to the track numbers.
5. Stop playback.
Press .
• You have to press this
button twice to stop
the playback of a
DVD.
6.
Unload the disc and
turn off the unit. Press and again.
OPEN/
CLOSE
OPEN/
CLOSE
or
- REMOTE CONTROL -- FRONT PANEL -
STOP
STOP
PLAY
PLAY
STANDBY/ON
Notes: If the power is not turned on,
check whether the power switch on
the rear of DVD is turned on.
STANDBY/ON
or

• 17 •
Press STEP .
•
WHEN PLAYING DVD PICTURES, VCD
Press STEP to make the playback
step. Pressing STEP again moves the
picture forward frame by frame.
•
WHEN PLAYING MUSIC CD, MP3
Press to make the playback pause.
Press to resume playback.
Press OSD , when the unit is operated,
the TV screen shows the operation
functions and information about the
disc.
• Remove the OSD, press OSD 4 times.
BASIC OPERATIONS (Continued)
According to the system of the TV to be
connected ,set the system of the unit to
make it match the TV.
1. If the system of the TV is NTSC
: Press P/N , select NTSC.
The screen shows:
2. If the system of the TV is PAL
:Press P/N , select PAL.
The screen shows:
3. If the TV is multi-system
: Press P/N , select AUTO.
The screen shows:
TITLE.PBC INTRO
REPEAT
P/N
RETURN A-B
MENU
STEP ZOOM
PLAY
STEP PROGRAM ZOOM
SLOW A-TIME MEMORY
CHANNEL
LANGUAGE
#
VOLUME
b
NTSC
PAL
AUTO
STEP
SYSTEM SETTING STEP, PAUSE
OSD
OSD
SUBTITLE
ANGLE
SET UP
MUTE 3D
123
654
78
0/10
9
10+
PLAY

• 18 •
BASIC OPERATIONS (Continued)
Some DVDs have title menus and chapter menus.
1. Press MENU or TITLE , the screen
shows the menu.
Use direction buttons to select the
desired item, then press .
2. Press TITLE once to return to the title
menu; press it again to return to
the current playback.
Press MENU once to return to the root
menu; press it again to return to the
current playback.
+
-
STEP PROGRAM ZOOM
SLOW A-TIME MEMORY
CHANNEL
LANGUAGE
#
VOLUME
b
•
Press VOLUME on the TV or
amplifier to adjust the volume.
•
Press VOLUME on the remote control.
1. Press + to raise the volume.
2. Press - to lower the volume.
VOLUME CONTROL (EXCEPT SPDIF/RAW)
DVD MENU PLAY
Notes:
•
When appears on the TV screen by
pressing TITLE . The disc does not have
the title list in the menu.
• When appears on the TV screen
by pressing MENU . The disc does not
have the menu.
MP3 PLAY
1. When an MP3 disc is loaded, MP3
menu screen is displayed automatically
depending on MP3 disc’s folder
(directory) structure as shown below.
OTHER FUNCTIONS
When playing a MP3 disc, the unit has
functions like mute, volume control, pause,
previous/next track, repeat and channel
selection. You may operate as you do with a
CD.
2. Use the direction button to select the
folder you want to play, by pressing the
PLAY button. This button allows, you
to see the file lists under the folder.
3. Use the direction button and select an
MP3 title using the PLAY button then
play will start automatically. When you
know the title number, enter the MP3
title number using the numeric buttons
on the remote control and then press
the PLAY button.
4. Press NEXT button on the remote
control to choose next title. Press
PREV button for previous title. When
you know the title number, enter MP3
title number using the numeric buttons
on the remote control and then press
the PLAY button.
PLAY
SMART NAV1
CD-1
CD-2
CD-3
CD-1 0
MP3 01-ABC 1
MP3 02-BCE 2
MP3 03-EIC 3
MP3 04-FGH 4
MP3 05-ADC 5

• 19 •
BASIC OPERATIONS (Continued)
1. If the track number is less than 10,
just press buttons 1-10.
Example: press 8 to select track 8.
The screen shows:
2. If the track number is over 10, press
10+ once and a button among 1-10.
Example: if you select track 12, press
10+ once and button 2.
The screen shows:
+
SELECT 08
00:00:21
SELECT 12
00:00:00
SELECT WITH NUMBER
BUTTONS (IN CASE OF CD)
When playing a super-VCD or VCD2.0,
you can enjoy the basic interactive
function.
Example: VCD2.0
1. Press , the screen shows the home
menu.
2. Press number buttons to select.
Example: select home menu1.
3. The screen shows the sub-menu after
the unit enters home menu1.
4. Press , to see the previous or
next page.
5. Press number buttons to select sub-
menus.
6. Press RETURN to return to the sub-
menu, press it again to return to the home
menu.
PBC PLAY
EXCHANGE DISCS
1. Press to open the disc tray.
2. Unload the disc and load another one.
3. Press again to close the disc tray.
Load a disc. Press number buttons to
select tracks after the unit finishes reading
the disc.
8
10+ 2

• 20 •
PLAY DISCS IN VARIOUS WAYS
WHEN PLAYING DVD
Press LANGUAGE , the screen shows as
below.
Press LANGUAGE again.
Different discs differ in languages.
When playing a disc, this function can
remove the sound.
1. REMOVE SOUND
Press MUTE , the screen shows
"MUTE".
2. RESUME SOUND
Press MUTE again.
AUDIO 1/2:AC-3 2CH ENGLISH
AUDIO 2/2:AC-3 5.1CH ENGLISH
SELECT LANGUAGE
WHEN PLAYING CD
You may select one mode.
MUTE
MUTE
MUTE
CHANNEL
CHANNEL
CHANNEL
MONO LEFT
MONO RIGHT
STEREO
Note:
• Different discs differ in languages.
• CHANNEL works when playing a
super-VCD, you may select mono
channel (left or right) or stereo.
• As to a two-language fiction VCD,
you may press LANGUAGE to select
a needed language.
MUTE OFF
SELECT CHANNEL
Table of contents
Other Daewoo DVD Player manuals

Daewoo
Daewoo DQD-6100D User manual

Daewoo
Daewoo DVN-8100N User manual

Daewoo
Daewoo DS-2000N User manual

Daewoo
Daewoo SD-8100P User manual

Daewoo
Daewoo DQD-6100D User manual

Daewoo
Daewoo DVG-4000S User manual

Daewoo
Daewoo DVD5000N User manual

Daewoo
Daewoo SH-3510P User manual

Daewoo
Daewoo DVG-4000S User manual

Daewoo
Daewoo DV6T811N User manual

Daewoo
Daewoo DSW-802N User manual

Daewoo
Daewoo DV-500 User manual

Daewoo
Daewoo DVG-3000N User manual

Daewoo
Daewoo DVDP485 User manual

Daewoo
Daewoo DV-3500H User manual

Daewoo
Daewoo DQD-6100D User manual

Daewoo
Daewoo DG-M12D1P-SA User manual

Daewoo
Daewoo DCSB-87N User manual

Daewoo
Daewoo DSW-800H User manual

Daewoo
Daewoo DV-6T834B User manual