Daewoo DPP-4270NHS User manual

PLASMA DISPLAY
USER’S MANUAL
DPP-4230NHS
DPP-4270NHS
Proper use guarantees
product life.
Before using the product, be advised
that you read this owner’s manual well
and try to operate it.

This Owner’s Manual presents safety precautions and how to use the product.
After reading it thoroughly, use the product safely.
Keep this manual where the user can see it easily.
Failure to comply with warnings and cautions for the safe use of electric
appliances may cause fire or human injury.
• 42” VGA wide Plasma Panel
• Built in Analog Tuner
PDP has the analog tuner inside for watching terrestrial broadcasting without the need to purchase a
separate broadcasting receiver.
• DVD Direct Connection / Outstanding Picture Quality via a Digital
Broadcast Receiver
A DVD can be directly connected to the unit so that you can view clear digital images. You can enjoy even
higher quality images by connecting a digital broadcasting receiver with which digital broadcasts can be
viewed.
•A
PC Direct Connection
PC can be connected to the PDP without a separate device and can be used as a monitor making it ideal
for presentation, various events and exhibitions.
•
160oWide-Angle Viewing Area
•
Flat Panel with No Distortion and Colour Blurring
Since Plasma TV has no problems such as distortion, blurring, flickering unlike existing CRT type displays
you can enjoy Home Cinema picture quality and sound.
•
Various Video Control
- 17 Languages OSD - 20 Step screen zooming function - Full-screen still function
- Various aspect ratio (16:9, 4:3, Auto, Enlarge LB, Enlarge LBS, Panorama)
•
Free Volt (100-240V~, 50/60Hz)
•
DVI (Digital Visual Interface) Connection
When connected to a PC, you can receive DVI digital signals as well as the former analog signals by
using DVI input and D-Sub input. Furthermore, using the DVI Input, you can receive directly a digital
signal from the computer. Consequently, pictures on the screen are much more clear and fresh.
•
CCF(Capsulated Colour Filter) Technology for natural colour
CCF Technology makes the picture clearer by controlling of the brightness among three different colour
filters.
•
MGDI (Meta Genuine Digital Image) Engine
MGDI is the image enhancement technology of Daewoo Electronics, which provides more clear, splendid,
and delicated images.
Features
Features

Always obey all
safety messages.
• All the safety and
operating
instructions should
be read before the
product is operated.
If anything strange
happens, unplug
this product from
the wall outlet.
• Do not disassemble
or replace any parts
of the TV.
Refer to a qualified
service personnel
for repair.
Safety Precautions
4
WARNING
You can be Killed
or seriously
injured if you do
not follow these
instructions.
During a lightning storm, or when it is left
unattended and unused for a long period
of time, unplug it from the wall outlet.
It can result in fire.
When unplugging your TV, always grip
plug firmly and pull straight out from the
socket.
It can result in fire or electric shock due to
damaged power cord.
This product must be properly grounded.
• Improper grounding may cause malfunction or
electric shock.
• When proper grounding is not possible, install
circuit breaker.
• Do not ground to gas pipe, water pipe, lightning
rod, or telephone line.
During a lightning storm, unplug the TV
from the wall outlet, and do not touch the
antenna.
It can cause fire or electric shock.
Power
Installation
Do not use this product in the
neighborhood of a bath or shower.
It can result in electric shock or fire.
Do not place this TV on an unstable cart,
stand, or table
It may cause the product and cart to overturn,
damaging equipment or causing possible injury.

5
During Use
Do not open the cover (or back)
because high voltage is present
within the TV enclosure.
It may cause electric shock.
Never push any kind of objects into
this product through openings at the
back of TV.
It may cause fire or electric shock.
The apparatus shall not be exposed to
dripping or splashing and that no objects
filled with liquids, such as vases, shall be
placed on the apparatus.
Spilled liquids may cause electric shock or
fire.
Do not allow children to play or hang
on the TV.
These actions may tip it over, causing
personal injury.
Do not place a candle or lighted
cigarette on the TV.
If these fall into the inside of the tv, it may
cause a fire or explosion.
Do not disassemble batteries, and
do not leave around in case children
swallow them.
Heavy metal may contaminate environment,
and can be harmful or detrimental to human
health. (If children swallow the batteries, go to
hospital and consult with a doctor.)
Batteries could explode if Fitted incorrectly.
Align the batteries according to the (+) and (-)
indication inside the case.
Do not spray water Onto the TV or
wipe with damp cloth.
It may cause an electric shock or fire.
Unplug the TV from the wall outlet
when smoke or a strange smell
occurs, then refer to a service
personnel.
Leaving the TV on in this condition, may
cause fire or electric shock.

Always obey all
safety messages.
• All the safety and
operating instructions
should be read before
the product is
operated.
Safety Precautions
6
Power
Installation
CAUTION
You can be injured,
or this product or
any other of your
property can be
damaged if you
don’t follow
instructions.
When moving your TV, remove the power
plug, antenna, and cables, and be sure to
move it by using two people..
Failure to follow this instruction can result in
electric shock or personal injury.
Do not touch the power plug with wet
hands when plugging or unplugging it
into the wall socket.
It can result in a risk of electric shock.
Do not install the product where it will be exposed to
the direct sunlight, and the product should not be
near heat sources such as radiators, stoves, etc.
It may cause malfunction.
Do not install the product where there is
oil, smog, moist, or dust
It may cause malfunction.
For proper ventilation, separate the product
from the wall, and keep a distance of more
than 10cm (4).
Due to the increase of temperature inside the TV,
it may cause fire.
Minimum distances around the apparatus
for sufficient ventilation.
Due to the increase of temperature inside the TV,
it may cause fire.
If you wish to install this product on the
wall or ceiling, refer to a professional.
Failure to do so may cause damage to product
and injury to human.
When using an outside antenna system, do not
install it in the vicinity of overhead power lines.
If the antenna touches such power lines, it may
cause electric shock.

77
During Use
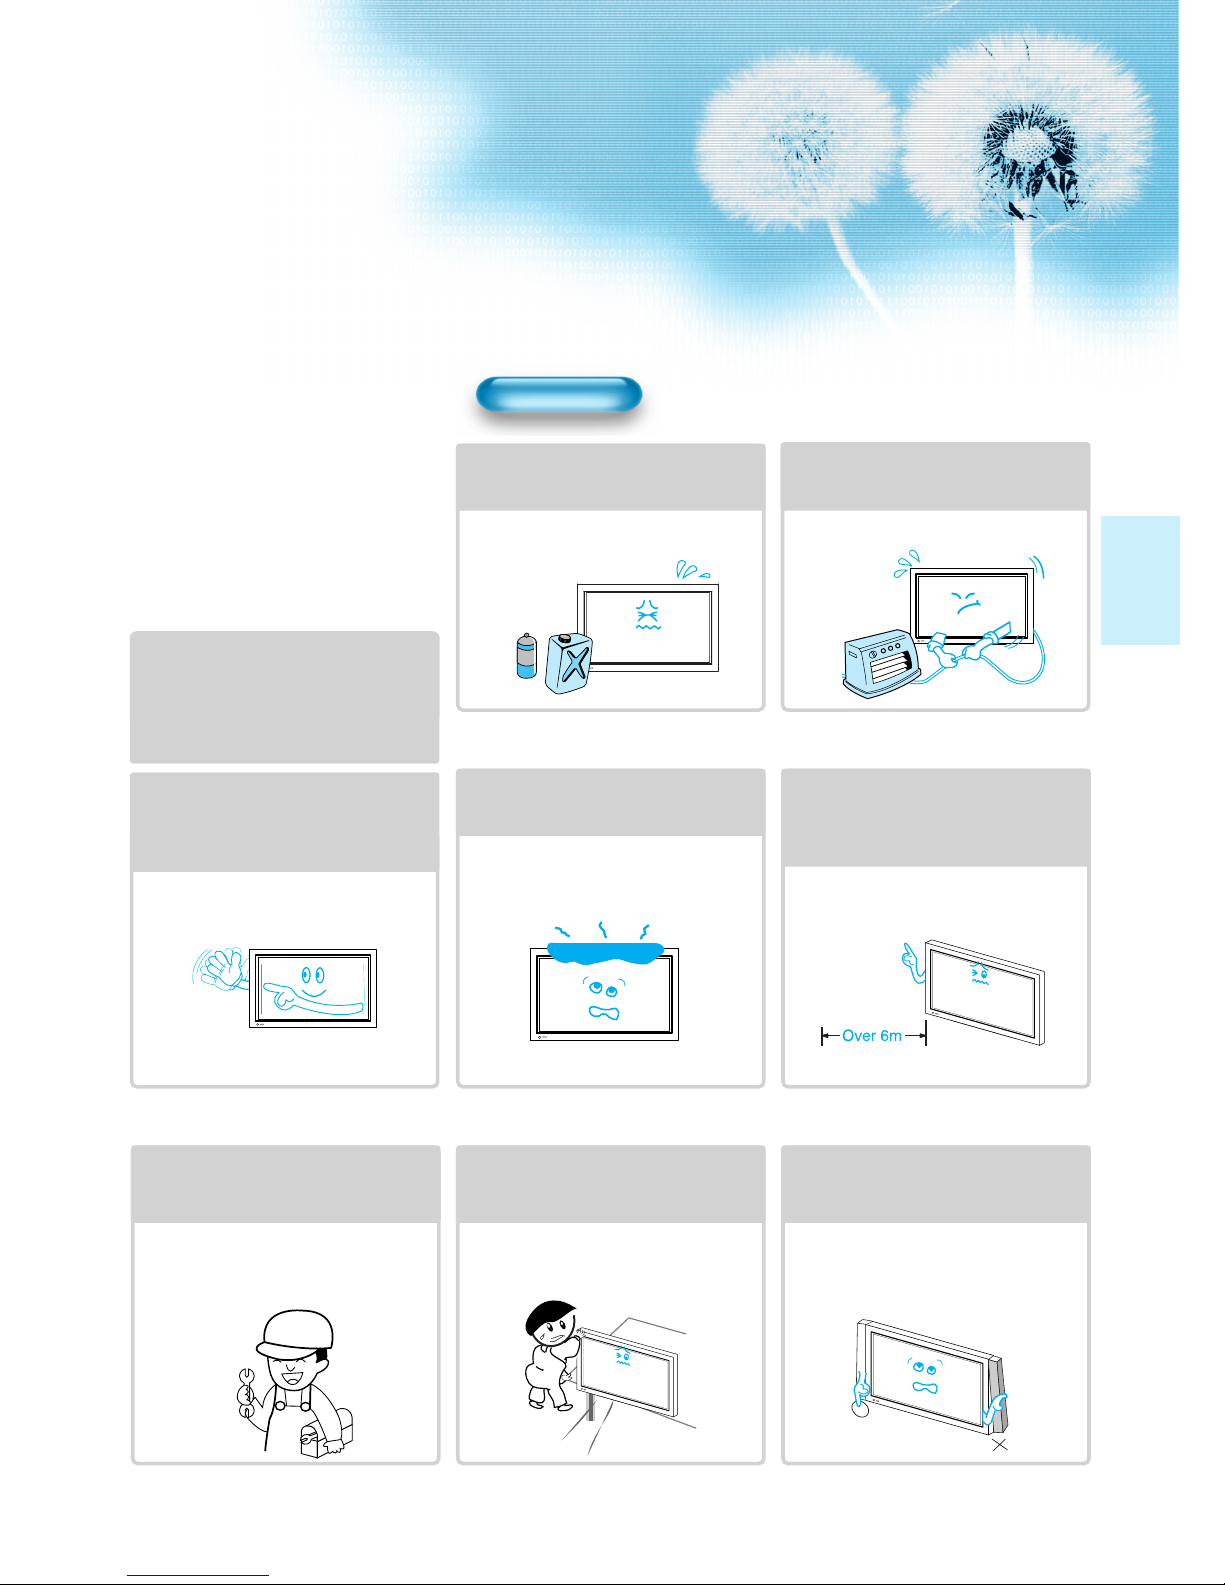
Do not wipe the TV using a cloth
damped with chemicals (benzene,
thinners, etc.).
The TV appearance may be marred.
(Unplug the power plug and wipe with soft
cloth.)
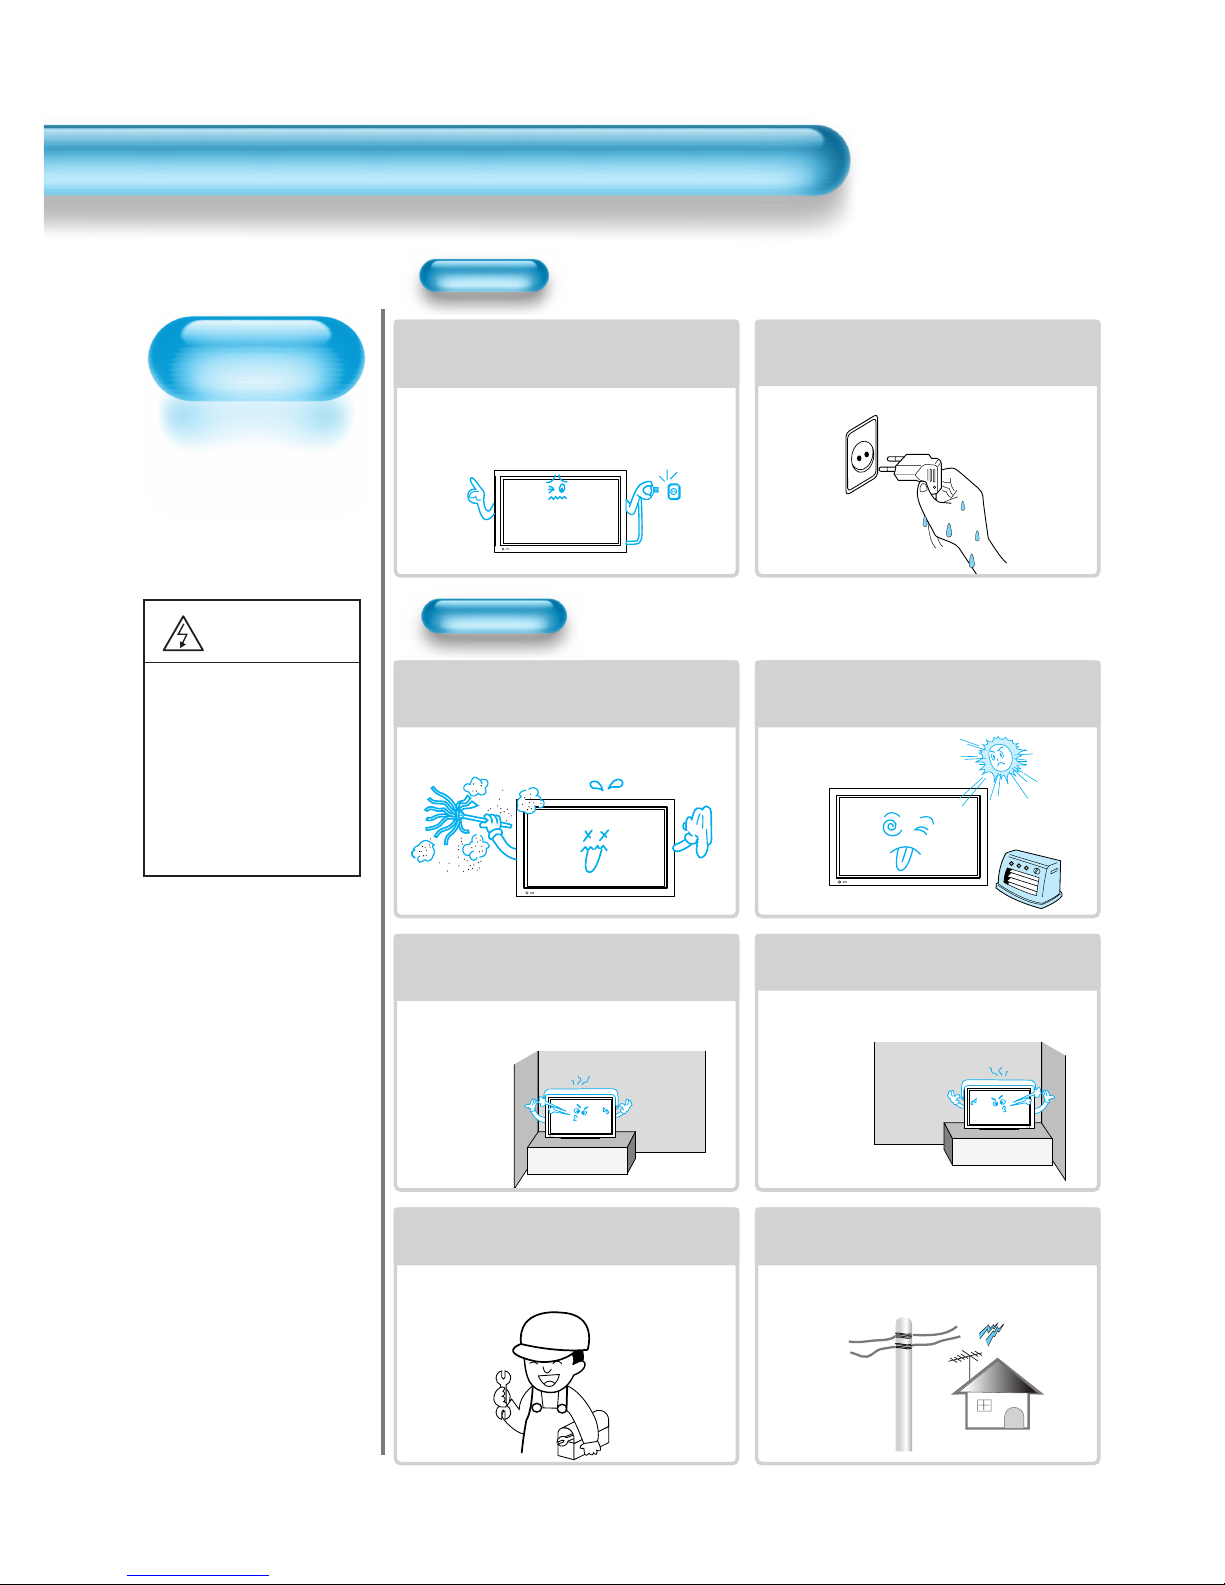
Do not place any object or cover on
the TV.
In an event of improper ventilation, the TV
will be overheated causing fire.
Do not place heavy objects or heat
sources on the power cord.
It may damage the power cord, causing fire
or electric shock.
When watching the TV, the distance
between the TV screen and your eye
should be as 5~7 times as the
diagonal distance of the TV.
Watching the TV for a long time may hurt
your eye sight.
When cleaning of the inside of the
TV is required, consult A qualified
service personnel.
When the TV is not cleaned for a long
period of time, dust in it may cause fire or
malfunction.
When the TV is placed on a cart or
table, the front side of the TV should
not project outward.
Unbalance may cause the TV to drop,
resulting in personal injury or equipment
malfunction and damage.
Do not grip speakers when moving
the TV attached with speakers.
When moving the TV while gripping
speakers, the speakers may fall from the TV
due to its weight, causing personal injury.
Do not allow a still picture to be
displayed for an extended period, as
this can cause a permanent ghost
image to remain on the Plasma
Display.
Examples of still pictures include logos,
video games, computer images, teletext
and images displayed in 4:3 mode.
The warranty does not cover any damage
caused by image retention.
The plasma display panel consists
of fine cells. Although the panels are
produced with more than 99.9
percent active cells, there may be
some cells that do not produce light
or remain lit.

8
Remote Control
1 UNIT
Note
Check to be sure that the following items are
packed with your Plasma panel.
Checking Accessories
Supplied Accessories
Note
The following items are optional accessories.
Refer purchasing optional accessories from
Daewoo Electronics Local retailer or the retailer
from where you purchased the unit.
Optional Accessories
AC Cable 1 UNIT
Ferrite Core
3UNITS
Scart(1 unit) Speaker(2 units)
Place the small ferrite
cores in the speaker
cables close to the
speaker terminals of
the PDP unit.
Speakers
Table Top Stand
Wall Mounting
Unit

9
4 • Safety Precautions
8 • Checking Accessories
11 • Panel Controls
12 • Remote control
PREPARATION
CONNECTION
13 • Antenna Connection
16 • To Watch TV
18 • Install Program
24 • Watching Digital Broadcasts
26 • Watching Cable Broadcasts
28 • Watching Satellite Broadcasts
30 • Watching a DVD Image
32 • Watching a VCR Image
34 • Watching a Camcorder/Game Console Image
36 • Connecting PC(15Pin D-Sub)
38 • Connecting PC(DVI)
APPLICATION
MISC.
70 • Before Requesting Service
71 • SPECIFICATIONS
CONTENTS
41 • Selecting Picture Mode 57 •
MENU Background, Language
42 • Customising Picture
and Child Lock Setting
44 •
Adjusting Screen Size
59 •
MGDI (Meta Genuine
(Component, AV, TV)
Digital Image)
46 •
Adjusting Screen Size(PC, DVI)
61 • Time Setting
48 • Enlarging Screen Size 63 • Image Sticking
50 • Watching a Still Image Minimisation(ISM)
51 • Adjusting Auto Sound Mode 65 • Initialise Setting
52 • Customising Sound Mode 67 • Setting Sleep Timer
54 • Selecting INPUT SIGNAL 68 • Teletext
56 •
Checking the Current Input Signal

0

Panel Controls
Front Panel, Back Panel, Remote Control
*
Items having same names on Plasma display and the remote control would function in exactly
the same way.
Front
ON/OFF
Select when adjusting volume or
select/adjust “MENU.”
Press when moving “MENU” or “Program”
STAND BY/OPERATE
DVI-D INPUT ANT
AV1 AV 2 AV3
L
R
AUDIO
S-VIDEO VIDEO
Used when
manufacturing(or
manufacturer
use only)
PC INPUT(15 pin
D-sub)
DVI-D
INPUT
COMPONENT A/V jacks
(DTV/DVD INPUT jacks)
SCART, A/V
INPUT/OUTPUT,
Cable Receiver
INPUT/OUTPUT
jacks
External
Speaker
Power
ANT S-VIDEO,
A/V INPUT,
Cable
Receiver
INPUT
jacks
Right Speaker Left Speaker
Position of
Ferrite Core
MOVE/PR
Select when adjusting volume
or select/adjust “MENU.”
Press when moving “MENU”or
“Program”
Rear
Power control sensor
Power Standby: Red - Standby
Green - ON
Power button
STAND BY/OPERATE
Power control sensor
Power Standby: Red - Standby
Green - ON
Power button
ON/OFF

2
Remote Control
When Using Remote Control:
•
Be sure not to allow the Remote Control to drop or to become wet.
•Keep it away from hot or moist locations.
Installing the Batteries in your Remote Control:
•
Push to open the cover of the remote controller
•
Put the batteries in the battery cell after checking the
Polarities, and then shut the cover.
TV/VCR/DVD/SAT/CATV
Use to select channel directly 0~9
Indicates the current state and resolution.
Use this function to make video input selection.
It changes in the following sequence
TV -> AV1 -> AV2 -> AV3
Used to zoom the screen. To enlarge, press the(+)
button, and to return to the previous condition, press
the(-) button.(Zoom Mode : Zoom 0~20)
Used to display a desired menu.
Pressing the Power button of the TV allows
the Display to be be in standby. (A red light is
shown in the Remote Control Sensor.) At this
time, if you press the Power button of the
Remote Control, the Display is turned ON
(And shows a green light in the Sensor).
Used to view a still picture whilst watching
moving images.(Sound can be heard.)
Use this function to make video input selections.
It changes in the following sequence PC -> DVI -
> Component 1-> Component 2 -> PC
Adjusts the size of the screen
(Normal, 16:9, etc.)
Each time you press this button, a different input mode
appears. The sequence is as follows: 15Min. -> 30Min. -
> 60Min. -> 90Min. -> 120Min. -> OFF
After the time is selected, the TV automatically goes into
a stand-by state.
RECALL
ZOOM button
Menu button Volume button /Adjusts the volume.
Screen Size button
Sleep Timer
Power button
Still
Channel number (0~9)
Multimedia
PR button
/Adjusts the channel.
Note
•Use two “AAA”batteries.
•Be sure to use replacement batteries of the
same type as the original ones.
•The life of a battery depends on how much
it has been used.
*The number in
()
indicates the page in which
the function of each button is explained in detail.
It returns to previous channel.
Previous Program button
Mute sound.
Mute button
Whenever pressing the button, it cycles
following order.
Normal -> User -> Cinema -> Dynamic
Picture Mode button
VIDEO/DVD Function
l - ll
- Selects the language during dual language
broadcast.
- Selects mono sound during stereo broadcast.
Whenever pressing the button, it cycles
following order.
modes: Normal -> Movie -> Music -> News -> User
Sound Mode button
Teletext Function
17
50
54
44
67
68
51
41
18
48
54
56
19

3
Antenna Connection
1. Connect the back of the TV set.
WHEN THE IMAGE IS NOT CLEAR
Unclear screen image and bad
reception may be caused by wrong
antenna connection. Be sure to check
its direction or installing place.
Antenna Input
Indoor Antenna Connection

CTV Antenna Connection
4
TV Antenna installation may be found in most.
When a coaxial cable is used
Plug the coaxial cable to the antenna socket, and fix it firmly.
It is recommended to use the provided coaxial cable.
When a feeder cable is used
ANT/CABLE 1
ANT/CABLE 1
Provided coaxial cable

5
Outdoor Antenna connection-such as VHF or/and UHF-may be necessary for installation at private
houses
Single Antenna Connection.
Separate Antenna Connection.
VHF Antenna
UHF Antenna
ANT/CABLE 1
ANT/CABLE 1
Outdoor Antenna Connection
VHF-Antenna
UHF-Antenna
In case of coaxial cable
In case of feeder cable
Antenna combining
Adapter
(Separate purchase)

To Watch TV
6
- The buttons on the keypad in the PDP unit, which have the same name as those on the remote controller,
perform the same function as the remote controller.
Press the “ON/OFF”button of the
PDP unit.
•The “PR ”or power button of the remote
control and the keypad on the PDP unit
would be operated only when the "AC Power"
of the PDP unit is supplied. Otherwise,
neither the remote controller nor keypad of
the PDP unit can turn on the PDP.
To mute the sound
1. Press the “”button.
2. No sound is heard if “MUTE”is displayed
on the screen.
3. Sound is heard again if pressing the “”
button once again.
For example, you can use this button when
telephone rings or when guest comes while
watching TV.
Check of TV operation status
•If pressing the “Recall”button, the status of
the Program or broadcasting being currently
watched or entry status of video component
is displayed on the screen.
To Watch TV
When pressing the Program button
•Select two digits if using the number button
for Program selection.
For example, to watch Program No.9, press
the number buttons 0 and 9.
If pressing only number 9, it takes more time
than pressing two digits for selecting a
channel.
Auto Power Off
•If TV broadcast for the day is finished, the
TV will automatically turn off after about 30
minutes. However, if the Off-time or Sleep
time is operating, it takes precedence. This
Auto Power Off feature only operates in the
TV mode.

7
Press the “ON/OFF”button.
•Press the “ON/OFF”button of the
PDP unit.
•The LED of the PDP unit turns on
red colour.
•Press the “PR ”, power button of
the remote control, or any button on
the keypad of the PDP unit.
•The LED of the PDP unit turns on
“green”colour and the TV
•To watch analog TV broadcasts,
select the correct input, i.e. 'PR' in
the on screen display box..
Select Program.
•Select the desired program by
pressing the “PR ”button or
the number button.
Ex) Program 09
Adjust volume.
•Sound reduces if pressing the
“VOL”button.
•Sound increases if pressing the
“VOL ”button.
3
1
2
MONO PM 12 : 00
PR 09 _____
10Volume
Press the “Power”button to turn the TV off.
•TV turns off and the LED of
the PDP unit changes to red
colour.
4
ON/OFF

Install Program
8
- This is the function for the TV to memorise the broadcasting channels. If the Auto Setup is done, you can simply
find out programs with “PR ”buttons and so need not to select programs by pressing each program number.
- Up to 100 TV stations can be stored in this set by programme numbers (0 to 99). Once you have preset the
stations, you will be able to use the “PR ”button or Number buttons to scan the stations you programmed.
Stations can be tuned using Auto Setup or Manual Setup.
Auto Setup
Press the “Menu”button.
•The menu screen appears as
follows.
•Press the “PR ”button and
select “Install”.
1
Move Select MENU Exit
Mode
Brightness
Contrast
Colour
Sharpness
Colour Temp.
Normal
Normal
32
48
32
32
Picture
Screen
Sound
Features
Install

9
Press the
“VOL ”
button.
Move Select MENU Exit
Auto Setup
Edit
Manual Setup
Picture
Screen
Sound
Features
Install
2
Select the “Auto Setup”.
•Select the “Auto Setup”with the
“PR ”button.
•Then press the “VOL ”
button.
Select the “Search”.
3
4
Move Select MENU Exit
Picture
Screen
Sound
Features
Install
Auto Setup
Edit
Manual Setup
Move Select MENU Exit
Picture
Screen
Sound
Features
Install
Auto Setup
Search

Auto Setup
20
Press the “
VOL
”key to start searching.
•Then it automatically searches
channels as in the right.
•While searching, if you press the
"Menu" button, the automatic
channel search is stopped. But,
channels searched by that time
are saved.
5
Auto Searching...
15%
Please wait ...
MENU Exit
Auto Search is completed.
•Edit menu appears as in the
right if the search is completed.
•Refer to the Edit following
pages.
•The order of stored program
may differ among countries.
6
Adjust
Move
MENU
Exit
Edit
PR Name Skip
PR98 _ _ _ _ _ o
PR99 _ _ _ _ _ o
PR0 _ _ _ _ _ o
PR1 _ _ _ _ _ o
PR2 _ _ _ _ _ o
PR3 _ _ _ _ _ o
PR4 _ _ _ _ _ o
Delete Skip

2
Deleting the program.
•Place the selection bar in the program that you want to delete using the
“PR ”buttons.
•Press the Delete(Yellow) button.
•The deleted program goes to PR number 99 for recover.
Moving the program positions
•Place the selection bar in the program that you
want to move.
•Press the Move(Green) button.
•It becomes ready for moving as the colour of
selection changes to green.
•Move the program that you desire to move.
•Press the Move(Green) button again to finish.
Skipping the channels
•Press the Red button to skip the selected program. In
order to skip other programs, use the “PR ”
buttons to move to the unwanted channels.
•The program marked with circle ( O ) means it is
skipped.
3
1
2
Adjust
Move
MENU
Exit
Edit
PR Name Skip
PR98 _ _ _ _ _ o
PR99 _ _ _ _ _ o
PR0 _ _ _ _ _ o
PR1 _ _ _ _ _ o
PR2 _ _ _ _ _ o
PR3 _ _ _ _ _ o
PR4 _ _ _ _ _ o
Delete Skip
Edit
This manual suits for next models
1
Table of contents
Other Daewoo Monitor manuals

Daewoo
Daewoo 712B User manual

Daewoo
Daewoo DP-42GM User manual

Daewoo
Daewoo L700C User manual

Daewoo
Daewoo 720D User manual

Daewoo
Daewoo F227B User manual

Daewoo
Daewoo LuComs CML-710 User manual

Daewoo
Daewoo 712D User manual

Daewoo
Daewoo CMC-518X User manual

Daewoo
Daewoo LuComs LXL-740 User manual

Daewoo
Daewoo DP-50GM User manual

Daewoo
Daewoo L520B User manual

Daewoo
Daewoo OSDPC78001 User manual

Daewoo
Daewoo 103F User manual

Daewoo
Daewoo HL711S User manual

Daewoo
Daewoo L500B1 User manual

Daewoo
Daewoo L510B1 User manual

Daewoo
Daewoo HL900S Service manual

Daewoo
Daewoo DPP-42A2(GMBD) User manual

Daewoo
Daewoo L700C User manual

Daewoo
Daewoo Lucoms C940DF User manual