Daewoo KOC-1C2R7A User manual

vviissiioonn@
@ccrreeaattiivveeLL@
@iinnccNN
Էړ ܞĸ ࣃۉʷ
VѨݖ ێΟӂ˱ Tࠚ
ABOUT THIS MANUAL
ABOUT THIS MANUAL
ɽ ʁ ď֪ݘ ɮ
Ҹ˝ daewoo ض ش ٙش
fN@
@model kocMQcRrWa
bN@
@model kocMQcRrWa
b@
@u@
@y@
@e@
@rcostco
country
ې լ ܿĹ
memo ߭TR
ِߏ
vision ɽɽʁʁіОր
telZ WSPMPVVP@faxZ WSPMSWXX
QTNPYNRVMݖL@QL@VL@WL@XL@YL@QPL@QQL@QRL@QSL@QTL@QUL
QVL@QWL@QXL@QYL@RPL@RQL@RRL@RSL@RTL@RUL
RVL@RWL@RXL@SU@֭Ŕ RV
QTNPYNRYMݖL@QL@RL@SL@TL@UL@VHێݖ ÃIL@WHێݖ
ÃIL@YL@QPL@QQL@QRL@QSL@QTL@QUHێݖ ÃIL
QVHێݖ ÃIL@QWL@QXL@QYL@RRL@RSL@RTL@RUL
RVL@RWL@RXL@RYL@SPL@STL@TPր܄@֭Ŕ SP
QTNPYNSPMQL@XTQ@ր܄@֭Ŕ SU
QTNQPNSPMTP@ր܄@֭Ŕ SU@Hێ࢚ৣ ɮI

OWNER’S
MANUAL
MULTI-FUNCTION OVEN
KOC-1C2R7A
Before operating this oven, please read these manual completely.
For safe use to avoid possible risk of tipping the oven, do not put heavy utensils or food on the door and tip the door.

TABLE OF CONTENTS
•
FEDERAL COMMUNICATIONS COMMISSION RADIO
FREQUENCY INTERFERENCE STATEMENT
...........2
• GROUNDING INSTRUCTIONS .................................2
• INSTALLATION ..........................................................3
• IMPORTANT SAFETY INSTRUCTIONS................... 4
• GENERAL USE ..........................................................5
• COOKING UTENSILS ................................................6
• WHICH UTENSILS CAN BE USED IN THE OVEN?. 7
• CONTROL PANEL .................................................... 8
• DISPLAY WINDOW................................................... 9
• ACCESSORIES....................................................... 10
• MEAT/FISH...............................................................11
• VEGETABLES .........................................................12
• DESSERT.................................................................13
• MELT/SOFTEN ........................................................14
• COOKING MENU CHART .......................................15
• POPCORN................................................................17
• MICROWAVE COOK............................................... 18
• SPEEDY COOK........................................................19
• CONVECTION COOK (Without Preheating) ............20
• CONVECTION COOK (With Preheating) .................21
• BROIL COOK ...........................................................22
• COMBINATION COOK (Microwave + Convection) ..23
• AUTO DEFROST
(Weight Defrost with Microwave Feature) ................24
• AUTO DEFROST
(Time Defrost with Microwave Feature) ...................25
• PROOFING (with Convection Feature) ....................26
• TIMER ......................................................................27
• STEAM CLEANING (with Microwave Feature).........28
• DEODORIZATION (with Convection Feature)..........29
• MEMORY COOK (with Microwave Feature).............30
• SETTING THE MEMORY COOK .............................31
• SETTING THE CLOCK ............................................32
• DISABLE THE CLOCK .............................................33
• POWER SAVE MODE .............................................34
• REMINDER...............................................................34
• CHILD LOCK ............................................................34
• TO STOP THE OVEN WHILE THE OVEN IS
OPERATING ........................................................... 34
• ABNORMAL MESSAGES ........................................34
• ARCING....................................................................34
• GENERAL GUIDELINES..........................................35
• CARE OF YOUR MICROWAVE OVEN....................36
• KEEP THE OVEN CLEAN........................................37
• BEFORE CALLING FOR SERVICE .........................38
• QUESTIONS AND ANSWERS................................ 39
• SPECIFICATIONS....................................................40
• DISPOSAL OF USED ELECTRICAL &
ELECTRONIC EQUIPMENT....................................40
• COOKING INSTRUCTIONS.....................................41
PRECAUTIONS TO AVOID POSSIBLE EXPOSURE
TO EXCESSIVE MICROWAVE ENERGY
(a) Do not attempt to operate this oven with the door open since open-door operation can result in
harmful exposure to microwave energy. It is important not to defeat or tamper with the safety
interlocks.
(b) Do not place any object between the oven front face and the door or allow soil or cleaner residue to
accumulate on sealing surfaces.
(c) Do not operate the oven if it is damaged. It is particularly important that the oven door close
properly and that there is no damage to the: (1) door (bent), (2) hinges and latches (broken or
loosened), (3) door seals and sealing surfaces.
(d) The oven should not be adjusted or repaired by anyone except properly qualified service personnel.
(e) WARNING : It is hazardous for anyone other than a competent person to carry out any service or
repair operation that involves the removal of a cover which gives protection against exposure to
microwave energy.
(f) WARNING : Liquids and other foods must not be heated in sealed containers since they are liable to
explode.
(g) WARNING : Only allow children to use the oven without supervision when adequate instructions have
been given so that the child is able to use the oven in a safe way and understands the hazards of
improper use.
(h) WARNING : When the appliance is operated in the combination mode, children should only use the
oven under adult supervision due to the temperature generated. (if provided)

2
FEDERAL COMMUNICATIONS COMMISSION
RADIO FREQUENCY INTERFERENCE STATEMENT
GROUNDING INSTRUCTIONS
This appliance must be grounded. In the event of an electrical short circuit, the grounding plug reduces the risk of
electric shock by providing an escape wire for electric current. This appliance is equipped with a cord having a
grounding wire with a grounding plug. The plug must be plugged into an outlet that is properly installed and grounded.
WARNING:
This equipment generates and uses ISM frequency energy and if not installed and used properly, that is in
strict accordance with the manufacturer's instructions, may cause interference to radio and television
reception.
It has been type-tested and found to comply with limits for an ISM Equipment pursuant to part 18 of FCC
Rules, which are designed to provide reasonable protection against such interference in a residential
installation.
However, there is no guarantee that interference will not occur in a particular installation.
If this equipment does cause interference to radio or television reception, which can be determined by turning
the equipment off and on, the user is encouraged to try to correct the interference by one or more of the
followings.
• Reorient the receiving antenna of radio or television.
• Relocate the Microwave oven with respect to the receiver.
• Move the microwave oven away from the receiver.
• Plug the microwave oven into a different outlet so that microwave oven and receiver are on different
branch circuits.
THE MANUFACTURER is not responsible for any radio or TV interference caused by
UNAUTHORIZED MODIFICATION to this microwave oven. It is the responsibility of the user to correct such
interference.
WARNING:
Improper use of the grounding can result in a risk of electric shock.
Consult a qualified electrician or serviceman if the grounding instructions are not completely understood, or if
doubt exists as to whether the appliance is properly grounded, and either :
(1) If it is necessary to use an extension cord, use only a 3-wire extension cord that has a 3-blade grounding
plug, and a 3-slot receptacle that will accept the plug on the appliance. The marked rating of the extension
cord shall be equal to or greater than the electrical rating of the appliance.
or
(2) Do not use an extension cord, if the power supply cord is too short, have a qualified electrician or serviceman
install an outlet near the appliance.
WARNING:
Do not cut or remove the third (ground) prong from the power cord under any circumstances.

3
INSTALLATION
1. Examine the oven after unpacking.
Check for damage such as a misaligned door, broken door or dent in the cavity.
If any damage is visible, DO NOT INSTALL, and notify your dealer immediately.
2. Level, flat location.
Install the microwave oven on a level, flat surface. Install the microwave oven more than 3ft.(914 mm)above the
floor.
3. Ventilation.
Do not block air vents. If they are blocked during operation, the oven may overheat and eventually cause a failure.
For proper ventilation, allow 4 inches of space between oven top, sides, rear and adjacent surfaces.
4. Away from radio and TV sets.
Poor television reception and radio interference may result if the oven is located close to a TV, radio, antenna,
feeder, etc.
Place the oven as far from them as possible.
5. Away from heating appliances and water taps.
Keep the oven away from heat, steam or splashing liquids. These things can adversely affect oven wiring and
contacts.
6. Power supply.
• Check your local power source.
This microwave oven requires a current of approximately 14 amperes, 120Volts, 60Hz grounded outlet.
1. A short power-supply cord is provided to reduce the risks resulting from becoming entangled in or tripping over a
longer cord.
2. Longer cord sets or extension cords are available and may be used if care is exercised in their use.
3. If a long cord or extension cord is used:
• The marked electrical rating of the cord set or extension cord should be at least as great as the electrical rating
of the appliance.
• The extension cord must be a grounding type 3-wire cord.
• The longer cord should be arranged so that it will not drape over the counter top or tabletop where it can be
pulled on by children or tripped over unintentionally.
7. The minimum height of free space necessary above the top surface of the oven is about 4 inches.
When use 3-pronged plug
3-prong Receptacle
Receptacle
Box cover
3-prong plug
When use grounding adaptor, make sure
the receptacle box is fully grounded.
Receptacle Box Cover
Receptacle
Grounding
Lead
Grounding
Adaptor
“THE CANADIAN ELECTRICAL CODE DOES NOT ALLOW THE USE OF THE GROUNDING ADAPTOR”
WARNING- Do not put heavy utensils or food on the door.
Do not tip the door

4
IMPORTANT SAFETY INSTRUCTIONS
When using electrical appliances, basic safety precautions should be followed, including the following:
WARNING - To reduce the risk of burns, electric shock, fire, injury to persons or exposure to excessive
microwave energy:
SAVE THESE INSTRUCTIONS
11. Read all instructions before using the appliance.
12. Read and follow the specific “PRECAUTIONS TO AVOID
POSSIBLE EXPOSURE TO EXCESSIVE MICROWAVE
ENERGY” found on page 1.
13. This appliance must be grounded. Connect only to properly
grounded outlet.
See “GROUNDING INSTRUCTIONS” found on page 2.
14. Install or locate this appliance only in accordance with the
provided installation instructions.
15. Some products such as whole eggs and sealed containers
- for example, closed glass jars-are able to explode and
should not be heated in this oven.
16. As with any appliance, close supervision is necessary
when used by children.
17. As with the appliance, close supervision is necessary when
used by children.
18. Do not operate this appliance if it has a damaged cord or
plug, if it is not working properly, or if it has been damaged
or dropped.
19. This appliance should be serviced only by qualified service
personnel. Contact nearest authorized service facility for
examination, repair or adjustment.
10. Do not cover or block any openings on the appliance.
11. Do not store this appliance outdoors. Do not use this
product near water — for example, near a kitchen sink, in a
wet basement, or near a swimming pool, or similar
locations.
12. Do not immerse cord or plug in water.
13. Keep cord away from heated surfaces.
14. Do not let cord hang over edge of table or counter.
15. When cleaning surfaces of door and oven that comes
together on closing the door, use only mild, non-abrasive
soaps or detergents applied with a sponge or soft cloth
16. To reduce the risk of fire in the oven cavity:
a) Do not overcook food. Carefully attend appliance when
paper, plastic, or other combustible materials are placed
inside the oven to facilitate cooking.
b) Remove wire twist-ties from paper or plastic bags before
placing bag in oven.
c) If materials inside the oven ignite, keep oven door
closed, turn oven off, and disconnect the power cord, or
shut off power at the fuse or circuit breaker panel.
d) Do not use the cavity for storage purposes. Do not leave
paper products, cooking utensils, or food in the cavity
when not in use.
17. Do not use this microwave oven to heat corrosive
chemicals (for example, sulfides and chlorides). Vapours
from such corrosive chemicals may interact with the
contact and springs of the safety interlock switches thereby
rendering them inoperable.
18. Keep the waveguide cover clean at all times.
Wipe the oven interior with a soft damp cloth after each
use.
If you leave grease or fat anywhere in the cavity it may
overheat, smoke or even catch fire when next using the
oven.
19. Never heat oil or fat for deep frying as you cannot control
the temperature and doing so may lead to overheating and
fire.
20. Liquids, such as water, coffee, or tea are able to be
overheated beyond the boiling point without appearing to
be boiling due to surface tension of the liquid. Visible
bubbling or boiling when the container is removed from the
microwave oven is not always present. THIS COULD
RESULT IN VERY HOT LIQUIDS SUDDENLY BOILING
OVER WHEN A SPOON OR OTHER UTENSIL IS
INSERTED INTO THE LIQUID.
To reduce the risk of injury to persons:
1Do not overheat the liquid.
2Stir the liquid both before and halfway through heating it
3Do not use straight-sided containers with narrow necks.
4After heating, allow the container to stand in the
microwave oven for a short time before removing the
container.
5Use extreme care when inserting a spoon or other
utensil into the container.
21. Oversized foods or oversized metal utensils should not be
inserted in a thicrowave oven as they may create a fire or
risk of electric shock.
22. Do not clean with metal scouring pads. Pieces can bum off
the pad and touch electrical parts involving a risk of electric
shock.
23. Do not store any materials, other than manufacturer’s
recommended accessories, in this oven when not in use.
24. Do not cover racks or any other part of the oven with metal
foil. This will cause overtheating of the oven.
25. Do not operate the oven without the glass tray in place.
Be sure it is properly sitting on the rotating base.
Prior to use(If your oven has a grill element)
In order to protect your oven during transportation and storage, the grill element is covered with a protective coating.
To remove this coating the grill element must be heated for 5 minutes.
This procedure will produce some bad odors as the protective coating on the element disappears.

5
11. Do not use the oven for any reason other than food
preparation, such as for drying clothes, paper, or
any other nonfood items or for sterilizing purposes.
They may catch on fire.
12. Do not use the oven when empty, this could
damage the oven.
13. Do not use the oven cavity for any type of storage,
such as papers, cookbook, cookware, etc.
14. Do not operate the oven without the metal tray in
place. Be sure it is properly sitting on the rotating
base.
15. Be caution when removing the metal tray after
cooking meats that may have caused an
accumulation of grease in the tray.
16. Unlike microwave-only ovens, this oven may
become hot on the cabinet and oven door.
Always use hot pads or oven mitts when placing or
removing food and/or accessories from the oven.
Be cautions about touching parts other then control
panel during or immediately following grill or
combination cooking.
17. If the oven is hot from combination cooking, do not
use plastic or Styrofoam cookware for microwave
cooking.
They may melt.
18. Do not use recycled paper products for cooking.
They may contain impurities which could cause
sparks and/or fires when used during cooking.
19. Do not continue to cook with metal utensils if
sparking appears. See “Accessories” section on
page 7 for proper use of cookware.
10. Do not leave the oven unattended during short
cooking times. Overcooking and fire may result.
11. Do not cook any food surrounded by a membrane,
such as egg yolks, potatoes, chicken livers, etc.,
without first piercing them several times with a fork.
12. Do not pop popcorn unless popped in a microwave
approved popcorn popper or unless it's
commercially packaged and recommended
especially for microwave ovens. Microwave popped
corn produces a lower yield than conventional
popping; there will be a number of unpopped
kernels. Do not use oil unless specified by the
manufacturer.
13. Do not attempt to operate this appliance with the
door open.
14. Do not attempt to remove covers, panels, etc.
15. Look at the oven from time to time when food is
heated or cooked in disposable containers of
plastic, paper or other combustible materials.
16. If smoke is observed, switch off or unplug the
appliance and keep the door closed in order to
stifle any flames.
17. Microwave heating of beverages can result in
delayed eruptive boiling, therefore care has to be
taken when handling the container.
18. Make sure you remove caps or lids prior to cooking
when you cook food sealed in bottles.
19. Do not put foreign material between the oven
surface and door. It could result in excessive
leakage of microwave energy.
20. When heating food in plastic or paper containers,
keep an eye on the oven due to the possibility of
ignition.
21. Always test the temperature of food or drink which
has been heated in a microwave oven before you
give it to somebody, especially to children or elderly
people. This is important because things which
have been heated in a microwave oven carry on
getting hotter even though the microwave oven
cooking has stopped.
22. Eggs in their shell and whole hard-boiled eggs
should not be heated in microwave ovens since
they may explode, even after microwave heating
has ended;
23. Keep the waveguide cover clean at all times. Wipe
the oven interior with a soft damp cloth after each
use. If you leave grease or fat anywhere in the
cavity it may overheat, smoke or even catch fire
when next using the oven.
24. Never heat oil or fat for deep frying as you cannot
control the temperature and doing so may lead to
overheating and fire.
25. During use the appliance becomes hot. Care
should be taken to avoid touching heating elements
inside the oven.
Listed below are, as with all appliances, certain rules to follow and safeguards to assure top performance
from this oven:
GENERAL USE

6
UTENSIL TEST
Dishes that do not absorb microwave energy are best
for microwave cooking. Lock on the label to verify that
particular cups, glasses,plates are indeed suitable,
especially paper goods. If you are not sure, try this
utensil test to check.
• Put the empty utensil in the microwave oven.
• Put one cup of water in a glass measure next to the
empty utensil.
• Heat on P-HI for 1 minute.
• After 1 minute the water should be warm but the
utensil should not. If the utensil is warm, it is not
suitable for microwave cooking.
Limited Use
Aluminum foil - Use narrow strips of foil to prevent
overcooking of exposed areas. Using too much foil can
damage your oven, so be careful.
Ceramic, porcelain, and stoneware - use these if they
are labeled “Microwave Safe.” If they are not labeled,
test them to make sure they can be used safely. Never
use dishes with metalic trim.
Plastic - Use only if labeled “Microwave Safe.” Other
plastics can melt.
Straw, wicker, and wood - Use only for short-term
heating, as they can be flammable.
Recommended Use
Glass and glass-ceramic bowls and dishes - Use for
heating or cooking.
Microwave browning dish - Use to brown the exterior of
small items such as steaks, chops, or pancakes. follow
the directions provided with you browning dish.
Microwaveable plastic wrap - Use to retain steam.
Leave a small opening for some steam to escape and
avoid placing it directly on the food.
Wax paper - Use as a cover to prevent spattering.
Paper towels and napkins - Use for short term heating
and covering; they absorb excess moisture and prevent
spattering. Do not use recycled paper towels, which
may contain metal and can catch fire.
Thermometers - Use only those labeled “Microwave
Safe” and follow all directions. Check the food in
several places. Conventional thermometers may be
used once the food has been removed from the oven.
Not Recommended
Glass jars and bottles - Regular glass is too thin to be
used in a microwave, and can shatter.
Paper bags - These are a fire hazard, except for
popcorn bags that are designed for microwave use.
Styrofoam plates and cups - These can melt and leave
an unhealthy residue on food.
Plastic storage and food containers - Containers such
as margarine tubs can melt in the microwave.
Metal utensils - These can damage your oven.
Remove all metal before cooking.
Utensils should be checked to ensure that they are suitable for use in microwave ovens.
COOKING UTENSILS

7
WHICH UTENSIL CAN BE USED IN THE OVEN?
Glass (general) No Yes (1) No
Glass (heat resistant) Yes Yes Yes
Glass-ceramic and
ceramic (heat resistant) Yes Yes (1) Yes (1)
Earthenware Yes Yes Yes
China (heat resistant) Yes Yes Yes
Plastic (general) No Yes (2) No
Plastic (heat resistant) Yes (2) Yes (2) Yes (2)
Aluminium foil containers
/aluminium foil Yes Yes (3) Yes
Metal baking tins Yes (4) No Yes (4)
Metal (pots.pans, etc) Yes No No
Paper No Yes No
1. Without metal parts or metal trims.
2. Some plastics are heat-proof only to certain
temperatures.
Check carefully!
3. It is possible to use aluminium foil to shield deliate
areas of food (this prevents over-cooking).
4. Metal tins can be used in the combination methods,
however if these are very deep, they will greatly
reduce the efficiency, as metal shields the microwave
energy from the food.
Only use utensils that are suitable for use in microwave ovens.
Before use, the user should check that utensils are suitable for use in microwave ovens.
Material
Grill &
Convection
cooking
Microwave
cooking Combined
cooking
TO AVOID EXPLOSION AND SUDDEN BOILIING
1. Eggs
Never cook eggs in their shells. Steam will build up
inside the shell during cooking and the egg will explode.
If you want to cook or reheat eggs which have not been
broken up by scrambling or mixing, you must always
pierce the yolks or these will also explode. You should
slice shelled hard boiled eggs before you reheat them in
your microwave oven.
2. Piercing
Always pierce food which has a skin or membrane, for
example, potatoes, tomatoes, apples, sausages etc. If
you don't pierce them, steam will build up inside and
they may explode.
3. Lids
Always remove the lids of jars and containers and take
away food containers, before you cook using your
microwave oven. If you don't, then steam and pressure
might build up inside and cause an explosion even after
the microwave cooking has stopped.
Microwave function only
Utensils and cooking containers used in a microwave oven
should be of a material that does not act as a barrier to
microwave energy. Generally this means that you should cook
in either (paper), plastic, glass or ceramic. Metal pans reflect
microwave energy and inhibit cooking, and should not be
used. In addition to material, the shape of the container should
also be considered. Round oval shapes give the most even
cooking. Square or rectangular containers may over-cook
foods in the corners because more energy is absorbed there.
Shallow containers give more even cooking results.
Utensils made of china and ceramic excellent to use in your
microwave oven. Most types of glass are also very good.
Lead crystal glass can crack and should therefore, not be
used. Plastics and paper can also be used, provided they
can withstand the temperature of the heated food. For
cooking only use plastics, which will withstand a temperature
of over 250˚F, e.g. polyproplyne and polyamide. Some
plastic materials, e.g. melamine, will be heated by the
microwave, and be damaged. To find out if a certain
container is suitable, the following simple test can be made:
Place the empty container and a glass of water inside the
microwave oven. The water is needed because the oven
must not be operated empty or with empty containers only.
Let the oven work on full power for one minute. A suitable
container will only be lukewarm.
Metal containers, e.g. saucepans or frying pans should not
be used in microwave ovens. Nor should plates or vessels
with decorations be used since metal e.g. gold, might be part
of the decoration and such decorations will be damaged.
Small pieces of aluminiuum foil can 430˚F
used, but only to shield the areas that
would over-cook (e.g. for covering
chicken wings, leg tips and fish tails) but
the foil must not touch the side of the
oven as damage may occur.
WARNING
Liquids, such as water, coffee, or tea are able to be
overheated beyond the boiling point without appearing to
be boiling due to surface tension of the liquid. Visible
bubbling or boiling when the container is removed from the
microwave oven is not always present. this could result in
very hot liquids suddenly boiling over when a spoon or
other utensil is inserted into the liquid.
To reduce the risk of injury to persons:
a) Do not overheat the liquid.
b) Stir the liquid both before and halfway through heating it
c) Do not use straight-sided containers with narrow necks.
d) After heating, allow the container to stand in the
microwave oven for a short time before removing the
container.
e) Use extreme care when inserting a spoon or other
utensil into the container.
Caution:
• There are a number of accessories available on
the market. Before you buy, make sure they are
suitable for microwave use.
• When you put food in the microwave oven, make
sure that food, food supports or covering do not
come in direct contact with any of the internal
walls or the ceiling of the cavity since
discolouration may take place.
8
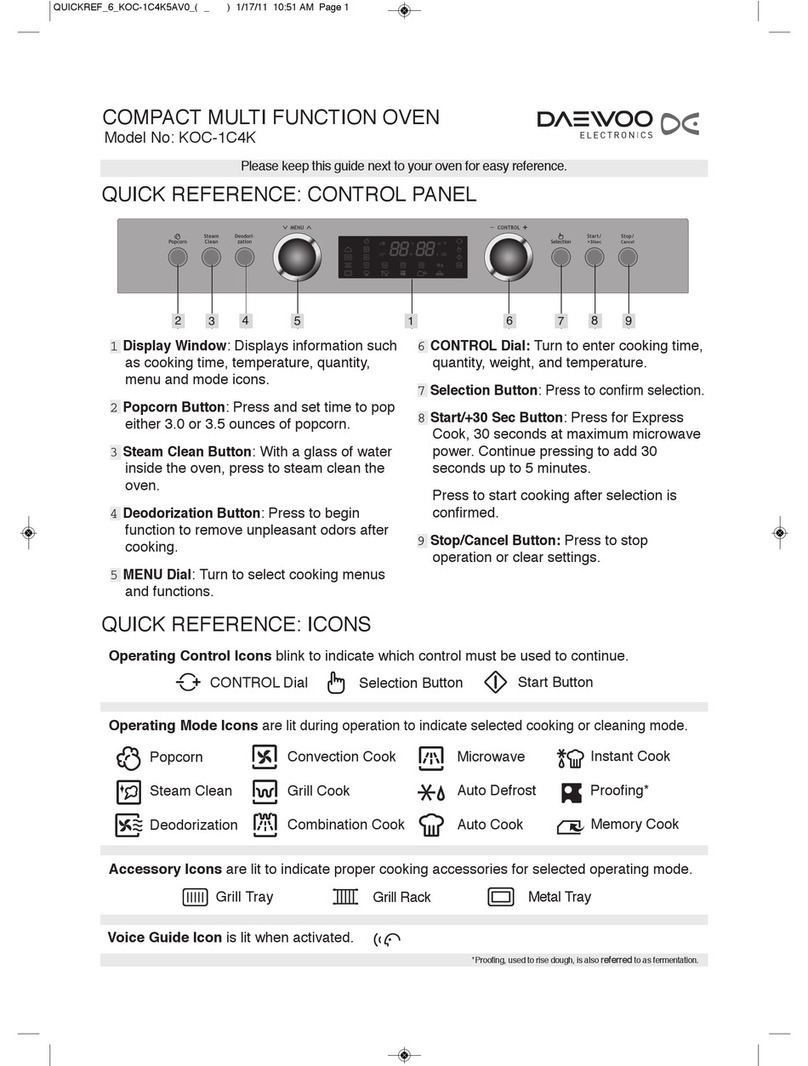
CONTROL PANEL
1 3 5 7
2 4 6
11 13 15
10
9
8
12 14
1Display
The display shows you some information such as
cooking time, menu, quantity and temperature and so
on.
2Convection cook Button
Press this button to select Convection cook.
3Microwave cook Button
Press this button to select Microwave cook.
4Broil cook Button
Press this button to select Broil cook.
5Auto defrost Button
Press this button to select Auto defrost cook.
6Combination cook Button
Press this button to select Combination cook.
7Popcorn Button
Press this button to select Popcorn.
8Control Dial Knob :
You can enter cooking time, quantity, weight, and
temperature by turning the Control Dial Knob.
9Select Button: You can confirm the contents you
entered by pressing the Select button.
0Meat/Fish Button
Press this button to select Meat/Fish feature.
qDessert Button
Press this button to select Desset feature.
wVegetables Button
Press this button to select Vegetables feature.
eMelt/Soften Button
Press this button to select Melt/Soften feature.
rStart/+30sec Button:
- You can start cooking immediately by pressing the
Start/+30sec button after entering cooking
information such as cooking time, power level and so
on.
- You can start the Microwave cook at power level 10
quickly by pressing the Start/+30sec button.
You can add 30 seconds to the cooking time up to 5
minutes each time the Start/+30sec button is
pressed.
tStop/Clear Button:
It is used for stopping the oven operation or clearing
the display.

4Icons of cooking menu
Deordorization : It means Deodorization feature. It lights
in the display during deodorization.
Steam Cleaning: It means Steam Cleaning feature. It
lights in the display during steam
cleaning.
Preheating : It means Preheating feature. It lights in
the display during preheating.
Convection : It means Convection feature. It lights in
the display during convection cooking.
Broil : It means Broil feature. It lights in the
display during broiling.
Combination : It means Combination feature. It lights in
the display during combination cooking.
Microwave : It means Microwave cook feature. It
lights in the display during microwave
cooking.
Auto Defrost : It means Auto defrost feature. It lights in
the display during weight defrosting or
time defrosting.
Proofing : It means Proofing feature. It lights in the
display during proofing.
Meat/Fish : It means Meat/Fish feature. It lights in
the display during Meat/Fish feature.
Vegetables : It means Vegetabels feature. It lights in
the display during vegetables feature.
Dessert : It means Dessert feature. It lights in the
display during Dessert feature.
Melt/Soften : It means Melt/Soften feature. It lights in
the display during Melt/Soften feature.
Popcorn : It means Popcorn feature. It lights in the
display during popcorn feature.
Timer : It means Timer feature. It lights in the
display during timer feature.
Memory : It means Memory cook. It lights in the
display during memory cook.
1Display window
The display shows you some cooking information such as
cooking time, clock, temperature, quantity and so on.
2Icons of cookware
: It means a oven rack. If lights in the display ,
use a oven rack for cooking.
: It means a Metal tray. If lights in the display ,
use a metal tray for cooking.
3Icons of operation guide
Control : It means the Control dial knob. If Control blinks,
turn the control dial knob.
Select : It means the Select button. If Select blinks, press
the select button.
Start : It means the Start button. If Start blinks, press the
Start/+30 sec button.
2 4
1 3
9
DISPLAY WINDOW

10
This oven is equipped with several accessories. They can be used in various ways to facilitate cooking.
1Metal Tray - Put food or proper cookware on the metal tray.
It can be laid on one of the three position of the
cavity.
2Oven Rack - Put the grill rack on the metal tray.
It should be always used with the metal tray for cooking.
■HOW TO USE THE ACCESSORIES OF COOKING
■Metal Tray ■Oven Rack
NOTE : Metal Tray is attached to the left cushion.
1
2
• Meat/Fish : 5
• Vegetables : 1,2
• Melt/Soften
• Dessert
• Microwave cook
• Convection cook
• Combination cook
• Broil
• Auto Defrost
• Proofing
• Memory cook
• Speedy cook
• Put the oven rack on the metal tray.
• It should be always used with the
metal tray for cooking.
• Meat/Fish : 1,2,3,4,6
• Vegetables : 3
• Popcorn
ACCESSORIES

11
This function allows you to cook some kind of meat or fish cooking easily and automatically.
1. Press the Meat/Fish button directly.
Or turn the Control dial knob to adjust to Meat/Fish icon and then press the Select button.
2. Turn the Control Dial Knob to select a menu number.
(example: Chicken Pieces)
• Three little horizontal bars turn on in the left side of the display and one of them blinks.
• It means an indicator of the place where a metal tray and grill rack is laid.
• If the second bar is blinking, it means a designated accessory is supposed to be laid on the
second level in the oven.
3. Press the Select button.
4. Turn the Control Dial Knob to set the weight.
(example : 800g)
Refer to the Chicken Pieces meat/fish menu chart.
5. Press the Select button.
• In this procedure, you can add or subtract extra cooking time to the automatic cooking time by
turning the Control Dial Knob .
6. Press the Start/+30sec button.
• The cooking time is automatically determined by the weight
7. Open the door after the oven beep and turn the food over.
8. Close the door and press the Start/ +30sec button again.
• The display shows "End" and beep sounds when the cooking is completed.
124 35
68
NOTE:
•
When you operate the oven at the first time, smoke and bad odor might come out from the
oven. Then, it will be helpful to operate the oven in Convection cook at 250˚C with no food
for about 10 minutes.
• The cooling fan could be operated for a few minutes after cooking for the safety.
The display will show “Cool” and “0” or “current time” in turns while the cooling fan is
operated.
WARNING: The oven and accessories are very hot after cooking.
Use a thick oven glove while you are handing food or accessories.
MEAT/FISH

12
This function allows you to cook some kind of vegetables easily and automatically.
1. Press the Vegetables button directly.
Or turn the Control dial knob to adjust to Vegetables icon and then press the Select button.
2. Turn the Control Dial Knob to select a menu number.
(example: Fresh vegetables)
• Three little horizontal bars turn on in the left side of the display and one of them blinks.
• It means an indicator of the place where a metal tray is laid.
• If the first bar is blinking, it means a designated accessory is supposed to be laid on the first level
in the oven.
3. Press the Select button.
4. Turn the Control Dial Knob to enter the cooking quantity
Refer to the vegetables menu chart.
5. Press the Select button.
• In this procedure, you can add or subtract extra cooking time to the automatic cooking time by
turning the Control Dial Knob .
6. Press the Start/+30sec button.
The cooking time is automatically determined by the weight
7. The display shows “End” and beep sounds when the cooking is completed.
NOTE:
•
When you operate the oven at the first time, smoke and bad odor might come out from the
oven. Then, it will be helpful to operate the oven in Convection cook at 250˚C with no food
for about 10 minutes.
• The cooling fan could be operated for a few minutes after cooking for the safety.
The display will show “Cool” and “0” or “current time” in turns while the cooling fan is
operated.
WARNING: The oven and accessories are very hot after cooking.
Use a thick oven glove while you are handing food or accessories.
124 35
6
VEGETABLES

13
This function allows you to cook some kind of dessert easily and automatically.
1. Press the DESSERT button directly.
Or turn the Control dial knob to adjust to Dessert icon and then press the Select button.
2. Turn the Control Dial Knob to select a menu number.
(example: Bundt cake)
• Three little horizontal bars turn on in the left side of the display and one of them blinks.
• It means an indicator of the place where a metal tray is laid.
• If the first bar is blinking, it means a designated accessory is supposed to be laid on the first level
in the oven.
3. Press the Select button.
• In this procedure, you can add or subtract extra cooking time to the automatic cooking time by
turning the Control Dial Knob .
4. Press the Start/+30sec button.
Dessert menu 2 and 3 have preheating process. If preheating is finished, the oven will beep and the
display will blink.
Put the food in the oven and close the door and press the Start/+30sec button.
5. The display shows “End” and beep sounds when the cooking is completed.
NOTE:
•
When you operate the oven at the first time, smoke and bad odor might come out from the
oven. Then, it will be helpful to operate the oven in Convection cook at 250˚C with no food
for about 10 minutes.
• The cooling fan could be operated for a few minutes after cooking for the safety.
The display will show “Cool” and “0” or “current time” in turns while the cooling fan is
operated.
WARNING: The oven and accessories are very hot after cooking.
Use a thick oven glove while you are handing food or accessories.
124 35
6
DESSERT

14
This function allows you to get some kind of food melt or soften easily and automatically.
1. Press the MELT/SOFTEN button directly.
Or turn the Control dial knob to adjust to Melt/Soften icon and then press the Select button.
2. Turn the Control Dial Knob to select a menu number.
(example: Ice cream)
• Three little horizontal bars turn on in the left side of the display and one of them blinks.
• It means an indicator of the place where a metal tray is laid.
• If the first bar is blinking, it means a designated accessory is supposed to be laid on the first level
in the oven.
3. Press the Select button.
4. Turn the Control Dial Knob to enter the cooking quantity
Refer to the melt/soften menu chart
5. Press the Select button.
• In this procedure, you can add or subtract extra cooking time to the automatic cooking time by
turning the Control Dial Knob .
6. Press the Start/+30sec button.
The cooking time is automatically determined by the weight
7. The display shows “End” and beep sounds when the cooking is completed.
NOTE:
•
When you operate the oven at the first time, smoke and bad odor might come out from the
oven. Then, it will be helpful to operate the oven in Convection cook at 250˚C with no food
for about 10 minutes.
• The cooling fan could be operated for a few minutes after cooking for the safety.
The display will show “Cool” and “0” or “current time” in turns while the cooling fan is
operated.
WARNING: The oven and accessories are very hot after cooking.
Use a thick oven glove while you are handing food or accessories.
124 35
6
MELT/SOFTEN

15
1. Place the chicken pieces on the grill rack on the metal tray.
2. Cook on “Meat/Fish-Chicken Pieces”
3. When Beep, turn food over. And the press start to continue cooking.
4. After cooking, stand covered with foil for 2~5minutes.
1. Wash and dry chicken. Tie the legs loosely together with string.
2. Pierce the skin a couple of times just under the legs.
3. Brush butter mixture all over the chicken on the dish.
4. Place the chicken on the metal tray.
5. Cook on “Meat/Fish-Whole Chicken”.
6. Remove from oven. Drain off any exess juices.Season with salt if
required. Stand for 10 minutes in foil before serving.
1. Place steak on the grill rack on the metal tray.
2. Cook on “Meat/Fish-Steaks”.
3. When beep,turn food over. And the press start to continue cooking.
4. After cooking, stand covered with foil for 2~5 minutes.
*Use setting to broil steaks from 3/4” to 1” thick. Individual boneless
steaks broil evenly.
1. Tie the joint into a neat shape.
2. Place the meat on the dish.
3. Brush with a little oil.
4. Place roast fat-side down on the grill rack on the metal tray.
5. Cook on “Meat/Fish-Pork”.
6. When beep,turn food over.And the press start to continue cooking.
7. Remove from oven. Drain off any excess juices.
8. Stand for 10 minutes in foil before serving.
1. All type of fresh fish(except battered or breadcrumbed fish) can be
cooked whether whole, fillets or steaks.
2. Place the prepared fish in a buttered dish.
3. Season with salt and pepper, sprinkle with lemon juice and dot with
butter.
4. Place the dish on the metal tray.
5. Cook on “ Meat/Fish-Fish Steaks”.
1. Clean the sausages from cover and pierce with fork.
2. Place sausage on the grill rack on the metal tray.
3. Cook on “Meat/Fish-Sausage”.
4. When beep,turn food over. And the press start to continue cooking.
No Food Quantity Display Method Cookware
1
2
3
4
5
6
Chicken Pieces
Whole Chicken
Steaks
Pork
Fish Steaks
Sausage
3.0 lb
3.5 lb
4.0 lb
4.5 lb
0.5 lb
1.0 lb
1.5 lb
2.0 lb
3.0
3.5
4.0
4.5
2.0 lb
2.5 lb
3.0 lb
3.5 lb
2.0
2.5
3.0
3.5
0.5 lb
1.0 lb
1.5 lb
2.0 lb
0.5
1.0
1.5
2.0
0.5 lb
1.0 lb
1.5 lb
2.0 lb
0.5
1.0
1.5
2.0
0.5
1.0
1.5
2.0
2 links
4 links
6 links
2
4
6
Metal tray and
oven rack on
the second
level
Metal tray and
oven rack on
the first level
Metal tray and
oven rack on
the third level
Metal tray and
oven rack on
the second
level
Metal tray on
the third level
Metal tray and
oven rack on
the third level
Meat/Fish Menu Chart
COOKING MENU CHART

16
Place in suitable sized container. Add no water if vegetables have just
been washed. Cover with pierced cling film or a lid. Set the weight and
press Start/+30sec button. After cooking, stir and let stand 2~5 minutes,
covered.
Place in suitable sized container. Add 2tbsp. of water. Cover with
pierced cling film or a lid. Set the weight and press Start/+30sec button.
After cooking, stir and let stand 2~5 minutes, covered.
*Frozen vegetables may be cooked without any added water if preferred.
Choose medium sized potatoes 200-250g. Wash and pierce with fork.
Place potatoes on the grill rack on the metal tray. Set the weight and
press Start/+30sec button.
No Food Quantity Display Method Cookware
1
2
3
Fresh
Vegetables
Frozen
Vegetables
Baked Potato
0.5 lb
1.0 lb
1.5 lb
2.0 lb
0.5
1.0
1.5
2.0
0.5 lb
1.0 lb
1.5 lb
2.0 lb
0.5
1.0
1.5
2.0
1 pcs
2 pcs
3 pcs
4 pcs
5 pcs
1
2
3
4
5
Metal tray on
the first level
Metal tray on
the first level
Metal tray and
oven rack on
the second
level
Vegetables Menu Chart
Remove the lid of the carton and place on the metal tray.
Unwrap the cream cheese and place on a microwave-safe container.
Cut in half vertically. Let stad for 1-2 minutes.
Place the butter in a dish and cover with wax paper. Stir well after
finishing and let stand for 1-2 minutes.
Place the chocolate chips or bar in a microwave-safe container. Stir well
after finishing and let stand for 1-2 minutes.
No Food Quantity Display Method Cookware
1
2
3
4
Ice Cream
Cream Cheese
Butter
Chocolate
1 pint
1/2 gallon
3 oz
8 oz
2tbsp
1/2cup
4 oz
8 oz
1
2
3
8
1
2
4
8
Metal tray on
the first level
Metal tray on
the first level
Metal tray on
the first level
Metal tray on
the first level
Melt/Soften Menu Chart
Ideal for packaged cake mix or your own recipe. Prepare according to
package or recipe directions and place in a greased and floured bundt
pan. Place pan in oven. Cool before frosting and serving.
Ideal for packaged muffin mix or your own recipe for 6 medium size
muffins. Prepare according to package or recipe directions and place in
muffin pan. After the preheat is over, place pan in oven.
Ideal for refrigerated cookie dough. Prepare according to package or
recipe directions and place on a greased and floured metal tray.
Cookies should be approximately 1/3-inch thick and 2-inch in diameter
for best results. After the preheat is over, place pan in oven. Cool before
serving.
No Food Quantity Display Method Cookware
1
2
3
Bundt Cake
Muffins
Cookies
1piece
6 cups
1 sheet
-
-
-
Metal tray on
the first level
Metal tray on
the first level
Metal tray on
the second
level
Dessert Menu Chart

POPCORN
17
Please use only prepackaged microwave popcorn weighing 3.0 to 3.5 ounces.
You should put a prepackaged microwave popcorn on the oven rack with the metal tray on the first level in the oven.
1. Press the POPCORN button directly.
Or turn the Control dial knob to adjust to Popcorn icon and then press the Select button.
2. Press the Start/+30sec button.
The cooking time is automatically determined by the weight
3. The display shows “End” and beep sounds when the cooking is completed.
NOTE:
•
When you operate the oven at the first time, smoke and bad odor might come out from the
oven. Then, it will be helpful to operate the oven in Convection cook at 250˚C with no food
for about 10 minutes.
• The cooling fan could be operated for a few minutes after cooking for the safety.
The display will show “Cool” and “0” or “current time” in turns while the cooling fan is
operated.
WARNING: The oven and accessories are very hot after cooking.
Use a thick oven glove while you are handing food or accessories.
12
3

MICROWAVE COOK
18
This function allows you to cook food with microwave energy. You can change the microwave power level from P-00 to P-HI.
Each power level gives you microwave energy a certain percent of the time. P-HI means that the oven cooks food at full microwave
energy. P-90 means that the oven cooks food at 90% microwave energy. A high setting will cook faster but food may need more
frequent stirring, rotating or turning over. A lower setting will cook more evenly and need less stirring or rotating of the food.
If the oven has been heated after grill cooking, convection cooking, or combination cooking, it may need to be cooled down before microwave cook.
Never operate the oven with no food inside in microwave cook. It may cause fire to happen.
1. Press the Microwave button directly.
Or turn the Control dial knob to adjust to Microwave icon and then press the Select button.
2. Select the appropriate power level by turning the Control Dial Knob until the corresponding
percentage is displayed.
(example: for maximum power level cooking)
3. Press the Select button.
4. Turn the Control Dial Knob to enter the cooking time.
(example: 10 minutes of cooking time.)
You can enter the cooking time up to 60 minutes in Microwave cook.
5. Press the Start/+30sec button.
6. The display shows “End” and beep sounds when the cooking is completed.
Tips : 1) Read this manual. It contains instructions to help you use and maintain your microwave oven properly.
2) If you open the door during microwave cooking, the oven stops working immediately.
Then if you press the Start/+30sec button, it restart to work. Or if you press the Stop/Clear button, the cooking process is cancelled.
Power level table
P-HI
P-90
P-80
P-70
P-60
P-50
100%
990%
980%
970%
960%
950%
900W
810W
720W
630W
540W
450W
P-40
P-30
P-20
P-10
P-00
40%
30%
20%
10%
90%
360W
270W
180W
090W
900W
Power level percentage Output Power level percentage Output
NOTE: • When you operate the oven at the first time, smoke and bad odor might come out from the
oven. Then, it will be helpful to operate the oven in Convection cook at 250˚C with no food for
about 10 minutes.
• The cooling fan could be operated for a few minutes after cooking for the safety.
The display will show “Cool” and “0” or “current time” in turns while the cooling fan is operated.
WARNING: The oven and accessories are very hot after cooking.
Use a thick oven glove while you are handing food or accessories.
Make sure that a metal tray is laid on the first level in the oven before Microwave cooking.
124 3
5
Table of contents
Other Daewoo Oven manuals

Daewoo
Daewoo O6HD51H1BG User manual

Daewoo
Daewoo KOC-1C4K User manual

Daewoo
Daewoo F6EV19SM2 User manual

Daewoo
Daewoo KBE-6R2SSS User manual

Daewoo
Daewoo KBE-V65CA User manual

Daewoo
Daewoo O7CD51M2BG User manual

Daewoo
Daewoo O6HD51H2BG User manual

Daewoo
Daewoo KOC-1C0KB User manual

Daewoo
Daewoo SDA1609 User manual

Daewoo
Daewoo SDA1608 User manual